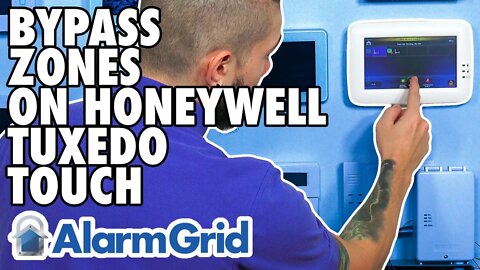
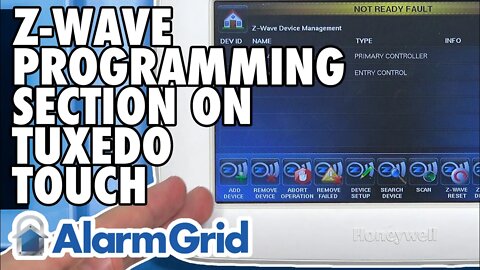
Bypassing Zones Using a Honeywell Tuxedo Touch Keypad
In this video, Jorge from Alarm Grid shows you how to bypass zones using a Honeywell Tuxedo Touch Keypad. The Tuxedo Touch serves as a keypad controller for a Honeywell VISTA Alarm System. When you bypass zones on a Tuxedo Touch Keypad, you are really bypassing zones for the Honeywell VISTA System itself. Bypassing a zone means that the zone is temporarily being ignored by the system. No response will be taken by the system if a bypassed zone is faulted. But the settings for the zone are still retained by the system. Once you un-bypass the zone later on, it will work as usual.
The fact that the system retains the programming information for a bypassed zone is what differentiates a bypassed zone from a deleted zone. Once you delete a zone, it cannot be recovered, and you would need to reprogram that zone from scratch. But if you bypass a zone, then you only need to un-bypass it later when you want the zone to be active again. This is much more convenient than having to manually delete and reprogram a zone every time you want to disable it for a single arming session and then re-enable it later. You can pick and choose which zones you want to bypass and which ones should remain active. This means that you can set up each arming session in the exact manner that you like.
If you have a faulted sensor on your system, then you will usually be required to bypass its zone prior to arming. This is to prevent the zone from triggering an immediate response on the system as soon as it is armed. But keep in mind that you cannot bypass 24-hour life-safety zones. These zones must always be active for the safety of those in the building. Bypassing is only possible for non-life-safety zones, including burglary and intrusion zones and environmental zones. The Tuxedo Touch Keypad will display a yellow bar at the top of its screen with a message indicating that at least one zone is bypassed. This is useful for informing anyone using the keypad that there is at least on bypassed zone on the system.
https://www.alarmgrid.com/faq/how-do-i-bypass-zones-using-a-honeywell-tuxedo-touch-keypad
http://alrm.gd/get-monitored
13
views
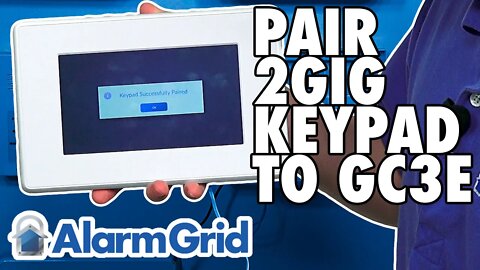
2GIG SP2: Pairing with the 2GIG GC3e
In this video, Jarrett from Alarm Grid covers the process for pairing a 2GIG SP2 Keypad with a 2GIG GC3e Security System. The 2GIG SP2 is a touchscreen keypad that works with the 2GIG GC3 and 2GIG GC3e Security Systems. The fact that this is a touchscreen keypad is often very much appreciated by end users. A touchscreen keypad can be more inviting and easier to understand than a more traditional push-button keypad.
You pair a 2GIG SP2 with a GC3 or GC3e if you want to be able to control that system from an additional on-site location. Some common locations for a 2GIG SP2 Keypad include by a front door, a back door, a garage door, or really area that is used for coming and going. The idea is that you won't have to go all the way to the main GC3 or GC3e Panel. Other options for controlling the system include a key fob or the Alarm.com Mobile App. But many users prefer having a dedicated keypad to serve as a secondary controller.
The 2GIG SP2 is paired with a compatible 2GIG GC3 or GC3e through WIFI. Most users will have WIFI readily available in their homes and offices, so this is usually how the 2GIG SP2 is paired. But if you are using the system in an area without WIFI, then you can complete the pairing process by enabling access point (AP) mode on the 2GIG GC3 or GC3e, and then connect the SP2 to that access point. It is important to note that the 2GIG SP2 Keypad only allows for relatively basic security functions. You cannot perform automation commands or system programming through the 2GIG SP2. Also, the 2GIG SP2 can only control the Smart Area Partition that it has been assigned. It cannot control other partitions on the system.
https://www.alarmgrid.com/faq/how-do-i-pair-the-2gig-sp2-with-the-2gig-gc3e
http://alrm.gd/get-monitored
26
views
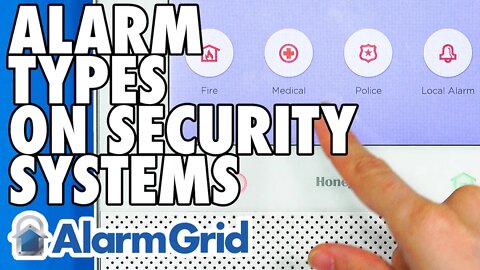
Different Alarm Types on Security Systems
In this video, Michael from Alarm Grid talks about the different types of alarm that can occur on a security system. When an alarm occurs on a system, an alert is sent to the central station and/or the end user directly, depending on the user's alarm monitoring plan. The reason why there are different types of alarms is because the appropriate response for one emergency may be very different than the response for another emergency. When the central station sees an alarm, they will contact the end user and/or request emergency dispatch from the local authorities, depending on the type of alarm and what is listed on the user's central station document.
The main types of alarms include burglary/intrusion, police panic, life-safety, and auxiliary. A burglary/intrusion alarm can only occur when the system is in an armed state. This type of alarm only occurs when a sensor is activated and alerts the armed system. Some response types that can trigger burglary/intrusion alarms include Perimeter, Interior Follower, and Entry/Exit. This alarm type should not be confused with a police panic. A police panic alarm is associated with a 24-hour zone type, which means that this type of alarm can occur while the system is armed or disarmed. Examples of triggers for police panic alarms include panic buttons on key fobs, panel on-board panic keys, and commercial panic or "holdup" switches. Burglary/intrusion alarms and police panic alarms can be silent or audible.
Life-safety alarms include fire alarms and CO alarms. For a fire alarm, the central station will typically try to contact the end user first. If the user tells the central station operator that everything is okay and that the fire alarm was a mistake, and the user provides their false alarm passcode, then no dispatch will occur. But for a CO alarm, dispatch is mandatory by law. Even if the end user provides their false alarm passcode when being contacted, the operator must still request emergency dispatch. Life-safety alarms are associated with 24-hour zones, and they can occur when the system is armed or disarmed.
The last type of alarm is an auxiliary alarm, which is a cover-all for the remaining alarm types. These include emergency medical alert alarms, temperature and freeze alarms, and flood alarms. Auxiliary alarms are associated with 24-hour auxiliary zones, and they can occur while the system is armed or disarmed. It is very important that the end user informs the central station about the purpose of each 24-hour auxiliary zone on their system. That way, the central station operator will be able to take appropriate action depending upon whether the alarm was cause by a medical alert zone, a temperature zone, or a flood zone.
https://www.alarmgrid.com/faq/what-are-the-different-types-of-alarms-on-a-security-system
http://alrm.gd/get-monitored
149
views

How an Alarm System Backup Battery Works
In this video, Michael from Alarm Grid talks about backup batteries for alarm systems. A backup battery keeps a system running when AC power is lost. The reasons for AC power loss include electrical outages, the system's plug-in transformer being disconnected, or the power wire being cut. Once this happens, the backup battery will activate to keep the system powered on. The system will display an AC loss message at this time to let you know that AC power has been lost.
A backup battery is designed to only serve as a temporary means for powering the system. You should not expect a backup battery to become the primary method for keeping your system running. The length of time that a battery can keep a system running depends on the system being used and the backup battery itself. Some batteries are advertised to only keep a system running for at least four (4) hours, while other batteries should keep a system powered on for at least 24 hours.
The design of a backup battery depends on whether the system is wireless or hardwired. A wireless system will usually have a small internal battery pack that plugs into the system board. You will typically need to get a certain model of battery pack that is specifically designed to work with the wireless system you are using and fits inside the panel. But hardwired systems typically use larger batteries that actually resemble small car batteries. They have leads for you to connect a battery harness that then connects with the panel. You will need to remember to follow polarity for a hardwired system backup battery. The red wire should connect at the positive (+) terminal, and the black wire should connect at the negative (-) terminal. Most metal enclosures for wired panels are large enough to accommodate an added backup battery.
https://www.alarmgrid.com/faq/how-does-the-backup-battery-for-an-alarm-system-work
http://alrm.gd/get-monitored
9
views

Duress Code Function on the 2GIG GC2e
In this video, Michael from Alarm Grid talks about duress code functionality on a 2GIG GC2e Security System. A duress code is used to send a discreet signal to the central station in the event of an emergency. It is usually used in hostage situations where a user is in danger, and they want to quietly call for help while in danger. The 2GIG GC2e System follows a unique method for duress codes, and understanding how they are used on the GC2e can be helpful for allowing you to get the most out of the system.
One important thing to understand about the 2GIG GC2e duress code is that it is really only useful if you have monitoring service with central station connectivity. When you use the duress code, only the central station receives a notification. There is no notification on Alarm.com or at the panel. This means that if your 2GIG GC2e System is unmonitored, or if you only have self-monitoring service without central station connectivity, then a duress code will not serve any useful purpose.
The duress code on a 2GIG GC2e is hard-coded to user slot number eight (8). The eighth slot can only be used for a duress code, and you cannot set it up as a standard user code. The GC2e makes it very clear that the code is for duress use, so it is highly unlikely that you would set up this code by accident and not be aware that it is a duress code. Setting up a duress code is completely optional, and you are not required to set one up. You can use the duress code when disarming the system or by pressing the 2GIG logo in the bottom-right corner of the main screen. No indication that the duress code was used will be displayed on the panel. Only the central station will receive a notification.
https://www.alarmgrid.com/faq/what-is-the-secret-duress-button-on-the-2gig-gc2e
http://alrm.gd/get-monitored
16
views
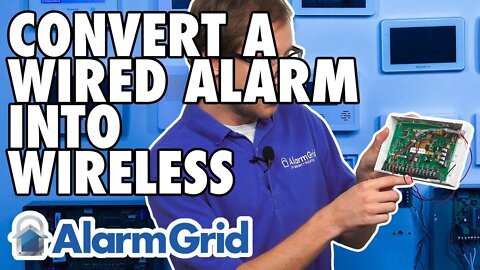
Converting a Wired Alarm Into Wireless
In this video, Michael from Alarm Grid explains how you can convert a wired alarm system into a wireless alarm system by using a wired to wireless converter. This will allow you to take the existing hardwired sensors from your old system and continue using them with your new wireless system. This can save you money by not having to buy new wireless sensors, which can very quickly add up in cost if you are using a large number of sensors with your system. Setting up a wired to wireless converter is actually quite easy, and it a fairly simple task for anyone replacing a wired alarm panel.
The easiest way to set up a wired to wireless converter when swapping a wired system for a wireless one is to install the module in the location of the old panel. This is typically in a storage area, such as a garage, attic, or closet. You should start by powering down the system and disconnecting all of the existing hardwired sensors. Then remove the wired panel, and connect the wired sensors to the new wired to wireless converter. In many cases, you can use the existing resistors for the sensors, thanks to a feature called EOLR learning that is supported by many converter modules.
Most wired to wireless converters will need to be calibrated once everything has been appropriately wired. You will often need to enroll the module itself with the system so that it can begin transmitting signals to the wireless panel. You can then begin learning each sensor into an individual wireless zones on the system. Remember that you must choose a wired to wireless converter module that transmits signals at a wireless frequency that is compatible with your new wireless system. Determine which converter module is compatible with your system, and make the appropriate purchase.
https://www.alarmgrid.com/faq/can-i-convert-a-wired-alarm-into-a-wireless-alarm
http://alrm.gd/get-monitored
36
views
Getting Into the Z-Wave Programming Section of a Tuxedo Touch Keypad
In this video, Jorge from Alarm Grid explains how to enter Z-Wave programming on a Honeywell Tuxedo Touch Keypad. In addition to serving as a touchscreen controller for a Honeywell VISTA System, the Honeywell Tuxedou Touch also operates as a Z-Wave home automation controller. You can pair Z-Wave smart home devices with the Tuxedo Touch so that you can control them at the keypad. If the Tuxedo Touch is set up with a Honeywell VISTA System that is monitored with access to Total Connect 2.0 for automation purposes, then the programmed Z-Wave devices will also get pushed over to the Total Connect 2.0 platform. This will allow you to control the Z-Wave devices remotely and include them with Total Connect 2.0 smart scenes.
Total Connect 2.0 can be accesed using a web browser or the Total Connect 2.0 Mobile App on your smartphone. Either way, you will be able to control your Z-Wave devices once you have signed-in to your account. This basically allows you to operate your Z-Wave devices remotely from almost anywhere in the world. When you make a Z-Wave command through Total Connect 2.0, an alert is forwarded to the Tuxedo Touch Keypad. The Tuxedo Touch then tells the associated Z-Wave device how to respond.
The other main benefit to pairing Z-Wave devices with the Tuxedo Touch is ability to include the devices with smart scenes. You can use smart scenes to have your programmed Z-Wave devices respond automatically based on a schedule and/or with certain predetermined events on your Honeywell VISTA Security System. This can make your life more convenient, and it is also great for saving money in energy expenses. Smart scenes can be built within the Total Connect 2.0 platform, or you can build the smart scenes locally at the Honeywell Tuxedo Touch Keypad.
https://www.alarmgrid.com/faq/how-do-i-get-into-the-z-wave-programming-section-on-a-honeywell-
http://alrm.gd/get-monitored
10
views
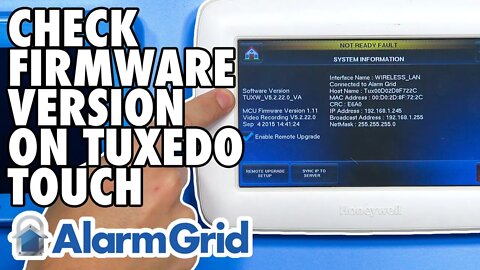
Checking the Firmware Version on a Tuxedo Touch
In this video, Jorge from Alarm Grid shows you how to check the current firmware version for a Honeywell Tuxedo Touch Keypad. Resideo, which was formerly known as Honeywell, will sometimes release firmware updates for the Tuxedo Touch. These firmware updates are designed to provide new device features and/or improve device performance and stability.
Updates for the Tuxedo Touch are provided via an SD card. You must download the updates to the SD card and then perform the updating process. This involves inserting the SD card and then resetting the Tuxedo Touch Keypad to get the updates to go through. After perform the update, it may be necessary to reapply the ECP address for the Tuxedo Touch.
But perform you go to update the Honeywell Tuxedo Touch, you might want to check its firmware version first. This is so that you can determine if a firmware update is actually needed. The current firmware version can be found inside the Keypad Information Menu. It is listed as the Software Version. You may want to note the Software Version on a piece of paper or take a picture of it so that you do not need to access the menu again later.
Remember that the Tuxedo Touch serves as both a Z-Wave hub and as a keypad controller for a Honeywell VISTA System. A firmware update may only affect one function of the Tuxedo Touch, or it may impact both its touchscreen keypad capabilities and its Z-Wave automation capabilities. This will depend upon the firmware update that is being applied. As the Tuxedo Touch is a relatively older device, new firmware updates are seldom provided these days. Once you update, you may never have to update it again. In fact, the Tuxedo Touch has effectively been discontinued and replaced by the newer and sleeker Honeywell Home Tuxedo Keypad.
https://www.alarmgrid.com/faq/how-do-i-check-the-firmware-version-for-my-honeywell-tuxedo-touc
http://alrm.gd/get-monitored
24
views

Scenes From Alarm com Won't Be Pushed to GC3 or GC3e
In this video, Michael from Alarm Grid explains how smart home automation scenes created within Alarm.com will not be pushed over to a 2GIG GC3 or 2GIG GC3e System. You will only be able to control the scenes from Alarm.com. This can be done using a web browser or the Alarm.com Mobile App. Likewise, when you create a smart scene at the 2GIG GC3 or 2GIG GC3e, it will not be pushed over to Alarm.com. That scene will only be available at the panel for local control.
A smart scene is basically a collection of actions that are all performed at once. These actions can involve the security system itself, but they are primarily used with Z-Wave smart home automation devices that are programmed with the system. An example of a single smart scene might be to have all the programmed Z-Wave lights turn OFF, have a Z-Wave door lock enter into a LOCKED status, and have a Z-Wave thermostat set to a specific temperature.
One of the most convenient aspects of a smart scene is that it can be set to activate automatically based on a set schedule or with a predetermined system event. For instance, you might have a smart scene activate automatically at 7:00pm, or you might have it go into effect whenever the system is armed. The options are extremely customizable, so you can set up the smart scene how you would like.
When building a smart scene on a GC3 or GC3e, you must decide whether you want it available for remote access through Alarm.com, or available for local access at the panel itself. If you want to operate the smart scene remotely, then build it through Alarm.com. If you want to control it locally at the panel, then build it at the GC3 or GC3e.
https://www.alarmgrid.com/faq/will-a-scene-created-in-alarm-com-be-pushed-to-a-2gig-gc3-or-2gi
http://alrm.gd/get-monitored
4
views
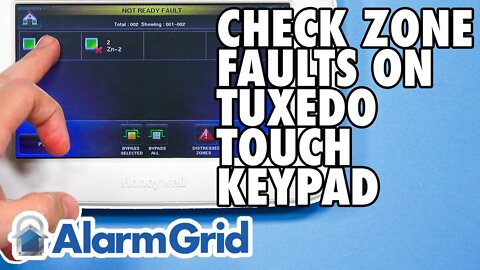
The Tuxedo Touch Keypad: Checking Zone Faults
In this video, Jorge from Alarm Grid shows you how to check zone faults on a Honeywell Tuxedo Touch Keypad. The primary function of a Tuxedo Touch is to serve as a touchscreen controller for a Honeywell VISTA Security System. As the Tuxedo Touch is connected with a VISTA System, it can display active zone faults on its behalf. The menu that shows zone faults can also be used to bypass faulted system zones so that you can successfully arm. This can be convenient if there is a faulted zone that you cannot easily restore.
Accessing the Zone Fault Menu is very simple. First make sure that there is at least one faulted zone on the system. You will know this because the bar at the top of the screen will be yellow, with the message "Not Ready Fault". To see the list of faulted zones, start by choosing Security on the main screen. Then click the Faulted Zones button on the right-hand side of the screen. You will see a table containing any faulted system zone based on Zone Number. You can click on any of the listed zones to highlight them. Then if you select the option to Bypass Selected, you can bypass the zones. You must bypass or restore every faulted zone before you will be able to arm your system.
Bypassing zones tells the system to ignore them. Faulted zones must be bypassed prior to arming because otherwise they would trigger an immediate sytem response once the sytem is armed. Please note that some zone types cannot be bypassed on a Honeywell VISTA System. For example, life-safety zones, such as smoke detectors and carbon monoxide (CO) sensors cannot be bypassed. This is because bypassing these zones would represent a serious life-safety risk on the security system.
https://www.alarmgrid.com/faq/how-do-i-check-zone-faults-on-a-tuxedo-touch-keypad
http://alrm.gd/get-monitored
24
views
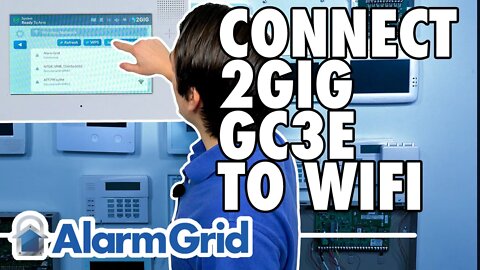
Connecting the 2GIG GC3e to WIFI
In this video, Jarrett from Alarm Grid shows you how to connect the 2GIG GC3e to a WIFI network. The 2GIG GC3e can use WIFI connectivity to communicate with the Alarm.com servers. However, it cannot be set up for WIFI connectivity alone. Alarm.com requires that a security system also has a cellular communication path enabled. While no additional hardware is needed for connecting to WIFI, you will need to add a separate cellular communicator to set up the required cellular communication path.
Communicating with Alarm.com is an essential component of monitoring service for the 2GIG GC3e System. The panel sends signal to the Alarm.com servers during alarm events. These signals are sent across WIFI and cellular. Whichever signal reaches Alarm.com first will go through, while the other signal will be automatically discarded. This prevents any incoming command from going through twice. Alarm.com forwards incoming alerts to a central station and/or the end user directly via text and/or email depending on the user's monitoring plan.
In order to connect the 2GIG GC3e to WIFI, you will need to access the appropriate menu on the system. This will require providing either the Master Code or the Installer Code for the GC3e System. For reference, the GC3e default Installer Code is 1561. When connecting with the WIFI network, you will be required to provide its network password. Make sure that you know that information. Also make sure that the GC3e Panel is within range of the WIFI router. You can connect the 2GIG GC3e to either a 2.4 GHz WIFI Network or a 5 GHz WIFI Network. Keep in mind that WIFI connectivity will only represent one communication path for the GC3e. If the internet ever goes down, then the system will still be able to communicate with Alarm.com using its cellular backup.
https://www.alarmgrid.com/faq/how-do-i-connect-a-2gig-gc3e-to-wifi
http://alrm.gd/get-monitored
28
views
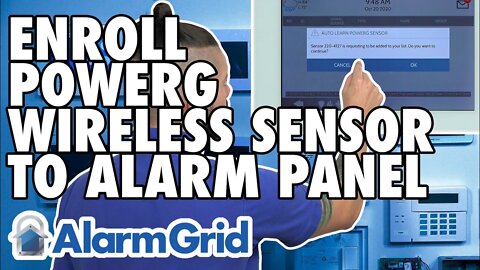
Enrolling a PowerG Wireless Sensor to an Alarm Panel
In this video, Jorge from Alarm Grid shows you how to enroll a PowerG Sensor to a compatible alarm system. The PowerG Sensors are wireless devices from DSC. They are often used with sytems like the Qolsys IQ panel 2 Plus, the DSC Iotega, and any DSC PowerSeries NEO System with an added PowerG Transceiver Module. The enrollment process involves putting the panel into its wireless enrollment mode and then activating the auto-enrollment function of the PowerG Sensor. This is typically done by either inserting batteries inside the PowerG Sensor to power it on, or by pressing and holding the device enrollment button until its LED light is solid orange. Refer to the manual for your specific PowerG Sensor to determine the exact auto-enrollment process. Auto-enrollment is almost always recommended over manually enrollment, as it will prevent you from making a mistake when entering the Serial Number for the device. However, there are some rare cases where manual enrollment may be preferred.
PowerG Wireless Sensors support many great features that help to make them some of the truly best security devices on the market today. For one, they offer an exceptional wireless range of up to 2,000 feet away from the panel when used with a Qolsys IQ Panel 2 Plus, and up to 2 km away from a DSC PowerSeries NEO System with an added PowerG Transceiver. The PowerG Sensors are also extremely secure, as they utilize 128-bit AES encryption and Frequency Hopping Spread Spectrum (FHSS) technology for protection. There are all sorts of PowerG Sensors, covering everything from door and window contact sensors, motion sensors, glass break detection sensors, smoke detectors, and more. Many users will make sure to use exclusively PowerG Sensors when setting up a new security system, as they support top-of-the-line technology provide some of the best protection available. And as wireless sensors, most users find them super convenient and easy to set up.
https://www.alarmgrid.com/faq/how-do-i-enroll-my-powerg-wireless-sensor
http://alrm.gd/get-monitored
17
views
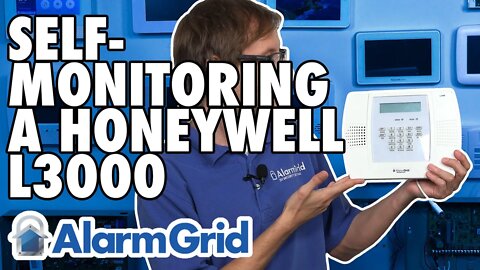
Honeywell L3000: Self Monitoring
In this video, Michael from Alarm Grid explains how you can self-monitor a Honeywell L3000 Security System. The term "self-monitoring" refers to the practice of connecting a security system with an interactive monitoring platform, but not with a central monitoring station. This monitoring platform will send the end user text and/or email alerts when system events occur. It will then be up to the user to contact emergency help when a text or email alert comes through. Since no central station is involved, it is the responsibility of the end user to request help on their own. Self-monitoring service is only recommended for users who feel comfortable and confident in their abilities to very quickly take action when they receive text and/or email alerts regarding system activity.
To use the Honeywell L3000 for self-monitoring service, the system must be set up with the AlarmNet servers and Total Connect 2.0. When the L3000 System goes into alarm, it will send an alert to AlarmNet. From there, AlarmNet will pass on the notification to Total Connect 2.0. The Total Connect 2.0 platform is designed to notify users via texts and/or email messages when this occurs. The user must set up notifications on Total Connect 2.0 so that alerts are sent out when alarm events are received by the platform. There is a specific process to follow when setting up Total Connect 2.0 notifications, so make sure that the notifications are set up properly.
Your Honeywell L3000 will need a compatible AlarmNet Communication to interface with AlarmNet and Total Connect 2.0. The most popular AlarmNet Communicators for use with the L3000 are the Honeywell LTE-L3A AT&T LTE Communicator and the Honeywell LTE-L3V Verizon LTE Communicator. Both use reliable cellular connectivity and will readily interface with Total Connect 2.0. The L3000 must be on Firmware Version 20.1 or higher to support Total Connect 2.0.
https://www.alarmgrid.com/faq/can-i-self-monitor-a-honeywell-lynx-plus-l3000
http://alrm.gd/get-monitored
11
views

Clip Limits With Alarm com Video Service
In this video, Michael from Alarm Grid discusses the clip limits associated with Alarm.com video monitoring service. At the base level without any upgrades, a user with an Alarm.com Video Plan gets 1,000 monthly clips, 1,000 total clips, and support for four (4) cameras and one (1) SVR device. Monthly clips refer to video clips captured by Alarm.com Cameras and stored on the Alarm.com servers within the same monthly cycle. Once the monthly clip imit is reached, no new clips will be captured and saved on Alarm.com. The only way to resume capturing clips for that month is to increase the clip limit. Additionally, the user will need to un-pause non-alarm recording rules, which become automatically paused when a user reaches their monthly clip limit. Meanwhile, total clips refer to all captured video clips that are stored on the Alarm.com servers across any time period. Once the total clip limit is reached, new clips will continued to be recorded and saved on the Alarm.com servers. However, the oldest unprotected clips will be deleted to make room for the new clips. This is basically a first in first out (FIFO) system. A user can choose to protect certain clips so that they are not deleted. But if a user "protects" as many clips as their total clip limit, then no new clips will be saved on Alarm.com.
There are a couple of ways that a user can increase clip limits and camera limits for Alarm.com. First, when a user has Alarm.com Video Analytics added to their account, their monthly clip limit and their total clip limit will increase from a base of 1,000 clips to a base of 3,000 clips. The user will also gain access to all of the features associated with Alarm.com Video Analytics. Alarm Grid will enable Video Analytics to a user's account at no additional charge, but a user must still formally request it from Alarm Grid. As a company, Alarm Grid does not enabled Video Analytics on Alarm.com Video Accounts by default. The other way to increase clip limits is to have one or more Video Expansion Packs added to your account. Each Video Expansion Pack will increase your monthly and total clip limits by 5,000 clips, while also providing you with support for four (4) additional Alarm.com Security Cameras and one (1) additional SVR device. Each Video Expansion Pack that is added will increase your monthly monitoring bill.
https://www.alarmgrid.com/faq/what-are-the-clip-limits-included-with-alarm-com-video-service
http://alrm.gd/get-monitored
22
views

2GIG GC3 or GC3e: Properly Replacing a Bad Sensor
In this video, Jarrett from Alarm Grid shows you how to properly replace a bad sensor on a 2GIG GC3 or 2GIG GC3e. This process involves clearing the wireless zone entirely and then reprogramming the zone from scratch. A user will typically find that if they just delete the old Serial Number from the sensor being replaced and then enter the Serial Number for the new sensor, then they will get a "bypassed at device" error for the zone.
Any user who needs to replace a sensor on their GC3 or GC3e should clear out the zone and then reprogram the zone from scratch. While this does require more time, it will save you trouble by not encounter the "bypassed at device" status. This condition results in the sensor being ignored by the system and the system not taking any action when the sensor is faulted. While the "bypassed at device" condition is what we have seen, it's possible that other abnormal zone status messages or zone responses may appear when a sensor is not properly replaced. After replacing a sensor, you should test the newly enrolled one to ensure that the system responds in the proper manner.
Both the 2GIG GC3 and 2GIG GC3e follow the same general programming steps. But there are some things to keep in mind when programming sensors. First, you will need the Installer Code for the system to enter programming so that you can delete zones and set up new ones. The default Installer Code on a GC3 or GC3e is 1561, and we recommend keeping the code at the default so that you do not become locked out of programming later on. Second, remember that using the correct Equipment Code is extremely important when you are enrolling 2GIG eSeries Encrypted Sensors on a 2GIG GC3e. Failing to use the proper code can result in issues.
https://www.alarmgrid.com/faq/how-do-i-properly-replace-a-bad-sensor-on-my-gc3-or-gc3e
http://alrm.gd/get-monitored
16
views

Changing the SiXCOMBO Batteries
In this video, Michael from Alarm Grid shows you how to change the batteries inside a Honeywell SiXCOMBO Smoke, Heat, and CO Detector for a Honeywell Lyric Alarm System. The Honeywell SiXCOMBO uses four (4) CR123A batteries for power. It is advised that you use lithium batteries, as they will provide a much longer battery life than alkaline batteries. By installing lithium batteries inside your SiXCOMBO device, you should only need to replace the batteries about every five (5) years. When the batteries are low and in need of replacing, a low-battery trouble condition will appear for the associated zones on the Honeywell Lyric System.
Replacing the batteries for the SiXCOMBO is quite simple. First you must open the detector by pressing the SiXCOMBO against its back plate and twisting the sensor counterclockwise to unlock it. You can then separate the sensor from its back plate and gain access to the battery compartment. You can then remove the old batteries. It is recommended that you wait at least ten (10) seconds after removing the old batteries before inserting the new ones. When inserting the new CR123A batteries, you must observe polarity. The positive (+) and negative (-) ends of the batteries should be facing the proper direction as indicated by the SiXCOMBO sensor. Once the new batteries are secure, you can then close the sensor. Properly align the sensor against the back plate, and twist it clockwise so that it locks into place.
In addition to replacing the batteries every few years, the other maintenance you must perform for the SiXCOMBO is testing it regularly. The SiXCOMBO has two (2) test buttons on the front that can be used for testing signal transmissions to the panel. These are perfectly fine for testing the sensor to get an updated Certificate of Alarm (CoA). But if you want to go above and beyond and test the actual functionality of the sensor, then you will need to use canned smoke, a hair dryer on the max setting, and canned CO gas. Remember to always place your system in test mode before testing the SiXCOMBO in any manner. This is very important for preventing false alarms on your system.
https://www.alarmgrid.com/faq/how-do-i-change-the-batteries-for-the-honeywell-sixcombo
http://alrm.gd/get-monitored
22
views

Alarm com: Limits for Z Wave Devices
In this video, Michael from Alarm Grid talks about the Alarm.com limits for Z-Wave devices. Alarm.com only allows you to pair 122 Z-Wave devices from a single panel. Once you reach 122 Z-Wave devices on Alarm.com, no further Z-Wave devices will get pushed over to the platform. Every 123rd Z-Wave device and beyond that you pair with your panel will only be available at the panel for local control, assuming that the panel supports local automation control. These Z-Wave devices from 123 and beyond will not be made available for remote access through the Alarm.com platform.
Alarm.com maintains its limit on Z-Wave devices for networking and latency considerations. They want to ensure that you experience as little slow-down and latency as possible when controlling your Z-Wave devices through the platform. Most users will not come anywhere close to approaching the 122 device limit. But for those who do, the 122 device limit helps ensure that the Z-Wave network runs smoothly and that performance is optimized.
If you have 122 Z-Wave devices on Alarm.com, and you get a new Z-Wave device that you really want to use for remote control, then you must follow a specific process to get it to pair with platform. First, you should delete a Z-Wave device that isn't as important for remote access, and you are fine with using for local control at the panel only. Then allow Alarm.com to update so that fewer than 122 Z-Wave devices are paired with the platform. Once you have 121 or fewer Z-Wave devices paired with Alarm.com, you should then pair the Z-Wave device that you really want to use for remote control. Allow Alarm.com to update the Z-Wave list, and your new Z-Wave device will be made available on the platform. You can then go back and add the Z-Wave devices you deleted. They won't get pushed over to Alarm.com for remote access, but they will still be available for local operation, assuming that local Z-Wave operation is supported by your panel.
https://www.alarmgrid.com/faq/what-is-the-alarm-com-limit-for-z-wave-devices
http://alrm.gd/get-monitored
229
views
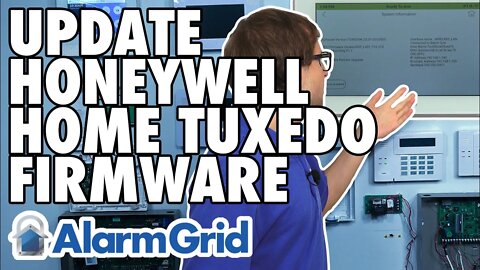
Updating the Honeywell Home Tuxedo Firmware
In this video, Michael from Alarm Grid explains the process for receiving firmware updates on a Honeywell Home Tuxedo Keypad. Firmware updates are sent to the Tuxedo Keypad over-the-air (OTA) from the AlarmNet servers. In order to receive firmware updates, you must have the Enable Remote Upgrade feature enabled on the Tuxedo, and you must meet all the conditions for updates to go through. Once the conditions are met, and a new update is released, it will be pushed down to the Tuxedo across its WIFI connection. The updates are entirely automatic, and no manual updating process is required. The purpose of these updates is to improve device function and performance and to potentially release new features for the Tuxedo Keypad. Resideo specifically designed the keypad to be upgradable, rather than requiring users to replace the device outright.
Several conditions must be met for automatic firmware updates to occur. First and foremost, the Enable Remote Upgrade feature for the keypad must be set to ON. This feature can be enabled by accessing the System Info Sub-Menu within the Settings Menu for the Tuxedo Keypad. Assuming that the Tuxedo is connected with a Honeywell VISTA System, the system must be disarmed, and there must be no faulted zones or trouble conditions on the system. There must also be no zones in alarm memory, and the system must be plugged in and receiving proper AC power and note have a low battery condition. Updates will also fail to go through if the Tuxedo is in Demo Mode or Safe Mode, if the system is in its programming mode, or if the Tuxedo is experiencing an ECP error. Critical firmware updates will be pushed down to the keypad automatically. No prompt will be displayed for a critical firmware update, and the Tuxedo will reboot about (15) seconds after the update has finished being applied.
https://www.alarmgrid.com/faq/can-i-update-resideo-tuxedo-firmware
http://alrm.gd/get-monitored
17
views

Using the SiXCOMBO for Only Smoke or Only Heat Detection
In this video, Michael from Alarm Grid explains how you can use the Honeywell SiXCOMBO for only smoke or only heat detection if needed. The Honeywell SiXCOMBO is a combination life-safety sensor that offers three (3) main functions. These are smoke detection, heat detection, and carbon monoxide (CO) detection. Each function can be toggled ON or OFF as needed. So if you want to disable smoke detection and/or heat detection for the SiXCOMBO, then that is certainly possible.
There are a few reasons why you might want to disable smoke detection or heat detection on a Honeywell SiXCOMBO. These reasons mostly fall under the category of preventing false alarms on the system. If you are using the SiXCOMBO in an area where smoke detection might cause false alarms then you might disable smoke detection. But you can keep heat detection enabled so that the device can still respond to a fire. One example could be if you are using the SiXCOMBO in a bathroom, and the vapors from the shower could potentially activate the smoke detector. Another example is if you are using the SiXCOMBO in the kitchen and the smoke from cooking could potentially activate the sensor.
Some users in hot areas will disable heat detection for false alarm prevention. The heat sensor on the SiXCOMBO is designed to activate at 135 degrees Fahrenheit, so if you live in an extremely hot climate where the temperature occasional exceeds 120 degrees Fahrenheit, then you might disable that feature for safety. Another example is if you install the SiXCOMBO near a furnace, you might turn off heat detection to prevent a false alarm. Really, these situations are on a case by case basis, and you will need to decide if having smoke and/or heat detection on your SiXCOMBO could potentially cause a false alarm.
https://www.alarmgrid.com/faq/can-i-use-the-sixcombo-for-only-smoke-or-only-heat-detection
http://alrm.gd/get-monitored
27
views
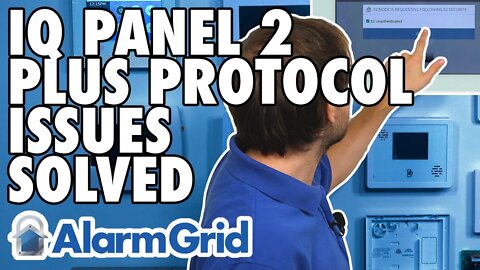
Qolsys IQ Panel 2 Plus: Solving S2 Protocol Issues
In this video, Michael from Alarm Grid gives you troubleshooting tips for getting Z-Wave Plus devices that support the S2 Security Protocol feature to work properly on the Qolsys IQ Panel 2 Plus. The term S2 in this case refers to a security protocol that is an upgrade over the older S0 protocol. Having top-of-the-line security for smart home automation devices isn't necessarily as important as it is for security sensors, but many users will still want to make their smart home devices secure as possible regardless. By getting S2 devices to work properly using the protocol, you can have a more secure home automation network. Some users will resort to "downgrading" these S2-compatible devices to use the S0 protocol for the sole purpose of getting them to enroll with the system successfully. But there are a few things you can check to get your S2 Z-Wave Plus devices to work as intended on the Qolsys IQ Panel 2.
In order for your Qolsys IQ Panel 2 to support the S2 Security Protocol, it must have a Z-Wave Firmware Version of 6.81.03. This was the Z-Wave Firmware Update that introduced the S2 Security Protocol to the IQ2, as well as the system's Smart Start feature. Additionally, the system firmware, which is separate from the Z-Wave firmware, should be at least 2.5.3. Although Firmware Version 2.4.2 was technically the first to support the S2 Protocol, Firmware Version 2.5.3 brought many fixes to help ensure that S2 devices would work as intended. Therefore, upgrading to System Firmware Version 2.5.3 is strongly advised. You can upgrade the system firmware and the Z-Wave firmware in either order. It doesn't matter which one you do first. Upon enrolling a compatible S2 device, you should get a checkbox for S2 Unauthenticated. You want to have that box checked to enroll the Z-Wave Plus device using the S2 Protocol.
https://www.alarmgrid.com/faq/why-isn-t-my-s2-z-wave-device-working-with-my-qolsys-iq-panel-2
http://alrm.gd/get-monitored
405
views

Interlinking Honeywell SiXCOMBO Devices
In this video, Michael from Alarm Grid shows how you can interlink multiple Honeywell SiXCOMBO devices on the same Honeywell Lyric System so that they all begin sounding when only one of them is activated. This feature is commonly referred to as One-Go-All-Go. This is an important safety feature that helps ensure that all building occupants are alerted during a potentially life-threatening emergency. You can include all programmed SiXCOMBO devices and SiXSMOKE devices in the One-Go-All-Go network. You have the option of excluding some devices from the One-Go-All-Go network while including others if you want. However, there's very little reason not to have all your SiXCOMBO and SiXSMOKE sensors operating as One-Go-All-Go.
The Honeywell SiXCOMBO and Honeywell SiXSMOKE devices have 85 dB sounders built inside. These 85 dB sounders are actually just as loud as the 85 dB sounder inside the Honeywell Lyric Alarm Panel. But the advantage to setting up a One-Go-All-Go network with all your SiXCOMBO and SiXSMOKE devices is that it will spread the sound out across a larger area. It may not make the sound any louder, but you can have a sounder in multiple rooms and hallways spread throughout the building. This can be very important if the system is being used in a larger home or business. Not to mention, any Honeywell SiXSIREN devices that you have set up with the system will also begin sounding. The SiXSIREN devices also have 85 dB sounders built inside.
For all programmed SiXCOMBO and SiXSMOKE devices, there is a toggle option within Honeywell SiX Sensor programming for One-Go-All-Go. You can turn it ON or OFF for each individual sensor that is enrolled with the Lyric Alarm System. In most cases, a user will simply enable the One-Go-All-Go feature for each SiXCOMBO and SiXSMOKE device that is enrolled with the Lyric, as there is virtually no reason to want to have every sensor begin sounding in the event of a fire or an outbreak of carbon monoxide gas.
https://www.alarmgrid.com/faq/how-do-i-access-video-for-honeywell-ip-cameras
http://alrm.gd/get-monitored
30
views
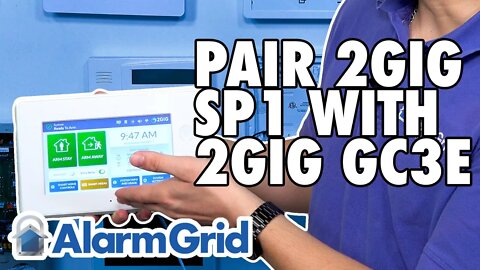
Pairing a 2GIG SP1 with the 2GIG GC3e
In this video, Jarrett from Alarm Grid shows you how to pair a 2GIG SP1 Touchscreen Keypad with a 2GIG GC3e Security System. The 2GIG SP1 allows you to perform security and automation functions from a second on-site location besides the primary GC3e Alarm Panel. Many users will install a 2GIG SP1 by a garage door or a back door so that they can conveniently arm, disarm, and bypass sensors as they come and go. Another popular location for a 2GIG SP1 Keypad is in a master bedroom so that users can perform smart scenes from a convenient location. The SP1 is also useful for triggering emergency panic alarms in distress situations.
One notable thing about the 2GIG SP1 is that it will mimic the GC3e main screen almost perfectly once it has been paired. You can use the 2GIG SP1 Keypad to control multiple smart area partitions, as long as you have a valid code for the partition you want to control. You will assign the 2GIG SP1 to a partition as part of its programming process. However, this only determines which partition will display a trouble condition that directly affects the SP1, such as an AC loss condition where its transformer becomes unplugged.
The 2GIG SP1 is truly a very complete alarm system keypad. It offers more functionality than the 2GIG SP2, which can only be used to perform security functions, like arming and disarming. The SP1 can do everything that the SP2 can, and it also adds smart home automation capabilities. Additionally, only the SP1 shows the date and time and a five-day weather forecast. One other limitation of the 2GIG SP2 is that it can only control the partition that it has been assigned. The 2GIG SP1 can control any partition as long as you have a valid code.
https://www.alarmgrid.com/faq/how-do-i-pair-the-2gig-sp1-with-the-2gig-gc3e
http://alrm.gd/get-monitored
5
views
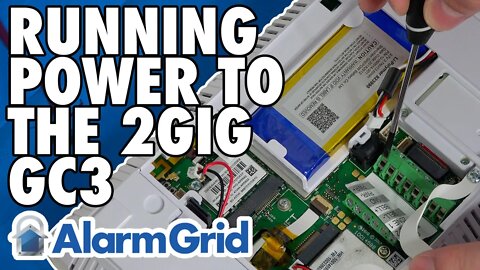
Running Power to a 2GIG GC3 or GC3e
In this video, Jarrett from Alarm Grid shows you how to provide power to the 2GIG GC3 Security System. The 2GIG GC3 is a wireless all-in-one security system with a built-in touchscreen. Like most wireless systems, the GC3 gets primary power from a plug-in transformer. The system also has a backup battery that will kick in automatically in the event that AC power is list. This keeps the system running reliably during power outages. The backup battery can only keep the system running for a limited duration of time, so you will want to make sure that AC power is restored as quickly as possible.
Powering the 2GIG GC3 is very simple. As is the case for most wireless alarm systems, you want to connect the backup battery before providing AC power. The 2GIG GC3 backup battery has a plug-in connector, and you just insert it into the designated port on the GC3 board. The backup battery will begin storing a charge after AC power has been applied to the system. By continuously storing a charge, the backup battery will be ready to jump in and power the system in the event that AC power is lost. But it is important to note that the backup battery will eventually lose its ability to store a charge, and you will need to replace it with a new one. This usually happens after several years of use.
On the inside of the panel, there are two (2) ways that you can provide AC power. This is also referred to as transformer power. There is a barrel connector where you can plug-in a male DC barrel connector. The long portion of the Honeywell LT-Cable is great for this job. If you only have traditional alarm wiring, then you can connect it to the terminal block on the panel. There are designated positive (+) and negative (-) power terminals for this purpose.
https://www.alarmgrid.com/faq/how-do-i-run-power-to-a-2gig-gc3
http://alrm.gd/get-monitored
11
views

Running Power to a Honeywell L7000
In this video, Jarrett from Alarm Grid shows you how to power on a Honeywell LYNX Touch L7000 System. Like most wireless alarm control panels, the L7000 uses a plug-in transformer for primary power and a plug-in battery for backup power. You must disconnect both the transformer and the backup battery if you want to power the system completely down. This is done when making hardware changes to avoid damage to the panel and the equipment.
When powering down, it doesn't matter whether you unplug the transformer or the backup battery first. But when powering the system back on, it is strongly recommended that you connect the backup battery first, followed by the transformer. Keep in mind that the panel will not power on from battery power alone. It needs the transformer to be connected before it will power back on. This is part of the battery saver circuitry that prevents the panel from discharging the battery too deeply.
The Honeywell L7000 uses a 9VDC, 2.5A transformer for power. This transformer is known as the Honeywell 300-04705. You connect it to the panel using 18-gauge or 22-gauge, 2-conductor wiring. The 18-gauge wire is a bit thicker to allow for longer wire runs, but some users prefer 22-gauge wire due to the fact that it is thinner and more flexible. You can find alarm wire at a hardware store. Another option is to use a Honeywell LT-Cable, which is a prepared cable that doesn't require any stripping. Just keep in mind that the Honeywell LT-Cable is a fixed-length cable, and it cannot be easily extended. As for the backup battery, it has a plug-in connector that secures to a port on the back of the panel. The backup battery will need to be replaced after about four (4) years depending upon use.
https://www.alarmgrid.com/faq/how-do-i-run-power-to-a-honeywell-l7000
http://alrm.gd/get-monitored
15
views
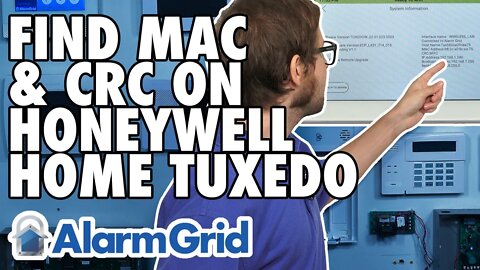
Finding the MAC and CRC for the Honeywell Home Tuxedo
In this video, Michael from Alarm Grid shows you how to find the MAC and CRC codes for a Honeywell Home Tuxedo Keypad. The Tuxedo has a MAC and CRC for the purpose of connecting to WIFI. The keypad uses this WIFI connection to communicate with Total Connect 2.0. This allows the Tuxedo to relay automation commands to the platform. And when the user accesses TC2 to perform automation functions, the commands are sent down to the Tuxedo across WIFI so that they can be passed to the automation devices.
Your monitoring company will request the MAC and CRC codes for your Honeywell Home Tuxedo when the device is being integrated with your Total Connect 2.0 account. This is usually either when a user buys a new Tuxedo Keypad, or when a user starts new alarm monitoring service. It is recommended that you write down these codes or take a picture of them and store them somewhere safe for easy access later on if needed. Otherwise, you will need to reference this information within the keypad menus.
The MAC and CRC codes can be identified by a few unique characteristics. For the MAC, the code is 12 characters long, and it consists of a mixture of numbers and letters. The MAC code will often begin with a specific set of numbers and letters, which is referred to as a MAC-prefix. One common MAC-prefix that you will encounter on a Tuxedo is b8:2c:a0. As for the CRC code, it is four (4) characters in length, and it also consists of numbers and letters.
If you want to access the MAC and CRC codes from within the Tuxedo menus, start from the main screen of the keypad, and choose the Settings icon (the gear) at the the bottom of the screen. From there, you should choose System Info. The MAC and CRC codes will be displayed on the right-hand side of the screen, along with other network information.
https://www.alarmgrid.com/faq/how-do-i-find-the-mac-crc-for-a-resideo-tuxedo
http://alrm.gd/get-monitored
24
views