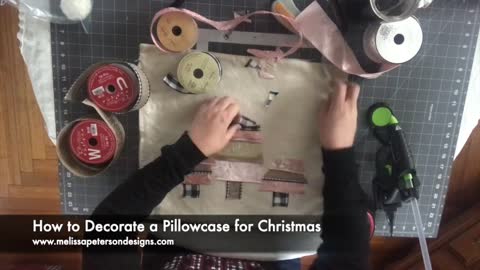
How to Decorate a Pillowcase for Christmas Shorts
Have you ever crafted a pillowcase? I've made pillow case covers from seasonal kitchen towels, but I've never taken a blank pillowcase and personalized it! Let me tell you, it's super easy! Let's do this!
For full blog post and supply list go to my website!
https://melissapetersondesigns.com/pillowcase/
55
views
How to Make Your Own Disney Inspired ShadowBox
I am all about personalized decor, so when I was asked by a good friend to make a Disney inspired DIY shadow box, I was thrilled!
Check out my blog post on how to personalize your own shadow box for a special little one in your life using a Disney inspired theme!
https://melissapetersondesigns.com/how-to-make-your-own-disney-inspired-diy-shadow-box/
61
views
Check out My 9 Favorite Valentines Crafts By Some of My Favorite Crafters!
I have found some of the cutest crafts and DIY's from some creative and talented bloggers for us to check out and hopefully entice you to add to your to-do-list!
Make sure to show the bloggers showcased here some love!
For full blog post and supply list go to my website!
https://melissapetersondesigns.com/valentine/
#Valentine Crafts #ValentineDIY
57
views
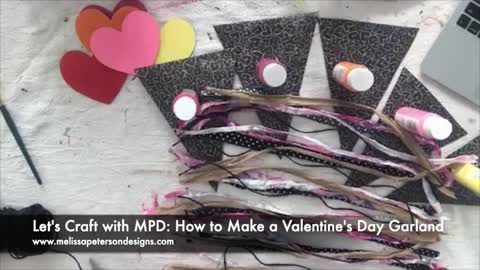
How to Make a Valentine's Day Garland
My coffee bar needed a little extra touch, and this Valentine’s Day Garland fit just perfect! I will show you how I decorated one of my favorite areas. And yes, I have a quick video included!
First gather your supplies
For your Valentine’s Day Garland you will need the following supplies
Your choice of banners. I used Chipboard Pennants from Hobby Lobby
Wood Heart Cutouts I found at Hobby Lobby in their Valentine section.
Messy bows: Click here for instructions and supplies you will need.
Jute rope or twine
Mod Podge, paint brushes, scissors, hot glue gun and glue sticks
You Choice of Paint (craft or chalk paint). I used craft paint from Walmart and painted each heart a different color. I used the following colors: Pale Daffodil, Candy Pink, Bright Magenta, Bright Red, and Jack O Lantern.
LET’S GET STARTED
Making these Valentine’s Day Garland is such an easy task and except for the use of the hot glue gun, this would be a kid-friendly craft.
This craft is also very versatile. Instead of using heart cutout, you could use letters to spell a specific word such as HOME or decorate your kiddos room and personalize it.
So many options!
LET’S PAINT
I started with painting my wood heart cutouts.
This will give them a chance to dry while I move onto putting the rest of the garland together.
The chipboard pennant banners I picked out from Hobby Lobby actually gave me enough to make 2 small garlands for the area I wanted to decorate.
For my small Valentine’s Day garland I used 5 pennants banners, so I painted 5 heart wood cutouts.
I decided to use a variety of colors and painted each one with a regular brush.
PENNANT BACKGROUND
For the pennant background, I used 2 pieces of scrapbook paper I had on hand.
I wanted to keep my color theme with the typical Valentine colors of red, pinks and I added orange, yellow and my base colors of black and white.
On the backside of the 12″ x 12″ scrapbook paper, I used the chipboard pennant and traced with a pen around the pennant.
On the scrapbook paper I was able to squeeze in 3 templates on one sheet and 2 on the remaining sheet.
Once these are traced, I cut them with my scissors.
Next, I grabbed my Mod Podge and a brush and painted the pennant with the glue.
I applied enough Mod Podge to cover the entire surface but trying to be careful not to leave excess for the scrapbook paper to bubble up.
I then placed one of the triangle scrapbook papers on the pennant with Mod Podge.
Once I had the scrapbook paper in place, I set it aside to dry, but I applied one of the paint bottle on top to keep the chipboard from warping.
When these were all in place, I then moved back to the wood heart cutouts.
APPLYING THE HEARTS
Here I used the hot glue gun.
I was somewhat generous with the hot glue but I applied the glue more in the middle of these wood cutouts.
I then immediately placed these on the pennant where I wanted them.
Hold in place for a few minutes or put something heavy on them while the hot glue cools.
MESSY BOWS
If you check out my video below I miscalculated how many bows I needed.
Better too many than not enough!
Click here, to see how I made my larger Messy Bows for one of my Valentine’s Day garland.
You can also click here to see how I make my smaller Messy Bows.
TIME TO ASSEMBLE
Now it’s time to bring together our Valentine’s Day Garland.
I decided to use black twine to string my pennant banners.
I wrapped approximately 1″ scotch tape to the ends to make it easier to thread them through the holes of the pennants.
Thread the jute rope through the holes of the pennant.
I didn’t cut my cut my jute rope until I had all the pennants threaded and knew how long I wanted it.
Once I had this arranged, I then tied the Messy Bows onto the pennants.
I placed one Messy Bow in-between each pennant and on each end.
That is it!
86
views
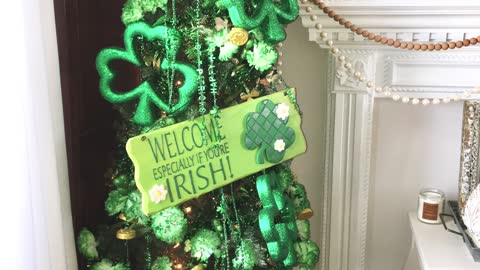
My Dollar Tree St. Patricks Tree Reveal
This is my first year decorating a St Patricks Tree! And I even surprised myself on how I was able to use mostly Dollar Tree goodies to accomplish this!
My St Patricks Tree
I was determined to have a St. Patricks Tree and not break the bank!
And what better way than to find my supplies at Dollar Tree!
ST PATRICKS TREE DECOR
I found these large Shamrock-shaped glittered styrofoam, garland, necklaces, flowers and picks all at Dollar Tree.
My “Welcome if your Irish” sign is something I’ve had for years (decades).
So my sign doesn’t really count. (right?)
DECORATING MY ST PATRICKS TREE
First I loosely wrapped three green garlands around the tree.
I had 12 carnation flower bundles with gold coins.
After spreading the flowers out, I placed them into my tree making sure to leave room for my large sign.
My sign has a wire hanger so I used that to secure it to my tree.
If you find a sign that doesn’t have a hanger, you can always staple wire pipes to the back and use them as hangers.
Then I hung my large styrofoam shamrocks.
And those St. Patrick Day necklaces?
I hung them like tinsel around the tree, and I love how they look!
Then I added my small shamrock picks throughout the tree to fill in any gaps.
For my tree skirt?
I simply used my Christmas tree skirt and added a few more St Patricks carnation flowers from Dollar Tree!
Next year, I may do something different?
We’ll see!
So in all, I think I decorated my whole tree for under $30?
Not to bad!
56
views
My Top 15 Christmas Gift Ideas for Crafters & DIYers!
Ever wonder what to get for the crafter in your life?
Here are 15 ideas that are perfect!
Check out my blog post for all the referral links!
https://melissapetersondesigns.com/gifts/
50
views
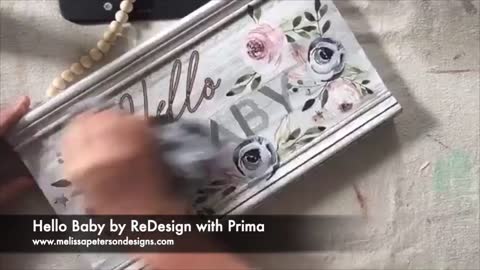
Hello Baby by reDesign with Prima | Melissa Peterson Designs
Hello baby! My top 2 favorite transfers are from ReDesign with Prima are America and Hello Baby! Check out how I took an unfinished wood sign from Hobby Lobby and dressed it up with this adorable Hello Baby transfer and a little Dixie Belle’s VooDoo Gel Stain in Black Smoke!
Supplies I Used
Unfinished Wood Sign of your choice, I used White Beveled Beaded Wood Wall Decor
Hello Baby transfer from ReDesign with Prima
Dixie Belle’s Clear Coat in Flat.
VoodooGel stand in Black Magic by Dixie Belle
My two favorite transfers are from ReDesign with Prima are America and Hello Baby!
Click here to see how I turned the America transfer into a beautiful rustic sign.
Just for the record, I was in Hobby Lobby’s unfinished wood section and came across this adorable white sign with beads hanger!
So far I can not find this unfinished sign online BUT I will keep looking since I hope to nab some more for future projects!
In the meantime, feel free to find a board or an unfinished sign you’d like to dress up and lets get started!
CREATING OUR HELLO BABY DECOR!
Before getting started with our new sign, make sure she is good and clean.
I prefer to use Dixie Belles’ White Lightning to clean my projects, click here to see how I use this product!
Next, grab your Hello Baby transfers from ReDesign with Prima.
I picked out the flower transfers available in this design, and with scissors cut around them plus the words “Hello” and “Baby”.
Next I worked on placement.
For a more thorough blog post on how to apply transfers you can click here.
Otherwise, just know that transfers comes in three layers usually, The white backing, the design or transfer itself and the clear plastic film on top.
Once I had an idea on where I wanted everything to lay I started pulling the back off the flowers first and applying.
Position the design where you want it.
Be careful not to touch the transfer on the project until you are ready to commit to where it will lay.
Once you do, put it on and start rubbing.
Each transfer comes with it’s own stick, I start rubbing the transfer and slowly pull up on an edge to see where it’s applied.
If the transfer pulls up a little, push it back down and keep rubbing.
Some lay down really easy, others take a little more time and elbow grease.
Once you have the clear plastic film completely removed and your transfer is on your project, use a clean towel or rag and rub over your sign.
This will help push the transfer down onto your project for a better adherence.
Don’t be afraid of overlapping some of your transfers, it’s ok!
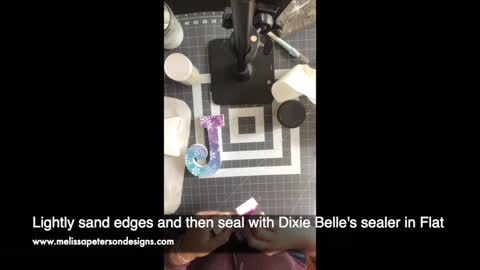
PROTECTING OUR HELLO BABY
Now it’s time to seal our sign.
I use Dixie Belles’ sealer and for this project I used their Flat sealer for minimal shine.
Apply a coat of sealer, let dry.
Once it’s dry, you can add a second coat again.
When this is dry, if you like the fresh clean look, your sign is done!
But, if you like the aged look, keep reading!
Adding an aged touch to your projects is easy and my first go to is usually using black or brown water-based wax by Dixie Belle.
But this time I wanted to use something else, VooDoo Gel Stain Black Magic by Dixie Belle.
Once my sign was sealed and cured, I used damp clean rag and squirted a little Black Magic on the rag and then started wiping across the sign.
I then used a separate area of the rag and wiped away some of the stain back off of the sign.
You can repeat this process again if you want a darker look.
Once this is dry, add another coat of sealer and you are done!
That’s it!
96
views

My Easter Bunny
Check out how easy it is to use the PVPP method to make these adorable Easter Bunny crafts!
Supplies I Used
Unfinished wooden Egg cutout
Fabric strips or ribbons of your choice to make your Messy Bow: click here for more information.
Bunny stencil made from contact paper: click here to see how I use contact paper with my Silhouette personal cutter.
Dixie Belle’s Colonel Mustard and Fluff
Dixie Belle’s Crackle
Mod Podge
Glue gun and glue stick
let’s get started
For my easter bunny I decided to use an egg shaped wood cutout.
I painted the background and around the edges with Dixie Belle’s Colonel Mustard.
Once the paint was thoroughly dried, I applied my bunny stencil without transfer tape.
Normally I use clear contact paper to apply my stencils, however, this is one piece stencil and it was just as easy to apply it myself.
Then I burnished around the stencil with mod podge to prevent any paint from bleeding underneath the stencil.
Adding crackle to my easter bunny
I love this product!
Such an easy way to add a little character and so far I’ve only used this on small projects and not furniture.
Before starting, stir your crackle good.
Using a paint brush or foam brush apply a liberal amount of this product where you would like to see your paint to crack.
I applied this around the bunny and just up to the edge of my easter egg.
I used my heat gun to help this dry, or you can just wait.
Once this was thoroughly dried, I then painted in a cross-hatch pattern, Dixie Belle’s Fluff over the same area where I had applied the crackle.
As the Fluff dries, you will notice areas developing cracks.
This process can take awhile, so be patient.
Due to technically difficulties, I was only able to catch a short clip in a time lapse video.
What I was able to video tape, you can check it out below!
TOUCHING UP MY EASTER BUNNY
To touch up the paint around the edges of the Easter Egg, I used a fan brush and went around the edges with Colonel Mustard again.
This technique created a rustic-frame around my Easter Bunny.
You could also use a chip brush and do the same thing.
I also painted the backside of my Easter Egg with Colonel Mustard to give my project a finished look when it’s sitting in a tray in case the backside shows.
EMBELLISHING MY EASTER BUNNY
For my Easter Bunny butt, I decided to make a small Messy Bow with my favorite colors, naval blue and mustard.
Click here to check out my blog post on Messy Bows.
That is is!
67
views
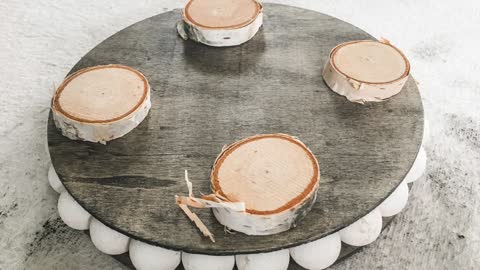
My DIY Mini Wooden Risers
I love risers! I’ve made risers (runners) before but never small ones I could use in my tiered trays or other small scaled decorating. Check out how easy these are to put together!
Supplies I Used for my DIY Wooden risers
E6000 craft glue
Hot Glue gun and glue
Dixie Belle Black Wax and clean rag
American white acrylic craft paint
Paper plate
FIRST RISER: BIRCH
1 birch coaster approximately 4″ in diameter
3 or 4 medium birch discs
SECOND RISER: RECTANGLE
2 plywood rectangles
Wooden beads: I used leftover beads from a unfinished sign for this riser
4 doll pin stands
THIRD RISER: ROUND
2 plywood circles
Wooden beads:
4 medium birch discs
I love Brooke Riley of ReFabbed crafts, style and personality!
And I hope someday to get to meet her.
But to be honest, I try so hard to stay away from other crafters, because I want to come up with my own ideas!
However, when I saw this, I had to give it a try and then I thought, I can put my own twist on it!
Be sure to check out Brooke’s version and let her know I sent ya! Click here!
MY BIRCH WOODEN RISER
This riser has to be the easiest of them all!
Once I found the diameter of birch cutout I wanted to use, I looked through my birch discs and found three of similar heights, (next time I’ll try four).
I grabbed my E6000 glue, applied a small dollop on the bottom of each birch disc, then added a small amount of hot glue.
Then I glued each one in place and flipped them over and set a jar of paint on the riser until the glue cured!
MY RECTANGLE WOODEN RISER
I think this rectangle wooden riser is my favorite!
Before we get started, I placed enough wood beads to complete this riser on a paper plate and squirted almost one tablespoon of paint over them.
I then swirled the plate around, essentially painting the beads!
You gotta check out my blog post on how I came up with this last year, click here!
While these are drying, time to “stain” the wood.
The small rectangle shape will decorate well on both my tiered trays or mantle.
I grabbed my favorite Dixie Belle black wax and clean rag, rubbed the black wax over both pieces of plywood (both sides) and the four doll pin stands.
A great bonus “staining” with wax, over time it will cure and essentially seal the wood.
Once the boards and doll pins are stained it’s time to assemble.
For the sake of neatness, once I had my beads laid out the way I wanted them, I hot glued them in place on the bottom layer.
To apply the second board, I did apply E6000 and then also hot glue and essentially sandwiched them together.
Final step, gluing the doll pins stands on the bottom of the riser.
While the glue cured, I placed something semi-heavy on top.
MY ROUND WOODEN RISER
Now I think you’re getting the idea on how this riser will go together!
This riser is assembled the same way as the rectangle riser.
But instead of doll pin stands for the risers legs, I used four birch discs!
And that is how I made my mini wooden risers!
Let me know what you think and I hope you give this craft a try!
87
views
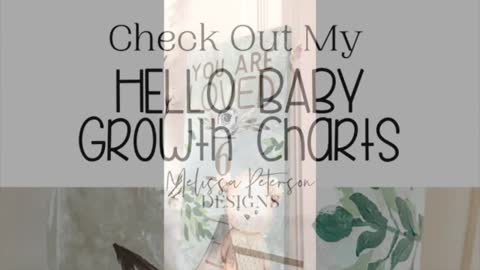
Check Out My Hello Baby Growth Charts
Here is my Hello Baby Growth Chart! Have you noticed a theme? Each Hello Baby transfer comes with cute critters and flowers that are perfect to decorate a nursery. But they are also perfect personalizing signs!
Supplies I Used for my Hello Baby Growth Chart
1″ x 10″ x 72″ Pine board, painted in your choice of background color.
Dixie Belle Products: Cotton, Dried Sage (#1 growth chart background), Vintage Duck Egg (#2 growth chart background), Palmetto (leaves), Chocolate, Mud Puddle and Satin Clear Coat
DIY Paint: Fancy Farmgirl and Apothecary also for leaves.
1 Hello Baby Transfer, specifically the animals, by ReDesign with Prima
Round artist paint brush, large paint brush (I used an old one) and mister bottle (optional)
PREPPING MY HELLO BABY GROWTH CHART
I had a vision of neutral themed growth charts with flowing branches with leaves and cute forrest animals.
To begin with, I painted the first growth chart background in Dried Sage.
Then with a large paint brush I lightly pounced Dixie Belles Cotton in random patterns and used my mister.
I misted these areas with water to break up the paint and give a “cloudy” or blurred effect.
This pattern was repeated until the entire board had the effect I liked.
Then I painted the second board background in Vintage Duck Egg and repeated the same steps.
When these were all dry, I prepared to stencil the growth chart measurements.
STENCILING MY HELLO BABY GROWTH CHART
Next I used my Silhouette Cameo 3 to cut my growth chart stencil.
If you join MPD tribe the basic Growth Chart cut file, is in the MPD Library free for your use.
To see how I apply these long stencils, check out my Woodland Growth Chart Blog.
Once I burnished the stencil with the same background paint, I then used Mud Puddle to paint the measurements and numbers on the growth chart.
Here in Iowa, things are a little humid.
So to help prevent pulling paint off when removing the stencil, I carefully removed the stencil with the paint still wet.
If you do this, go slow so the paint does splatter onto the board below.
When this is all dry, we can start adding those cute transfers!
APPLYING TRANSFERS TO THE BIRTH STAT SIGNS
Before we get started, to get more ideas on how to apply transfers, check out these blog posts!
I had all my animals from the Hello Baby transfer cut apart from each other.
Just to get an idea where I wanted these animal transfers, I just moved these around until I liked what I saw.
Then I removed the backing, grabbed my favorite squeegee and started applying them.
ADDING DETAILS TO THE HELLO BABY GROWTH CHART
I decided once I had the animal transfers applied, I wanted the measurements and numbers a darker color.
So I grabbed my round brush, Dixie Belle’s Chocolate and a small glass of water.
The Chocolate paint was watered down and I painted over the measurement and numbers.
I love how this gave them a water-colored effect.
Keep your boards flat after painting with water until it dries, or you may have color running where you don’t want it!
PAINTING THE LEAVES FOR MY HELLO BABY GROWTH CHART
Then came my multi-colored leaves.
If you check out my short video below, you’ll see how I painted my leaves.
I even slowed it down, in part of the video so you could get a better look!
Basically I paint a squiggly ovals.
And the best part, there are no mistakes!
Don’t forget to layer the colors to add a little depth.
And once you have these all painted and they are dry, add three coats of your sealer.
That’s it!
64
views
How I Upcycled my Mother's Day Vase
Check out my upcycled vase! I got a beautiful bouquet of flowers for Mother’s Day from my son, Dalton and his girlfriend Hannah. I love the shape of this vase so much, I decided to switch it up so I can use it in my home decor!
Supplies I Used for my Upcycled Vase
Vase or vases of you choice
Dixie Belle Products: Slick Stick, Sea Spray, Cotton
Sherwin Williams: Indigo Batik
Paper plate, paper bowl, plastic disposable bowl, tongue depressor, old paint brush
PREPPING MY UPCYCLED VASE
Before I got started, I made sure my vase was clean.
Any oils from our hands or fingers can prevent primer or paint products from adhering to any surface we are painting.
When my soon-to-be upcycled vase was clean and dry, I started painting on slick stick.
Slick stick is Dixie Belle’s primer for slick surfaces.
I painted on two coats, letting each coat dry for a couple of hours in between and then over night after the second coat.
Now it’s time to do some mixing and painting!
PAINTING MY UPCYCLED VASE
I knew I wanted to add some texture to my upcycled vase.
Dixie Belle’s Sea Spray added to Cotton, is the perfect way to accomplish this.
The directions are to mix 2 scoops of Sea Spray for 8 ounces of paint.
I used about 2 to 3 ounces of Cotton paint and mixed the Sea Spray in until I got a nice mixture when it wasn’t runny, but stuck to my tongue depressor.
Check out my video below to see how I did this!
Then I used both my tongue depressor and an old paint brush to paint this mixture on my vase.
I used my paint brush to pounce the mixture on also to add more texture.
Once it was all covered, I let this dry overnight.
I went over the vase lightly with my 220 grit sand block to knock of any areas that were too rough.
Then I went over the vase one more time and pounced on one more coat of Cotton Dixie Belle Paint.
DIPPING MY UPCYCLED VASE
This took a little planning, I grabbed an old plastic container my vase would fit in to dip.
Also, I grabbed a paper place and paper bowl to set my vase on after I dipped so she could dry.
If you are going to do more than one vase at a time, I would have a paper plate and bowl combo for each vase.
I ended up using some sample Sherwin Williams paint I had on hand for the bottom layer of my upcycled vase.
In the bowl, I poured my paint until it was between 1/2 to 3/4 full.
Then I grabbed my upcycled vase and set her down in the bowl with paint.
Carefully I lifted her up and let the paint drip off and then I set her on my paper plate/bowl combo and let her dry.
I occasionally went back with a paper towel and wiped off the drip area underneath, just in case any drips didn’t dry on the vase itself.
And that was it!
She is now sitting on my mantle with some pretty faux flowers and fits right in with my home decor.
Don’t forget to check out my short video below!
59
views
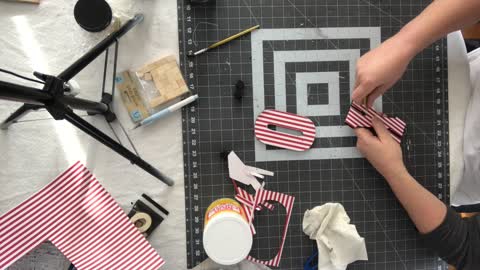
How I Made my XO Signs
If you see those unfinished wood XO letters at a craft store, grab em! I’m gonna show you how to make them into cute signs you can use in your Valentine decor whether you add them on a shelf, or as fillers for those tiered trays!
Supplies I Used for mY XO Signs
Unfinished wood letters: XO
Craft unfinished wood cubes: I found these in the craft section at Dollar Tree and unfinished wood section at Hobby Lobby
Caviar: Dixie Belle’s Chalk Mineral paint in black
Mod Podge
Scrapbook paper of your choice: I used red and white stripes
Fiskar Self Healing Mat, Cricut craft knife, sandpaper or sand block.
Mod Podge in matte
Hot glue and glue gun
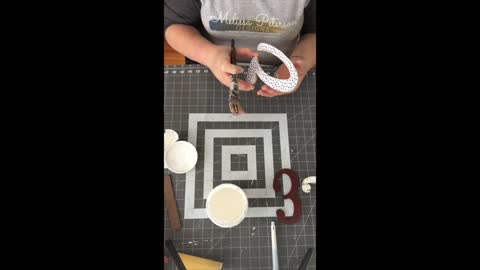
MAKING OUR XO SIGNS
Are these really signs? Or fillers?
Either way, I love how these turned out!
First I painted the backsides and the sides in Caviar, Dixie Belles’ black.
Once this was dry, I painted Mod Podge and then I decoupaged my scrapbook paper onto the front side.
Since I have striped scrapbook paper, I had to be careful I match the strips on each letter, going vertically.
Once the Mod Podge was dry, I used my cricut knife to cut around the letters and remove the excess scrapbook paper, then I used my sandpaper to clean up the edges.
When this was done, I applied a coat of Mod Podge over the topside of my XO’s as a sealer.
Since these letters won’t stand on their own, I ended up using unfinished wood cubes and glued them onto the backside.
I hope you check out my video, I try to show you how I glued them on.
They were not hot glued, flush on the backside of the letters, I placed the cube on the table and then butted the letter up to it the way I wanted the letter to be held.
This ended up being at an angle.
On another project, it took me a few times to get it.
I just removed the cube and re-glued until I had it the way I wanted it!
And that is it!
Currently my XO’s are sitting on my mantle, but they also fit nicely on my tiered trays too!
74
views
2
comments

How to Stencil your Chalkboard | Part 2 | Melissa Peterson Designs
Did you know you can use a stencil on your chalkboard to create chalk art? I’m going to show you just how easy it is using re-usable stencils bought from stores like Hobby Lobby or Amazon or stencils made from your personal cutter like Silhouette or Cricut!
To see the related blog post go to
https://melissapetersondesigns.com/stencil-your-chalkboard/
https://melissapetersondesigns.com/chalkboard-sign/
41
views
1
comment

DIY Spring Flowers on Burlap Canvas
Whose ready for Spring? Me Me Me! Let me introduce my first Spring-y DIY Burlap Canvas craft! I have a super quick video tutorial included also, I hope you enjoy this and if you are inspired to make your own, please tag me! I really would love to see what you create!
First gather your supplies
My son calls me a hoarder.
He may be right BUT it came into good use with this craft! The only item I purchased specifically for this craft was the burlap canvas (50% Off!). If you wish, you can also use scrap wood instead. Just an idea!
Burlap canvases: I used the Master Touch Burlap Canvas 8″ x 16″ from Hobby Lobby.
Your choice of faux flowers: I used a Apple Green Hydrangea flower head from Hobby Lobby and the “woody” stem of another flower cut up in 2-3 inch pieces and the leaves.
Your choice of scrap lace and ribbons: I kept with neutral colors of white and beige
Wire or floral cutters
Hot glue gun and glue sticks
LET’S GET STARTED
PREPPING
While the hot glue gun is warming up, I grabbed my hubby’s wire cutters and a woody looking stem from a second flower.
The flower stem from the green hydrangea did not have a wood stem for the look I wanted.
I cut the flower stems in 2-3″ pieces.
Don’t forget the leaves!
Cut the leaves and set them aside to repurpose also.
I narrowed down my choice of lace and ribbons to 3 styles I had on hand. These choices include burlap and white colors.
Don’t forget to pick which flower you want to use.
When you cut it from the stem. Leave 1/2″ to 1″ of the stem left.
We can trim the excess stem before we glue to the burlap canvas if needed.
DRY RUN
For my flower head, I really struggled with which one to use!
The green hydrangea was my first choice, but I worried it would be too big for the project.
I also had a large pink carnation style flower head and two different blue flower heads to chose from.
Decisions, decisions.
In the end I went with my gut and I am thrilled that I did!
Lay everything down on the canvas and arranged the items in different ways to see which arrangement you prefer.
TIME TO ASSEMBLE!
First glue the lace and ribbons to the canvas banner.
For safety sake, I used my beat up scissors to press the ribbons and lace down where needed so I didn’t burn my fingers, again!
Next I started gluing the stems down. I didn’t butt the stems up next to each other, I did leave a small gap.
Next glue the leaves in place.
I didn’t glue them flat against the burlap canvas because I wanted dimension with this craft.
Finally it’s time for the flower head!
Be careful applying glue here also!
I laid some glue on the backside of the flower head.
Since there was no leaves on the back of my flower head, I also applied glue to the burlap canvas and then laid the flower down on it.
Viola!
We have a unique Spring-y decor!
REGRETS?
I love how this turned out!
I wish I had placed my flower head down a little more and made sure it was more centered!
Hazards or making this on FB live and upside down on my end!
Oh well!
She is a keeper and I am proudly displaying this decor in my dining room!
46
views
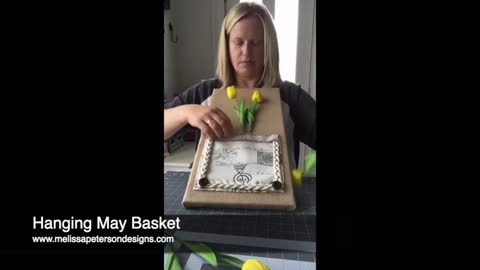
Hanging May Basket
May baskets were a tradition growing up with me and my cousins next door. We made them from paper crafts and filled them with whatever flowers we found outside. Usually they were filled with dandelions and we ran around our neighborhood giving them as gifts!
Supplies I Used
Master Touch Burlap Blank Canvas 8 x 16 from Hobby Lobby
Fabric or large ribbon of your choice: I cut my piece just shy of 8″ x 8″
Assortment of embellishments: I used cream braided rope from Hobby Lobby as my main embellishments plus a burlap/lace ribbon and two buttons.
Hot glue and glue gun and E6000 flexible glue
Assortment of faux flowers of your choice.
Ding Dong Ditching
We then delivered our May baskets to our neighbors, rang the door bell and ran away as fast as we could!
MAKING A HANGING MAY BASKET
Time to make our home decor version of a May Basket!
To start with I roughly measured my fabric to see how I wanted this to lay on my burlap canvas.
I measured a rough 7 to 8″ square and cut the fabric.
Then I pulled the loose threads out of the fabric for a rustic look.
Next, I grabbed my braided rope and measured by placing the rope over my fabric square.
I did this for the bottom and along each side of my fabric square making sure to leave some fabric showing on the outside of the rope.
Next, hot glue these in place where you want them on your fabric.
For the top of the square, I wanted to use a burlap and lace ribbon.
I measured and cut this ribbon so it would fit across the top including the braided rope.
Glue this in place with your hot glue gun.
Now we are ready to apply our fabric basket to the canvas.
Flip your fabric square over, apply a line of E6000 glue to the two sides and bottom of the square.
Next apply hot glue along the E6000 glue.
The hot glue will cool quicker than the E6000 glue and will hold our May Basket in place while the E6000 glue cures.
As soon as I applied my fabric down on the canvas, I flipped the canvas over and so I could apply pressure while the hot glue cooled to this area without stretching the canvas.
Finally, I flipped my wall decor back over and I added two decorate bottoms to the bottom corners of my May basket pocket for an extra special touch.
That is it!
DECORATING OUR HANGING MAY BASKET
It’s time to decorate our May Basket with flowers!
I decided not to glue any flowers in my Hanging May Basket so I can leave this wall decor up year round if I choose and switch out the flowers according to the season or Holidays.
50
views
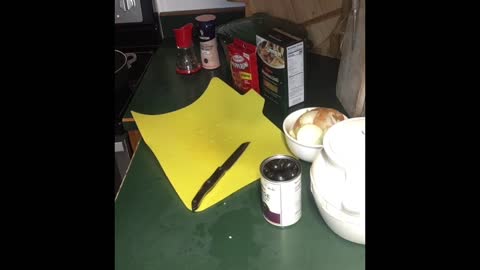
How to Make G'ma Macs Simply Delicious Pasta Pepperoni Salad
Pasta Pepperoni has been in the Peterson household for over three decades! Thank you G’ma Mac for giving us this recipe! Bonus, if you want to make a lower carb version, substitute you choice of pasta with baked spaghetti squash!
let’s get started with our Pasta Pepperoni
This hand-me-down recipe is one of my personal favorites and it’s super easy.
While the pot of water is coming to boil to cook the pasta, I prep the veggies and pepperoni.
For this dish I like to use either Penne or Mostaccioli Pasta.
And when cooking pasta for the Pasta Pepperoni Salad, I usually cook it a minute or two less than what the directions call for.
So if it states, “cook 10-12 minutes”, I’ll usually cook it for 8 minutes.
I like my pasta ‘al-dente”.
PREPPING OUR VEGGIES FOR PASTA PEPPERONI
For the Pasta Pepperoni, I like slicing my veggies and pepperoni lengthwise so I have similar sizes compared to the pasta.
In fact, the reason why I started slicing the pepperoni, my kiddos used to steal them out of the bowl! I am serious, those stinkers!
I slice my black olives also, why? I honestly can’t tell you.
Yes you can use the sliced black olives if you choose.
Set the black olives aside until later.
While the pasta is cooking, I turn the heat on the veggie mixture on low and cover with a lid.
Once the pasta is cooked, I add to the veggie mixture, and stir together.
Then I add about a cup of heavy cream or whole milk to the mixture and black olives and stir together.
SERVING OUR PASTA PEPPERONI
I love serving Pasta Pepperoni with parmesan cheese and garlic bread.
Otherwise this is also perfect as a side dish too.
Check it my video shorts below!
59
views
Let's make a Simple 'Joy'ful Craft
Let's get ready for the holidays with this simple craft! Mostly of my supplies either came from Hobby Lobby or I had on hand!
For a full supply list go to www.melissapetersondesigns.com
45
views
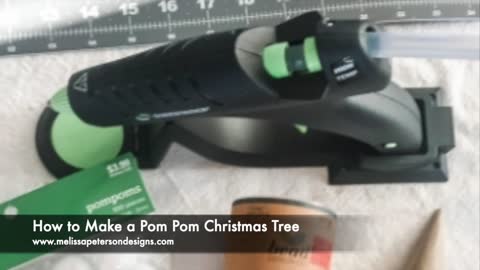
How to Make a Pom Pom Christmas Tree
I love adding texture when I craft and decorate and this project not only does that but is super simple too!
#Christmascrafts #ChristmasDIY #christmasdecor
34
views
How I Made my LOVE Sign
I LOVE making signs! I don’t do very many personal requests anymore (I am blessedly busy!) but sometimes the bug just bites ya! Check it out, with a few supplies I had on hand and few that I recently purchased I whipped up a new Valentine Sign in no time!
Supplies I Used for my LOVE Sign
Wood Sign: This sign measures 8 x 30. If you can’t find it, a wood board of the same sign would work!
Dixie Belles Cotton and Muscadine Wine Chalk Mineral Paint
Unfinished wood letters
Small Wreath: I found mine at TJ Maxx
Round watercolor brush, regular flat square brushes.
Mod Podge in matte
Hot glue and glue gun
GATHERING OUR LOVE SUPPLIES
Well the girls (my daughter, my sons girlfriend and I) had a shopping day not to long ago and I found this cutest heart shaped wreath at TJ Maxx for less than $8!
I knew I’d use it somewhere and when I dug out this long rectangle sign from the supplies in my craft room, I knew I wanted to make a Valentine sign.
So my next visit to Hobby Lobby I grabbed a few unfinished wood letters, L, V, and E.
Then I went back through my stash again and found a left over Never-ending transfer from Re-Design with Prima, several different designs of scrapbook paper.
Next I grabbed my paint, Cotton and Muscadine Wine.
These are the same colors I used in my last project on my mini houses, click here for the blog post!
Now I just had to figure out how to put it all together!
ASSEMBLING OUR LOVE SIGN
OK! Let’s Craft!
First I started out painting my letters, I painted my L in Cotton and my E in Muscadine wine.
Once these were all covered and dry, I added my Never-ending transfer to my L.
For more detailed instructions, click here to see how I use and apply transfers to projects.
I have several blogs post on how to do this, you basically remove the backing and apply it to your project. rub it really good before removing the top cover!
Super Easy!
Then I added a white and black polka dot scrapbook paper by decoupaging this on to the surface.
If you want to see other projects where I used decoupage, click here!
You just need your favorite glue, mine is matte Mod Podge, a brush and your paper of choice.
Once that was all done, I positioned everything onto my unfinished sign to make sure everything would not only fit, but look good.
Then I grabbed my favorite glue gun and started gluing away!
Later, I realized my E blended in too much with the background and looked too plain, so I went back with a little watered down Cotton and my favorite round watercolor brush and handprinted stripes.
Now it doesn’t get lost!
That is it!
I hope I inspired you to give this a try and if you do, please share!
53
views
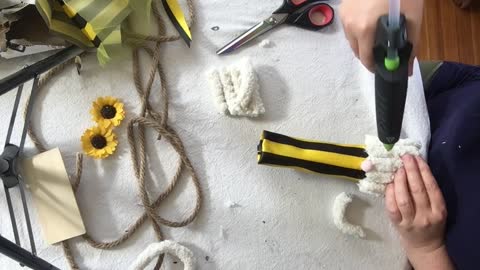
My Spring Gnome
I absolutely LOVE my Spring Gnome! I knew what I wanted him to look like, but while I was crafting, I wasn’t sure it was working out! But I am happily surprised!
Supplies I Used for my Spring Gnome
Styrofoam cone: Dollar Tree is my source!
Rope Braid: once again Dollar Tree, and you’ll find then close to the styrofoam cone.
Fabric: of your choice, I found this cute bumble bee skirt at Dollar Tree
Hot Glue gun and glue
Scissors
Wood bead: for nose, click here to see how I painted my wood beads.
Chunky yarn: I had some cream-white yarn on hand from Hobby Lobby
Medium birch discs: this is optional
Embellishments: I used three paper sunflowers I had on hand.
ASSEMBLING MY SPRING GNOME
I knew on my recent trip to Dollar Tree, I wanted to make Spring Gnome, in a sort of beehive style.
Dollar Tree had most of my supplies; styrofoam cone, rope, and even the cute bumble bee skirt I used for fabric I found by the register!
The remaining supplies, I had on hand.
LET’S GET STARTED
First, I had to be careful using hot glue on my styrofoam cone, I was worried it would melt.
So, I cut the fabric I had in approximately 12″ x 12″ “square”.
A very rough square.
Since it was wrinkled, I ironed it and then I wrapped it around the cone and glued it in place.
Once that was done, I measured how long I wanted my “chunky yarn beard” and cut about 12 strips.
They ended up being about 5″ long.
When I was done, I realized I probably added to many, I’ll know better next time.
Next time, I’ll have my bottom row of five pieces of yarn and then add three pieces on top to make a “fluffy” chunky yarn beard.
Once the yarn was glued in place, I grabbed my speckled painted wood bead for the nose and glued that in place.
Click here to see how I paint wood beads, with one color and then two colors to make a speckled effect.
For the final piece, I added one chunky yarn over the top of the nose as the eyebrows.
So in all, we’ll need nine pieces of chunky yarn for the beard and uni-brow.
MY SPRING GNOME STOCKING HAT
Now here comes the fun part.
I now grabbed the rope, started wrapping and gluing the rope in a circular fashion working my way up the cone.
Be careful not to burn your fingers as your gluing, craft sticks or tongue depressors helps but I always forget them!
Once I reached the top, I made sure to glue the ends down and then I grabbed my paper flowers and glued them randomly in place on the hat as an embellishment.
For the final impromptu piece, I decided to glue a medium birch disc to the bottom of my Spring Gnome as a stand.
Since I used a styrofoam cone, this was pretty lightweight and this helps add height and a stable base so it doesn’t tip over.
And that is it!
I can not wait to do this again and try the “chunky yarn beard” again, I loved how this turned out!
52
views
How to Make my Spring Door Hanger
Check out my cute Spring door hanger! I completed this craft last year and I was so happy to pull her out of my storage box to decorate for Easter this year!
Join MPD Tribe: https://melissapetersondesigns.com/mpd-tribe/
MeWe: https://mewe.com/i/melissapeterson1
Rumble: https://rumble.com/c/c-309345
Pinterest: https://pin.it/3Ka1fOI
Facebook: https://www.facebook.com/melissapetersondesigns/
Facebook: https://www.facebook.com/boutiquebymelissamarie
Instagram: https://www.instagram.com/melissapetersondesigns/
Instagram: https://www.instagram.com/boutique_by_melissa_marie/
Making the world a little more beautiful with a paintbrush, a laptop, and a creative spirit..
30
views
Check out my Valentine Pom Poms Tree
What do you do when you have left over Christmas supplies, Pom Poms and Valentines Day is coming? Craft of course!
Supplies I Used
Mini Christmas Trees: I found mine in the clearance section at Target
Mini Pom Poms of your choice: I found mine at Hobby Lobby in the Valentine section
Chunky yarn of your choice: I found this cute loop yarn in white and pink, click here!
Scissors
Hot glue and glue gun
SUPPLY SHOPPING FOR MY VALENTINE CRAFT
The day after Christmas my daughter, son’s girlfriend and I went shopping and we found some cute clearance items at Target.
But thats not all we found there.
I also found a craft kit of unfinished wood houses, click here to check it out how they turned out!
And I found mini white trees for $2.50 and I grabbed two!
One thing I love about crafting, is being able to save scraps or left overs from previous projects and incorporate them into other projects.
So I grabbed my loop yarn from my previous craft, my Valentine Trees and I am all set!
DECORATING MY VALENTINE POM POMS TREE
Once my glue gun is hot, I’m ready to get started!
First I started with the loop yarn first and started gluing and applying yarn as I go around the trunk of the tree bottom.
Working my way up until I get to the top of the of the tree trunk, I glue the end of the loop yarn and camouflage it a little.
Next, I grab my Hobby Lobby Pom Poms, do a quick sort by size and start hot gluing each Pom Pom onto a brand, starting with the bigger Pom Poms first and then gluing the smaller ones next.
That is it and I love how these turned out!
33
views
Check out my Valentine Pom Poms Tree #Shorts
What do you do when you have left over Christmas supplies, Pom Poms and Valentines Day is coming? Craft of course!
Supplies I Used
Mini Christmas Trees: I found mine in the clearance section at Target
Mini Pom Poms of your choice: I found mine at Hobby Lobby in the Valentine section
Chunky yarn of your choice: I found this cute loop yarn in white and pink, click here!
Scissors
Hot glue and glue gun
SUPPLY SHOPPING FOR MY VALENTINE CRAFT
The day after Christmas my daughter, son’s girlfriend and I went shopping and we found some cute clearance items at Target.
But thats not all we found there.
I also found a craft kit of unfinished wood houses, click here to check it out how they turned out!
And I found mini white trees for $2.50 and I grabbed two!
One thing I love about crafting, is being able to save scraps or left overs from previous projects and incorporate them into other projects.
So I grabbed my loop yarn from my previous craft, my Valentine Trees and I am all set!
DECORATING MY VALENTINE POM POMS TREE
Once my glue gun is hot, I’m ready to get started!
First I started with the loop yarn first and started gluing and applying yarn as I go around the trunk of the tree bottom.
Working my way up until I get to the top of the of the tree trunk, I glue the end of the loop yarn and camouflage it a little.
Next, I grab my Hobby Lobby Pom Poms, do a quick sort by size and start hot gluing each Pom Pom onto a brand, starting with the bigger Pom Poms first and then gluing the smaller ones next.
That is it and I love how these turned out!
29
views
Check out My 9 Favorite Spring Crafts By Some of My Favorite Crafters!
Spring crafts? Who’s ready for Spring? I found some adorable craft ideas you can try! I hope you’ll check them out and be sure to show some love to the creative bloggers showcased here!
Spring Craft #1. How to make easter Gnomes (diy sock gnomes)
How adorable are these spring gnomes from It’s Always Autumn?
Personally, I can’t wait to give this craft a try!
Have you ever made your own gnome? If you have, I’d love to see them!
SPRING CRAFT #2. DIY BUNNY POM POM CRAFTS FOR SPRING
I love gnomes and especially bunnies and how cute it this one from Birkley Lane Interiors?
Perfect for your Spring decor!
SPRING CRAFT #3. DIY EASTER BUNNY BUTT
This spring craft is by me!
I wasn’t sure how well she would turn out, but she did!
And several items I used for this craft were scraps!
The faux greenery and supplies I used for my Messy Bow for the bunny tail.
SPRING CRAFT #4. AN EASY DIY SPRING HOOP WREATH
Hello Central Avenue show us how to embellish a wreath she purchased (ON SALE) for her spring decor!
SPRING CRAFT #5. HOW TO MAKE ADORABLE STRING CARROTS IN 15 MINUTES OR LESS
Decorative carrots make great fillers for your spring decor and Surrounds by Debi shows you how to craft your own!
And it looks so easy! Thank you!
SPRING CRAFT #6. DIY SPRING FLOWER ON BURLAP CANVAS
This is another one of my favorite crafts from last year!
It was tough deciding which flower head to use for this project but I am so happy I chose this light green faux hydrangea!
SPRING CRAFT #7. AN EASY TULIP WREATH DIY
Tulips are the perfect spring flower!
And this adorable wreath by Chatfield Court looks so easy to make.
I’m definitely going to have add this to my craft-to-do list!
SPRING CRAFT #8. MASON JAR EASTER CENTERPIECES
These mason jar centerpieces by Crafting Morning are perfect for your spring decor and so easy!
I bet these would also be perfect on my mantle!
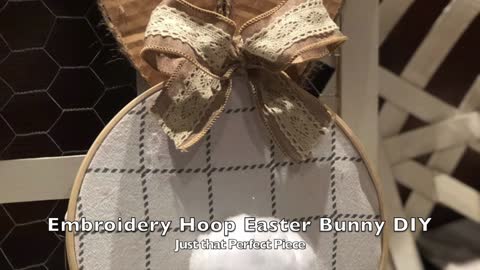
SPRING CRAFT #9. EMBROIDERY HOOP EASTER BUNNY DIY
Did I mention I love bunnies?
Check out this cute bunny by Just That Perfect Piece!
I hope the collection of crafts here inspired you to do some projects of your own!
If so, please join me on Facebook and share away!
I’d love to see them!
50
views
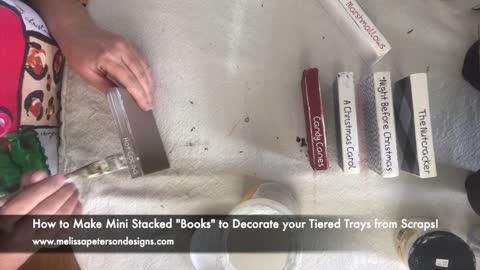
How to Make Mini Stacked "Books" to Decorate your Tiered Trays from Scraps!
I struggle with decorating those tiered trays and my goal this Christmas Season is to make some cute Christmas-y knicknacks!
Check out where I made some goofs but still managed to make it work!
Full blog post at https://melissapetersondesigns.com/mini-stacked-books/
Don't forget to Subscribe and follow me on my social media!
Join MPD Tribe: https://melissapetersondesigns.com/mpd-tribe/
TikTok: https://bit.ly/3fpY7ZO
MeWe: https://mewe.com/i/melissapeterson1
Parler: https://bit.ly/3ftTluu
Rumble: https://rumble.com/c/c-309345
Pinterest: https://pin.it/3Ka1fOI
Facebook: https://www.facebook.com/melissapetersondesigns/
Facebook: https://www.facebook.com/boutiquebymelissamarie
Instagram: https://www.instagram.com/melissapetersondesigns/
Instagram: https://www.instagram.com/boutique_by_melissa_marie/
Making the world a little more beautiful with a paintbrush, a laptop, and a creative spirit.
27
views