
Enjoyed this channel? Join my Locals community for exclusive content at
straightarrowrepair.locals.com!
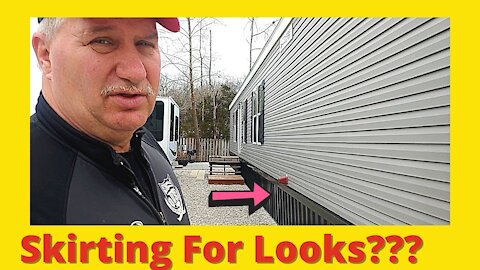
Mobile Home Skirting Ideas
Not only can metal skirting make your mobile home warmer, it can also be used as an accent. Here's an idea of what you can do with a mobile home skirting job to improve the looks of your home.
⏱️⏱️Chapters⏱️⏱️
00:00 Follow along with a handyman
00:25 How much metal skirting can improve the looks of your home
01:05 Be an American not an American't
🙏 Subscribe, 👍, it helps a lot!!
➤❓/ 💬: ask@straightarrowrepair.com
➤ Follow https://straightarrowrepair.com/pipf
➤➤I get a little for the channel-no charge for you if you use the links:
➤➤Shop Amazon https://amzn.to/3CxD1T4
➤➤Tool lists & recommended products🧰 https://straightarrowrepair.com/0lvf
➤➤Services We use
➤➤MORNINGFA·ME https://morningfa.me/invite/StraightArrowRepair
➤➤A2 Hosting http://www.a2hosting.com/refer/140244
➤➤Tubebuddy https://www.tubebuddy.com/StraightArrowRepair
➤➤Apsumo http://fbuy.me/v/philbridges
➤➤VidIQ: https://vidiq.com/straightarrowrepair
Hi, I'm Phil bridges, owner of Straight Arrow Repair. Ever want to know how a repairman fixes things? Well come with me, and I'll show you how I solve problems. Let's make things better together.
OK, a windy day, but we got it done the black skirting, trim, j-channel, it didn't take any time. If you need to know details on how to cut some of the angles and such which we didn't have here. There's several other videos that I've got that shows you how, but you see. How pretty it can look as an accent? Let's go down this other side. Very, very durable tada You can do to.
This is Phil Bridges, if you like what you saw and think it might be helpful to somebody else, push that like button and let other people know what you and I know, and we'll work together toward making a brighter future. By the way, we're not Amera-Can'ts We Americans see you next time.
#MobileHomeRepair, #MobileHomeImprovement, #MobileHomeSkirting
69
views
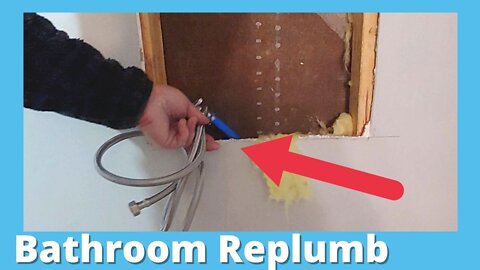
How To Move Plumbing In Bathroom for Sistine Shower Kit
We are re-plumbing a mobile home bathroom to install a Sistine Corner shower kit with glass doors. We take you through the steps of rearranging the plumbing from a removing a garden tub to replace it with the shower kit.
The kit itself weights over 600 lbs, had to be delivered by a forklift. He's keeping the drywall he cut for the two lower holes because they will use it to plug those holes.
We fast forward on the cutting, this way you get to see all the steps they take moving the plumbinig. This will be part of a seires where we take you througth the complete removing of garden tub to the installed shower kit.
⏱️⏱️Chapters⏱️⏱️
00:00 Follow along with a handyman
00:25 Opening up the shower kit, American bathroom Sistine corner shower kit
02:54 Inside measuring
03:30 Cutting an opening to move the mechanical vent inside the wall
03:45 How does a mechanical vent work
04:15 Why he's opening up the two pieces on the wall
04:30 Need to get all the plumbing and mechanical vent into the wall before installing hardy board
05:40 Cutting the various areas to move the plumbing
05:55 Need inch and half holes for mechanical vent
06:35 Continuing to cut through the drywall
07:38 Drywall on one side a bit harder to cut because there's paneling behind it
07:48 And we're still cutting
08:40 Teaching our son about pipe sizes
09:57 Clay cutting the hole to run the mechanical vent
10:38 Marking where the shower pan will be
11:05 preparing for installing the Pex and vent
12:40 Cutting hole for the new drain
13:05 How they will reinforce the drain area
13:20 What we have done
13:55 Put 100% Silicone over the area where the shower pan will be.
15:30 How hard is it to get the silicone going??
18:36 Be an American not an American't
🙏 Subscribe, 👍, it helps a lot!!
➤❓/ 💬: ask@straightarrowrepair.com
➤ Follow https://straightarrowrepair.com/pipf
➤➤I get a little for the channel-no charge for you if you use the links:
➤➤Shop Amazon https://amzn.to/3CxD1T4
➤➤Tool lists & recommended products🧰 https://straightarrowrepair.com/0lvf
➤➤Services We use
➤➤MORNINGFA·ME https://morningfa.me/invite/StraightArrowRepair
➤➤A2 Hosting http://www.a2hosting.com/refer/140244
➤➤Tubebuddy https://www.tubebuddy.com/StraightArrowRepair
➤➤Apsumo http://fbuy.me/v/philbridges
➤➤VidIQ: https://vidiq.com/straightarrowrepair
#MobileHomeRepair, #MobileHomeBathroomRemodel, #GardenTubtoShowerKit
96
views
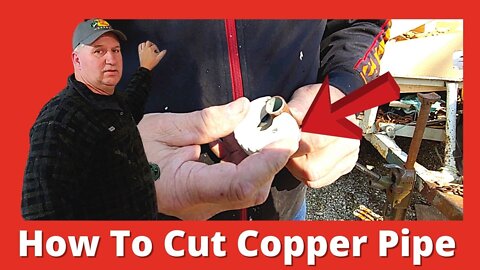
Linux Tool To Cut Copper Pipe
Phil shows three ways to cut copper pipe: with sawzall-DON't, a shorty pipe cutter, or a Linux cutter. The Linux is much faster and easier.
⏱️⏱️Chapters⏱️⏱️
00:00 Follow along with a handyman
00:25 Why you don't want to cut copper pipe with a hacksaw or sawzall
01:10 Leaves a really rough, uneven edge on the pipe
01:20 Normally you would cut with shorty. Tighten and spin it to cut
02:15 Now you have a Linux set to cut copper pipe with
02:35 It does all the tightening for you and is much quicker to cut with
03:04 Be an American not an American't
🙏 Subscribe, 👍, it helps a lot!!
➤❓/ 💬: ask@straightarrowrepair.com
➤ Follow https://straightarrowrepair.com/pipf
➤➤I get a little for the channel-no charge for you if you use the links:
➤➤Shop Amazon https://amzn.to/3CxD1T4
➤➤Tool lists & recommended products🧰 https://straightarrowrepair.com/0lvf
➤➤Services We use
➤➤MORNINGFA·ME https://morningfa.me/invite/StraightArrowRepair
➤➤A2 Hosting http://www.a2hosting.com/refer/140244
➤➤Tubebuddy https://www.tubebuddy.com/StraightArrowRepair
➤➤Apsumo http://fbuy.me/v/philbridges
➤➤VidIQ: https://vidiq.com/straightarrowrepair
Hi, I'm Phil Bridges, owner of Straight Arrow Repair. Ever want to know how a repairman fixes things? Well come with me, and I'll show you how I solve problems. Let's make things better together.
What you might not know is that there's a new innovation out. But to explain first.
The copper pipes that you cut. Quite often you use a something similar to this as, and it can be bigger. But you tighten it up and so on. But reason you do that with copper pipes is because you don't want to say like to use a hacksaw and this is a sawzall that's not really even accurate either.
So wrong. See how that leaves a really ragged edges. You clean it up and all you want to but it's going to not be round. So what you would normally do is you use one of these which this is a shorty, small one. And you would tighten it up so that little wheel in there cuts, and you, so you tighten it up a little bit, spin it around, tighten up a little bit.
Spin it around. When it starts getting loose tighten it up a little more so you see how clean that is compared to that. And that's why you would use this. But now, and that's been around a long time, there's a Linux set that has the three different sizes. This is a little bit on the price. It's not terrible, but you just push it in.
"The other way."
No, the other way I see the arrow and it does all that tightening for you. Guess what? It's quicker So might be something you should consider since it makes a does a really good job and it gets in really tight places and it's quicker. This is a great tool. I think it's like 50, 60 bucks but it's well worth it if you're doing much work with copper. See you.
This is Phil Bridges, if you like what you saw and think it might be helpful to somebody else, push that like button and let other people know what you and I know, and we'll work together toward making a brighter future. By the way, we're not Amera-Can'ts we're Americans. See you next time.
#linuxcuttingtool #howtocutcopperpipe #tooltips
69
views
3
comments
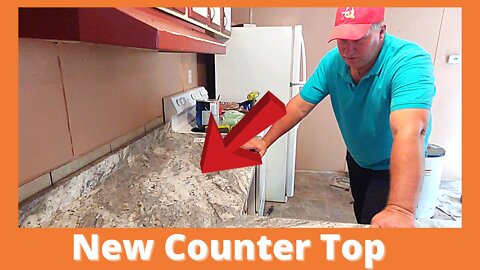
Installing Countertops Kitchen Kitchen Sink
Installing new kitchen counter tops in a mobile home. Repairing the cabinets and installing the sink.
00:00 Intro
00:22 What we're doing today
01:29 Putting together the countertops kit
02:45 Lining up the hooks for the cabinet
03:00 Using a 7mm wrench
03:45 If there's something that could be done wrong, he's probably done it over the years
04:05 Which is why he always measures multiple times
04:30 The fun things you see as a repairman-stories to next
06:15 Phil's big old fingers getting in the way
06:45 The glue that comes with the kit
07:15 Since John can't hear Phil just moved it
07:45 Hammering nails from the other cabinet down
08:00 Phil DID NOT build the cabinet, we're fixing what someone else did
08:30 Counter is on the top, amazing how much nicer it looks.
09:00 Next is the sink
09:15 Measuring for the sink
11:00 Always be sure of the measurement before you cut
11:34 Measuring the sink
11:50 Want to stay back an inch on the corners
12:05 Do not fix your
12:25 He measures twice sometimes 3 times before he cuts cabinets.
🙏 Subscribe, 👍, it helps a lot!!
➤❓/ 💬: ask@straightarrowrepair.com
➤ Follow https://straightarrowrepair.com/pipf
➤➤I get a little for the channel-no charge for you if you use the links:
➤➤Shop Amazon https://amzn.to/3CxD1T4
➤➤Tool lists & recommended products🧰 https://straightarrowrepair.com/0lvf
➤➤Services We use
➤➤MORNGFA·ME https://morningfa.me/invite/StraightArrowRepair
➤➤A2 Hosting http://www.a2hosting.com/refer/140244
➤➤Tubebuddy https://www.tubebuddy.com/StraightArrowRepair
➤➤Apsumo http://fbuy.me/v/philbridges
➤➤Vid: https://vidiq.com/straightarrowrepair
#MobileHomeRepair, #MobileHomeImprovement, #KitchenCountertop, Straight Arrow Repair,handyman,trailer home,house,mobile home,rogers arkansas,countertop,countertops,faucet,home improvement,installing countertops kitchen kitchen sink,remodeling,cutting a sink hole in laminate countertop,how to install a kitchen sink countertop,laminate countertop installation tools,undermount sink clips,undermount sink installation,laminate countertop installation lowes,installing laminate countertops diy,mobile home remodeling,mobile home living
121
views

Mobile Home Bathroom Ceiling Repair
Phil's replacing the bathroom ceiling after he repaired a roof leak.
⏱️⏱️Chapters⏱️⏱️
00:00 Bathroom ceiling repair after roof leak
00:30 Taking the ceiling down
00:54 Going across the rafters not with them
01:13 Old drywall trick
01:42 Put OSB in
02:10 How to support the ceiling
02:45 Using fast mud, cuts time in half
🙏 Subscribe, 👍, it helps a lot!!
➤❓/ 💬: ask@straightarrowrepair.com
➤ Follow https://straightarrowrepair.com/pipf
➤➤I get a little for the channel-no charge for you if you use the links:
➤➤Shop Amazon https://amzn.to/3CxD1T4
➤➤Tool lists & recommended products🧰 https://straightarrowrepair.com/0lvf
➤➤Services We use
➤➤MORNINGFA·ME https://morningfa.me/invite/StraightArrowRepair
➤➤A2 Hosting http://www.a2hosting.com/refer/140244
➤➤Tubebuddy https://www.tubebuddy.com/StraightArrowRepair
➤➤Apsumo http://fbuy.me/v/philbridges
➤➤VidIQ: https://vidiq.com/straightarrowrepair
#MobileHomeRepair, #MobileHomeBathroom, #bathroomCeilingRepair
Transcription:
Uh, um, so we're going to. Fix the ceiling that we've already fixed the roof leak and, uh. Somebody else tried to fix it just thinking they a put waterproof material. But it's not waterproof. On the other side. So we're going to take that down and replace it with plywood, OSB, and then we'll finish it. Just like drywall.
Taking the ceiling down. And, uh, there's signs of other animals being in here. Um, mice, which is normal birds. Uh, snakes. Um, but that's all part of it, that’s in town. It's not a big deal. You need to close in the ends to keep some of the traffic down, but they can get into areas small.
So what I'm doing is going across the rafters not with the rafters. So we pulled it all down, hammered down those nails, and we don't have any support way over here. But we're going to put that in and I'll show you how we do that. Um, we're going to cut it across. Measure it, also marked where the rafters are with a mark down below it, which is like an old drywall trick.
That way we know where to put the screws once we've covered it up. I can mark the studs, but in this case, we're not going to have to. The hard part is going to be getting it up here and then sliding boards in from both directions. Cause I'll do this side, and then I'll do that side and then I can put a piece in the middle. So here we go.
All right, we have put the OSB inexpensive plywood up there knowing full well that we're going to have to do some drywall. We’ve marked where they covered up. The wiring is still there.
And a vent fan for pulling out the moisture and the smell. Now, I'll always told you that, uh. Got the poo on me. We put 2bys on the sides here that set top the wall and then screw the plywood up and it hold it all up tight. Didn't have to have it, but it's usually good to do that. If you can't, what you can do is put trim around the outside of like a smaller crown mold or just regular trim and fastenen that.
And that will hold up that floating area. But as you're going to see, we're going to have this finished like drywall, textured, like drywall and painted white drywall. This is a wet mix. This is fast mud that we're using. It's dries in 20 minutes. Any of your fast muds. You use hot water instead of cold. It cuts the time in half.
We are not doing that and I'll be hard pressed to use it. But here's your screws into the rafters it. If you see any kind of inconsistency up and down, that's the rafters themselves. It's not the plywood or the installation.
102
views

Mobile Home Underpinning Repair
Frequent problem with houses, especially mobile and trailer homes, are the underpinning collapsing. You can replace it with Lowe's house wrap and use one bys to screw into and tighten it up under the house. That way the installation is adjustable, you can secure it.
⏱️⏱️Chapters⏱️⏱️
00:00 Follow along with a handyman
00:50 Somebody may have cut the plastic to do work
01:01 Use Lowe's house wrap, fiberglass material
01:45 We need to measure and then will cut beyond that so we can wrap it up
02:05 Removed the skirting and need to crawl up and measure. May need to do more than one section, patch
02:29 Under the house checking the underbelly for how much insulation is down
03:10 Finding where we can put the wood strips
03:20 Be careful what you fasten to or you will be fixing another problem
03:40 It is a challenge to feel the floor joist and miss the lines
04:00 You want to keep your water lines all inside. They design the trailer that way to protect the pipes
04:45 One of his favorite tools
05:05 Measured the wrap
05:55 Put one by under to cut, smoother cut without dulling the blade
06:30 Now, get it under and place the one bys and fasten it up
06:48 Be an American not an American't
🙏 Subscribe, 👍, it helps a lot!!
➤❓/ 💬: ask@straightarrowrepair.com
➤ Follow https://straightarrowrepair.com/pipf
➤➤I get a little for the channel-no charge for you if you use the links:
➤➤Shop Amazon https://amzn.to/3CxD1T4
➤➤Tool lists & recommended products🧰 https://straightarrowrepair.com/0lvf
➤➤Services We use
➤➤MORNINGFA·ME https://morningfa.me/invite/StraightArrowRepair
➤➤A2 Hosting http://www.a2hosting.com/refer/140244
➤➤Tubebuddy https://www.tubebuddy.com/StraightArrowRepair
➤➤Apsumo http://fbuy.me/v/philbridges
➤➤VidIQ: https://vidiq.com/straightarrowrepair
158
views
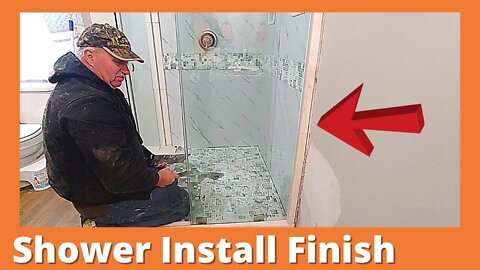
Tub To Shower Conversion - Finish
This is part five of five of the conversion. We finish up the click-fit access panel, give you some tips on mixing small batches of grout, and other tips. This is the grout, installing the finishing trim and clean up. Thanks for following along with us.
Tomorrow I will put out the whole video.
Complete garden tub to Sistine Stone Alcove Shower kit conversion. We take a mobile home garden tub out and install a beautiful American Bath Factor Sistine Stone Alcove Stone Shower Kit.
Not something you expect to see in a mobile home bathroom remodel. While complex, it's a diy remodel anyone could do. Phil shows you how to adjust the kit for a mobile home bathroom remodel.
⏱️⏱️Chapters⏱️⏱️
00:00 Follow along with a handyman
00:25 Completing Fluidmaster Click fit access panel
02:27 What is the best tape we have found for underpinning under a mobile home
03:39 Mixing a small batch of non-sanded grout for the tile in the shower
04:10 Tricks of the trade-easy way to do a small batch of grout, fast mud, floor leveler
07:50 You can use a rubber float for grout, but here's why he uses a drywall knife
08:05 Steel vs Stainless steel drywall knives
08:53 Grouting the shower tile/trim
09:29 Applying grout to the shower pan & a fun story
10:45 Why he's doing the channel
13:00 Wait for it to dry and then clean up
13:30 Why we didn't take you with us under the house
13:50 Back for clean up with sponge and water
14:20 How to fix a small patch you missed
15:00 Back to tile clean up
15:45 Installing the footstool that came with the Sistine Stone Shower Kit
18:24 Installing the soap dish
19:12 Be an American not an American't
🙏 Subscribe, 👍, it helps a lot!!
➤❓/ 💬: ask@straightarrowrepair.com
➤ Follow https://straightarrowrepair.com/pipf
➤➤I get a little for the channel-no charge for you if you use the links:
➤➤Shop Amazon https://amzn.to/3CxD1T4
➤➤Tool lists & recommended products🧰 https://straightarrowrepair.com/0lvf
➤➤Services We use
➤➤MORNINGFA·ME https://morningfa.me/invite/StraightArrowRepair
➤➤A2 Hosting http://www.a2hosting.com/refer/140244
➤➤Tubebuddy https://www.tubebuddy.com/StraightArrowRepair
➤➤Apsumo http://fbuy.me/v/philbridges
➤➤VidIQ: https://vidiq.com/straightarrowrepair
#MobileHomeRepair, #MobileHomeBathroomRemodel, #HandymanTips
107
views
Installing A Cabinet Over A Vent
Phil walks you through, installing a cabinet over a vent. You can always make a box to angle the air out the bottom of the cabinet.
⏱️⏱️Chapters⏱️⏱️
00:00 Intro
00:12 Moving a cabinet
00:35 Cover the vent and build a box to vent outside the cabinet
01:05 Measured from the stove
01:35 Have to build a frame in the cabinet
02:30 He marked out where the vent goes, and they are drilling it out
02:50 You could use a Sawzall, but shakes the cabinet pretty bad
03:25 Doesn't have to look pretty just be there
04:05 Moving the cabinet over to where it goes
05:00 Putting the top back on
05:45 Set the little vent
06:15 Putting the drawers back
🙏 Subscribe, 👍, it helps a lot!!
➤❓/ 💬: ask@straightarrowrepair.com
➤ Follow https://straightarrowrepair.com/pipf
➤➤I get a little for the channel-no charge for you if you use the links:
➤➤Shop Amazon https://amzn.to/3CxD1T4
➤➤Tool lists & recommended products🧰 https://straightarrowrepair.com/0lvf
➤➤Services We use
➤➤MORNINGFA·ME https://morningfa.me/invite/StraightArrowRepair
➤➤A2 Hosting http://www.a2hosting.com/refer/140244
➤➤Tubebuddy https://www.tubebuddy.com/StraightArrowRepair
➤➤Apsumo http://fbuy.me/v/philbridges
➤➤VidIQ: https://vidiq.com/straightarrowrepair
#KitchenMakeover, #BudgetKitchenRemodel #DIYHomeRepair
Transcript:
We have a little bit of a dilemma, but they want to move this cabinet that’s here, here. So that sits right on top of a vent, which I would lay you odds. This used to be the hallway, but anyway, I don't care.
So we're going to cover that vent. What we're going to do is build a box around it and have a vent in the front of the cabinet, which we got the cabinet over here, and we're going to cut the little skinny vent in and build a box in here for the air to blow out to the main house, to the vent on the front and not be trapped underneath the cabinet and not have any heat in the kitchen.
So what I've done is measured from since it's all going to be up against. I measure from the stove and a 17 and a half and won't run on the floor, 17 and a half and 30 and five and a half inches over. I’ll literally pull that vent cover off and I'll put a different vent cover right here.
So right now I'm I said 17 and a half and 30, so so we'll have to build a frame in here so that probably what we'll do is put a two by and screw it together on the backside, maybe at five and a half inches, which would be from the backside here and that'll be the front side of our two by. This thing is pretty rotted.
And this thing's been wet. We'll put screws through here to hold it in place on the two by all the way across. So now, I'm able to run a two by in between here so it'll be sitting flat on the floor and then I'll have the vent hole cut in here and it will blow then theoretically out, which I know will. And then I'll be able to put the cabinet against the wall. That's what we're doing next.
So I keep catching myself, we roll so fast that we don't take you along with us. But anyway, we marked up the sides of the vent that we're going to put in there, or we mark the corners. He's drilling out with a paddle bit, which you can use pretty much anything that you can get a jigsaw bit into or a blade into, and then we'll cut all this out.
He was saying, you can use a Sawzall. You can, but it shakes the cabinet pretty rough. There you go. He's got it in the corners like that. You can go either direction. You.
Right now, we're trying to put in an enclosure and uh, this doesn’t have to look pretty inside there. We just needed to flow air and family's. That didn’t hold either. Fastening everything and then we'll just put some silicone around it just to keep it kind of air tight, getting back. It is second here and the sun is now fitting all. Here, right here. I don't need you. All right, fine. I was just trying to be helpful man.
Now going to put this over. I may just go ahead and fasten it to the wall. It's got a long three inch screw right through there. I can see there’s. Probably the only cabinet in this house that is sturdy. Incase the next stove is an eighth inch bigger.
Yeah. Nothing there? Nothing. Um, going to move that over here. Leave that one there. That’s good. This whole cabinet is about to fall apart? It's been wet so many times. Okay, let's get that top over there. OK. That’s way bigger than the cabinet itself. Yeah, that's what it was over here. But they're going to be happy cause she's got it right next to her stove instead of stove being over here where the refrigerator was. Anyway, now we just got to put this little vent. We need to set it where it'll point upwards ideally, so that you do that, that and put one inside it. Sure, you're going to come in. It’s all above and beyond really what I should be doing. And there it is so that's where the vents going to be coming out. Of course, you need to tilt it a little bit. that one single time.
139
views
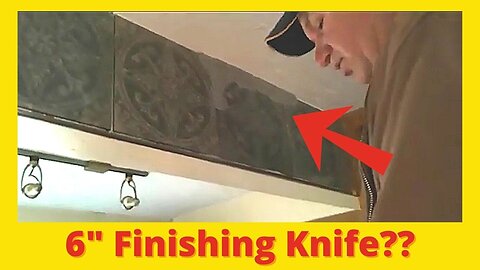
How To Grout Tile Floor
The guys are back to show you some tips and tricks for grouting tile bathroom floors, an easier way to clean the mess
⏱️⏱️Chapters⏱️⏱️
00:00 Intro
00:12 Back after all the tile has been set
00:23 Made sure the customer was happy with the color
00:35 He's used to using drywall tools
00:50 Forcing the grout in the cracks
01:05 He suggested the kids get to pull the spacers out
01:25 How we mix our grout
01:35 Don't want to mix a lot because got to get it down it 45 mins
01:55 Wiping down the tile with a sponge
02:10 Using thrift store towels to clean
02:35 After the towel leaves a fine dust
02:55 Come back in an hour and knock the dust off all of this
🙏 Subscribe, 👍, it helps a lot!!
➤❓/ 💬: ask@straightarrowrepair.com
➤ Follow https://straightarrowrepair.com/pipf
➤➤I get a little for the channel-no charge for you if you use the links:
➤➤Shop Amazon https://amzn.to/3CxD1T4
➤➤Tool lists & recommended products🧰 https://straightarrowrepair.com/0lvf
➤➤Services We use
➤➤MORNINGFA·ME https://morningfa.me/invite/StraightArrowRepair
➤➤A2 Hosting http://www.a2hosting.com/refer/140244
➤➤Tubebuddy https://www.tubebuddy.com/StraightArrowRepair
➤➤Apsumo http://fbuy.me/v/philbridges
➤➤VidIQ: https://vidiq.com/straightarrowrepair
#bathroomremodeling #bathroom #bathroomrenovation
Transcript:
Hello friends, today we're after the grout and if you’ll pan through there, the tiles all been set and we're putting the grout in. Make sure the customer was happy with the color. And I'm using a sanded grout and use the finishing knife to push it in. That way.
I'm just really familiar with finishing knives, all your drywall finishing and we mixed it with a battery power drill and a beater. Which I'll show you here shortly, how that works and I’m forcing the grout in there. Of course, we've taken all the spacers out. We didn't do it. The kids that live here had a lot of fun doing it. I had suggested that would be some fun for the kids to do. And so we’ll let that set a little bit and we will keep on keeping on and we'll come back here, start wiping it out. Wiping it down and we'll show you how to do that.
Okay. In case you're wondering, go ahead keep mixing. This is how we make, use a beater like this and a battery powered drill. Don’t to mix a whole lot because I've got to get it down in 45 minutes. That's when it starts getting stiffer than to wipe it all down. So that's about the mixture that we want maybe a little thicker, but that'll work. And then we're going inside and put it in.
When we first start off, we do the sponge to watch how Drew’s doing this, getting the main part of it off. When we come back with the towel. If you look back here we’re using towels, Clay’s tracking it up. But this team is getting better and better at it and you can pull it down with a towel.
Believe it or not, that works better than sponges and it could be expensive if you buy them brand new towels. I go to thrift stores and pick them up, and then use them again and again. The sponge I can’t reuse, but a towel cleans it up and does a better job. Now, after that towel does its job, it’ll leave a fine dust. And here by the way we need to clean that up. It will leave a fine dust and then we'll come back with the towel again and wipe that dust down. We'll get it all cleaned up nice and pretty. And that’s how you grout.
Okay. The next thing we're going to do is if you let this dry for about an hour or so, we're going to take a towel knock the dust off of all this.
173
views
1
comment
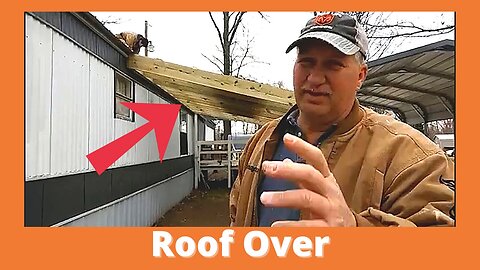
Installing Metal Roof On Mobile Home and Carport
Here Phil walks you through installing a metal roof between a trailer and a carport for a customer.
He had to cut from the part because of the weather, but he shows you exactly what he did. And how you can do it too.
⏱️⏱️Chapters⏱️⏱️
00:00 Started at 8:00 am loading up
00:40 Now 12:30 We're going to put a roof between the trailer and carport
01:00 Took 4.5 hours to collect materials
01:20 Will connect to the 1 bys from where we put a metal roof
01:35 Bolt 2x10s to the carport
01:45 Had to cut away because of weather
02:10 Love having you along, but have to hurry sometimes
02:20 How we did it
02:30 Bent and cut the metal gutter so could fasten the wood every 2'
03:00 Put 3" screws every ft at an angle so can hit the 2by at the top
03:15 How they fastened to the roof and carport
04:00 What they ended up doing
🙏 Subscribe, 👍, it helps a lot!!
➤❓/ 💬: ask@straightarrowrepair.com
➤ Follow https://straightarrowrepair.com/pipf
➤➤I get a little for the channel-no charge for you if you use the links:
➤➤Shop Amazon https://amzn.to/3CxD1T4
➤➤Tool lists & recommended products🧰 https://straightarrowrepair.com/0lvf
➤➤Services We use
➤➤MORNINGFA·ME https://morningfa.me/invite/StraightArrowRepair
➤➤A2 Hosting http://www.a2hosting.com/refer/140244
➤➤Tubebuddy https://www.tubebuddy.com/StraightArrowRepair
➤➤Apsumo http://fbuy.me/v/philbridges
➤➤VidIQ: https://vidiq.com/straightarrowrepair
#MobileHomeRepair, #MobileHomeImprovement, #carportroofover
Transcript:
Hey, guys. We started 8:00 this morning and it's like 1230 now. That is where I used to lose a lot of time when I did. Estimating is the time to go get materials and set up. So like this morning, we came and aired up tires and checked fluids and loaded scaffold and saw horses and ladders and walk boards, made sure we had all the screws we needed.
And then we went to the place to get the metal. We're going to put a roof between here, this carport and that mobile home. And so in order to do that span, I'm using two by tens. They literally, can have a dance floor up there when we get through and so away all this time to get here to the job, pick up wood at Lowes. Pick up the metal at metal central.
All that took four and a half hours. So that is where I use to lose a lot of time because I can figure out how much time it took me to do something. After a while. But I would forget about the time to go get the materials. So here we are, four and a half hours into the job and we're going to if you look up there, you'll see the one bys that we put a metal roof on this house and we're going to have to make sure that our two bys are up to the bottom of those one bys so that our metal can go over the top and underneath that metal.
So and then we're going to bolt 2x10s to this. because the only so here we go.
I did not show you all the stuff like I wanted to because I thought for sure we're going to have rain. If you pan around you'll see dark clouds, overcast, temperature drop 36 degrees feels like 40. It's 50 or 49 now with the wind blowing, I was worried it was going to rain and knock us off.
So it still might rain. I'm hoping to get the metal on. That's why I did not take you with every step of the way, because I want to slow this down even more. I like having you guys along. I just got to hurry sometimes. Anyway, I'll tell you how I did it. We took that gutter down and did not cut it off. I did not unscrew it either.
I folded it down, bent it over and we cut it about every two feet and fastened it with metal screws to the metal siding up here. And then when that was done, we took these 2x10s, which we could have done it with 2x8s, but I did it would just higher quality. And we put screws about every foot, three inch screws at an angle so that when we got up there we could hit the two by that’s at the top of that and of that roof.
Now there's a one by up there with the metal roofing. We stayed below that one by and we fastened every foot or more all the way down. We didn't do anything on the bottom and you'll see that. So come with me Where... You got those? We have that gap there. Now on the other side, this 2x10 here I do not want it to be level.
I don't want water stand on it. So what I did was I went from over there and I want to stay on the flat area, not on the curved area of this thing. So I set it up there. First, we were going to put... Drill holes and put bolts through it. I didn't like how that worked out.
So what we end up doing with this, I've got the screws in here somewhere, is buying screws that you use on a trailer beds, for putting metal or wood on top of the metal bed and that is a self tapping screw. phillips head drive. It was pain, but it did go in and it was hold to good. I've got two in every one of those.
So let me take a break. Get these guys roll and I'll show you guys some more stuff.
103
views

Baby Chicks Growing June 9, 2022
Because of the newish environment and stupid dog scaring the babies I just did a recording of them moving around and playing.
My first set of baby chicks growing up.
⏱️⏱️Chapters⏱️⏱️
00:00 Welcome to Chickens For Chicks and homesteading
00:15 Chicks playing in the new brooder
00:30 Chicks are 2.5-4 weeks old
00:50 My guinea
01:27 Just record them playing and moving around
02:05 Follow us
I recorded how my babies grow each day. This is my first set of baby chicks. I ordered them from Cackle Hatchery. They are the Crested “Top Hat” Special and the Feather Footed Bantam Assortment Special.
I ordered 10 of each mix. If I had it to do again, I would not have ordered the mixes because I'm using these to start a breeding program. I love my babies, but business wise ordering specific chicks would have been a much better plan.
We also have 1 guinea and three silkie babies that survived a freak storm in this group. Enjoy watching them grow. I will have them all linked into a playlist so you can watch them. Chick flicks to enjoy: https://www.youtube.com/playlist?list=PLn3fko4h1DljAYO9YWVOCErGTrn3v11Yk
🙏 Subscribe, 👍, it helps a lot!!
➤❓/ 💬: chris@chickensforchicks.com
➤➤I get a little for the channel-no charge for you if you use the links:
➤➤Shop Amazon https://amzn.to/3CxD1T4
➤➤Chickens Supplies https://a.co/8zehoAb
➤➤Services We use
➤➤Bitchute https://www.bitchute.com/accounts/referral/chickensforchicks/
➤➤MORNINGFA·ME https://morningfa.me/invite/ChickensForChicks
➤➤A2 Hosting http://www.a2hosting.com/refer/140244
➤➤Tubebuddy https://www.tubebuddy.com/StraightArrowRepair
➤➤Apsumo http://fbuy.me/v/philbridges
➤➤VidIQ: https://vidiq.com/straightarrowrepair
Instagram https://www.instagram.com/chickensforchicks/
Newsletter https://artisanal-leader-9310.ck.page/961509f39a
Website https://chickensforchicks.com/
Pinterest https://www.pinterest.com/cbridgesdesigns/
Facebook Page https://www.facebook.com/ChickensForChicksAR/
Rumble Channel https://rumble.com/c/c-17425
YouTube https://www.youtube.com/channel/UCeNbGSK1Ira-sBPyYCPLFiQ
Transcript:
Hi. This is Chris, of Chickens For Chicks. This is where my babies are, and I would love for you to come on along with me on my journey in homesteading and learning about my chickens and doing all that fun stuff.
There we go. You can see everybody. These guys are now a week and or two and a half weeks old.
And the big ones, I'm not sure. They're at least four weeks old, maybe older, like Dropkick right there he maybe older.
And there's my little guinea hen. I think Dropkick is a rooster. I don't know what kind, but I'm pretty sure he's a roo. I'm pretty sure. Hi baby, high babies. Hi babies. All right. That's a good enough chick flick of the day.
I think I'm just going to record them moving around. They're so cute. Foxy. That one's beautiful.
baby chicks chirping,baby chicks cute,baby chicks fighting,baby chicks growing,baby chicks growing up,baby chicks peep,baby chicks playing,baby chicks videos,baby cochin chicks,baby polish chicks,baby silkie chicks,chick development day by day,Chickens for Chicks,chicks,chicks chirping,keeping chickens,polish chicks,polish chicks growing up,silkie chicken,silkie chicken growth stages,silkie chicks care,silkie chicks growing,silkie chicks week by week
107
views
2
comments

People's Convoy Springfield Mo - Clay
We're bring you something a little different. Phil and I (Chris-his wife) and Clay all went to watch and support the truckers and the People's Convoy.
I figured we would upload the convoy film. How often will you see over 7,000 trucks and vehicles all at the same time, fighting for the same thing?
There was talk that the convoy had grown to over 12,000 vehicles. We drove over an hour and a half to support the convoy. This is the footage from Clay's video.
There will be another video that I put up for the video Chris, I took.
🙏 Subscribe, 👍, it helps a lot!!
➤❓/ 💬: ask@straightarrowrepair.com
➤ Follow https://straightarrowrepair.com/pipf
➤➤I get a little for the channel-no charge for you if you use the links:
➤➤Shop Amazon https://amzn.to/3CxD1T4
➤➤Tool lists & recommended products🧰 https://straightarrowrepair.com/0lvf
➤➤Services We use
➤➤MORNINGFA·ME https://morningfa.me/invite/StraightArrowRepair
➤➤A2 Hosting http://www.a2hosting.com/refer/140244
➤➤Tubebuddy https://www.tubebuddy.com/StraightArrowRepair
➤➤Apsumo http://fbuy.me/v/philbridges
➤➤VidIQ: https://vidiq.com/straightarrowrepair
#peoplesconvoy, #truckersconvoy, #freedomconvoy
57
views

My First Chick - Hatching Chicken Eggs
Watch nature at its best, and me act the fool trying to encourage my chick to hatch. I will be doing several videos on this. I managed, so far, to actually get 2 chicks from piping the shell to hatching out.
It was amazing to watch this little baby try so hard to make it into the world. This chick hatched out 07-27-2022. I just happened to walk by at the right time... Not that I spent all day hanging out at the hatcher or anything.
I was seriously excited. I apologize about all the repeated words...you could always watch without sound.
⏱️⏱️Chapters⏱️⏱️
00:00 Welcome to Chickens For Chicks and homesteading
00:15 One of the eggs pipped and then started zipping
01:50 This egg is from my Showgirl Rooster, who we lost one of his females
04:00 He's got the shell zipped and I can make out the head
04:45 The shell is open where I can see him
06:00 Pretty much out of the shell
08:00 He's a naked neck
09:00 And we have a chick!!
09:45 Completely out of the shell, just really tire baby
12:20 Follow us
🙏 Subscribe, 👍, it helps a lot!!
➤❓/ 💬: chris@chickensforchicks.com
➤➤I get a little for the channel-no charge for you if you use the links:
➤➤Shop Amazon https://amzn.to/3CxD1T4
➤➤Chickens Supplies https://a.co/8zehoAb
➤➤Services We use
➤➤MORNINGFA·ME https://morningfa.me/invite/StraightArrowRepair
➤➤A2 Hosting http://www.a2hosting.com/refer/140244
➤➤Tubebuddy https://www.tubebuddy.com/StraightArrowRepair
➤➤Apsumo http://fbuy.me/v/philbridges
➤➤VidIQ: https://vidiq.com/straightarrowrepair
baby chick hatching,baby chicken noises,baby chicken sounds,baby chickens hatching,baby chicks,baby chicks cute,baby chicks hatching,baby chicks video,chick hatching,chicken,chicken egg hatching,Chickens For Chicks,chicks,egg hatching,egg incubator,eggs hatching,farm life,hatch chicken eggs,hatching,hatching chicken eggs,hatching chickens,hatching chicks,hatching eggs,homesteading,incubating chicken eggs,silkie chick hatching,silkie chicken hatching
104
views

Mobile Home Tubs What You Need to Know
Phil explains what you need to watch for when ordering a tub for your mobile home.
If this video helped you please "Hit that Like Button!" Also If you disliked this video, please state why everything helps us improve.
Please Subscribe, it helps a lot!!
If you have questions, please post In the comments, we will reply, you can email us, or you can also tag us on social media #straightarrowrepair.
Follow us on the socials @straightarrowrepair
#MobileHomeRepair, #SARepair, #MobileHomeImprovement, #DIYHomeRepair
#tooltips
Rumble https://rumble.com/user/StraightArrowRepair
Dailymotion https://www.dailymotion.com/StraghtArrowRepair
YouTube https://www.youtube.com/straightarrowrepair
Library TV https://lbry.tv/@straightarrowrepair:3
Instagram: @straightarrowrepair
Pinterest https://www.pinterest.com/cbridgesdesigns/
If you would like to support us:
BuyMeACoffee https://www.buymeacoffee.com/StraightArrow
Ko-Fi Ko-fi.com/straightarrowrepair
Flattr https://flattr.com/@philbridges
65
views
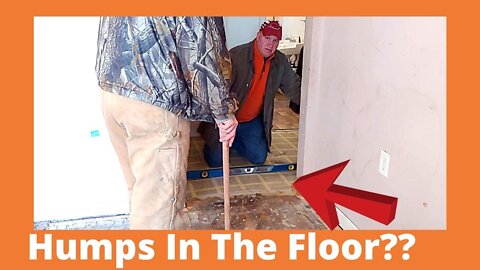
Sagging Floors In Old House
When is it time to relevel your home? Phil walks you through some of the things to watch for and what you can do to fix the problem.
⏱️⏱️Chapters⏱️⏱️
00:00 Follow along with a handyman
00:25 Older house that has settled
00:40 There's a gap where the floor is pulling apart from the wall
01:15 How far out of level to the main wall
01:30 Crack in the wall
02:00 Floor Joists need to come up and the main beam needs to come up and will lift the floor joists with it
02:20 New room, huge hump in the floor
02:45 Only thing level is the hump
03:00 When you see cracks in the wall and sagging floor, it's time
03:45 There are certain things you look for to know when it's the house settling
04:15 If your floor is pulling from the wall and cracks...
04:40 How are they going to get underneath the floor??
05:05 Probably the only good time to have a water leak
05:35 Be an American not an American't
🙏 Subscribe, 👍, it helps a lot!!
➤❓/ 💬: ask@straightarrowrepair.com
➤ Follow https://straightarrowrepair.com/pipf
➤➤I get a little for the channel-no charge for you if you use the links:
➤➤Shop Amazon https://amzn.to/3CxD1T4
➤➤Tool lists & recommended products🧰 https://straightarrowrepair.com/0lvf
➤➤Services We use
➤➤MORNINGFA·ME https://morningfa.me/invite/StraightArrowRepair
➤➤A2 Hosting http://www.a2hosting.com/refer/140244
➤➤Tubebuddy https://www.tubebuddy.com/StraightArrowRepair
➤➤Apsumo http://fbuy.me/v/philbridges
➤➤VidIQ: https://vidiq.com/straightarrowrepair
#SaggingFloors, #LevelingOldHome, #LevelingFloors
60
views

1987 Ford Bronco 2 Fuel Pump Replacing External Pump
Show you how to change out the fuel pumps on a Ford Bronco II.
⏱️⏱️Chapters⏱️⏱️
00:00 Intro
00:22 1987 Ford Bronco II External Fuel Pump
00:37 Looking at the fuel pump on the frame
00:52 Two bolts hold it to the frame, 13mm
01:05 8mm bolts hold the wrap on
01:42 The wrap comes off and you have a rubber piece
02:00 Need to disconnect the wiring
02:58 This one is just a plug in connection
03:20 Trying to determine which is positive and negative
🙏 Subscribe, 👍, it helps a lot!!
➤❓/ 💬: ask@straightarrowrepair.com
➤ Follow https://straightarrowrepair.com/pipf
➤➤I get a little for the channel-no charge for you if you use the links:
➤➤Shop Amazon https://amzn.to/3CxD1T4
➤➤Tool lists & recommended products🧰 https://straightarrowrepair.com/0lvf
➤➤Services We use
➤➤MORNINGFA·ME https://morningfa.me/invite/StraightArrowRepair
➤➤A2 Hosting http://www.a2hosting.com/refer/140244
➤➤Tubebuddy https://www.tubebuddy.com/StraightArrowRepair
➤➤Apsumo http://fbuy.me/v/philbridges
➤➤VidIQ: https://vidiq.com/straightarrowrepair
#FordBroncoII, #ExternalFuelpump, #FordBroncoIIExternalFuelPump.Straight Arrow Repair,handyman,trailer home,house,mobile home,rogers arkansas,1987 ford bronco 2 fuel pump,bronco,bronco 2,bronco ii,external fuel pump install,external fuel pump ls swap,external fuel tank for truck,ford,ford bronco,ford bronco 2,ford bronco ii,fuel,ranger,ford bronco 2 door,ford bronco 2 door base,simple car repairs,diy bronco,diy bronco ii reapairs,ford bronco ii 1987,diy bronco ii repairs,bronco 2 door,ford bronco ii restoration
105
views

How To Repair Subfloor - Home, Mobile Home, and General
DIY how to repair a mobile home subfloor. Shows total floor repair. The techniques will work for all types of floors. When you have water damage in mobile homes, usually they have particle board and needs to be removed completely. The board will continue to rot under the plywood if you just try to cover it over.
Phil goes through how to put extra support, and ways to prevent those irritating humps in your floor.
⏱️⏱️Chapters⏱️⏱️
00:00 Tools needed for the job
01:23 Electric tools you could use
02:25 Reason he likes screws
03:35 Why you would want to use an impact driver
05:00 If you strip the screw, pull it out and grab another
05:56 How to replace swelled up damaged floor
06:50 Want to find the nails, that's your rafter. Make a hole to get started
07:00 If on a budget, you can use a hammer and chisel to remove the floor by the drywall
07:35 Run Sawzall at an angle to get closest to the drywall
08:35 Over the joist want to raise the sawzall
10:28 Want to make sure and get down to 2x6" get it clean
11:05 Why you don't want to go over the top of particle board
12:10 You need to take the particle board all the way off and put plywood down
12:28 And we're back, have cleaned along the walls
13:00 Find your joists, want to cut between them, then tilt the particle board back and forth
14:35 What about water and electric lines? Make sure to cut open the underbelly to get the water out
15:30 How to get the flooring out
16:00 And like magic, you can pull full sections out
16:10 Floor vents
17:15 Bigger pieces are much easier to clean up
18:00 Cut each section
18:55 Need a pry bar to get the nails out
20:18 In the corner securing the joists, want to do that with each
21:51 On outside edge you want to add 2x6 between the joists
22:50 Back after fastening support-the 2 bys gives the mobile home added strength
23:22 Placing the plywood and fastening it, want to center on the floor joists
24:16 Screw every 6" along the edge
25:24 Want to put a 2 by under the edge of the plywood, secures your floor
26:20 Reason he runs across the floor rafters-that prevents humps in your floor
28:04 You want to stagger your plywood joists, again for strength
🙏 Subscribe, 👍, it helps a lot!!
➤❓/ 💬: ask@straightarrowrepair.com
➤ Follow https://straightarrowrepair.com/pipf
➤➤I get a little for the channel-no charge for you if you use the links:
➤➤Shop Amazon https://amzn.to/3CxD1T4
➤➤Tool lists & recommended products🧰 https://straightarrowrepair.com/0lvf
➤➤Services We use
➤➤MORNINGFA·ME https://morningfa.me/invite/StraightArrowRepair
➤➤A2 Hosting http://www.a2hosting.com/refer/140244
➤➤Tubebuddy https://www.tubebuddy.com/StraightArrowRepair
➤➤Apsumo http://fbuy.me/v/philbridges
➤➤VidIQ: https://vidiq.com/straightarrowrepair
#MobileHomeRepair, #MobileHomeImprovement, #MobileHomeFlooring
70
views

Taking Out A Garden Tub
We are taking out a garden tub to install a free-standing shower. This first video shows you exactly how to take out a garden tub from a home or mobile home. You have all asked to watch him do all the taking the tub out. This video shows you how, particularly if you're replacing the tub with something better.
You pull out the trim, then paneling. It could be drywall, but that would never last. We show him tearing out all the paneling.
⏱️⏱️Chapters⏱️⏱️
00:00 What we're doing today, garden tub to a glass shower
00:11 Follow along with a handyman
00:36 Garden tub we are taking it out and will take you along
00:53 Removed the trim, and working on the paneling
01:15 Tearing out the paneling
03:40 Paneling is out
04:00 Unscrewing the tub from support.
04:45 Cutting the mechanical vent
05:15 Use a long metal cutting blade and why
07:15 Trim's down
07:30 Hammer to get the trim completely off
07:45 Explaining to the customer what the next steps are
08:30 Unscrewing the tub and trim from the wall
11:00 Improvising because no shut-offs, he cuts around the faucet
12:05 Might want to remove objects from above, before you saw
13:25 Goal is to get the tub out without cutting the lines until we have the shut offs
13:45 And it's off
14:50 Trying to break out around the drain, make it easier to work on the plumbing once the tub's out
15:40 Make sure your drain and lines are secure
🙏 Subscribe, 👍, it helps a lot!!
➤❓/ 💬: ask@straightarrowrepair.com
➤ Follow https://straightarrowrepair.com/pipf
➤➤I get a little for the channel-no charge for you if you use the links:
➤➤Shop Amazon https://amzn.to/3CxD1T4
➤➤Tool lists & recommended products🧰 https://straightarrowrepair.com/0lvf
➤➤Services We use
➤➤MORNINGFA·ME https://morningfa.me/invite/StraightArrowRepair
➤➤A2 Hosting http://www.a2hosting.com/refer/140244
➤➤Tubebuddy https://www.tubebuddy.com/StraightArrowRepair
➤➤Apsumo http://fbuy.me/v/philbridges
➤➤VidIQ: https://vidiq.com/straightarrowrepair
#MobileHomeRepair, #MobileHomeImprovement, #RemoveGardenTub
92
views
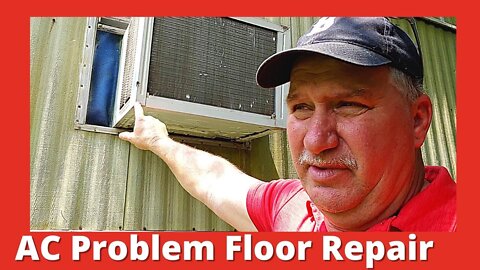
Mobile Home Floor Repair Caused By Air Conditioner - Complete AC Problems Floor Repair
Complete floor repair, damages cause by an air conditioner leak. Here's the complete AC problem and floor repair. Thought you might want the whole video.
⏱️⏱️Chapters⏱️⏱️
00:00 Intro
00:12 Window units and issues they can have
01:22 Why you need a downhill tilt
01:50 Two repair guys later, and the floor had been ruined
02:05 Another issue, it could be running water inside the wall
02:25 When the got there the drain hole was plugged up
02:45 Way a mobile home is built
03:00 How it rotted out the mobile home floor
03:20 What you should do to prevent the damage from window a/c units
04:30 Floor repair, bring you in late because the customer's TV was too loud before
05:00 Traffic Master Grip Strip flooring-why he likes it
06:05 You could use snips to do complicated cuts
07:20 He picked the harder way to do it.
08:28 How he staggered the first row
12:35 Awkward cut, wrong kind of snips
13:05 And the mic died
13:44 Done, and will be putting furniture back
14:26 Follow us
🙏 Subscribe, 👍, it helps a lot!!
➤❓/ 💬: ask@straightarrowrepair.com
➤ Follow https://straightarrowrepair.com/pipf
➤➤I get a little for the channel-no charge for you if you use the links:
➤➤Shop Amazon https://amzn.to/3CxD1T4
➤➤Tool lists & recommended products🧰 https://straightarrowrepair.com/0lvf
➤➤Services We use
➤➤MORNINGFA·ME https://morningfa.me/invite/StraightArrowRepair
➤➤A2 Hosting http://www.a2hosting.com/refer/140244
➤➤Tubebuddy https://www.tubebuddy.com/StraightArrowRepair
➤➤Apsumo http://fbuy.me/v/philbridges
➤➤VidIQ: https://vidiq.com/straightarrowrepair
#MobileHomeRepair, #MobileHomeImprovement, #AirConditionerProblems
66
views

Quercetin & Bromelain #shorts
Quercetin & Bromelain for health
Hello guys, just wanted to let you know one more thing that I will be taken if I get the coronavirus and that is some stuff called Quererain and there's some other derivatives that do the same. This is a vitamin. It tells you on the back not to use when you're pregnant. Obviously, I'm not pregnant or nursing. So that tells you something.
A little bit of warning. So probably on every evening vitamin C But either way, this is supposed to break down the virus theoretically. And it's pretty good game. So that's up to you to.
🙏 Subscribe, 👍, it helps a lot!!
➤❓/ 💬: ask@straightarrowrepair.com
➤ Follow https://straightarrowrepair.com/pipf
➤➤I get a little for the channel-no charge for you if you use the links:
➤➤Shop Amazon https://amzn.to/3CxD1T4
➤➤Tool lists & recommended products🧰 https://straightarrowrepair.com/0lvf
➤➤Services We use
➤➤MORNINGFA·ME https://morningfa.me/invite/StraightArrowRepair
➤➤A2 Hosting http://www.a2hosting.com/refer/140244
➤➤Tubebuddy https://www.tubebuddy.com/StraightArrowRepair
➤➤Apsumo http://fbuy.me/v/philbridges
➤➤VidIQ: https://vidiq.com/straightarrowrepair
72
views
2
comments

Applying Drywall to Corner Bead
Phil shows how to put drywall onto your corner beads.
If this video helped you please "Hit that Like Button!" Also If you disliked this video, please state why everything helps us improve.
Please Subscribe, it helps a lot!!
If you have questions, please post In the comments, we will reply, you can email us, or you can also tag us on social media #straightarrowrepair.
Follow us on the socials @straightarrowrepair
#MobileHomeRepair, #SARepair, #MobileHomeImprovement, #DIYHomeRepair
#tooltips
Rumble https://rumble.com/user/StraightArrowRepair
Dailymotion https://www.dailymotion.com/StraghtArrowRepair
YouTube https://www.youtube.com/straightarrowrepair
Library TV https://lbry.tv/@straightarrowrepair:3
Instagram: @straightarrowrepair
Pinterest https://www.pinterest.com/cbridgesdesigns/
If you would like to support us:
BuyMeACoffee https://www.buymeacoffee.com/StraightArrow
Ko-Fi Ko-fi.com/straightarrowrepair
Flattr https://flattr.com/@philbridges
55
views
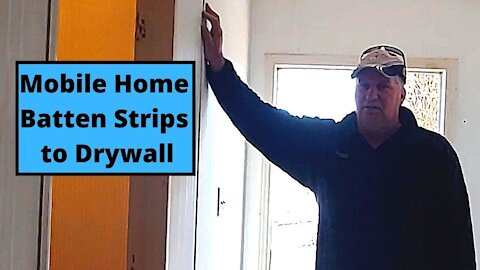
Mobile Home Batten Strips to Drywall
Phil shows you how to quickly remove the batten strips on your mobile home.
If this video helped you please "Hit that Like Button!" Also If you disliked this video, please state why everything helps us improve.
Please Subscribe, it helps a lot!!
If you have questions, please post In the comments, we will reply, you can email us, or you can also tag us on social media #straightarrowrepair.
Follow us on the socials @straightarrowrepair
#MobileHomeRepair, #SARepair, #MobileHomeImprovement, #DIYHomeRepair
#tooltips
Rumble https://rumble.com/user/StraightArrowRepair
Dailymotion https://www.dailymotion.com/StraghtArrowRepair
YouTube https://www.youtube.com/straightarrowrepair
Library TV https://lbry.tv/@straightarrowrepair:3
Instagram: @straightarrowrepair
Pinterest https://www.pinterest.com/cbridgesdesigns/
If you would like to support us:
BuyMeACoffee https://www.buymeacoffee.com/StraightArrow
Ko-Fi Ko-fi.com/straightarrowrepair
Flattr https://flattr.com/@philbridges
57
views

What You Can Do With a Mobile Home Bathroom
Walk through the end of a mobile home bathroom revamp. It's amazing what you can accomplish with your mobile home. You can do the same repairs in and home.
⏱️⏱️Chapters⏱️⏱️
00:00 Follow along with a handyman
00:25 Mobile home bathroom remodel
00:35 54" Cast Iron claw-foot tub
00:45 Created iron shower curtain rod
00:55 What you can do with a mobile home bathroom
01:10 Be an American not American't
🙏 Subscribe, 👍, it helps a lot!!
➤❓/ 💬: ask@straightarrowrepair.com
➤ Follow https://straightarrowrepair.com/pipf
➤➤I get a little for the channel-no charge for you if you use the links:
➤➤Shop Amazon https://amzn.to/3CxD1T4
➤➤Tool lists & recommended products🧰 https://straightarrowrepair.com/0lvf
➤➤Services We use
➤➤MORNINGFA·ME https://morningfa.me/invite/StraightArrowRepair
➤➤A2 Hosting http://www.a2hosting.com/refer/140244
➤➤Tubebuddy https://www.tubebuddy.com/StraightArrowRepair
➤➤Apsumo http://fbuy.me/v/philbridges
➤➤VidIQ: https://vidiq.com/straightarrowrepair
#MobileHomeRepair, #MobileHomeBathroom, #MobileHomeTubSurround
62
views
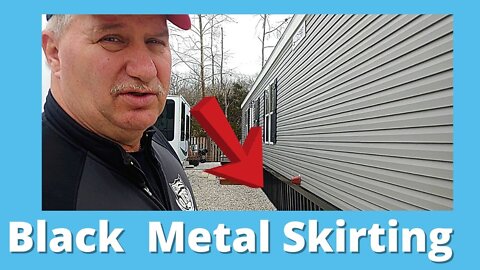
Mobile Home Skirting Installation - Black Metal Skirting
Follow along with a mobile home metal skirting job. This one is pretty simple, very few cuts. We have other skirting videos that go through difficult cuts.
They do the corner trim, and show simple cuts. The results are beautiful.
The tool list: Materials you have top-front, j-channel, corner trim, and metal panels
Want: straight snips, straight hammer, four-foot level, screw gun with quarter inch bit, screws, nails to hold down the j-channel, tape measure, pencil, and razor knife
⏱️⏱️Chapters⏱️⏱️
00:00 Follow along with a handyman
00:25 Putting skirting on a mobile home
00:43 The metal you will need
01:20 Tool list for the metal skirting job
02:15 Start on the tallest corner j-channel
03:14 Measure with your level after placing the j-channel
03:46 Nail J-channel down
05:03 Set next piece of j-channel
05:30 You can always make a mark in the mud once you are level
05:45 Remember when your setting the j-channel the back is where your skirting will be
06:05 Next corner with the j-channel
06:50 Always double check your measurements
07:30 Pushing down the j-channel-you cut it
08:19 Another cut to encourage it to lay where you need it
08:30 Backing up and filling the nails in for the side done
09:15 You want the nails about every 3 feet
09:45 When measuring for skirting make sure to leave room for the top front trim
10:00 Want to be down at least an inch from where skirting needs to end
10:15 Cutting metal for corner, here we have corners but you can make them
11:00 Always measure never assume it's level
11:15 Cutting the first panel
12:25 Trick for cutting your metal
13:10 Installing the metal panel
13:30 First one and then every so many check for level
14:20 This job doesn't have as many problems and obstacles as most jobs would
14:42 Cut to meet the first corner
16:00 Measure and cut for the other side of the corner
17:15 Adding the corner trim, you want it to be up to the top-front trim
17:55 Put the cut edge into the j-channel
20:00 Next corner
20:10 The way he's marking allows him to speed up and have less tools (21:00)
22:03 Finished Black mobile home metal skirting
22:45 Be an American not an American't
🙏 Subscribe, 👍, it helps a lot!!
➤❓/ 💬: ask@straightarrowrepair.com
➤ Follow https://straightarrowrepair.com/pipf
➤➤I get a little for the channel-no charge for you if you use the links:
➤➤Shop Amazon https://amzn.to/3CxD1T4
➤➤Tool lists & recommended products🧰 https://straightarrowrepair.com/0lvf
➤➤Services We use
➤➤MORNINGFA·ME https://morningfa.me/invite/StraightArrowRepair
➤➤A2 Hosting http://www.a2hosting.com/refer/140244
➤➤Tubebuddy https://www.tubebuddy.com/StraightArrowRepair
➤➤Apsumo http://fbuy.me/v/philbridges
➤➤VidIQ: https://vidiq.com/straightarrowrepair
#MobileHomeRepair, #MobileHomeImprovement, #MetalSkirting
67
views
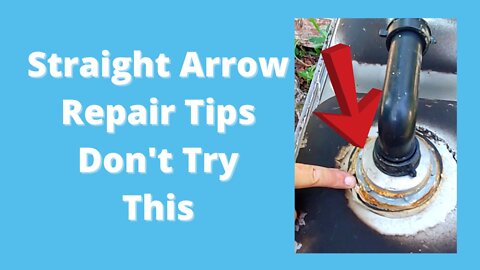
How Not To Fix A Leaky Faucet #Shorts
Please don't try this at home. There are better ways to fix a sink.
🙏 Subscribe, 👍, it helps a lot!!
➤❓/ 💬: ask@straightarrowrepair.com
➤ Follow https://straightarrowrepair.com/pipf
➤➤I get a little for the channel-no charge for you if you use the links:
➤➤Shop Amazon https://amzn.to/3CxD1T4
➤➤Tool lists & recommended products🧰 https://straightarrowrepair.com/0lvf
➤➤Services We use
➤➤MORNINGFA·ME https://morningfa.me/invite/StraightArrowRepair
➤➤A2 Hosting http://www.a2hosting.com/refer/140244
➤➤Tubebuddy https://www.tubebuddy.com/StraightArrowRepair
➤➤Apsumo http://fbuy.me/v/philbridges
➤➤VidIQ: https://vidiq.com/straightarrowrepair
#MobileHomeRepair, #MobileHomeImprovement, #kitchensink
Transcript:
One thing I might point out is this kind of thing right here where you silicone the drain doesn't work. See here and they just kept on and it just didn't work.
So we had to replace all that.
do it yourself,drip,dripping,dripping faucet,handyman,home improvement,home repair,house,how not to fix a leaky faucet,kitchen faucet leak repair,kitchen faucet replacement,leaky bathroom faucet,leaky kitchen faucet,leaky kitchen faucet repair,leaky kitchen faucet under sink,mobile home,rogers arkansas,spout,Straight Arrow Repair,tap,trailer home,faucet repair,leaky faucet,leaking faucet,leaky faucet repair,leaky faucet fix,leaking faucet kitchen sink
83
views