
Enjoyed this channel? Join my Locals community for exclusive content at
straightarrowrepair.locals.com!

1987 Bronco 2 External Pump Location #Shorts
Okay. So not many people are going to want to know this, but this is an 87 Ford Bronco II that we're working on. Bronco two, it has two fuel pumps, one in the tank, one on the frame. The one in the tank is a low pressure and the one on the frame, which this is like. So it's inside the frame in front of the door.
But before the frame goes up to the engine, it has two bolts in the bottom that goes through the frame. All you see is these two bolts in this wrap. So you got to take these two bolts and then peel this thing out. This is the part that goes toward the tank and this goes toward the engine. And you have a plug in right here for electricity.
🙏 Subscribe, 👍, it helps a lot!!
➤❓/ 💬: ask@straightarrowrepair.com
➤ Follow https://straightarrowrepair.com/pipf
➤➤I get a little for the channel-no charge for you if you use the links:
➤➤Shop Amazon https://amzn.to/3CxD1T4
➤➤Tool lists & recommended products🧰 https://straightarrowrepair.com/0lvf
➤➤Services We use
➤➤MORNINGFA·ME https://morningfa.me/invite/StraightArrowRepair
➤➤A2 Hosting http://www.a2hosting.com/refer/140244
➤➤Tubebuddy https://www.tubebuddy.com/StraightArrowRepair
➤➤Apsumo http://fbuy.me/v/philbridges
➤➤VidIQ: https://vidiq.com/straightarrowrepair
#FordBroncoII #FordBroncoIIFuelPump #Carrepairshorts,Straight Arrow Repair,handyman,trailer home,house,mobile home,rogers arkansas,1987 ford bronco 2 fuel pump,bronco,bronco 2,bronco ii,external fuel pump install,external fuel pump ls swap,external fuel tank for truck,ford,ford bronco,ford bronco 2,ford bronco ii,fuel,ranger,ford bronco 2 door,ford bronco 2 door base,simple car repairs,diy bronco,diy bronco ii reapairs,ford bronco ii 1987,diy bronco ii repairs,bronco 2 door,ford bronco ii restoration
89
views

How To Use Shingle Removal Tool Lowes
How to use a shingle removal tool, little tips and tricks to help you get the most out of the tool
⏱️⏱️Chapters⏱️⏱️
00:00 Shingle removal tool
00:19 With staples, you need to
00:54 When the shingle are cooler
01:15 What he thinks about the tool
01:45 Watch your UV rating when doing roofs
🙏 Subscribe, 👍, it helps a lot!!
➤❓/ 💬: ask@straightarrowrepair.com
➤ Follow https://straightarrowrepair.com/pipf
➤➤I get a little for the channel-no charge for you if you use the links:
➤➤Shop Amazon https://amzn.to/3CxD1T4
➤➤Tool lists & recommended products🧰 https://straightarrowrepair.com/0lvf
➤➤Services We use
➤➤MORNINGFA·ME https://morningfa.me/invite/StraightArrowRepair
➤➤A2 Hosting http://www.a2hosting.com/refer/140244
➤➤Tubebuddy https://www.tubebuddy.com/StraightArrowRepair
➤➤Apsumo http://fbuy.me/v/philbridges
➤➤VidIQ: https://vidiq.com/straightarrowrepair
#roofingtools #shingleremovaltool, #toolreviews
Transcript:
Part of the tool that pulls up the shingles. This one's from Lowe's. It works pretty good with nails. You can come at it from any direction. And you basically slide it along on the bottom from any direction with the nails, with the staples. You'll need to either go up from underneath or down, but you won't be able to go sideways because it ends up hitting the end of the staple folded over.
You get hung up and waste a lot of time. This is a really handy tool in that you can actually keep a minimum of two people busy and you could keep as many as three or four, but you have to change off the guy working this thing is going to work hard to keep all the people busy dumping the shingles.
When the shingles are colder, they pull off in larger sections. That's something we found out. When they're hot, they pull off in smaller pieces or one or two at a time. You can get up sections more, basically. It does better when they're colder.
So I would say this is a good tool. It's a little bit on the short side for me, but it's perfect for people under six foot three. And so you're basically shoving and then pushing down. We would have done more review it and showing you more about it. But the UV was so high we're here. Ten ultraviolet rays were killing us and we were suffering pretty bad.
So be careful. Pay attention. You might actually pay attention to UV whenever you're doing any kind of removal like that or even work on anything outside. But we wanted to let you know.
That this is a good tool. It's worth $45. I guess. I'm sure there's a way to make it a lot cheaper than that. But it's worth paying $45 for.
69
views
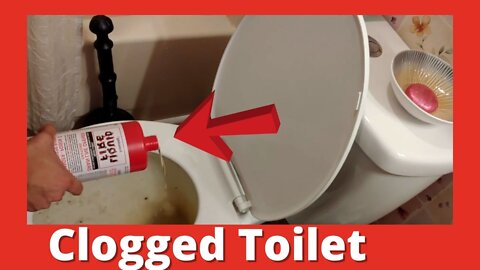
Liquid Fire For Plumbing
Here's a plumber's trick that will fix most clogged toilets.
⏱️⏱️Chapters⏱️⏱️
00:00 Intro
00:12 Liquid fire
00:42 Make SURE to read instructions
01:05 Generally costs about $10
01:15 About a quarter for a toilet
02:07 Follow us
🙏 Subscribe, 👍, it helps a lot!!
➤❓/ 💬: ask@straightarrowrepair.com
➤ Follow https://straightarrowrepair.com/pipf
➤➤I get a little for the channel-no charge for you if you use the links:
➤➤Shop Amazon https://amzn.to/3CxD1T4
➤➤Tool lists & recommended products🧰 https://straightarrowrepair.com/0lvf
➤➤Services We use
➤➤MORNINGFA·ME https://morningfa.me/invite/StraightArrowRepair
➤➤A2 Hosting http://www.a2hosting.com/refer/140244
➤➤Tubebuddy https://www.tubebuddy.com/StraightArrowRepair
➤➤Apsumo http://fbuy.me/v/philbridges
➤➤VidIQ: https://vidiq.com/straightarrowrepair
So this is not so bad looking toilet. And this is the liquid fire comes in a red tube and it's in a plastic bag. Believe me, you want to not get this stuff on you, so don't splash it.
Don't want to put it in. I think it's a very cold toilet. It says on there, on the instructions. Very, very cold water it causes. It has very explicit instructions. Please read. This is read. I'm saying please, it says Just read it, so follow those instructions.
"This is your, general,"
Pretty conceited amazing productions are products incorporated
"This is where your tubs or toilets or separate tanks."
Yeah. Shows you how to do each one.
"But it's very important you read all of this."
This cost $10 and usually breaks free. The some pretty bad things now something plastic is in there, it ain't going to eat that. So. About a quarter of it for a toilet, we're putting a little bit more because we had already done this. Make sure you put the lid on. Make sure you put it in the plastic bag.
Usually it does it's job, if not, you have to get Roto-Rooter or something. I can't imagine what it is, but I will tell you one thing it was flashing from yesterday. Yeah, I don't know. But that doesn't mean there wasn't something in it.
I will tell you one thing that I notice on this place and I will show it to you guys. It's an example of what you should not do that you probably take out. So we're going to do that next.
#plumbingtip, #plumbinghack, #liquidfire
58
views

Tub To Shower Conversion - Glass Doors Installation
This is part four of five of the conversion. We sealed the decorative stone tile on the shower walls and sealed the corners.
The glass doors were more complex than expected, so we had to get additional instructions. While the first set of doors were drying, we held them in place. The hinges for the sliding doors were where the instructions were confusing.
Then we repair one of the glass/stone pieces that was broken when we opened the package. We get started on installing the access panel for the plumbing shut-offs.
Complete garden tub to Sistine Stone Alcove Shower kit conversion. We take a mobile home garden tub out and install a beautiful American Bath Factor Sistine Stone Alcove Stone Shower Kit.
Not something you expect to see in a mobile home bathroom remodel. While complex, it's a diy remodel anyone could do. Phil shows you how to adjust the kit for a mobile home bathroom remodel.
⏱️⏱️Chapters⏱️⏱️
00:00 Follow along with a handyman
00:25 Sealing the shower trim and the corners
02:18 Putting the faucet cover on
02:50 Want to make sure the shower faucet handle is correctly positioned
04:10 You want to make sure you line the notch up on all the various pieces
06:15 Positioning the glass shower doors, we had to call for additional instructions
06:45 You'll want to hold the glass until the silicone dries.
07:15 The brackets to keep sliding glass from falling out was confusing, but they got it
09:00 Handles are part of the door, and rollers were already on the glass when they came.
09:45 How to replace a broken piece of tile in the shower pan
15:50 The problem we ran into and why we didn't take you along with all the shower glass installation
17:20 You may need to shim the bumpers to make sure they are tight
18:05 Vacuuming the shower pan
18:18 Start of installing Fluidmaster 14 by 14 Click Fit access panel
19:50 Set the saw depth to the siding
20:17 Be an American not an American't
🙏 Subscribe, 👍, it helps a lot!!
➤❓/ 💬: ask@straightarrowrepair.com
➤ Follow https://straightarrowrepair.com/pipf
➤➤I get a little for the channel-no charge for you if you use the links:
➤➤Shop Amazon https://amzn.to/3CxD1T4
➤➤Tool lists & recommended products🧰 https://straightarrowrepair.com/0lvf
➤➤Services We use
➤➤MORNINGFA·ME https://morningfa.me/invite/StraightArrowRepair
➤➤A2 Hosting http://www.a2hosting.com/refer/140244
➤➤Tubebuddy https://www.tubebuddy.com/StraightArrowRepair
➤➤Apsumo http://fbuy.me/v/philbridges
➤➤VidIQ: https://vidiq.com/straightarrowrepair
#MobileHomeRepair, #MobileHomeBathroomRemodel, #ShowerKitInstallation
58
views

Drywall Corners - Corner Bead Tips
Several quick tips and tricks about drywall corner bead.
⏱️⏱️Chapters⏱️⏱️
00:00 Intro
00:12 Back, sweaty, to show some of the things about corner bead
00:25 Want to cut your corner bead, it has a profile
00:47 Make sure you don't have anything bulged out to make an issue
01:15 Ways you can secure the corner bead.
01:30 Ways to keep corner bead straight
01:55 Want to get it tight and where it stands up
02:05 Want corner to be the high on both sides
03:07 Reason he uses screws
03:40 Aim is to always be a bit better and look after the customer
04:38 Follow us
🙏 Subscribe, 👍, it helps a lot!!
➤❓/ 💬: ask@straightarrowrepair.com
➤ Follow https://straightarrowrepair.com/pipf
➤➤I get a little for the channel-no charge for you if you use the links:
➤➤Shop Amazon https://amzn.to/3CxD1T4
➤➤Tool lists & recommended products🧰 https://straightarrowrepair.com/0lvf
➤➤Services We use
➤➤MORNINGFA·ME https://morningfa.me/invite/StraightArrowRepair
➤➤A2 Hosting http://www.a2hosting.com/refer/140244
➤➤Tubebuddy https://www.tubebuddy.com/StraightArrowRepair
➤➤Apsumo http://fbuy.me/v/philbridges
➤➤VidIQ: https://vidiq.com/straightarrowrepair
#drywall, #drywallcorners, #drywallcornerbeadtips
Transcript:
We're back. Caught me when I'm sweaty. Which is not ever, ever, I should be a supervisor by now, but I'm not. Anyway, we're doing a corner bead, want to show you how, things that I know about corner bead, some of the things I know. First of all your want to cut your corner bead, so you know it has a profile, if you notice it's built up off of each side so you can slide mud over the top of that. It's particularly, I want to show you. I want to sure you don't have anything that's going to keep you bulged out and make an issue.
And then you put it up here with this case for you to screw a one of the videos I showed you a corner bead clincher. You can do that. And you can also use nails, a lot of guys like nails. The thing about screws is that you want to make sure you don't pull so far down, that it will twist the metal you want to try to keep it straight.
So, try to eyeball it straight. And one of the ways you can kind of avoid doing that is put where you put one screw, put another screw over here, close. Now, you can use these holes or you can use the smaller holes, either way you want. The idea is to get it where it's tight and where it stands up. Now, you can twist it around and then this will be hidden When you go across instead of this, what you want is that corner to be the high on both sides All right.
So we're going to keep on going. Now, the reason I use screws as opposed to nails. It's a lot harder to knock that off, with a piece of furniture or something else.
And, you can always change something I was checking something, you can always pull screw out. It's harder to pull a nail out. And it's easier to knock a nail off, or for a nail to have vibration and pull out. I'm not saying you shouldn't do it with nails, I'm saying that's the reason I'm doing it with screws. You can also do it with the corner bead clincher, but that clencher, it relies on the little bitty holes you pinches on the side to hold it on that metal on. It doesn't take very much to knock it off. So, I live with me, the customer might not know how good of a job I'm doing, but I do. And I have to live with me, I have to sleep with me. And if it gets a little bit better.
Takes a little more time, a little more money. That's what I want to do, and that's what you should do. Because you might not want to do it later on over and over. Fixing it. But, everybody has to make their decision. There you go, just try to keep it straight.
110
views

Deck Installation - Gazebo Deck
Building a deck for a gazebo
⏱️⏱️Chapters⏱️⏱️
00:00 What we're doing on this job
00:16 Estimating a job, don't forget this
01:23 You want to account for board width
01:55 Deck layout and how to measure/mark
02:05 Using 16" centers instead of 20"
05:26 Measure twice, cut once
07:20 Layout is complete
07:45 Secured it to the fence
08:12 Why we laid the deck out the way we did
08:45 Who knew Phil spent all day screwing off, literally
09:10 Finished deck
🙏 Subscribe, 👍, it helps a lot!!
➤❓/ 💬: ask@straightarrowrepair.com
➤ Follow https://straightarrowrepair.com/pipf
➤➤I get a little for the channel-no charge for you if you use the links:
➤➤Shop Amazon https://amzn.to/3CxD1T4
➤➤Tool lists & recommended products🧰 https://straightarrowrepair.com/0lvf
➤➤Services We use
➤➤MORNINGFA·ME https://morningfa.me/invite/StraightArrowRepair
➤➤A2 Hosting http://www.a2hosting.com/refer/140244
➤➤Tubebuddy https://www.tubebuddy.com/StraightArrowRepair
➤➤Apsumo http://fbuy.me/v/philbridges
➤➤VidIQ: https://vidiq.com/straightarrowrepair
#MobileHomeRepair, #MobileHomeImprovement, #mobilehomedeck, Straight Arrow Repair,Mobile home repair,Mobile home improvement,building a deck,building deck in backyard,pressure treated deck,mobile home repair and remodeling,mobile home repairs diy,deck installation,deck installation diy,deck instructions,deck installation guide,how to build a deck,diy deck building,deck building,build deck,do it yourself deck,deck diy,how to build a deck by yourself,how to build a deck on the ground,how to build a deck out of wood
84
views

Baby Chicks Playing In Rain
The babies first rainstorm let's see what they do.
⏱️⏱️Chapters⏱️⏱️
00:00 Babies first rainstorm
00:20 Dosen't seem to be bothering them
00:35 Put the feeders up so they can't kick crap into them
01:10 So nice the rain is cooling everything down
01:30 When I came out Jenny was alarming
02:20 Can you see Dropkick's color
03:00 Surprise! I didn't bring any food
03:25 4 of the birds were in a freak rainstorm, lost a bunch of babies
🙏 Subscribe, 👍, it helps a lot!!
➤❓/ 💬: chris@chickensforchicks.com
➤➤I get a little for the channel-no charge for you if you use the links:
➤➤Shop Amazon https://amzn.to/3CxD1T4
➤➤Chickens Supplies https://a.co/8zehoAb
➤➤Services We use
➤➤Bitchute https://www.bitchute.com/accounts/referral/chickensforchicks/
➤➤MORNINGFA·ME https://morningfa.me/invite/ChickensForChicks
➤➤A2 Hosting http://www.a2hosting.com/refer/140244
➤➤Tubebuddy https://www.tubebuddy.com/StraightArrowRepair
➤➤Apsumo http://fbuy.me/v/philbridges
➤➤VidIQ: https://vidiq.com/straightarrowrepair
Instagram https://www.instagram.com/chickensforchicks/
Newsletter https://artisanal-leader-9310.ck.page/961509f39a
Website https://chickensforchicks.com/
Pinterest https://www.pinterest.com/cbridgesdesigns/
Facebook Page https://www.facebook.com/ChickensForChicksAR/
Rumble Channel https://rumble.com/c/c-17425
YouTube https://www.youtube.com/channel/UCeNbGSK1Ira-sBPyYCPLFiQ
I recorded how my babies grow each day. This is my first set of baby chicks. I ordered them from Cackle Hatchery. They are the Crested “Top Hat” Special and the Feather Footed Bantam Assortment Special.
I ordered 10 of each mix. If I had it to do again, I would not have ordered the mixes because I'm using these to start a breeding program. I love my babies, but business wise ordering specific chicks would have been a much better plan.
We also have 1 guinea and three silkie babies that survived a freak storm in this group. Enjoy watching them grow. I will have them all linked into a playlist so you can watch them. Chick flicks to enjoy: https://www.youtube.com/playlist?list=PLn3fko4h1DljAYO9YWVOCErGTrn3v11Yk
#chicksgrowing #silkiechicknes #polishchicks
Transcript:
Okay, I'm taping right now because it just started raining and I think this is this guy. These guys is only rain. See what they're going to do. Today, I decided they're feeders. I went ahead and I was almost at the end of that 90 lbs of chick food. So I gave it to them and I went ahead and pulled their feeders up because...
I had a lot, as you can see right there, at a lot of crap in their feeders. So... What are you guys going to do? It’s raining? Well, it's happening. Okay. And you just fell off of her. I think these have been rained on. Certainly. It is nice and cool. It is cooling everything down. So. Well, I guess it ain't no big deal.
Although when I come out, Jenny was alarming. I still can't figure out if Jenny's a Jack. I think powder puff and. I think Powder Puff is a girl. I think Dina Butt and Dropkick are girls which is kind of cool because I have every intention... Here, baby are you trying to get into that? I the every intention of if I'm right and those three or girls they're going to probably go in with Cosmo and Dizzy.
It's raining guys. Can you see that on Dropkick? I don't know what that is. What is that color? If you look at her, she's got this brown weird color. I like it, but it just came in. What's everybody doing? I just want to see what they're doing in the rain. What they think about it. Doesn’t seem like they think anything other than they're chasing bugs.
I think they think I brought food. They're wrong. All right. Well, evidently doesn't bother the babies at all, because I don't think these have ever been in rain. Well, Dropkick Dyna and Powder and Jenny have been in rain, but it was a bad, bad thing. They were in a freak rainstorm where we lost a bunch of babies. It was not me taking care of them, but we lost a bunch of babies. All right. Well, I'm going to go back in the house because I am totally obsessed. I have my first ever babies hatching and I got to see it. Jenny! What the hell are you doing?
Hi guys, this is Chris with Chickens for Chicks. And if you like what you saw, subscribe, come back, like the video. There’ll be more. Lots of education. Lots of babies.
77
views

Skirting Top Front How To
Ever wondered how to do Mobile Home skirting top front?
Phil walks you through it.
🙏 Subscribe, 👍, it helps a lot!!
➤❓/ 💬: ask@straightarrowrepair.com
➤ Follow https://straightarrowrepair.com/pipf
➤➤I get a little for the channel-no charge for you if you use the links:
➤➤Shop Amazon https://amzn.to/3CxD1T4
➤➤Tool lists & recommended products🧰 https://straightarrowrepair.com/0lvf
➤➤Services We use
➤➤MORNINGFA·ME https://morningfa.me/invite/StraightArrowRepair
➤➤A2 Hosting http://www.a2hosting.com/refer/140244
➤➤Tubebuddy https://www.tubebuddy.com/StraightArrowRepair
➤➤Apsumo http://fbuy.me/v/philbridges
➤➤VidIQ: https://vidiq.com/straightarrowrepair
#MobileHomeRepair, #MobileHomeImprovement, #DIYHomeRepair
42
views
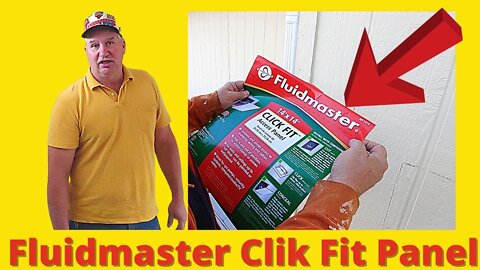
How To Install Access Panel
We're installing a Fluidmaster 14" x 14" click fit access panel into the mobile home siding. This will give the customer easy access to the plumbing shut-offs for the shower conversion we installed. All a person needs to do is access this through the outside wall and you can shut the water off.
Seems to be made for the do it yourself, home improvement person. Easy step-by-step instructions.
Another chapter of the American Bath Factory Sistine Stone Alcove Shower kit. We have taken out a garden tub to convert to a shower.
⏱️⏱️Chapters⏱️⏱️
00:00 Follow along with a handyman
00:25 Installing Fluidmaster Click Fit Access Panel
00:36 The paper on the package is the template to cut
02:00 Set the depth of the saw to thickness of the siding
03:05 Pry the siding out
04:00 Need to cut the screws off-went through the area
04:15 Clean all that up and snap the panel in
04:25 Be an American not an American't
🙏 Subscribe, 👍, it helps a lot!!
➤❓/ 💬: ask@straightarrowrepair.com
➤ Follow https://straightarrowrepair.com/pipf
➤➤I get a little for the channel-no charge for you if you use the links:
➤➤Shop Amazon https://amzn.to/3CxD1T4
➤➤Tool lists & recommended products🧰 https://straightarrowrepair.com/0lvf
➤➤Services We use
➤➤MORNINGFA·ME https://morningfa.me/invite/StraightArrowRepair
➤➤A2 Hosting http://www.a2hosting.com/refer/140244
➤➤Tubebuddy https://www.tubebuddy.com/StraightArrowRepair
➤➤Apsumo http://fbuy.me/v/philbridges
➤➤VidIQ: https://vidiq.com/straightarrowrepair
#MobileHomeRepair, #FluidmasterClikFitPanel, #AccessPanel
Okay. We're installing a Fluidmaster 14 x 14 Click Fit access panel. It says to cut along this dotted line. And then that is your template. So that's all there is supposed to be 13 and three quarters, 13 and three quarters. Set my depths so that just the thickness of the siding. Need a screw driver or something, pry bar that out. Might get a hammer. Alright, right there. That's why. The screws are holding it.So, we have to break the screws off. We're not turning those on until such time it's right.
Okay. We'll clean all this up and snap that back in there. And away we go.
49
views

How To Remove Tub & Surround From Mobile Home
Phil walks you through removing a tub and tub surround. The tub surround is usually just glued up there, easy to pull down once you have the trim off. Please be careful, the trim will cut you.
⏱️⏱️Chapters⏱️⏱️
00:00 Intro
00:11 Why we need to replace the tub
00:30 Expect to find that the floor under the tub will be rotted from a leak
01:00 Taking the tub apart, want to keep the trim
01:30 Watch the trim because it can easily cut you
01:45 Tub surround is usually just glued up there.
01:55 Back after removing the surround
02:20 Watch when you pull the ring off you want to pop the clips out
02:40 Once you have the knob out you can put the screw inside so you don't lose it
02:55 Downspout-how to keep from messing up the chrome.
03:23 You don't want to score up the drain, $15-20 costs and the time to go get it
04:25 Next we're going to pull the screws out of the tub, and trim around
05:10 Now we need to take out the drain, using a dumbell
05:55 How they plan to get the tub out
06:08 A bit strange what you can find under these tubs
07:15 When you have a crack in your tub it's because...
07:31 New tub from Lowe's
07:58 The legs are adjustable
08:21 Follow Us
🙏 Subscribe, 👍, it helps a lot!!
➤❓/ 💬: ask@straightarrowrepair.com
➤ Follow https://straightarrowrepair.com/pipf
➤➤I get a little for the channel-no charge for you if you use the links:
➤➤Shop Amazon https://amzn.to/3CxD1T4
➤➤Tool lists & recommended products🧰 https://straightarrowrepair.com/0lvf
➤➤Services We use
➤➤MORNINGFA·ME https://morningfa.me/invite/StraightArrowRepair
➤➤A2 Hosting http://www.a2hosting.com/refer/140244
➤➤Tubebuddy https://www.tubebuddy.com/StraightArrowRepair
➤➤Apsumo http://fbuy.me/v/philbridges
➤➤VidIQ: https://vidiq.com/straightarrowrepair
➤➤Services We use
➤➤MORNINGFA·ME https://morningfa.me/invite/StraightArrowRepair
➤➤A2 Hosting http://www.a2hosting.com/refer/140244
➤➤Tubebuddy https://www.tubebuddy.com/StraightArrowRepair
➤➤Apsumo http://fbuy.me/v/philbridges
➤➤VidIQ: https://vidiq.com/straightarrowrepair
#MobileHomeRepair, #MobileHomeImprovement, #TubAndTubSurround
100
views

White Silkie Rooster Soaking Wet #Shorts
Cosmo is enjoying the rain. He's drenched, looks about half the size he is dry.
Transcript:
Cosmo. Cosmo, Cosmo. Oh, my God. Look at my fluffy butt. He is soaked. Look at his head. His head is completely soaked. Is this good stuff, ladies. Cosmo needs a bath. He's not going to get one, but he needs one. All right, look at that. His whole head. Everything is soaked, soaked.
🙏 Subscribe, 👍, it helps a lot!!
➤❓/ 💬: chris@chickensforchicks.com
➤➤I get a little for the channel-no charge for you if you use the links:
➤➤Shop Amazon https://amzn.to/3CxD1T4
➤➤Chickens Supplies https://a.co/8zehoAb
➤➤Services We use
➤➤Bitchute https://www.bitchute.com/accounts/referral/chickensforchicks/
➤➤MORNINGFA·ME https://morningfa.me/invite/ChickensForChicks
➤➤A2 Hosting http://www.a2hosting.com/refer/140244
➤➤Tubebuddy https://www.tubebuddy.com/StraightArrowRepair
➤➤Apsumo http://fbuy.me/v/philbridges
➤➤VidIQ: https://vidiq.com/straightarrowrepair
Instagram https://www.instagram.com/chickensforchicks/
Newsletter https://artisanal-leader-9310.ck.page/961509f39a
Website https://chickensforchicks.com/
Pinterest https://www.pinterest.com/cbridgesdesigns/
Facebook Page https://www.facebook.com/ChickensForChicksAR/
Rumble Channel https://rumble.com/c/c-17425
YouTube https://www.youtube.com/channel/UCeNbGSK1Ira-sBPyYCPLFiQ
backyard chickens,chicken (animal),Chickens for Chicks,cute chicken,fluffy,fluffy chicken,funny,raising chickens,rooster,roosters,silkie chicken,silkie chicken pet,silkie chicken videos,Silkie Chickens,silkie chickens 101,silkie chickens pets at home,silkie chicks care,white silkie chicken,white silkie hen,white silkie rooster,silkie rooster,silkie chickens farm,silkie chickens playing,backyard chicken,backyard chickens coop,backyard chicken coop
64
views

Why Is Ac Leaking Water Inside House
And this is another example of a bathroom that got an issue with the air conditioner. The overflown on the a-coil, spilled over and then ran inside the bathroom of the bathroom and into the hallway some too. That's very typical. What you want to do is every year, sometimes twice a year you want to blow out that line. That goes for a drain, and it's uh...
I'll talk about that another time. But that drain line needs to go to the other side of the house. Not on the uphill downhill side. Otherwise, that water can literally make this house settle because that moisture underneath the piers make the house settle down. So this is an important thing maintain your drain line and clean your a-coils.
A lot of people don't know how to do that, but there's plenty of maybe at some point I'll show you how to do that. You can buy a little aerosol can that sprays and cleans it all up. I'll show you all that another time. Anyway, that's what happened here.
Not having the drain. And this is the drain.
"Good save."
This is the drain line. This is a cool mess that gets clogged up here. Or if it gets clogged in that drain line all the way out. It'll overflow, drop down into your air conditioning vents and all over onto the floor. That's what happens. This is not unusual at all. It happens a lot. And before you know it, your floor is rotted out.
You don't even have a chance to fix it. So once or twice a year, you need to clean that up. We'll clean this up. Alright?
⏱️⏱️Chapters⏱️⏱️
00:00 Follow along with a handyman
00:25 Why you need to clean the A/C
01:19 Inside the AC unit
01:52 Be an American not an American't
🙏 Subscribe, 👍, it helps a lot!!
➤❓/ 💬: ask@straightarrowrepair.com
➤ Follow https://straightarrowrepair.com/pipf
➤➤I get a little for the channel-no charge for you if you use the links:
➤➤Shop Amazon https://amzn.to/3CxD1T4
➤➤Tool lists & recommended products🧰 https://straightarrowrepair.com/0lvf
➤➤Services We use
➤➤MORNINGFA·ME https://morningfa.me/invite/StraightArrowRepair
➤➤A2 Hosting http://www.a2hosting.com/refer/140244
➤➤Tubebuddy https://www.tubebuddy.com/StraightArrowRepair
➤➤Apsumo http://fbuy.me/v/philbridges
➤➤VidIQ: https://vidiq.com/straightarrowrepair
#ACLeakingWater, #ACDrainClogged, #ACLeakingInsideHouse
51
views
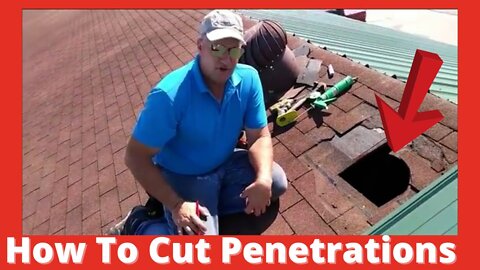
Metal Roof Penetration Installation - Metal Roof Penetrations
How to cut for penetrations in a metal roof. We are putting the metal directly over the shingles. Your shingles act as both barrier and insulation, and save a massive amount on your labor costs. Doesn't matter if you are DIYing the project or paying someone. We all only have so much time.
⏱️⏱️Chapters⏱️⏱️
00:00 You will usually need to cut the metal for roof penetrations
00:17 How you need to measure it
00:49 Marking the metal
01:45 Tip to cut out the penetration
03:30 We have all the tools, but try to give you ways to do the job with simple tools too
03:57 How to seal the flange over the metal ridges
05:00 Fasten from the middle and move out to keep it spread out
07:15 Why I don't use sealant
🙏 Subscribe, 👍, it helps a lot!!
➤❓/ 💬: ask@straightarrowrepair.com
➤ Follow https://straightarrowrepair.com/pipf
➤➤I get a little for the channel-no charge for you if you use the links:
➤➤Shop Amazon https://amzn.to/3CxD1T4
➤➤Tool lists & recommended products🧰 https://straightarrowrepair.com/0lvf
➤➤Services We use
➤➤MORNINGFA·ME https://morningfa.me/invite/StraightArrowRepair
➤➤A2 Hosting http://www.a2hosting.com/refer/140244
➤➤Tubebuddy https://www.tubebuddy.com/StraightArrowRepair
➤➤Apsumo http://fbuy.me/v/philbridges
➤➤VidIQ: https://vidiq.com/straightarrowrepair
#CommercialRepair, #metalroofs , #metalroofpenetration
commercial metal roofing installation,diy metal roof,Metal roof,metal roof installation,metal roof installation over shingles,metal roof penetration,metal roof penetration installation,Metal roof penetrations,metal roof pipe boot,metal roofing 101,metal roofing installation,metal roofing tips and tricks,pipe boot,roof tar,roof tar for leaks,roof tar sealant,sealing roof with tar,standing seam metal roof,Straight Arrow Repair,vent pipe flashing
76
views

Measuring Valley Angle For Metal Roof
How to measure and adjust metal roofing for the angles
⏱️⏱️Chapters⏱️⏱️
00:00 Follow along with a handyman
00:25 Mark your valley
00:35 You need to know what your bottom of the valley is
00:56 Take tape measure where your angle will start
01:40 Usually have a small cut off piece, want to use the factory cut off edge
02:15 Find where outside corner hits on that line
03:05 Be an American, not an American't
🙏 Subscribe, 👍, it helps a lot!!
➤❓/ 💬: ask@straightarrowrepair.com
➤ Follow https://straightarrowrepair.com/pipf
➤➤I get a little for the channel-no charge for you if you use the links:
➤➤Shop Amazon https://amzn.to/3CxD1T4
➤➤Tool lists & recommended products🧰 https://straightarrowrepair.com/0lvf
➤➤Services We use
➤➤MORNINGFA·ME https://morningfa.me/invite/StraightArrowRepair
➤➤A2 Hosting http://www.a2hosting.com/refer/140244
➤➤Tubebuddy https://www.tubebuddy.com/StraightArrowRepair
➤➤Apsumo http://fbuy.me/v/philbridges
➤➤VidIQ: https://vidiq.com/straightarrowrepair
#metalroofing #metalroof #metalroofvalley
Transcript:
Hi, I'm Phil Bridges, owner of Straight Arrow Repair. Ever want to know how a repairman fixes things? Well come with me, and I'll show you how I solve problems. Let's make things better together.
And we've made our mark on, on our valley, which it has that ribbon that's in there to make it a valley. And then we go, I need to know what the bottom is.
So I'm going to put a 4 foot level across here. And where that intersection is, is right about a quarter inch, three-eighths of an inch, maybe a half right there. Okay. So then I can take a tape measure.
It's really steep. All right.
Got everything locked in, so don't fall off. Now we're going to measure from this side of because remember, we're lapping and then that half inch from looks about 15. All right. So now we know the bottom is going to go over 15 inches and that's where our angles are going to start. And I'll take you with me now.
I usually have small cut off piece so I can get and I want to use the factory square edge, and what we're going to do is find out where this corner, the outside corner hits on that line and we're going to slide it up with this sitting, you know, solid on that rib to find that square. Just another reason why it's important to be as square as possible.
See how I'm coming down to this four inch mark right here. Right there. And I'm sitting square on that. And then I'm going to mark right there.
Remember, we move from this bottom edge where we're going to lap to, to this mark is how much I got to go up on that side. 28 and a half can remember we were 15 across and then we're going to go 28 and a half up to get our angles. So let's go down there and do that.
This is Phil Bridges, if you like what you saw and think it might be helpful to somebody else, push that like button and let other people know what you and I know, and we'll work together toward making a brighter future. By the way, we're not Amera-Can'ts, we're Americans. See you next time.
handyman,house,installing a metal roof,measuring valley angle for metal roof,metal,metal roof,metal roof flashing,metal roof installation,metal roof valley trim,metal roofing installation,mobile home,rogers arkansas,roof,roofing,steel,steel building construction,steel roof,Straight Arrow Repair,trailer home,valley,valley trim installation,metal roofing,metal roof valley detail,metal roof valley cuts,metal roof valley installation,roofing installation
75
views

Gas Water Heater Problems
Problems with a gas water heater, not something you see everyday. I've seen way worse.
⏱️⏱️Chapters⏱️⏱️
00:00 Follow along with a handyman
00:25 Unusual gas water heater problems
00:43 Vent is cracked, letting carbon monoxide into the home
00:56 He's seen the water heater below the floor when there's a major water leak
01:30 Disconnect and drain the water heater
01:53 Be an American, not an American't
🙏 Subscribe, 👍, it helps a lot!!
➤❓/ 💬: ask@straightarrowrepair.com
➤ Follow https://straightarrowrepair.com/pipf
➤➤I get a little for the channel-no charge for you if you use the links:
➤➤Shop Amazon https://amzn.to/3CxD1T4
➤➤Tool lists & recommended products🧰 https://straightarrowrepair.com/0lvf
➤➤Services We use
➤➤MORNINGFA·ME https://morningfa.me/invite/StraightArrowRepair
➤➤A2 Hosting http://www.a2hosting.com/refer/140244
➤➤Tubebuddy https://www.tubebuddy.com/StraightArrowRepair
➤➤Apsumo http://fbuy.me/v/philbridges
➤➤VidIQ: https://vidiq.com/straightarrowrepair
#WaterHeater #waterheatergas , #plumbing do it yourself,fix,gas,gas water heater,gas water heater problems,gas water heater repair,gas water heater troubleshooting,handyman,house,mobile home,plumbing,repair,rogers arkansas,Straight Arrow Repair,trailer home,water heater,water heater leaking,water heater maintenance,water heater repair,water heater replacement,water heater repair gas,hot water heater maintenance,hot water heater replacement,gas water heater replacement,plumbing work in house
Transcript:
Hi, I'm Phil Bridges, owner of Straight Arrow Repair. Ever want to know how a repairman fixes things? Well come with me, and I'll show you how I solve problems. Let's make things better together.
Here's a situation we don't see every day. But I've seen it several times. I'm actually seen it where, way worse than this. But if you look over here, water heaters lean in.
This is a gas water heater and show the vent. The vent is cracked so that carbon dioxide can come in the house and it's trying to fall through the floor. There's a water leak in here. I've actually seen these water heaters where I could see the bottom of the water heater down here. So what we're going to do first is shut it off and we'll shut the gas off here.
Which we may have to have a pair of plyers this ole thing. It may not shut off. home anyway, and then we'll hook a hose up, I think this is a balde screwdriver, drain the water out because it takes a blade screwdiver instead of a handle to let this one open, we'll have to disconnect the gas. That means I have to be able to shut the gas off.
And I'll disconnect that line. Then we'll disconnect the water up here. That way get after drained. We've got to pull it out. That's going to be a journey to and then we're going to rebuild the bottom. So here we go.
This is Phil Bridges, if you like what you saw and think it might be helpful to somebody else, push that like button and let other people know what you and I know, and we'll work together toward making a brighter future. By the way, we're not Amera-Can'ts, we're Americans. See you next time.
71
views
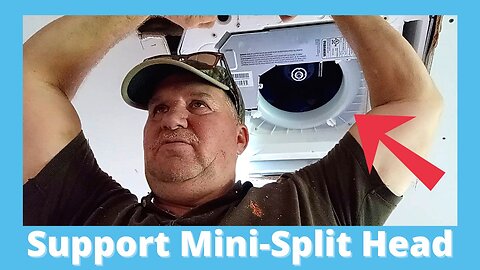
Installing A Mini Split - Installing One Head
Phil's installing a 3 headed mini split air conditioner for a customer. We have cut the hole, added supports to the head and are now putting the head where it will be.
Pioneer Inverter Ultra High Efficiency Heat Pump 3 head mini split.
⏱️⏱️Chapters⏱️⏱️
00:00 Intro
00:12 Not really a one person job trying to get the head up there
00:25 Woops, cut the area wrong
00:40 Need to cut the other corner out
01:05 Had to move the freon lines and cut another hole
01:30 You can't have the freon lines going out, may have to adjust
02:20 Using roofing screws to fasten it
03:30 The fun of working with someone you can't see
04:20 Only thing stays same is everything changes
04:30 Heavy or awkward?
06:12 The small piece of board is a measuring device
🙏 Subscribe, 👍, it helps a lot!!
➤❓/ 💬: ask@straightarrowrepair.com
➤ Follow https://straightarrowrepair.com/pipf
➤➤I get a little for the channel-no charge for you if you use the links:
➤➤Shop Amazon https://amzn.to/3CxD1T4
➤➤Tool lists & recommended products🧰 https://straightarrowrepair.com/0lvf
➤➤Services We use
➤➤MORNINGFA·ME https://morningfa.me/invite/StraightArrowRepair
➤➤A2 Hosting http://www.a2hosting.com/refer/140244
➤➤Tubebuddy https://www.tubebuddy.com/StraightArrowRepair
➤➤Apsumo http://fbuy.me/v/philbridges
➤➤VidIQ: https://vidiq.com/straightarrowrepair
#minisplit #ACInstall #ductlessAC
Transcript:
Not really a one person job more of a two, probably a three person job. You got that wrong. Ooh, that’s not gonna work. Nope. Come back down. You got it cut wrong. Okay. So this one's got to turn this way. We got to cut this corner out. Come on down here. Did you get down like that. All the all of them got to be changed to the bracket. So I'll lower down to he Fisher to this whole. You can just cut another hole right next to it, Dad. I know what you're saying. I don't think it will let me...
I want you to know that we end up having to move the freon line over here. Change the brackets. I made a hole on this end so that we wouldn't hit the rafters on this side. So that might not be anything but the choice you have is that so it'll come out the side if you turn it this way or go into the rafters.
You can't have the free lines going out, have to go inside the rafters. So here we go. It's kind of heavy. Probably 40 lbs, more awkward than heavy. 40 or 50. I’m hanging up on something up there. You’re good. together. Which one you want to fasten to first? Let’s do this one. What's this corner? That's my... I’ll leave it right here. Good. Yeah. He's using roofing screws, that have a quarter inch drive and a washer. But you can use what you need to.
You want to do the other side this thing in? there. So. It’s not going to reach right there or I'll get you this other this corner. All right. I went over there. Bomb. You need me to come over there behind you? I got it. All right.
The one closest to the. The wall, the kitchen in the barn there. It, I suppose, should be reaching that one to the end, Drew. Can't get us through. Got in there. Right. The other corner through. What do you talk about? We're going to the other corner. Which one? I didn't want to. Here. I can be over there. Do you.
Go ahead. I'll hold that, for you. I got it. I don’t know why I need a board. Less group of interest. I guess we need a board on top of that one. Yeah. Is that? What are you going to need on the other side? A short piece. Always plan for things to change right, Dad?
Right there. Is it heavy? Or is it more just strain? After having your arms up there for a while, ya. It’s like the guy pushing the ball up the hill, Dad. Yep.
What do you need to do that? All right, do you want to do the other end? What would the tip go that was in it? Let me have that tip over there.
He needs to go up a little bit? No, he's got right where he needs. Right there. I think all the uncomfortability you're getting right now, he's way more uncomfortable. People pay to work out. I work out. You know, he's cooking. You're just straining to talk about a weird hand. What about this other side over here. I need a very short vertical 2 by.
Did you already explain them what that is? That's his measuring device. Ya, I already explained. Somewhere in there. That stuff you got to plan for, right? Losing screws. I have a screw lose. All right. Happy? I’ll be happy when it’s done. You'll be happy when it's blowing cold, right?
78
views

Steel Truss Building Pt 1
We fast forward the guys working on the building. There will be several parts to this job. At the end we'll collect up all the videos and create a complete video.
If this video helped you please "Hit that Like Button!" Also If you disliked this video, please state why everything helps us improve.
Please Subscribe, it helps a lot!!
🙏 Subscribe, 👍, it helps a lot!!
➤❓/ 💬: ask@straightarrowrepair.com
➤ Follow https://straightarrowrepair.com/pipf
➤➤I get a little for the channel-no charge for you if you use the links:
➤➤Shop Amazon https://amzn.to/3CxD1T4
➤➤Tool lists & recommended products🧰 https://straightarrowrepair.com/0lvf
➤➤Services We use
➤➤MORNINGFA·ME https://morningfa.me/invite/StraightArrowRepair
➤➤A2 Hosting http://www.a2hosting.com/refer/140244
➤➤Tubebuddy https://www.tubebuddy.com/StraightArrowRepair
➤➤Apsumo http://fbuy.me/v/philbridges
➤➤VidIQ: https://vidiq.com/straightarrowrepair
#MobileHomeRepair, #MobileHomeImprovement, #DIYHomeRepair
McCullah-Rising Up
Video Visual Effects by Zerg
Artist: MC Cullah
Track: Rising Up
Album: Cullahnary School
Genre: Rock, Blues, Hip-Hop
Music licensed under a Creative Commons Attribution https://creativecommons.org/licenses/... Available on the Free Music Archive http://freemusicarchive.org/music/MC_...
"Proof" of Attribution license can be found at archive.org https://web.archive.org/web/201405162... Screenshot of "Proof" at mega.nz https://mega.nz/#!rYcnHDRB!Dnv_rRfKJK... https://www.eff.org Electronic Frontier Foundation Defending your rights in the digital world
41
views
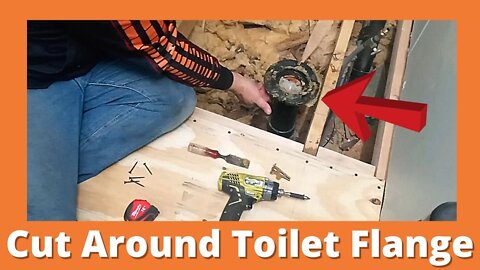
How To Cut Plywood Around Toilet Flange
How to measure around the toilet flange and lay down plywood when replacing your sub-floor.
⏱️⏱️Chapters⏱️⏱️
00:00 Follow along with a handyman
00:25 Next step is cutting the sheet of plywood
00:36 Water line and toilet flange to deal with, lessons from a toile flange
01:17 Pulling the old wax ring off the flange
01:50 Have 4 screws that hold the flange to the floor
02:30 You can drill holes in the flange, but you want to be careful
03:15 How to measure the flange for your plywood cuts
04:26 How to find the centers of the flange
05:50 Marking the plywood
07:05 You can get compasses
08:15 How to mark your center without a compass
09:36 Now that you have it marked, how to cut your plywood to get it in
11:35 You need to look at your cuts and see if you can't make it easier to do the cuts
12:15 He carries both electric and battery power tools because you never know when battery might be dead and you gotta get the job done
13:55 Cut away to wrestle the plywood in
14:57 Be an American not an American't
🙏 Subscribe, 👍, it helps a lot!!
➤❓/ 💬: ask@straightarrowrepair.com
➤ Follow https://straightarrowrepair.com/pipf
➤➤I get a little for the channel-no charge for you if you use the links:
➤➤Shop Amazon https://amzn.to/3CxD1T4
➤➤Tool lists & recommended products🧰 https://straightarrowrepair.com/0lvf
➤➤Services We use
➤➤MORNINGFA·ME https://morningfa.me/invite/StraightArrowRepair
➤➤A2 Hosting http://www.a2hosting.com/refer/140244
➤➤Tubebuddy https://www.tubebuddy.com/StraightArrowRepair
➤➤Apsumo http://fbuy.me/v/philbridges
➤➤VidIQ: https://vidiq.com/straightarrowrepair
#MobileHomeRepair, #MobileHomeImprovement, #Subfloor
47
views

Kobalt battery powered chainsaw #shorts-Kobalt 80 Volt Battery Pack Saw
Batter Power Chainsaw by Kobalt.
Another neat little tool we've got from Lowe's is Kobalt Brand. It's an 80 volt battery powered chainsaw. And I recommend you get another battery. In addition, sometimes you can get them pretty cheap online, but it does pretty good for 20 minutes. It takes 20 minutes to charge.
There you go.
🙏 Subscribe, 👍, it helps a lot!!
➤❓/ 💬: ask@straightarrowrepair.com
➤ Follow https://straightarrowrepair.com/pipf
➤➤I get a little for the channel-no charge for you if you use the links:
➤➤Shop Amazon https://amzn.to/3CxD1T4
➤➤Tool lists & recommended products🧰 https://straightarrowrepair.com/0lvf
➤➤Services We use
➤➤MORNINGFA·ME https://morningfa.me/invite/StraightArrowRepair
➤➤A2 Hosting http://www.a2hosting.com/refer/140244
➤➤Tubebuddy https://www.tubebuddy.com/StraightArrowRepair
➤➤Apsumo http://fbuy.me/v/philbridges
➤➤VidIQ: https://vidiq.com/straightarrowrepair
#tooltips, #tooltipshorts, #batterypowerchainsaw
36
views
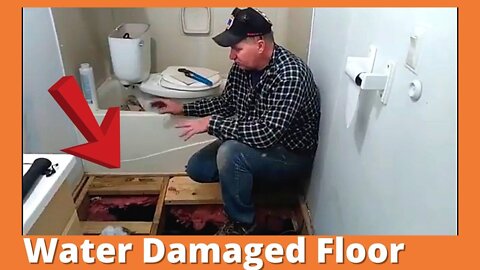
Replacing Bathroom Floor
Phil shows you how to replace the bathroom floor. Mobile home bathroom that was damaged by an overflow air conditioner leak.
⏱️⏱️Chapters⏱️⏱️
00:00 Bathroom damaged from a/c leak
00:15 Check your over flow line at least once a year and blow out
00:25 Drain line needs to be on the other side of the house on the downhill side
00:55 The leak could come from anything
01:05 What all we're going to do today
01:40 We'll pull back the carpet checking for damage
03:03 Toilet has been taken up. Why you might not want to caulk there.
03:41 Tank bolts, what if they won't come lose?
04:20 Before you move the toilet and tank back
04:37 You will want to block the septic drain
05:25 Inside the AC
06:02 Brought the trim back in to show you why you want to caulk the bathroom trim
07:05 Want to break a hole in the floor along the edge
07:50 Floor is out, and we're adding wood along the edges to support the floor
10:17 Where we put the wood supports
10:50 Measured for the flange
11:35 Shut offs and water lines
11:49 Why we cut the plywood the way we did
12:29 Showing how we pieced the plywood for the floor together
13:10 Supporting the cabinet
13:49 Cutting the two by
15:08 Back inside with the 2 by
16:56 Starting the tile
17:22 Tile glue and what you need to think about
17:49 An alternative to tile glue
18:15 Floors in, we sealed the trim bottom and top
18:43 Fast grab saves you some time, but costs 3 times as much
🙏 Subscribe, 👍, it helps a lot!!
➤❓/ 💬: ask@straightarrowrepair.com
➤ Follow https://straightarrowrepair.com/pipf
➤➤I get a little for the channel-no charge for you if you use the links:
➤➤Shop Amazon https://amzn.to/3CxD1T4
➤➤Tool lists & recommended products🧰 https://straightarrowrepair.com/0lvf
➤➤Services We use
➤➤MORNINGFA·ME https://morningfa.me/invite/StraightArrowRepair
➤➤A2 Hosting http://www.a2hosting.com/refer/140244
➤➤Tubebuddy https://www.tubebuddy.com/StraightArrowRepair
➤➤Apsumo http://fbuy.me/v/philbridges
➤➤VidIQ: https://vidiq.com/straightarrowrepair
#ACDamage, #BathroomFloorRepair, #FloorInstall
41
views

Tile Backsplash Installation For the Corner #Shorts
What we're doing is working with a tile for Backsplash, and what I like to do generally is cut the tile in the middle or in the side here so that I don't have a lot of complications when it comes to going around the corner. In this case, it literally falls out, for that row and will go over the top. So, if I cut this through, I will just leave this section out and then I'll have both sides to start with.
And I know that sounds very complex, but we'll do another part where I'll show you literally, me putting it in. We're going to go outside and cut it. Okay.
🙏 Subscribe, 👍, it helps a lot!!
➤❓/ 💬: ask@straightarrowrepair.com
➤ Follow https://straightarrowrepair.com/pipf
➤➤I get a little for the channel-no charge for you if you use the links:
➤➤Shop Amazon https://amzn.to/3CxD1T4
➤➤Tool lists & recommended products🧰 https://straightarrowrepair.com/0lvf
➤➤Services We use
➤➤MORNINGFA·ME https://morningfa.me/invite/StraightArrowRepair
➤➤A2 Hosting http://www.a2hosting.com/refer/140244
➤➤Tubebuddy https://www.tubebuddy.com/StraightArrowRepair
➤➤Apsumo http://fbuy.me/v/philbridges
➤➤VidIQ: https://vidiq.com/straightarrowrepair
#budgetmobilehomeimprovement #budgetmobilehomeremodel #diymobilehomerepair backsplash ideas,backsplash tile,backsplash tile installation,bathroom tile,ceramic tile bathroom wall,how to install backsplash in kitchen,how to install tile,kitchen backsplash,Mobile home repair,small mobile home bathroom remodel,small mobile home decorating ideas,small mobile home kitchen remodel,Straight Arrow Repair,tile backsplash ideas,tile backsplash in kitchen,tile backsplash installation,tile bathroom wall,tile installation,wall tile installation
66
views
Things To Avoid Installing A Kitchen Sink
Phil runs through a couple of tips on what NOT to do when you install/reinstall a sink.
⏱️⏱️Chapters⏱️⏱️
00:00 Intro
00:22 When you are measuring the sink to cut cabinet, want to go back 1"
00:55 Don't silicon the drain to fix leaks
01:22 Follow us
🙏 Subscribe, 👍, it helps a lot!!
➤❓/ 💬: ask@straightarrowrepair.com
➤ Follow https://straightarrowrepair.com/pipf
➤➤I get a little for the channel-no charge for you if you use the links:
➤➤Shop Amazon https://amzn.to/3CxD1T4
➤➤Tool lists & recommended products🧰 https://straightarrowrepair.com/0lvf
➤➤Services We use
➤➤MORNINGFA·ME https://morningfa.me/invite/StraightArrowRepair
➤➤A2 Hosting http://www.a2hosting.com/refer/140244
➤➤Tubebuddy https://www.tubebuddy.com/StraightArrowRepair
➤➤Apsumo http://fbuy.me/v/philbridges
➤➤VidIQ: https://vidiq.com/straightarrowrepair
#MobileHomeRepair, #MobileHomeImprovement, #Kitchensinkdonts
Transcript:
So when I'm measuring this, you know, 18.
Is right and 32 is right. But the mistake I used to make early on is I'd bring that all the way out here and this, a lot of times this wouldn't cover. So, we're going to stay back an inch and then cut across this way so we don't have that point stick in that top. One thing I might point out is this kind of thing right here where you silicone the drain doesn't work. See here and they just kept on and it just didn't work.
So we had to replace all that. Lots of fun. That is. Here we go in there to mark and check again because I always measure twice before I cut that, sometimes three times before I cut the cabinets out.
handyman,kitchen,kitchen sink,kitchen sink installation,kitchen sink plumbing,knowledge,mobile home,plumbing,remodel,remodeling,replace,rogers arkansas,sink,Straight Arrow Repair,things to avoid installing a kitchen sink,trailer home,plumbing tips,home renovation,how to install,kitchen sink installation plumbing,plumbing tips and tricks of the trade,plumbing tips for beginners,kitchen sink strainer leaking,home renovation fails,kitchen sink plumbing leaking
73
views

Mobile Home Doors Have Gaps At The Bottom Of The Door
Why do mobile home's interior doors always have gaps at the bottom? You need them for your heating and air system to work.
⏱️⏱️Chapters⏱️⏱️
00:00 Intro
00:22 Mobile home doors, what you need to know
01:28 Follow us
🙏 Subscribe, 👍, it helps a lot!!
➤❓/ 💬: ask@straightarrowrepair.com
➤ Follow https://straightarrowrepair.com/pipf
➤➤I get a little for the channel-no charge for you if you use the links:
➤➤Shop Amazon https://amzn.to/3CxD1T4
➤➤Tool lists & recommended products🧰 https://straightarrowrepair.com/0lvf
➤➤Services We use
➤➤MORNINGFA·ME https://morningfa.me/invite/StraightArrowRepair
➤➤A2 Hosting http://www.a2hosting.com/refer/140244
➤➤Tubebuddy https://www.tubebuddy.com/StraightArrowRepair
➤➤Apsumo http://fbuy.me/v/philbridges
➤➤VidIQ: https://vidiq.com/straightarrowrepair
#MobileHomeRepair, #MobileHomeImprovement, #diyhomerepair
Transcript:
On a mobile home. You're going to have to replace your doors sooner or later because they make them about as cheap as they can, make them, including the knobs. You can use a house door. In this case, somebody put in a six panel door. But something you need to keep in mind, you need to have an inch and a half gap on the bottom of the door because that's how the return air works for the central heating air system.
If you don't, this room will fill up with air and won't letting more air come in and it won't pull out what's in here. So you will never have as much heat or air conditioning as you want. If you don't have that return, air gap on the bottom of the door. So what we're going to be doing today is cutting these doors off, even though they've been replaced once and they've been damaged. You can see the places right here.
See, somebody cut the door down and it was just instead of a 2 by, it's just barely got anything. So anyway, that's what we're going to do. We're going to cut these doors off.
door gap,door gap at bottom,door gap filler,door gap fix,door tips and tricks,mobile home,mobile home doors have gaps at the bottom of the door,rogers arkansas,Straight Arrow Repair,trailer home,mobile home repair,manufactured home,mobile home door,interior door gap at bottom,bathroom door gap at bottom,mobile home repairs diy,mobile home repair and remodeling,mobile home door replacement,mobile home door repair,manufactured homes,mobile home remodeling
65
views
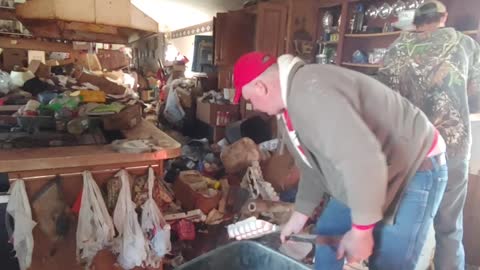
Hoarders Clean Up Clips 2 #Shorts
“I don’t know what that’s going to.”
Little kid caps?
“Say cowboy, you lost your chaps?”
You know what Keith said yesterday? He said that truth goes around naked, but lies have to be covered up.
“Who said that?”
Keith, that guy we did a lot of work for.
“Oh the old man?”
🙏 Subscribe, 👍, it helps a lot!!
➤❓/ 💬: ask@straightarrowrepair.com
➤ Follow https://straightarrowrepair.com/pipf
➤➤I get a little for the channel-no charge for you if you use the links:
➤➤Shop Amazon https://amzn.to/3CxD1T4
➤➤Tool lists & recommended products🧰 https://straightarrowrepair.com/0lvf
➤➤Services We use
➤➤MORNINGFA·ME https://morningfa.me/invite/StraightArrowRepair
➤➤A2 Hosting http://www.a2hosting.com/refer/140244
➤➤Tubebuddy https://www.tubebuddy.com/StraightArrowRepair
➤➤Apsumo http://fbuy.me/v/philbridges
➤➤VidIQ: https://vidiq.com/straightarrowrepair
#MobileHomeRepair, #MobileHomeImprovement, addiction, clean out hoarders house, clean up hoarder, clean up hoarders house, clean up house videos, cleaning up hoarding, compulsive hoarding, extreme hoarders clean up, handyman, hoarder, hoarder aftermath, hoarder house cleaning, hoarders, hoarders clean up, hoarders clips, hoarders show cleaners, hoarders show youtube, hoarders videos, hoarding, how to clean up after a hoarder, mobile home, nightmare tenants, rogers arkansas, Straight Arrow Repair, trailer home, trash, shorts
85
views
1
comment
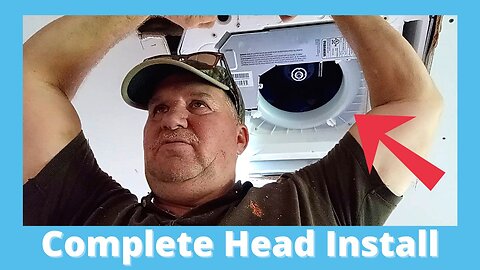
Installing A Mini Split - Complete Cassette Head
Phil's installing a 3 headed mini split air conditioner for a customer. Here they are completely installing one of the cassette heads.
Pioneer Inverter Ultra High Efficiency Heat Pump 3 head mini split.
⏱️⏱️Chapters⏱️⏱️
00:00 Intro
00:12 Installing a 3 headed mini-split
00:25 One of the heads will be going through a double ceiling
00:45 Took a drill and bit and drilled out the corners where we need to cut
01:05 Went upstairs to mark the plywood
01:45 Made the cut marks
02:15 Going to cut the drywall
02:40 Back after pulling the drywall out
02:50 Scored the drywall with razor knife and cut with an oscillating saw
03:08 Put a paddle bit wider that the saw blade and drill the corners
04:00 Something you may run into when measuring
04:15 The jog in the hole is for the freon lines
04:35 Before cutting, make sure there's no electrical above you
04:45 They ran into that with one of the heads
04:55 The instructions are for offices, not good for putting in a house
05:13 This job has several complications. They have to adjust to.
03:20 Cutting the plywood
06:10 Be careful of falling debris
06:25 Need to move insulation back... The heat is flooding into the room
06:50 Put boards to support the area
07:20 The area for your freon lines you'll have to support too
08:00 Pattern for the shape of the head
08:25 The pattern shows a gap, you're not going to have it when it comes to rafters
08:45 They are doing the second head
08:55 Where the control wires go
09:50 Installation manual, pretty specific for acoustical ceiling
10:05 He's showing you how to put it into a home
10:20 The supports are in the blue package
10:50 The drain and freon lines for the head
11:05 Where the lines will be pointing
11:30 Electrical will come in there. You're using a 5/8 wrench
12:00 Installing the support bars
14:25 You have to keep an eye on the support to make sure it's facing where you need it to
15:00 2 supports are done
15:45 Want to be careful when rolling the head over
16:10 Leave enough room on the bottom to adjust it if you have to
16:50 The kit has anchors for concrete
17:30 You could use the anchors if it was inside a wall, but probably won't need them
18:00 Cut a piece of wood to keep the head 7/8 above the ceiling
18:20 Using 1/4" roofing screws
18:52 Not really a one person job trying to get the head up there
19:10 Woops, cut the area wrong
19:20 Need to cut the other corner out
19:45 Had to move the freon lines and cut another hole
20:00 You can't have the freon lines going out, may have to adjust
21:00 Using roofing screws to fasten it
21:45 The fun of working with someone you can't see
23:00 Only thing stays same is everything changes
23:10 Heavy or awkward?
24:50 The small piece of board is a measuring device
26:10 The box for the cassette head cover
26:50 Little tiny package of screws in the box
27:10 The cover doesn't go on just any old way
27:35 The wires have to go to a specific space
27:45 Where the wires have to go
28:25 To put the screws in you have to take one of the covers off
29:55 Tight fit
🙏 Subscribe, 👍, it helps a lot!!
➤❓/ 💬: ask@straightarrowrepair.com
➤ Follow https://straightarrowrepair.com/pipf
➤➤I get a little for the channel-no charge for you if you use the links:
➤➤Shop Amazon https://amzn.to/3CxD1T4
➤➤Tool lists & recommended products🧰 https://straightarrowrepair.com/0lvf
➤➤Services We use
➤➤MORNINGFA·ME https://morningfa.me/invite/StraightArrowRepair
➤➤A2 Hosting http://www.a2hosting.com/refer/140244
➤➤Tubebuddy https://www.tubebuddy.com/StraightArrowRepair
➤➤Apsumo http://fbuy.me/v/philbridges
➤➤VidIQ: https://vidiq.com/straightarrowrepair
#minisplit #ACInstall #cuttingceiling
67
views