

Homemade Moroccan Lemonade with Rosewater and Cardamom recipe
Homemade Moroccan Lemonade with Rosewater and Cardamom Recipe
This refreshing lemonade is infused with the fragrant flavors of rosewater and cardamom, perfect for a hot day.
Ingredients:
• 1 cup granulated sugar
• 2 cups water
• 1 cup freshly squeezed lemon juice (about 4-5 lemons)
• 1/2 cup rosewater
• 1/4 teaspoon ground cardamom
• Pinch of salt
• Lemon slices and rose petals (for garnish)
Instructions:
1. Make a simple syrup: In a saucepan, combine the sugar and 2 cups of water. Heat over medium heat, stirring constantly, until the sugar dissolves completely. Bring to a boil, then reduce heat and simmer for 5 minutes. Remove from heat and let cool completely.
2. Assemble the lemonade: In a large pitcher, combine the cooled simple syrup, lemon juice, rosewater, cardamom, and salt. Stir well to combine.
3. Chill and serve: Add ice to the pitcher and stir. Garnish with lemon slices and rose petals before serving.
Tips:
• For a sweeter lemonade, adjust the amount of lemon juice to your preference.
• You can substitute fresh cardamom pods for ground cardamom. Crush the pods slightly with the back of a spoon to release their flavor before adding them to the lemonade.
• If you don't have rosewater, you can omit it or add a splash of orange flower water instead.
• For a fizzy twist, add some club soda to the lemonade before serving.
Enjoy this delicious and refreshing homemade Moroccan lemonade!
27
views

The Royal Sip: Almond Milk with Dates and Cinnamon
Almond Milk with Dates and Cinnamon (Royal Sip)
This creamy and flavorful homemade drink is a healthy and delicious alternative to store-bought options. Packed with natural sweetness from dates and a touch of warming cinnamon, it's the perfect way to indulge without the guilt.
Prep Time: 5 minutes Total Time: 5 minutes Yields: 2 servings
Ingredients:
• 2 cups unsweetened almond milk (or milk of your choice)
• 10-12 Medjool dates, pitted (adjust based on sweetness preference)
• 1 tsp ground cinnamon
• 1/4 tsp vanilla extract (optional)
• Pinch of ground cardamom (optional)
• 1 tbsp chopped nuts (almonds, pistachios, or walnuts) for garnish (optional)
Instructions:
1. Gather your ingredients. Make sure your dates are pitted.
2. Add the almond milk to your blender. You can use any type of milk you prefer, such as dairy, soy, or oat milk.
3. Add the pitted dates. Start with 10 and adjust the amount based on your desired sweetness level. You can always add more later if needed.
4. Sprinkle in the cinnamon. For an extra layer of flavor, add some vanilla extract and a pinch of cardamom (both optional).
5. Blend until smooth. Blend for about 30 seconds to 1 minute, or until the dates are fully incorporated and the drink is creamy.
6. Taste and adjust. If the drink is not sweet enough, add more dates one at a time and blend again.
7. Pour into glasses and serve. Garnish with chopped nuts for added texture and visual appeal (optional).
Tips:
• For a richer flavor, soak your dates in warm water for 10 minutes before adding them to the blender.
• Want a thicker consistency? Use less almond milk.
• Craving a colder drink? Add some ice cubes before blending.
• Feel free to experiment with different flavors! Try adding a tablespoon of cocoa powder for a chocolatey twist, or throw in some frozen berries for a refreshing version.
Enjoy your delicious and healthy homemade Almond Milk with Dates and Cinnamon!
12
views

Salmon Swirl: Baked Pinwheels of Deliciousness!
Baked Salmon Pinwheels with Cream Cheese and Smoked Salmon Filling
These delicious and visually appealing pinwheels are perfect for appetizers, parties, or a light lunch.
Prep Time: 15 minutes Cook Time: 20-25 minutes Yields: 12-14 pinwheels
Ingredients:
• 2 large boneless, skinless salmon fillets
• 8 oz softened cream cheese
• 4 oz thinly sliced smoked salmon, chopped
• 1/4 cup chopped fresh dill (or other fresh herbs like chives or parsley)
• 1 tbsp lemon juice
• 1 tsp dried onion powder
• 1/2 tsp garlic powder
• Salt and freshly ground black pepper to taste
• 1 puff pastry sheet (thawed according to package instructions)
• 1 egg, beaten
• Everything bagel seasoning (optional)
Instructions:
1. Preheat oven to 400°F (200°C). Line a baking sheet with parchment paper.
2. Prepare the salmon: Season both sides of the salmon fillets with salt and pepper. Using a sharp knife, carefully slice the salmon fillets in half horizontally to create thin pieces.
3. Make the cream cheese filling: In a mixing bowl, mash up the softened cream cheese until smooth. Add in the chopped dill (or chosen herb), lemon juice, onion powder, garlic powder, salt, and pepper. Mix well. Gently fold in the chopped smoked salmon.
4. Assemble the pinwheels: Lay the thawed puff pastry sheet on a lightly floured surface. Spread the cream cheese mixture evenly over the entire surface, leaving a 1-inch border around the edges.
5. Roll and slice: Starting from a long edge, carefully roll up the puff pastry sheet jelly-roll style. Pinch the seam closed to seal. Using a sharp knife, slice the roll into about 1-inch thick pinwheels.
6. Bake the pinwheels: Arrange the pinwheels on the prepared baking sheet with a little space between them. Brush the tops with the beaten egg wash. Sprinkle with everything bagel seasoning (optional).
7. Bake for 20-25 minutes, or until the puff pastry is golden brown and flaky and the salmon is cooked through.
8. Serve: Let the pinwheels cool slightly before transferring them to a serving platter. Enjoy warm or at room temperature with your favorite dipping sauce (optional).
Tips:
• For a vegetarian option, substitute the smoked salmon with chopped sun-dried tomatoes or pesto in the filling.
• Feel free to experiment with other fresh herbs like chives or parsley in the cream cheese mixture.
• To prevent the puff pastry from sticking to the rolling pin, lightly dust it with flour before rolling.
• Leftover pinwheels can be stored in an airtight container in the refrigerator for up to 3 days. Reheat in the oven at 350°F (175°C) for a few minutes until warmed through.
Enjoy these delicious and creative Baked Salmon Pinwheels with Cream Cheese and Smoked Salmon Filling!
19
views

Sizzle of the Souk: Grilled Moroccan Lamb Skewers with Couscous & Mint Yogurt
Grilled Moroccan Lamb Skewers with Couscous and Mint Yogurt recipe
This recipe takes you on a trip to Morocco with flavorful lamb skewers, fluffy couscous, and a refreshing mint yogurt sauce.
Prep Time: 15 minutes Marinate Time: 30 minutes (or overnight for best flavor) Cook Time: 10-15 minutes Servings: 4
Ingredients:
• For the Lamb Skewers:
o 1 pound boneless, skinless lamb shoulder, cut into 1-inch cubes
o 2 tablespoons olive oil
o 1 tablespoon ground ginger
o 1 teaspoon paprika
o 1 teaspoon cumin
o 1 teaspoon coriander
o 1/2 teaspoon cayenne pepper (optional)
o Pinch of saffron threads
o 1/2 lemon, juiced
o 1/4 cup chopped fresh mint
o 1/4 cup chopped fresh parsley
o Salt and freshly ground black pepper, to taste
o Wooden skewers (soaked in water for 30 minutes to prevent burning)
• For the Couscous:
o 1 cup couscous
o 1 1/2 cups boiling water
o 1/4 cup golden raisins
o 1/4 cup toasted almonds, roughly chopped
o 1/4 cup dried apricots, chopped (optional)
o Salt and freshly ground black pepper, to taste
• For the Mint Yogurt Sauce:
o 1 cup plain yogurt
o 1/4 cup chopped fresh mint
o 1 tablespoon honey
o Pinch of salt
Instructions:
1. Marinate the Lamb: In a large bowl, combine lamb cubes, olive oil, spices (ginger, paprika, cumin, coriander, cayenne pepper, saffron), lemon juice, chopped mint, and chopped parsley. Season with salt and pepper to taste. Toss well to coat the lamb evenly. Cover the bowl and refrigerate for at least 30 minutes, or preferably overnight for deeper flavor.
2. Prepare the Couscous: In a large bowl, combine couscous and boiling water. Cover the bowl with a lid and let it sit for 5 minutes, or according to package instructions, until the couscous is fluffy and cooked through. Fluff the couscous with a fork.
3. Assemble the Skewers: Thread the marinated lamb cubes onto soaked wooden skewers. Make sure not to overcrowd the skewers for even cooking.
4. Grill the Skewers: Preheat your grill to medium-high heat. Once hot, place the skewers on the grill and cook for 5-7 minutes per side, or until the lamb reaches an internal temperature of 145°F (63°C) for medium-rare.
5. Make the Mint Yogurt Sauce: In a small bowl, whisk together yogurt, chopped mint, honey, and salt.
6. Assemble the Dish: Serve the cooked couscous on plates. Top with grilled lamb skewers and drizzle generously with the mint yogurt sauce. Garnish with additional chopped fresh parsley, if desired.
Tips:
• For a smoky flavor, you can add a teaspoon of smoked paprika to the lamb marinade.
• If you don't have saffron, you can omit it or substitute a pinch of turmeric.
• To toast the almonds, spread them on a baking sheet and bake in a preheated oven at 350°F (175°C) for 5-7 minutes, or until golden brown and fragrant.
• Leftover lamb skewers can be stored in an airtight container in the refrigerator for up to 3 days. Reheat gently on the stovetop or in a preheated oven.
Enjoy this delicious and flavorful Moroccan-inspired dish!
12
views

Ditch the Beef, Embrace the Sea: Salmon Burgers with Lemon Dill Aioli!
Salmon Burgers with Lemon Dill Aioli
These juicy salmon burgers are packed with flavor and topped with a refreshing lemon dill aioli. Perfect for a summer cookout!
Ingredients:
• 2 pounds salmon fillets, skinless and boneless
• 1 cup panko breadcrumbs
• 1/2 red onion, finely diced
• 1/4 cup fresh dill, chopped
• 2 tablespoons lemon juice
• 1/2 teaspoon garlic powder
• 1/2 teaspoon onion powder
• 1/2 teaspoon paprika
• Salt and freshly ground black pepper, to taste
• Hamburger buns
• Vegetable oil, for grilling
Lemon Dill Aioli:
• 1/2 cup mayonnaise
• 2 tablespoons fresh dill, chopped
• 1 tablespoon lemon juice
• Salt and freshly ground black pepper, to taste
Instructions:
1. Prepare the salmon:
o Flake the salmon fillets with a fork or your fingers, removing any large bones.
2. Make the burger mixture:
o In a large bowl, combine flaked salmon, panko breadcrumbs, diced red onion, chopped dill, lemon juice, garlic powder, onion powder, paprika, salt, and pepper.
o Mix gently to combine without overworking the mixture.
3. Form the patties:
o Wet your hands slightly to prevent sticking.
o Divide the salmon mixture into 4 equal portions and form them into slightly flattened patties that are a bit wider than your burger buns.
4. Grill the burgers:
o Preheat your grill to medium-high heat.
o Brush the grill grates lightly with oil.
o Grill the salmon burgers for 3-4 minutes per side, or until cooked through and slightly charred.
o Be careful not to overcook the salmon, as it can dry out easily.
5. Make the aioli:
o In a small bowl, whisk together mayonnaise, chopped dill, lemon juice, salt, and pepper.
6. Assemble the burgers:
o Toast the hamburger buns if desired.
o Spread a generous amount of lemon dill aioli on the bottom bun of each burger.
o Top with a cooked salmon burger and your favorite burger toppings, such as lettuce, tomato, red onion, or avocado.
o Enjoy!
Tips:
• For a more flavorful aioli, you can use roasted garlic mayonnaise instead of regular mayonnaise.
• If you don't have a grill, you can cook the salmon burgers in a pan on the stovetop over medium heat for 4-5 minutes per side.
• Leftover salmon burgers can be stored in an airtight container in the refrigerator for up to 2 days. Reheat gently in a pan or microwave until warmed through.
33
views
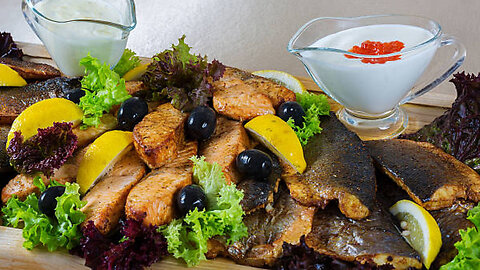
Swordfish Takes a Moroccan Vacation: Tagine Time!
Moroccan Swordfish Tagine with Preserved Lemons and Olives recipe
Swordfish steaks 2 (about 6-ounces each), thick cut
Moroccan spice blend 1 tablespoon (or make your own)
Ground cumin 1 teaspoon
Ground coriander 1 teaspoon
Paprika 1/2 teaspoon
Cayenne pepper (optional) Pinch
Turmeric 1/4 teaspoon
Salt and freshly ground black pepper To taste
Olive oil 2 tablespoons
Red onion 1, thinly sliced
Preserved lemon 1, quartered and thinly sliced
Cherry tomatoes 1 cup
Green olives, pitted and halved 1/2 cup
Chicken broth or water 1 cup
Chopped fresh cilantro 1/4 cup
Chopped fresh parsley 1/4 cup
Instructions:
1. Prepare the Moroccan spice blend (if not using pre-made):
o In a small bowl, combine cumin, coriander, paprika, cayenne pepper (if using), and turmeric.
2. Season the swordfish:
o Pat the swordfish steaks dry with paper towels.
o Season both sides generously with the Moroccan spice blend, salt, and pepper.
3. Sauté the onions and preserved lemons:
o Heat olive oil in a large tagine or oven-safe Dutch oven over medium heat.
o Add the red onion and cook until softened and translucent, about 5 minutes.
o Add the preserved lemon and cook for an additional minute, stirring to release the flavors.
4. Assemble the tagine:
o Arrange the seasoned swordfish steaks in the tagine.
o Scatter the cherry tomatoes and green olives around the fish.
o Pour in the chicken broth or water.
5. Simmer and cook the tagine:
o Bring to a simmer, then cover the tagine and reduce heat to low.
o Simmer for 15-20 minutes, or until the swordfish is cooked through and flakes easily with a fork.
6. Garnish and serve:
o Remove the tagine from heat and sprinkle with fresh cilantro and parsley.
o Serve immediately with couscous or rice.
Tips:
• Adjust the amount of cayenne pepper to your desired level of spiciness.
• If you don't have preserved lemons, you can substitute with 1 tablespoon of fresh lemon juice and 1 teaspoon of lemon zest.
• This recipe can be easily doubled to serve more people.
Enjoy this delicious and flavorful Moroccan Swordfish Tagine with Preserved Lemons and Olives!
21
views

Moroccan Spice Odyssey: Tuna Skewers for a Sultan's Feast!
Moroccan-Spiced Tuna Skewers: A Flavorful Adventure
Embark on a culinary journey to Morocco with these delicious and easy-to-make Moroccan-Spiced Tuna Skewers. Packed with warm spices and fresh flavors, they're perfect for a light meal or a fun appetizer.
Ingredients:
• 1 lb fresh tuna steaks, cut into 1-inch cubes
• 1/2 cup olive oil
• 1/4 cup fresh lemon juice
• 2 tablespoons honey
• 1 tablespoon ground cumin
• 1 tablespoon ground coriander
• 1 teaspoon paprika
• 1/2 teaspoon turmeric
• 1/4 teaspoon cayenne pepper (optional)
• 2 cloves garlic, minced
• 1 lemon, zested
• Wooden skewers, soaked in water for at least 30 minutes
• Salt and freshly ground black pepper, to taste
• Cherry tomatoes, red onion wedges, or bell pepper chunks (optional)
• Chopped fresh parsley and mint, for garnish
Instructions:
1. Marinate the Tuna: In a large bowl, whisk together the olive oil, lemon juice, honey, cumin, coriander, paprika, turmeric, cayenne pepper (if using), garlic, and lemon zest. Season with salt and pepper. Add the tuna cubes and toss to coat evenly. Cover the bowl and refrigerate for at least 30 minutes, or up to overnight for deeper flavor.
2. Prepare the Skewers: Thread the marinated tuna cubes onto the soaked wooden skewers. You can also alternate the tuna with cherry tomatoes, red onion wedges, or bell pepper chunks for added color and flavor.
3. Cook the Skewers: Preheat your grill or grill pan to medium-high heat. Once hot, add the skewers and cook for 3-4 minutes per side, or until the tuna is cooked through and slightly browned.
4. Serve and Enjoy: Plate the cooked skewers and garnish with chopped fresh parsley and mint. Serve immediately with your favorite dipping sauce (optional).
Tips:
• Make sure to soak the wooden skewers in water for at least 30 minutes before using to prevent them from burning on the grill.
• Don't overcook the tuna. It should be cooked through but still slightly moist in the center.
• You can adjust the amount of cayenne pepper in the marinade according to your spice preference.
• Leftover skewers can be stored in an airtight container in the refrigerator for up to 2 days. Reheat gently in a pan or oven until warmed through.
• Feel free to experiment with other vegetables like zucchini, mushrooms, or broccoli on your skewers.
Enjoy your delicious and flavorful Moroccan-Spiced Tuna Skewers!
41
views

Thai Tuna Lettuce Wrap Smackdown: Ditch the Bun, Embrace the Fun!
Thai Tuna Lettuce Wraps Recipe: A Flavorful and Healthy Meal
These Thai Tuna Lettuce Wraps are a delicious and healthy option for lunch, dinner, or even a party appetizer. Packed with fresh flavors and textures, they're sure to satisfy your taste buds while keeping things light.
Ingredients:
• 1 (5 oz) can tuna in water, drained and flaked (or 6 oz cooked and flaked ahi tuna)
• 2 cups shredded red cabbage
• 1 cup chopped cucumber
• 1 cup sliced bell pepper (any color)
• 1 cup julienned carrots
• 1/2 cup chopped fresh cilantro
• 1/4 cup chopped red onion
• 1/4 cup chopped roasted peanuts
For the Sauce:
• 1/4 cup low-sodium soy sauce
• 2 tablespoons fresh lime juice
• 1 tablespoon brown sugar (or honey)
• 1 teaspoon sriracha (optional)
• 1 teaspoon toasted sesame oil
• 1 clove garlic, minced
For Serving:
• 1 head butter lettuce, leaves separated and washed
• Fresh lime wedges (optional)
• Chopped fresh mint (optional)
Instructions:
1. Prep the Veggies: In a large bowl, combine the flaked tuna, shredded red cabbage, chopped cucumber, sliced bell pepper, and julienned carrots.
2. Make the Sauce: In a separate bowl, whisk together the soy sauce, lime juice, brown sugar (or honey), sriracha (if using), toasted sesame oil, and minced garlic.
3. Assemble the Wraps: Lay out the butter lettuce leaves on a plate.
4. Fill and Flavor: Spoon the tuna and veggie mixture onto each lettuce leaf. Drizzle with the flavorful sauce and sprinkle with chopped peanuts and fresh cilantro.
5. Customize and Enjoy: For an extra kick, squeeze some fresh lime juice over each wrap. Add a touch of freshness with chopped fresh mint.
Tips:
• To save time, use pre-shredded vegetables for the cabbage and carrots.
• You can adjust the amount of sriracha in the sauce according to your spice preference.
• Leftover cooked chicken or shrimp can be used as a substitute for the tuna.
• This recipe is easily doubled or tripled to feed a crowd.
• Feel free to experiment with other toppings like chopped avocado, crumbled cashews, or a sprinkle of sesame seeds.
Enjoy your delicious and healthy Thai Tuna Lettuce Wraps!
8
views
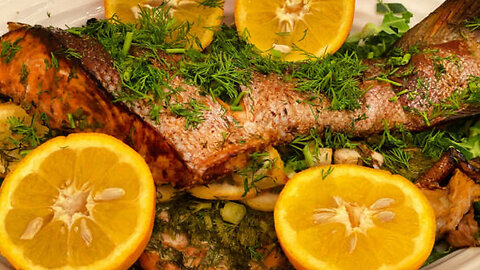
Moroccan Salmon with Chermoula and Roasted Sweet Potatoes: A Flavorful Odyssey
Moroccan Salmon with Chermoula and Roasted Sweet Potatoes recipe
This recipe transports your taste buds to Morocco with a vibrant green chermoula paste and perfectly roasted sweet potatoes, creating a delicious and satisfying meal.
Ingredients:
• For the Chermoula:
o 1 bunch fresh cilantro, chopped
o 1/2 bunch fresh parsley, chopped
o 1 lemon, juiced
o 2 cloves garlic, minced
o 1 teaspoon ground cumin
o 1/2 teaspoon paprika
o 1/4 teaspoon cayenne pepper (adjust to your spice preference)
o 1/4 cup olive oil
o Salt and freshly ground black pepper
• For the Salmon:
o 2 salmon fillets (skin-on or skinless)
o 1 tablespoon olive oil
• For the Roasted Sweet Potatoes:
o 2 medium sweet potatoes, peeled and cut into wedges
o 1 tablespoon olive oil
o 1/2 teaspoon ground cumin
o 1/4 teaspoon ground coriander
o Salt and freshly ground black pepper
Instructions:
1. Make the Chermoula: In a food processor or blender, combine chopped cilantro, parsley, lemon juice, garlic, cumin, paprika, cayenne pepper (optional), and olive oil. Blend until a smooth paste forms. Season with salt and pepper to taste.
2. Marinate the Salmon: Pat the salmon fillets dry with paper towels. Place them in a baking dish and drizzle with olive oil. Spread half of the chermoula paste evenly over the salmon. Cover with plastic wrap and refrigerate for at least 30 minutes, or up to overnight for deeper flavor.
3. Prepare the Sweet Potatoes: Preheat your oven to 400°F (200°C). Toss the sweet potato wedges with olive oil, cumin, coriander, salt, and pepper. Spread them out on a baking sheet in a single layer.
4. Roast: Place the baking sheet with sweet potatoes in the preheated oven and roast for 20-25 minutes, or until tender and slightly golden brown.
5. Bake the Salmon: After marinating, remove the salmon from the refrigerator and discard any remaining marinade. Place the salmon on a separate baking sheet. Transfer the remaining chermoula paste on top of the salmon fillets.
6. Bake the salmon for 12-15 minutes, or until cooked through and flakes easily with a fork.
7. Assemble and Serve: Once the salmon and sweet potatoes are cooked, plate the salmon with roasted sweet potatoes on the side. Drizzle with any remaining chermoula sauce from the pan, if desired. Enjoy!
Tips:
• If you don't have fresh herbs, you can substitute 2 tablespoons of a store-bought chermoula paste for the homemade version.
• Serve this dish with a side of couscous or fluffy rice for a complete and satisfying meal.
• Leftovers can be stored in an airtight container in the refrigerator for up to 3 days. Reheat gently in the oven or microwave
Salmon Cooking Hacks You Need to Know:
Perfect Sear Every Time: Pat your salmon dry before cooking to ensure a beautiful sear.
Don't Overcook: Salmon is best cooked to medium-rare for the most flavorful and tender results.
Skin On or Off?: Salmon skin adds flavor and crisps up beautifully when cooked. However, it can be easily removed after cooking if desired.
Season Simply: Salmon has a naturally rich flavor, so a simple seasoning of salt, pepper, and herbs is often all you need.
Leftover Magic: Use leftover cooked salmon in salads, sandwiches, pasta dishes, or fish cakes for delicious and creative meals
18
views

Honey Miso Glazed Baked Salmon with Sesame Edamame: A Sweet & Savory Symphony
Honey Miso Glazed Baked Salmon with Sesame Edamame recipe
This recipe combines the rich, umami flavors of miso paste with the sweetness of honey for a delicious and easy baked salmon dish. Sesame-coated edamame adds a delightful pop of protein and texture as a perfect side dish.
Ingredients:
For the Honey Miso Glaze:
• 2 tablespoons white miso paste
• 2 tablespoons honey
• 1 tablespoon soy sauce
• 1 tablespoon rice vinegar
• 1 tablespoon sriracha (optional, for a touch of heat)
• 1 clove garlic, minced
• 1 ginger knob, grated (about 1 tablespoon)
For the Salmon:
• 2 salmon fillets (skin-on or skinless, your preference)
• 1 tablespoon olive oil
• Salt and freshly ground black pepper
For the Sesame Edamame:
• 1 cup frozen shelled edamame
• 1 tablespoon olive oil
• 1 tablespoon soy sauce
• 1/2 teaspoon sesame oil
• 1/4 cup toasted sesame seeds
Instructions:
1. Make the Honey Miso Glaze: In a small bowl, whisk together miso paste, honey, soy sauce, rice vinegar, sriracha (if using), garlic, and ginger until smooth. Set aside.
2. Prep the Salmon: Preheat your oven to 400°F (200°C). Line a baking sheet with parchment paper. Pat the salmon fillets dry with paper towels and season generously with salt and pepper.
3. Glaze the Salmon: Spread half of the miso glaze evenly over the top of each salmon fillet. Reserve the remaining glaze for basting during baking.
4. Bake the Salmon: Place the salmon on the prepared baking sheet and bake for 12-15 minutes, or until the salmon is cooked through and flakes easily with a fork. Baste the salmon with the remaining glaze halfway through baking.
5. Cook the Edamame: While the salmon bakes, cook the edamame according to package instructions. Drain and set aside.
6. Make the Sesame Edamame: In a large skillet or pan, heat olive oil over medium heat. Add the edamame, soy sauce, and sesame oil. Cook for 2-3 minutes, stirring occasionally, until heated through and slightly coated in the sauce.
7. Assemble and Serve: Remove the salmon from the oven and transfer to plates. Top with sesame seeds and serve alongside the sesame edamame. Enjoy!
Tips:
• For a thicker glaze, simmer the glaze in a small saucepan over low heat for a few minutes before using.
• If you don't have white miso paste, you can substitute with light or yellow miso paste.
• To toast sesame seeds, simply heat a dry skillet over medium heat and add the sesame seeds. Toast for a few minutes, stirring constantly, until fragrant and golden brown.
• Leftovers can be stored in an airtight container in the refrigerator for up to 3 days. Reheat gently in the oven or microwave.
Salmon Cooking Hacks You Need to Know:
Perfect Sear Every Time: Pat your salmon dry before cooking to ensure a beautiful sear.
Don't Overcook: Salmon is best cooked to medium-rare for the most flavorful and tender results.
Skin On or Off?: Salmon skin adds flavor and crisps up beautifully when cooked. However, it can be easily removed after cooking if desired.
Season Simply: Salmon has a naturally rich flavor, so a simple seasoning of salt, pepper, and herbs is often all you need.
Leftover Magic: Use leftover cooked salmon in salads, sandwiches, pasta dishes, or fish cakes for delicious and creative meals
44
views

Mango Tango: A Tropical Escape in a Glass
Mango Tango: A Tropical Escape in a Glass
This refreshing and vibrant drink is perfect for a hot summer day! Packed with the sweetness of mango and the tang of citrus, it's a taste bud party in a glass. Let's get started!
Ingredients:
• 1 ripe mango, peeled and chopped
• 1 orange, juiced
• 1/2 lime, juiced (optional: add more for a tangier taste)
• 1/2 cup water (or more to desired consistency)
• 1-2 tablespoons honey or agave nectar (optional, for sweetness)
• Fresh mint leaves and a mango wedge (for garnish)
• (Optional) 1/2 cup chopped pineapple or passion fruit (for an extra flavor boost)
Instructions:
1. Prep the Tropical Stars:
o Wash and dry your mango. Peel it and chop it into large chunks.
o Juice your orange and lime. You can use a juicer or simply squeeze them by hand.
o If using pineapple or passion fruit, wash and chop them into small pieces.
2. Blend it Up:
o Combine all your chopped fruits, citrus juices, and water in a blender.
o Add honey or agave nectar if you prefer a sweeter drink.
o Pulse the blender a few times to break down the ingredients, then blend until smooth and creamy.
3. Adjust to Perfection:
o Taste your Mango Tango! If it's too thick, add a little more water and blend again. If it's too tart, add a touch of honey or agave nectar.
4. The Grand Reveal:
o Pour your beautiful Mango Tango into a glass filled with ice.
o Garnish with a fresh mint leaf and a wedge of mango for an extra tropical touch.
5. Sip and Savor:
o Sit back, relax, and enjoy your taste of paradise! This refreshing drink is perfect on its own or as a delicious accompaniment to a poolside party or barbecue.
Tips:
• If your mango isn't very ripe, you can add a tablespoon of frozen mango chunks for a thicker consistency.
• For a fun twist, rim your glass with sugar or chili powder before adding the drink.
• This recipe is easily doubled or tripled to serve a crowd.
• Get creative! Experiment with different fruits like strawberries, kiwi, or guava to create your own unique flavor combination.
11
views

Fish and Chips with Mushy Peas recipe
Fish and Chips with Mushy Peas recipe
Ingredients:
For the Fish
Skinless, boneless white fish (cod, haddock, etc.) 2 lbs
Salt 1 tsp
Black pepper 1/2 tsp
For the Batter
All-purpose flour 1 cup
Cold beer 1 cup
Baking powder 1 tsp
Pinch of salt
For the Chips
Large potatoes 3
Vegetable oil for frying
For the Mushy Peas
Frozen peas 1 bag (10 oz)
Butter 2 tbsp
Lemon, zested 1/2
Mint leaves, chopped (optional) Pinch
Salt and pepper to taste
Instructions:
1. Prep the Fish:
o Cut the fish into thick pieces.
o Pat the fish dry with paper towels.
o Season the fish with salt and pepper.
2. Make the Batter:
o In a large bowl, whisk together the flour, beer, baking powder, and salt until smooth.
o Let the batter rest for 15 minutes.
3. Prep the Chips:
o Peel the potatoes and cut them into thick wedges.
o Soak the potatoes in cold water for 30 minutes.
o Drain the potatoes and pat them dry with paper towels.
4. Fry the Fish:
o Heat vegetable oil in a large pot or Dutch oven to 350°F (175°C).
o Dip the fish in the batter, coating it completely.
o Carefully lower the fish into the hot oil.
o Fry the fish for 3-5 minutes per side, or until golden brown and cooked through.
o Transfer the fish to a paper towel-lined plate to drain.
5. Fry the Chips:
o Heat the oil to 375°F (190°C).
o Fry the potatoes in batches for 3-4 minutes per side, or until golden brown and tender.
o Transfer the chips to a paper towel-lined plate to drain.
6. Make the Mushy Peas:
o In a saucepan, melt the butter over medium heat.
o Add the peas, lemon zest, and mint (if using).
o Cook for 2-3 minutes, or until the peas are heated through.
o Use a potato masher to mash the peas slightly, leaving some texture.
o Season with salt and pepper to taste.
7. Serve:
o Plate the fish and chips, and spoon the mushy peas alongside.
o Enjoy with malt vinegar for the fish and lemon wedges for the peas (optional).
This recipe is a great way to make a classic British dish at home. The fish and chips are crispy and golden, and the mushy peas are a delicious and flavorful accompaniment. With a little bit of effort, you can create a restaurant-quality meal in your own kitchen.
12
views

Citrus Pancakes recipe
Citrus Pancakes recipe
These fluffy pancakes are bursting with citrusy flavor and sunshine! Perfect for a delightful and vibrant breakfast.
Ingredients:
• 1 1/2 cups all-purpose flour
• 2 tablespoons granulated sugar
• 2 teaspoons baking powder
• 1/2 teaspoon salt
• Zest of 1 lemon
• Zest of 1 orange
• Pinch of grapefruit zest (optional)
• 1 1/4 cups milk
• 1 egg
• 2 tablespoons melted butter
For the Toppings (choose your favorites):
• Fresh berries (such as blueberries, raspberries, strawberries)
• Whipped cream (optional: add a splash of orange liqueur for a citrus twist)
• Maple syrup
• Homemade orange marmalade
Instructions:
1. Prep the Citrus: Using a fine-grained grater, zest your lemon, orange, and grapefruit (if using). Be sure to avoid the white pith, as it can be bitter.
2. Dry Ingredients: In a large bowl, whisk together the flour, sugar, baking powder, and salt.
3. Zest it Up: Add the lemon zest, orange zest, and grapefruit zest (if using) to the dry ingredients and whisk to combine.
4. Wet Ingredients: In a separate bowl, whisk together the milk, egg, and melted butter.
5. Combine Wet and Dry: Pour the wet ingredients into the dry ingredients and whisk until just combined. Be careful not to overmix, a few lumps are okay!
6. Heat Up the Griddle: Preheat your griddle or a large skillet over medium heat. Grease lightly with butter or cooking spray.
7. Pancake Power!: Pour about 1/4 cup of batter per pancake onto the preheated griddle.
8. The Golden Touch: Cook the pancakes for 2-3 minutes per side, or until golden brown and bubbles appear on the surface.
9. Stack 'em Up: Transfer the cooked pancakes to a plate and keep warm while you cook the remaining batter.
10. Top it Off!: Now comes the fun part! Top your pancakes with your favorite toppings. Fresh berries, a dollop of citrus-infused whipped cream, a drizzle of maple syrup, or a spoonful of homemade orange marmalade - the possibilities are endless!
11. Serve and Enjoy!: Dig in and enjoy your sunshine-filled plate of Sun-kissed Citrus Pancakes!
10
views

Get Fizzy with Fruit: A Sparkling Water Recipe
This recipe is just a jumping-off point! Feel free to experiment with different fruits, herbs, and even flavored sparkling water for endless flavor combinations.
Ingredients:
• 1 cup sparkling water (chilled)
• 1/2 cup fresh fruit (berries, citrus slices, mango chunks, etc.)
• Optional: Fresh mint or basil sprig
• Optional: Splash of juice (lime, orange, etc.)
Instructions:
1. Fruity Prep: Wash and prepare your chosen fruit. Slice or chop them into bite-sized pieces.
2. Flavor Fusion: Add the fruit pieces to a tall glass. Feeling extra bold? Throw in a squeeze of fresh juice (lime, orange, etc.) for an additional flavor boost.
3. Fresh Touch (Optional): If you're using mint or basil, gently muddle a sprig in the glass to release those fragrant oils.
4. The Grand Fizz: Pop the top of your chilled sparkling water and carefully pour it over the fruit in your glass. Watch the bubbles dance and mingle with the fruit!
5. Serve it Up!: Fill the glass with ice (optional) and enjoy your refreshing, homemade sparkling water creation!
Tips:
• For a stronger fruit flavor, let the fruit sit in the glass for a few minutes before adding the sparkling water.
• Frozen berries can be a fun and icy twist!
• Want a more intense mint flavor? Muddle the mint a little more vigorously.
• This recipe can be easily doubled or tripled to serve a crowd.
• Get creative! Experiment with different fruit combinations like watermelon and mint, or kiwi and lime.
17
views

Ultimate Homemade Lemonade Recipe: A Symphony of Citrus!
Ingredients:
• 4-6 lemons (depending on juiciness)
• 1 cup sugar (or your preferred sweetener)
• 4 cups water
• Fresh mint sprig (optional)
Instructions:
1. Squeeze Out the Sunshine: Wash and dry your lemons. Cut them in half and prepare to unleash the citrus symphony! Using a manual juicer or even a fork, extract as much juice as possible from those little yellow suns. Aim for about 1 cup of fresh lemon juice.
2. Sweetness Symphony: In a large pitcher, combine the freshly squeezed lemon juice with your chosen sweetener. Sugar is a classic, but honey or agave nectar can add a unique twist. Stir it all up until the sugar dissolves completely.
3. Water, Glorious Water: Now, add 4 cups of cold water to the pitcher. You can adjust this amount for a stronger or weaker lemonade depending on your preference.
4. The Minty Touch (Optional): Feeling fancy? Wash a sprig of mint and give it a gentle muddle in the pitcher. This will release those refreshing minty oils and elevate your lemonade to a whole new level.
5. Chill Out: Stir everything together one last time, then cover the pitcher and place it in the refrigerator for at least 1 hour, or until nice and cold.
6. Serve it Up!: Fill a glass with ice and pour your homemade lemonade over it. Garnish with a lemon wedge or a sprig of mint for an extra touch of visual appeal (and maybe another flavor burst with the mint!).
Tips:
• For a perfectly balanced lemonade, taste and adjust the sugar or water content to your liking.
• Leftover lemonade can be stored in the refrigerator for up to 3 days.
• Get creative! Experiment with adding other fruits like sliced strawberries, raspberries, or even muddled peaches for a fruity twist.
• Make it fizzy! Add a splash of club soda to your glass for a delightful bubbly surprise.
22
views

Ultimate Summer Iced Tea Recipe
Ultimate Summer Iced Tea Recipe
This recipe is a guide to get you started. Feel free to adjust the sweetness, fruits, and herbs to create your own perfect flavor combination!
Ingredients:
• 4 cups water
• 3 black tea bags (or 2 tablespoons loose leaf tea)
• 1/2 cup sugar (or your preferred sweetener)
• 1 lemon, sliced
• 1 orange, sliced (optional)
• 1 cup fresh berries (optional)
• 1 sprig of mint or basil (optional)
Instructions:
1. Brew the Tea: Bring 2 cups of water to a boil in a saucepan. Remove from heat and add the tea bags or loose leaf tea. Steep for 5-10 minutes, depending on desired strength. (Stronger tea = longer steeping time)
2. Sweeten it Up: While the tea steeps, heat the remaining 2 cups of water in a separate pot. Add sugar and stir until dissolved. You can also use honey, agave nectar, or another sweetener of your choice.
3. Fruity Fun: In a large pitcher, combine the brewed tea (after removing the tea bags or leaves) with the hot sugar water. Add the sliced lemon and orange (if using). Muddle the fruit slightly with a spoon to release the juices.
4. Herbal Twist: Throw in your mint or basil sprig for an extra refreshing flavor.
5. Chill Out: Let the mixture cool slightly at room temperature, then place it in the refrigerator for at least 1 hour, or until completely chilled.
6. Serve it Up: Fill a glass with ice and pour your delicious homemade iced tea over it. Garnish with a lemon wedge, orange slice, or a sprig of mint for an added touch.
Tips:
• For a stronger iced tea, brew the tea concentrate with less water (use 3 cups instead of 4) and dilute it with cold water after chilling.
• Want a fizzy twist? Add a splash of club soda to your glass before pouring the iced tea.
• This iced tea can be stored in the refrigerator for up to 3 days.
• Experiment with different fruits and herbs to create endless flavor combinations! Try sliced peaches, mangoes, or even kiwi for a tropical twist.
25
views

Smoothie Bowls: Beyond the Sip! It's a Tropical Vacation in a Bowl!
Build Your Own Paradise: A Step-by-Step Smoothie Bowl Recipe
This recipe creates a thick, creamy, and flavorful smoothie bowl that's endlessly customizable.
Ingredients:
• 1 cup frozen fruit (mix and match your favorites! Berries, mango, pineapple, banana, etc.)
• ½ cup fresh fruit (sliced or chopped – for topping)
• ½ cup yogurt (Greek yogurt for protein, or non-dairy yogurt for a vegan option)
• ¼ cup milk (dairy or plant-based milk – whichever you prefer!)
• Optional add-ins:
o 1 tablespoon nut butter (peanut butter, almond butter, cashew butter)
o 1 scoop protein powder (chocolate, vanilla, or any flavor you enjoy)
o ½ cup greens (spinach or kale – a sneaky way to add veggies!)
o 1 tablespoon chia seeds
o Granola (for a satisfying crunch)
o Honey, agave nectar, or maple syrup (for a touch of sweetness)
Instructions:
1. Prep the Fruit: Wash and slice or chop your fresh fruit for topping. Set it aside.
2. Blend the Base: Place your frozen fruit, yogurt, and milk in a blender. If you're using protein powder or greens, add them now. Blend until smooth and thick. This is the base of your smoothie bowl!
(proTip!)
For an extra thick and creamy base, add a frozen banana or half an avocado to the blender.
3. Pour and Top: Pour the blended smoothie base into a bowl. Now, unleash your creativity! Top your bowl with fresh fruit slices, a drizzle of honey or syrup, a sprinkle of granola, a dollop of nut butter, or a sprinkle of chia seeds.
4. Get Creative!: This is your chance to personalize your creation! Feeling like a chocolate fix? Add a drizzle of chocolate syrup. Want a tropical twist? Top it with shredded coconut and a sprinkle of lime zest.
5. Enjoy! Grab a spoon and savor your delicious and healthy smoothie bowl creation!
Tips:
• Leftover smoothie base can be stored in an airtight container in the freezer for up to 3 months. Thaw slightly before blending again for a smoothie bowl.
• Don't have fresh fruit for topping? No problem! Frozen fruit works just fine.
• Make it a family affair! Let everyone create their own personalized smoothie bowl with their favorite toppings.
Have fun and blend your way to a delicious and healthy treat!
21
views

Escape the Heat! Craft Coffee Shop-worthy Iced Coffee at Home
Homemade Iced Coffee Recipe: Beat the Heat!
This recipe creates a refreshing, customizable iced coffee that's better than anything you'll get at a coffee shop.
Ingredients:
• 1 cup strong brewed coffee (cold brew recommended, but any strong coffee will work)
• 1 cup ice (crushed ice preferred)
• ½ cup milk of your choice (dairy, nut-based, oat – the choice is yours!)
• Sweetener to taste (sugar, honey, agave nectar, sugar substitute, or none at all!)
• Optional flavorings: Vanilla extract, cinnamon, chocolate syrup, caramel sauce
Instructions:
1. Brew Strong Coffee: Brew a strong cup of coffee using your preferred method (French press, pour-over, or regular coffee pot). If you have time, cold brew coffee is the ultimate choice for a smooth iced coffee.
2. Chill it Out: Pour your hot coffee over crushed ice in a mason jar or pitcher. Stir gently to combine. Let it sit for 5 minutes, or until the coffee is chilled.
3. Milk Time (Optional): Pour in your desired amount of milk. Slowly add the milk while stirring gently to avoid over-diluting the coffee.
4. Sweeten to Taste: Add your preferred sweetener (sugar, honey, agave nectar, etc.) a little at a time, stirring after each addition, until you reach your desired level of sweetness. For a sugar-free option, skip the sweetener altogether.
5. Flavor Frenzy (Optional): Now's the time to get creative! Add a splash of vanilla extract for a classic touch, a sprinkle of cinnamon for warmth, or drizzle with chocolate or caramel sauce for a decadent treat.
6. Serve and Sip: Pour your iced coffee into a tall glass filled with fresh ice. Grab a straw and enjoy your delicious homemade iced coffee!
Tips:
• For a thicker iced coffee, use less ice or add less milk.
• Leftover iced coffee can be stored in an airtight container in the fridge for up to 2 days. Revive the flavor by adding fresh ice before serving.
• Want a fun twist? Freeze leftover coffee cubes and use them instead of ice for a slow-melting, ultra-chilled iced coffee.
Enjoy your cool and refreshing homemade iced coffee!
22
views

Beyond the Mug: Craft Hot Chocolate Like a Chocolatier
Homemade Hot Chocolate Recipe: A Step-by-Step Guide
This recipe creates rich, delicious hot chocolate that's easy to customize to your taste.
Ingredients:
• 2 cups milk (whole milk for extra creaminess, but any milk works!)
• 3 tablespoons unsweetened cocoa powder
• ¼ cup sugar (white, brown, or a mix depending on your preference)
• Pinch of salt
• ½ teaspoon vanilla extract
• 1 tablespoon heavy cream (optional, for extra richness)
• Optional toppings: whipped cream, marshmallows, chopped chocolate, cinnamon, peppermint extract, chili flakes
Instructions:
1. Prep the Cocoa: In a medium saucepan, whisk together the cocoa powder and sugar. Sifting the cocoa powder beforehand helps prevent clumps.
2. Heat the Milk: Pour the milk into the saucepan with the cocoa powder and sugar mixture. Heat the mixture over medium-low heat, whisking constantly.
3. Simmer, Don't Boil: Bring the mixture to a simmer (small bubbles around the edges). Do not let it boil, as this can make the hot chocolate taste burnt.
4. Whisk in the Creamy Goodness: Once simmering, whisk in the salt and vanilla extract. If you're using heavy cream for extra richness, add it now and whisk it in until fully incorporated.
5. Customize Your Creation: This is where you get creative! Add chopped chocolate (dark, milk, or white!), a sprinkle of cinnamon for warmth, a dash of peppermint extract for a festive twist, or even a pinch of chili flakes for a surprising kick.
6. Serve and Savor: Pour your hot chocolate into your favorite mug and top it off with your favorite garnishes! Whipped cream, marshmallows, chocolate shavings – the choice is yours!
Tips:
• For a thicker hot chocolate, whisk in a cornstarch slurry (1 tablespoon cornstarch mixed with 2 tablespoons of cold milk) before heating the mixture.
• Want to make a big batch? This recipe easily doubles or triples.
• Leftover hot chocolate can be stored in an airtight container in the fridge for up to 3 days. Reheat gently on the stovetop.
Enjoy your delicious homemade hot chocolate!
20
views

Spiced Apple Cider: A Warm Fall Hug in a Mug!
Ingredients:
• 2-3 apples (a mix of sweet and tart varieties works well)
• 4 cups apple cider (freshly pressed or store-bought)
• 4 cinnamon sticks
• 10 whole cloves
• 1/2 cup orange juice (optional)
• Orange slices and cinnamon sticks for garnish (optional)
Instructions:
1. Gather your autumnal bounty! Make sure you have all your ingredients ready on your counter.
2. Apple prep time! Wash and core your apples. Slice them thinly, but don't worry about being perfect.
3. Spice up your life! In a large pot, combine the apple slices, apple cider, cinnamon sticks, and cloves.
4. Feeling fancy? Add a splash of orange juice for a citrusy kick (optional).
5. Let it simmer! Bring the mixture to a gentle simmer on your stovetop. Reduce heat and simmer for 15-20 minutes, allowing the flavors to meld and mingle.
6. Time to get cozy! Ladle the warm cider into your favorite mugs.
7. Garnish time! Add a festive touch with an orange slice and a cinnamon stick (optional).
8. Embrace the fall vibes! Curl up on the couch with a blanket and your mug of Spiced Apple Cider. Breathe in the warm aroma and enjoy the taste of autumn in every sip!
Tips:
• For a stronger apple flavor, simmer the cider for a longer time.
• Don't like cloves? Leave them out or substitute with a pinch of nutmeg.
• Make it a party! This recipe easily doubles or triples for sharing with friends and family.
• Add a dollop of whipped cream for an extra decadent treat!
21
views

Virgin Piña Colada Recipe: Beach in a Glass!
Ingredients:
• 1 1/2 cups unsweetened frozen pineapple chunks (or fresh pineapple, chopped)
• 1/4 cup ice (optional)
• 3/4 cup unsweetened pineapple juice
• 3/4 cup unsweetened coconut milk
• 1-3 tablespoons brown sugar (optional)
• Fresh pineapple wedges and maraschino cherries for garnish (optional)
Instructions:
1. Gather your tropical treasures! Make sure you have all the ingredients ready on your kitchen counter.
2. Get your blend on! Place the frozen pineapple chunks (or fresh chopped pineapple) and ice (if using) into your blender.
3. Pour in the sunshine! Add the pineapple juice and coconut milk on top of the pineapple and ice.
4. Sweet tooth talkin'? If you crave a touch more sweetness, add 1 tablespoon of brown sugar at a time and blend until desired taste is reached.
5. Blend it like you mean it! Turn on your blender and blend until the mixture is smooth and creamy. No pineapple chunks should be in sight!
6. Aloha to paradise! Pour your beautiful Virgin Piña Colada into chilled glasses.
7. Garnish time! Add a festive touch with a fresh pineapple wedge and a maraschino cherry (optional).
8. Escape to the tropics! Sit back, relax, and take a sip of your delicious Virgin Piña Colada. Close your eyes and imagine the beach waves crashing and the palm trees swaying.
Tips:
• For an extra creamy Piña Colada, use full-fat coconut milk.
• Want a thicker drink? Add more frozen pineapple chunks.
• Don't have brown sugar? White sugar or simple syrup can work too!
• Make it a party! This recipe easily doubles or triples for sharing with friends and family.
13
views

Shirley Temple recipe
Ingredients:
• 1 tall glass
• 1 maraschino cherry (for the bottom)
• 1 ounce grenadine syrup
• Lemon-lime soda or club soda (chilled)
• Optional garnishes: maraschino cherry on a stem, orange slice, festive straw
Instructions:
1. The Cherry Surprise: Pop a beautiful maraschino cherry right into the bottom of your glass. This is your sweet reward for the first sip!
2. A Touch of Magic: Pour in 1 ounce of grenadine syrup. Remember, a little goes a long way! You want a vibrant red hue, not a sugary mess.
3. The Fizzy Finish: Slowly pour your chilled lemon-lime soda or club soda into the glass. Watch the magic happen as the bubbles dance with the grenadine, creating a delightful fizz.
4. Star Power Garnish: It's time to make this drink a showstopper! Add another maraschino cherry on a fancy stem for a touch of elegance. Then, throw in a juicy orange slice for a pop of sunshine and color. Finish it off with a festive straw for stylish sipping.
Tips:
• Use high-quality grenadine syrup for the best flavor.
• Experiment with different lemon-lime sodas for a twist on the classic taste.
• Make it a party pleaser! This recipe is easily multiplied for a crowd.
• Get creative with your garnishes! Try edible flowers, a sprig of mint, or even a sprinkle of cinnamon.
Enjoy your delicious and nostalgic Shirley Temple!
16
views

Sparkling Italian Soda Recipe: Fizz Up Your Day!
Ingredients:
• 1 tall glass
• Ice cubes (enough to fill the glass halfway)
• 1-2 ounces flavored syrup (choose your favorite!)
• Club soda or sparkling water (chilled)
• Optional: Whipped cream, maraschino cherries, fruit slices
Instructions:
1. Build the Ice Castle: Fill your tall glass with ice cubes all the way to the brim. Don't be shy – the more ice, the colder your soda will stay!
2. Flavor Frenzy: Now for the fun part! Pick your favorite flavored syrup (or mix a few for a unique twist) and pour 1-2 ounces into the glass. Raspberry, cherry, mango, guava – the possibilities are endless!
3. Fizz Time! Grab your chilled club soda or sparkling water and slowly pour it into the glass. Watch the magic happen as the bubbles rise and mingle with the syrup, creating a beautiful fizzy concoction.
4. The Grand Finale: Here comes the best part – customization! This is your Italian soda masterpiece, so dress it up however you like. Want a creamy delight? Dollop on some whipped cream. Feeling nostalgic? Pop in a maraschino cherry. Craving a burst of freshness? Throw in some juicy fruit slices!
Tips:
• Use high-quality flavored syrups for the best taste.
• Experiment with different flavor combinations to create your own signature soda!
• Make sure your club soda or sparkling water is well chilled for an extra refreshing drink.
• Get creative with your garnishes! Try edible flowers, mint leaves, or even a sprinkle of cinnamon.
Enjoy your delicious homemade Italian soda!
25
views

Homemade Ginger Ale recipe : Your DIY Fizz Fix!
This recipe is all about crafting a refreshing and flavorful homemade ginger ale. Skip the store-bought stuff and unleash the power of fresh ginger for a taste bud party!
Ingredients:
• 2 cups water
• 1 large knob of fresh ginger, peeled and grated
• 1/2 cup sugar (or to taste)
• 1/4 cup honey (or to taste, optional)
• Peel of 1 lemon
• 1 liter club soda, chilled
• Juice of 1 lime
• Fresh ginger slices and lime wedge for garnish (optional)
Instructions:
1. Ginger Power: In a saucepan, combine the water and grated ginger. Heat over medium heat and bring to a simmer. Let simmer for 15 minutes, allowing the ginger to infuse its magic flavor into the water.
2. Sweet Symphony: Remove the saucepan from heat and stir in your chosen sweetener, sugar or honey (or a combination of both). Adjust the amount to your taste preference. Let the mixture cool slightly.
3. Citrus Squeeze: While the ginger mixture cools, add the lemon peel to the saucepan. This will add a subtle citrusy note to your ginger ale.
4. Straining the Show: Once the ginger mixture has cooled, strain it into a pitcher using a fine-mesh sieve to remove the ginger pieces and lemon peel.
5. Fizz & Fun: Now for the exciting part! Add the chilled club soda to the ginger mixture in the pitcher. Gently stir to combine, but be careful not to overmix as you want to preserve the fizz.
6. Tangy Twist: Add the fresh lime juice to the pitcher and stir gently. Taste and adjust the sweetness or lime juice content as desired.
7. Ginger Ale Glory: Serve your homemade ginger ale over ice in glasses. For an extra touch, garnish with fresh ginger slices and a lime wedge.
Tips:
• Want a stronger ginger flavor? Simply simmer the ginger for a longer duration.
• Feeling adventurous? Add a few cloves or a star anise pod to the simmering water for a unique twist.
• Leftover ginger syrup can be stored in an airtight container in the refrigerator for up to a week. Use it to make more ginger ale or add a spicy kick to cocktails and mocktails.
• Feel free to experiment with different sweeteners like agave nectar or maple syrup.
Embrace the fizz and enjoy your homemade ginger ale creation!
21
views

Spiced Chai Latte: Brewing Your Own Cozy Magic
This recipe is all about creating a delicious and comforting spiced chai latte at home. Forget the overpriced coffee shop versions, this is fresh, flavorful, and easy to make!
Ingredients:
• 2 cups water
• 2 black tea bags (or 2 tablespoons loose-leaf black tea)
• 4 whole cloves
• 4 green cardamom pods, crushed slightly
• 1 cinnamon stick, broken into pieces
• 1/2 inch fresh ginger, peeled and thinly sliced (optional)
• 1/4 cup honey or maple syrup (or to taste)
• 2 cups milk (dairy or non-dairy)
• Pinch of ground cinnamon (for garnish, optional)
Instructions:
1. Spice Symphony: In a small saucepan, combine the water, cloves, cardamom pods, cinnamon pieces, and ginger (if using). Heat over medium heat until simmering. Let simmer for 5 minutes, allowing the spices to release their magic aromas.
2. Black Tea Party: Add the black tea bags (or loose-leaf tea) to the simmering spice mixture. Steep for 5 minutes for a strong tea flavor.
3. Sweeten the Deal: Remove the saucepan from heat and stir in your preferred sweetener, honey or maple syrup. Adjust the amount to your taste preference.
4. Strain the Show: Strain the chai tea mixture into a heatproof pitcher or mug, discarding the used spices and tea bags.
5. Milk Magic: In a separate saucepan or using a milk frother, heat the milk until steaming hot but not boiling. If using a frother, froth the milk until light and foamy.
6. The Grand Finale: Divide the strained chai tea between two mugs. Gently pour the frothed milk over the chai, creating a beautiful layered effect. Garnish with a pinch of ground cinnamon for an extra touch of warmth (optional).
7. Sip & Savor: Now comes the best part! Curl up with your homemade Spiced Chai Latte and enjoy the burst of flavor and warm embrace in every sip.
Tips:
• For a richer chai flavor, simmer the spices in the dry pan for a minute before adding water, releasing even more aroma.
• Don't have a milk frother? No problem! Fill a mason jar halfway with milk and shake vigorously for a minute or two to create frothed milk.
• Want a stronger chai? Simply use more tea bags or loose-leaf tea during steeping.
• Feeling adventurous? Add a star anise pod or a pinch of black pepper to the spice mix for a unique twist.
• This chai concentrate can be stored in the refrigerator for up to a week. Simply warm it up and add frothed milk for a quick and delicious chai latte anytime.
17
views