

Enjoyed this channel? Join my Locals community for exclusive content at
noreenskitchen.locals.com!

SKILLET CHICKEN PARM!! FEED YOURSELF; RECIPES FOR NEW COOKS
#learntocook #chickenparm #homemade
Today I am starting a new series where I will be sharing quick and easy recipes for new cooks! This is brought on by the fact that both my daughters are starting their life journey with new jobs and serious beaus and their future is very bright! My oldest has great ability in the kitchen, my youngest, not so much. She is now figuring out that if she wants to eat she needs to know how to cook some simple but delicious things for herself. With that idea in mind, I am going to add some of those to the catalog. I am starting with this delicious, skillet chicken parmesan. A few ingredients, from the fridge and pantry can make this delicious meal in under a half an hour and it is so satisfying and comforting!
Keep in mind that I will be using store bought, off the shelf ingredients for this series because new cooks don't need to know how to make everything from scratch. They need to get inspired and encouraged through simplicity and that is what I intend to do. So if this is not your cup of tea, I completely understand but please give grace and understanding in this particular case because semi homemade is just as good as homemade when you are starting out! The scratch stuff comes later!
I hope you give this a try sometime soon, whether you are a new or seasoned cook and I hope you love it!
Happy Eating!
You can find a printable version of this recipe here: https://bit.ly/3pRstun
Get my cookbooks here: http://bit.ly/1czqM5R
Business Inquiries can be sent to:
info@noreenskitchen.com
Check me out on social media!
Facebook: http://on.fb.me/12bdibt
Twitter: @noreenskitchen
Instagram: http://bit.ly/12bdqrp
Google + http://bit.ly/1o5GMYy
***MAILING ADDRESS****
Noreen's Kitchen
PO Box 14173
New Bern, NC 28561
Have a question for me? Send me an email:
info@noreenskitchen.com
Noreen's Kitchen Community Guidelines (The Rules)
http://bit.ly/2i7VocU
Any links to Amazon are, in many cases, affiliate links.
Produced by Noreen's Kitchen ©2008-2016 all rights reserved All embeds must live link to Noreen's Kitchen channel. No Editorial Excerpts without permission, Violators agree to pay royalties, all court costs, all collections & all lawyers fees.
skillet dinner chicken parmesan recipe cooking unbreaded chicken parmesan
199
views

SLOW COOKER MEATBALL MINESTRONE!! CROCKTOBER EXTRAVAGANZA!!
Be sure to subscribe to all these channels so you don't miss out on any of the CROCKtober videos!
CROCKtober Extravaganza 2021 FB Group
https://www.facebook.com/groups/12100...
CROCKtober Extravaganza 2021
Jeni Gough https://bit.ly/3D2xN2B
A Country Life https://bit.ly/3ov0nWk
Noreen's Kitchen https://bit.ly/3DafJn0
The Bealles https://bit.ly/3Fe2x2t
That 1870's Homestead https://bit.ly/3orTCob
Parsnips and Parsimony https://bit.ly/3ortQjJ
Homestead Dad https://bit.ly/3F8tVyV
organizedMOM https://bit.ly/3mo1R1I
Apron strings https://bit.ly/2ZUz79t
Linda's Pantry https://bit.ly/3itxlCE
Gregs Kitchen https://bit.ly/3ixEHF7
Freedom Homestead https://bit.ly/2ZUzj8H
Diane - The Canning Nana https://bit.ly/3iwgJu2
Our HodgePodge Homestead https://bit.ly/3F6UoN8
Frugal Fit Mom https://bit.ly/3Fg4yeA
Whippoorwill Holler https://bit.ly/3mmYHvm
Souper at 60 https://bit.ly/3DcONTV
A Good Life Farm https://bit.ly/3FhhIYw
2leelou Creates https://bit.ly/3mjXvZI
Prepper Potpourri https://bit.ly/2ZUHGB6
In the Kitchen with Karen https://bit.ly/3D8q4Qx
The Purposeful Pantry https://bit.ly/3iv6hCP
Helga's Pennsylvania Cooking https://bit.ly/3itZ7yC
Arizona Homestead https://bit.ly/3DbkNrA
Fantail Valley Homestead https://bit.ly/3FcSLxu
Mennonite Farmhouse: https://bit.ly/3mpD8KJ
Little Village Homestead https://bit.ly/3mllnMn
Little Urban Homestead https://bit.ly/3D7rlHt
Country living with the Bateman's: https://bit.ly/3ovmL1S
Today I am excited to have been invited to participate in the CROCKtober Extravaganza! Every day in October you will find a new video posted, brought to you by a curated selection of folks who were hand picked by our host, Jeni! You will find all things slow cooker and instant pot! One new video, every day culminating with a give away by Jeni for a crockpot on the 31st! So be sure to leave a comment down below and then go check out all the channels so you don't miss a video or an opportunity to enter the giveaway! Also be sure to go over to Facebook and join the CROCKtober Facebook group! Lots of fun to be had by all!
We have chosen to share this delicius, meatball minestrone soup that is so simple to throw together with fresh vegetables of your choice and homemade mini meatballs from my favorite basic recipe. You can choose to use my version which is included in the written recipe the link to which is below and posted in the pinned comment below the video or you can use frozen mixed vegetables and frozen meatballs along with the other ingredients to make this super simple, budget friendly and just as delicious!
Minestrone is nothing more than a delicious vegetable soup that we traditionally serve with some sort of tiny pasta, whether it be elbows, baby shells or wagon wheels, which were a favorite when was a kid. I have added the meatballs to make this extra hearty and delicious and really a one pot dish.
This can be made in the slow cooker or the electric pressure cooker. Both techniniques are included in my written recipe. This can be made as simple or elaborate as you choose, but either way you will end with a delicious, hearty soup that is chock full of nutritious vegges and little meatballs that are sure to please!
Be sure to check the pinned post for links to the recipe as well as the Facebook group and all the wonderful participants in the CROCKtober Extravaganza!
I hope you give this a try and I hope you love it!
Happy Eating!
Get a printable version of this recipe here; https://bit.ly/3DdVepP
Business Inquiries can be sent to:
info@noreenskitchen.com
Check me out on social media!
Facebook: http://on.fb.me/12bdibt
Instagram: http://bit.ly/12bdqrp
Any links to Amazon are, in many cases, affiliate links.
Produced by Noreen's Kitchen ©2008-2016 all rights reserved All embeds must live link to Noreen's Kitchen channel. No Editorial Excerpts without permission, Violators agree to pay royalties, all court costs, all collections & all lawyers fees.
248
views

OVEN POACHED EGGS!! SHIRRED EGGS!! RETRO KITCHEN BASIC!
Today I am pulling one out of the "way back". Shirred eggs are eggs baked in the oven and were very popular in the 40's, 50's and 60's when ladies lunched and attended brunches and luncheons. While, not technically a poached egg, but sort of, these eggs could be baked in many ways. In cream, alone in butter etc. Essentially gently cooking them with surrounding heat and then serving with toast points. Today I am sharing with you how to poach eggs in the oven very similar to the shirred eggs of yore. This is a great way to make poached eggs without thinking too hard or without babysitting them. Also this is a great way to make poached eggs for a crowd! So let's get into the way back machine and poach some eggs in the oven!
As mentioned above, shirred eggs and poached eggs are similar but not the same. Shirred eggs are baked with cream or butter or both and sometimes with a mornay sauce or just about anything you can think of to fancy them up. Poached eggs are everyday goodness that can be fancied up or eaten as is. This is a great way to make a bunch all at one time if you are serving a crowd. It's also an easy way to make poached eggs if you are "challenged" in this department. I can poach an egg, but I am not patient and usually end up ruining them. So this is a great way to take care of the task.
You will need a cupcake tin, some eggs and some water. A spray of cooking oil is recommended even if you have a non stick pan like I do. This is just extra insurance that your eggs will come out of the pan with no problem. Next crack one egg into each well of the muffin tin. Next you will want to drizzle one tablespoon of water around the edge and into the middle of each egg. Be sure not to just dump the water on the egg. You want the water to distribute over the entire surface of each egg so that it will be bathed in warm water as it bakes in the oven.
Next you can place the pan in a 350 degree, preheated oven. Now is the tricky part. Every oven is different so you will want to set your timer for 8 minutes then check your eggs. If your eggs look very loose and still translucent on top they will need more time. Return them to the oven for an additional 3 minutes and then check them again. If they still look loose or not to your liking, add more time, but be warned, eggs will carry over cook, very quickly so if they look a bit under done, they will still be cooking in the pan and if you take them out and leave them for a few minutes they will be perfect but if you put them back in the oven, you run the risk of the egg over cooking. This all being said that if you like a harder yolk, you should cook them longer but if you want to ensure a velvety runny, dippy yolk, then take them out if you think they are getting close.
Now you can remove each egg from the pan using an offset spatula or a tablespoon, which is what I find most helpful. You can use these eggs to serve on toast, place on a burger or to make homemade eggs Benedict. You can make your easy hollandaise sauce while your eggs are in the oven and everything will be ready to go all at one time!
That is how you make poached eggs in the oven, or old fashioned shirred eggs like your grandma used to make. Only these are way easier and I am always looking for an easier way to get the job done! I hope you give this method a try and I hope you love it!
Happy Eating!
Get my cookbooks here: http://bit.ly/1czqM5R
Business Inquiries can be sent to:
info@noreenskitchen.com
Check me out on social media!
Facebook: http://on.fb.me/12bdibt
Twitter: @noreenskitchen
Instagram: http://bit.ly/12bdqrp
Google + http://bit.ly/1o5GMYy
***MAILING ADDRESS****
Noreen's Kitchen
PO Box 14173
New Bern, NC 28561
Have a question for me? Send me an email:
info@noreenskitchen.com
Noreen's Kitchen Community Guidelines (The Rules)
http://bit.ly/2i7VocU
Any links to Amazon are, in many cases, affiliate links.
Produced by Noreen's Kitchen ©2008-2016 all rights reserved All embeds must live link to Noreen's Kitchen channel. No Editorial Excerpts without permission, Violators agree to pay royalties, all court costs, all collections & all lawyers fees.
581
views

3 QUICK AND EASY SKILLET SUPPERS!! QUICK COMFORT FOOD!!
Busy day? Busy night? You are home but need to be somewhere but still need to cook supper? These three, quick and easy skillet suppers are the answer! Nothing beats a skillet meal that you can toss something in and have it come out delicious! Add some pasta, rice or potatoes and you can get dinner on the table quick and it won't even seem like you were in a hurry to make it! I have chosen these three for your consideration and I think you are going to love them! A chicken and shrimp scampi that is so versatile. Don't like shrimp? Leave it out and add extra chicken. If you want all shrimp go ahead! The Rotini with sausage and broccoli is a really quick meal! This one is a definite crowd pleaser and it is a one pot deal, other than cooking the pasta, you are in like Flynn when it comes to quick and easy! Lastly you have my heart in a pan! I took my grandmothers recipe for chicken paprikash or paprika and made it super fast. It is so good that I may not go back to the original, but this one is a taste of my childhood and I know you are going to love the creamy goodness of this sauce that is boss!
I hope you give these three skillet suppers a try sometime soon and I hope you love them!
You can find printable versions of these recipes here:
Chicken and shrimp scampi skillet: https://bit.ly/3sCoSSY
Rotini with sausage and broccoli skillet: https://bit.ly/3tr9DLR
Quick chicken paprika skillet: https://bit.ly/34dhrs8
Get my cookbooks here: http://bit.ly/1czqM5R
Business Inquiries can be sent to:
info@noreenskitchen.com
Check me out on social media!
Facebook: http://on.fb.me/12bdibt
Twitter: @noreenskitchen
Instagram: http://bit.ly/12bdqrp
Google + http://bit.ly/1o5GMYy
***MAILING ADDRESS****
Noreen's Kitchen
PO Box 14173
New Bern, NC 28561
Have a question for me? Send me an email:
info@noreenskitchen.com
Noreen's Kitchen Community Guidelines (The Rules)
http://bit.ly/2i7VocU
Any links to Amazon are, in many cases, affiliate links.
Produced by Noreen's Kitchen ©2008-2016 all rights reserved All embeds must live link to Noreen's Kitchen channel. No Editorial Excerpts without permission, Violators agree to pay royalties, all court costs, all collections & all lawyers fees.
185
views

OVEN BAKED HOT WINGS!! PERFECT FOR GAME DAY!!
Super Bowl Sunday is just a few days away from the posting of this video so we felt there was no better time to redo our 12 year old video on how I make oven baked hot wings. These are super simple to make and all you need are some wings, an oven with a broiler and a sheetpan! The secret is in the broiling! Then sauce them all up to your hearts content and boom! Chicken wings! These are tasty, crispy and you will come back again an again to make them this way! I know you're going to love them!
I started with a large, family size tray of chicken wings Thankfully I was able to get some. These days it is questionable whether the store will have them in stock. We were successful this time! Wings usually come whole and you need to cut them up. Removing the wingtips and separating the flats from the drumettes. This is a relatively easy task as long as you understand the bone joints and have an impeccably sharp knife!
You can see how I cut up wings in this older but informative video: https://bit.ly/3HOi2z8
I seasoned these super simply. Smoked paprika and garlic pepper seasoning blend. You can use whatever you like. Salt, pepper, onion powder, and garlic powder would be delicious! Some chicken rub or rib rub would be a win or just toss some Cayanne pepper and salt in there and you're good to go! I like to put my cut up wings in a large zip top bag and toss the seasoning in with them, Then seal and toss around, massaging the seasoning into the wings to evenly distribute.
Once your wings are seasoned, go ahead and dump them on to a sheet pan that has been lined with foil and/or parchment that you have given a generous spray of cooking oil. Evenly distribut the wings on the sheet pan and be sure that they are all in one layer. Then put in a 425 degree oven for 20 to 30 minutes or until a meat thermometer placed in one of the drumettes reads 165 degrees. Then switch your oven over to the "broil" setting and pop the wings back in the oven for five minutes or until the skin is crispy and golden brown. Then flip the wings over and put them back under the broiler for an additional 5 mintues to brown the other side.
Now that the wings are done and out of the oven, time to make the sauce. You can use your favorite bottled hot wings sauce, barbecue sauce, dressing or marinade. You can make your own favorite marinade or sauce for your wings. I have made several different varieties over the years but consistently come back to traditional Buffalo wing sauce and our favorite BBQ sauce.
I make my Buffalo by adding 1 stick of melted butter and 1 cup of Franks Red Hot sauce to a large, deep, plastic container with a tight fitting lid. I gave the sauce a good whisk to incorporate. Then I divided the cooked wings and put half of them in the container with the Buffalo sauce and put the lid on and gave them a good shake to coat. Now you can simply pop those wings into a serving dish. I poured the extra sauce into a cup so everyone could take extra for their serving.
I prepared the BBQ wings the same way. You can rinse out the container or just pop about a half cup of BBQ sauce into the bottom of the same container then add the remaining wings and pop on the lid then shake, shake, shake! Put your BBQ wings in a dish and you're done! No fuss, a little muss from a sheet pan and a shaking container. Be sure to have lots of napkins on hand and some wet wipes don't hurt either! These may be messy but they sure are delicious!
I hope you give these oven baked hot wings a try sometime soon! It doesn't have to be for your favorite big game either! It can be for the race, a party or just because! I hope you try them and I hope you love them!
Happy Eating!
You can find a printable version of this recipe here: https://bit.ly/3sD2XtE
You can find a playlist of all my hot wing variations here: https://bit.ly/3gIeOB4
You can see how I cut up wings in this older but informative video: https://bit.ly/3HOi2z8
Get my cookbooks here: http://bit.ly/1czqM5R
Business Inquiries can be sent to:
info@noreenskitchen.com
Check me out on social media!
Facebook: http://on.fb.me/12bdibt
Twitter: @noreenskitchen
Instagram: http://bit.ly/12bdqrp
Google + http://bit.ly/1o5GMYy
***MAILING ADDRESS****
Noreen's Kitchen
PO Box 14173
New Bern, NC 28561
Have a question for me? Send me an email:
info@noreenskitchen.com
Noreen's Kitchen Community Guidelines (The Rules)
http://bit.ly/2i7VocU
Any links to Amazon are, in many cases, affiliate links.
Produced by Noreen's Kitchen ©2008-2022 all rights reserved All embeds must live link to Noreen's Kitchen channel. No Editorial Excerpts without permission, Violators agree to pay royalties, all court costs, all collections & all lawyers fees.
237
views
2
comments
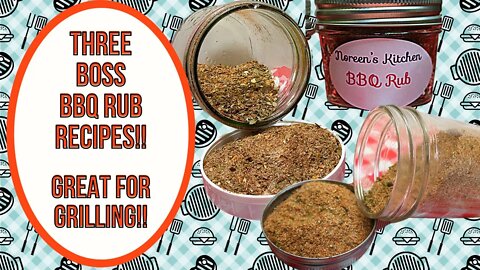
3 BOSS BBQ RUB RECIPES!! GREAT FOR GRILLING!!
Since my buttery steak seasoning was met with such appeal, I thought it would be fun to revisit and represent a few of my favorite barbecue rubs that I have made over the years! These are tried and true and delicious! I have had multiple requestes for refills from friends for some of these after I gifted it to them! I know you are going to love these! Chicken rub, sweet and spicy BBQ rub and burger and fry seasoning are all you need to be ready to grill out all summer long! I hope you give these a try and I hope you love them!
You can find the Worchestershire sauce powder here: https://amzn.to/3rGmrxY
You can find the tomato powder here: https://amzn.to/3xIlkBz
Printable versions of these spice blend recipes can be found here:
Sweet and spicy BBQ rub: https://bit.ly/3v1WPgQ
All Purpose Chicken Rub: https://bit.ly/3OnHb7p
Burger & Fry Seasoning: https://bit.ly/3xHTbKP
Get my cookbooks here: http://bit.ly/1czqM5R
Business Inquiries can be sent to:
info@noreenskitchen.com
Check me out on social media!
Facebook: http://on.fb.me/12bdibt
Twitter: @noreenskitchen
Instagram: http://bit.ly/12bdqrp
Google + http://bit.ly/1o5GMYy
Have a question for me? Send me an email:
info@noreenskitchen.com
Noreen's Kitchen Community Guidelines (The Rules)
http://bit.ly/2i7VocU
Any links to Amazon are, in many cases, affiliate links.
Produced by Noreen's Kitchen ©2008-2016 all rights reserved All embeds must live link to Noreen's Kitchen channel. No Editorial Excerpts without permission, Violators agree to pay royalties, all court costs, all collections & all lawyers fees.
212
views
4
comments

3 FUN S'MORES DESSERTS FOR SUMMER!!
Time for a little bit of sweet fun! What says summer more than S'mores? These concocted creations consisting of graham crackers, chocolate and marshmallow have been mashed up, twisted, and revised over and over again. Today I am sharing three of my favorite S'more's themed recipes for a little summer fun! Peanut butter brownie S'mores pizza is quick and easy when you use your favorite brownie mix! Homemade indoor S'mores cookie squares are a great treat to put together for giving! Consider these as a party favor or gift during the holidays. One wrapped in a cellophane bag and tied with a bow that goes with your themeing or your holiday of choice are a great way to share with friends and family! Last but certainly not least, my no bake S'mores pie is quick to put together using items from your pantry and fridge. This pie is so satisfying and delicious everyone is going to love it with it's little marshmallo surprises in the creamy chocolate filling!
I hope you give all of these S'mores treats a try sometime soon and I hope you love them!
Happy eating!
You can find prinable recipe for the Smore's Pie here: https://bit.ly/3eqtEf9
The cookie squares and pizza are self explanatory and I did not think they needed a recipe.
Get my cookbooks here: http://bit.ly/1czqM5R
Business Inquiries can be sent to:
info@noreenskitchen.com
Check me out on social media!
Facebook: http://on.fb.me/12bdibt
Twitter: @noreenskitchen
Instagram: http://bit.ly/12bdqrp
Google + http://bit.ly/1o5GMYy
***MAILING ADDRESS****
Noreen's Kitchen
PO Box 14173
New Bern, NC 28561
Have a question for me? Send me an email:
info@noreenskitchen.com
Noreen's Kitchen Community Guidelines (The Rules)
http://bit.ly/2i7VocU
Any links to Amazon are, in many cases, affiliate links.
Produced by Noreen's Kitchen ©2008-2016 all rights reserved All embeds must live link to Noreen's Kitchen channel. No Editorial Excerpts without permission, Violators agree to pay royalties, all court costs, all collections & all lawyers fees.
161
views

5 FAVORITE HOT DOGS OF SUMMER!! MEMORIAL DAY SPECIAL!!
To celebrate Memorial Day and the official kick off of summer what would be better than some of our favorite hot dogs of summer? Here on our channel we do a series all about regional hot dog favorites. Here are five that we love! The Southern Slaw Dog, the Chicago Dog, the Bronx B.omber Dog, the New Jersey Ripper Dog and the German style Sauerkraut Dog. All delicious, all easy and all a favorite somewhere on the map!
Some of these hot dogs have delicious toppings that I have recipes for! You can find printable recipes for those toppings here:
KFC Copycat Coleslaw: https://bit.ly/3GuVGm8
Red Onion Sauce: https://bit.ly/3f4vhfG
German Cabbage Relish: http://bit.ly/2KNixPO
Sweet Onion Sauerkraut Video; https://bit.ly/3GvtLm6
Get my cookbooks here: http://bit.ly/1czqM5R
Business Inquiries can be sent to:
info@noreenskitchen.com
Check me out on social media!
Facebook: http://on.fb.me/12bdibt
Twitter: @noreenskitchen
Instagram: http://bit.ly/12bdqrp
Google + http://bit.ly/1o5GMYy
***MAILING ADDRESS****
Noreen's Kitchen
PO Box 14173
New Bern, NC 28561
Have a question for me? Send me an email:
info@noreenskitchen.com
Noreen's Kitchen Community Guidelines (The Rules)
http://bit.ly/2i7VocU
Any links to Amazon are, in many cases, affiliate links.
Produced by Noreen's Kitchen ©2008-2016 all rights reserved All embeds must live link to Noreen's Kitchen channel. No Editorial Excerpts without permission, Violators agree to pay royalties, all court costs, all collections & all lawyers fees.
149
views
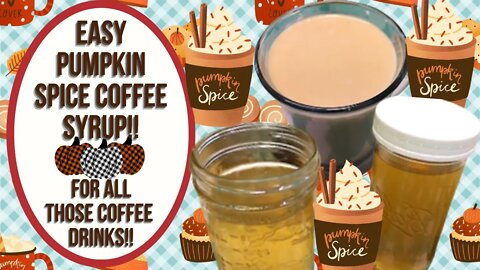
EASY PUMPKIN SPICE COFFEE SYRUP!! PERFECT FOR FALL COFFEE DRINKS!!
Since it is that time of year I thought I would share an easy way to make delicious coffee syrup with items from your pantry! This is so easy and it takes no time at all to whip up a delicious pumpkin spice coffee syrup to use in all your coffee drinks both hot and cold as well as cocktails this fall season!
While other recipes call to use canned pumpkin and sugar and water and spices then boil and strain. This version uses extract. No fuss, no muss! This is so easy and can be applied to any number of coffee syrup flavors you might like to try!
We are starting off by making a heavy sugar syrup using two cups of sugar and 1 cup of hot water. You can do this on the stove and bring to a simmer. My hot tap water is VERY hot so I just used that and stirred and stirred then let things sit until everything was dissolved into a syrup and there were no traces of sugar crystals. I also made a sugar free version using 2 cups of splenda and 1 cup of water and stirred until dissolved.
The magic happens when you add the extract. Today I am using Watkins Pumpkin Spice Extract along with Watkins Baking Vanilla Extract. 1 tablespoon of each to start which is good for me but if you like yours stronger then go ahead and add more of either extract to taste. Stir up to combine and then you are ready to flavor all your coffee drinks and even cocktails!
Not a pumpkin spice fan? Think beyond that! What extracts do you have in your cupboard? Do you love a double vanilla coffee creamer? Use your vanilla to make this syrup then use your milk of choice to make your drink. How about chocolate, caramel or even mint? Tis almost the season where you could easily make your own homemade mint mocha syrup to elevate your coffee came all holiday season! No matter what flavor you choose, make it your own and make it simple and delicous!
I hope you give this idea for homemade coffee syrup a try and I hope you love it!
Happy Eating!
Get my cookbooks here: http://bit.ly/1czqM5R
Business Inquiries can be sent to:
info@noreenskitchen.com
Check me out on social media!
Facebook: http://on.fb.me/12bdibt
Instagram: http://bit.ly/12bdqrp
Have a question for me? Send me an email:
info@noreenskitchen.com
Any links to Amazon are, in many cases, affiliate links.
Produced by Noreen's Kitchen ©2008-2016 all rights reserved All embeds must live link to Noreen's Kitchen channel. No Editorial Excerpts without permission, Violators agree to pay royalties, all court costs, all collections & all lawyers fees.
167
views
1
comment
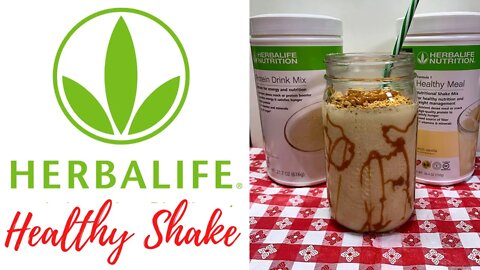
KEY LIME PIE HEALTHY SHAKE!! HERBALIFE SHAKE RECIPE!!
My Herbalife overview and story: https://bit.ly/2VNs
Key Lime Pie Healthy Shake:
2 SCOOPS French Vanilla Formula 1
1 SCOOP Vanilla Protein Drink Mix
1 teaspoon True Lime powder
8 to 10 ounces water
2 to 3 teaspoons instant sugar free vanilla instant pudding
2 to 3 teaspoons instant sugar free cheesecake instant pudding
Swizzle glass with Smucker’s sugar free caramel sundae syrup
Top with graham cracker crumble
1 cup ice cubes
Combine all the dry powder ingredients and the water in the carafe of your blender and blend for 10 to 15 seconds. Add in the desired amount of ice and blend for 30 seconds longer or until thick and creamy.
Swizzle glass with sugar free caramel syrup. Pour into your glass and enjoy top with graham cracker crumble and another drizzle of caramel! You'll feel like you're being naughty but you're getting healthy!
You can also make this in a shaker cup with water, ice and the ingredients, just shake and drink. Sometimes if you have to be away from home it's a way to enjoy these products and stick to your goals. That's it! A healthy shake meal replacement that doesn't taste like chalk. That doesn't leave you hungry and is super satisfying and really tasty! I love the versatility of Herbalife for the simple fact that it fits into my life and I can get what I want quick and it comes right to my door!
If you would like more information about possibly giving Herbalife a try, please use the link provided above to get an overview of how it all works and how you can get started!
To Explore the Herbalife Line go here: https://bit.ly/2VLTqRV
HOW TO BECOME A PREFERRED MEMBER:👇🏼
1) Go to https://bit.ly/2Yh0BmP
2) Click “Apply Online” under the “Join Herbalife” tab.
3) Create an Herbalife account.
Enter your e-mail address and create a password.📝
4) Choose the Membership - Click "Sign Up as a Preferred Member" (on the left)
5) Enter Sponsor’s Details:
🔹Sponsor ID: message me!
🔹Sponsor Last Name: Message me!
6) Proceed to Fill Out Personal Information-
Personal Info, Residential Address, Phone Numbers, Email, Etc.
7) Create a PIN CODE #
(Make it something you will easily remember! You will need this if/when you call Herbalife.)
8 )Review Application Agreement- if you agree with the terms, check ✅ “I Agree to the Terms Listed Above”
9) Complete Herbalife Preferred Member Survey!
10) Review and Confirm Info
11) Preferred Member Pack $34.95
🔹 Shipping
🔹 Shipping Method: Fedex Home Delivery
12) Submit Payment Info 💳
Once you complete the process, you'll be a Preferred Member and you can enjoy your 25% off savings! You earn points each time you order and earn up to 42% off!
💥{30 Day Money Back Guarantee including Shipping}
💥{If you don’t care for a flavor, Herbalife will send you a new flavor for free and let you keep the original flavor!}
💥{No monthly auto-draft, auto-refill, sketchy hidden fees or minimum purchase!}
There are SO many wonderful products and you can choose whatever you like! However, these are the products that I started with and that I still use today. It will last you one month and covers your two meals per day!
⭐️Make sure that you order these exact SKU #’s/sizes so that your products will all run out about the same time.
✌🏼TWO containers of:
Formula 1 Healthy Meal Nutritional Shake 750g (you can choose two flavors)
SKU 2628 (Banana Caramel)
...it should pop up all of the other flavors for you to choose from! Choose 2! I recommend
🍌Banana Caramel,
🍫Dutch Chocolate,
🍪Cookies n Cream,
🥛French Vanilla,
☕️Cafe Latte,
☘️Mint Chocolate and
🍊Orange Cream.
🍓Wild Berry
🥥 Pina Colada
👆🏼One container of:
Vanilla Protein Drink Mix 840g
SKU 1426
The Formula 1 shakes with added Protein will provide all of the vitamins and minerals from a perfectly balanced meal...and they are SO delicious!
☝🏼One carton of:
Herbal Aloe Concentrate (I recommend Mango, Cranberry or Mandarin) (Pint)
SKU 1065
The aloe soothes the stomach, supports nutrient absorption and intestinal health and acts as a daily, gentle cleanse.
☝🏼One container of:
Herbal Tea Concentrate: 3.53/3.6 OZ (102g) (I recommend Raspberry, Peach, Lemon or Cinnamon)
SKU 0189
This tea boosts the metabolism, burns abdominal fat and provides energy! It also contributes to your overall health.
I hope you give this a try sometime soon and I hope you love it!
Business Inquiries can be sent to:
info@noreenskitchen.com
Check me out on social media!
Facebook: http://on.fb.me/12bdibt
Twitter: @noreenskitchen
Instagram: http://bit.ly/12bdqrp
***MAILING ADDRESS****
Noreen's Kitchen
PO Box 14173
New Bern, NC 28561
Produced by Noreen's Kitchen ©2008-2016 all rights reserved All embeds must live link to Noreen's Kitchen channel. No Editorial Excerpts without permission, Violators agree to pay royalties, all court costs, all collections & all lawyers fees.
154
views
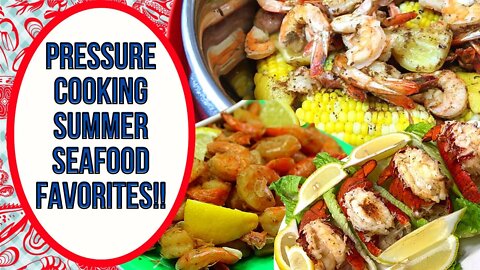
PRESSURE COOKING SUMMER SEAFOOD FAVORITES!!
Summer is in full swing and what is more delicious in the summer than seafood? Today I am sharing my pressure cooker recipes for how to make delicious peel and eat shrimp, lobstertail and a down east shrimp boil that will make everyone at your table happy!
I hope you give all of these a try and I hope you love them!
You can find printable version of the follwing recipe shared here:
Down East Shrimp Boil: https://bit.ly/3RfHXVd
Get my cookbooks here: http://bit.ly/1czqM5R
Business Inquiries can be sent to:
info@noreenskitchen.com
Check me out on social media!
Facebook: http://on.fb.me/12bdibt
Twitter: @noreenskitchen
Instagram: http://bit.ly/12bdqrp
Google + http://bit.ly/1o5GMYy
***MAILING ADDRESS****
Noreen's Kitchen
PO Box 14173
New Bern, NC 28561
Have a question for me? Send me an email:
info@noreenskitchen.com
Noreen's Kitchen Community Guidelines (The Rules)
http://bit.ly/2i7VocU
Any links to Amazon are, in many cases, affiliate links.
Produced by Noreen's Kitchen ©2008-2016 all rights reserved All embeds must live link to Noreen's Kitchen channel. No Editorial Excerpts without permission, Violators agree to pay royalties, all court costs, all collections & all lawyers fees.
141
views
1
comment
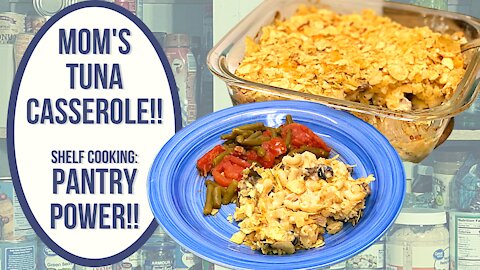
MOM'S TUNA CASSEROLE!! PANTRY COOKING!!
Today I am sharing the original pantry meal that I grew up with! My Mom's tuna casserole. This one is a little unconventional but it is delicious. It is simple to make and it is easy enough for your kids to make on their own, with supervision. A great way to put a budget friendly meal on the table that is sure to satisfy both their hunger as well as your desire to save money and pull from what you have. This is a favorite of my father's as well as the rest of my family and I hope that you will find it to be the same for you!
I recently put a question out on my YouTube community page, instagram and Facebook and asked if you would like to see some more pantry style cooking and recipe videos. The response was overwhelmingly YES! So here we are. I will be planning to share more practical recipe and information videos including stocking a pantry on a budget as well as fill a request for information about those dates on your food and packages. What do they really mean?
I digress. Today we are making a simple, delicious and budget friendly recipe that uses 95% pantry items that you can put together in no time! Tuna casserole is propably something that every mom has made. My mom's is a little different. It starts with a box of macaroni and cheese. I prefer the thick and creamy variety and it is simply made according to the directions on the box.
To that .37 cent box of mac and cheese we are going to add one can of cream of mushroom soup, a can of sliced mushrooms, a can of sliced ripe olives as well as two cans of the tuna of your choice. I prefer albacore which is a little more expensive than chunk light which would make this casserole a little cheaper, but the flavor, taste and texture of the albacore is something we prefer over the less expensive variety. We are also going to add 1 cup of shredded cheddar cheese as well as a cup of crushed potato chips. If you don't have chips, use some buttered breadcrumb or some crushed corn flakes that have been tossed in a bit of melted butter. Any of those will give you the crunchy topping you are looking for here.
This all gets mixed together, with the exception of half the cheese and the chips. Poured into a baking dish and then topped with the remaining cheese and the crushed potato chips. Then it gets popped in the oven for about a half an hour until browned and bubbly.
We serve this with our favorite side which is one can of green beans mixed with one can of stewed tomatoes which adds a great accompaniment to the creamy, cheesy casserole. This will serve six people generously and with the addition of the vegetable side dish and maybe some biscuits or bread if you desire, no one is walking away hungry!
The cost breakdown here goes as follows: NOTE: I used all store brand ingredients and they came from Walmart.
Great Value Thick and Creamy Mac and Cheese: $0.34
Great Value Cream of Mushroom Soup: $0.57
2 cans Great Value Albacore Tuna: ($1.12 each) $2.24
Great Value Mushroom Stems & Pieces: $1.25
Great Value Sliced Ripe Olives: $0.67
1 cup shredded sharp cheddar cheese: $1.33
1 cup crushed potato chips: $0.25
1/2 stick butter for mac and cheese: $0.34
1/2 cup milk for mack and cheese: $0.18
Total cost: $7,17
NOTE: In the video I mentioned that the cost breakdown was $7.35. I miscalculated on the part of the milk and actually doubled the amount. This breaks down to approximately $1.20 per serving if serving six people. The cost of the vegetable side dish was $1.17 for the whole bowl. In my opinion this is a champion pantry meal that really hits all the notes of being budget friendly as well as being family friendly! If you are not keen on tuna, you could certainly make this casserole with chicken or ham as well!
I hope you give this recipe for my Mom's tuna casserole a try sometime soon and I hope you love it!
Happy Eating!
Get a printable version of this recipe here: https://bit.ly/3mSxlgF
Get my cookbooks here: http://bit.ly/1czqM5R
Business Inquiries can be sent to:
info@noreenskitchen.com
Check me out on social media!
Facebook: http://on.fb.me/12bdibt
Instagram: http://bit.ly/12bdqrp
Any links to Amazon are, in many cases, affiliate links.
173
views

SLOW COOKER POTATO CHEESE SOUP!! PANTRY POWER COMFORT FOOD!!
Today we are sharing this delicious potato cheese soup that we make in the slow cooker! This is super easy to toss together and it used ingredients that are readily available and that many will already have on hand. This is why I am calling this a Pantry Power recipe! Remember I consider the fridge and freezer pantry as well as the dry pantry. When we shop and store we always have what we need. This one is creamy and delicious and it makes up a super thick soup so you can always opt to add more liquid and in the end I usually do. Creamy, cheesy, delicious and versatile, this soup can be changed up to your liking and I know your family is going to love it!
This soup starts with some chicken broth or stock. I buy chicken bone broth but you can use what you have on hand. One box of stock or broth is generally four cups. If you don't keep stock on the shelf, make up some chicken bullion to equal four cups, or I might recommend using 8 cups. Or you can use a combo of water and stock. Depending on how thick or brothy you like your soup, you can adjust to your personal preference.
The stock is mixed with one can of cream of chicken and one can of cream of celery soup. I normally don't pull the creamed soups out of the cabinet very often, but this is one of the recipes I do use them. I season this up with more chicken bullion powder, salt, pepper, onion powder and garlic powder. If you have made your liquid up using all bullion then leave out the additional bullion or it may end up too salty.
Next goes in a brick of cream cheese, cut into cubes along with some shredded cheddar cheese. Then a 2 pound bag of southern style diced hash brown potatoes from the freezer. If you have a bag of potatoes O'Brien, those will work as well or even a similar size bag of shredded hash browns will work here. Just use your judgement. Don't use tater tots or frozen fries here. But the hash browns will do just fine.
Stir everything well. Pop in the slow cooker with the lid on low for four hours. Important to keep this one on low because we have a lot of dairy going on in here that could have a tendency to burn or over brown, should you cook it too high or too long. I also recommend that you give this a stir often. I know this goes against just about every rule for slow cooker, cooking but trust me, stirring will help. My slow cooker runs very hot so stirring often is necessary to keeping things cooking to perfection.
I cooked my soup for just around four hours then flipped the switch to warm until I was ready to have dinner. At that point I added a cup of heavy cream and you can add milk, water or more stock if you like and you can add as much as you prefer to get the consistency of soup you like. This soup is very thick when finished. I also added a cup of cooked, crumbled bacon, which you can add at the beginning but I forgot about, in the end, adding it when completed is just fine. No mistakes here!
I served my soup with extra cheese, bacon bits and green onion for toppings. My daughters also like a dollop of sour cream which will give this the taste of a baked potato soup. Your choice here.
This soup is very versatile. You can use chopped, leftover ham or sliced smoked sausage in place of or in addition to the bacon if you like and I think that will cook up nicely! Adding in some fresh chopped celery and onion at the beginning will enhance this further with fresh flavors and give the soup even more texture. Using the frozen potatoes is a great way to use what you have on hand and if you are like me, we don't use that many fresh potatoes so this is a great way to have potato soup any time we like.
I hope you give this creamy, cheesy, slow cooker potato soup a try sometime soon and I hope you love it!
Happy Eating!
You can find a printable version of this recipe here; https://bit.ly/3K1th8W
Get my cookbooks here: http://bit.ly/1czqM5R
Business Inquiries can be sent to:
info@noreenskitchen.com
Check me out on social media!
Facebook: http://on.fb.me/12bdibt
Twitter: @noreenskitchen
Instagram: http://bit.ly/12bdqrp
Google + http://bit.ly/1o5GMYy
***MAILING ADDRESS****
Noreen's Kitchen
PO Box 14173
New Bern, NC 28561
Have a question for me? Send me an email:
info@noreenskitchen.com
Noreen's Kitchen Community Guidelines (The Rules)
http://bit.ly/2i7VocU
Any links to Amazon are, in many cases, affiliate links.
Produced by Noreen's Kitchen ©2008-2016 all rights reserved All embeds must live link to Noreen's Kitchen channel. No Editorial Excerpts without permission, Violators agree to pay royalties, all court costs, all collections & all lawyers fees.
201
views

MOUTHWATERING SUMMER TREATS: 3 EASY DESSERTS FOR ULTIMATE SATISFACTION
Indulge in the sweetness of summer with these three delectable dessert recipes that will make your taste buds dance! In this video, we bring you three irresistible treats: Cream Cheese Brownies, Berry Lemon Buttermilk Loaf, and a delightful Retro Jelly Roll Cake. Whether you're hosting a backyard barbecue, planning a picnic, or simply craving a delightful summer dessert, these recipes are sure to impress your family and friends.
First up are the Cream Cheese Brownies, a heavenly combination of rich chocolate and tangy cream cheese. With their fudgy texture and decadent taste, these brownies are a true delight for chocolate lovers. Watch closely as we guide you through the process of creating this irresistible treat, from mixing the batter to achieving the perfect layers9.
Next, we present the Berry Lemon Buttermilk Loaf, a refreshing and zesty dessert that showcases the vibrant flavors of summer berries and tangy lemon. Moist and tender, this loaf cake is enhanced by the creamy buttermilk, creating a delightful balance of flavors. Join us as we demonstrate the step-by-step process of making this delightful treat, from preparing the batter to adding the berry and lemon accents.
Lastly, we take you back in time with a Retro Jelly Roll Cake, a classic dessert that never goes out of style. This light and airy sponge cake, filled with a luscious layer of jelly or jam, is a timeless favorite that will transport you to a nostalgic era. Follow along as we show you how to create a beautiful roll, ensuring a perfect texture and an impressive presentation.
These three sweet summer dessert recipes are guaranteed to bring joy and deliciousness to your table. Whether you're an experienced baker or a novice in the kitchen, our detailed instructions and helpful tips will guide you through each recipe with ease. So grab your apron, gather your ingredients, and get ready to savor the flavors of summer with these mouthwatering desserts. Don't forget to like, comment, and subscribe for more delectable recipes. Happy baking!
You can find printable versions of these recipes here:
Cream cheese brownies: https://bit.ly/3pTPy2Z
Berry buttermilk loaf: https://bit.ly/3NJYiAK
Retro Jelly Roll: https://bit.ly/3PZNpxD
-
Get my cookbooks here: http://bit.ly/1czqM5R
Business Inquiries can be sent to:
info@noreenskitchen.com
Check me out on social media!
Facebook: http://on.fb.me/12bdibt
Twitter: @noreenskitchen
Instagram: http://bit.ly/12bdqrp
Google + http://bit.ly/1o5GMYy
***MAILING ADDRESS****
Noreen's Kitchen
PO Box 14173
New Bern, NC 28561
Have a question for me? Send me an email:
info@noreenskitchen.com
Noreen's Kitchen Community Guidelines (The Rules)
http://bit.ly/2i7VocU
Any links to Amazon are, in many cases, affiliate links.
Produced by Noreen's Kitchen ©2008-2016 all rights reserved All embeds must live link to Noreen's Kitchen channel. No Editorial Excerpts without permission, Violators agree to pay royalties, all court costs, all collections & all lawyers fees.
232
views
2
comments

CLAM DIP!! VIEWER REQUEST!! 1950's RETRO RECIPE!!
Today we have another delicious dip recipe. This is actually a request from viewer "KillerBeBe" who asked if I had a recipe for a 1960s style clam dip. So I went to my Nanny's recipe box and indeed found what I was looking for! I remember her making this when I was a kid. We all loved it! Now KillerBeBe can make this and recall happy memories and share them with others!
This clam dip is DEElicious! So simple to make and you can whip it up in no time with ingredients you may always have on hand! Some cream cheese, sour cream and mayo start this off then some Worcestershire, Tabasco and a squeeze of lemon give this amazing flavor, along with some dry spices. I used my homemade salt free garlic herb seasoning blend along with some salt, and dry mustard, but you can just use salt, pepper, dry mustard and garlic powder if you have that on hand. A splash of the reserved clam juice from the can is a great way to give this the right flavor and consistency.
I think this is a great dip to share during the holiday season! You can serve with ripple chips or Fritos but sliced cucumber and some celery sticks are a great option if you are doing a low carb holiday! I hope that you will give this retro, 1950s style clam dip a try sometime soon and I hope you love it!
Happy Eating and Happy Holidays!
You can find a printable version of this recipe here: https://bit.ly/3H3WcKn
Get my cookbooks here: http://bit.ly/1czqM5R
Business Inquiries can be sent to:
info@noreenskitchen.com
Check me out on social media!
Facebook: http://on.fb.me/12bdibt
Instagram: http://bit.ly/12bdqrp
Any links to Amazon are, in many cases, affiliate links.
Produced by Noreen's Kitchen ©2008-2016 all rights reserved All embeds must live link to Noreen's Kitchen channel. No Editorial Excerpts without permission, Violators agree to pay royalties, all court costs, all collections & all lawyers fees.
165
views
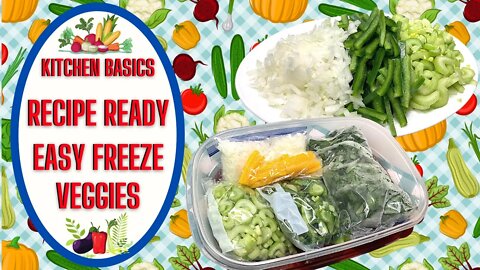
EASY FREEZE RECIPE READY VEGGIES!! NO MORE CASH IN THE TRASH!!
A couple years ago I posted a video on how to freeze and save green onions or scallions from the trash. Seeing as how I always was tossing them because we didn't use them quickly enough. Well that video really resonated with people and as a result is one of my most popular videos. I have received a lot of questions on that video. Mostly, what else can easily be frozen and used in recipes. Today I am addressing these questions and hopefully you will be inspired to freeze some of those veggies and keep them from the trash. Prolonging their useability and saving you money at the same time!
Today we are focusing on celery, bell peppers, onions and fresh spinach. These items freeze very well after just washing and chopping. I have cut my veggies in the way I would use them the most. Sliced celery, cut the peppers into sticks or "julianne" and fine diced the onions. These three veggies I would use in my chicken and sausage gumbo or in my chicken lettuce wraps or in any number of recipes. This is also a great way to have onion and bell pepper on hand for making eggs or your favorite wester omelette. Just toss those in a skillet with a little butter and you're good to go!
I would like to emphasize that this method is meant to preserve the vegetables for later use in hot or cooked applications. They are never going to eat like a fresh vegetable because the freezing process is going to break down the cellular structure of the vegetable and make them go soft. But they are still useful and flavorful for things like soups stews and stir fry. A great way to bulk up the veggie content in things like chili, spaghetti meat sauce and sloppy joes.
The process is simple. Wash your vegetables. Chop or cut in the way you like best and then pop into a zip lock bag, sealed with all the air removed or in an airtight container with a tight fitting lid such as a plastic keeper of some sort or even a mason jar. I am putting mine in freezer bags and then placing them in a larger airtight container in an effort to help my freezer from smelling and tasting like onions and peppers. Once these are frozen you can just break them up and take out what you need.
In the alternative you can "pre-freeze" the vegetables by laying them out in a single layer on a baking sheet that will fit in your freezer and allow them to freeze for a couple of hours or overnight, then putting them into the bag or container of your choice. Pre-freezing emulates the commercial process of "Quick freezing" wherein the item would be cleaned, sprayed with water on a conveyer and flash frozen and prepared for packaging.
This is an effort to save us money by saving us from tossing vegetables that we most likely paid a premium for and don't want to waste. Every penny counts especially in these times. We never want to waste if we don't have to and even though freezing bits and bobs of celery, peppers and onions may seem a little over the top it really isn't. When you go to make something and you realize you don't have the fresh counterpart you will feel good knowing you can reach into your freezer and grab what you need for your dinner.
I have also shared how to freeze baby spinach. I buy the bag at the store and put it in the freezer. These greens have already been triple washed and once frozen you can simply crunch up the bag and make spinach ready for smoothies, soups, stews, creamed spianch or tossed into scrambled eggs. This will also work for other tender greens as well like kale, turnip greens and more. Avoid freezing lettuce or cucumbers though they will be plain awful.
One thing I did not mention was zucchini! This abundant summer squash can be grated and popped into portion sized bags and frozen, ready to toss into your favorite zucchini bread, cake, muffin or soup.
Let me know if there are other vegetables or even fruits you would like me to address with regard to freezing methods. There are more things than you think that you can just wash and freeze. Surprisingly I am still learning a lot about what you can and cannot do with certain produce items. More often than not you can do this method. Even if you don't think you can!
I hope you give this a try and I hope you love it!
Happy Eating!
Get my cookbooks here: http://bit.ly/1czqM5R
Business Inquiries can be sent to:
info@noreenskitchen.com
Check me out on social media!
Facebook: http://on.fb.me/12bdibt
Instagram: http://bit.ly/12bdqrp
Have a question for me? Send me an email:
info@noreenskitchen.com
Noreen's Kitchen Community Guidelines (The Rules)
http://bit.ly/2i7VocU
Any links to Amazon are, in many cases, affiliate links.
Produced by Noreen's Kitchen ©2008-2016 all rights reserved All embeds must live link to Noreen's Kitchen channel. No Editorial Excerpts without permission, Violators agree to pay royalties, all court costs, all collections & all lawyers fees.
202
views
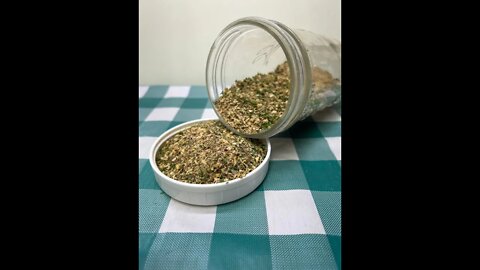
SALT FREE GARLIC HERB SEASONING
See Full Video Here: https://bit.ly/3UUNylB
Today I am sharing a delicious seasoning blend that was requested by a viewer who said she had a hard time finding the Mrs. Dash Garlic and Herb seasoning. I actually use this seasoning often and we love it on just about everything! It's even a great pizza sprinkle! So since not everyone can find this I thought it was a great idea to add this to the channel. Not to mention this is a great way to use up the seasonings and spices you have on your spice rack to rotate them out for freshness. Use this on anything from beef, pork, chicken, fish, seafood and as I mentioned, pizza! I hope you give this a try sometime soon and I hope you love it!
174
views

1950's RETRO CLAM DIP RECIPE!!
This clam dip is DEElicious! So simple to make and you can whip it up in no time with ingredients you may always have on hand! Some cream cheese, sour cream and mayo start this off then some Worcestershire, Tabasco and a squeeze of lemon give this amazing flavor, along with some dry spices. I used my homemade salt free garlic herb seasoning blend along with some salt, and dry mustard, but you can just use salt, pepper, dry mustard and garlic powder if you have that on hand. A splash of the reserved clam juice from the can is a great way to give this the right flavor and consistency.
154
views

SOUTHWEST STYLE TURKEY CLUB WRAP!! EASY MEAL IDEAS!!
The end of summer brings hot thick days that seem to go on forever, but even we can feel fall knocking at our door. On nights when you are tired this delicious southwest style turkey club wrap is just the ticket for a quick and delicious meal that won't heat up the kitchen. I used some tortillas, some lunch meat and veggies from the fridge, some pre cooked bacon that I crisped in the microwave and made a delicious spread with sour cream, cream cheese and taco seasoning. This made a delicious wrap sandwich that was filling and satisfying. Even Rick said we need to put this into the rotation! When you don't know what to make, go for a sandwich! This one will make you glad you did!
I hope you give this southwest style turkey club wrap a try sometime soon and I hope you love it!
Happy Eating!
Taco seasoning: https://bit.ly/3Al0OGX
Get my cookbooks here: http://bit.ly/1czqM5R
Business Inquiries can be sent to:
info@noreenskitchen.com
Check me out on social media!
Facebook: http://on.fb.me/12bdibt
Instagram: http://bit.ly/12bdqrp
Have a question for me? Send me an email:
info@noreenskitchen.com
any links to Amazon are, in many cases, affiliate links.
Produced by Noreen's Kitchen ©2008-2016 all rights reserved All embeds must live link to Noreen's Kitchen channel. No Editorial Excerpts without permission, Violators agree to pay royalties, all court costs, all collections & all lawyers fees.
133
views
2
comments
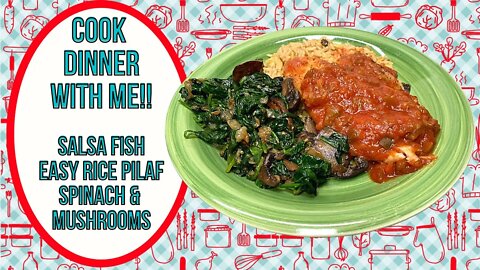
COOK DINNER WITH ME! SALSA FISH, PILAF & SAUTEED SPINACH!!
A little something different today! Let's cook dinner together! This was a Sunday dinner for Rick and myself but it would be great for company or even a date night with your sweetheart! Baked Salsa fish, easy rice pilaf and some sauteed spinach with mushrooms are on the menu and these come together in about 45 minutes from start to finish. I know that you will love these as much as we do!
Find printable versions of these recipes here:
Salsa Fish: https://bit.ly/3PVVEbd
Rice Pilaf: https://bit.ly/3M41mER
Spinach & mushrooms: https://bit.ly/3ta3DYN
Get my cookbooks here: http://bit.ly/1czqM5R
Business Inquiries can be sent to:
info@noreenskitchen.com
Check me out on social media!
Facebook: http://on.fb.me/12bdibt
Twitter: @noreenskitchen
Instagram: http://bit.ly/12bdqrp
Google + http://bit.ly/1o5GMYy
***MAILING ADDRESS****
Noreen's Kitchen
PO Box 14173
New Bern, NC 28561
Have a question for me? Send me an email:
info@noreenskitchen.com
Noreen's Kitchen Community Guidelines (The Rules)
http://bit.ly/2i7VocU
Any links to Amazon are, in many cases, affiliate links.
Produced by Noreen's Kitchen ©2008-2016 all rights reserved All embeds must live link to Noreen's Kitchen channel. No Editorial Excerpts without permission, Violators agree to pay royalties, all court costs, all collections & all lawyers fees.
136
views
1
comment
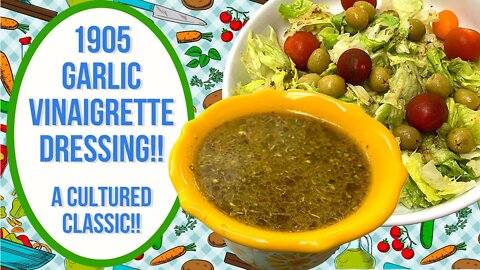
1905 GARLIC VINAIGRETTE DRESSING!!
This garlic vinaigrette dressing is inspired by a historic recipe that is famous in the Ybor City area of Tampa, Florida. Hailing from the over 100 year old Columbia restaraunt in that area, this dressing is a delicious, tanging and unexpected treat that is the perfect dressing for the corresponding salad of the same name and fame! I will be sharing that in another, upcoming video! This dressing is flavorful and not as robust as you might think, considering the all the robust flavors, but I can attest that when tossed in with the delicous and bountiful salad that will be forthcoming, this dressing is the perfect compliment!
This garlic vinaigrette is simple to make and it gets even better as it sits. Double or triple this delicious dressing and keep it in your fridge. The longer the flavors have to mix and mingle the better it is.
This dressing starts and finishes with simple, pantry and refrigertor ingredients that you most likely have on hand the key here is the Worcestershire sauce! It may seem like a shockingly large amount but trust me, this is the key! So grab all your ingredients and shake this up! Wait for the upcoming video so you can make this for dinner this weekend! I know you will be glad you did!
I hope you give this 1905 garlic vinaigrette dressing a try sometime soon and I hope you love it!
Happy eating!
You can find a printable version of this recipe here: https://bit.ly/3HVETJ9
Get my cookbooks here: http://bit.ly/1czqM5R
Business Inquiries can be sent to:
info@noreenskitchen.com
Check me out on social media!
Facebook: http://on.fb.me/12bdibt
Twitter: @noreenskitchen
Instagram: http://bit.ly/12bdqrp
Google + http://bit.ly/1o5GMYy
***MAILING ADDRESS****
Noreen's Kitchen
PO Box 14173
New Bern, NC 28561
Have a question for me? Send me an email:
info@noreenskitchen.com
Noreen's Kitchen Community Guidelines (The Rules)
http://bit.ly/2i7VocU
Any links to Amazon are, in many cases, affiliate links.
Produced by Noreen's Kitchen ©2008-2016 all rights reserved All embeds must live link to Noreen's Kitchen channel. No Editorial Excerpts without permission, Violators agree to pay royalties, all court costs, all collections & all lawyers fees.
123
views
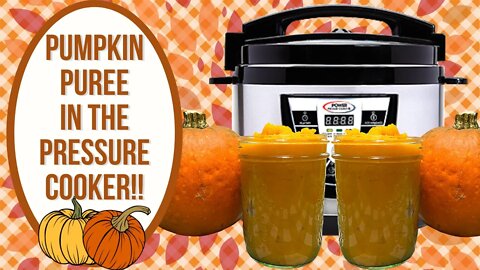
FRESH PUMPKIN PUREE IN THE PRESSURE COOKER!! KITCHEN BASICS!!
Today I am sharing how easy it is to cook fresh sugar or pie pumkins in the pressure cooker to get that delicious pumpkin puree that we all need for holiday pies, breads and other pumpkiny things. It is so easy to cook up fresh pumpking and make your own puree you won't even believe it. Yes you can do it in your oven by baking them for around an hour, but the pressure cooker makes things so simple and if you have one, then why not use it! I think you will see that this is a great way to have the pumpkin you need this year!
Reports are saying that canned pumpkin is going to be at a premium this year and may well be in a shortage due to a number of factors, including but not limited to supply chain issues, raw materials shortages to make the cans as well as crop failures due to both drought and late harvest. These things are stemming from the current world situation. So let's make our own and get ahead of the curve!
I used one small sugar pumpkin also sometimes called pie pumpkin. These can be found in the produce section of your grocery store near where they sell the decorative gourdes and Indian corn. These small pumpkins are sweet and less fibrous than the typical field or "Jack-O-Lantern" pumpkins that folks like to carve this time of year and the smaller ones are more flavorful. You can cook the large ones but they are not very good. Super stringy, spongy and not a lot of flavor. So be sure to get the right kind.
I have cut my pumpkin in half using a large, sharp knife and cleaned out the seeds and fibers. I will be roasting those later for a treat. Then I cut the pumpkin up into wedges to make it fit in my 6 quart pressure cooker better. I have a 10 quart version that I could have easily popped two of these pumpkins in but did not feel like getting it down. This 6 quart sits on my counter everyday so it's just easy to grab and use.
I used the basket insert and placed all the cut pumpkin in that. Added 2 cups of water to the vessel then popped on the lid. Made sure the valve was set to pressurize and not vent and then programmed it on the vegetable setting and then on the longer time for 10 minutes, which turned out to be perfect. I allowed the machine to come up to pressure then cook then I quick released the steam and transferred the cooked pumpkin to a bowl and removed the rind. I was able to mash the pumpkin with a fork to a beautiful consistency. No need for the masher or even an immersion blender!
I am storing my pumpkin in a mason jar and this one rendered exactly 1 pint or 2 cups of puree. This is just the right amount for one pie and equivelent to what would be in a can from the store. This will stay fresh in the refrigerator for up to a week. I also like to freeze my fresh pumpkin puree in ziplock freezer bags in recipe sized portions . Just lay flat, squeeze out the air and freeze flat for easy storage. These will keep in your freezer for up to six months.
I hope you give making your own fresh pumpkin puree in the pressure cooker a try sometime soon and I hope you love it!
Happy eating!
Get my cookbooks here: http://bit.ly/1czqM5R
Business Inquiries can be sent to:
info@noreenskitchen.com
Check me out on social media!
Facebook: http://on.fb.me/12bdibt
Twitter: @noreenskitchen
Instagram: http://bit.ly/12bdqrp
Google + http://bit.ly/1o5GMYy
***MAILING ADDRESS****
Noreen's Kitchen
PO Box 14173
New Bern, NC 28561
Have a question for me? Send me an email:
info@noreenskitchen.com
Noreen's Kitchen Community Guidelines (The Rules)
http://bit.ly/2i7VocU
Any links to Amazon are, in many cases, affiliate links.
Produced by Noreen's Kitchen ©2008-2016 all rights reserved All embeds must live link to Noreen's Kitchen channel. No Editorial Excerpts without permission, Violators agree to pay royalties, all court costs, all collections & all lawyers fees.
171
views
1
comment

HOW TO COOK LOBSTER TAIL IN THE PRESSURE COOKER!! NOREEN'S KITCHEN BASICS!!
Going back to basics, in a way you may not have thought of. Today I am going to show you how I cook lobster tail in the pressure cooker! This is the quickest, best, most convenient way I have found for cooking these luxurious gifts from the sea. I am making these to use in another video for another regional sandwich favorite that I am excited to share so be sure to stay tuned for that one coming up later this week. Since my recipe requires lobster, we have to cook some and I wanted to take the opportunity to share how I do mine in the pressure cooker! I know you are going to love this idea and I think you are going to really want to give it a try!
We are starting off with four small lobster tails that I got from my local fish counter at Harris Teeter. These are a little on the small side, but this is what they had fresh today so we went with it. I like to process these a little before cooking and that requires nothing but a good rinse in cold water and a pair of kitchen utility scissors.
I like to cut all the way down the top side of the shell splitting in in half, but not cutting the whole tail in half. Then I run my fingers just between the meat and the shell to loosen gently This is not neccesary but I wanted to show you how to do it. The meat will loosen from the shell after cooking as well. Next you want to turn the tail upside down and being careful to avoid the barbs that run down the center of the tail, gently press at each division to crack the shell. This will help to avoid curling while cooking.
Now it's time to put everything into the pressure cooker! Add 1 cup of water, wine or beer to the vessel along with the juice of 1 lemon. I also tossed the lemon halves in the basket after I squeezed them for extra flavor during the cooking process. Then pop your prepped lobster tails in the basket and sprinkle with your favorite seafood seasoning. Today I am using some seasoning from Saltopia that my brother gave me as a gift this past Christmas. It smells and tasted amazing! But the standard Old Bay will work just fine!
I popped the lid on my cooker, made sure the vent valve was shut and set the machine on the "fish and vegetables" setting on the low option for 2 minutes which is the default. This will allow the machine to come to pressure, cook and then I like to allow the vessel to sit for two more minutes before quick releasing the remaining pressure from the vessle. Now your lobster tail is perfectly done and you can serve it or chill it for use later, which is what I am planning to do.
I hope that this was somewhat helpful in giving you a new idea in a way to cook lobster without having to boil large vats of water on the stove. This is quick, easy and makes a delicious end product. I hope you give this a try sometime soon and I hope you love it!
Happy Eating!
Get my cookbooks here: http://bit.ly/1czqM5R
Business Inquiries can be sent to:
info@noreenskitchen.com
Check me out on social media!
Facebook: http://on.fb.me/12bdibt
Twitter: @noreenskitchen
Instagram: http://bit.ly/12bdqrp
Google + http://bit.ly/1o5GMYy
***MAILING ADDRESS****
Noreen's Kitchen
PO Box 14173
New Bern, NC 28561
Have a question for me? Send me an email:
info@noreenskitchen.com
Noreen's Kitchen Community Guidelines (The Rules)
http://bit.ly/2i7VocU
Any links to Amazon are, in many cases, affiliate links.
Produced by Noreen's Kitchen ©2008-2016 all rights reserved All embeds must live link to Noreen's Kitchen channel. No Editorial Excerpts without permission, Violators agree to pay royalties, all court costs, all collections & all lawyers fees.
180
views
1
comment