
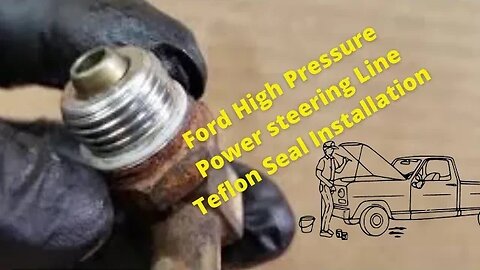
Ford High Pressure Power Steering Line Teflon Seal Installation
In this video I go over how to install a teflon seal on a Ford high pressure power steering line. The process is simple enough when you have the correct tools. The tool I use in the video can be found in the kit linked below. The process involves simply placing the tool over the threads of the line and sliding the seal down the tool until it is in the seated position. This seal can also be installed without the use of special tools. In the video I give an example of a way to install the seal without a special tool. It involves using a punch to aid in stretching out the seal enough to get it over the threads of the line. The use of hot water may be helpful in the process. Soaking the seal for a few seconds may help it stretch and stay stretched a bit longer to aid in getting it over the threads in time. (Note: Do not over heat the seal as this can damage the seal. Be sure the seal contracts and fits snuggly on the line within a few minutes after installation. If it does not then a new seal will need to be installed. If you are not using the special tool then It would be recommended to purchase a few seals before doing the job as you are likely to damage one or two until you get lucky and get one to work. Use care not to get burned handling hot water. I'd only use hot water out of a household faucet. )
Note: The seal should slide down the tool or instrument you are using in order to spread it. Do not roll the seal. Also, if you are using a punch keep the seal on the round portion of the punch. Don't push the seal onto any part of the punch that may have sharp edges or pointed edges.
Note: Always insure that the seal is not leaking after the line has been installed on the vehicle. Usually, if a leak is present, it will show up after the system has been filled and the steering wheel has been turned back and forth with the engine running. Check for leaks after the engine has been shut down and the vehicle has been placed in park with the parking brake applied. If the seal is leaking a new seal will have to be installed.
Note: The seal shown in the video was installed using a 16mm tool. This tool is designed to install a 16mm seal. If you are installing a different sized seal then you will need a different tool. To my knowledge Ford uses a 16mm and a 14mm seal for applications such as the one shown in this video. Use the correct sized tool for the seal you are installing or damage may occur.
Here is a link to the tool mentioned in the video. It has a 16mm and 14mm seal installer:
https://www.amazon.com/Edelmann-70013-Steering-Teflon-Assortment/dp/B00WDWZB34/ref=asc_df_B00WDWZB34/?tag=hyprod-20&linkCode=df0&hvadid=241994092016&hvpos=&hvnetw=g&hvrand=10191096122562268571&hvpone=&hvptwo=&hvqmt=&hvdev=c&hvdvcmdl=&hvlocint=&hvlocphy=9053121&hvtargid=pla-585075334748&psc=1
DISCLAIMER
Barbour's Auto Help is not responsible for any damage or personal injury incurred in the process of performing any auto repairs done by you the viewer. Automotive repair is extremely dangerous. Repair your vehicle at your own risk. It is the viewers responsibility to verify all information and procedures as outlined in YOUR REPAIR MANUAL AND OWNERS MANUAL FOR YOUR VEHICLE. Owning and using a repair manual suited for your vehicle is essential for correctly and safely performing ANY repair to your vehicle. Always wear safety glasses and heed all instructions for use applicable to any piece of equipment you may use. Due to circumstances out of the control of Barbours Auto Help, Barbours Auto Help makes no guarantee that by the use of the information given in this video a quality repair will be made. Barbour'sAutoHelp makes no guarantee that the information provided is totally complete, syncronized and accurate. Verify everything using an appropriate repair manual.
Repair your vehicle at your own risk! Barbour's auto help does not guarantee a proper repair using these techniques.
20
views
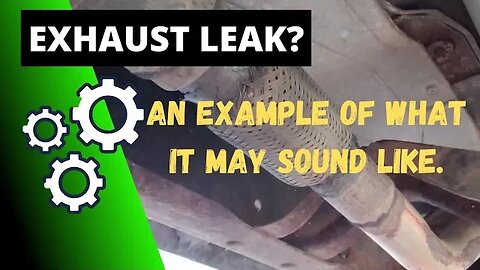
What An Exhaust Leak May Sound Like
In this video I give a great example of what an exhaust leak may sound like. The example was taken from my 04 Ford Ranger. It recently developed and exhaust leak just to the front of the flex pipe of the exhaust. It began to make a "spuddering / blump blump blump" type noise. In this video I show where this leak is and I also give audio of the leak so that you can have an example of what it sounds like.
While exhaust leaks can sound similar to the audio taken in the video exhaust leaks may differ in they way they sound. This is just one way it may sound if you have an exhaust leak.
Note: In no way am I guaranteeing that you have an exhaust leak if your vehicle sounds similar to the vehicle in the video. This is meant to only be an example of just one way and exhaust leak can sound. There are other factors to consider when diagnosing an exhaust leak. This video is not a complete guide to diagnosing exhaust leaks.
⚠️ Always use caution when working around exhaust systems. They can reach temperatures in excess of 300 Degrees F and can cause serious burns. Be sure the exhaust is totally cool before touching. Use caution when working under your vehicle. Be sure your vehicle is in park with the parking brake on and wheels chocked before getting underneath your vehicle. If your vehicle must be lifted be sure it is lifted properly using a repair manual and your owners manual. Properly lifting and securing vehicle not shown in video or explained in description. ⚠️
GENERAL DISCLAIMER
Barbour's Auto Help is not responsible for any damage or personal injury incurred in the process of performing any auto repairs done by you the viewer. Automotive repair is extremely dangerous. Repair your vehicle at your own risk. It is the viewers responsibility to verify all information and procedures as outlined in YOUR REPAIR MANUAL AND OWNERS MANUAL FOR YOUR VEHICLE. Owning and using a repair manual suited for your vehicle is essential for correctly and safely performing ANY repair to your vehicle. Always wear safety glasses and protective gloves and heed all instructions for use applicable to any piece of equipment you may use. Due to circumstances out of the control of Barbour's Auto Help, Barbour's Auto Help makes no guarantee that by the use of the information given in this video a quality repair will be made. Barbour's Auto Help makes no guarantee that the information provided is totally complete, synchronized and accurate. Verify everything using an appropriate repair manual.
Repair and service your vehicle at your own risk! Barbour's auto help does not guarantee a proper repair using these techniques. Because of unforeseen circumstances and situations Barbour's Auto Help makes no guarantee that you will not damage your vehicle using the information in this video.
17
views
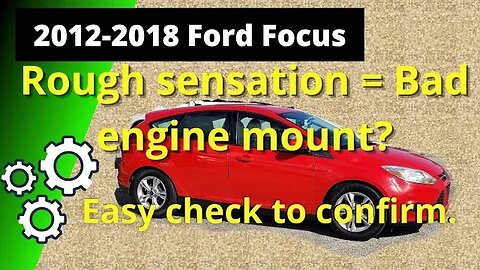
Easy Check For Bad Engine Mount 2012-2018 Ford Focus
In this video I show a quick and easy way to check for a bad right front engine mount on a 2012-2018 Ford Focus 2.0L. A rough sensation while the engine is running may be felt in the passenger compartment when this mount is bad. Typically the mount will become weak and ground itself out on the engine mount bracket causing engine vibrations to be transferred into the passenger compartment. The mount can be checked for this failure by simply looking at the mount with a mirror as shown in the video. If the mount is grounded to the bracket then the mount is bad and needs to be replaced. (It's likely that if you are having this "rough sensation" that the engine mount is the cause if it is grounded out as shown in the video. Regardless if it fixes your problem or not, if it is grounded then it is bad and needs to be replaced.)
Note: At the 1:24 mark I show the "bad" mount outside of the vehicle. There is spacing between the mount and the mounting bracket at this time, but only because it is not supporting the weight of the engine. As mentioned later in the video, if the weight of the engine where applied to the "bad" mount then the mount would be touching the mounting bracket.
Folks, use common sense when working on or inspecting your vehicle. If you're working or inspecting things under the hood then be sure the vehicle is in park with the parking brake on. I'd recommend inspecting this mount with the engine off. Use caution around the accessory drive (the serpentine belt area). If the engine is running things can get caught in the accessory drive potentially leading to injury.
This is not a "how to repair" video showing how to replace the mount.
***If something is unclear or you have a question please comment below the video.***
GENERAL DISCLAIMER
Barbour's Auto Help is not responsible for any damage or personal injury incurred in the process of performing any auto repairs done by you the viewer. Automotive repair is extremely dangerous. Repair your vehicle at your own risk. It is the viewers responsibility to verify all information and procedures as outlined in YOUR REPAIR MANUAL AND OWNERS MANUAL FOR YOUR VEHICLE. Owning and using a repair manual suited for your vehicle is essential for correctly and safely performing ANY repair to your vehicle. Always wear safety glasses and protective gloves and heed all instructions for use applicable to any piece of equipment you may use. Due to circumstances out of the control of Barbour's Auto Help, Barbour's Auto Help makes no guarantee that by the use of the information given in this video a quality repair will be made. Barbour's Auto Help makes no guarantee that the information provided is totally complete, synchronized and accurate. Verify everything using an appropriate repair manual.
Repair and service your vehicle at your own risk! Barbour's auto help does not guarantee a proper repair using these techniques. Because of unforeseen circumstances and situations Barbour's Auto Help makes no guarantee that you will not damage your vehicle using the information in this video.
14
views
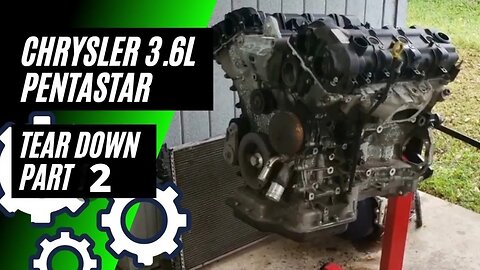
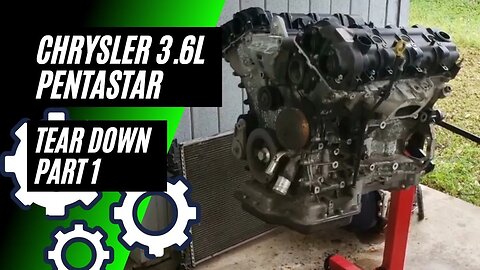
Chrysler Pentastar 3.6L Tear Down: Part 2
This is part 2 of my Pentastar 3.6L tear down series. In this video I take you along as I take apart a Chrysler Pentastar 3.6L while discussing the various parts of the engine and explain how they work. In this video I will be getting into the cylinder head of the 3.6L. Camshafts, cam followers, hydraulic valve lash adjusters, valves and variable valve timing units will be gone over. It's a fun video and a bit of a deviation from my normal "how to" stuff. I hope you enjoy!
Note: this video Is a very high level overview of this engine and the parts inside. This video should not take the place of a manual and the tear down methods used are not meant to be used. It's just a fun and informational video....that probably doesn't have all the information you could every need for this engine.
Here is a link to the video discussing the cam follower failure.
https://youtu.be/se0q8gvwj-c
Here is a link to part 1 of this series.
https://youtu.be/bV5frHweDlI
Here is a link to part 3 of this series.
https://youtu.be/Px8B_iIfCG8
DISCLAIMER
Barbour's Auto Help is not responsible for any damage or personal injury incurred in the process of performing any auto repairs done by you the viewer. Automotive repair is extremely dangerous. Repair your vehicle at your own risk. It is the viewers responsibility to verify all information and procedures as outlined in YOUR REPAIR MANUAL AND OWNERS MANUAL FOR YOUR VEHICLE. Owning and using a repair manual suited for your vehicle is essential for correctly and safely performing ANY repair to your vehicle. Always wear safety glasses, protective gloves and heed all instructions for use applicable to any piece of equipment you may use. Due to circumstances out of the control of Barbours Auto Help, Barbours Auto Help makes no guarantee that by the use of the information given in this video a quality repair will be made. Barbour'sAutoHelp makes no guarantee that the information provided is totally complete, syncronized and accurate. Verify everything using an appropriate repair manual. Verify everything with your own research.
4
views
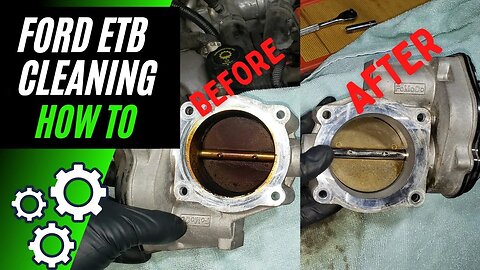
Ford Electronic Throttle Body Cleaning
In this video I take you along as I clean the electronic throttle body on my 2007 Ford Edge. While the vehicle in the video is an 07 Ford Edge the technique used to clean the throttle body can be used on, to my knowledge, all Ford electronic throttle bodies used on gas powered engines. I personally have cleaned Ford throttle bodies spanning many models and years using this technique with success. (Always verify this process can be used on your vehicle by using a repair manual suitable for your vehicle. While I have had success on a BUNCH of throttle body cleanings I cannot say that I have performed this on every year and model of Ford out there. There could be an exception I do not know about.)
Note: Disconnecting the negative battery cable and isolating it from the battery before starting this service can help prevent setting codes or accidentally cranking the engine.
Note: ONLY USE "THROTTLE BODY CLEANER" when cleaning throttle body. Read and understand the instructions and warnings on the bottle or can of throttle body cleaner. Follow instructions on bottle or can.
Warning!! As notated in the video... If you choose to clean the throttle body while it is still mounted to the intake use care to use small amounts of throttle body cleaner. Spraying excessive amounts of cleaner into the intake could flood the cylinders and possible hydrolock the engine causing engine damage.
GENERAL DISCLAIMER
Barbour's Auto Help is not responsible for any damage or personal injury incurred in the process of performing any auto repairs done by you the viewer. Automotive repair is extremely dangerous. Repair your vehicle at your own risk. It is the viewers responsibility to verify all information and procedures as outlined in YOUR REPAIR MANUAL AND OWNERS MANUAL FOR YOUR VEHICLE. Owning and using a repair manual suited for your vehicle is essential for correctly and safely performing ANY repair to your vehicle. Always wear safety glasses and protective gloves and heed all instructions for use applicable to any piece of equipment you may use. Due to circumstances out of the control of Barbour's Auto Help, Barbour's Auto Help makes no guarantee that by the use of the information given in this video a quality repair will be made. Barbour's Auto Help makes no guarantee that the information provided is totally complete, synchronized and accurate. Verify everything using an appropriate repair manual.
Repair and service your vehicle at your own risk! Barbour's auto help does not guarantee a proper repair using these techniques. Because of unforeseen circumstances and situations Barbour's Auto Help makes no guarantee that you will not damage your vehicle using the information in this video.
55
views
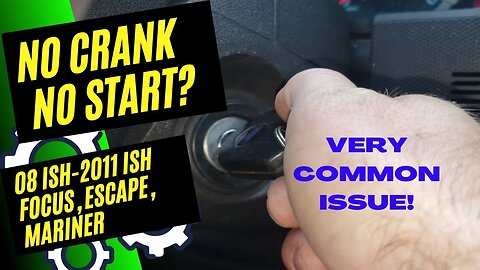
2008-2011 Ford Focus/ Escape/ Mariner No Crank No Start
In this video I go over a common cause of a "no crank/ no start" symptom on some 2008-2011 Ford Focus, Escape and Mercury Mariner vehicles. This common cause is a failed ignition lock housing. This is the part that goes between the ignition lock cylinder (the part you insert the key into) and the ignition switch. The way in which this part fails is that it does not transfer the rotation of the key to the ignition switch thus causing a no crank/ no start symptom. Typically, when the ignition lock housing is at fault, you can push the key into the tumbler and then rotate it to get the vehicle to start.
Note: I do not guarantee that this part is the cause of your "no crank/ no start" symptom. I'm only sharing a common cause of this symptom. I always suggest having your vehicle properly diagnosed to ensure that the proper parts are replaced for repair. Also, I may be off a year, plus or minus, concerning the vehicles that are affected by this common issue. Verify by doing your own research. Also, I do believe that Mazda Tributes may be affected by this as well. However, I have not had experience with this vehicle in regards to this issue.
This is the link to the part shown in the video. Please verify that this part is the correct one for your vehicle. Parts may differ from year to year and by application. This on is for an 09 Focus. There will be a bar at the top of the screen that you can verify fitment.
https://www.amazon.com/dp/B07VPR5R4S/ref=au_as_r?_encoding=UTF8&Make=Ford%7C54&Model=Focus%7C679&Year=2009%7C2009&ie=UTF8&newVehicle=1&vehicleId=1&vehicleType=automotive
Pictures used for lock housing in video found at Amazon.com and Ebay.com and used under "fair use".
DISCLAIMER
Barbour's Auto Help is not responsible for any damage or personal injury incurred in the process of performing any auto repairs done by you the viewer. Automotive repair is extremely dangerous. Repair your vehicle at your own risk. It is the viewers responsibility to verify all information and procedures as outlined in YOUR REPAIR MANUAL AND OWNERS MANUAL FOR YOUR VEHICLE. Owning and using a repair manual suited for your vehicle is essential for correctly and safely performing ANY repair to your vehicle. Always wear safety glasses and heed all instructions for use applicable to any piece of equipment you may use. Due to circumstances out of the control of Barbours Auto Help, Barbours Auto Help makes no guarantee that by the use of the information given in this video a quality repair will be made. Barbour'sAutoHelp makes no guaranty that the information provided is totally complete, syncronized and accurate. Verify everything using an appropriate repair manual. You can do it. Do it right and do it safely.
Repair your vehicle at your own risk! Barbour's auto help does not guarantee a proper repair using these techniques. The diagnostic path shared in the video may not be the correct one for your vehicle or the particular symptom you are experiencing. This video should not take the place of a repair manual.
6
views
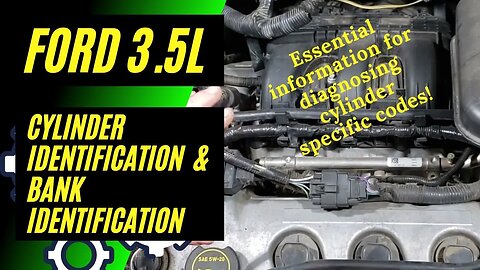
Ford 3.5L Cylinder Identification and Bank Identification
I this video I go over the cylinder identification and the bank identification on a Ford 3.5L V-6. This information is applicable to Ford vehicles that have the 3.5L engine in it from around 2006-present day. (including the 3.5L ecoboost). The cylinder id is 1,2,3 from front to the back of the right side of the engine and 4,5,6 from the front to the back of the left side of the engine. The side of the engine that has cylinders 1-3 is known as "bank 1" and the side of the engine that has cylinders 4-6 is known as "bank 2".
A senior tech mentioned to me a while back that all Fords, 3.5l v-6 or not, will always have there cylinders numbered in numerical order. If it's a v-8 cyinders 1-4 with always be on the right bank, bank 1, and the cylinders will be numbered 1,2,3,4 from front to back and the left bank, bank 2, will have cylinders 5-8 and the cylinders will be numbered 5,6,7,8 from the front of the engine to the rear. A V-6 is numbered as the video shows. A four cylinder is numbered 1-4 starting with cylinder 1 at the front of the engine and ending will 4 at the rear of the engine. V10s are similarly ordered. The right bank will have cylinders 1-5 and the left bank will have cylinders 6-10....... I have yet to prove this guy wrong.
DISCLAIMER
Barbour's Auto Help is not responsible for any damage or personal injury incurred in the process of performing any auto repairs done by you the viewer. Automotive repair is extremely dangerous. Repair your vehicle at your own risk. It is the viewers responsibility to verify all information and procedures as outlined in YOUR REPAIR MANUAL AND OWNERS MANUAL FOR YOUR VEHICLE. Owning and using a repair manual suited for your vehicle is essential for correctly and safely performing ANY repair to your vehicle. Always wear safety glasses and heed all instructions for use applicable to any piece of equipment you may use. Due to circumstances out of the control of Barbours Auto Help, Barbours Auto Help makes no guarantee that by the use of the information given in this video a quality repair will be made. Barbour'sAutoHelp makes no guarantee that the information provided is totally complete, syncronized and accurate. Verify everything using an appropriate repair manual. You can do it. Do it right and do it safely.
Repair your vehicle at your own risk! Barbour's auto help does not guarantee a proper repair using these techniques.
10
views
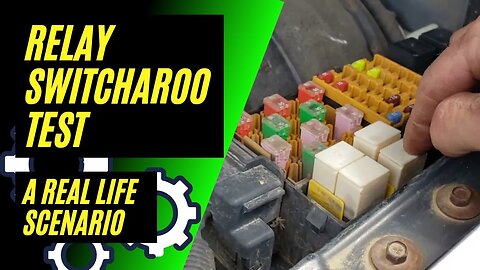
Real Life Scenario Where The Relay "Switcharoo Test" Worked For Me.
I made this video after figuring out that I had a bad A/C relay. I was out in the country and it was hot. My A/C was inop and I needed to figure out what was wrong with my A/C . I figured out that I had a bad A/C relay after performing the relay "switcharoo test". I made a video showing how to do this not too long ago. ( see link below). That video was good but It lacked an actual bad relay. I now had a "real life" scenario. So, I made this video. I thought it would be great to show you how this failed relay was behaving and to reinforce just how handy and easy the "switcharoo test" is. ( I didn't even have to break out the tools)
Note: Not all faulty relays will behave in the same manner. Some may not even intermittently work.
Also at around the 1:50 mark I'm not trying to wiggle the relay. Well I am but it's an attempt to get the relay out, not test it. It's best not to wiggle relays that violently. I was having a hard time getting the relay out while filming with one hand.
Here is a link to that video mentioned. I'd suggest watching it as it goes into a little more detail on the "relay swap test" aka "switcharoo test": https://youtu.be/XGG9FzKBVd4
DISCLAIMER
Barbour's Auto Help is not responsible for any damage or personal injury incurred in the process of performing any auto repairs done by you the viewer. Automotive repair is extremely dangerous. Repair your vehicle at your own risk. It is the viewers responsibility to verify all information and procedures as outlined in YOUR REPAIR MANUAL AND OWNERS MANUAL FOR YOUR VEHICLE. Owning and using a repair manual suited for your vehicle is essential for correctly and safely performing ANY repair to your vehicle. Always wear safety glasses and heed all instructions for use applicable to any piece of equipment you may use. Due to circumstances out of the control of Barbours Auto Help, Barbours Auto Help makes no guaranty that by the use of the information given in this video a quality repair will be made. Barbour'sAutoHelp makes no guarantee that the information provided is totally complete, syncronized and accurate. Verify everything using an appropriate repair manual. You can do it. Do it right and do it safely.
Repair your vehicle at your own risk! Barbour's auto help does not guaranty a proper repair using these techniques.
5
views
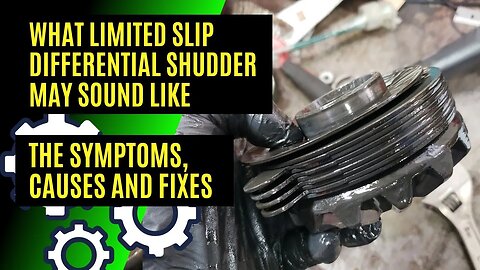
What Limited Slip Differential Shudder May Sound Like/ The Symptom, Causes and Fixes
In this video I go over what a limited slip differential shudder may sound like and discuss the causes and fixes. I was even able to catch some limited slip shudder audio to share with you.
Limited slip differential shudder can also be described as a growling noise, a chattering noise or a vibration coming from the rear of the vehicle when making turns at very low speeds, usually 1-2 mph. It's caused by the limited slip clutch pack locking and unlocking repeatedly at a fast rate. Typically, in my experience, this is caused by one of two things. One: a differential service has been performed but friction modifier was not added. Two: the rear clutch packs are worn or damaged. Sometimes you can get by with just adding friction modifier to the rear end in the cases where the rear end was serviced and the modifier was left out. Of course if the clutch packs are worn or damaged they will need to be replaced.
Note: The information provided in this video may not be appropriate for every vehicle out there with a limited slip differential. Diagnostic processes and repairs may differ depending. Verify information provided in this video is applicable to your vehicle by doing your own research. I do not guaranty that you will properly diagnose or repair your vehicle with the aid of this video. Furthermore, this video is not a complete "how to" video showing how to properly diagnose and repair this problem. This video is only informational and is meant to share my experience with this particular problem. Use the information found in this video at your own risk.
DISCLAIMER
Barbour's Auto Help is not responsible for any damage or personal injury incurred in the process of performing any auto repairs done by you the viewer. Automotive repair is extremely dangerous. Repair your vehicle at your own risk. It is the viewers responsibility to verify all information and procedures as outlined in YOUR REPAIR MANUAL AND OWNERS MANUAL FOR YOUR VEHICLE. Owning and using a repair manual suited for your vehicle is essential for correctly and safely performing ANY repair to your vehicle. Always wear safety glasses and heed all instructions for use applicable to any piece of equipment you may use. Due to circumstances out of the control of Barbour's Auto Help, Barbour's Auto Help makes no guarantee that by the use of the information given in this video a quality repair will be made. Barbour's Auto Help makes no guarantee that the information provided is totally complete, synchronized and accurate. Verify everything using an appropriate repair manual.
7
views
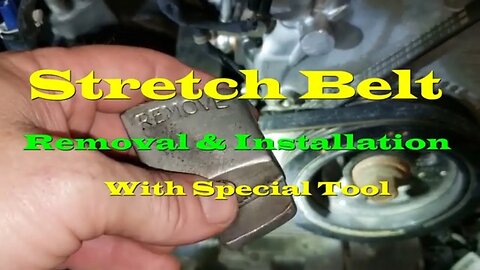
Stretch Belt Removal and Installation
In this video I show you a quick and easy way to remove and install a stretch belt. It involves using a stretch belt removal and installer tool linked below.
Stretch belts are becoming more and more common on automobiles. These are belts that do not require a tensioner to make them tight as they have to stretch over the pulleys that they run. In many cases using a special tool to assist in installing these belts can make life a bit more easy.
***Note: The vehicle featured in the video is equipped with an automatic transmission. If your vehicle is equipped with a manual transmission it will be necessary to place the transmission into neutral in order to rotate the crankshaft as shown in the video. Warning: Be sure that the parking brake is applied and that the wheels are chocked when the vehicle is in neutral.
Note: Barbour's Auto Help is not affiliated with Amazon or the makers of the product linked below. The tool featured in the video was bought by me and is used by me on a regular basis at my day job as an automobile technician.
Here is a link to the tool:
https://www.amazon.com/Drake-Off-Road-Stretch-Installer/dp/B00AC60VEC/ref=sr_1_22?crid=QO83SSPY734X&dchild=1&keywords=stretch+belt+remover%2Finstaller&qid=1604018377&sprefix=stretch+belt+remo%2Caps%2C208&sr=8-22
DISCLAIMER
Barbour's Auto Help is not responsible for any damage or personal injury incurred in the process of performing any auto repairs done by you the viewer. Automotive repair is extremely dangerous. Repair your vehicle at your own risk. It is the viewers responsibility to verify all information and procedures as outlined in YOUR REPAIR MANUAL AND OWNERS MANUAL FOR YOUR VEHICLE. Owning and using a repair manual suited for your vehicle is essential for correctly and safely performing ANY repair to your vehicle. Always wear safety glasses and heed all instructions for use applicable to any piece of equipment you may use. Due to circumstances out of the control of Barbours Auto Help, Barbours Auto Help makes no guarantee that by the use of the information given in this video a quality repair will be made. Barbour'sAutoHelp makes no guarantee that the information provided is totally complete, syncronized and accurate. Verify everything using an appropriate repair manual.
4
views
Chrysler Pentastar 3.6L Tear Down: Part 1
This is part 1 of my Pentastar 3.6L tear down series. In this video I take you along as I take apart a Chrysler Pentastar 3.6L while discussing the various parts of the engine and explain how they work. It's a fun video and a bit of a deviation from my normal "how to" stuff. I hope you enjoy!
Note: this video Is a very high level overview of this engine and the parts inside. This video should not take the place of a manual and the tear down methods used are not meant to be used. It's just a fun and informational video....that probably doesn't have all the information you could ever need for this engine.
Also, toward the end of the video I referred to the cam sprockets as "variable cam timing units" and "cam phasers". They can also be know as "Variable Valve Timing Units or Sprockets". Just an FYI.
Information about his engine and the specs at the beginning of this video was sourced from Wikipedia.
https://en.wikipedia.org/wiki/Chrysler_Pentastar_engine
Here is a link to part 2
https://youtu.be/p_E322bDf4s
DISCLAIMER
Barbour's Auto Help is not responsible for any damage or personal injury incurred in the process of performing any auto repairs done by you the viewer. Automotive repair is extremely dangerous. Repair your vehicle at your own risk. It is the viewers responsibility to verify all information and procedures as outlined in YOUR REPAIR MANUAL AND OWNERS MANUAL FOR YOUR VEHICLE. Owning and using a repair manual suited for your vehicle is essential for correctly and safely performing ANY repair to your vehicle. Always wear safety glasses, protective gloves and heed all instructions for use applicable to any piece of equipment you may use. Due to circumstances out of the control of Barbours Auto Help, Barbours Auto Help makes no guarantee that by the use of the information given in this video a quality repair will be made. Barbour'sAutoHelp makes no guarantee that the information provided is totally complete, syncronized and accurate. Verify everything using an appropriate repair manual. Verify everything with your own research.
7
views
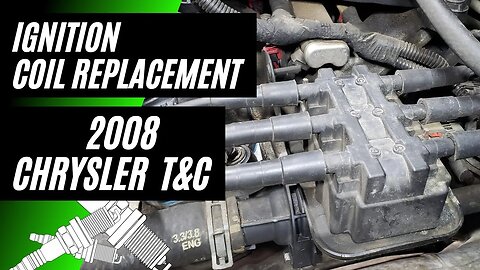
Ignition Coil Pack Replacement 08 Chrysler Town and Country 3.8L
In this video I show how to replace an ignition coil pack on an 08 Chrysler Town and Country 3.8L. The process is pretty simple. First, disconnect and isolate the negative battery cable. Then disconnect all of the ignition cables from the coil pack. Disconnect the electrical connector. Remove the two nuts that hold the coil pack down. Then remove the coil pack. Installation is the reverse procedure. (Torque specifications not provided. Reference your repair manual for this information.)
Note: At around the 1:20 mark I make a note to see description form more information about cleaning the tray that the coil mounts to. It is not uncommon for debris to be found on this tray or to fall on this tray when the coil is removed. Any debris should be removed from the tray before mounting the ignition coil pack as this debris could get trapped between the coil and the tray and could cause the coil to not fasten correctly to the tray.
DISCLAIMER
Barbour's Auto Help is not responsible for any damage or personal injury incurred in the process of performing any auto repairs done by you the viewer. Automotive repair is extremely dangerous. Repair your vehicle at your own risk. It is the viewers responsibility to verify all information and procedures as outlined in YOUR REPAIR MANUAL AND OWNERS MANUAL FOR YOUR VEHICLE. Owning and using a repair manual suited for your vehicle is essential for correctly and safely performing ANY repair to your vehicle. Always wear safety glasses, protective gloves and heed all instructions for use applicable to any piece of equipment you may use. Due to circumstances out of the control of Barbours Auto Help, Barbours Auto Help makes no guarantee that by the use of the information given in this video a quality repair will be made. Barbour'sAutoHelp makes no guarantee that the information provided is totally complete, syncronized and accurate. Verify everything using an appropriate repair manual. Verify everything with your own research.
12
views
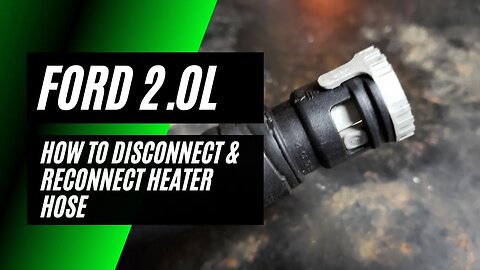
How To Disconnect Heater Hose On Ford 2.0L
In this video I show how to disconnect and reconnect a Ford heater hose used on 2012-2016 Ford Focus 2.0L and 2013-2016 Ford Escape 2.0L Ecoboost. The process is very simple once you understand how the coupling that connects the heater hose works. First turn the two tangs on the ring, as shown in the video, counter clockwise. This unlocks the coupling. Once the coupling is unlocked you can then disconnect the heater hose. To reconnect, first turn the two tangs on the ring clockwise until the tang with an arrow on it lines up with the symbol on the black plastic portion of the housing as show in the video. Then reconnect the coupling. Be sure the divot on the male end lines up with the symbol on the coupling. Push the hose on until the coupling snaps into place. Give the hose a light tug (don't break anything in the process) to insure it is locked securely.
The special tool used in the video is a Lisle 39200. You can find it by clicking the ling below.
https://www.amazon.com/Lisle-39200-Heater-Hose-Disconnect/dp/B06XP8KT8L/ref=sr_1_1?dchild=1&keywords=lisle+39200&qid=1616811461&sr=8-1
*Information for specific years and models that this hose fits on was taken from the back of the package of the Lisle tool*
Warning: Whenever servicing the cooling system, disconnecting hoses, the cooling system should be totally cool and depressurized. Injury can occur if care isn't taken. Please refer to your repair manual for information on how to safely cool and depressurize your cooling system.
Warning!! Be sure the cooling system is totally cool and depressurized before disconnecting heater hose. Hot coolant under pressure could spray onto you causing personal injury if you don't. I'd suggest letting the vehicle cool down, with the engine off, for a few hours before opening the cooling system. I'd also suggest carefully opening the radiator cap to relieve any pressure that may be in the system after the engine is cool. (Place a rag over the radiator cap before removing it. Remove it slowly and carefully. Do not allow the cap to blow off and possibly get hot coolant on you.) Once the system is cool and depressurized then you can perform you repair. Use your repair manual for further information on whatever repair you are performing.
DISCLAIMER
Barbour's Auto Help is not responsible for any damage or personal injury incurred in the process of performing any auto repairs done by you the viewer. Automotive repair is extremely dangerous. Repair your vehicle at your own risk. It is the viewers responsibility to verify all information and procedures as outlined in YOUR REPAIR MANUAL AND OWNERS MANUAL FOR YOUR VEHICLE. Owning and using a repair manual suited for your vehicle is essential for correctly and safely performing ANY repair to your vehicle. Always wear safety glasses, protective gloves and heed all instructions for use applicable to any piece of equipment you may use. Due to circumstances out of the control of Barbours Auto Help, Barbours Auto Help makes no guarantee that by the use of the information given in this video a quality repair will be made. Barbour'sAutoHelp makes no guarantee that the information provided is totally complete, synchronized and accurate. Verify everything using an appropriate repair manual.
17
views
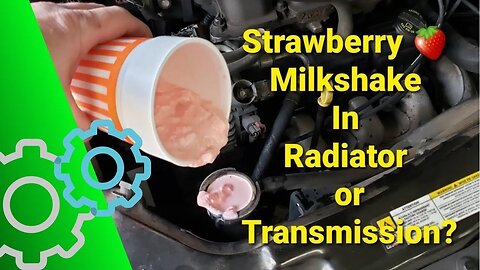
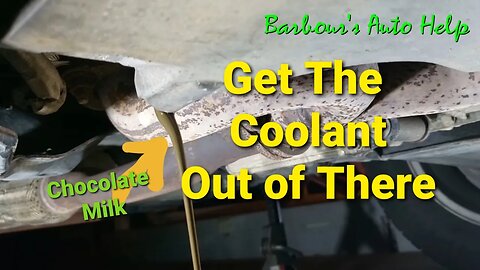
How Coolant and Transmission Fluid Mix, How It Affects The Vehicle, and What Can Be Done
In this video I'll go over how transmission fluid can enter the cooling system and/ or how coolant can enter the transmission fluid. I'll also go over how this negatively affects both the cooling system and the transmission. I then discuss what can be done about this issue.
A failure such as this is either caused by someone adding the wrong fluid to the wrong system or by a faulty transmission fluid cooler. And while people do add the wrong fluid to the wrong system it's far more likely that this is caused by a faulty cooler. A leak develops in the cooler allowing either transmission fluid to enter the cooling system and/ or coolant to enter the transmission.
This truly messes up a bunch of stuff. In the cooling system all of the rubber can be ruined by transmission fluid. It can also affect the cooling systems ability to properly cool the engine. If coolant gets into the transmission it can ruin the clutch packs and potentially the whole transmission. Usually a rebuild or a transmission replacement is needed. ***If the transmission is replaced or rebuilt due to this then it is recommended to flush the cooler lines to the transmission to remove any coolant so that the new transmission is not affected.***
Of course, to repair this, the transmission fluid cooler will have to be replaced. If the cooler is internal to the radiator then the radiator will have to be replaced. If transmission fluid entered the cooling system then the cooling system will need to be thoroughly flushed out until there is no more transmission fluid in the cooling system. I'd also recommend replacing all the rubber components in the system. If coolant has gotten into the transmission it is likely the transmission will have to be rebuilt or replaced. However, It's worth a try to do a thorough transmission fluid flush with a filter replacement. (this may take several dozen quarts of fluid to do properly.)
Note: this video is superficial in nature and cannot apply to all vehicles out there. A lot of the information given in the video is a matter of opinion and may not be best for your vehicle given factors unknown. Do your own research.
Images shown in video depict not only contaminated fluid but also uncontaminated fluid. Contaminated fluid with have a "milky", thick, opaque, look to it. Some coolants are red or orange. Red and orange coolant is supposed to be red and orange. But when it gets contaminated with transmission fluid it becomes "milky" and thick. Also, most transmission fluids are red or some shade of red. This too will become "milky" and thick when coolant is mixed in with it. In both cases, with the coolant and transmission fluid, the severity of contamination may vary.
GENERAL DISCLAIMER
Barbour's Auto Help is not responsible for any damage or personal injury incurred in the process of performing any auto repairs done by you the viewer. Automotive repair is extremely dangerous. Repair your vehicle at your own risk. It is the viewers responsibility to verify all information and procedures as outlined in YOUR REPAIR MANUAL AND OWNERS MANUAL FOR YOUR VEHICLE. Owning and using a repair manual suited for your vehicle is essential for correctly and safely performing ANY repair to your vehicle. Always wear safety glasses and protective gloves and heed all instructions for use applicable to any piece of equipment you may use. Due to circumstances out of the control of Barbour's Auto Help, Barbour's Auto Help makes no guarantee that by the use of the information given in this video a quality repair will be made. Barbour's Auto Help makes no guarantee that the information provided is totally complete, synchronized and accurate. Verify everything using an appropriate repair manual.
Repair your vehicle at your own risk! Barbour's auto help does not guarantee a proper repair using these techniques.
61
views
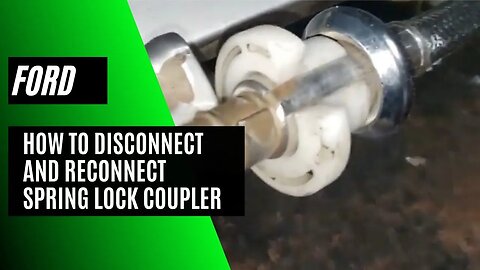
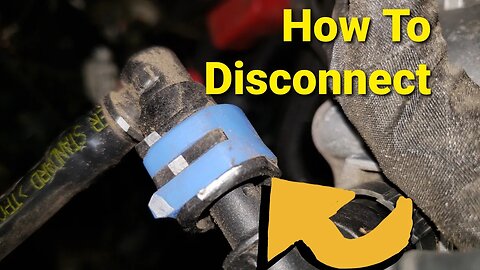
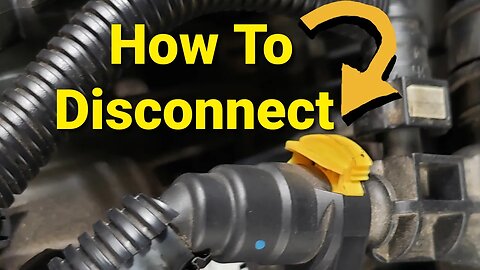
How To Disconnect A Ford Spring Lock Coupler
In this video I'll demonstrate how to disconnect a Ford spring lock coupler. The process is super simple but it does require a special tool, a spring lock coupler disconnect tool. These tools are readily available at most auto parts stores and tool stores. Simply find the correct size tool the the coupler you are trying to disconnect. Fit the tool over the coupler on the spring side with the working end of the tool facing the spring. Push the tool into the spring unseating the spring. Once the spring is unseated you can then pull the two halves of the coupler apart.
Warning: The contents of the line that the coupler is joining may be under pressure. These couplers are typically used on fuel and A/C systems. Both systems require being depressurized before disconnecting the coupler or damage and personal injury could occur. I'm am not aware of any other systems that this spring lock coupler is used on. However, if there is another system it is possible that it will have to be depressurized too.
Depressurizing the fuel system: (This is a generic method of depressurizing a fuel system and may not apply to your vehicle. Verify this procedure is correct in your repair manual.)
Typically a fuel system can be depressurized by disconnecting power from the fuel pump. This can be done by removing the fuel pump fuse or removing the fuel pump relay. Once power is disconnected from the fuel pump start the engine and allow it to run until it dies. Once the engine dies crank the engine over for another 10 seconds to insure the most pressure possible has been removed. Note: There could still be pressure in the line so use caution when disconnecting the coupler. Wear safety glasses and keep a fire extinguisher handy.
Depressurizing the A/C system: This is also know as evacuating the A/C system. Special equipment is required for this as well as certifications for handling refrigerant. I would recommend having a certified tech evacuate your system.
DISCLAIMER
Barbour's Auto Help is not responsible for any damage or personal injury incurred in the process of performing any auto repairs done by you the viewer. Automotive repair is extremely dangerous. Repair your vehicle at your own risk. It is the viewers responsibility to verify all information and procedures as outlined in YOUR REPAIR MANUAL AND OWNERS MANUAL FOR YOUR VEHICLE. Owning and using a repair manual suited for your vehicle is essential for correctly and safely performing ANY repair to your vehicle. Always wear safety glasses and heed all instructions for use applicable to any piece of equipment you may use. Due to circumstances out of the control of Barbour's Auto Help, Barbour's Auto Help makes no guarantee that by the use of the information given in this video a quality repair will be made. Also, Barbour's Auto Help makes no guarantee that the information provided is totally complete, synchronized and accurate. Verify everything using an appropriate repair manual.
Repair your vehicle at your own risk! Barbour's auto help does not guarantee a proper repair using these techniques. Also, there may be other risks involved that where not gone over in the video and in this description. I tried to name them all but I may have missed something. So again, use this information at your own risk. Do as much research as possible before working on your vehicle.
13
views
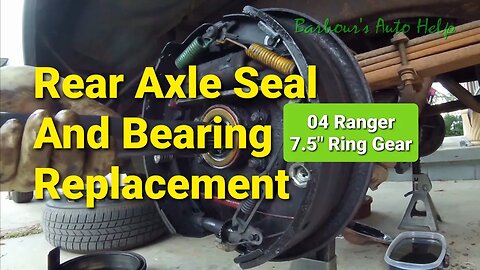
Rear Axle Seal And Bearing Replacement 04 Ford Ranger With 7.5" Ring Gear
In this video I'll take you along as I replace the rear axle bearings and seals on my 04 Ford Ranger with a 7.5" ring gear. The process is pretty simple but requires a little labor. First the vehicle needs to be lifted in the rear end with the vehicle in neutral. (How to properly lift and support your vehicle not shown or explained in video. IT IS ABSOLUTELY IMPERATIVE THAT YOU LIFT AND SUPPORT YOUR VEHICLE CORRECTLY TO PREVENT PERSONAL INJURY OR DEATH. THIS VIDEO IS NOT A GOOD EXAMPLE OF HOW TO DO THAT. You will need to obtain that information elsewhere.) Once the vehicle is lifted remove the wheels and the brake drums. Then remove the pumpkin cover on the differential. Once the cover is removed from the differential you can then remove the C clips from either axle. Once the C clip is removed the axle can be slid out. Once axle is out remove the old seal and bearing. Install new seal and bearing and reverse procedure. Torque down all fasteners to specification. (You will need a repair manual for specifications and to verify procedures. )
Note: Removal and installation of wheels not shown in video. When installing wheels after repair has been made be sure the lug nuts are torqued to specification.
As noted in the video, fill the rear end with gear oil after the wheels have been installed and vehicle is off jack stands. Be sure the vehicle is on a level surface for an accurate level check.
As for the Scotch Brite scouring pads.. Scotch Brite is in no way affiliated with Barbour's Auto Help and Barbour's Auto Help has not received any money from Scotch Brite to promote their product. I just think it woks well. Also, Walmart is also not affiliated with Barbour's Auto Help. NOTE: I would advise softening them up a bit before using them. Maybe use one that has been used on dishes for a while. Here is a link to what I'm referring to.
https://www.walmart.com/ip/Scotch-Brite-Heavy-Duty-Scour-Pads-20-ct/189719313?wmlspartner=wlpa&selectedSellerId=101002828&&adid=22222222227038402673&wl0=&wl1=g&wl2=c&wl3=432774210164&wl4=pla-899486037100&wl5=9053121&wl6=&wl7=&wl8=&wl9=pla&wl10=129377705&wl11=online&wl12=189719313&veh=sem&gclid=CjwKCAiA1eKBBhBZEiwAX3gql54cKwZ4gXefYQSTeSFYIF6Dv1dZ52dOU0AqP64D0iG7MjyQ3lnSaBoCEu4QAvD_BwE
Warning: Use only light pressure when using the scouring pads to clean the axle. DO NOT GOUGE THE MATING SURFACE OF THE AXLE. I have had success using scouring pads on sealing surfaces with no problems. However, I make no guarantees that you will. Use this technique at your own risk.
DISCLAIMER
Barbour's Auto Help is not responsible for any damage or personal injury incurred in the process of performing any auto repairs done by you the viewer. Automotive repair is extremely dangerous. Repair your vehicle at your own risk. It is the viewers responsibility to verify all information and procedures as outlined in YOUR REPAIR MANUAL AND OWNERS MANUAL FOR YOUR VEHICLE. Owning and using a repair manual suited for your vehicle is essential for correctly and safely performing ANY repair to your vehicle. Always wear safety glasses and heed all instructions for use applicable to any piece of equipment you may use. Due to circumstances out of the control of Barbour's Auto Help, Barbour's Auto Help makes no guarantee that by the use of the information given in this video a quality repair will be made. Also, Barbour's Auto Help makes no guarantee that the information provided is totally complete, synchronized and accurate. Verify everything using an appropriate repair manual.
Repair your vehicle at your own risk! Barbour's auto help does not guarantee a proper repair using these techniques. Further more I do not guarantee you will not damage your vehicle in the process of repairing it.
66
views
How To Disconnect and Reconnect Ford Line Connector With Blue Lock
In this video I'll show you how to disconnect a Ford line Connector with a blue lock. This type of connector is used on many late model Fords as either a fuel line connector or a vacuum line connector.
First spread the legs of the blue lock apart slightly. Then slide the lock off its seat. Once the lock is pushed off its seat then the connector can be disconnected. Then reconnect connector. Once connector is fully seated passed the rib of the male end of the line push the blue lock back into it's seat. Ensure connector is secure by giving it a small tug.
Warning: If you are disconnecting a fuel line be sure to bleed fuel pressure off before hand. A fuel line under pressure can spray fuel. This can get into your eyes and onto your person. Bleed off fuel pressure in manor prescribed by repair manual. Even after fuel pressure has been bleed use care when disconnecting line. ALWAYS WEAR SAFETY GLASSES AND HAVE A FIRE EXTINGUISHER HANDY. Fuel is flammable. Use caution.
DISCLAIMER
Barbour's Auto Help is not responsible for any damage or personal injury incurred in the process of performing any auto repairs done by you the viewer. Automotive repair is extremely dangerous. Repair your vehicle at your own risk. It is the viewers responsibility to verify all information and procedures as outlined in YOUR REPAIR MANUAL AND OWNERS MANUAL FOR YOUR VEHICLE. Owning and using a repair manual suited for your vehicle is essential for correctly and safely performing ANY repair to your vehicle. Always wear safety glasses and heed all instructions for use applicable to any piece of equipment you may use. Due to circumstances out of the control of Barbours Auto Help, Barbours Auto Help makes no guarantee that by the use of the information given in this video a quality repair will be made. Barbour'sAutoHelp makes no guarantee that the information provided is totally complete, syncronized and accurate. Verify everything using an appropriate repair manual.
6
views

Thermostat and Thermostat Housing Replacement 1998 Dodge Durango 5.2L
In this video I replace the thermostat and thermostat outlet, aka thermostat housing, on a 1998 Dodge Durango 5.2L V-8. The approach I take in this video is the "long way". I end up taking off a lot of components in order to open things up so that I could clean the mating surface really well. Having all the components out of the way as shown in the video really helps in doing a good job. However, you don't have to take all that stuff off. You can take the thermostat housing out and still clean the mating surface. I've done it several times. In my opinion it's difficult to do it this way and do a good job. A lot of folks think it's difficult to take off all the stuff I did. I don't think so. I guess it's up to you to pick your "difficult". Either way good luck.
Note: You will have to bleed and fill the cooling system after this repair. Also, check over your work to ensure there are no leaks after repair. A pressure tester would be needed to properly check the system for leaks.
Be sure to allow the RTV applied to the gasket to fully dry before adding coolant.
Here are some other videos that you may find helpful.
Bleeding And Filling Cooling System With Vacuum Filler (The Best Method in my opinion!)
https://youtu.be/OGuXoRV5xg4
If you don't have a vacuum filler then you could use a fill funnel to bleed the system. Note: It is a little more difficult to get all the air our using this method. Also, the vehicle shown in the video is not the same but the concept is similar. Refer to your repair manual for any special precautions that need to be taken.
https://youtu.be/93aWiO01g0o
Here is a video showing how to pressure test a cooling system to check for leaks.
https://youtu.be/ue86SVk4rGU
DISCLAIMER
Barbour's Auto Help is not responsible for any damage or personal injury incurred in the process of performing any auto repairs done by you the viewer. Automotive repair is extremely dangerous. Repair your vehicle at your own risk. It is the viewers responsibility to verify all information and procedures as outlined in YOUR REPAIR MANUAL AND OWNERS MANUAL FOR YOUR VEHICLE. Owning and using a repair manual suited for your vehicle is essential for correctly and safely performing ANY repair to your vehicle. Always wear safety glasses and heed all instructions for use applicable to any piece of equipment you may use. Due to circumstances out of the control of Barbours Auto Help, Barbours Auto Help makes no guarantee that by the use of the information given in this video a quality repair will be made. Barbour'sAutoHelp makes no guarantee that the information provided is totally complete, syncronized and accurate. Verify everything using an appropriate repair manual.
Repair your vehicle at your own risk! Barbour's auto help does not guarantee a proper repair using these techniques.
6
views
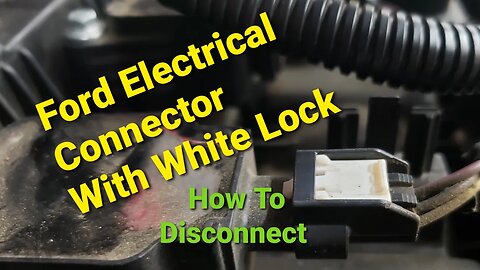
How To Disconnect and Reconnect Ford Electrical Connector With White Slide Lock
In this video I show how to disconnect and reconnect a Ford electrical connector with a white slide lock. This type of electrical connector is used on many ford vehicles and has been for many years.
This connector requires that the white slide lock be pulled back. This allows the release tang to be pushed down. Once the release tang is pushed down then the connector can be disconnected from the component. The installation is the reverse procedure. Be sure to give the connector a tug after it has been locked in order to verify it is secure.
Link to play list will be added as soon as more videos are available.
DISCLAIMER
Barbour's Auto Help is not responsible for any damage or personal injury incurred in the process of performing any auto repairs done by you the viewer. Automotive repair is extremely dangerous. Repair your vehicle at your own risk. It is the viewers responsibility to verify all information and procedures as outlined in YOUR REPAIR MANUAL AND OWNERS MANUAL FOR YOUR VEHICLE. Owning and using a repair manual suited for your vehicle is essential for correctly and safely performing ANY repair to your vehicle. Always wear safety glasses and heed all instructions for use applicable to any piece of equipment you may use. Due to circumstances out of the control of Barbours Auto Help, Barbours Auto Help makes no guarantee that by the use of the information given in this video a quality repair will be made. Barbour'sAutoHelp makes no guarantee that the information provided is totally complete, syncronized and accurate. Verify everything using an appropriate repair manual.
Repair your vehicle at your own risk! Barbour's auto help does not guarantee a proper repair using these techniques.
17
views

How To Bleed Brakes With A Helper
How to bleed brakes using the buddy system (communicate with each other)
Please Read Entire Description below for important notices and disclaimer!
Be sure your vehicle is properly lifted and supported before beginning this procedure. ! -use your repair manual for this information.
Step one: Top off the brake fluid.
Step two: Gravity bleed the brakes at the wheel you are trying to remove air from. "Gravity bleeding" is basically just letting the brake fluid drip with the reservoir cap off and the bleeder screw open. Once a drip has been achieved proceed to step three.
Step three: After the bleeder screw has been closed and the brake fluid topped back off and the reservoir cap has been installed have an assistant pump the brakes for you three times and hold it applying constant pressure on the pedal. While pressure is being applied to the pedal open the bleeder screw slowly. Allow air and fluid to escape until the brake pedal has reached the floor. Once the pedal has reached the floor then close the bleeder screw..... Repeat this step repeatedly until you get a constant flow of brake fluid. If you see spitting then that means their is air. CHECK YOUR BRAKE FLUID REPEATEDLY ESPECIALLY IF YOU ARE BLEEDING FOR A LONG TIME. TOP OFF AS NEEDED.
Step four: Once all the air has been removed tighten down the bleeder screw to the specification outlined in your repair manual and check the feel of the brake pedal. The pedal should be nice and firm and should not fade to the floor when applying pressure. If the pedal is not firm then air may still be present in the system. Remove all the air from the brake system before driving vehicle.
It's been my experience that the majority of vehicles are to be bleed at the right rear first, then the left rear, then the right front, then the left front.
Please note: If the system has ingested too much air and air could not be fully removed from the brake system the ABS HCU may have to be bleed using a bleeding procedure that requires special tools such as a scan tool that is capable of this etc. Also, If the master cylinder was replaced the master cylinder must be bench bled in order to removed air from it. (not shown in video)
If you are not successful in removing all the air from the brake system and are not able to achieve a consistently firm and responsive brake pedal DO NOT DRIVE THE VEHICLE TO A SHOP. TOW IT TO A SHOP TO HAVE IT REPAIRED. DRIVING YOUR VEHICLE WITHOUT PROPERLY WORKING BRAKES IS DANGEROUS AND COULD RESULT IN PERSONAL INJURY AND OR DEATH TO YOU AND OTHERS!
!!Notice!!: Do clean any residual brake fluid that may have gotten on your caliper or other components when bleeding your brakes. Brake fluid is corrosive and can possibly promote rust. Make efforts not to get brake fluid on wheels or tires. Brake fluid can be slung off the wheels and tires. This can possibly get onto your paint. Brake fluid can eat through your paint.
Here are some other videos you may be interested in!
"How to collapse/ compress a twist in brake caliper"
https://youtu.be/fSCYMfRBIC8
"How to diagnose a locked up brake caliper"
https://youtu.be/1Mor9N9Rv2w
Note: the vehicle shown in the video was not running at the time of bleeding the system. Unless your repair manual states other wise I suggest having the engine off when bleeding the brakes.
Also, this procedure may not apply to every vehicle out there. Use a repair manual to confirm what is the correct way to bleed the brakes on the vehicle you are working on.
DISCLAIMER
Barbour's Auto Help is not responsible for any damage or personal injury incurred in the process of performing any auto repairs done by you the viewer. It is the viewers responsibility to verify all information and procedures as outlined in YOUR REPAIR MANUAL AND OWNERS MANUAL FOR YOUR VEHICLE. Owning and using a repair manual suited for your vehicle is essential for correctly and safely performing ANY repair to your vehicle. Always wear safety glasses and heed all instructions for use applicable to any piece of equipment you may use. Due to circumstances out of the control of Barbours Auto Help, Barbours Auto Help makes no guaranty that by the use of the information given in this video a quality repair will be made. Barbour'sAutoHelp makes no guaranty that the information provided is totally complete, syncronized and accurate. Verify everything using an appropriate repair manual. Repair your vehicle at your own risk! Barbour's auto help does not guaranty a proper repair using these techniques.
Music by:
Zombie Rock by Audionautix is licensed under a Creative Commons Attribution license (https://creativecommons.org/licenses/by/4.0/)
Artist: http://audionautix.com/
102
views
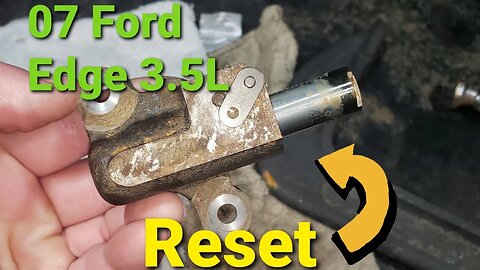
Resetting Timing Chain Tensioner 07 Ford Edge 3.5L
In this video I'll show how to reset a timing chain tensioner on an 07 Ford Edge 3.5L. The process is a simple one. First, the ratchetting mechanism has to be unlocked. This is achieved by pushing it forward as shown in the video. Once it is unlocked then the piston can be pushed back into the tensioner. A soft jaw vise or a c-clamp will assist in pushing the piston back in. Be sure if you are not using a soft jaw vise to protect the ends of the tensioner. You do not want to damage the surfaces. The same thing goes for the c-clamp. Once the piston is pushed in all the way lock it into places with a pin as shown in the video. Bolt the tensioner back up to the engine block. Release the piston by removing the pin. That's it!
Note: If the piston is pushed in to far you will not be able to lock it. You'll notice that the teeth of the ratchetting mechanism have to set into the ridges on the top of the piston. If the teeth cannot set into those ridges you will not be able to lock it into place because the leaver will not go back far enough to be locked into place. The goal is to get the piston as far in as possible and still be able to lock it.
DISCLAIMER
Barbour's Auto Help is not responsible for any damage or personal injury incurred in the process of performing any auto repairs done by you the viewer. Automotive repair is extremely dangerous. Repair your vehicle at your own risk. It is the viewers responsibility to verify all information and procedures as outlined in YOUR REPAIR MANUAL AND OWNERS MANUAL FOR YOUR VEHICLE. Owning and using a repair manual suited for your vehicle is essential for correctly and safely performing ANY repair to your vehicle. Always wear safety glasses and heed all instructions for use applicable to any piece of equipment you may use. Due to circumstances out of the control of Barbours Auto Help, Barbours Auto Help makes no guarantee that by the use of the information given in this video a quality repair will be made. Barbour'sAutoHelp makes no guarantee that the information provided is totally complete, syncronized and accurate. Verify everything using an appropriate repair manual.
USE THE INFORMATION FOUND IN THIS VIDEO AT YOUR OWN RISK! YOU CAN GET HURT. BE CAREFUL.
Wearing protective gloves is suggested.... Even though I'm not wearing them.
11
views
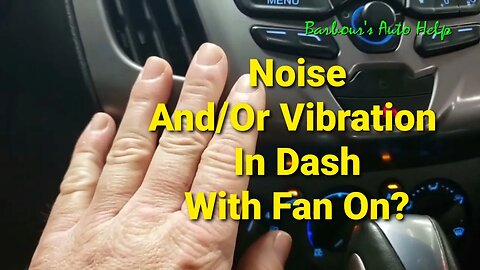
What Causes Instrument Panel Vibration and Noise When Blower Motor Is On
In this video I share what, in my experience, is usually the cause of a vibration/ noise coming from the Instrument panel whenever the heating and air conditioning blower motor is turned on. This video also includes an audio and visual of this symptom accompanied by explanation and visual illustration as to what causes it. Typically, this symptom is caused by trash getting into the blower causing the blower motor to become out of balance. Usually trash is introduced to the blower via the fresh air inlet just behind the glove box. Spare napkins and other loose items can be sucked into the blower. Once the trash or loose items have gotten into the blower it then throws the blower motor out of balance. The fix for this is to remove foreign material from blower fan. Trash or debris can also be introduced into the blower via rodent intrusion. Rodents love warm places to nest down and what better place to do this than the HVAC case where the hot heater core is. Rodents bring all kinds of debris. This also throws the blower motor out of balance. This is repaired by removing debris from blower fan. It also should be noted that the fan on the blower motor can become damaged. Fins can break off and weights can come off too. This also throws it out of balance. This is a far less common occurrence, however. In the case where the fan, aka "squirrel cage", has become damaged it will be needed to replace the blower motor. (If the fan only comes with the blower motor. If the fan is available apart from the blower motor then just the fan can be replace. In many cases the fan only comes with the blower.)
Note: Some parts manufacturers may offer the fan apart from the blower. In this case the whole blower motor assembly will not need to be replaced. Just the fan can be replaced.
Also, it was not mentioned in the video but, bearings inside the blower motor it's self can fail throwing it out of balance. Excessive play in the shaft of the motor will usually be noticed if this is the case.
⚠️ Warning! Working on or around automobiles can be very dangerous. There are several scenarios that could take place that could lead to personal injury. Repair your vehicle at your own risk.
DISCLAIMER
Barbour's Auto Help is not responsible for any damage or personal injury incurred in the process of performing any auto repairs done by you the viewer. Automotive repair is extremely dangerous. Repair your vehicle at your own risk. It is the viewers responsibility to verify all information and procedures as outlined in YOUR REPAIR MANUAL AND OWNERS MANUAL FOR YOUR VEHICLE. Owning and using a repair manual suited for your vehicle is essential for correctly and safely performing ANY repair to your vehicle. Always wear safety glasses and heed all instructions for use applicable to any piece of equipment you may use. Due to circumstances out of the control of Barbours Auto Help, Barbours Auto Help makes no guarantee that by the use of the information given in this video a quality repair will be made. Barbour'sAutoHelp makes no guarantee that the information provided is totally complete, syncronized and accurate. Verify everything using an appropriate repair manual.
USE THE INFORMATION FOUND IN THIS VIDEO AT YOUR OWN RISK! YOU CAN GET HURT. BE CAREFUL.
8
views
How To Disconnect Ford Evap Line Connector With Yellow Lock Tab
In this video I'll show you how to disconnect a Ford evaporative emissions line connector with a yellow lock tab.
Obviously, If the connector you are trying to disconnect does not look like the one in the video then this video does not apply.
Warning! Working on or around automobiles can be very dangerous. There are several scenarios that could take place that could lead to personal injury. Repair your vehicle at your own risk.
DISCLAIMER
Barbour's Auto Help is not responsible for any damage or personal injury incurred in the process of performing any auto repairs done by you the viewer. Automotive repair is extremely dangerous. Repair your vehicle at your own risk. It is the viewers responsibility to verify all information and procedures as outlined in YOUR REPAIR MANUAL AND OWNERS MANUAL FOR YOUR VEHICLE. Owning and using a repair manual suited for your vehicle is essential for correctly and safely performing ANY repair to your vehicle. Always wear safety glasses and heed all instructions for use applicable to any piece of equipment you may use. Due to circumstances out of the control of Barbours Auto Help, Barbours Auto Help makes no guarantee that by the use of the information given in this video a quality repair will be made. Barbour'sAutoHelp makes no guarantee that the information provided is totally complete, syncronized and accurate. Verify everything using an appropriate repair manual.
USE THE INFORMATION FOUND IN THIS VIDEO AT YOUR OWN RISK! YOU CAN GET HURT. BE CAREFUL.
6
views
How To Get Coolant Out Of Engine Oil System
If you are watching this video then chances are that you have had coolant get into the oil system of your engine. In this video I'll show you my way of getting the coolant out of the oil system. First, whatever has allowed coolant to enter the oil system must be repaired. Typically a blown head gasket, faulty water pump, cracked head or faulty oil cooler (among other things) can allow coolant into the oil system of an engine. Figure out what is leaking and then repair. Once the repair has been made simply drain the old oil and changed the oil filter. The longer you let the oil drain the better. Reinstall the drain plug and fill the engine with fresh oil. Allow the engine to run. Perhaps take the vehicle for a test drive for 30-45 minute. Then, change the oil and filter again. At this point there will still be some residual coolant left in the engine cooling system. This will mostly be removed when vehicle is ran as the PCV system will remove it. It may take time, maybe a week or so, to remove the majority of the remaining coolant. Just drive the vehicle as you normally would after the second oil change.
Note: Be sure your repair actually holds before driving the vehicle. Pressure test the cooling system to insure that it holds pressure and that no leaks, internal or external, are present.
Here is a link to the video showing what it looks like when coolant gets into an engines oil system.: https://youtu.be/MsrU7PhtF-U
Here is a link to the video describing my diagnostic process for my vehicle after finding coolant mixed with the engine oil. :https://youtu.be/pZyM3m-OEuI
Here is a link part 1 of the repair for replacing the water pump, which was the source of my internal coolant leak, on my 07 Ford Edge. : https://youtu.be/bBgsUS1awr8
Please note: This video is not intended to be a detailed "step by step" how to video. It is just a high level overview of what I believe should be done to remove coolant from an ending oil system. Refer to your repair manual for information on how to change oil.
DISCLAIMER
Barbour's Auto Help is not responsible for any damage or personal injury incurred in the process of performing any auto repairs done by you the viewer. Automotive repair is extremely dangerous. Repair your vehicle at your own risk. It is the viewers responsibility to verify all information and procedures as outlined in YOUR REPAIR MANUAL AND OWNERS MANUAL FOR YOUR VEHICLE. Owning and using a repair manual suited for your vehicle is essential for correctly and safely performing ANY repair to your vehicle. Always wear safety glasses and heed all instructions for use applicable to any piece of equipment you may use. Due to circumstances out of the control of Barbours Auto Help, Barbours Auto Help makes no guarantee that by the use of the information given in this video a quality repair will be made. Barbour'sAutoHelp makes no guarantee that the information provided is totally complete, syncronized and accurate. Verify everything using an appropriate repair manual.
USE THE INFORMATION FOUND IN THIS VIDEO AT YOUR OWN RISK! YOU CAN GET HURT. BE CAREFUL.
14
views