

Late Model Ford Heater Hose Quick Disconnect/ How To Disconnect and Reconnect
In this video I go over how to disconnect and reconnect a heater hose quick disconnect used on late model Ford vehicles. I'm seeing this style heater hose quick disconnect used more and more by Ford, especially on the F150 and Expeditions. This style quick disconnect is also used on other components of the cooling system besides the heater hoses.
The process is very simple. simply manipulate the white lock ring in a counter clockwise rotational manner using the serrated surface of the lock ring. Once the lock ring is spread then you can remove the quick disconnect from the heater core or component. Sometimes wiggling the quick disconnect in a rotational manner helps.
Note: For whatever reason Ford is using all sorts of new quick disconnects on their cooling, fuel and evap systems on their later model vehicles. Please see playlists below for information concerning other quick disconnects that you may need help with.
https://youtube.com/playlist?list=PL7NPJ1x_VGbJxMpaTPcVPKYJqpEmrK5Cf
Warning! Working on cooling systems can be especially dangerous. The coolant in a cooling system can exceed 200 degrees F and is usually under pressure. If caution and care are not used when repairing any component of a cooling system injury can result. Be sure that the cooling system is totally cool and depressurized before removing or disconnecting any components in the cooling system. It is recommended that the vehicle be given a chance to cool down with the engine not running for at least 2 hours before opening the cooling system. Use caution when removing the radiator cap or coolant reservoir cap to depressurize the cooling system. The system could still be under pressure even after it has cooled for 2 hrs. Please refer to your repair manual and owner's manual for more safety instructions and information on how to safely remove your radiator cap or coolant reservoir cap. Instructions on how to safely remove radiator cap or coolant reservoir cap not given here.
DISCLAIMER
Barbour's Auto Help is not responsible for any damage or personal injury incurred in the process of performing any auto repairs done by you the viewer. Automotive repair is extremely dangerous. Repair your vehicle at your own risk. It is the viewers responsibility to verify all information and procedures as outlined in YOUR REPAIR MANUAL AND OWNERS MANUAL FOR YOUR VEHICLE. Owning and using a repair manual suited for your vehicle is essential for correctly and safely performing ANY repair to your vehicle. Always wear safety glasses, protective gloves and heed all instructions for use applicable to any piece of equipment you may use. Due to circumstances out of the control of Barbour's Auto Help, Barbour's Auto Help makes no guarantee that by the use of the information given in this video a quality repair will be made. Barbour's Auto Help makes no guarantee that the information provided is totally complete, synchronized and accurate. Verify everything using an appropriate repair manual. Verify everything with your own research.
24
views
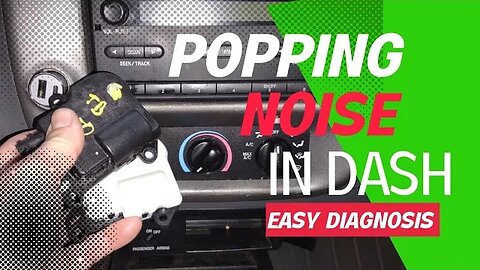
Dashboard Popping Noise Check (Very Simple)
In this video I go over how I diagnose a popping noise inside of a dashboard caused by a faulty actuator. In my experience the particular popping noise demonstrated in the video is only caused by an internal fault in one of these actuators. There are typically 3 types of A/C actuators, a mode door actuator, temperature blend door actuator and a recirculation door actuator. Any one of these actuators can sound just like the example given in the video and the source of the noise. I personally use the steps given in the video to identify which one of these actuators on the particular vehicle that I am working on is causing this noise.
The diagnostic process I use is just a two step process. First manipulate the a/c controls and identify which one of the A/C controls is causing the noise to occur. The mode control knob or mode control buttons will cause the "mode door" actuator to move. So, if when manipulating the mode control knob or buttons cause the noise to occur then it would be suspected that the "mode door" actuator is the cause of the noise. The same logic applies when manipulating the temperature control knob or buttons and the recirculation control button. The temperature control knob controls the "temperature blend door" actuator. So, if noise occurs with this is manipulated then suspect the "temper blend door" actuator. Same for recirculation door actuator.
Note: when I refer to the "blend door actuator" in the video I am referring to the "temperature blend door actuator".
Note: This process is based on my experience. While it is my belief that this process can be used on most vehicles equipped with these type actuators I make no guarantee that this information is suitable for and applies to all vehicles out there. Further more I make no guarantee that by following the instructions given in this video a proper diagnosis and or repair will be made. Please verify this information is applicable to whatever vehicle you are working on with your own research.
Note: In some cases there may be damage to the HVAC case or to the actual doors inside the HVAC case that the actuators control. Diagnose accordingly. It is never a bad idea to manually manipulate the different doors inside of the HVAC case to confirm the move freely and smoothly without binding.
DISCLAIMER
Barbour's Auto Help is not responsible for any damage or personal injury incurred in the process of performing any auto repairs done by you the viewer. Automotive repair is extremely dangerous. Repair your vehicle at your own risk. It is the viewers responsibility to verify all information and procedures as outlined in YOUR REPAIR MANUAL AND OWNERS MANUAL FOR YOUR VEHICLE. Owning and using a repair manual suited for your vehicle is essential for correctly and safely performing ANY repair to your vehicle. Always wear safety glasses, protective gloves and heed all instructions for use applicable to any piece of equipment you may use. Due to circumstances out of the control of Barbour's Auto Help, Barbour's Auto Help makes no guarantee that by the use of the information given in this video a quality repair will be made. Barbour's Auto Help makes no guarantee that the information provided is totally complete, synchronized and accurate. Verify everything using an appropriate repair manual. Verify everything with your own research.
10
views

2018 - Later F150 2.7L Broken EGR Tube Sound and Repair
This video features a 2018 Ford F-150 equipped with a 2.7L ecoboost that has a broken EGR cooler inlet tube. When the EGR cooler inlet tube breaks in this manner it creates a loud exhaust leak. This video gives an example of what this exhaust leak may sound like. I also clearly show how the EGR cooler inlet tube failed and explain a bit of the repair process with you and I share some part numbers.
The part numbers needed for this repair are JT4Z-9D477-B AND JT4Z-9E933-A. You can cut and past these numbers into a google search and find the part there or you can simply go to your local dealership and get the parts there. I'd suggest having the correct parts looked up by VIN, vehicle identification number. This will insure that you receive the correct part for your vehicle. As mentioned in the video, always confirm that these part numbers are correct for your vehicle.
DISCLAIMER
Barbour's Auto Help is not responsible for any damage or personal injury incurred in the process of performing any auto repairs done by you the viewer. Automotive repair is extremely dangerous. Repair your vehicle at your own risk. It is the viewers responsibility to verify all information and procedures as outlined in YOUR REPAIR MANUAL AND OWNERS MANUAL FOR YOUR VEHICLE. Owning and using a repair manual suited for your vehicle is essential for correctly and safely performing ANY repair to your vehicle. Always wear safety glasses, protective gloves and heed all instructions for use applicable to any piece of equipment you may use. Due to circumstances out of the control of Barbour's Auto Help, Barbour's Auto Help makes no guarantee that by the use of the information given in this video a quality repair will be made. Barbour's Auto Help makes no guarantee that the information provided is totally complete, syncronized and accurate. Verify everything using an appropriate repair manual. Verify everything with your own research.
4
views
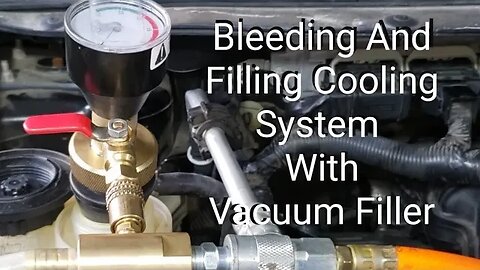
Bleeding And Filling Cooling System With Vacuum Filler (The Best Method in My Opinion!)
In this video I show how to bleed and fill a cooling system using a cooling system vacuum filler. The particular vacuum filler I am using in the video is a UView Airlift Cooling System Leak Checker and Airlock Purge Tool Kit. The process is similar among many different brands of cooling system vacuum fillers. In my opinion, using a vacuum filler is the best and easiest way to bleed and fill a cooling system. It removes 100%ish of the air from the system.
Note: This demonstration is applicable to vehicles that have had the cooling system drained and that need to be refilled.
Warning! Special care should be taken when working on a hot cooling system. This video does not go over this as the vehicle is totally cool. Use our owners and repair manual for specific information regarding the dangers of working on a hot cooling system.
Step 1: Place the head of the tool as shown in the video into the coolant degas bottle, aka reservoir, or place the had of the tool directly into the radiator where the radiator cap fits.
Note: placing the head of the tool in an over flow bottle will not work. While the overflow bottle is a part of the cooling system it does not handle pressurized coolant and cannot support a vacuum.
Step 2: Attach the venturi tube, the hose that has the T in it, to the head of the tool. Then attach the air hose from your air compressor to the venturi tube.
Step 3: Open the valve on the head of the tool allow a vacuum to build. Allow the vacuum to reach approximately 25hg. Then shut the valve off.
Step 4: Disconnect the venturi tube from the head of the tool. Watch the vacuum gauge on the head of the tool. There should be no drop in vacuum. If there is then inspect for leaks. If no leaks can be found then it would be recommended to fill the system with water instead of coolant during the next steps. It would then be recommended to pressurize the cooling system to identify where the leak is at. (I'll have a link to a video showing how to perform a pressure test below.) If the gauge holds proceed to next step.
Step 5: Attach fill tube to tool head. Place the screened end into coolant container until the screen reaches the bottom of the coolant container. Open the valve on the head of the tool to allow coolant to be sucked into the cooling system. Keep an eye on the coolant level in the coolant container. Do not let the coolant level fall below the screened end of the fill tube. Once level approaches the screened portion of the fill tube shut the valve off on the tool head stopping the flow of coolant.
Step 6: Take fill hose out of coolant container keeping the screened portion of the hose pointed up and above the level of the tool head as to not allow air to enter the fill hose. Fill coolant container with either coolant or water in order to obtain a 50/50 mixture of coolant. Insert fill hose into container and open the valve on the tool head to allow coolant or water to flow into system. Allow vacuum to dissipate. If vacuum is still present and the coolant container is close to empty then repeat above instructions to add more coolant or water. (Do not allow air to enter the system.) Once vacuum is gone then the system is filled. Replace the radiator cap or reservoir cap.
Note: While it is a good indication that the system is tight if the vacuum does not drop in step 4 I would still suggest performing a cooling system pressure test to insure no leaks are present. Sometimes a cooling system may not leak under a vacuum but will leak under pressure. Here is a link to a video showing how to perform a cooling system pressure test.
https://youtu.be/ue86SVk4rGU
Here is a link to the tool featured in this video. Tool manufacturer is not a sponsor.
https://www.amazon.com/Airlift-Cooling-System-Checker-Airlock/dp/B07BT3978C/ref=sr_1_7?crid=2RLKP9UU95K4V&dchild=1&keywords=cooling+system+vacuum+filter&qid=1591062995&sprefix=cooling+system+vacuum%2Caps%2C419&sr=8-7
DISCLAIMER
Barbour's Auto Help is not responsible for any damage or personal injury incurred in the process of performing any auto repairs done by you the viewer. Automotive repair is extremely dangerous. Repair your vehicle at your own risk. It is the viewers responsibility to verify all information and procedures as outlined in YOUR REPAIR MANUAL AND OWNERS MANUAL FOR YOUR VEHICLE. Owning and using a repair manual suited for your vehicle is essential for correctly and safely performing ANY repair to your vehicle. Always wear safety glasses and heed all instructions for use applicable to any piece of equipment you may use. Due to circumstances out of the control of Barbours Auto Help, Barbours Auto Help makes no guarantee that by the use of the information given in this video a quality repair will be made. Also, Barbour'sAutoHelp makes no guarantee that the information provided is totally complete, syncronized and accurate.
83
views
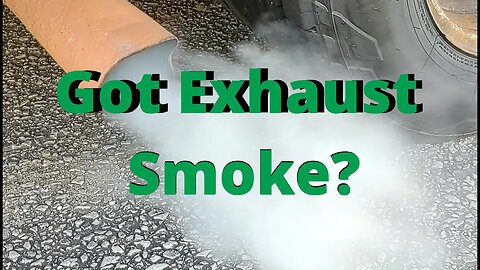
Black, Blue and White Smoke From Exhaust. What It Means.
In this video I go over three different types of exhaust smoke that a vehicle may produce and what causes them. These are typically black smoke, blue smoke and white smoke. Black smoke is usually made by an overly "rich" condition. In an overly rich condition too much fuel is present in the air fuel mixture. This produces a black smoke that smell like burnt raw fuel. Blue smoke is caused by oil being burned in the combustion chamber or in the exhaust system. When oil either in the engine or the exhaust system it produces a very light blue colored smoke. White smoke, under conditions where there is a problem, is typically caused by coolant intrusion into the combustion chamber of the engine. When the coolant burns it produces steam that comes out of the exhaust as a white smoke.
Some of you may be wondering about air fuel ratio. The ideal air fuel ratio is 14.7:1. That's 14.7 parts of air to 1 part of fuel. So when you get anything greater than 1 part of fuel to 14.7 parts of air then you have a rich condition. For instance if you have a ratio of 14.7:2, 2 being 2 parts of fuel, then your vehicle is running rich. Conversely if you have a ratio of 14.7: .75 then your vehicle is running lean, not enough fuel to air.
Here is a helpful link to help you understand more about air fuel ratio:
https://en.wikipedia.org/wiki/Stoichiometry
Note: As mentioned in the video, this is a very superficial and generic video. It does not cover every scenario and situation where smoke is produced by a vehicle. There may be somethings that can produce smoke and smokes of differing colors that where not mentioned. But, in my experience, these are the most common smokes that can be produced by a vehicle and these are the most common causes of these smokes. This video is based off of my experience and is not a full and comprehensive explanation. Further more there are situations where excessive fuel can cause white smoke. The information in this video doesn't apply to every situation. There can be variations and variations I'm not aware of.
Note: Rich conditions that cause black smoke can also be caused by an air restriction. If not enough air is being introduced into the combustion chamber then an overly rich condition can result. Also, I don't mean to throw you off but white smoke can also be caused by too much fuel, excessive amounts, getting into the combustion chamber.
DISCLAIMER
Barbour's Auto Help is not responsible for any damage or personal injury incurred in the process of performing any auto repairs done by you the viewer. Automotive repair is extremely dangerous. Repair your vehicle at your own risk. It is the viewers responsibility to verify all information and procedures as outlined in YOUR REPAIR MANUAL AND OWNERS MANUAL FOR YOUR VEHICLE. Owning and using a repair manual suited for your vehicle is essential for correctly and safely performing ANY repair to your vehicle. Always wear safety glasses, protective gloves and heed all instructions for use applicable to any piece of equipment you may use. Due to circumstances out of the control of Barbour's Auto Help, Barbour's Auto Help makes no guarantee that by the use of the information given in this video a quality repair will be made. Barbour's Auto Help makes no guarantee that the information provided is totally complete, synchronized and accurate. Verify everything using an appropriate repair manual. Verify everything with your own research.
23
views

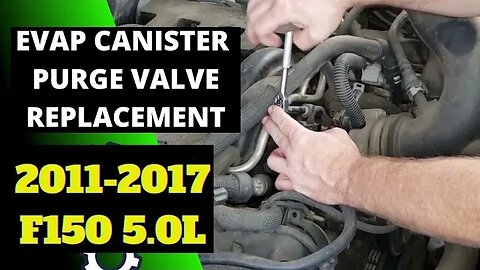
EVAP Canister Purge Valve Replacement 2011-2017 F150 5.0L
In this video I go over how to replace the evaporative emissions canister purge valve (evap canister purge valve) on the 2011-2017 Ford F150 equipped with the 5.0L coyote engine. The procedure is rather simple. First, disconnect the electrical connector. Then disconnect the evap line from the valve. Then unbolt the valve from the intake manifold. Pull the valve away from the intake while twisting back and forth slightly. The installation is the reverse procedure.
Note: If your check engine lamp was on due to a faulty valve then you will need to have the codes erased to clear the check engine lamp. This can be done with a scan tool. If the light comes back on and the same code sets after replacing the valve then the root cause was not corrected and further diagnosis will be needed.
Note: when using the word "evap" it is short for "evaporative emissions".
DISCLAIMER
Barbour's Auto Help is not responsible for any damage or personal injury incurred in the process of performing any auto repairs done by you the viewer. Automotive repair is extremely dangerous. Repair your vehicle at your own risk. It is the viewers responsibility to verify all information and procedures as outlined in YOUR REPAIR MANUAL AND OWNERS MANUAL FOR YOUR VEHICLE. Owning and using a repair manual suited for your vehicle is essential for correctly and safely performing ANY repair to your vehicle. Always wear safety glasses, protective gloves and heed all instructions for use applicable to any piece of equipment you may use. Due to circumstances out of the control of Barbour's Auto Help, Barbour's Auto Help makes no guarantee that by the use of the information given in this video a quality repair will be made. Barbour's Auto Help makes no guarantee that the information provided is totally complete, synchronized and accurate. Verify everything using an appropriate repair manual. Verify everything with your own research.
16
views
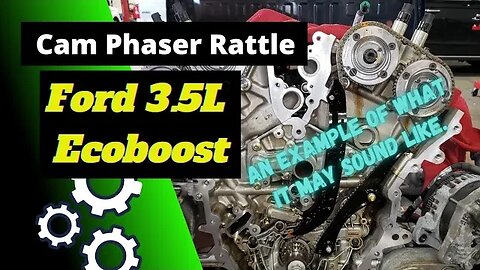
The Sound Of Cam Phaser Rattle Ford F150, Expedition, and Lincoln Navigator 3.5L Ecoboost
In this video I have a great example of what "cam phaser rattle" may sound like on a Ford F150, Expedition and Lincoln Navigator equipped with the 3.5L Ecoboost engine. This rattle usually happens upon start up after the vehicle has been sitting for a long time. (Usually first thing in the morning.) The noise usually only lasts for few seconds at most. It's been my experience that this noise, or some variation of it, could potentially affect the above mentioned vehicles that were built with the 3.5L Ecoboost from 2013 to around 2020, in my experience. It is possible that this noise could be present in later models as well. (The Expedition and Navigator did not get the 3.5L Ecoboost until a later year. I believe it was 2015 that they got the 3.5L)
Note: This noise can vary in intensity depending.
In my experience, typically, cam phaser replacement is the solution to this noise. However, I would always suggest properly diagnosing this noise before putting a new set of phasers in your vehicle. Phaser replacement is an expensive repair. You don't want to be wrong about it. It never hurts to have a professional, who has personally touched and diagnosed your vehicle, confirm what course of action is needed to repair your vehicle.
Note: this is just an example of what this noise MAY sound like. This is not a how to video. This video is not intended to encourage you to change your phasers if you hear this noise. I'm simply giving an example and conveying my experiences with this noise.
DISCLAIMER
Barbour's Auto Help is not responsible for any damage or personal injury incurred in the process of performing any auto repairs done by you the viewer. Automotive repair is extremely dangerous. Repair your vehicle at your own risk. It is the viewers responsibility to verify all information and procedures as outlined in YOUR REPAIR MANUAL AND OWNERS MANUAL FOR YOUR VEHICLE. Owning and using a repair manual suited for your vehicle is essential for correctly and safely performing ANY repair to your vehicle. Always wear safety glasses, protective gloves and heed all instructions for use applicable to any piece of equipment you may use. Due to circumstances out of the control of Barbour's Auto Help, Barbour's Auto Help makes no guarantee that by the use of the information given in this video a quality repair will be made. Barbour's Auto Help makes no guarantee that the information provided is totally complete, syncronized and accurate. Verify everything using an appropriate repair manual. Verify everything with your own research.
109
views
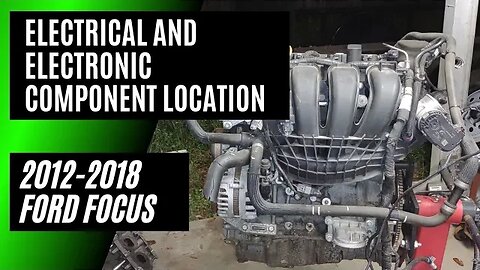
Engine Management Electrical and Electronic Component Locations 2012-2018 Ford Focus
In this video I go over the locations of several engine management electrical and electronic components. These components located are the electronic throttle body, the mass air flow sensor, the oil pressure switch, knock sensors 1 & 2, fuel rail pressure sensor, fuel injectors 1-4, vct solenoids 1 & 2, ignition coils 1-4, cylinder head temperature sensor, camshaft position sensor, evaperative emissions canister purge valve, high pressure fuel injection pump, engine coolant temperature sensor, fuel line pressure sensor, O2 sensor bank 1 sensor 1, O2 sensor bank 1 sensor 2, and the crankshaft position sensor.
As mentioned in the video, this video is a continuation of my series on the 2012-2018 Ford Focus equipped with a DPS6 transmission. Here is a link to that play list...
https://youtube.com/playlist?list=PL7NPJ1x_VGbJ4hJTXWnz1j-8B7dPyI6CN
DISCLAIMER
Barbour's Auto Help is not responsible for any damage or personal injury incurred in the process of performing any auto repairs done by you the viewer. Automotive repair is extremely dangerous. Repair your vehicle at your own risk. It is the viewers responsibility to verify all information and procedures as outlined in YOUR REPAIR MANUAL AND OWNERS MANUAL FOR YOUR VEHICLE. Owning and using a repair manual suited for your vehicle is essential for correctly and safely performing ANY repair to your vehicle. Always wear safety glasses, protective gloves and heed all instructions for use applicable to any piece of equipment you may use. Due to circumstances out of the control of Barbour's Auto Help, Barbour's Auto Help makes no guarantee that by the use of the information given in this video a quality repair will be made. Barbour's Auto Help makes no guarantee that the information provided is totally complete, syncronized and accurate. Verify everything using an appropriate repair manual. Verify everything with your own research.
27
views
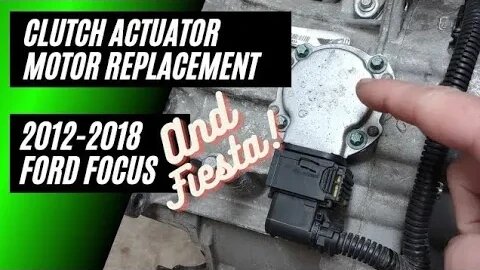
DPS6 Clutch Actuator Motor Replacement 2012-2018 Ford Focus & Fiesta With DPS6
In this video I go over the procedure for replacing a clutch actuator motor on a Ford DPS6 transmission. The information shared in this video can also be used for Ford Fiestas that are equipped with the DPS6 transmission as well, (process for getting to the actuators on the Fiesta varies from the Focus and is not gone over in this video.).
The DPS6 transmission is equipped with two clutch actuator motors, A & B. Clutch actuator motor A can be found on top of the transmission just to the left of the battery box and rearward of the air inlet tube going to the throttle body. Clutch actuator motor B can be found just underneath the transmission rearward of the radiator. Once the splash shield is removed the actuator is easily located.
Note: Please verify torque specifications in your repair manual. Also, if you are working on a Ford Fiesta the procedure, as far as getting to the actuator motor, varies a bit from the Focus. Also, the model year range that this information is applicable to for the Fiesta may be slightly different from the Focus. Verify information is applicable to your vehicle by doing your own research.
Warning: Vehicle should be off and in park with the parking brake applied before beginning repair to prevent vehicle rolling forward or backwards. If clutch actuator motor B is to be replaced then the vehicle will need to be lifted. Please refer to your owners manual and repair manual for information on how to do this properly and safely. Instructions on how to properly lift and support your vehicle not shared in this video.
Here is a link to the play list for the 2012-2018 Ford Focus 2.0L equipped with DPS6 transmission:
https://youtube.com/playlist?list=PL7NPJ1x_VGbJ4hJTXWnz1j-8B7dPyI6CN
DISCLAIMER
Barbour's Auto Help is not responsible for any damage or personal injury incurred in the process of performing any auto repairs done by you the viewer. Automotive repair is extremely dangerous. Repair your vehicle at your own risk. It is the viewers responsibility to verify all information and procedures as outlined in YOUR REPAIR MANUAL AND OWNERS MANUAL FOR YOUR VEHICLE. Owning and using a repair manual suited for your vehicle is essential for correctly and safely performing ANY repair to your vehicle. Always wear safety glasses, protective gloves and heed all instructions for use applicable to any piece of equipment you may use. Due to circumstances out of the control of Barbour's Auto Help, Barbour's Auto Help makes no guarantee that by the use of the information given in this video a quality repair will be made. Barbour's Auto Help makes no guarantee that the information provided is totally complete, syncronized and accurate. Verify everything using an appropriate repair manual. Verify everything with your own research.
17
views
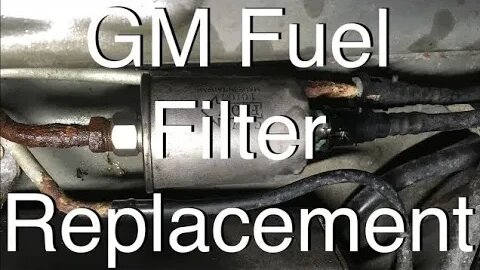
GM Fuel Filter Replacement
In this video I'll show you how to replace one of the most common fuel filters used on General Motors vehicles. This particular fuel filter fits a myriad of GM vehicles. I do not have a list of all the vehicles that this fuel filter fits on, but I believe that this filter was used from 1995-2005. (Give or take a few years). If you are not aware, Chevy, GMC, Pontiac, Buick, Cadillac, Oldsmobile and a few others would be considered General Motors vehicles.
Please use extreme care when replacing your fuel filter. You will be exposed to fuel, which is flammable. Keep a fire extinguisher handy and have a partner supervise you as you do this. (you may need someone to jump in to action to extinguish the fire). Keep all sources of flame and ignition away from vehicle while you do this.
⚠️REPLACEMENT OF RUST DAMAGE FUEL LINES OR DAMAGED LINES IN GENERAL IS HIGHLY ADVISES AS COMPROMISED LINES CAN LEAD TO DUEL LEAKS AND POSSIBLE FIRE! ⚠️
Note: A repair manual is always recommended when using my videos. Please reference your repair manual for torque specifications and proper technique techniques.
⚠️As you know, you will have to lift the vehicle to be able to get to the fuel filter. Use your repair manual and owners manual for information about properly jacking up and supporting your vehicle. Use caution when checking for leaks under the vehicle with the engine running. Be sure the vehicle is in park. Be sure the parking brake is applied. Be sure the wheels are chocked to prevent the vehicle from rolling. 🛑☢️
****Remove exposed fuel from around or under the vehicle before checking for fuel leaks and before starting the engine. Keep fuel at a safe distance from vehicle and be sure fuel is kept in an approved container. (This includes the fuel that was caught in your catch pan when the old filter was removed.*****
Also, just to make sure I'm clear, when checking for leaks at the fuel filter after replacement do not start the engine. When you cycle the key on and off a few times you should just cycle the key to the run position, not the crank position. Once you have determined that no leaks are present then you can crank the vehicle and allow it to run while checking for leaks.
DISCLAIMER
Barbour's Auto Help is not responsible for any damage or personal injury incurred in the process of performing any auto repairs done by you the viewer. Automotive repair is extremely dangerous. Repair your vehicle at your own risk. It is the viewers responsibility to verify all information and procedures as outlined in YOUR REPAIR MANUAL AND OWNERS MANUAL FOR YOUR VEHICLE. Owning and using a repair manual suited for your vehicle is essential for correctly and safely performing ANY repair to your vehicle. Always wear safety glasses and heed all instructions for use applicable to any piece of equipment you may use. Due to circumstances out of the control of Barbours Auto Help, Barbours Auto Help makes no guaranty that by the use of the information given in this video a quality repair will be made. Barbour'sAutoHelp makes no guaranty that the information provided is totally complete, synchronized and accurate. Verify everything using an appropriate repair manual. You can do it. Do it right and do it safely.
Repair your vehicle at your own risk! Barbour's auto help does not guaranty a proper repair using these techniques.
11
views
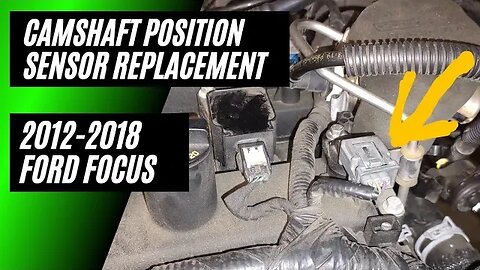
Camshaft Position Sensors Replacement 21012-2018 Ford Focus 2.0L
In this video I go over the camshaft position sensor replacement on a Ford Duratech 2.0L HE engine found in the 2012-2018 Ford Focus equipped with the DPS6 transmission. This engine actually has two camshaft position sensors. It has an intake camshaft position sensor and an exhaust camshaft position sensor. The process for replacing either is pretty much the same.
Of course, codes will have to be cleared after the camshaft position sensor is replaced if a code was set causing a check engine light to come on. If the code/codes cannot be cleared, due to not having the proper equipment, it may take a couple of drive cycles for the code to clear on its own. Note: a drive cycle is not necessarily a trip to the store. A drive cycle is completed after all "monitors" have been run by the PCM. The vehicle has to be driven in a very specific way to achieve this. A reputable repair manual will have all the criteria of a drive cycle outlined for you.
Always use "lint free" rags in and around the engine.
Please reference your repair manual for torque specifications.
Here is a link to the play list for the 2012-2018 Ford Focus 2.0L equipped with DPS6 transmission:
https://youtube.com/playlist?list=PL7NPJ1x_VGbJ4hJTXWnz1j-8B7dPyI6CN
DISCLAIMER
Barbour's Auto Help is not responsible for any damage or personal injury incurred in the process of performing any auto repairs done by you the viewer. Automotive repair is extremely dangerous. Repair your vehicle at your own risk. It is the viewers responsibility to verify all information and procedures as outlined in YOUR REPAIR MANUAL AND OWNERS MANUAL FOR YOUR VEHICLE. Owning and using a repair manual suited for your vehicle is essential for correctly and safely performing ANY repair to your vehicle. Always wear safety glasses, protective gloves and heed all instructions for use applicable to any piece of equipment you may use. Due to circumstances out of the control of Barbour's Auto Help, Barbour's Auto Help makes no guarantee that by the use of the information given in this video a quality repair will be made. Barbour's Auto Help makes no guarantee that the information provided is totally complete, syncronized and accurate. Verify everything using an appropriate repair manual. Verify everything with your own research.
6
views
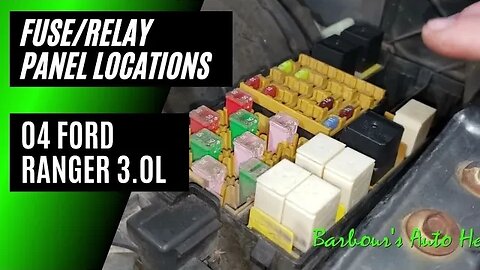
Fuse Panel Location 04 Ford Ranger
In this video I go over the fuse panel locations on an 04 Ford Ranger 3.0L. There are two fuse panels on this vehicle. One is located in the engine compartment just underneath the hood and to the side of the brake master cylinder. This fuse panel is actually called a battery junction box. The second fuse panel is located in the passenger side of the passenger compartment behind the right kick panel. This fuse panel is actually called a smart junction box.
As mentioned in the video, your owners manual, usually located in your glove box, will have diagrams of all fuse locations along with information on what each fuse powers.
Here is a link to the 04 Ford Ranger 3.0L play list:
https://youtube.com/playlist?list=PL7NPJ1x_VGbJ3I3l2OsPrAr0Cus5dolur
Here is a link to the video explaining how to check a fuse:
https://youtu.be/M0kX3NSIb2o
DISCLAIMER
Barbour's Auto Help is not responsible for any damage or personal injury incurred in the process of performing any auto repairs done by you the viewer. Automotive repair is extremely dangerous. Repair your vehicle at your own risk. It is the viewers responsibility to verify all information and procedures as outlined in YOUR REPAIR MANUAL AND OWNERS MANUAL FOR YOUR VEHICLE. Owning and using a repair manual suited for your vehicle is essential for correctly and safely performing ANY repair to your vehicle. Always wear safety glasses, protective gloves and heed all instructions for use applicable to any piece of equipment you may use. Due to circumstances out of the control of Barbour's Auto Help, Barbour's Auto Help makes no guarantee that by the use of the information given in this video a quality repair will be made. Barbour's Auto Help makes no guarantee that the information provided is totally complete, syncronized and accurate. Verify everything using an appropriate repair manual. Verify everything with your own research.
7
views
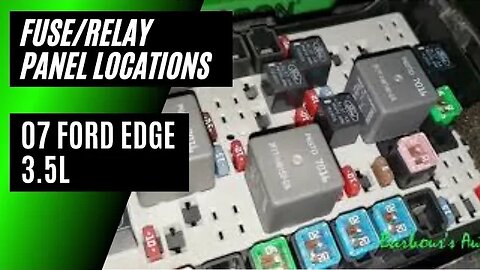
Fuse/Relay Panel Locations 07 Edge
In this video I go over the fuse panel locations on an 07 Ford Edge 3.5L. There are actually 2 fuse panels on this vehicle. One is located under the hood next to the battery. This fuse panel is known as the "battery junction box". The other fuse panel is located in the passenger compartment on the driver's side behind the kick panel. This fuse panel is known as the "smart junction box".
In this video I also briefly explain how to identify the fuses and relays located in each fuse panel.
Here is a link to the video explaining how to check a fuse:
https://youtu.be/M0kX3NSIb2o
Here is a link to the 07 Ford Edge play list:
https://youtube.com/playlist?list=PL7NPJ1x_VGbIJ2ScaAPVaSIMfEYZEHof3
DISCLAIMER
Barbour's Auto Help is not responsible for any damage or personal injury incurred in the process of performing any auto repairs done by you the viewer. Automotive repair is extremely dangerous. Repair your vehicle at your own risk. It is the viewers responsibility to verify all information and procedures as outlined in YOUR REPAIR MANUAL AND OWNERS MANUAL FOR YOUR VEHICLE. Owning and using a repair manual suited for your vehicle is essential for correctly and safely performing ANY repair to your vehicle. Always wear safety glasses, protective gloves and heed all instructions for use applicable to any piece of equipment you may use. Due to circumstances out of the control of Barbour's Auto Help, Barbour's Auto Help makes no guarantee that by the use of the information given in this video a quality repair will be made. Barbour's Auto Help makes no guarantee that the information provided is totally complete, syncronized and accurate. Verify everything using an appropriate repair manual. Verify everything with your own research.
10
views
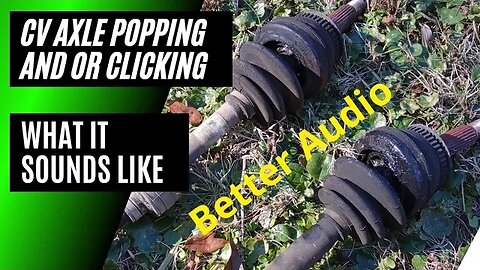
CV Axle Clicking And/Or Popping Noise (Just a better example of what it sounds like)
In this video I have some great audio of what popping or clicking noise caused by a faulty CV axle sounds like. The video only gives an example of what it may sound like. I start by recording audio and video of the noise outside the vehicle. I then take some more audio and video of the noise inside the vehicle and then finally I record audio and video of the noise underneath the vehicle. This video does not go into an explanation of what causes this type of failure in a cv axle. Also, please keep in mind that this is just one example of what it could sound like if your outer joint is bad. CV axles can and will make other noises. Please click the video link below for an explanation of what causes this noise.
Here is a link to the video that explains what causes this noise:
https://youtu.be/qjljUMi-Tc8
DISCLAIMER
Barbour's Auto Help is not responsible for any damage or personal injury incurred in the process of performing any auto repairs done by you the viewer. Automotive repair is extremely dangerous. Repair your vehicle at your own risk. It is the viewers responsibility to verify all information and procedures as outlined in YOUR REPAIR MANUAL AND OWNERS MANUAL FOR YOUR VEHICLE. Owning and using a repair manual suited for your vehicle is essential for correctly and safely performing ANY repair to your vehicle. Always wear safety glasses and heed all instructions for use applicable to any piece of equipment you may use. Due to circumstances out of the control of Barbour's Auto Help, Barbour's Auto Help makes no guarantee that by the use of the information given in this video a quality repair will be made. Also, Barbour's Auto Help makes no guarantee that the information provided is totally complete, synchronized and accurate. Verify everything using an appropriate repair manual.
12
views
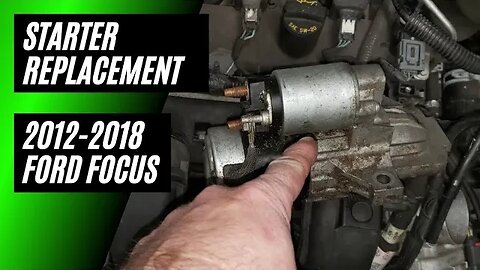
Starter Replacement 2012-2018 Ford Focus 2.0L
In this video I go over the removal and installation procedure for a starter on a 2012-2018 Ford Focus 2.0L equipped with a DPS6 transmission.
As mentioned in the video the front end of the vehicle will have to be jacked up in order to gain access to the starter. The vehicle will have to be jacked up and properly supported. Instructions on how to do this properly were not given in this video. You will have to reference your repair manual for this information.
Warning ⚠️: Improperly lifting and supporting your vehicle can result in serious personal injury or death. You must reference a reputable repair manual for information on how to do this properly.
DISCLAIMER
Barbour's Auto Help is not responsible for any damage or personal injury incurred in the process of performing any auto repairs done by you the viewer. Automotive repair is extremely dangerous. Repair your vehicle at your own risk. It is the viewers responsibility to verify all information and procedures as outlined in YOUR REPAIR MANUAL AND OWNERS MANUAL FOR YOUR VEHICLE. Owning and using a repair manual suited for your vehicle is essential for correctly and safely performing ANY repair to your vehicle. Always wear safety glasses and heed all instructions for use applicable to any piece of equipment you may use. Due to circumstances out of the control of Barbour's Auto Help, Barbour's Auto Help makes no guarantee that by the use of the information given in this video a quality repair will be made. Also, Barbour's Auto Help makes no guarantee that the information provided is totally complete, synchronized and accurate. Verify everything using an appropriate repair manual.
Repair your vehicle at your own risk! Barbour's auto help does not guarantee a proper repair using these techniques. Further more I do not guarantee you will not damage your vehicle in the process of repairing it.
15
views
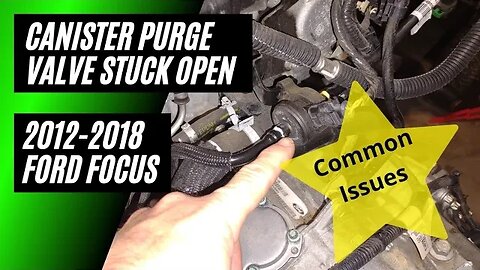
2012-2018 Ford Focus 2.0 Common Points Of Failure/ Stuck Open Canister Purge Valve
This video is the first of several in my new series on "common points of failure" for the 2012-2018 Ford Focus 2.0L. In this video I focus on the evap canister purge valve. The evap canister purge valve of the 2012-2018 focus can get stuck open and I've seen my fair share of this. It can lead to symptoms like a rough idle, check engine light coming on, damage to the evap canister and the fuel tank. And to the best of my understanding, the last two symptoms, damage to the evap canister and the fuel tank, are likely to only occur to vehicles that have not had the recall 18S32 performed. I do go into some details pertaining to recall 18S32 in this video.
Note: While I have seen my fair share of stuck open purge valves for this particular vehicle over all the total number of vehicles that have a stuck open purge valve compared to the ones without is relatively small in my estimation. However, the recall applies to all 2012-2018 vehicles mentioned in the recall 18S32.
Here is a link to nhtsa.gov that goes into detail what is involved with the recall:
https://static.nhtsa.gov/odi/rcl/2018/RCMN-18V735-0635.pdf
And, of course, here is a link to a video showing how to replace the canister purge valve.:
https://youtu.be/kCQc_-9bdoo
DISCLAIMER
Barbour's Auto Help is not responsible for any damage or personal injury incurred in the process of performing any auto repairs done by you the viewer. Automotive repair is extremely dangerous. Repair your vehicle at your own risk. It is the viewers responsibility to verify all information and procedures as outlined in YOUR REPAIR MANUAL AND OWNERS MANUAL FOR YOUR VEHICLE. Owning and using a repair manual suited for your vehicle is essential for correctly and safely performing ANY repair to your vehicle. Always wear safety glasses, protective gloves and heed all instructions for use applicable to any piece of equipment you may use. Due to circumstances out of the control of Barbour's Auto Help, Barbour's Auto Help makes no guarantee that by the use of the information given in this video a quality repair will be made. Barbour's Auto Help makes no guarantee that the information provided is totally complete, syncronized and accurate. Verify everything using an appropriate repair manual. Verify everything with your own research.
24
views
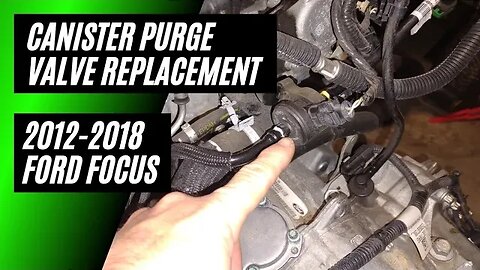
Canister Purge Valve Replacement 2012-2018 Ford Focus 2.0L
In this video I go over the replacement procedure for the evaporative emissions canister purge valve for the 2012-2018 Ford Focus 2.0L equipped with the DPS6 transmission. The evaporative emissions canister purge valve is also known as the evap purge valve or the vapor management valve. The replacement procedure is simple as shown in the video. Installation is the reverse procedure. Be sure to erase codes after the repair has been made.
***Correction: at around the 3:35 mark I mention that the purge valve tube has to be disconnected from the tube on the fire wall going back to the gas tank. THE TUBE ACTUALLY GOES TO THE EVAP CANISTER, NOT THE GAS TANK. Sorry! My goof.****
Note: As mentioned in the video a stuck open purge valve can cause an incorrect fuel gage. However, Ford has issued a TSB, 18S32, concerning this issue. If the recall has been performed it is my understanding that the concern with the incorrect fuel gage resulting from a stuck open purge valve should not happen. Here is a link explaining in greater details what the safety recall 18S32 involves. Also, please contact your dealership if to verify if this recall is still open on your vehicle. You may be able to get the issue repaired at not cost.
https://static.nhtsa.gov/odi/rcl/2018/RCMN-18V735-0635.pdf
Here is a link to a video I did concerning the issue of a stuck open purge valve. I also touch on recall 18S32 a bit too.:
https://youtu.be/MEmHX_oZLWA
DISCLAIMER
Barbour's Auto Help is not responsible for any damage or personal injury incurred in the process of performing any auto repairs done by you the viewer. Automotive repair is extremely dangerous. Repair your vehicle at your own risk. It is the viewers responsibility to verify all information and procedures as outlined in YOUR REPAIR MANUAL AND OWNERS MANUAL FOR YOUR VEHICLE. Owning and using a repair manual suited for your vehicle is essential for correctly and safely performing ANY repair to your vehicle. Always wear safety glasses, protective gloves and heed all instructions for use applicable to any piece of equipment you may use. Due to circumstances out of the control of Barbour's Auto Help, Barbour's Auto Help makes no guarantee that by the use of the information given in this video a quality repair will be made. Barbour's Auto Help makes no guarantee that the information provided is totally complete, syncronized and accurate. Verify everything using an appropriate repair manual. Verify everything with your own research.
55
views
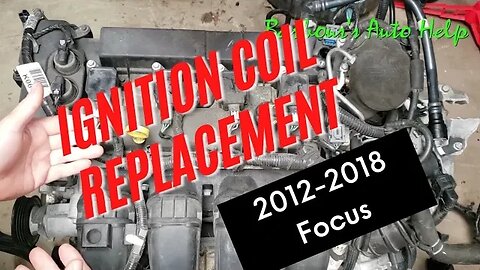
2012-2018 Ford Focus 2.0 Ignition Coil Replacement
In this video I go over the process of replacing an ignition coil on a 2012-2018 Ford Focus equipped with a N/A Duratec 2.0. The process is simple enough. (vehicle should not be running.) Disconnect the electrical connector of the ignition coil. Loosen and remove the hold down bolt. Remove the ignition coil. Installation is reverse procedure.
DISCLAIMER
Barbour's Auto Help is not responsible for any damage or personal injury incurred in the process of performing any auto repairs done by you the viewer. Automotive repair is extremely dangerous. Repair your vehicle at your own risk. It is the viewers responsibility to verify all information and procedures as outlined in YOUR REPAIR MANUAL AND OWNERS MANUAL FOR YOUR VEHICLE. Owning and using a repair manual suited for your vehicle is essential for correctly and safely performing ANY repair to your vehicle. Always wear safety glasses, protective gloves and heed all instructions for use applicable to any piece of equipment you may use. Due to circumstances out of the control of Barbours Auto Help, Barbours Auto Help makes no guarantee that by the use of the information given in this video a quality repair will be made. Barbour'sAutoHelp makes no guarantee that the information provided is totally complete, syncronized and accurate. Verify everything using an appropriate repair manual. Verify everything with your own research.
3
views
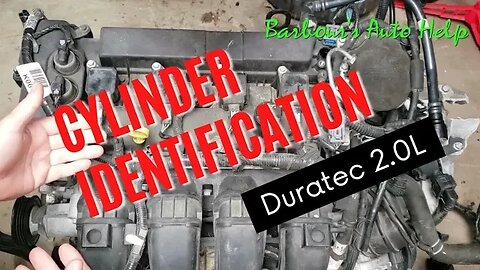
Cylinder Identification Duratec 2.0L
In this video I go over the cylinder identification of the Duratech 2.0L. From the front of the engine, nearest the accessory drive, is cyinder #1. Cylinder #1 is followed by #2, #3 and #4 in that order. This information is essential in aiding with diagnostics. Many diagnostic trouble codes that can be set are "cylinder specific". Knowing what cylinder has a problem helps in properly identifying components that may be at fault. I hope this helps.
The Duratec 2.0L is has been used for quite some time in many Ford vehicles. While the look of the 2.0 changes slightly from vehicle to vehicle the information pertaining to the cylinder identification is the same.
The engine shown in this video is out of a 2014 Ford Focus.
DISCLAIMER
Barbour's Auto Help is not responsible for any damage or personal injury incurred in the process of performing any auto repairs done by you the viewer. Automotive repair is extremely dangerous. Repair your vehicle at your own risk. It is the viewers responsibility to verify all information and procedures as outlined in YOUR REPAIR MANUAL AND OWNERS MANUAL FOR YOUR VEHICLE. Owning and using a repair manual suited for your vehicle is essential for correctly and safely performing ANY repair to your vehicle. Always wear safety glasses, protective gloves and heed all instructions for use applicable to any piece of equipment you may use. Due to circumstances out of the control of Barbours Auto Help, Barbours Auto Help makes no guarantee that by the use of the information given in this video a quality repair will be made. Barbour'sAutoHelp makes no guarantee that the information provided is totally complete, syncronized and accurate. Verify everything using an appropriate repair manual. Verify everything with your own research.
17
views
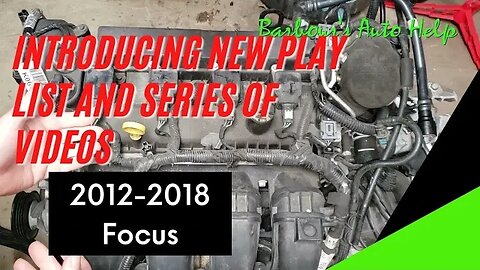
Introducing New Play List And Series Of Videos 2012-2018 Ford Focus 2.0L
In this video I'll be introducing you to my new and up coming 2012-2018 Ford Focus 2.0L videos. I've got a lot of experience with the Ford Focus, especially the 2012-2018 equipped with the DPS6 transmission. I look forward to sharing my knowledge and experience with you.... Stay tuned!
Videos will be posted below as the are available.
4
views
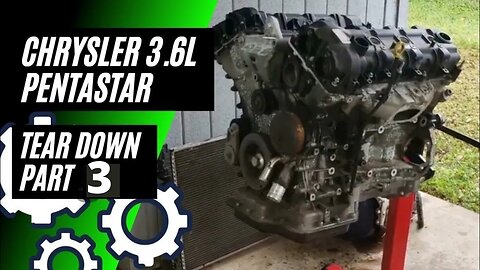
Chrysler Pentastar 3.6L Tear Down: Part 3
This is part 3 of my Pentastar 3.6L tear down series. In this video I take you along as I take apart a Chrysler Pentastar 3.6L while discussing the various parts of the engine and explain how they work. In this particular video I get into the lower end of the engine. I remove the oil pump and dissect it while explaining how it works. I then continue to take the short block apart further by removing the windage tray, pistons and connecting rods while explaining how they work. I also give a brief explanation of how rotational force is created by the engine and how this is translated to the drive wheels of the vehicle.
Note: This video only provides a high level over view of the various parts of this engine. It is superficial in nature and is only intended to give the viewer an idea of how this engine is put together and how it works. No detailed specifications are given.
Here are a few links that may be helpful in helping you understand better how this engine and some components of the engine work...
Here is a link explaining how a vane type oil pump works
https://youtu.be/IxIio2r_bQE
A simple google search of "variable displacement vane pump" will populate many more helpful videos and links to liturature.
Here is a link explaining in more detail the "windage tray"
https://www.cantonracingproducts.com/categories/oil-pan-accessories/windage-trays.html
DISCLAIMER
Barbour's Auto Help is not responsible for any damage or personal injury incurred in the process of performing any auto repairs done by you the viewer. Automotive repair is extremely dangerous. Repair your vehicle at your own risk. It is the viewers responsibility to verify all information and procedures as outlined in YOUR REPAIR MANUAL AND OWNERS MANUAL FOR YOUR VEHICLE. Owning and using a repair manual suited for your vehicle is essential for correctly and safely performing ANY repair to your vehicle. Always wear safety glasses, protective gloves and heed all instructions for use applicable to any piece of equipment you may use. Due to circumstances out of the control of Barbours Auto Help, Barbours Auto Help makes no guarantee that by the use of the information given in this video a quality repair will be made. Barbour'sAutoHelp makes no guarantee that the information provided is totally complete, syncronized and accurate. Verify everything using an appropriate repair manual. Verify everything with your own research.
8
views
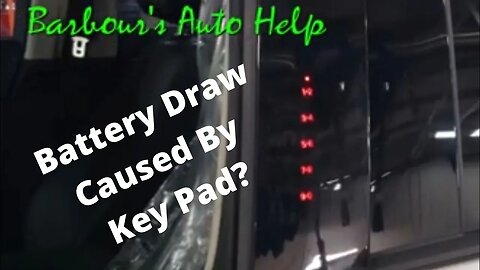
Battery Draw Caused By Keyless Entry Key Pad
In this video I share a story about a recent experience I had with a Ford that had a battery draw caused by a faulty keyless entry key pad. What was happening was that the keyless entry key pad would come on by it's self causing other things to come on in the vehicle. This was causing an excessive draw on the battery when the vehicle was not in use. Often the battery would not be charged enough after sitting for a long time to start the vehicle. I was even able to catch the symptom occurring and took some video of it happening. I also showed how I could push on the panel that the key pad is embedded in and how that caused the key pad to light up.
Note: This video is meant to share my experience and perhaps point you in a direction while diagnosing your battery draw. This video is by no means a comprehensive video on how to fully and properly diagnose a battery draw. It's just a suggested area to check. Also, I suppose it is possible that this symptom can be caused by another root cause other than a faulty key pad. If your keypad is behaving in this manner then it would be advised to unplug it (this has to be done by removing the interior door trim panel and disconnecting the keypad) and then perform a draw test again to insure this is the source of your draw. If the draw is gone then the key pad is probably ( I said probably, not definitely) your problem. I make no guarantees. Use this information at your own risk and expense. Also, educate yourself on how to properly diagnose a battery draw. There are great videos out there on this that can help you tremendously.
Note: The vehicles that I have experienced this on are later model Fords equipped with the style keyless entry key pads shown in the video. I have no experience with similar situations with other vehicle makes.
DISCLAIMER
Barbour's Auto Help is not responsible for any damage or personal injury incurred in the process of performing any auto repairs done by you the viewer. Automotive repair is extremely dangerous. Repair your vehicle at your own risk. It is the viewers responsibility to verify all information and procedures as outlined in YOUR REPAIR MANUAL AND OWNERS MANUAL FOR YOUR VEHICLE. Owning and using a repair manual suited for your vehicle is essential for correctly and safely performing ANY repair to your vehicle. Always wear safety glasses, protective gloves and heed all instructions for use applicable to any piece of equipment you may use. Due to circumstances out of the control of Barbours Auto Help, Barbours Auto Help makes no guarantee that by the use of the information given in this video a quality repair will be made. Barbour'sAutoHelp makes no guarantee that the information provided is totally complete, syncronized and accurate. Verify everything using an appropriate repair manual. Verify everything with your own research.
8
views
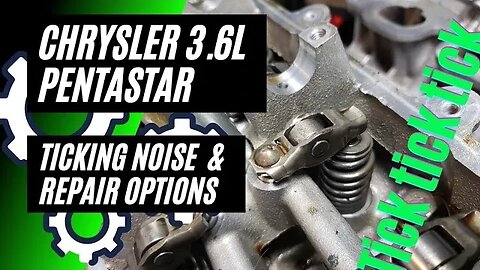
Chrysler 3.6L Pentastar Ticking Noise & Repair Options
In this video I feature a Chrysler 3.6L Pentastar engine that has failed rocker arms. This failure is somewhat common for this engine. In the video I discuss how the rocker arms fail and other issues that may be caused by this failure while showing the parts that are affected like the camshafts, cam bearings, and lifters. I then talk about possible repair options depending upon the severity of damaged caused.
Note: While this video is somewhat detailed it is superficial in several ways. This is not a detailed step by step how to guide for properly diagnosing and repairing your vehicle. The video is meant to be a very high level overview of the issue discussed and to present possible repair options only. This video also does not cover all possible scenarios that may occur. Other repair routes may be needed depending upon the condition of the engine and the results of diagnosis. Also, the damage shown in the video may vary greatly compared to your own vehicle. If you are not confident in your own abilities to diagnose and repair your vehicle it may be best to have a professional tech diagnose and repair your vehicle for you.
Also, I believe that there is a TSB for this issue on the earlier 3.6Ls. It never hurts to contact your dealership to see if there is some kind of extended coverage or assistance for this issue. (judging by the chatter online.) You may be pleasantly surprised. Who knows?
By the way, the engine in the video is going to the scrap yard. I normally would not set a cam on top of the engine as your saw at about the 5:00 mark. This could damage the cam and the mating surface that the cam is sitting on on the head. (It's at the top of the screen.) Be kind and gentle with cams. Set them on a pillow or some sort of pad if you can. You don't want to damage the lobes or the cam journals.
I'll post a link to the tear down video of this engine when it becomes available. At this time, It's still cooking.
DISCLAIMER
Barbour's Auto Help is not responsible for any damage or personal injury incurred in the process of performing any auto repairs done by you the viewer. Automotive repair is extremely dangerous. Repair your vehicle at your own risk. It is the viewers responsibility to verify all information and procedures as outlined in YOUR REPAIR MANUAL AND OWNERS MANUAL FOR YOUR VEHICLE. Owning and using a repair manual suited for your vehicle is essential for correctly and safely performing ANY repair to your vehicle. Always wear safety glasses, protective gloves and heed all instructions for use applicable to any piece of equipment you may use. Due to circumstances out of the control of Barbours Auto Help, Barbours Auto Help makes no guarantee that by the use of the information given in this video a quality repair will be made. Barbour'sAutoHelp makes no guarantee that the information provided is totally complete, syncronized and accurate. Verify everything using an appropriate repair manual. Verify everything with your own research.
23
views
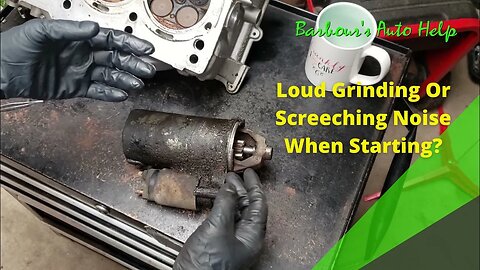
Loud Screeching/Grinding Noise When Starting. What Caused This On My Vehicle
In this video I share some audio of a noise that my starter was making and why it was making this noise. It was making a screeching/ grinding noise when I'd go to start my vehicle and it was doing this because the starter gear was not fully engaging the flywheel when I attempted to start the vehicle. Instead of the gear spinning out all the way and fully engaging the teeth of the flywheel, aka flexplate, it was only spinning out part way and grinding into the teeth of the flywheel. Of course when the starter would do this the vehicle would not start. After a few attempts at starting the vehicle the starter would eventually engage and start the engine.
Note: as mentioned in the video there are a number of things that can cause a similar symptom. This is just how my starter failed and the noise that it made. This video is not a comprehensive video on how to fully and properly diagnose a starter or starting issues. It's not even a comprehensive video on how to properly diagnose and repair the symptom of a screeching/ grinding noise when starting. This is just a quick video demonstrating a noise and its cause with added information about a few other things to check when this symptom is experienced. Use the information found in this video at your own risk. Barbour's Auto Help makes no guarantee that proper diagnosis and repair will be made by using this video.
While this is a simple video and does not contain all information you may need when diagnosing your starter the information you need is probably just a click away. A quick google search on.. "how to test a starter", "how to diagnose a starter", "what does a grinding noise mean when I start my vehicle"...etc will place a huge amount of information at your finger tips that may very well help you diagnose your issue further. Here are some quick links to a few sites that I saw that I believe may help some...
https://www.firestonecompleteautocare.com/blog/maintenance/signs-of-a-bad-starter/
https://www.jdpower.com/cars/shopping-guides/what-is-the-grinding-noise-when-starting-a-car
https://dannysengineportal.com/starter-problems-what-do-you-hear-when-you-try-to-start-your-car/
The forum linked below has some great pics of damaged teeth on a flywheel....So you have some kind of example. Typically the teeth will be straight and not have rounded or worn edges....."typically". As mentioned in the video, the flywheel can be inspected by turning the crankshaft a little at a time while inspecting the teeth of the flywheel though the opening that the starter mounts into. The crankshaft can be rotated by placing a socket and ratchet on the crank bolt and rotating the crank. (always turn the crank in the direction that the engine normally spins in when running.) ⚠️ ⚠️Anytime you are underneath a vehicle it should be supported and secured in place properly. Find this information in your repair manual. Injury can occur if this is not done correctly. ⚠️ ⚠️
https://www.mgexp.com/forum/mg-magnette-forum.27/flywheel-teeth-repair.4185100/
It's fair to also point out the amount of oil and crud that had built up on my starter. I have oil and coolant leaks. The starter had become soaked with oil due to this and coolant leaking on it also isn't helping matters too. If you have oil leaks and or coolant leaks that are allowing coolant or oil to get on and in your starter then it would be highly advised to repair such leaks. Contaminants getting on and in the starter can cause premature failure of the starter.
DISCLAIMER
Barbour's Auto Help is not responsible for any damage or personal injury incurred in the process of performing any auto repairs done by you the viewer. Automotive repair is extremely dangerous. Repair your vehicle at your own risk. It is the viewers responsibility to verify all information and procedures as outlined in YOUR REPAIR MANUAL AND OWNERS MANUAL FOR YOUR VEHICLE. Owning and using a repair manual suited for your vehicle is essential for correctly and safely performing ANY repair to your vehicle. Always wear safety glasses and heed all instructions for use applicable to any piece of equipment you may use. Due to circumstances out of the control of Barbours Auto Help, Barbours Auto Help makes no guarantee that by the use of the information given in this video a quality repair will be made. Barbour'sAutoHelp makes no guarantee that the information provided is totally complete, syncronized and accurate. Verify everything using an appropriate repair manual.
Repair your vehicle at your own risk! Barbour's auto help does not guarantee a proper repair using these techniques.
100
views