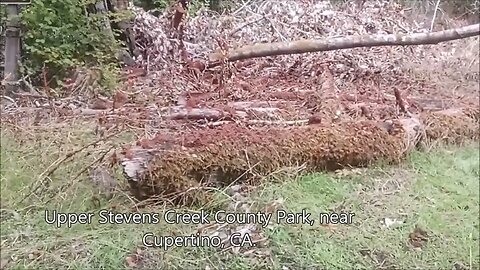
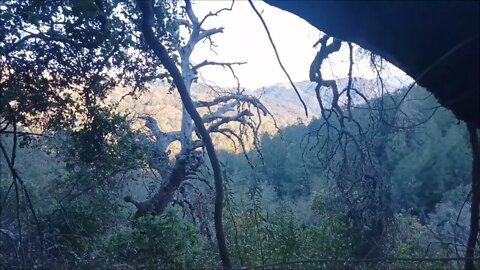
Ladybug Hibernation (Diapause)
Visit to a local ladybug hibernation location in the eastern Santa Cruz Mountains. Every winter that I've been coming up here on my bike, I see these guys gathering in late fall and hanging out until late winter/early spring.
Technically, ladybugs don't hibernate, per se. The correct term is they enter diapause for a few months:
https://meadowia.com/do-ladybugs-hibernate/
This bunch started showing up mid-October this year and they typically start dispersing in late-February when the days start to warm up. This seems to be a popular spot for these guys as I've seen them gather here every winter since I first ran across them.
I tried my low light camera for this video, it worked better under the overcast skies and shadows down in the bottom of the canyon. However, I didn't realize that there's no stabilization with that camera, so the video came out unsteady. This was the best I could stabilize it in my video editor.
More to come...
Subscribe for more content like this
Comment, like, share & click the bell icon
And as always, thanks for watching
#ladybugs
1
view

Stevens Canyon Trail: Power Line Down / Update
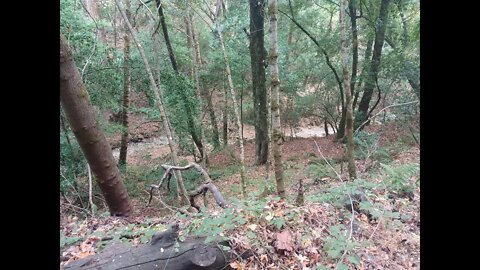
At the end of July '22, just as I got to the gate at the end of the paved road, a strange sound came down the power lines overhead. It sounded like the noise you hear in a rail way ahead of a far off train, or like a supersonic projectile whizzing by. You could see waves running down the lines and reflecting back from each power pole.
Since there's nothing up the canyon past here, I had assumed the lines had been disconnected when the last cabins were demolished about 8 years ago. But then a local resident came up to see why his power was out, so then I knew these lines were still live.
Why PG&E hasn't abandoned/disconnected these lines is beyond me. These are the sort of lines that can cause fires when trees like this fall on them, as has happened many times in previous years. They actually sent a crew up to repair this line after a tree fell across it! I guess it must cost money to disconnect a power line. You need to add disconnecting hardware to the end pole or additional bracing for that end pole since it'll be supporting the tension of the lines running up to it. Maybe there is some reason this line is left energized that I'm unaware of.
There are about 12 power poles up from the last residential connection just past the gate at the end of Stevens Canyon Rd. that have live high voltage wires strung on them. Last pole with the transformer is 146938.
Makes one wonder how many similar unused sections of power lines there are around the state that could be disconnected and made safe?
More to come...
Subscribe for more content like this
Comment, like, share & click the bell icon
And as always, thanks for watching
5
views
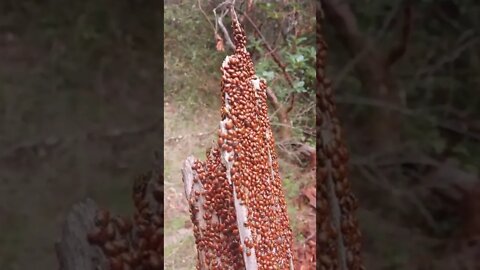
Ladybug Tower
Visit to a local ladybug hibernation location in the eastern Santa Cruz Mountains. Here, they've taken over part of a dead tree trunk to make a high rise tower.
In the background, if you turn up the volume, you can hear a local Western Grey Squirrel making territorial calls.
Technically, ladybugs don't hibernate, per se. The correct term is they enter diapause for a few months:
https://meadowia.com/do-ladybugs-hibernate/
This bunch started showing up at the end of October this year and they typically start dispersing in mid- to late-February when the days start to warm up. This seems to be a popular spot for these guys as I've seen them gather here every winter since I first ran across them in 2020.
#Shorts #ladybugs
2
views
Stevens Creek Main Branch above Waterwheel Creek, Initial Recon
A short hike upstream along Stevens Creek from the confluence of Waterwheel Creek.
I found I could get down into the creek channel between Branch D and Waterwheel Creek. Was able to get about 0.1 miles up the canyon before I ran out of time and had to turn back. From that point onward, the canyon appears to get more rugged with a series of landslides triggered by recent earthquakes.
I would like to return and explore more of the canyon once I do some exploring upstream. With recent rains, the water may be flowing again, so this may have to wait until next fall.
In GaiaGPS, you can download and install the bedrock geology layer and it's striking the difference in the rock types on either side of the San Andreas fault. One side of the canyon is all dark colored Mesozoic rocks of volcanic origin that were formed along island arcs that were pushed up onto the west edge of North America. The other side is light colored Miocene marine sedimentary rocks that were pushed up along the Southern California coast and then transported hundreds of miles north by the fault movement. Standing on the canyon here, those different rock types are right in front of you!
A nice find from the OsmAnd Wikipedia layer, not only does this area contain tectonic blocks, speleothems, but it's also the epicenter of a little known earthquake!
OsmAnd WIkipedia layer:
https://wiki.openstreetmap.org/wiki/OsmAnd#Strong_Wikipedia_Integration
1838 San Andreas earthquake:
https://en.wikipedia.org/wiki/1838_San_Andreas_earthquake
https://youtu.be/mDLw9tCSRSQ
Paleo-Seismic Evidence of the 1890 and 1838 Earthquakes on the Santa Cruz Mountains Section of the San Andreas Fault, near Corralitos, California:
https://pubs.geoscienceworld.org/ssa/bssa/article-abstract/104/1/285/331810/Paleoseismic-Evidence-of-the-1890-and-1838?redirectedFrom=fulltext
San Francisco's 1906 quake was third of a series on San Andreas Fault:
https://pages.uoregon.edu/digital/uonews-archive//archive/news-release/2014/2/san-franciscos-1906-quake-was-third-series-san-andreas-fault.html
Geologic Analysis Of The Monte Bello Ridge Mountain Study Area paper:
https://fbdroch.com/book/environmental-geologic-analysis-of-the-monte-bello-ridge-mountain-study-area-santa-clara-county-california
From that paper:
"TECTONIC BLOCKS - Large angular to rounded, commonly elliptically shaped masses of relatively hard rocks surrounded by a clay-rich, sheared matrix. Occurs within shear zones and fault gouge. In the shear zones of the Franciscan rocks, these blocks range from "fist size" to masses more than one mile long."
USGS National Map Viewer w/ Hill Shade:
https://apps.nationalmap.gov/viewer/
About the USGS HTMC:
https://www.usgs.gov/programs/national-geospatial-program/historical-topographic-maps-preserving-past
View/download maps on the TopoView site:
https://ngmdb.usgs.gov/topoview/
Section of single track Canyon Trail built in 1990:
https://www.trailcenter.org/newsletter/2000/winter2000/winter2000-19f.htm
Future plan: I want to try to hike along the top of the ridge between the Canyon Trail and Stevens Creek between the Table Mtn. and Grizzly Flat trails. I'm hoping there might be some exposed sedimentary rock outcrops up there that might show if this block has been tilted in the past.
More to come...
Subscribe for more content like this
Comment, rate, share & click the bell icon
And as always, thanks for watching
#USGS #HillShade
75
views

Stevens Creek, Branch C: Initial Recon
While looking at the USGS hill shade map of Branch C, I saw what looked like an old road running up the south side of this branch of Stevens Creek.
It's very faint at the bottom where Branch C joins Stevens Creek, but it gets more and more distinct the farther upstream you go until it eventually joins up with Charcoal Road.
This road up Branch C may help to explain the building at the confluence with Stevens Creek that's shown on the 1895 USGS topo map. It would be located at the point where the Canyon Road continued up towards Branch D and this fork of the road running up Branch C.
Charcoal production in this area mentioned in the Saratoga Gap OSP history page:
https://www.openspace.org/preserves/saratoga-gap#history
This is where Charcoal Road joins up with Skyline Blvd/Hwy. 35. And this road up Branch C clearly joins up with the bottom of Charcoal Road on top of Table Mtn.
If anyone has any links to information on this road or where the New Almaden smelters got their fuel, please post up in the comment section below. This is pure speculation on my part, but this is likely one of the largest consumers of fuel (charcoal assumed) in the area at this time.
New Almaden Mine info: https://en.wikipedia.org/wiki/New_Almaden
Image Description: Smelting Works — at the New Almaden Mine.
Located in Almaden Quicksilver County Park, Santa Clara County, Northern California.
Date 1863
Source http://www.getty.edu/art/gettyguide/artObjectDetails?artobj=65339
Author Carleton Watkins (1829–1916)
About the USGS HTMC:
https://www.usgs.gov/programs/national-geospatial-program/historical-topographic-maps-preserving-past
View/download maps on the TopoView site:
https://ngmdb.usgs.gov/topoview/
I used the 1895 Palo Alto quadrangle or the 1900 historical topo as listed in GaiaGPS:
https://www.gaiagps.com/
More to come...
Subscribe for more content like this
Comment, rate, share & click the bell icon
And as always, thanks for watching
5
views
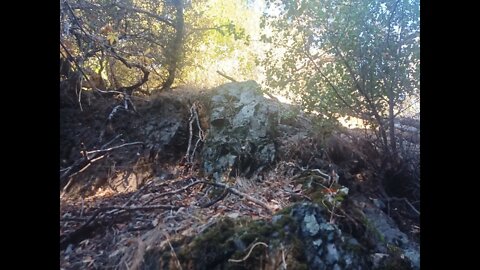
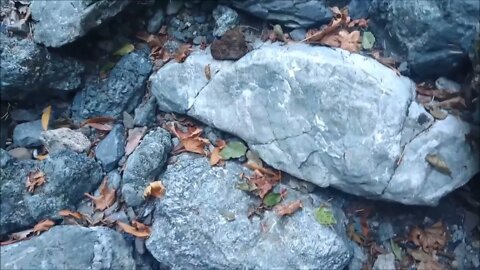
Rock Outcrop Along the Stevens Canyon Trail
An up close look at a bedrock outcrop on the North American side of the San Andreas fault and the Canyon Trail in Montebello Open Space Preserve.
Sorry about the video quality, my camera was having issues with the difficult lighting conditions.
The surface rocks along the stretch of the Canyon Trail where USGS shows the creek flowing are almost all angular. Aside from some minor rounding from decades of hoot, horse and bicycle travel, the rocks are all sharp and angular. This is in contrast to the well rounded rocks found in the bed of Stevens Creek. Also, many of the rocks in Waterwheel Creek proper are coated in Travertine from the minerals dissolved in that water.
Rock outcrop may be a Greenstone or similar type of metamorphosed basalt of the Franciscan Complex:
https://en.wikipedia.org/wiki/Franciscan_Complex
I was hoping to find a sedimentary rock to look at layering, but that type of rock is not as common on this side of the fault.
Geologic Analysis Of The Monte Bello Ridge Mountain Study Area paper:
https://fbdroch.com/book/environmental-geologic-analysis-of-the-monte-bello-ridge-mountain-study-area-santa-clara-county-california
From that paper:
"TECTONIC BLOCKS - Large angular to rounded, commonly elliptically shaped masses of relatively hard rocks surrounded by a clay-rich, sheared matrix. Occurs within shear zones and fault gouge. In the shear zones of the Franciscan rocks, these blocks range from "fist size" to masses more than one mile long."
USGS National Map Viewer w/ Hill Shade:
https://apps.nationalmap.gov/viewer/
About the USGS HTMC:
https://www.usgs.gov/programs/national-geospatial-program/historical-topographic-maps-preserving-past
View/download maps on the TopoView site:
https://ngmdb.usgs.gov/topoview/
Section of single track Canyon Trail built in 1990:
https://www.trailcenter.org/newsletter/2000/winter2000/winter2000-19f.htm
Future plan: I want to try to hike along the top of the ridge between the Canyon Trail and Stevens Creek between the Table Mtn. and Grizzly Flat trails. I'm hoping there might be some exposed sedimentary rock outcrops up there that might show if this block has been tilted in the past.
More to come...
Subscribe for more content like this
Comment, rate, share & click the bell icon
And as always, thanks for watching
#USGS #HillShade
27
views

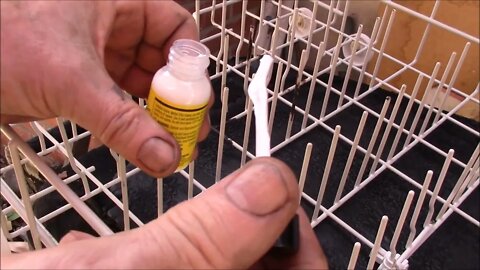
How to Measure Spring Eye Bushing Diameters
Showing an easy way to measure what size spring eye bushing will fit a particular spring. This is a common question we get from our customers.
Using a dial caliper, it's easy to measure the thickness of the main leaf in the spring pack along with the outer diameter of the spring eye you want to size a bushing for. From the outer diameter, subtract 2 times the leaf thickness and that will be the inner diameter of the spring eye. Round that number to the nearest standard size bushing for that type of leaf spring. For the Toyota pickup, 4Runner, T100, Tacoma, Hilux, Hilux Surf models those diameters are 30mm, 36mm and 40mm.
Realize that you may have different spring eye diameters on each end of the spring. Also, with the ability to swap springs between various Toyota models, you can't just go by a chart, it pays to measure and confirm the size bushing(s) you need. On the above vehicles, spring hanger bushings are typically all 30mm outer diameter and either a width equal to the spring eye or wider than the spring eye.
For other vehicle makes, you'll have different diameter spring eye and shackle hanger bushings. This same technique will work for obtaining the measurement but realize that the bushings may be sized in imperial units.
Also, do not get hung up on getting the dimensions to 0.01mm or 0.001". You just need to get within a few mm or 16ths of an inch in order to choose between common bushing sizes for your vehicle.
Dial calipers:
https://amzn.to/3EfTob5
https://www.harborfreight.com/hand-tools/measuring-marking/calipers-micrometer/calipers.html
Web page link for more information:
https://www.4crawler.com/4x4/ForSale/Shackles.shtml
Photo album with more information:
https://photos.app.goo.gl/2nZceJMFsYMzvoyq5
9
views
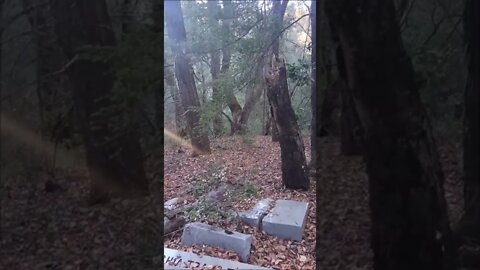
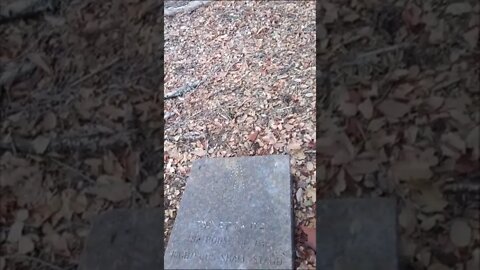
Halloween-eve at GC75BP8 GeoCache and beyond
Just had to return to this location for a Halloween-eve visit! Since my first 3 visits to this area late last fall, which were all based on scant information gleaned from GeoCaching log posts, this time I head up there armed with hill shade map intel.
It's incredible to link all this information together and in the end come up with a nice way to access the Table Mtn. and Charcoal Road area even though most of the trails there are closed until next spring. There are more GeoCaches like this up along Charcoal Road that I hope to be able to access via this road and trail, although the trail maintenance leaves something to be desired :)
Grav3stones cache:
https://www.geocaching.com/geocache/GC75BP8
This cache has an incredible back story with lots of interesting twists and turns:
- AlphaRoaming, an avid GeoCacher, stumbles on this area in 2013 while exploring an abandoned (unnamed) road
- Posts his adventures in his blog
- Contacts the MidPen Open Space District and the California Pioneers historical group
- After identifying historical head stones, a MidPen work party goes in and recovers those stones in 2016
- This prompts an article in a local newspaper
- GeoCacher Werdave places a nearby cache with hints of an old road to the bottom of the canyon in 2016
- GeoCacher TickMag reads newspaper article, blog post and above GeoCache and heads out to the Grav3stones site to place a cache
- Later, AlphaRoaming sees cache listing and comes back with friend to revisit the site.
- AlphaRoaming's friend posts log entry about coming up via and old road the AlphaRoaming knew about along with other log entries about other roads and trails in the area.
Sometimes, it really pays to read and reread the cache descriptions and log entries to figure out all this before setting out.
A Secret Trailhead Redwood Pair (Premium cache):
https://www.geocaching.com/geocache/GC6F63Y
San Jose Mercury News article:
https://www.mercurynews.com/2016/04/04/herhold-unmarked-road-leads-to-historical-headstones/
https://web.archive.org/web/20170508023706/http://www.mercurynews.com/2016/04/04/herhold-unmarked-road-leads-to-historical-headstones/
AlphaRoaming blog posts:
https://alpharoaming.com/2014/09/29/headstones/
https://alpharoaming.com/2016/04/04/return-of-the-mysterious-headstones/
YouTube videos:
Initial cataloging (seems to be missing):
https://www.youtube.com/watch?v=hID6_Cmgx28
Moving them out!
https://www.youtube.com/watch?v=V595-XMf8b0
Venturing off the established trails can be dangerous. There is no cell signal in this area. It's highly unlikely another person will come along. There are the the usual trail warnings:
https://www.openspace.org/preserves/monte-bello#know-before-you-go
Interesting tidbit on the YT algorithm: If the word "grav3stones" is spelled out correctly, then the video gets flagged. "Head stones" seems to be OK, but not that "G" word!
Wonder what George Carlin would make of the situation today:
https://youtu.be/kyBH5oNQOS0
More to come...
Subscribe for more content like this
Comment, rate, share & click the bell icon
And as always, thanks for watching
20
views
Dishwasher Rack Repair, Part 3
Repairing a 15 year old dishwasher rack that has a damaged vinyl coating and is starting to rust. Applying ReRack coating to repair the damaged portions.
This is a 2007 GE Profile model dishwasher.
Tools required:
A small carving knife and a sharp wood chisel worked best for scraping off the bubbled up vinyl coating. A small wire brush helped remove any remaining surface rust and a small paint brush to apply the rust converter.
The process:
Scrape off loose vinyl coating.
Wire brush to remove rust
Treat exposed metal with rust converter:
Jenolite (or other brand) Rust Converter
https://amzn.to/3ztmAIY
Apply a vinyl repair coating over the rust converted areas:
ReRack Vinyl Dishwasher Rack Repair Coating, available in white and possibly gray:
https://amzn.to/3SR04k5
More to come...
Subscribe for more content like this
Comment, like, share & click the bell icon
And as always, thanks for watching
Intro/Outro:
Louisiana Fairytale by Austin Rogers
https://web.archive.org/web/20170402222425/http://drfiddle.com/show_tune.php?id=94
8
views
Halloween At GC75BP8 GeoCache, 2nd view
Just had to return to this location for a Halloween-eve visit!
Grav3stones cache:
https://www.geocaching.com/geocache/GC75BP8
This cache has an incredible backstory with lots of interesting twists and turns:
- AlphaRoaming, an avid GeoCacher, stumbles on this area in 2013 while exploring an abandoned road
- Posts his adventures in his blog
- Contacts the MidPen Open Space District and the California Pioneers historical group
- After identifying historical head stones, a MidPen work party goes in and recovers those stones in 2016
- This prompts a newspaper article
- GeoCacher Werdave places a nearby cache with hints of an old road to the bottom of the canyon in 2016
- GeoCacher TickMag reads newspaper article, blog post and above GeoCache and heads out to the Gravestones site to place a cache
- Later, AlphaRoaming sees cache listing and comes back with friend to revisit the site.
- AR's friend posts log entry about coming up via and old road the AlphaRoaming knew about along with other log entries about other roads and trails in the area.
Sometimes, it really pays to read and reread the cache descriptions and log entries to figure out all this before setting out.
A Secret Trailhead Redwood Pair (Premium cache):
https://www.geocaching.com/geocache/GC6F63Y
San Jose Mercury News article:
https://www.mercurynews.com/2016/04/04/herhold-unmarked-road-leads-to-historical-headstones/
https://web.archive.org/web/20170508023706/http://www.mercurynews.com/2016/04/04/herhold-unmarked-road-leads-to-historical-headstones/
AlphaRoaming blog posts:
https://alpharoaming.com/2014/09/29/headstones/
https://alpharoaming.com/2016/04/04/return-of-the-mysterious-headstones/
YouTube videos:
Initial cataloging (seems to be missing):
https://www.youtube.com/watch?v=hID6_Cmgx28
Moving them out!:
https://www.youtube.com/watch?v=V595-XMf8b0
Interesting tidbit on the YT algorithm: If the word "grav3stones" is spelled out correctly, then the video gets flagged. "Head stones" seems to be OK, but not that "G" word!
Wonder what George Carlin would make of the situation today:
https://youtu.be/kyBH5oNQOS0
Another YouTube #Shorts video
More to come...
Subscribe for more content like this
Comment, rate, share & click the bell icon
And as always, thanks for watching
Greta Sting by Kevin MacLeod is licensed under a Creative Commons Attribution 4.0 license. https://creativecommons.org/licenses/by/4.0/
Source: http://incompetech.com/music/royalty-free/index.html?isrc=USUAN1100530
Artist: http://incompetech.com/
12
views
Halloween At GC75BP8 GeoCache
Just had to return to this location for a Halloween-eve visit!
Grav3stones cache:
https://www.geocaching.com/geocache/GC75BP8
This cache has an incredible backstory with lots of interesting twists and turns:
- AlphaRoaming, an avid GeoCacher, stumbles on this area in 2013 while exploring an abandoned road
- Posts his adventures in his blog
- Contacts the MidPen Open Space District and the California Pioneers historical group
- After identifying historical head stones, a MidPen work party goes in and recovers those stones in 2016
- This prompts a newspaper article
- GeoCacher Werdave places a nearby cache with hints of an old road to the bottom of the canyon in 2016
- GeoCacher TickMag reads newspaper article, blog post and above GeoCache and heads out to the Gravestones site to place a cache
- Later, AlphaRoaming sees cache listing and comes back with friend to revisit the site.
- AR's friend posts log entry about coming up via and old road the AlphaRoaming knew about along with other log entries about other roads and trails in the area.
Sometimes, it really pays to read and reread the cache descriptions and log entries to figure out all this before setting out.
A Secret Trailhead Redwood Pair (Premium cache):
https://www.geocaching.com/geocache/GC6F63Y
San Jose Mercury News article:
https://www.mercurynews.com/2016/04/04/herhold-unmarked-road-leads-to-historical-headstones/
https://web.archive.org/web/20170508023706/http://www.mercurynews.com/2016/04/04/herhold-unmarked-road-leads-to-historical-headstones/
AlphaRoaming blog posts:
https://alpharoaming.com/2014/09/29/headstones/
https://alpharoaming.com/2016/04/04/return-of-the-mysterious-headstones/
YouTube videos:
Initial cataloging (seems to be missing):
https://www.youtube.com/watch?v=hID6_Cmgx28
Moving them out!:
https://www.youtube.com/watch?v=V595-XMf8b0
Interesting tidbit on the YT algorithm: If the word "grav3stones" is spelled out correctly, then the video gets flagged. "Head stones" seems to be OK, but not that "G" word!
Wonder what George Carlin would make of the situation today:
https://youtu.be/kyBH5oNQOS0
Another YouTube #Shorts video
More to come...
Subscribe for more content like this
Comment, rate, share & click the bell icon
And as always, thanks for watching
Greta Sting by Kevin MacLeod is licensed under a Creative Commons Attribution 4.0 license. https://creativecommons.org/licenses/by/4.0/
Source: http://incompetech.com/music/royalty-free/index.html?isrc=USUAN1100530
Artist: http://incompetech.com/
13
views
Dishwasher Rack Repair, Part 2
Repairing a 15 year old dishwasher rack that has a damaged vinyl coating and is starting to rust. Finding more areas of damaged coating, working in full sunlight helped to see less bubbled up coating areas.
This is a 2007 GE Profile model dishwasher.
Tools required:
A small carving knife and a sharp wood chisel worked best for scraping off the bubbled up vinyl coating. A small wire brush helped remove any remaining surface rust and a small paint brush to apply the rust converter.
The process:
Scrape off loose vinyl coating.
Wire brush to remove rust
Treat exposed metal with rust converter:
Jenolite (or other brand) Rust Converter
https://amzn.to/3ztmAIY
Apply a vinyl repair coating over the rust converted areas:
ReRack Vinyl Dishwasher Rack Repair Coating, available in white and possibly gray:
https://amzn.to/3SR04k5
More to come...
Subscribe for more content like this
Comment, like, share & click the bell icon
And as always, thanks for watching
Intro/Outro:
Louisiana Fairytale by Austin Rogers
https://web.archive.org/web/20170402222425/http://drfiddle.com/show_tune.php?id=94
19
views

Dishwasher Rack Repair, Part 1
Repairing a 15 year old dishwasher rack that has a damaged vinyl coating and is starting to rust.
This is a 2007 GE Profile model dishwasher.
The process:
Scrape off loose vinyl coating.
Wire brush to remove rust
Treat exposed metal with rust converter:
Jenolite (or other brand) Rust Converter
https://amzn.to/3ztmAIY
Apply a vinyl repair coating over the rust converted areas:
ReRack Vinyl Dishwasher Rack Repair Coating, available in white and possibly gray:
https://amzn.to/3SR04k5
More to come...
Subscribe for more content like this
Comment, like, share & click the bell icon
And as always, thanks for watching
Intro/Outro:
Louisiana Fairytale by Austin Rogers
https://web.archive.org/web/20170402222425/http://drfiddle.com/show_tune.php?id=94
9
views
Abandoned Section of the Canyon Trail, near Gold Mine Creek
Finally figured out the this puzzling section of the Canyon Trail just below Gold Mine Creek in the Montebello Open Space Preserve.
I've ridden by this part of the Canyon Trail countless times and always wondered why it's different than the rest of the trail. This is located just down from mile post 2.5.
The Canyon Trail shows up down to this location on the 1961 USGS historical topo map, marked as a "Jeep Trail". On that map, it ends right at this point, where it turns into a somewhat modern multi-use trail for about 1/4 mile. Then it turns back into an old single lane dirt road all the way down to where it crosses Stevens Creek at the Lower Table Mountain trail.
It seems that right here, the old road washed out some time ago, likely before the 1961 topo map was surveyed. Since the ranches in this area seemed to have stopped active operations around that time, whoever built this road probably didn't feel the need to repair it after it washed out.
When the Open Space District took over in the 1970s, they likely wanted to connect the 2 sections of the Canyon Trail back up to access the lower half of the canyon. So a multi-use trail was built around the washed out section of the old road. This may have been around 1990 or earlier as there was some trail construction below here around that time:
An accurate hill shade map proved to be invaluable in locating the old road, especially at the lower end. Since there's no cell coverage in the canyon, having an off-line version of that map is essential.
USGS National Map Viewer w/ Hill Shade:
https://apps.nationalmap.gov/viewer/
About the USGS HTMC:
https://www.usgs.gov/programs/national-geospatial-program/historical-topographic-maps-preserving-past
View/download maps on the TopoView site:
https://ngmdb.usgs.gov/topoview/
Montebello Open Space history page:
https://www.openspace.org/preserves/monte-bello#history
More to come...
Subscribe for more content like this
Comment, rate, share & click the bell icon
And as always, thanks for watching
#USGS #HillShade
6
views
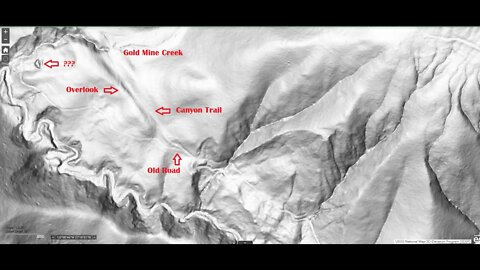
Road to Gold Mine Creek, Intro.
Trying to find an old road that branches off the Canyon Trail and heads down to lower Gold Mine Creek in the Montebello Open Space Preserve that can be seen on the USGS hill shade map.
I've ridden by this part of the Canyon Trail countless times and I've never noticed there's a road here. But once you know where to look, it's there. This is located just down from mile post 2.5.
Hopefully I'll be able to hike this road down to lower Gold Mine Creek once the vegetation dies back this winter. Lower Gold Mine Creek canyon looks like it's very rugged. On the map, the creek is nothing above the Canyon Trail, but right below it turns into a massive canyon and it's chock full of trees and brush. From the Canyon Trail, you can only get a glimpse, but hopefully from below, it may be more visible. Also hope to see what the mysterious object is on the hill shade map.
This may also be a good way to access Stevens Creek to see what this part of the canyon looks like. From Google Maps and the hill shade map it appears to be quite spectacular but also incredibly hard to access. This section of the canyon was ground zero for the 1838 San Andreas earthquake. That quake likely triggered some slides and earth movement that caused the creek to have to cut a very chaotic canyon here. I suspect it's this very rugged terrain that precluded extending the old Canyon Road up the main branch of Stevens Creek.
USGS National Map Viewer w/ Hill Shade:
https://apps.nationalmap.gov/viewer/
About the USGS HTMC:
https://www.usgs.gov/programs/national-geospatial-program/historical-topographic-maps-preserving-past
View/download maps on the TopoView site:
https://ngmdb.usgs.gov/topoview/
Montebello Open Space history page:
https://www.openspace.org/preserves/monte-bello#history
More to come...
Subscribe for more content like this
Comment, rate, share & click the bell icon
And as always, thanks for watching
#USGS #HillShade
7
views

ProForged Idler Arm Bushing: Grease Grooves
Adding grease grooves to our bronze idler arm bushings for use in idler arms that come with grease fittings.
These bushings and idler arms are for the 1986-1995 4WD 4Runner, Pickup, Hilux, Hilux Surf and T-100 pickup models. Also will work with the non-US 1996 and later Hilux and Hilux Surf models with the recirculating ball steering box and idler arm.
Web page with more information and ordering:
https://www.4crawler.com/4x4/ForSale/IdlerArm.shtml
More to come...
Subscribe for more content like this
Comment, like, share & click the bell icon
And as always, thanks for watching
5
views

Die Holder Handle Upgrade
Upgrading the handles on an old tap and die set.
I have 2 of these carbon steel tap and die sets, metric and SAE, that are around 40 years old. I mainly use these for chasing threads on bolts and nuts. This is the only die holder I have that fits these smaller round dies. I could buy a new die holder but why not fix up the one I have.
I did purchase a new tap wrench and have fixed up the handles on it with some heat shrink tubing. So I'm not worried about that handles on the tap wrenches that came with this kit.
Subscribe for more content like this
Comment, like, share & click the bell icon
And as always, thanks for watching
Intro/Outro:
Louisiana Fairytale by Austin Rogers
https://web.archive.org/web/20170402222425/http://drfiddle.com/show_tune.php?id=94
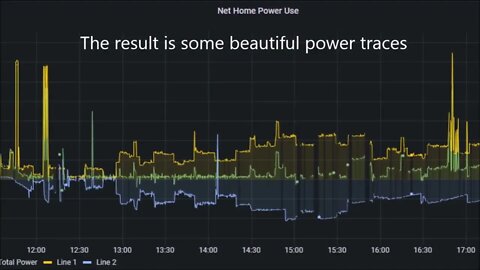
AC Diversion Load: Data Cleanup
Following on from adding the "Watchdog Timer" feature to the AC diversion load program, I found more data quality issues that were causing problems in the code. The video is long, but all these issues all are related.
Timeline:
0:05 Introduction
2:45 Damping feature in action
4:34 PLEG Trigger
5:09 PLEG Interval Timers
6:51 PLEG Device Properties
8:13 PLEG Condition Logic Cleanup
9:20 Energy Meter Quality and Sanity checks
10:08 Reconstructing missing data
11:57 Self Re-Trigger Timers
14:20 Adding data protection to the code
This took some time to identify and correct these issues. Reason being you find an issue and make a preliminary code change, maybe just adding a conditional expression to compute an intermediate result. Then you need to let that run for some time until the issue repeats and see what the result of the code change was. Then make some changes and incorporate that into the code and let it run again for some days or weeks. Each cycle lets you gain more insight into the cause of the issue. Also, in some cases, I had code added from the initial development last year, where I had attempted to work around some of the issues I saw but didn't fully understand at the time. So that code had to back backed out before moving forward with the new changes.
The basic idea is to detect when the reported power data is older than the designed reporting interval. This is done by taking advantage of the Program Logic Event Generator (PLEG) time stamp information in the device property that records the power data.
The logic is that if either of the 2 diversion load interval times (Clamp1Check or Clamp2Check) have run and expired, then check the "age" of the power data and if it's older than the reporting interval, request new data from the power meter.
I extended the above data "age" checks to the Line1 and Line2 power readings as well. I've seen all 8 possible combinations of the 3 pieces of data being present or missing.
Initially, I just requested new power data from the energy meter. However, sometimes that didn't result in fresh data, so then I had the code stop updating the diversion load when only partial data was present. This was needed because the code assumes that if a change in the light dimmer setting is made, the next power reading will reflect the result of that change.
The problem arises if the power data isn't updated. Let's say the code determined that the light dimmer/load needed to increase by 100 watts. That change is made, then 15 secs. later, it will make the same calculation and determine the load needs to increase by 100 watts. Rinse and repeat and all of a sudden, the light dimmer is maxed out.
But then I found that it was possible to reconstruct missing data in 3 out of 8 cases, so that code was added and then I only stopped updates from happening unless there was insufficient data available. This helped a great deal by allowing the diversion load algorithm to keep running as much as possible. In cases where there's insufficient data, the code just keeps the current settings and waits for fresh data to arrive.
Using the Self Re-Trigger timers allowed me to finally have the code execution and ZWave network activity spread out in time. Initially, I used Self Trigger timers but since they essentially are started at the same time, they stay in sync all day long. The Self-Re-Trigger timers can be interrupted while running. While I normally run them with a fixed 15 second interval, for startup, I instead feed in a 3 or 6 second interval for the 2 timers to get them out of sync. Then the 15 second interval is resumed and they stay separated in time all day long.
Not sure what's causing the missing data, I'll often see it both on my Gen1 as well as Gen5 power meter, so I don't think it's a particular device. The VeraPlus seems to be responsive when the data is missing and I don't think the ZWave network is being saturated.
More to come...
Subscribe for more content like this
Comment, like, share & click the bell icon
And as always, thanks for watching
Intro/Outro:
Louisiana Fairytale by Austin Rogers
https://web.archive.org/web/20170402222425/http://drfiddle.com/show_tune.php?id=94
20
views

GE Advantium 120 Speedcook Oven: Door Handle Repair
Repairing a broken door handle on my 2007 GE/Kenmore Advantium 120 Speedcook oven.
Apparently the original door handle p/n: WB15X10070 has been re-used for newer GE microwave ovens. So you'll find many hits on Amazon, eBay and other appliance repair sites, but they are for the newer style handle that fits on doors with a recessed front. A few older pages list the same p/n but correctly show it as no longer available.
Originally, I repaired the first break with some Amazing Goop Automotive adhesive. That held for a number of years but eventually failed.
After removing handle and the adhesive residue, I drilled through the 2 screw holes with a 2.5mm drill bit. There's some un-drilled plastic at the bottom of the existing hole. The bit will eventually break into a hollow section inside the handle. Then hand drive a #6 x 1-1/8" or 1-1/4" drywall screw into the freshly drilled hole. It's easiest to do this on the counter top before trying to install the handle on the hanging door. Do not use a power driver for this. Add a small backing washer under the screw head and run it through the back of the door, into the handle. Pull back on the handle as you drive the screw in. Snug up both screws until there's no play between the handle and door.
Great door handle repair videos:
https://youtu.be/4fDe0n6yScQ
https://youtu.be/vw4PZYDcG5U
Door removal, at least for some models:
https://youtu.be/YVV9hjeNiuc
More to come...
Subscribe for more content like this
Comment, like, share & click the bell icon
And as always, thanks for watching
Intro/Outro:
Louisiana Fairytale by Austin Rogers
https://web.archive.org/web/20170402222425/http://drfiddle.com/show_tune.php?id=94
#advantium #speedcooking
10
views

AC Diversion Load: Watchdog Timer
Adding a "Watchdog Timer" feature to the AC diversion load program code to help fill in missing power data that seem to occur from time to time.
The basic idea is to detect when the reported power data is older than the designed reporting interval. This is done by taking advantage of the Program Logic Event Generator (PLEG) time stamp information in the device property that records the power data.
The logic is that if either of the 2 diversion load interval times (Clamp1Check or Clamp2Check) have run and expired, then check the "age" of the power data and if it's older than the reporting interval, request new data from the power meter.
More to come...
Subscribe for more content like this
Comment, like, share & click the bell icon
And as always, thanks for watching
Intro/Outro:
Louisiana Fairytale by Austin Rogers
https://web.archive.org/web/20170402222425/http://drfiddle.com/show_tune.php?id=94
11
views
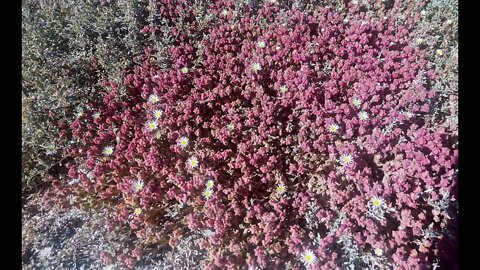
SF Bay Trail, GeoCaching Ride 04 Sep 2022
A "beat the heat ride" along the San Francisco Bay Trail. This was the beginning of the local heat wave, temps in the valley climbed to the mid 90'sF, along the bay, they were in the upper 80'sF.
Found 1 new GeoCache:
https://www.geocaching.com/geocache/GC91HTZ_birds-bikes-battlestar-galactica
Need to return and sign the log in the cache I found plus check out the other caches along this route. Aside from about a half mile of pavement to/from the start, this ride is all on bike paths with only 2 street crossings.
With the sea breeze and the dry trails, it was a fairly dusty ride as you can see in the first part of the video. The external mic I used helped a great deal with the wind noise, but may need something better than the foam cover that came with it.
Pl@ntnet.org:
https://identify.plantnet.org/
Slender Iceplant:
https://www.inaturalist.org/guide_taxa/351435
Hanger 1 Image:
Licensed under the Creative Commons Attribution 2.0 Generic license:
https://commons.wikimedia.org/wiki/File:Last_Look_at_Hangar_One.jpg
Route:
https://www.google.com/maps/dir/37.4155308,-121.9806957/37.4203069,-122.0177513/37.4348597,-122.0675322/South+Adobe+Creek+Loop+Trailhead/37.4556792,-122.1012699/37.4590869,-122.1055619/37.4752322,-122.1265038/@37.4389179,-122.0776221,13z/data=!4m14!4m13!1m0!1m0!1m0!1m5!1m1!1s0x808fbb5dd7ff7d47:0xa0d0b8aab3c42292!2m2!1d-122.0996222!2d37.4357078!1m0!1m0!1m0!3e1!5m1!1e3
More to come...
Subscribe for more content like this
Comment, like, share & click the bell icon
And as always, thanks for watching
#geocache #baytrail #geocaching #sfbay #gravelbike #gravel #cycling #partypace
10
views
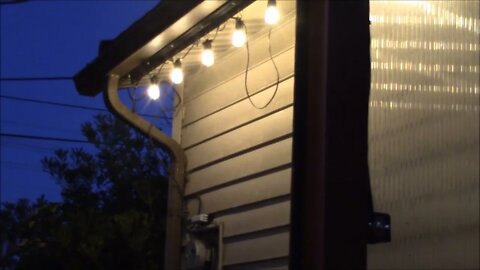
Hanging LED Lights for the Patio, Part 3
Wrapping up the install by adding a DPDT switch to allow for more control options. The switch allows selecting between full blown home automation mode and plain old manual on/off control; all this is solar powered
Since these lights will illuminate the outdoor cooking area, which will be of great use in a power outage or other grid-down situation, the Google Assistant features will be of little use. Also, for sitting out on the patio on a warm summer evening, the automatic motion sensor control may cause the lights to turn off after some period of inactivity. I may add a "patio scene" to the control logic to get around this.
I always try to consider adding in grid down type of features into projects like this. All my Class-II lighting controls have a built-in switch to allow for manual on/off control with only 12V battery power:
https://youtu.be/FZx2Px5f-ZQ
Some of those controllers are hard to access if needed, but at least that option is there. With these lights, grid down operation just requires flipping the switch on. Considering the increasing fragility of the CA power grid, these lights and the outdoor kitchen may be getting to real use soon.
So far have been using these lights for about 5 months now, they are still working well. I've left them in automatic mode all that time.
Amico 48FT LED Outdoor String Lights with Shatterproof LED Filament Bulbs:
https://amzn.to/3CLlFpx
These light are spaced about 3 ft. or 1m.
The 15-light string was cut into 9- and 6-light strings and mating connectors added to the cut ends. Adding a mating connector on the end of each string allow for extending the string in the future:
2-pin low voltage lighting connectors:
https://amzn.to/3RpZppk
Be sure to get the right size and configuration of connector to match your light string. I ordered a set of the connectors that looked similar but were too small. Only then did I find out there are 2 different sizes. I'll be using the smaller waterproof connectors on my 4Runner when I replace some old incandescent lights with LEDs, they'll be ideal for that.
3 of the socket connectors were used to make a splitter to take the power feed and send it out to the 9 lights under the patio roof, 6 lights under the house roof and finally to the gas grill 12V light input.
Wire Loom Tools:
https://www.thingiverse.com/thing:2979358
https://www.thingiverse.com/thing:3127294
Toggle switch box:
https://www.thingiverse.com/thing:3660963
Other than the sting of lights and the weatherproof connectors, this whole project was done with materials on hand. Made use of the existing patio light circuit I set up some 7 years ago. Then by adding a simple toggle switch, I increased the functionality in case of a grid down event.
Subscribe for more content like this
Comment, like, share & click the bell icon
And as always, thanks for watching.
Intro/Outro:
Louisiana Fairytale by Austin Rogers
https://web.archive.org/web/20170402222425/http://drfiddle.com/show_tune.php?id=94
7
views

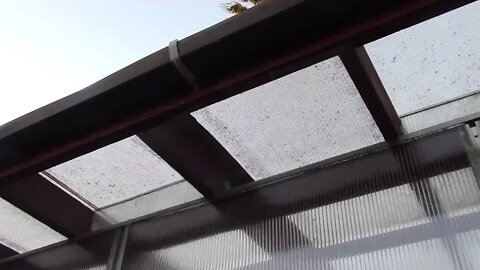
Hanging LED Lights for the Patio, Part 2
Finished filling in the gaps between the patio roof framing with insect screen. I selected a 24" wide, 0.108" galvanized steel mesh and cut it into 25.5" lengths to fit the 24" spacing on the roof framing:
https://www.mcmaster.com/9217T23
That was stapled to the underside of the framing and then some black PVC angle was caulked and screwed over the mesh. That PVC covers the raw edge of the mesh and staples as well and providing a drip edge for the patio roof:
https://www.mcmaster.com/7077N16
Brass S-hooks were used to hang the LED lights from the PVC angle:
Amico 48FT LED Outdoor String Lights with Shatterproof LED Filament Bulbs:
https://amzn.to/3CLlFpx
These light are spaced about 3 ft. or 1m.
The 15-light string was cut into 9- and 6-light strings and mating connectors added to the cut ends. Adding a mating connector on the end of each string allow for extending the string in the future:
2-pin low voltage lighting connectors:
https://amzn.to/3RpZppk
Be sure to get the right size and configuration of connector to match your light string. I ordered a set of the connectors that looked similar but were too small. Only then did I find out there are 2 different sizes. I'll be using the smaller waterproof connectors on my 4Runner when I replace some old incandescent lights with LEDs, they'll be ideal for that.
3 of the socket connectors were used to make a splitter to take the power feed and send it out to the 9 lights under the patio roof, 6 lights under the house roof and finally to the gas grill 12V light input.
Wire Loom Tools:
https://www.thingiverse.com/thing:2979358
https://www.thingiverse.com/thing:3127294
Toggle switch box:
https://www.thingiverse.com/thing:3660963
Then a DPDT toggle switch will be used to tie these lights into the existing patio lighting circuit as well as having a manual control option. Since the gas grill and cook top on the patio are potentially to be used during extended power outages, having a backup to a complex home automation system for controlling these lights is desirable.
More to come, hooking up the DPDT switch...
Subscribe for more content like this
Comment, like, share & click the bell icon
And as always, thanks for watching.
Intro/Outro:
Louisiana Fairytale by Austin Rogers
https://web.archive.org/web/20170402222425/http://drfiddle.com/show_tune.php?id=94
17
views
Hanging LED Lights for the Patio, Part 1
Time to replace the 7 year old LED strip lights for the outside of the patio enclosure. Originally this was a 16ft.(5M) weatherproof LED tape fitted under the edge of the patio roof. Over the years, that LED tape broke down to where 5-10% of the LEDs had failed. That strip light was removed and will get re-used to light up the garage attic storage area.
At the same time, I needed to fill in the gaps between the patio roof framing with some sort of insect screen. I selected a 24" wide, 0.108" galvanized steel mesh and cut it into 25.5" lengths to fit the 24" spacing on the roof framing:
https://www.mcmaster.com/9217T23
In upcoming videos:
That was stapled to the underside of the framing and then some black PVC angle was caulked and screwed over the mesh:
https://www.mcmaster.com/7077N16
That PVC will cover the raw edge of the mesh and staples as well and providing a drip edge for the patio roof.
Brass s-hooks were used to hang the LED lights from the PVC angle:
Amico 48FT LED Outdoor String Lights with Shatterproof LED Filament Bulbs:
https://amzn.to/3CLlFpx
The 15-light string was cut into 9- and 6-light strings and mating connectors added to the cut ends:
2-pin low voltage lighting connectors:
https://amzn.to/3RpZppk
3 of the socket connectors were used to make a splitter to take the power feed and send it out to the 9 lights under the patio roof, 6 lights under the house roof and finally to the gas grill 12V light input.
Then a DPDT toggle switch will be used to tie these lights into the existing patio lighting circuit as well as having a manual control option. Since the gas grill and cook top on the patio are potentially to be used during extended power outages, having a backup to a complex home automation system for controlling these lights is desirable.
More to come...
Subscribe for more content like this
Comment, like, share & click the bell icon
And as always, thanks for watching.
Intro/Outro:
Louisiana Fairytale by Austin Rogers
https://web.archive.org/web/20170402222425/http://drfiddle.com/show_tune.php?id=94
17
views

Grizzly G4000 Lathe: Belt Cover Thumb Screw
Making an easy to use thumbscrew for the belt cover on the 9x19 lathe.
Lots of ways to make something like this. I had a scrap of 1" (25mm) round steel rod about 1.5" (35mm) long and a scrap of copper water pipe. Thread on the screw is M6x1.0, needs to be at least 1/2" (12mm) long.
The rod was divided in half, one end turned down slightly to fit the copper pipe over. I overshot that OD and just soldered the copper to the steel. The copper end was knurled for better grip. The middle of the rod was left full diameter to serve as a flange on the thumb screw. Turn down the end to 6mm and thread up as close to the flange as possible.
A closer look at the parts manual shows the belt cover hinge may be bolted to the lathe, so I'll have to look into removing that to see what's going on with the hinge. I think the M6 socket head cap screw and washer were the original hold down for the belt cover. 25+ years of use had worn out the sheet metal where that screw was.
@Don Brandt video:
https://youtu.be/0YmRjwFO6Z4
3D Printed Knurled Knob:
https://www.thingiverse.com/thing:177400
More to come...
Subscribe for more content like this
Comment, like, share & click the bell icon
And as always, thanks for watching
10
views