
Enjoyed this channel? Join my Locals community for exclusive content at
noreenskitchen.locals.com!
BUTTER BURGERS! FEATURING THE SANHOYA AIR FRYER OVEN !!
LEARN MORE ABOUT THE SANHOYA OVEN HERE: https://amzn.to/38nzoRW
Happy New year! I hope that the holidays were great for all of you and I hope that the coming year is filled with a bunch of great opportunities and experiences! As you can tell, I have been gone for about a month now and I took time to spend with my family during the holidays but we are back to business with our first upload of the year with many more to come!
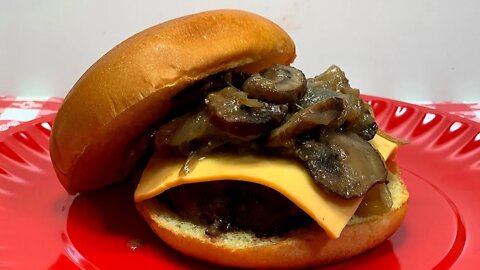
Today I am sharing with you a delicious option for a burger! This is my rendition of a butter burger. Not the style of the Wisconsin butter burger, but rather a burger with some compound butter encapsulated within to make a moist, juicy and delicious burger full of herbaceous flavor and one that I am sure you will want to try. We are making our burgers in our Sanhoya air fryer oven today and we want to thank them for sponsoring this video. Remember, sponsored videos give our channel the opportunity to grow and bring you more amazing content. We thank you for supporting our channel and our sponsors. You can easily make these burgers on the grill, under the broiler or in a skillet on top of the stove. No matter how you choose to make them they are going to be a delicious treat!
I have started out with a package of 1/3 pound, 85/15 lean, Angus beef steak burgers. I am also using a couple disks of compound butter to make all this happen. If you missed my video on how to make compound butter, you can have a look when you are done with this video by clicking through here: http://bit.ly/2NqxCGH The trick now is to take the patty, place the disk of compound butter in the center and then gently pull the meat round the disk. This will look like a mess and will even look like a giant meatball, Keep at it, pressing and forming into a patty. It will all be fine in the end. This is one time where I will not be putting a hole in my burger. Otherwise all that delicious flavored butter will run out all over the place!
Once the patties are all formed, I placed them on the perforated cooking plate for my air fryer and then set it in the elevated rack inside the vessel, which had been preheated at 350 degrees for 5 minutes. I cooked these burgers for a total of 13 minutes at that same temperature checking them at the 10 minute mark for doneness. We prefer our burgers somewhere between medium rare and medium so an internal temp of 135 to 140 leaving room for carry over cooking is ideal. I allowed them to rest for a few minutes before building the burgers and serving.
I served these burgers with melted American cheese, on brioche buns, with a jammy onion and mushroom saute. They needed nothing else. No ketchup or mustard and not even a pickle was necessary. The garlic and herb compound butter was so flavorful that it made the burger burst with deliciousness. The perfect bite for lunch or dinner with an unexpected surprise in the center.
These burgers could be dressed up or down as much as you like. Adding bacon would be a wonderful option as well. If you are on a low carb or keto style diet then these are just as delicious without the bun, served in a smothered style or as an "UN Burger" using lettuce in place of your bread. These would also be delicious served atop a roasted portobello mushroom cap, open faced with melted provolone or smoke gouda cheese on top. Don't forget those jammy onions and mushrooms because you'll be sad if you do.
If you are interested in more information on the Sanhoya air fryer oven you can see the link a the top of this post. We would like to thank them for sponsoring our video today and hope that you will join us in supporting them if this appliance is something that you think would benefit your life in the kitchen!
I hope you give these butter burgers a try sometime soon and I hope you love them!
Happy Eating!
Get my cookbooks here: http://bit.ly/1czqM5R
Business Inquiries can be sent to:
info@noreenskitchen.com
Check me out on social media!
Facebook: http://on.fb.me/12bdibt
Twitter: @noreenskitchen
Instagram: http://bit.ly/12bdqrp
***MAILING ADDRESS****
Noreen's Kitchen
PO Box 14173
New Bern, NC 28561
Have a question for me? Send me an email:
info@noreenskitchen.com
Noreen's Kitchen Community Guidelines (The Rules)
http://bit.ly/2i7VocU
Any links to Amazon are, in many cases, affiliate links.
Produced by Noreen's Kitchen ©2008-2016 all rights reserved All embeds must live link to Noreen's Kitchen channel. No Editorial Excerpts without permission, Violators agree to pay royalties, all court costs, all collections & all lawyers fees.
76
views

LATKE WAFFLES!! A CLASSIC WITH A TWIST!! A REALLY RETRO HOLIDAY!!
Here is a modern twist on my grandmothers classic latke recipe! If you are not familiar with latkes, they can also be called potato pancakes. Think hashbrowns, but pumped up and better. I am not a fan of hash browns but latkes, I could eat all day! But we reserve these for a once a year treat. My twist is making them in the waffle iron. After doing this I will probably never make them any other way again. The even heating from top and bottom allows these latkes to cook evenly and without babysitting! I am also taking some help from the grocery store and using refrigerated shredded potatoes from Simply Potatoes. These worked out so well, why go through all the trouble of shredding and squeezing out fresh? Whether you are celebrating a high holiday or just enjoying these with your roast beef, they are definitely a keeper and one to try if you have never had the chance! I know you will love them! Now please pass the sour cream and applesauce!
Latkes are a happy part of my childhood. Made every year by my German grandmother, served with lots of homemade apple sauce and dollops of sour cream, these were an annual treat. We usually enjoyed these along side a slow roasted beef brisket and red cabbage. They are easy to throw together but usually, when made the way Nanny made them, you need to stand over a skillet full of hot oil, babysitting these delicious morsels of heaven to a crispy, golden brown. I am making my grandmother's latkes in the waffle iron which was kind of a face palm moment for me. Because why did I not think of this sooner?! From now on the waffle iron is the way to go for me.
To start off we are mixing up a classic latke recipe. Shredded potatoes, beaten eggs, flour, baking powder, onion and salt. Typically you would shred fresh, russet potatoes and then allow them to sit in some water, then rinse and squeeze out then proceed with the mixture. These refrigerated potatoes are a great time save and help you avoid all that extra mess. You can find them in the dairy section near the eggs. I do not recommend using frozen hash brown potatoes here because they are too overly processed and will not give you the desired end result. If you are going to make this using fresh potatoes, please peel, grate on a box grater, (not in a food processor because it produces too much starch) and set in a bowl of cold water for up to 10 minutes, then drain, rinse and place in a clean kitchen towel and squeeze all the moisture out of it.
Now you can simply mix up all the rest of the ingredients with the potatoes and scoop into the waffle iron. I am using a standard waffle iron not a Belgium style which has very deep pockets and will most likely not give you the same result as mine. I brushed the bottom plate of the iron with sunflower oil and then scooped the potato mixture using an ice cream scoop that was approximately 1/4 cup in volume. I gave each a little press to spread them out then brushed a bit more oil on the top of each one. I cooked the latkes for 6 minutes on the "waffle" setting of this iron which is between medium and high. This gave me perfectly golden latkes that were really easy to make. I removed them from the iron and placed them on a sheet pan that I had lined with paper towel and kept in a warm oven until everything was ready.
Who knew latkes could be so easy? Such an excellent use of your waffle iron to go beyond just plain waffles! These latke waffles are a great side to go along with just about anything including breakfast, but my favorite way is just the way Nanny would have made them, with sour cream and applesauce. A trip back to my childhood is always a good thing!
I hope you give these latke waffles a try sometime soon and I hope you love them!
Happy Eating and Happy Holidays!
You can find a printable version of this recipe here: http://bit.ly/38LIRCI
You can find some of the items used in this video on my shopping list on Amazon here: https://amzn.to/2PUAZX5
Get my cookbooks here: http://bit.ly/1czqM5R
Business Inquiries can be sent to:
info@noreenskitchen.com
Check me out on social media!
Facebook: http://on.fb.me/12bdibt
Twitter: @noreenskitchen
Instagram: http://bit.ly/12bdqrp
Google + http://bit.ly/1o5GMYy
***MAILING ADDRESS****
Noreen's Kitchen
PO Box 14173
New Bern, NC 28561
Have a question for me? Send me an email:
info@noreenskitchen.com
Noreen's Kitchen Community Guidelines (The Rules)
http://bit.ly/2i7VocU
Any links to Amazon are, in many cases, affiliate links.
Produced by Noreen's Kitchen ©2008-2016 all rights reserved All embeds must live link to Noreen's Kitchen channel. No Editorial Excerpts without permission, Violators agree to pay royalties, all court costs, all collections & all lawyers fees.
52
views
1
comment
AIR FRYER LONDON BROIL!! FT: SANHOYA AIR FRYER OVEN!! A REALLY RETRO HOLIDAY!!
LEARN MORE ABOUT THE SANHOYA OVEN HERE: https://amzn.to/38nzoRW
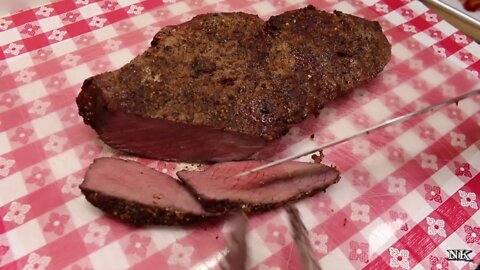
Today we are going to make a London broil in the air fryer! This cut is the perfect family style steak, in my opinion and we love it in our house. My mom always made it but she cooked it under the broiler, all year long. We love it on the grill but have never tried it in the air fryer. Today is the day! Come and see this classic family style steak and how you can rock this for your holiday, retro style!
I love a London broil. The term used to refer to a flank steak, but this is anything but. Flank is a very different cut of meat and is usually used for a different application. The London broil of today is usually a top round cut. One that would normally be reserved for a long slow braise, but when cooked just right, seasoned perfectly and cut on the bias, this steak is delicious and economical. Your family won't be left wanting for steak when you serve this to them. This is also a great option for entertaining because you can get a couple large London broils and cook them up just right and slice thin, and serve with sides and salads or you can serve as a filling to stuff rolls on your open house buffet. The possibilities are endless.
When it comes to a good steak, the simpler the better. Yes you can marinate, you can rub, you can glaze but when it comes to a delicious cut like this I like to go simple. I am using a liberal amount of my homemade Hungarian style steak seasoning to apply on both sides of the London Broil and then allow this to rest while the air fryer heats up. If you don't have an air fryer, you can easily do this on your grill, in your oven or in a skillet. Just be mindful of your application and use your meat thermometer and you will be good to go.
You can see the steak seasoning here: http://bit.ly/2YyQoAj
The Sanhoya air fryer oven is being used today and we thank them for sponsoring today's video and providing the oven for us to use. This oven has a large 17 liter (about 17 quarts) bowl that is made of heavy glass! This means it can hold a lot, you can double decker your food items and you can easily clean it.
As for the finished London Broil, it was AMAZING! I set the timer for 15 minutes at 400 degrees and then tested for doneness with my instant read thermometer. I like it to be between 135 and 140 degrees F. I needed it to go just a little longer so set it for an additional 5 minutes. When I say this was perfectly I mean it was perfect! Seriously medium from one end to the other. And boy was this delicious, juicy and tender. The perfect family style steak for our meal which also included steamed broccoli and homemade latke waffles.
I am so impressed with this machine that I cannot wait to do more things with it. I think burgers will be next and then maybe moving on to a whole roast chicken. There are a number of dishes that I look forward to trying in this oven. If you have been looking into buying an air fryer, I highly recommend that you give this one some serious consideration. For the money, the size and capacity of this particular model are second to none in my opinion.
If you are planning a family meal or even a holiday open house I hope you consider cooking up some London broil! It can be heated and held in some au jus, or even in some of your favorite barbecue sauce or beef gravy. Great as a main or as a way to serve delicious steak sliders to your guests on a build your own slider station. Cut it into smaller squares after you carve your strips and douse it in some teriyaki sauce, serve with toothpicks for a nice alternative to cocktail meatballs.
I hope you give this London broil a try this holiday season for a truly retro offering or anytime you want family style steak that is delicious! I also hope you will check out our sponsor Sanhoya and their amazing air fryer oven. For more information, please use the link provided above!
I hope you try this and I hope you love it!
Happy Eating and Happy Holidays!
Get my cookbooks here: http://bit.ly/1czqM5R
Business Inquiries can be sent to:
info@noreenskitchen.com
Check me out on social media!
Facebook: http://on.fb.me/12bdibt
Twitter: @noreenskitchen
Instagram: http://bit.ly/12bdqrp
***MAILING ADDRESS****
Noreen's Kitchen
PO Box 14173
New Bern, NC 28561
Have a question for me? Send me an email:
info@noreenskitchen.com
Any links to Amazon are, in many cases, affiliate links.
Produced by Noreen's Kitchen ©2008-2019 all rights reserved All embeds must live link to Noreen's Kitchen channel. No Editorial Excerpts without permission, Violators agree to pay royalties, all court costs, all collections & all lawyers fees.
97
views
HERB AND GARLIC COMPOUND BUTTER!! A REALLY RETRO HOLIDAY!!
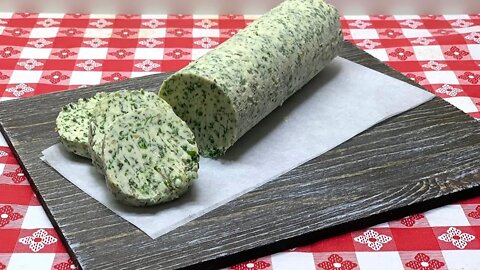
Today I am sharing a total throwback idea. Compound butter is the thing of the steak houses of yore. A delicious disk of flavored butter that melts atop your perfectly grilled steak, chicken, fish or prime rib. It is flavored the way you choose to go with the main dish you choose. Today we are making an herb and garlic compound butter that will be used to go along with a London Broil that will be made in the air fryer oven. You can use this versatile condiment on so many things! I am certain you will enjoy this for many years to come!
Compound butter may sound like a complicated thing but really its just butter that has been softened, then lots of delicious things have been added to it. It is then rolled into a long, set to harden and sliced for service. Typically this is served to top a steak, but it is just as at home on a piece of grilled or poached fish, chicken or even a great way to top a baked potato.
I softened two sticks or half a pound of salted butter. I like to cut mine into cubes so it will soften faster. I added about a 1/2 cup of minced fresh parsley, 1 tablespoon of minced, fresh rosemary and the same of fresh, minced thyme. In went 4 cloves of minced garlic and a heavy pinch of steak seasoning. You can add whatever flavors you prefer. A bit of lemon, lime or orange zest would be great or if you are going more italian, some basil, oregano and marjoram might be just right.
I used my hand mixer to whip this all together to get a nice cohesive blend. Once complete, I scooped up every bit of this buttery goodness and plopped (yes that is a culinary term, don't roll your eyes) it right on top of a large piece of parchment paper.
The rolling part is really the trick to a perfectly formed roll of compound butter. Fold over part of the parchment so it covers the mound of soft butter you just plopped down. Then using something straight, like a ruler or in my case a plastic dough scraper, Hold down the paper that covers the butter then gently, but firmly press against the bottom part of the butter to make it spread into a cylinder. Physics will kick in and this will naturally take the right form. Do this until your roll is about 8 inches long or thereabouts.
Next gently roll the rest of the paper around the cylinder and twist the ends tightly in opposite directions. I then wrapped the whole thing in some plastic wrap and did the same to keep this nice and secure. I placed it on a small tray and put in in the fridge for at least two hours.
Once hardened you can slice this into discs for serving. Compound butter can be made well in advance and you may even consider keeping some on hand for when you are going to grill just about anything. Slice and serve or slice and freeze. This will keep in the freezer for up to six months when properly sealed in an airtight container.
I hope that you will give making compound butter a try, sometime soon and I hope you love it!
Happy Eating!
You can find a printable version of this recipe on my website here:
Get my cookbooks here: http://bit.ly/1czqM5R
Business Inquiries can be sent to:
info@noreenskitchen.com
Check me out on social media!
Facebook: http://on.fb.me/12bdibt
Twitter: @noreenskitchen
Instagram: http://bit.ly/12bdqrp
Google + http://bit.ly/1o5GMYy
***MAILING ADDRESS****
Noreen's Kitchen
PO Box 14173
New Bern, NC 28561
Have a question for me? Send me an email:
info@noreenskitchen.com
Noreen's Kitchen Community Guidelines (The Rules)
http://bit.ly/2i7VocU
Any links to Amazon are, in many cases, affiliate links.
Produced by Noreen's Kitchen ©2008-2016 all rights reserved All embeds must live link to Noreen's Kitchen channel. No Editorial Excerpts without permission, Violators agree to pay royalties, all court costs, all collections & all lawyers fees.
13
views

SUGAR FREE HOT COCOA MIX!! A REALLY RETRO HOLIDAY!!
Today I am sharing a recipe that has been highly requested! As many of you know I am the queen of holiday drink mixes. I have even written two cookbooks that feature several of those easy recipes. The problem for some is that all of those recipes are regular, sugar-full mixes that they could not enjoy. So today I am sharing a sugar free version of everyone's favorite winter mug, hot cocoa mix. This is super easy and really only has five ingredients. I know this will hit the spot mixed up by itself, or used as a base for a quick and easy cafe mocha! What a great way to warm up this holiday season! Make a big batch and share!
This starts with dry milk powder. You can use your favorite version. I prefer the fine ground style that I get in number 10 cans. But you can use the type from the grocery store that may look a little more granulated. If you like it finer, run the whole batch through the food processor or blender to make it more powdery.
To the dry milk powder we are adding some heavy cream powder. THis is going to give you the unctuousness and richness that you love in hot cocoa. It will also give a great texture. This replaces the coffee creamer powder that I use in the original recipe. It also takes up some of the responsibilities of the pudding mix I usually add for richness and smoothness. We are not adding pudding here.
This mix is sugar free, not fat free so keep that in mind. Some organic cocoa powder is added here. I am using only one cup in this version but if you like yours more dark and stormy, add two cups for a higher cacao level. The more cocoa powder, the darker your cup will be.
For sweetness in place of the sugar I am using a stevia blend. A mixture of sucralose and stevia. You can use whatever cup for cup sweetener you prefer. Erythritol or monk fruit are great options here if you like them. We prefer to not use those due to side effects we do not enjoy.
All this is mixed together very well with a dash of salt for balance. I made one small batch and used a whisk to do this but if you are planning to make a larger amount you can easily do this in your mixer with the paddle attachment and set it on low for about five minutes. a dish towel placed around the top of the bowl will help reduce "smoke" from all the powders mixing dispersing into the air.
You can divide the mix into mason jars, disposable icing cones or cello bags tied with pretty ribbon to give out as gifts. Anyone would enjoy this. Even people who do not necessarily require sugar free items. Sometimes it's nice to enjoy a treat knowing it isn't going to hurt too much!
If you want to guild the lily, when building a cocoa cone, add the cocoa to the bottom, enough for at least four cups Top with some sugar free mini marshmallows and some sugar free chocolate chips.
To prepare a mug of this hot cocoa, use a generous 1/4 measure of mix per 8 ounces of boiling water. We use a hot water kettle for best results. It heats up quickly and helps the mix to dissolve. If you have larger mugs like I do, then you will need to use more mix to achieve your preferred taste.
I hope you will give this sugar free hot cocoa mix a try this holiday season and I hope you love it!
Happy Eating and Happy Holidays!
You can find a printable version of this recipe here: http://bit.ly/2sJDO5f
You can find a shopping list featuring some of the items used in this video on my Amazon Influencer page: https://amzn.to/367T0HX
Get my cookbooks here: http://bit.ly/1czqM5R
Business Inquiries can be sent to:
info@noreenskitchen.com
Check me out on social media!
Facebook: http://on.fb.me/12bdibt
Twitter: @noreenskitchen
Instagram: http://bit.ly/12bdqrp
Google + http://bit.ly/1o5GMYy
***MAILING ADDRESS****
Noreen's Kitchen
PO Box 14173
New Bern, NC 28561
Have a question for me? Send me an email:
info@noreenskitchen.com
Noreen's Kitchen Community Guidelines (The Rules)
http://bit.ly/2i7VocU
Any links to Amazon are, in many cases, affiliate links.
Produced by Noreen's Kitchen ©2008-2016 all rights reserved All embeds must live link to Noreen's Kitchen channel. No Editorial Excerpts without permission, Violators agree to pay royalties, all court costs, all collections & all lawyers fees.
22
views

SUGAR FREE RUSSIAN SPICE TEA MIX!! A REALLY RETRO HOLIDAY!!
Keeping with our "really retro" theme, we are revisiting a true holiday throwback! Russian spice tea has been a favorite in many homes during the holiday seasons for many more years than I could probably count. My mom made it, my grandmother made it and it is distinctively retro in its origin. The classic recipe calls for Tang, orange drink mix but I have many subscribers who either cannot have that or choose not to have that we are reworking the recipe into a sugar free version that anyone can enjoy! This is the perfect gift in a jar to share with friends, neighbors and family during this festive time of year!
As I mentioned, the original recipe that my mom made for many, many years contained copious amounts of orange drink mix which is full of sugar as well as sugared lemon iced tea mix, unsweetened iced tea mix and even more sugar along with spices that made this warm and inviting and dare I say, almost irresistible. My brother and I used to enjoy this treat during the holiday season, when mom would allow us to have a cup in the evenings in place of hot cocoa.
Today we have a lot of subscribers who have asked for sugar free versions of many of my hot cocoa and tea mixes so I am working on some of those. Rick and I have taken a low sugar approach to our life in the past year and have tried to use erythritol, but it does not agree with either of us so we opt for stevia. We have gotten used to the slight bitter taste overall. In this drink mix it is hardly noticeable and to me tastes as good as the original.
In place of both the orange drink powder and the lemon tea powder we are using old school, Kool Aid drink mix packets. The kind you would add sugar to yourself. You know, the kind your mom made for you and only added half the sugar? These work perfectly to flavor this tea! I have seen some other recipes that call for sugar free drink mix that is sweetened with aspartame. I personally, prefer to avoid that so opted for this route.
I am using unsweetened iced tea powder. This is readily available in most grocery stores and Lipton and Nestea both offer their versions. Either is fine. In my estimation they are both the same and I have used both at different times over the years. So you can use what you can find.
This is spiced with cinnamon and clove. You can feel free to add or take away what you like, but this is the classic version. I think some allspice or even some cardamon would be a lovely addition here. You can choose to add more if you like, but remember they are strong spices and they do not dissolve. They will leave a silt in the bottom of the cup. Adding too much spice can be unpleasant.
Mix everything up in a big bowl and whisk together for a while to incorporate. You can put the entire batch into a quart jar with a tight fitting lid or divide between smaller vessels or bags for gift giving throughout the holiday season! This would be welcomed when given in a festive mug or even in a disposable pastry bag or cellophane bag tied with a cute ribbon and bow. Include some in a gift basket or care package for loved ones far from home. It is sure to be enjoyed by everyone!
I hope that this sugar free version helps those of you who have requested it. I hope you give this a try and I hope you love it!
Happy Eating and Happy Holidays!
You can find a printable version of this recipe here:
http://bit.ly/2r6BLb1
You can find a list of products used in this video on my Amazon Influencer page here: https://amzn.to/2OGe8PC
Get my cookbooks here: http://bit.ly/1czqM5R
Business Inquiries can be sent to:
info@noreenskitchen.com
Check me out on social media!
Facebook: http://on.fb.me/12bdibt
Twitter: @noreenskitchen
Instagram: http://bit.ly/12bdqrp
Google + http://bit.ly/1o5GMYy
***MAILING ADDRESS****
Noreen's Kitchen
PO Box 14173
New Bern, NC 28561
Have a question for me? Send me an email:
info@noreenskitchen.com
Noreen's Kitchen Community Guidelines (The Rules)
http://bit.ly/2i7VocU
Any links to Amazon are, in many cases, affiliate links.
Produced by Noreen's Kitchen ©2008-2016 all rights reserved All embeds must live link to Noreen's Kitchen channel. No Editorial Excerpts without permission, Violators agree to pay royalties, all court costs, all collections & all lawyers fees.
59
views

CREAMED SPINACH & MUSHROOMS!! A REALLY RETRO HOLIDAY
One last quick side dish before you embark on your holiday dinner journey! This one is a quick and easy option for when you really want something different! Creamed spinach and mushrooms is an elegant side dish with punch. This is super simple to make and gives a nice green option that isn't a green bean casserole (truthfully, not my favorite!) The earthy combination of spinach, mushrooms and cream lends itself to everything from a fine filet mignon to your holiday turkey or standing rib roast. I hope you will consider this for your holiday table!
Nothing could be simpler! Sauteed' mushrooms with minced shallots and garlic, add in spinach and you take your traditional steak house side right over the top. In fact this is the happiest of marriages of two steak house favorites! Sauteed mushrooms and creamed spinach come together for a most amazing mash up that will send your guests to heaven and wonder how they ever lived without it! All kidding aside, this is just good and simple. Two of my favorite things.
This dish takes all of ten to fifteen minutes to throw together and even if its an afterthought, you can easily make this with provisions you most likely set in for the big day. Spinach is a great option to traditional green beans, peas or broccoli and adds a nice twist for people when they want something a little unusual. Don't think this only belongs next to a nice cut of meat. THis side dish is just as at home next to your favorite poultry and people, including yourself are going to love it.
After the mushrooms are sauteed perfectly add in as much spinach as your skillet will hold. Pop on the lid and let it go for a few minutes, go back with some tongs and squidge it up a bit and see how quick it cooked down! Keep on adding more spinach till you reach your desired amount then add in the cream in a couple of additions. If it doesn't thicken the way you like, add in a couple tablespoons of Wondra flour. A staple that should be in every pantry. This will give you the thickness desired to move forward to the finish. When your spinach reaches the perfect creaminess, dust with a bit of freshly grated nutmeg and stir. Now you are ready to go.
I hope you give this delicious side dish option a try for your holiday meal or anytime and I hope you love it!
Happy Eating and Happy Holidays!
Get a printable version of this recipe here: http://bit.ly/2rmBuka
Get my cookbooks here: http://bit.ly/1czqM5R
Business Inquiries can be sent to:
info@noreenskitchen.com
Check me out on social media!
Facebook: http://on.fb.me/12bdibt
Twitter: @noreenskitchen
Instagram: http://bit.ly/12bdqrp
Google + http://bit.ly/1o5GMYy
***MAILING ADDRESS****
Noreen's Kitchen
PO Box 14173
New Bern, NC 28561
Have a question for me? Send me an email:
info@noreenskitchen.com
Noreen's Kitchen Community Guidelines (The Rules)
http://bit.ly/2i7VocU
Any links to Amazon are, in many cases, affiliate links.
Produced by Noreen's Kitchen ©2008-2016 all rights reserved All embeds must live link to Noreen's Kitchen channel. No Editorial Excerpts without permission, Violators agree to pay royalties, all court costs, all collections & all lawyers fees.
29
views
4 INGREDIENT SCALLOPED CORN! A REALLY RETRO HOLIDAY
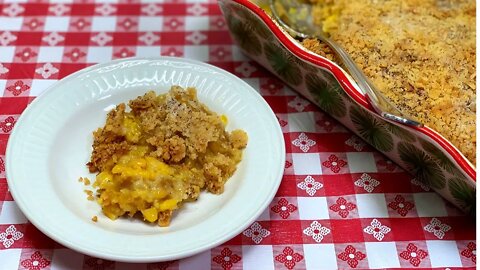
Today we are taking a card from Rick's mother's recipe box with this retro classic, scalloped corn. True to their Indiana roots, this easy, 4 ingredient casserole is a timeless, midwestern classic. I consulted my mother in law, Judy for instructions on how to make this and while the instructions were somewhat vague, I winged it and came out the other side winning. Rick says this is exactly as he remembered. SCORE! This is super easy and you can adjust it to feed two or two hundred. Just adjust your ingredients and you should be good to go! This is sweet, savory and full of corn flavor with a crunchy, buttery topping that I know you will love!
This all starts with two cans of creamed corn. Pour one into the bottom of a buttered baking dish. I used a small one. An 8 inch cake pan should do, or even a pie dish would be fine too! Cover the corn with a layer of cracker crumbs. I am using saltine crackers. Next time I am going to use a buttery cracker like a Club or a Ritz cracker. Next I drizzled over half a stick of melted butter and sprinkled 2 tablespoons of granulated sugar over that.
Next layer we repeat the first layer (makes me want to sing "second verse same as the first".) I sprinkled a thicker layer of cracker crumbs on the top so that we would have a nice crunchy layer. Drizzled with the rest of the butter and sprinkled with a bit more sugar. I also added salt and pepper into each layer, but the salt was not necessary. Next time I will leave it out. The crackers are salty enough. Honestly, you could leave out the sugar as well, considering that the creamed corn has sugar in it. Your choice.
Bake this in a 350 degree oven for 45 minutes. I checked mine at 30 minutes and found the top was not buttery enough so I placed 2 more tablespoons of butter on it and put it back in the oven for an additional 15 minutes. This came out perfectly! Sweet, savory and surprisingly not runny because I was honestly suspect that without the addition of eggs this would be a runny mess. But it wasn't and everyone enjoyed it a lot!
I hope that you will give this scalloped corn casserole a'la the Lambert family a try and I hope you love it!
Happy Eating and Happy Holidays!
You can find a printable version of this recipe here: http://bit.ly/2QSkMUg
Get my cookbooks here: http://bit.ly/1czqM5R
Business Inquiries can be sent to:
info@noreenskitchen.com
Check me out on social media!
Facebook: http://on.fb.me/12bdibt
Twitter: @noreenskitchen
Instagram: http://bit.ly/12bdqrp
Google + http://bit.ly/1o5GMYy
***MAILING ADDRESS****
Noreen's Kitchen
PO Box 14173
New Bern, NC 28561
Have a question for me? Send me an email:
info@noreenskitchen.com
Noreen's Kitchen Community Guidelines (The Rules)
http://bit.ly/2i7VocU
Any links to Amazon are, in many cases, affiliate links.
Produced by Noreen's Kitchen ©2008-2016 all rights reserved All embeds must live link to Noreen's Kitchen channel. No Editorial Excerpts without permission, Violators agree to pay royalties, all court costs, all collections & all lawyers fees.
68
views
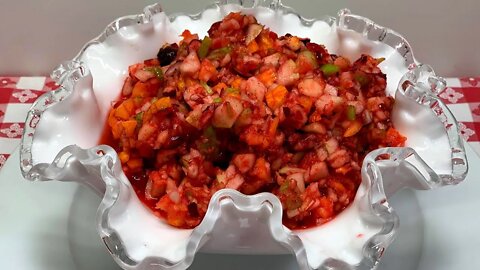
FRESH CRANBERRY RELISH!! A REALLY RETRO HOLIDAY
Today I am sharing my Nanny's old school fresh cranberry relish! Perfect for your holiday table. All the fruits and flavors of the season mixed up in one bite. This will be a lovely accompaniment to your holiday turkey or ham or a nice winter fruit salad for any time you like. This incorporates all the fruits of the season. A true bite of Autumn! I remember my grandmother making this using her meat grinder clamped onto her kitchen table. Today I am employing my food process to get the job done. No matter how you make it I know you will love this true holiday throwback!
I am using one 12 ounce bag of fresh cranberries. It is important to use them while they are fresh and not frozen, thawed out cranberries. This recipe will only work with fresh. Once they are frozen they become soft and slumped. They will not grind once thawed but become mush. Please keep that in mind.
I have used two medium sized Honeycrisp apples, 2 medium sized Bartlett pears and 2 medium sized navel oranges along with 4 ribs of celery which is optional but Nanny always used it so I am too. If you don't like celery you can leave it out. Celery adds a nice crunch that remains crunchy when the rest of the relish has become juicy and softer.
Cut the fruits and celery in chunks that can be placed in the food processor. I did each one separately and added them to the bowl once finished. I processed each one by pulsing for 10 to 14 times until they were like a fine grind. Much like it would be if run through a grinder.
Add all the processed ingredients to a large bowl and stir well to incorporate thoroughly. Next add in the sugar and gelatin powder. Again stirring very well to incorporate. The gelatine will help give this relish some body and take up some of the liquid that will be produced as the fruits sit after being processed.
This relish should be stored in an airtight container in the refrigerator for at least 24 hours prior to serving. This can be made up to three days in advance and then should be eaten within one week. This should not be frozen and is best eaten fresh within a day after making.
I hope you give this fresh cranberry relish a try. I hope it brings back happy memories for you that you can share with your family. I hope when you try it that you love it!
Happy Eating and Happy Holidays!
You can get a printable version of this recipe here: http://bit.ly/2qMAi9z
Get my cookbooks here: http://bit.ly/1czqM5R
Business Inquiries can be sent to:
info@noreenskitchen.com
Check me out on social media!
Facebook: http://on.fb.me/12bdibt
Twitter: @noreenskitchen
Instagram: http://bit.ly/12bdqrp
Google + http://bit.ly/1o5GMYy
***MAILING ADDRESS****
Noreen's Kitchen
PO Box 14173
New Bern, NC 28561
Have a question for me? Send me an email:
info@noreenskitchen.com
Noreen's Kitchen Community Guidelines (The Rules)
http://bit.ly/2i7VocU
Any links to Amazon are, in many cases, affiliate links.
Produced by Noreen's Kitchen ©2008-2016 all rights reserved All embeds must live link to Noreen's Kitchen channel. No Editorial Excerpts without permission, Violators agree to pay royalties, all court costs, all collections & all lawyers fees.
16
views

HOT ARTICHOKE SPINACH DIP!! A REALLY RETRO HOLIDAY!!
Thanksgiving is only about 10 days away! Time to get that menu all squared away and figure out what family favorites you plan to make. This really retro hot artichoke spinach dip is one of our family favorites and is perfect for an appetizer offering during the game or with some wine while everyone is convening in the kitchen getting the big meal ready! Creamy, cheesy and full of deliciousness, this dip is a sure fire favorite for the holidays or anytime!
This is truly a classic! A throwback to the 1950s when people were starting to eat in front of that new fangled favorite, the television. Thank you Philo Farnsworth! Food manufacturers such as Hellman's Lipton and Birdseye collaborated on this fabulous dip to promote their products and wove themselves into American food culture. We don't think of those brands, necessarily when we make this dip, but they started it all. Some may think that hot artichoke and spinach dip is a new idea, brought on by chains the likes of TGIFriday's or Chilis, but in truth it has a pretty similar beginning to many of the favorites on our holiday table and it all started with a brand and a desire to be appealing to the consumer. That would be your food history lesson for the day.
This dip, like many dips starts off with the usual suspects. Cream cheese, mayonnaise and cheese. In this case both Mozzarella and an Italian blend that includes Parmesan, Romano, Asiago, Fontina, Mozzarella, Provolone and Pecorino. You can use regular mozzarella and parmesan if you want. This Italian blend has ultra creaminess when melted and adds lots of flavor to the dip.
I love to add mushrooms to my dip and if you are a long time viewer, this will not come as a surprise to you. I sauteed 8 ounces of sliced Crimini mushrooms in a bit of butter then added some garlic to sautee. You can also add half of a sweet onion that has been diced to this as well if desired. On this day I was taking it to a baby shower so left the onion out.
When the veggies are nice and soft, time to add the rest of the veggies! In goes a couple of cans of whole artichoke hearts that have been roughly chopped along with a 10 ounce bag of frozen, chopped spinach. I did not thaw or squeeze out the spinach and find that this is not entirely necessary. If you want to go the extra step, please do so, but I do not find it adds an over abundance of moisture.
Time to add the softened cream cheese and mayonnaise. Stir constantly until melty and creamy and perfectly incorporated. Then you can add in the measured amounts of shredded Italian blend cheese and Parmesan. Stir well and then you can bring the mixture to a bit of a slow bubble. This just ensures that you know the whole mixture is heated through. Top with more Parmesan and shredded Italian blend and boom, done!
I love to serve this with sliced baguette and a lot of people enjoy serving with tortilla chips like in the restaurant. You can serve this with either of those, an assortment of crudite' such as celery, carrots and sweet red pepper strips, even sliced, raw zucchini is nice. Butter crackers are also a nice offering here.
The trick is to keep this warm. Lots of people like to serve this in a bread bowl, but it is problematic to keeping things warm and creamy. Keep this in an electric skillet or slow cooker set to warm if you are going to be taking this for a party. That is the best way to ensure fresh goodness!
This would make an excellent offering for your holiday open house, or Christmas cocktail party. A great offering to share for your holiday potluck or as mentioned above, a pre Thanksgiving appetizer. No matter how you share it, please give this dip a go!
I hope you give this throwback, hot artichoke and spinach dip a try sometime soon and I hope you love it!
Happy Eating and Happy Holidays!
You can find a printable version of this recipe here: http://bit.ly/2XpUSsg
Get my cookbooks here: http://bit.ly/1czqM5R
Business Inquiries can be sent to:
info@noreenskitchen.com
Check me out on social media!
Facebook: http://on.fb.me/12bdibt
Twitter: @noreenskitchen
Instagram: http://bit.ly/12bdqrp
Google + http://bit.ly/1o5GMYy
***MAILING ADDRESS****
Noreen's Kitchen
PO Box 14173
New Bern, NC 28561
Have a question for me? Send me an email:
info@noreenskitchen.com
Noreen's Kitchen Community Guidelines (The Rules)
http://bit.ly/2i7VocU
Any links to Amazon are, in many cases, affiliate links.
Produced by Noreen's Kitchen ©2008-2016 all rights reserved All embeds must live link to Noreen's Kitchen channel. No Editorial Excerpts without permission, Violators agree to pay royalties, all court costs, all collections & all lawyers fees.
37
views

EASY THANKSGIVING SIDE DISHES IN THE SANHOYA AIR FRYER CONVECTION OVEN!!
See the Sanhoya Steam/Convection/Air Fryer Oven here: https://amzn.to/2X7xgsk
Today we are going to be roasting off some crispy green beans and some classic sweet potatoes in the new Sanhoya Steam/Convection/Air Fryer oven. Thanks to them for sponsoring today's video and providing the oven for us to use in our video! These are two simple side dishes that you can easily make to go along with that amazing turkey roll we shared in a previous video! It’s a great way to throw together a smaller celebration, if you are only having a few people and don't want to roast a whole bird. we are also roasting off some sweet potatoes and some green beans to round out our meal. I will be sharing how to use the oven as well as an over view in our video today! Thanks again to our generous sponsor for providing the oven as well as partnering with us for today’s video! I say anything that can make cooking the holiday meal easier is a good, good thing!
This Sanyhoa oven is a really awesome alternative to a traditional air fryer and has a ton of room! This thing is nearly 2 gallons in area and can hold up to a 12-pound turkey if you wanted to roast it whole. The bowl is Arcopal glass and comes with a perforated pan for baking pizza, either frozen or homemade, as well as a great rack that you can use to cook multiple items at once. You can even bake two pies in this at one time! It’s a great space saver and a way to make use of your time when cooking a large holiday meal. This is that extra oven you dreamed of having without the expense!
The abilities of this oven are vast. Think beyond turkey, chicken, or beef and pork roasts! You can bake pizzas, breads, pies, cakes and other delectable treats with ease. The convection style oven is a great way to have fried flavor without the fat and you can crank out a bunch of wings in no time with awesome flavor but without deep frying. This oven has multiple functions and is easy to program. You can set the time; temperature and it has the ability to inject steam to keep things moist! A real plus if you are a baker of artisan bread. You can recreate the steam injected oven at home to simulate that great crunchy artisan bread from your favorite bakery!
If you think that this Sanhoya oven is a good fit for your home and life, please use the link above to learn more and get your own to help you through the holidays. This would also make an excellent holiday gift for the foodie on your list!
In the end, this oven was impressive to me. It roasted this turkey roll to perfection, and it was succulent on the inside and browned to perfection on the outside. The beans were delicious and roasted to crispy perfection and the sweet potato was crunchy on the outside and soft and tasty on the inside. Overall the whole meal took less than 3 hours to complete and the beans and potatoes cooked while the turkey roll rested prior to slicing. This was a great way to save time and consolidate the cooking.
I hope you will give these two sides some consideration for your holiday table and I hope you love it! I also hope you will check out the Sanhoya Steam/Convection/Air Fryer Oven if it is something you think will fit into your kitchen and your life!
Happy Eating and Happy Holidays!
FTC DISCLAIMER: Today we have partnered with Sanhoya to bring you this video demonstration of their air fryer/convection oven. They have generously provided the oven as well as compensated our channel for the opportunity to do so. We appreciate their confidence in us as well as our audience and we thank them for the opportunity to work with them today. We thank you, the viewer for your generosity of spirit in watching these videos when we are able to present them. They help us make the channel better and help to provide even more opportunity in the future for us and for you!
Get my cookbooks here: http://bit.ly/1czqM5R
Business Inquiries can be sent to:
info@noreenskitchen.com
Check me out on social media!
Facebook: http://on.fb.me/12bdibt
Twitter: @noreenskitchen
Instagram: http://bit.ly/12bdqrp
Google + http://bit.ly/1o5GMYy
***MAILING ADDRESS****
Noreen's Kitchen
PO Box 14173
New Bern, NC 28561
Have a question for me? Send me an email:
info@noreenskitchen.com
Noreen's Kitchen Community Guidelines (The Rules)
http://bit.ly/2i7VocU
Any links to Amazon are, in many cases, affiliate links.
Produced by Noreen's Kitchen ©2008-2016 all rights reserved All embeds must live link to Noreen's Kitchen channel. No Editorial Excerpts without permission, Violators agree to pay royalties, all court costs, all collections & all lawyers fees.
64
views
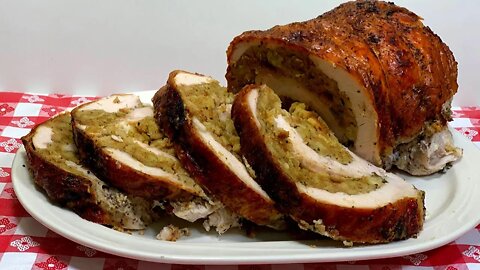
STUFFED TURKEY ROLL! A REALLY RETRO HOLIDAY!
Today we are going really retro and making a delicious stuffed turkey roll just in time for Thanksgiving! This is a great option for a smaller celebration, if you are only having a few people and don't want to roast a whole bird. This turkey roll is very easy. It starts out with a deboned turkey breast that is laid out and pounded evenly. Then stuffed with your favorite stuffing and rolled to perfection. Definitely a classic throw back to days gone by and a great memory I have of something my own mother enjoyed making for dinner parties when I was younger. I am so happy to be sharing it with you today to consider for your own holiday table!
This all starts with a deboned turkey breast. You can do this yourself or you can have your butcher do it for you. A good sharp boning knife is your best friend when removing the turkey breast from the bone. Just cut along the bone and it will come right off. Try to keep the two lobes together if possible, and then detach the tenders. Place them all on a baking sheet lined with parchment and then a generous amount of plastic wrap. This is the key! Arrange the pieces and then place another sheet of plastic wrap on top. Using a meat mallet pound the meat evenly. Don’t pound it so hard it tears the meat, just enough that it evens everything out nicely. Now you can move on to seasoning, stuffing and rolling!
I sprinkled a combination of my all-purpose chicken seasoning and my poultry seasoning blend over the prepared meat before adding the prepared stuffing. I used approximately 4 cups of my favorite basic turkey stuffing to roll up inside this roast. Lay stuffing evenly across the entire span of turkey except for about 2 inches on one of the short ends where you will end up rolling it into itself. When the stuffing is ready you can begin to roll. Using the plastic wrap to help you, roll from the short end, slowly and patiently. When you reach the end, be sure to flip it over on itself. The roll may look like a mess, and that will happen because you have pieced together a few different cuts of meat. Tighten up the roll as best as you can, place the skin over the roll and tuck it under. You want to cover as much as you can with the skin. IF you do not have the skin or did not use the whole breast, go ahead and wrap the roll with some bacon. This will help keep the turkey nice and moist while baking. Tie with kitchen twine in several segments across the length of the roll. Season the outside with the remaining spices and you are ready to prep for baking! I placed some poultry herbs, i.e., rosemary, sage and thyme in the bottom of a small round baking pan. I also added some fresh sliced apple. I used a pan that was purposely small to help the roll maintain it’s shape while baking. Place the turkey roll on top of the herbs and apples in the pan. Roast at 350 degrees for an hour and 20 to an hour and 45 minutes or until the internal temperature when taken with a meat thermometer reads between 160 and 165 degrees. When that occurs, remove from the oven and tent with aluminum foil and allow this roll to rest for at least 30 minutes but an hour is even better, before slicing and serving.
While the turkey roll is resting, you can make your side dishes. We chose to have crispy roasted green beans as well as baked sweet potatoes with ours. I also made some gravy with turkey stock from a box. This was delicious and I hope it is something you consider making for your holiday table!
I hope you will give this stuffed turkey roll a try sometime soon and I hope you love it
Happy Eating and Happy Holidays!
You can find a printable version of this recipe here:
Get my cookbooks here: http://bit.ly/1czqM5R
Business Inquiries can be sent to:
info@noreenskitchen.com
Check me out on social media!
Facebook: http://on.fb.me/12bdibt
Twitter: @noreenskitchen
Instagram: http://bit.ly/12bdqrp
Google + http://bit.ly/1o5GMYy
***MAILING ADDRESS****
Noreen's Kitchen
PO Box 14173
New Bern, NC 28561
Have a question for me? Send me an email:
info@noreenskitchen.com
Noreen's Kitchen Community Guidelines (The Rules)
http://bit.ly/2i7VocU
Any links to Amazon are, in many cases, affiliate links.
Produced by Noreen's Kitchen ©2008-2016 all rights reserved All embeds must live link to Noreen's Kitchen channel. No Editorial Excerpts without permission, Violators agree to pay royalties, all court costs, all collections & all lawyers fees.
34
views

FESTIVE COLD CRAB DIP! A REALLY RETRO HOLIDAY!
As promised in the last video today I am sharing this delicious, simple, cold crab dip that is perfect for any time, but especially nice during the holidays! This is simple to whip up even on a moments notice and really requires not hold time before enjoying. If friends drop by you can mix this up and share right away! This has been a family favorite for a long time in my family. Brought to us by a friend over 20 years ago. This crab dip stands the test of time and I know you will love it!
When I say this is an oldie but a goodie, I am not kidding! This crab dip hearkens back to a time of cocktail parties and vodka gimlets. When people had bridge nights and ladies wore dresses and gloves to play cards at their friends house. A far cry from our casual lives now where we "Netflix and chill" and order food on our phone apps. While all that is lovely, taking a page from the old school and enjoying a retro recipe is always a welcomed treat!
I got this recipe from a friend over 20 years ago. Her name was Rose Phelan at the time. She was a young mom with five small boys who had a love for crafts that drove her to open a shop to sell her creations. One Christmas she invited us to her home for a holiday get together and served this amazing dip. The rest, as they say, is history. I love knowing where a recipe came from. The reality is, this was probably printed in a women's magazine in the 50s using ingredients that would be easily accessible during that time. Canned crab, cream cheese and even prepared, bottle cocktail sauce. A respite for the harried housewife to make an easy offering for last minute guests. That paints a real picture. One of where we have been and where we have come.
All that aside, make this dip! Which is really more of a spread than a dip and should be served with a spreader for ease of the person enjoying it. This all starts out with a couple bricks of softened cream cheese beaten till light and fluffy. Then you are going to add a good amount of crab meat. I am using fresh, lump crab meat but you can use a couple cans of canned crab, drained and flaked or even an equal amount of imitation crab meat that has been flaked or chopped into small pieces. You decide what to use based on your availability in your area. Living on the coast affords me the ability to get fresh, atlantic blue crab that is pulled from the ocean and picked the same day. You may not have that luxury where you live. No matter what you choose is still going to be delicious. When I first tasted this dip it was made with canned crab because there isn't fresh seafood in Arizona!
Once the cream cheese is whipped, add in the crab, lemon juice, green onions and seasonings, then continue to whip to combine. Spread into a pie plate (my serving dish of choice because of it's depth) and top with one recipe of my homemade cocktail sauce. Add some more lump crab meat and green onions to the top and bam! You are ready to enjoy a wonderful appetizer or snack with family and friends.
This retro recipe is one that should not be forgotten. It should be enjoyed and passed down. As all favorite recipes should. It's what keeps alive those who have gone before and stokes the memories of holidays and gatherings past. Making and sharing a family favorite with others is just spreading the love of what you remember in your life. It helps to enrich our lives. It helps to keep memories of loved ones alive and it is just fun to eat good food.
I hope that you give this cold crab dip a try for the holidays or anytime, sometime soon and I hope you love it!
Happy Eating and Happy Holidays!
You can find a printable version of this recipe here: http://bit.ly/2O0cVkt
Get my cookbooks here: http://bit.ly/1czqM5R
Business Inquiries can be sent to:
info@noreenskitchen.com
Check me out on social media!
Facebook: http://on.fb.me/12bdibt
Twitter: @noreenskitchen
Instagram: http://bit.ly/12bdqrp
Google + http://bit.ly/1o5GMYy
***MAILING ADDRESS****
Noreen's Kitchen
PO Box 14173
New Bern, NC 28561
Have a question for me? Send me an email:
info@noreenskitchen.com
Noreen's Kitchen Community Guidelines (The Rules)
http://bit.ly/2i7VocU
Any links to Amazon are, in many cases, affiliate links.
Produced by Noreen's Kitchen ©2008-2016 all rights reserved All embeds must live link to Noreen's Kitchen channel. No Editorial Excerpts without permission, Violators agree to pay royalties, all court costs, all collections & all lawyers fees.
26
views

OLD SCHOOL COCKTAIL SAUCE RECIPE! | A REALLY RETRO HOLIDAY!
The holidays have begun in my world. Today is the launch of our holiday videos. Rather than separate Thanksgiving and Christmas, we have decided to simply go full throttle and do it up right. I hope you enjoy the fabulous retro recipes we plan to share this holiday season. Many of them will be from my late mother's own recipe box as a tribute to her favorite time of year.
Today we are making my favorite cocktail sauce. It is everything you want it to be. A bit sweet, a bit tangy and with just the right amount of spice and savory flavor. This is very reminiscent of a old time favorite cocktail sauce from the famous Bookbinders restaurant in Philadelphia. We love it and we enjoy it throughout the year, but especially during the holiday season when we entertain and share with friends. Perfect for a shrimp platter or cocktail or to serve with other seafood or in my case atop a delicious cold crab dip that will be coming soon to the channel!
I love this cocktail sauce recipe! It is one that my mom made growing up. It is perfect in it's simplicity and just the perfect addition to a shrimp cocktail or peel and eat shrimp platter for any holiday buffet or open house celebration. Make a big jar at the beginning of the season and you will be set for all the things that you want to enjoy it with!
This all starts out with a good quality ketchup. We use Heinz organic but you should use what you like. We also use Heinz chili sauce. This gives the cocktail sauce a lot of body and extra flavor. While you can make this sauce with all ketchup, I hope you will give the chili sauce a try because it adds so much to this! Then the usual suspects come by to play. Lemon juice, tabasco sauce, horseradish and Worcestershire. You can adjust the heat level to your preference but I do not recommend leaving out any of these ingredients because they are all integral to the end product. There will just be something missing if you leave it out.
This is, hands down the best cocktail sauce you can make. It is so much better than buying premade and it has such a fresh taste. You probably have everything you need to make this and even if you don't have fresh lemons and choose to use bottled lemon juice, no judgement here. I have done it and it tastes great!
I hope you will give this cocktail sauce recipe a try for the holidays and beyond and I hope you love it!
Happy Eating!
A printable version of this recipe is available here: http://bit.ly/32wjznT
Get my cookbooks here: http://bit.ly/1czqM5R
Business Inquiries can be sent to:
info@noreenskitchen.com
Check me out on social media!
Facebook: http://on.fb.me/12bdibt
Twitter: @noreenskitchen
Instagram: http://bit.ly/12bdqrp
Google + http://bit.ly/1o5GMYy
***MAILING ADDRESS****
Noreen's Kitchen
PO Box 14173
New Bern, NC 28561
Have a question for me? Send me an email:
info@noreenskitchen.com
Noreen's Kitchen Community Guidelines (The Rules)
http://bit.ly/2i7VocU
Any links to Amazon are, in many cases, affiliate links.
Produced by Noreen's Kitchen ©2008-2016 all rights reserved All embeds must live link to Noreen's Kitchen channel. No Editorial Excerpts without permission, Violators agree to pay royalties, all court costs, all collections & all lawyers fees.
14
views
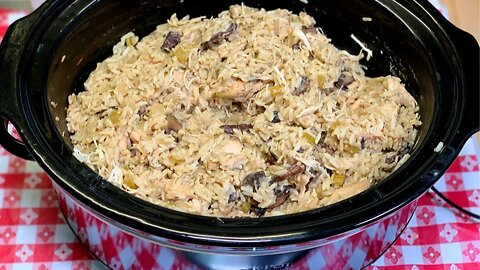
SLOW COOKER CHICKEN & RICE | DUMP AND GO CROCK POT MEAL
Going into the cooler weather, nothing says comfort more than a delicious, slow cooked dish. This slow cooker chicken and rice fits the bill perfectly! A great way to warm up and fill up your family in the coming fall and winter months that is economical, flavorful and delicious! This one falls into that favorite "dump and go" category with a bit of a twist. I know you and your family are going to love this meal idea!
Chicken and rice is an institution in the south. Not something that I grew up eating but boy I wish I had. Its never too late to add this to your repertoire and I highly suggest that you consider it! This is certainly one of the simplest of dishes that you can easily toss together without a second thought. It will make your house smell amazing and when your family comes home at the end of a hard day at work or school they are going to be happy that you made it.
It all starts with some chicken. I am using chicken tenders, but you can use a whole chicken that has been removed from the bone or boneless, skinless chicken thighs cut into chunks. That would also make and excellent choice if you didn't want to use the tenders.
The sauce is easy and starts with some chicken stock. I am using chicken bone broth for its deep and intense flavor, but you can use what you like. Broth, stock, bone broth or even, in a pinch bullion mixed with water works great too! I love to add some cream of chicken and herbs soup. Campbell's got this one right and it adds just the right amount of herbaceous goodness to this dish. I always say I don't use cream soups very often and as a rule I don't but in the cooler months it seems that our favorite recipes require them. So as the saying goes, "if it ain't broke, don't fix it".
Poultry Seasoning Video: http://bit.ly/34DaxXv
Super Savory Salt Video: http://bit.ly/2rh43xP
Hungarian Chicken Rub Video: http://bit.ly/2pPgfqF
The liquids are mixed well and the spices are added to them. Then the "dump and go" part happens. Toss in fresh mushrooms, chopped onion, diced celery and some minced garlic then pour over the liquid mixture and give everything a nice little nudge with your tongs. Now you are ready to cook for 4 to 5 hours or high or 6 to 8 hours on low.
I know what you are saying! "Wait! You didn't toss in the rice!" You would be right! Some recipes call for the rice to be slow cooked all day but I do not find that appealing in the finished product, so I cook the chicken until it is soft enough to break apart with the tongs then add the rice into the vessel and stir. This will cook for an additional 45 minutes to an hour until the rice of your choice has cooked completely. Then it is time to eat!
I have used par cooked rice in my recipe. This takes less water and time to fully cook. If you prefer to use long grain rice or even instant rice, you will need to adjust to accomodate the nature of those rices so they will cook properly in your version of the dish. I prefer to use either long grain or par cooked. Instant can become very starchy and begin to break down. If you wanted to use brown rice it will need lots more water and lots more cooking time. The choice is yours and you should use the rice that is best for you.
This is great paired with steamed veggies and some cranberry sauce for a wonderful meal. Depending on how many you are serving you will have leftovers for lunches and or another meal. I froze my leftovers for later use and kept two portions out for lunches.
If you wish to freeze this place in an airtight container and freeze for up to three months. When ready to eat remove from freezer and thaw on the counter then reheat in a skillet with a bit of chicken stock or water to prevent scorching.
I hope you give this slow cooker chicken and rice a try sometime soon and I hope you love it!
Happy Eating!
You can get a printable version of this recipe on my website here: http://bit.ly/2rmoLxR
Get my cookbooks here: http://bit.ly/1czqM5R
Business Inquiries can be sent to:
info@noreenskitchen.com
Check me out on social media!
Facebook: http://on.fb.me/12bdibt
Twitter: @noreenskitchen
Instagram: http://bit.ly/12bdqrp
Google + http://bit.ly/1o5GMYy
***MAILING ADDRESS****
Noreen's Kitchen
PO Box 14173
New Bern, NC 28561
Have a question for me? Send me an email:
info@noreenskitchen.com
Noreen's Kitchen Community Guidelines (The Rules)
http://bit.ly/2i7VocU
Any links to Amazon are, in many cases, affiliate links.
Produced by Noreen's Kitchen ©2008-2016 all rights reserved All embeds must live link to Noreen's Kitchen channel. No Editorial Excerpts without permission, Violators agree to pay royalties, all court costs, all collections & all lawyers fees.
39
views

QUICK PICKLED RED ONIONS FOR TACOS AND MORE!! EASY REFRIGERATOR PICKLED ONIONS
Today I am sharing how I made the delicious, tender crisp, tangy, pickled red onions we used on our pork carnitas tacos in a recent video. These are a quick pickle that is super simple to throw together but can make all the difference when creating homemade "street tacos" from home. These onions are seriously amazing and they are great on more than just tacos! Use these on sandwiches, in salads, in deviled eggs or anywhere you want a little oniony zip! Add chiles or leave them out but make these! I promise you will love them!
Quick pickles are simply the best way to use up produce and give a little acidic note to just about anything. Cuisines the world over rely on a little pop of acid to clear the palate and help to level out flavors of foods that can coat the tongue. Much like carnitas, which can be a bit on the heavy side. These pickled red onions are the perfect way to add that pop to your taco.
I started with one large red onion and sliced it thin on a mandoline. You want these to have a bit of body but you don't want them really thick but you also don't want them too thin because they will just disappear once they hit the brine. I stuffed my sliced onion in a jar that I knew would best fit all the ingredients along with one very thinly sliced serrano chile. I did not remove the seeds or ribs from the chile I wanted the heat. You can leave out the peppers if that is not your jam. The onions provide enough heat on their own. You make the choice. As someone I once heard say, "The world is your pickle".
The brine is very simple but packs a punch. Water, fresh lime juice (but bottled works too) and apple cider vinegar. Some salt and honey or other liquid sweetener for good rounded flavor make this the perfect flavor when blended together. If you don't like honey you can use agave nectar, maple syrup or other liquid sweetener that you prefer. I put everything in the jar and gave it a push with the spatula then popped the lid on and gave it all a good shake for a couple of minutes. That's it! Your simple, quick pickled red onions are ready to rest.
Now you can wait as little as 15 minutes or up to a few days. I recommend using these the day you plan to eat them and they are good for at least three to five days after that. Make sure you submerge the onions that remain in the brine so they don't dry out. Just tuck these into your fridge and enjoy whenever the spirit moves you.
That is how simple it is to make a quick and tasty condiment to go along with your tacos. These really are amazing and add just the right extra touch when serving favorites from south of the border and beyond! These onions are great tucked into a noodle bowl or some ramen to add just the right note of tangy acidity and spice. Give them a try!
I hope you make some of these pickled red onions some time soon and I hope that you love them!
Happy Eating!
Get my cookbooks here: http://bit.ly/1czqM5R
Business Inquiries can be sent to:
info@noreenskitchen.com
Check me out on social media!
Facebook: http://on.fb.me/12bdibt
Twitter: @noreenskitchen
Instagram: http://bit.ly/12bdqrp
Google + http://bit.ly/1o5GMYy
***MAILING ADDRESS****
Noreen's Kitchen
PO Box 14173
New Bern, NC 28561
Have a question for me? Send me an email:
info@noreenskitchen.com
Noreen's Kitchen Community Guidelines (The Rules)
http://bit.ly/2i7VocU
Any links to Amazon are, in many cases, affiliate links.
Produced by Noreen's Kitchen ©2008-2016 all rights reserved All embeds must live link to Noreen's Kitchen channel. No Editorial Excerpts without permission, Violators agree to pay royalties, all court costs, all collections & all lawyers fees.
109
views

SLOW COOKER PORK CARNITAS!! DUMP AND GO CROCK POT MEAL IDEA!!
Today we are going to use some of that Carnitas seasoning blend to make a delicious slow cooked carnitas for tacos or whatever you like. This is super easy to do but as a dump and go recipe goes this is a little more entailed but so worth it in the end! Slow cooked pork shoulder with delicious spices until it falls apart and then gets crispy fried in a skillet then stuffed into a flavorful street taco with all the fixings. What could be better than that? Perfect for anytime you want to make tacos or burritos. Perfect for parties, tailgates or taco Tuesday! I know that you are going to love this!
Carnitas is a very traditional dish and while mine may be a bit untraditional, it is still delicious. Anyone who would like to tell me that I am doing it all wrong, can simply save it for someone who cares. Just because I don't do it your way just means I do it different. Kind of like math. If we reach the same end, what difference does it make how we got here? So I will leave at that.
This all starts off with a portion of boneless pork shoulder. I purchased a bone in shoulder and cut it into 2 inch chunks. You can also find boneless pork shoulder and use that or even better is boneless country pork ribs. Those are cut from the shoulder and they suffice here very well. You want to have a cut that is very fatty. The fat is very important here as the cooking process requires it. You cannot do this with a pork loin or a leaner cut of pork. It just won't work. If you are afraid of pork fat, this recipe may not be for you. Traditional carnitas are actually cooked in rendered lard. What we are doing here is using the rendered fat from the meat to cook the pork in. Kind of like duck Confit. Confit is a process where a meat is cooked, low and slow in it's own fat and is a very old way of preserving meat for the winter. Just go with it. You will thank me later.
Carnitas Seasoning video: http://bit.ly/2MUaZLi
I am going to douse the meat with a good portion of the seasoning blend and mix it up in the crock. Then I added a copious amount of garlic and a sliced onion as well as an orange that I quartered and squeezed the juice from and tossed the rest of the orange in for good measure. One of the secrets is one can or 12 ounces of Mexican Coca Cola or in my case a natural, all sugar Pepsi. You will not want to use regular Coke or Pepsi here as you will want to avoid anything containing regular or high fructose corn syrup due to the recipe not turning out just right with those ingredients. If you cannot find Mexican Coca Cola or all sugar natural Pepsi then you can leave it out.
All of these ingredients go into the crock and now we wait. This cooks on high for up to 8 hours or on low for 10 to 12 hours. This would be great on low, cooked overnight, if you can handle the delicious aroma wafting from the kitchen while you sleep. Once the meat is soft and easily shredded with a fork, it's done. Then you can move on to the next step and you are even closer to your tacos!
When the meat is fully shredable, remove it from the crock with a slotted spoon to a pan for holding. You want to avoid scooping as much liquid with the meat as possible. We are then going to strain the liquid from the crock and then skim all the rendered fat off of it. Now is a great time to get your gravy skimmer out to make this job really easy. You can discard all the cooking liquid but not the fat. In the end from 4 pounds of pork shoulder, I got 1 cup of rendered pork fat that was seasoned with all the flavors that we cooked the meat in. That is pure gold! We are going to use this fat to crispify our taco meat!
Take a bit of the fat and add it to a hot skillet. Toss in a good portion of the shredded carnitas. Cook until it begins to crisp and keep going until you attain your personal level of crispness. Then build your tacos any way you like. We used fresh cilantro, sour cream, salsa rojo and verde as well as some delicious pickled red onions to top them off perfectly!
I hope you give these slow cooked pork carnitas a try sometime soon and I hope you love them!
Happy Eating!
Get a printable version of this recipe here: http://bit.ly/36CPJRU
Get my cookbooks here: http://bit.ly/1czqM5R
Business Inquiries can be sent to:
info@noreenskitchen.com
Check me out on social media!
Facebook: http://on.fb.me/12bdibt
Twitter: @noreenskitchen
Instagram: http://bit.ly/12bdqrp
***MAILING ADDRESS****
Noreen's Kitchen
PO Box 14173
New Bern, NC 28561
Have a question for me? Send me an email:
info@noreenskitchen.com
Noreen's Kitchen Community Guidelines (The Rules)
http://bit.ly/2i7VocU
Any links to Amazon are, in many cases, affiliate links.
Produced by Noreen's Kitchen ©2008-2016 all rights reserved All embeds must live link to Noreen's Kitchen channel. No Editorial Excerpts without permission, Violators agree to pay royalties, all court costs, all collections & all lawyers fees.
154
views
2
comments
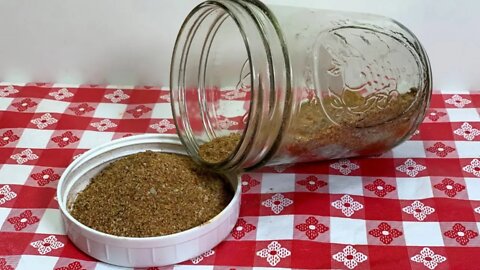
CARNITAS SEASONING BLEND!! HOMEMADE CARNITAS SEASONING!!
Getting ready to slow cook some carnitas for tacos and burritos. So I thought it might be a good idea to make up a seasoning blend to make things super fast and easy! This carnitas seasoning blend is easy to put together using many spices you may already have in your pantry or on your spice rack. Its a great way to rotate out your spice stock and make some delicious slow cooked carnitas in the process! This will season up a delicious pork shoulder and turn it into moist, shredded, perfectly seasoned meat for your very own street tacos at home!
You all know I love me a spice blend! I love my spices and today we are tossing together some of them to make a delicious slow cooked pork carnitas recipe that we will be sharing very soon on the channel. We love Mexican food in our house and having grown up in Arizona was shown by many a native grandma how to do things just right. There are ways to take shortcuts, even if they are often frowned upon, but I think making a spice blend is a great way to ease the path and have everything ready to go in one jar when the need for street tacos hits!
This spice blend is a great way to use what you have. You can always substitute, add or take away from the things I have used. If you don't like a lot of spice, leave out the heat. If you like even more, add in what you like. This blend is super mild and pleasing to most people who only want to enjoy their taco and not remember it for days! If you know what I mean!
Mine starts out with salt, but if you are on a salt restricted diet feel free to leave it out. I went light on the salt because I actually will have everyone salt their own tacos when all is said and done. The amount used here is perfect for us. Then we use the usual suspects! Black pepper, cumin, sweet paprika but you can use hot or smoked if you desire, onion and garlic powder, oregano, marjoram, bay, thyme and in my case a bit of ancho chili powder. I am using ground bay leaf to make this super easy and avoid having to pull out a bunch of nasty leaves at the end of the cooking process.
Put all these ingredients into a jar and give it a good shake. Use to your hearts desire for carnitas, tacos, chicken, beef brisket or more. This would be a great seasoning for chips too! I love having a variety of blends on hand for when I want to make something taste authentic. Then I know I have what I need and don't have to pull out a bunch of jars, bottles and containers every time I want to do something!
This would also make a lovely addition to any holiday gift. A taco Tuesday gift basket would be awesome! This spice blend with a tortilla warmer, some taco racks, some jars of upscale salsa, taco sauce and other shelf stable taco fixings' all placed into an iron skillet and wrapped in cellophane and tied with a bow! That would make anyone super happy to receive!
This spice blend will stay fresh for up to six months if kept in an airtight container like a mason jar in a dark, cool and dry place. Give it a good shake before using because things can tend to settle.
I hope you give this carnitas seasoning a try sometime soon and I hope you love it!
Happy Eating!
Get a printable version of this recipe here: http://bit.ly/31SB5CC
Get my cookbooks here: http://bit.ly/1czqM5R
Business Inquiries can be sent to:
info@noreenskitchen.com
Check me out on social media!
Facebook: http://on.fb.me/12bdibt
Twitter: @noreenskitchen
Instagram: http://bit.ly/12bdqrp
Google + http://bit.ly/1o5GMYy
***MAILING ADDRESS****
Noreen's Kitchen
PO Box 14173
New Bern, NC 28561
Have a question for me? Send me an email:
info@noreenskitchen.com
Noreen's Kitchen Community Guidelines (The Rules)
http://bit.ly/2i7VocU
Any links to Amazon are, in many cases, affiliate links.
Produced by Noreen's Kitchen ©2008-2016 all rights reserved All embeds must live link to Noreen's Kitchen channel. No Editorial Excerpts without permission, Violators agree to pay royalties, all court costs, all collections & all lawyers fees.
73
views

SLOW COOKER CHICKEN & SAUSAGE GUMBO!! DUMP AND GO CROCK POT MEAL IDEA!!
Mondays call for a slow cooker meal! Every day is appropriate but Mondays are almost a necessity. Sometimes you just need to know dinner will be ready and waiting when you get home! Today we are making a delicious, chicken and sausage style gumbo. I say "style" because any lover of true gumbo knows that it will have a deep dark roux involved. Because we are doing a dump and go recipe we are foregoing that part and just getting the job done! This one is deeply satisfying, rich, and full of flavor. Leftovers are also wonderful and who is going to complain about that?
Gumbo is a favorite in our house, but sometimes we just don't have time to make a roux or we just don't want to. Yes, I know you can make it and keep it in your fridge, but alas, I have none so today we are making this version of a gumbo slow cooker style without a roux and without any shame. In the end we all loved it and it was amazing. This one has chicken and smoked sausage, along with all the delicious flavors you would find in any regular gumbo that you have enjoyed.
Dump and go recipes are truly that, so in the vessel of your slow cooker, dump 1, 28 ounce can of petite diced tomatoes, 2 6 ounce cans of tomatoes and green chilies along with four cloves of minced garlic, some serrano chili and a bunch of spice. I used salt, oregano, bay leaf and thyme. I also used chicken tenders, some smoked link sausage and a bag of frozen okra. To get things going I also added 2 cups of boxed chicken bone broth.
I am using chicken tenders because I got a deal on them. If you have regular chicken breasts, just cut them into cubes or strips to help the cooking process. Over the cooking time they will become super tender and you should be able to break them up with a good pair of metal tongs like I did.
As for the sausage, I am using what I had on hand. 2 links of beef smoked sausage. You can go more traditional if you like and use smoked Andouille if you have it available to you. As I can tell it is fairly easy to source even in the big box stores anymore. We really enjoyed what we used, but next time will add the traditional type.
Once everything is in the pot, give it a good stir and pop the lid on. Slip it into the heat sleeve and set it on low for 6 to 8 hours or on high for 4 to 6 hours or until the chicken is tender and easy to break apart.
If you like to have shrimp in your gumbo, you can easily satisfy that desire by having a 1 pound bag of cooked, peeled and deveined, tails off shrimp in your freezer. 15 minutes before you are ready to eat, pop those in the hot gumbo, stir well and put the lid back on. Turn off the slow cooker and in 15 minutes your shrimp will be ready to go. That gives you plenty of time to prep a side of your choice.
We enjoyed ours with rice that we had leftover in the fridge. We often have cooked rice in our freezer because I cook more than I need every single time. Frozen rice is a great time saver as a go to side for dishes like this and more. Dinner was ready in no time, the rice was easy to reheat in the microwave and the gumbo was cooked all day and made the house smell amazing.
If you absolutely, positively must have a roux in your gumbo, you can do that by cooking it and adding it in during the last hour of cooking. This will give your gumbo a nice rich, dark flavor as well as a thicker consistency that gumbo is known for. Your choice! I am not disappointed with how ours turned out without the roux. In the end, you make that choice for yourself.
This is a great leftover meal to! This served us for two full meals and one meal went to my dad. So that's 9 servings. It would have probably stretched to 10. That's a lot of food for a little bit of effort. It's also super budget friendly and you can use what you have on hand to make this happen!
I hope you give this chicken and sausage gumbo a try, sometime soon and I hope you love it!
Happy Eating!
A printable version of this recipe can be found here: http://bit.ly/2MVbhBB
Get my cookbooks here: http://bit.ly/1czqM5R
Business Inquiries can be sent to:
info@noreenskitchen.com
Check me out on social media!
Facebook: http://on.fb.me/12bdibt
Twitter: @noreenskitchen
Instagram: http://bit.ly/12bdqrp
Google + http://bit.ly/1o5GMYy
***MAILING ADDRESS****
Noreen's Kitchen
PO Box 14173
New Bern, NC 28561
Have a question for me? Send me an email:
info@noreenskitchen.com
Noreen's Kitchen Community Guidelines (The Rules)
http://bit.ly/2i7VocU
Any links to Amazon are, in many cases, affiliate links.
Produced by Noreen's Kitchen ©2008-2016 all rights reserved All embeds must live link to Noreen's Kitchen channel. No Editorial Excerpts without permission, Violators agree to pay royalties, all court costs, all collections & all lawyers fees.
96
views

SLOW COOKER GOLDEN MUSHROOM CHICKEN!! DUMP AND GO CROCK POT MEAL IDEA!!
The cooler weather is upon us in my neck of the woods and nothing beats a great slow cooker meal to welcome sweater weather! Today I am sharing a little something that falls into the "Dump and Go" recipe craze and sharing a distinct family favorite that we have been enjoying for years! Slow cooker golden mushroom chicken. This is super simple to throw together and perfect for a hearty, effortless evening meal, even on the busiest of days!
I love my slow cooker! I know many of you do as well and so many times I turn to it to cook dinner for my family when I know I am going to be busy and even when I am not. I use mine at least two times a week all year round. But in the warmer months I put it outside because it really does heat up the kitchen! In the cooler months it helps to keep my always cold kitchen warm and toasty.
This recipe is super simple and one that I have been enjoying nearly my entire life. It evolved from a stove top recipe that my mom used to make often then converted to an oven bake and now it is a slow cooker recipe. Heck you can even make this in your electric pressure cooker if you like. No matter how you make it, just make it because I know you will love it.
I do not often use canned "cream of" soups but I do use them from time to time and this recipe is one of those times. Campbell's golden mushroom soup is what makes the magic happen here. I understand that it supposed to be reminiscent of a "marsala" sauce. I don't know about that, but what I do know is that it is delicious and that there is not really any substitute for it. No shame in using a canned soup to get the job done and dinner on the table.
The whole idea of "dump and go" recipes is to use a protein, some veggies and some pantry stock to feed your family like royalty and this recipe fits the bill. Starting off with about 2 pounds of white meat chicken then adding in extra fresh mushrooms. I used about a pound of sliced Criminis but you can use what you like. Fresh or canned work here. If you don't like mushrooms you can leave out the extras but don't skip the soup. you won't notice the small amount of mushrooms in the sauce once this is done cooking. I also added a bag of baby cut carrots and then the saucy goodness.
The sauce is nothing more than two or three cans of golden mushroom soup. Campbell's is the only brand that offers this so you should have no problem finding it. However, big box stores don't carry it sometimes so check your local better grocer they will almost always have it! Stock up when it's on sale 4 for $5 and you will always have it in your pantry. SInce my store did not have any on hand today I used two cans from the pantry and then mixed it together with enough chicken bone broth to equal 4 cups. Pour this over the meat and veggies and pop a lid on it. cook on low for 8 to 10 hours or on high for 6 to 8 hours. Mine cooked on high for 5 hours and I turned it down to low for another 2 hours then the chicken was perfect for shredding.
I broke up the chicken using a tongs when it was tender enough to fall apart. At this point you can decide if it is thick enough for you. We like this sauce a bit on the thicker side so I added a slurry made up of 1/4 cup of corn starch and 1/4 cup of cold water. Since the slow cooker is super hot at this point just pour it in and stir. That sauce will thicken and turn beautiful and glossy. Now all you need to do is choose a side.
We serve this, often with egg noodles or rice. My mom loved to serve this with macaroni. Mostly because she had it on hand. It is also delicious served over mashed potatoes! You choose. You don't have to eat this over or with anything. Really it is a one pot if you want to forego the starchy side.
This is super economical and it feeds a lot of people. This meal made for a total of 7 servings. Four for dinner and three for lunches over the following days. It is rich and satisfying. You can leave it the way I made it which is very simple or add things. I often will toss in a sliced onion or two as well as a healthy dose of fresh, chopped garlic.
I hope you give this family favorite, golden mushroom chicken a try sometime soon and I hope you love it!
Happy Eating!
Get my cookbooks here: http://bit.ly/1czqM5R
Business Inquiries can be sent to:
info@noreenskitchen.com
Check me out on social media!
Facebook: http://on.fb.me/12bdibt
Twitter: @noreenskitchen
Instagram: http://bit.ly/12bdqrp
***MAILING ADDRESS****
Noreen's Kitchen
PO Box 14173
New Bern, NC 28561
Have a question for me? Send me an email:
info@noreenskitchen.com
Any links to Amazon are, in many cases, affiliate links.
Produced by Noreen's Kitchen ©2008-2016 all rights reserved All embeds must live link to Noreen's Kitchen channel. No Editorial Excerpts without permission, Violators agree to pay royalties, all court costs, all collections & all lawyers fees.
152
views

CARAMEL APPLE CAKE MIX COOKIES!! FAST FALL FLAVOR!!
Time for a festive sweet treat full of fall flavor! This one is three ingredients! Four if you count the sprinkles. Two if you take out the caramel. Cake mix cookies are a great way to broaden your options and get something pulled together quickly. These caramel apple cake mix cookies are the perfect combination of apple flavor and caramel sweetness. These smell great when they are baking and they taste like a caramel apple cake! I know you and your family are going to love these!
I have made cake mix cookies for you before. Two years ago we made some red velvet and some pink velvet sugar cookies using cake mixes and a few extra ingredients. They go together super quick and they taste delicious. They are similar to the type of consistency you get from the cookies in a whoopie pie. Definitely cakey and not crisp. These are soft and amazing. The best part is that you need only a few ingredients to get these whipped out and ready to go.
I have used one Duncan Hines spice cake mix and 2 cups of unsweetened apple sauce. You can stop there and mix up these to be delicious, soft, applesauce cookies. Or you can go the extra step of adding the caramel baking bits. These can be found in the same section of the store as you find chocolate chips. You can also opt for cinnamon chips, butter scotch chips or even salted caramel chips of you prefer.
Toss everything in a bowl, blend well with a wooden spoon and then scoop onto a parchment lined baking sheet. Super important to use parchment if you are using the caramel. I will explain later. I used a cookie scoop that is equal to 2 tablespoons to dish out my cookies. I also sprinkled these with some festive fall colored nonpareils. You can use whatever sprinkles you like or none at all! These baked in a 350 degree oven for 12 to 15 minutes. All ovens are different so you will want to monitor these after the 10 minute mark to ensure complete doneness.
Remove the cookies from the oven when they are puffy and a toothpick inserted in the center comes out clean. If using the caramel bits be sure to stick in an area where there are none. Allow these cookies to remain on the baking sheet until completely cooled. An option would be to slide the sheet of parchment onto a cooling rack to help the cookies cool more quickly. When cooled you can gently peel the cookies from the parchment.
These cookies will remain soft and the caramel will be sticky. If you are using butterscotch, cinnamon or caramel flavored chips you will have an easier time of removing the cookies from the parchment. Cooled cookies should be stored in an airtight container in a cool place for up to three days. Because of the moisture level in these cookies, they could spoil a bit faster than what you might be used to.
I will be sharing another delicious fall cake mix cookie very soon and I know that you are going to love those as well. I hope you give these caramel apple cake mix cookies a try sometime soon and I hope you love them!
Happy Eating!
Get my cookbooks here: http://bit.ly/1czqM5R
Business Inquiries can be sent to:
info@noreenskitchen.com
Check me out on social media!
Facebook: http://on.fb.me/12bdibt
Twitter: @noreenskitchen
Instagram: http://bit.ly/12bdqrp
Google + http://bit.ly/1o5GMYy
***MAILING ADDRESS****
Noreen's Kitchen
PO Box 14173
New Bern, NC 28561
Have a question for me? Send me an email:
info@noreenskitchen.com
Noreen's Kitchen Community Guidelines (The Rules)
http://bit.ly/2i7VocU
Any links to Amazon are, in many cases, affiliate links.
Produced by Noreen's Kitchen ©2008-2016 all rights reserved All embeds must live link to Noreen's Kitchen channel. No Editorial Excerpts without permission, Violators agree to pay royalties, all court costs, all collections & all lawyers fees.
10
views
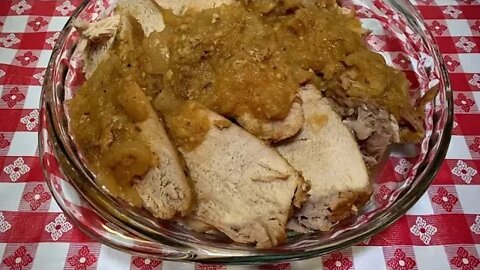
SLOW COOKER PORK LOIN IN APPLE SAUCE!! DUMP & GO CROCK POT MEAL!!
Today it's beginning to actually feel like fall where I live. A lot better than a week ago when this video was filmed. But with fall upon us here in the states and beyond, it's no better time than to combine simple ingredients in the slow cooker for a delicious, warming meal. This slow cooked pork loin in applesauce fits that bill. Add a couple of delicious sides like egg noodles, spaetzel or rice pilaf and some root veggies or greens and you have a delicious heart warming, belly filling meal that will put smiles on your loved ones faces! They will just love this one!
This starts out so simple with a two to three pound pork loin. I like to buy them whole when they are on sale and cut them in half and freeze them. Since I live in the middle of a large pork producing area, pork is very affordable to us. You can also do this with chicken if you prefer and it will be just as delicious. I spread some minced garlic over the pork loin, sprinkled it with my homemade version of Szeged chicken rub seasoning and then added a sliced onion, a honeycrisp apple that I cut into wedges and poured over a jar of unsweetened organic applesauce. That's it!
Find the video for the chicken rub seasoning here: http://bit.ly/331Wn1n
I cooked this for about 7 hours on high in my slow cooker. All slow cookers are different. Mine tends to take a long time to get up to temp and then when it is off and running it tends to get out of control, cooking very hot. I often will turn mine down to low half way through and then off completely once the meat is up to temperature. I always take the temp on my pork and chicken with an instant read thermometer to ensure safety. Pork should be cooked to at least 145 degrees and chicken should be cooked to at least 165 degrees. Carry over cooking will happen, but make sure your protein is cooked to your liking as well as the preferred tenderness before turning off the cooker completely. You can let rest while you cook your sides and it will stay nice and hot.
As far as sides for this meal, I considered making some spaetzel but did not and opted for good quality egg noodles and fried up a head of Savoy cabbage with an onion, some garlic and instead of adding a chopped apple, like I usually do when frying cabbage, I ladeled in some of the cooking sauce from the slow cooker. It was amazing! These made for excellent choices to go along with this succulent pork loin.
This is also a great economical option for feeding your family. Truth be told, this fed my family for two full dinners for four. We had plenty of leftover sides so that made for an easy night of no cooking, a few days later. I love when that happens! You could easily prep this dish for a slow cooker freezer meal by adding all the ingredients to a zip top bag and freezing then just popping into the slow cooker before work and cooking on high for 8 to 10 hours from the frozen state. I will warn you though to refer to your slow cookers warranty because some to not recommend for frozen items to be placed in their units. I have never had a problem doing it, but some of the more expensive versions are more sensitive. Just a friendly warning.
As mentioned above, I think that this would be great made with boneless, skinless chicken breasts or thighs in place of the pork loin and you could also sub out nice bone in pork chops too if that is what you have on hand! Make it work for your family and use what you have on hand. Step outside that box and enjoy!
I hope you give this slow cooker pork loin in applesauce a try sometime soon and I hope you love it!
Happy Eating!
Find a printable version of this recipe here: http://bit.ly/2IL7tQT
Get my cookbooks here: http://bit.ly/1czqM5R
Business Inquiries can be sent to:
info@noreenskitchen.com
Check me out on social media!
Facebook: http://on.fb.me/12bdibt
Twitter: @noreenskitchen
Instagram: http://bit.ly/12bdqrp
Google + http://bit.ly/1o5GMYy
***MAILING ADDRESS****
Noreen's Kitchen
PO Box 14173
New Bern, NC 28561
Have a question for me? Send me an email:
info@noreenskitchen.com
Noreen's Kitchen Community Guidelines (The Rules)
http://bit.ly/2i7VocU
Any links to Amazon are, in many cases, affiliate links.
Produced by Noreen's Kitchen ©2008-2016 all rights reserved All embeds must live link to Noreen's Kitchen channel. No Editorial Excerpts without permission, Violators agree to pay royalties, all court costs, all collections & all lawyers fees.
120
views
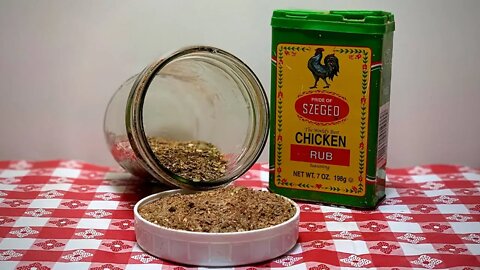
ALL PURPOSE CHICKEN RUB SEASONING!! SZEGED COPYCAT!!
Today I am sharing with you my best replication of my favorite chicken rub seasoning of all time! As many of you know I am a HUGE fan of the Pride of Szeged line of seasonings. I have every blend they have ever produced. I grew up watching my Hungarian grandmother and my mom use this brand of paprika all my life. About ten years ago I found that they had spice blends and have grown to love them. This is my best guess as to how to make your own version of this amazing rub at home!
To elaborate a bit, when I found that Pride of Szeged had many more offerings than just paprika, I was a very happy girl. I have amassed a collection of nearly all their offerings, or at least what I can tell is such. I have both their regular and hot paprika, garlic powder, chicken rub, steak rub, rib rub, fish rub pizza seasoning, poultry seasoning, apple and pumpkin pie spice as well as cinnamon and cinnamon sugar sprinkle. They are all in vintage style tins that sit on top of my stove in a wooden rack.
My problem is that these are few and far between. The purchasing opportunities are slim. Occasionally you can find these spices, some but not all in discount stores like TJMaxx or Marshalls. I do have an online outlet that used to sell them regularly but have since changed their brand lineup and only have the Szeged spices on a very limited basis. If I every have the situation where I cannot get the chicken rub I will be very sad. No it will not be the end of the world, but I would want to know how to make it myself. So here we are.
Reverse engineering a spice rub can be a daunting task. I poured a generous portion of the rub into a bowl and then sifted it to get the larger bits separated, which I placed on a plate and using a skewer examined each little bit to see if it was identifiable. For the most part I was able to determine each ingredient.
The recipe I have developed is my best guess, minus the fennel which I know is in there. Rick has a deep dislike for the flavor of fennel. I can take it or leave it. But if its in something he can detect it and in some cases, even though it may be a very small amount he can still find that licorice like taste in a bite from time to time. So it must go. If you like fennel, I suggest adding a teaspoon of the ground version to this blend.
The bulk of this rub is, as you may imagine, salt. You can adjust this to suit your needs or your personal taste. You can even eliminate the salt altogether if you are on a salt restricted diet. I have used canning salt and my finished product was a bit more salty than the original. That could be because of the type of salt I used. I would venture a guess that the commercial version uses table salt, which is not as salty as some other salts. So start with less and work your way up until you reach your sweet spot. Or salty spot as the case may be.
This blend has only a few, simple herbs and spices that come together in a way that is beyond compare. You can also choose to add some red pepper flake if you like or even a small amount of cayenne pepper if you like things a bit on the spicy side.
When reversing the blend I was surprised at the things I did not find such as black pepper, sage or parsley. I was uncertain about the celery seed, but since our family enjoys that flavor I added it. You may wish to omit if that is not something you enjoy. Overall I stuck with what I found. Of course, reading the label will help you with the big stuff. Theirs lists Paprika, garlic, basil salt and spices. So salt is not the first ingredient and that is a good thing.
I hope you will give this copycat blend of the Pride of Szeged chicken rub seasoning a try some time soon and I hope you love it!
Happy Eating!
You can find a printable version of this recipe here: http://bit.ly/2MaRso6
Get my cookbooks here: http://bit.ly/1czqM5R
Business Inquiries can be sent to:
info@noreenskitchen.com
Check me out on social media!
Facebook: http://on.fb.me/12bdibt
Twitter: @noreenskitchen
Instagram: http://bit.ly/12bdqrp
Google + http://bit.ly/1o5GMYy
***MAILING ADDRESS****
Noreen's Kitchen
PO Box 14173
New Bern, NC 28561
Have a question for me? Send me an email:
info@noreenskitchen.com
Noreen's Kitchen Community Guidelines (The Rules)
http://bit.ly/2i7VocU
Any links to Amazon are, in many cases, affiliate links.
Produced by Noreen's Kitchen ©2008-2016 all rights reserved All embeds must live link to Noreen's Kitchen channel. No Editorial Excerpts without permission, Violators agree to pay royalties, all court costs, all collections & all lawyers fees.
68
views

CHICKEN AND BISCUITS BAKE!! RETRO RECIPE!!
Today we are going really retro! A comfort food classic that will take you right back to your grandmother's table? Chicken and biscuits bake is a really simple way to have home cooked taste without a lot of fuss. Fairly quick to make with simple ingredients, this would also work as a great leftover makeover with roast chicken or as a way to use up holiday turkey!
I don't know about your family but mine pretty much loves anything with chicken and gravy. Toss biscuits into the mix and you have a real crowd pleaser. Chicken and biscuits bake is one of those favorites. Its' right up there with chicken and dumplings and is kind of along the same lines but instead of steaming your dough you are baking it. Making it come out crisp and fluffy instead of soft and fluffy. This also does not need, quite as much tending so it is a great go to for weeknight meals.
This all starts with some cooked, cubed chicken. I am using all white meat and it's from the Butcher Box I shared with you recently in another video. The chicken is tender and not stringy with good flavor. I also wanted to confirm that there were a total of six chicken in the box with there being two in each cryo sealed packet. If you are interested in looking into Butcher Box for yourself, you can use this link: http://bit.ly/2kXdVeF
Since this starts with cooked chicken, you can whip this up fast. You can poach chicken like I did or you can use a rotisserie chicken from the store or use a couple jars of your home canned chicken or even a couple cans of chicken from your pantry. Either way this will make into a delicious meal your family will love.
Saute some celery, onion, garlic and mushrooms in a bit of butter and then add in your favorite spices. I used onion powder, garlic powder, poultry seasoning and some extra dried parsley. Next I added a bit of all purpose flour to begin making my roux that would thicken the gravy. Chicken stock goes in next. I love to use a boxed bone broth that is readily available in my store and even though it is organic it is super affordable. If you don't have any chicken stock on hand, go ahead and make up four cups of chicken bullion liquid.
Once the gravy is thickened, you can add in the cooked chicken along with some frozen mixed vegetables that will really bulk things up nicely and add in extra nutrition and fiber. I like to use the type with corn, green beans, carrots and peas. Pour this into a baking dish or if you used an oven safe skillet just make your biscuits and keep on going!
The biscuits are simple. Just like my basic baking powder biscuits, flour, baking powder, salt a bit of parsley or any herb you would like to add and some butter and buttermilk. You know the drill! Mix dry ingredients. Toss butter cubes in and then cut them into the butter. You will notice, I forgot this part and got ahead of myself and added the buttermilk in a bit too soon. I left it in and kept on going. We all make mistakes. Even the most seasoned cooks and we just need to soldier on. As you will see in the end, it did not really effect the outcome.
These are a drop biscuit so the batter will be wet and loose. I scooped the dough on top of the chicken and gravy mixture. I like to use a cookie scoop to divvy up the biscuit dough. This makes things super easy and everybody gets a biscuit or two to enjoy in their serving. This recipe makes just enough for 12 nice size biscuits.
Now that everything is put together its time to bake. This casserole will go into a 350 degree oven for 25 to 35 minutes depending on your oven. You will know it is ready when the biscuits are lightly golden on top and the gravy mixture is bubbling evenly. Then you can remove from the oven and allow to rest for 10 minutes before serving.
This is also a great freezer banking option. Just make it all the way up to just before baking. Then freeze. When ready, bake at 400 degrees for 45 minutes to an hour.
I hope you give this chicken and biscuit bake a try sometime soon and I hope you love it!
Happy Eating!
You can find a printable version of this recipe here: http://bit.ly/2ndiX84
Get my cookbooks here: http://bit.ly/1czqM5R
Business Inquiries can be sent to:
info@noreenskitchen.com
Check me out on social media!
Facebook: http://on.fb.me/12bdibt
Twitter: @noreenskitchen
Instagram: http://bit.ly/12bdqrp
Google + http://bit.ly/1o5GMYy
***MAILING ADDRESS****
Noreen's Kitchen
PO Box 14173
New Bern, NC 28561
Have a question for me? Send me an email:
info@noreenskitchen.com
Noreen's Kitchen Community Guidelines (The Rules)
http://bit.ly/2i7VocU
Any links to Amazon are, in many cases, affiliate links.
Produced by Noreen's Kitchen ©2008-2016 all rights reserved All embeds must live link to Noreen's Kitchen channel. No Editorial Excerpts without permission, Violators agree to pay royalties, all court costs, all collections & all lawyers fees.
68
views

OPENING MY FIRST BUTCHER BOX!! FREE GROUND BEEF & BACON!!
Get $20 off plus free ground beef for life, free bacon and free shipping! http://bit.ly/2kXdVeF
Today I am going to share my very first Butcher Box unboxing. I have never tried their meats before and thought it was something our family would benefit from. So when they reached out to me and offered to send me a box I agreed! We are so thankful to them for providing this as well as a great offer for our viewers. Grass fed, humanely raised and butchered meats are sometimes hard to come by depending on where you live. They can also be pricey. I hope you can benefit from this unboxing!
Butcher Box is a monthly subscription box that specializes in offering grass fed and humanely raised meats that are pasture raised with no antibiotics, with natural and organic feeds. Their beef is grass fed, their chicken is free range and allowed to do all the chickeny things and their pigs are heritage breeds that are lower in fat with good marbling finished in a way that is beneficial to the end consumer and gives the meat a gourmet edge.
You can choose to get one box or continue the subscription if it is something you enjoy and find value in using. They offer several different options. Today I am sharing the mixed box that they sent me. It contains beef, chicken, pork and bacon. I received four sirloin steaks, two new york strip steaks, four beautiful pork loin chops, three packages of chicken breast, two pounds of grass fed ground beef and one pound of smoked bacon that contained no sugar and is whole 30 certified.
In total I received 12 pounds of meat. The mixed box currently has a price of $129.00. That may seem like a lot on the surface but if you were to source the same quality meat at your local grocer I think you would find this to be fair pricing that is market competitive. I received 3 pounds of non gmo, organic chicken, 2 pounds of grass fed ground beef, 2 pounds of new york strip steak, 2 pounds of sirloin steak, 2 pounds of pork loin chops and 1 pound of bacon.
Butcher Box is currently offering free ground beef for life. Meaning that with each order you place you will get 2 pounds of grass fed ground beef for free. This offer is open until September 30th after which time they will be offering free bacon for life. In addition to your free ground beef you will receive 1 pound of free bacon with your first order as well as $20 off your order and free shipping. I think that is a great deal to take advantage of if you wanted to give them a try.
Personally, I know people from my church who swear by Butcher Box and order monthly for their family. They love the quality and continue to be impressed with the value they receive. I will be using these meats in upcoming videos and will be sure to mention that each time so you can see the quality of the meat once it is prepared.
I know that this may not be something that everyone can take advantage of at the current season in their life. I know that this can be expensive depending on your budget. But if this is something you have been on the fence about, the time to try is now with all the great offers that have been extended to Noreen's Kitchen subscribers!
I hope that if this fits into your life, you will give it a try and I hope you love it!
Happy Eating!
FTC DISCLAIMER: This video is not sponsored, but I did receive this box free of charge. I was not compensated in any way with the exception of receiving the product from the company. I am blessed to be able to get to take advantage of these offers from time to time and hope that you appreciate me sharing information that may be helpful to you.
Get my cookbooks here: http://bit.ly/1czqM5R
Business Inquiries can be sent to:
info@noreenskitchen.com
Check me out on social media!
Facebook: http://on.fb.me/12bdibt
Twitter: @noreenskitchen
Instagram: http://bit.ly/12bdqrp
Google + http://bit.ly/1o5GMYy
***MAILING ADDRESS****
Noreen's Kitchen
PO Box 14173
New Bern, NC 28561
Have a question for me? Send me an email:
info@noreenskitchen.com
Noreen's Kitchen Community Guidelines (The Rules)
http://bit.ly/2i7VocU
Any links to Amazon are, in many cases, affiliate links.
Produced by Noreen's Kitchen ©2008-2016 all rights reserved All embeds must live link to Noreen's Kitchen channel. No Editorial Excerpts without permission, Violators agree to pay royalties, all court costs, all collections & all lawyers fees.
77
views