
Enjoyed this channel? Join my Locals community for exclusive content at
noreenskitchen.locals.com!
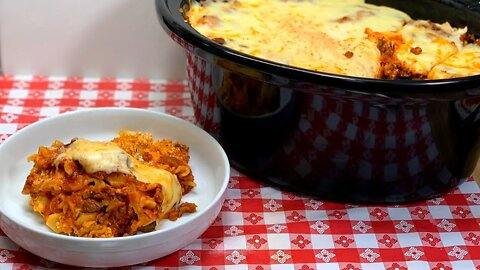
SLOW COOKER LASAGNA!! EASY SLOW COOKER DINNER IDEA!!
Y'all, I'm going to be honest. I did not think this would turn out as good as it did! This slow cooker lasagna was a whim I was willing to try. Honestly, I don't know that I will ever make a lasagna any other way! TRUTH! This is my classic lasagna recipe. The one I have used for freezer banking for many years. The same one my mom used to make. We had a good bit of Rick's homemade spaghetti sauce leftover and instead of having another pasta dinner as usual, I thought a lasagna sounded good. I love experimenting with different ways to make things we love and this is no exception. Slow cooker lasagna for the win! Seriously good, seriously delicious!
I know that making a lasagna is not rocket science. You just layer noodles, sauce and cheese. Sometimes veggies you bake and you eat. BUT, this way of making a lasagna takes things to a whole new level. This baby has five or six layers or more of noodly, cheesy goodness going on. Top that off with homemade meat sauce chock full of mushrooms and you have a serious winner! This video is a suggestion. A way for you to take your favorite lasagna and cook it in a new and different way!
I used oven ready lasagna noodles, but you don't have to seek those out. Regular will do just fine. The benefit of the oven ready ones is the fact that they are corrugated to allow for better uptake and absorption of the liquid in the recipe. The flat ones will do the same. Don't worry about it if that is all you can find! I used a good quality, whole milk ricotta and mixed it up with eggs, seasonings and a bit of mozzarella and parm. Adding the eggs and the cheese into the ricotta allows for better structure over the cooking time. This will prevent the cheese layer from collapsing giving it more body to hold up. I also used an Italian cheese blend as well as a thicker grated whole milk mozzarella. I prefer the whole milk mozz simply because it melts much nicer. You can use whatever is your preference or whatever is available at the time.
Important tips are to always start by placing a good layer of sauce on the bottom of your vessel, This will help that bottom layer cook properly and the noodles to be done well. Next is to break up the lasagna noodles to suit your needs. Don't be afraid to really fit them in there! They will cook and expand and this will help with the structure of the end result. Next, be sure to spread everything to the edges! This is also a super important tip because you want to be sure the noodles have enough coverage as well as moisture to uptake during the slow cooking process. Next, if you are using leftover sauce like I am, be sure to have an extra jar of your favorite pasta sauce on hand to thin it down a bit. This will also facilitate the cooking of the noodles perfectly. End with your top layer being sauce. Spread it to the edges and cook from there. You will add your last layer of cheese when everything is well cooked and you can check the noodles for doneness.
I layered my lasagna in this order: sauce, noodles, ricotta cheese mixutre but leaving a little for the second to last layer, noodles, parm, mozz, more noodles, sauce, mozz, parm, noodles, a bit more of the ricotta mixture, mozz, parm, noodles, the last bit of the sauce. It looks like a lot, but think about how divinely deep dish your lasagna will be!
This cooked on high for one hour and on low for two additional hours. I then spread the top with a good thick layer of mozzarella and a good sprinkling of parmesan. I put the lid back on it and left it. I did not turn on the slow cooker. In fact, I unplugged it. I allowed this to rest for two hours. You really want to do this so you can slice beautiful servings in the end.
As you can see, this sliced beautifully! It went all the way to the bottom and with the help of a fish spatula and a think spreading spatula I was able to remove the slices without having them fall apart. I was even impressed with that! This was a lot of lasagna, to be sure! I sent some over to my dad and I froze two meals for the family that I had left. A win for me the next time I want lasagna and I can actually have my own on hand!
I hope you give this slow cooker method of making lasagna a try and I hope you love it!
Happy Eating!
#wecook
Get my cookbooks here: http://bit.ly/1czqM5R
Business Inquiries can be sent to:
info@noreenskitchen.com
Check me out on social media!
Facebook: http://on.fb.me/12bdibt
Twitter: @noreenskitchen
Instagram: http://bit.ly/12bdqrp
Google + http://bit.ly/1o5GMYy
***MAILING ADDRESS****
Noreen's Kitchen
PO Box 14173
New Bern, NC 28561
Any links to Amazon are, in many cases, affiliate links.
Produced by Noreen's Kitchen ©2008-2016 all rights reserved All embeds must live link to Noreen's Kitchen channel. No Editorial Excerpts without permission, Violators agree to pay royalties, all court costs, all collections & all lawyers fees.
46
views
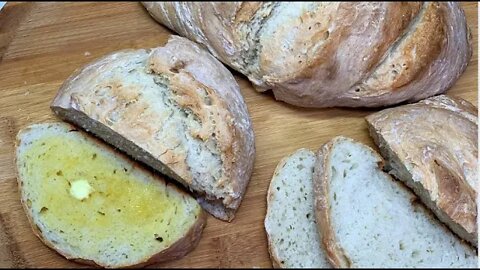
3 HOUR NO KNEAD BREAD!! EASY HOME BAKED BREAD RECIPE!!
Today I am sharing how you can make fresh bread with no kneading, no mixer, no special equipment and only 5 ingredients in less than 3 hours and have amazing, crusty, fresh, rustic, homemade bread on your table. I have been playing with this recipe for about three weeks. In an effort to help all of you have fresh, homemade bread whenever you want it. This bread is super economical and you can make it for pennies compared to the bakery style bread from the store. The best part is that you know what went in there! No preservatives, not extenders, no artificial anything! Just wholesome, bread that you and your family won't be able to stop eating! I promise, you will be addicted! If you thought you couldn't bake bread because it was too difficult, think again! I am here to bust that myth once and for all!
I have been baking bread for many years. I have shared how to make everything from my famous everyday sandwich loaf to homemade burger and hot dog buns to cinnamon rolls and even nursed a homemade sourdough. Bread baking is a passion and and education. It takes time, effort and finesse to bake some bread, but this one we are sharing today is super easy and cheap! You don't have to have prior experience and honestly if this was the only bread I could make I would be happy.
This all starts out with the basics. Flour, water, salt, yeast and a sweetener. This needs to be a true sugar, not an artificial sweetener. It is not intended to flavor the bread, but to feed the yeast and provide gassing for the rise. This starts out like any other no knead bread. Mix the flour and the salt in a large bowl. Mix warm water, no more than 110 degrees with the honey and yeast. Whisk this mixture to blend well then pour the whole thing in with the flour and salt. I am using a dough scraper to blend the flour and liquid mixture until it forms a ball. If you think you have too much flour, you don't. Just keep blending until everything comes together in a ball and the sides of the bowl are relatively clean. I like to gather the dough on the dough scraper and spray the bowl with cooking oil. Then place the dough back in the bowl, spray the top and cover. Set in a warm place and walk away for 2 to 3 hours. That's it!
A word about the yeast. I only ever use SAF instant yeast in my breads. Unless I am making sourdough this is the only yeast I ever use. It does not require proofing like active dry yeast and you can simply add it right into your recipes dry. I buy this yeast in vacuum sealed, one pound bags. Once opened, I transfer the yeast to a mason jar and seal with both a metal flat canning lid and a plastic storage lid. This jar is kept in the freezer, as is all my yeast that has not yet been opened. When yeast is kept frozen you suspend the life indefinitely. Yeast cannot go bad if you keep it in the freezer. Never keep your yeast on the shelf or at room temperature. Normally yeast, according to many manufacturers is good for up to 1 year past the date printed on the envelope. In order to ascertain the freshness and efficacy of the yeast, you need to "proof" it. Add it to warm water with a bit of sugar, and wait 5 to 10 minutes. If the yeast produces a bubbly foam, it is good to use and can be added to your dough recipe.
When the dough has finished fermenting and has risen at least twice it's original size, you can knock it down with a dough scraper that has been sprayed with cooking oil and divide into two loaves. You can roughly shape them by turning them on the side of the bowl and then transfer to a baking sheet lined with parchment. Clean up your loaves with wet hands and then slash with a very sharp knife a few times. This will help the dough to expand and rise into a lovely loaf.
Bake in a 375 degree oven for 25 to 30 minutes or until golden brown and when tapped on the bottom the loaves sound hollow. These are best if allowed to cool for at least an hour before slicing and always slice better the next day. Now dig in! Fresh bread is irresistable!
I hope you give this 3 hour no knead bread a try, sometime soon and I hope you love it!
Happy Eating!
#wecook
A printable version of this recipe can be found here: https://bit.ly/34KJQkW
SAF Yeast on Amazon: https://amzn.to/34JcRO9
SAF Yeast on KAF: https://bit.ly/2VQmV3Z
Business Inquiries can be sent to:
info@noreenskitchen.com
Check me out on social media!
Facebook: http://on.fb.me/12bdibt
Twitter: @noreenskitchen
Instagram: http://bit.ly/12bdqrp
***MAILING ADDRESS****
Noreen's Kitchen
PO Box 14173
New Bern, NC 28561
Have a question for me? Send me an email:
info@noreenskitchen.com
Any links to Amazon are, in many cases, affiliate links.
Produced by Noreen's Kitchen ©2008-2016 all rights reserved All embeds must live link to Noreen's Kitchen channel. No Editorial Excerpts without permission, Violators agree to pay royalties, all court costs, all collections & all lawyers fees.
147
views
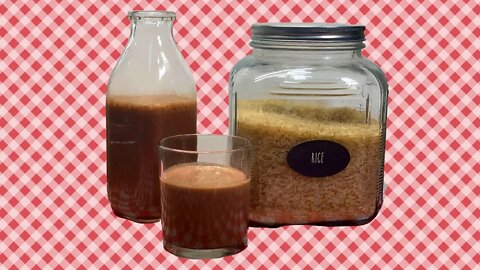
HOMEMADE RICE MILK!! CHOCOLATE COCONUT RICE DRINK!! PANTRY POWER!
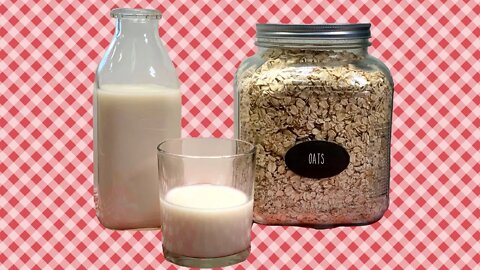
After overwhelming response to the video we recently uploaded on how to make oat milk, you have requested that I share how to make rice milk. So for a little fun I thought we could make chocolate coconut rice drink. The procedure is very similar to the oat milk, but with only a couple of differences. Cooked rice and water is all you need. Take it up a notch to make delicious, creamy chocolate coconut rice drink! We could probably all use a treat and this is definitely it!
A caveat first. I am using some leftover cooked rice that I needed to use up. It was parcooked or "converted" rice. It was probably not the best choice for making rice milk. I recommend that you use either a long or short grain rice, brown or white would be fine. You can use cooked like I have or you can soak dry rice overnight covered in water, rinse and then blend with fresh water. If you do the latter, you will end up with a much creamier "ricey" end result with less starchy waste. For demonstration purposes, I used the cooked rice. You can make the choice that suits you best.
I am using one cup of cooked rice and four cups of cool water. That is the base for this "milk". Yes I know that it isn't really milk, I am aware that rice does not have the ability to lactate, so for all of you who thought you would be smarty pants and point that out on the oat milk video, good for you, you recognize that oats are not a life form. We will move on from that topic and all assume we know this. For the purposes of the demonstration we are calling this "milk".
The use of a high speed blender is recommended but any blender will do here. You want to blend on high for 3 minutes to get the best result. It should be smooth and creamy looking upon completion. This mixture will need to be strained using either a nut milk bag, several layers of true cheesecloth (not the kind from the hardware store) or a flour sack towel, which is what I used. Allow this to drain lifting up and giving it a gentle squeeze to extract the majority of the liquid. In the end I had 3 cups of rice milk. Since I wanted at least four cups of liquid, I added 1, 14 ounce can of coconut milk to round it out and add creaminess. Now lets make this a chocolate treat!
I poured the rice and coconut milk back into the rinsed out carafe of the blender and added 2 tablespoons of dark chocolate, Dutch processed cocoa powder along with 1/4 cup of agave nectar to sweeten. You can use what you like here. Your sweetener of choice, honey, brown rice syrup, maple syrup, brown or white sugar or even splenda or stevia will do. Blend this for a few seconds to homogenize everything well and then you can decant and enjoy.
This will last for up to 5 days in the refrigerator. Be sure to shake well before pouring. This was silky, smooth, creamy and chocolatey. You can choose to add more or less cocoa or even add more or less sweetener to taste. If you simply want plain rice milk, you can just use the rice and water but to boost the flavor just a bit add some vanilla extract and adding a pinch of salt is always a good idea to boost all the flavors.
That is how easy it is to make rice milk. I hope this was helpful and that you learned something that will help stretch your pantry even further in these times of change. I hope you give making rice milk a try and I hope that you love it!
Happy eating!
#wecook
Get my cookbooks here: http://bit.ly/1czqM5R
Business Inquiries can be sent to:
info@noreenskitchen.com
Check me out on social media!
Facebook: http://on.fb.me/12bdibt
Twitter: @noreenskitchen
Instagram: http://bit.ly/12bdqrp
Google + http://bit.ly/1o5GMYy
***MAILING ADDRESS****
Noreen's Kitchen
PO Box 14173
New Bern, NC 28561
Have a question for me? Send me an email:
info@noreenskitchen.com
Noreen's Kitchen Community Guidelines (The Rules)
http://bit.ly/2i7VocU
Any links to Amazon are, in many cases, affiliate links.
Produced by Noreen's Kitchen ©2008-2016 all rights reserved All embeds must live link to Noreen's Kitchen channel. No Editorial Excerpts without permission, Violators agree to pay royalties, all court costs, all collections & all lawyers fees.
18
views
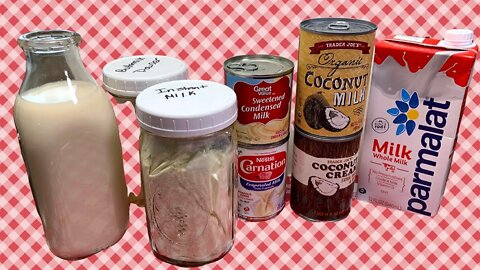
SHELF STABLE MILK OPTIONS! PANTRY CHAT!
In our last video we shared how to make oat milk with pantry items. This was a great introduction to how you can have "milk" anytime you need it even if you run out of traditional dairy milk. Today I thought it would be a good time to take a moment and have a chat about they myriad of shelf stable milk options available to you that you may or may not have considered. I believe many of you already have one or two or maybe even all of these on your pantry shelf but may or may not realize what a lifesaver they can all be in their own right given the current situation we are all living with.
Shelf stable milk is not a new idea. In 1865 Borden developed the process for making sweetened condensed milk and thirty years or so later he devised a way to make evaporated milk by eliminating the sugar. Both of these processes were instrumental in keeping soldiers fed and nourished during both the civil war, and world war 1. The sweetened condensed milk seriously lowered infant mortality rates of the day by offering healthy and safe milk for babies and infants who would otherwise have starved.
Both sweetened condensed and evaporated milks have been an American staple in pantries and cupboards for many, many years. If I venture a guess many of you have a couple of cans in yours as well. These are great options for having milk available when there is none to be found.
In the 80's American's were introduced to Parmalat and other shelf stable milk in boxes. Europeans and Canadians have had these for decades prior to them arriving on our store shelves. These milks are "ultra high temperature" pasteurized and have a very long shelf life. They are a great option for your own pantry. You can find whole milk, in the same place as the soy, rice and almond milk on the shelf in your store as well. Look near the baking or the juice aisle. Other companies make whole, 1 and 2 percent as well as half and half and heavy cream with the same process. You can find them online and purchase by the case. I like a company named Gossner Foods. They have a great product and it is consistent as well as made here in the United States.
Canned coconut milk is also another great option. We usually have this on our shelf to put in Thai food or smoothies or just as a great addition to make something super creamy like a soup or stew. You can also find coconut cream which you can refrigerate and remove the fat solids and whip into a beautiful non dairy whipped cream option. I always have a few cans on hand.
Of course there is the old standby powdered milk. You can find this in instant and non instant varieties and if you are a food storage fan you can also find "whey milk alternatives" that act as milk for drinking or using on cereal. Powdered milk is something I always keep in my pantry because I often use it as an amendment to my bread baking. This can obviously be used as drinking milk as well. However if you want to make it delicious, mix only part of the powder with about half of the water called for on the instructions. Make sure the water is super hot from the tap then stir, stir, stir. Even better, use an immersion blender or make it in your regular blender to get this well incorporated and super creamy. Then add the remaining recommended water and stir again. Decant and refrigerate overnight for a much more pleasant dry milk experience than simply mixing and drinking.
Last on my list is buttermilk powder and while this is not intended to be mixed and used as a beverage, it is a nice "milk" to have on the shelf for baking of pancakes, biscuits and muffins as well as creating dry mixes for salad dressing or anything that calls for buttermilk. Since you may not use it very quickly I do recommend that you put it in a mason jar with a very tight fitting lid and then even put that jar in a storage bag or if you have a vacuum sealer, use that to remove any air from the jar. This will help keep the product longer and help to avoid clumping, especially in humid areas.
I hope that this was helpful and I hope you are inspired to use some of these tips to beef up your pantry with milk!
Happy Eating!
#wecook
Amazon list of available and recommended milk options: https://amzn.to/2wuEv4Q
Get my cookbooks here: http://bit.ly/1czqM5R
Business Inquiries can be sent to:
info@noreenskitchen.com
Check me out on social media!
Facebook: http://on.fb.me/12bdibt
Twitter: @noreenskitchen
Instagram: http://bit.ly/12bdqrp
Google + http://bit.ly/1o5GMYy
***MAILING ADDRESS****
Noreen's Kitchen
PO Box 14173
New Bern, NC 28561
Have a question for me? Send me an email:
info@noreenskitchen.com
Any links to Amazon are, in many cases, affiliate links.
Produced by Noreen's Kitchen ©2008-2016 all rights reserved All embeds must live link to Noreen's Kitchen channel. No Editorial Excerpts without permission, Violators agree to pay royalties, all court costs, all collections & all lawyers fees.
95
views
1
comment
HOW TO MAKE OAT MILK!! PANTRY PULL KITCHEN BASICS!
Since it seems to be increasingly more difficult to obtain basic necessities in certain areas I thought it would be a good idea to share with you how to make a refrigerator staple out of pantry ingredients. Today we are going to make oat milk. This is a simple procedure that requires no more than four ingredients but can be done with two if you like. This is a great non dairy option that can keep you going in a pinch. You can use this for anything from cereal to soup. I think we should all give it a try, at least once! This is tasty and creamy and, no it isn't real dairy milk, but if you can't get it or you cannot get to the store to get it or you don't have your own goats or a cow, then this might just be the answer you are looking for! Maybe you had milk on your shelf all this time but never even knew it!
Oat milk is simple to make and it tastes good! In my opinion, better than other milk alternatives. I am personally not a fan of milk in the first place. Never liked it, even as a kid. Yes I cook with it and I put cream in my coffee from time to time, but milk is not something I ever reached for as a beverage at any time. Like the thought of drinking an entire glass revolts me to my core. BLECH!
All kidding aside, we are living in changing times. We, as humans, are the best at learning to adapt. This is no different. We are living in historic times that will forever be spoken about. So while making oat milk may not be historical, it may help you to stretch your dollar and get more mileage out of your pantry stock. With this in mind, I hope you enjoy learning about how you can turn your common, everyday breakfast grain into a milk alternative.
Oat milk can have a tendency to become slimy. This is simply due to the starchy nature of the grain. You can avoid this by following a couple simple tips. First you want to use the coldest water you have available to you. I used the water dispenser on my fridge. But you could easily replace one cup of the required water for one cup of ice to make things just cold enough to work well. The second tip is to use the highest speed your blender offers for the shortest amount of time so the oats become pulverised. On my blender I used the high setting for 30 seconds. Third, when you strain, do not squeeze so much that the starches begin to build up and release into the milk. These tips all combined will give you a delicious milk alternative that will satisfy your kids through endless bowls of cereal.
I used 4 cups of ice cold water and 1 cup of organic, old fashioned rolled oats. You can do this with steel cut oats, or oat groats, however you will need to soak those overnight covered in water then rinse twice before proceeding with the process I demonstrated here. I have added about a tablespoon of agave nectar but you could use maple syrup, brown sugar, a pitted date or two or some honey. You don't have to sweeten this at all if you prefer. I have also added about a teaspoon of vanilla extract. Again you can omit this if you prefer. Pop all these ingredients in the blender and blend on high for 30 seconds. That's it!
Now you will need either a nut milk bag or do what I did which was line a fine sieve with a double layer of impeccably clean flour sack towel. Pour the mixture in and then gently lift the corners of the cloth to form a bag. Gently squeeze until most of the liquid has been extracted. Try not to squeeze it all out super dry because towards the end the liquid can begin to get very thick with starch which will cause the milk to be slimy and unpleasant. You may choose to strain again or you can check for sediment and if it is clear, you can decant.
Place the oat milk into a container or jar with a tight fitting lid. I used an old glass milk bottle from the dairy milk we used to be able to get in our area. I saved the bottles for decor, but washed this up and it was perfect to use for one quart of oat milk, which this recipe will render. Refrigerate overnight and then enjoy as you would regular milk.
So you had milk in your pantry the whole time and didn't even know it! I hope that this inspires you to go make a batch and give it a try and I hope you love it!
Get my cookbooks here: http://bit.ly/1czqM5R
Business Inquiries can be sent to:
info@noreenskitchen.com
Check me out on social media!
Facebook: http://on.fb.me/12bdibt
Twitter: @noreenskitchen
Instagram: http://bit.ly/12bdqrp
Google + http://bit.ly/1o5GMYy
***MAILING ADDRESS****
Noreen's Kitchen
PO Box 14173
New Bern, NC 28561
Have a question for me? Send me an email:
info@noreenskitchen.com
Any links to Amazon are, in many cases, affiliate links.
Produced by Noreen's Kitchen ©2008-2016 all rights reserved All embeds must live link to Noreen's Kitchen channel. No Editorial Excerpts without permission, Violators agree to pay royalties, all court costs, all collections & all lawyers fees.
105
views
TUNA PATTIES!! RETRO SHELF COOKING RECIPE!!
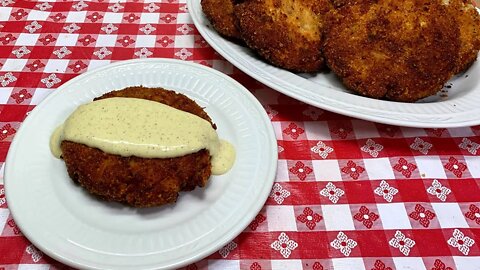
Shelf cooking sometimes means, digging into tried and true recipes from mom and grandma's recipe box! In this day of digital everything, sometimes reaching for that hand written card can be easy to forget. Today I am sharing my mom's tuna patties. She used to call these "croquettes". She also used to make them with chicken and they were hand formed, triple dredged and deep fried. I think that is to much work for a regular weeknight meal. So patties it is! Tuna is the star here with other ingredients from the fridge and pantry. They come together quickly and they are oh so satisfying. Whip up a little cold sauce to serve on the side or over the top and you are in for a treat!
I grew up eating these, or something similar. Like I mentioned, my mom's "croquettes" were little cones of goodness that were seriously delicious. Mostly she made them with chicken that she pulled from the bone and chopped ever so fine. Sometimes she would make them with tuna. Still they were a process. And she would make a cream sauce to pour over the top. Nothing is cuter on your plate when you are a kid!
These start with four regular sized (5 ounce) cans of tuna, drained and flaked. I like solid white albacore but you can use what you prefer here. I add in dry bread crumbs, shredded cheese, chopped onion and celery along with a couple eggs and some mayo and mustard. You can add whatever you like. You should make the tuna much like you would tuna salad but I do not recommend using salad dressing (miracle whip).
The mixture is blended well. I like to do this by hand until it comes to a dough like consistency that you can pick up in the palm of your hand. Now you can divide into 8 patties or more if you like them smaller and bread them. I do not do anything more than dunk each patty into a tray of dry bread crumbs. You can compact them even more when doing this to ensure good coating.
I shallow fry these in about 1 1/2 cups of vegetable oil. I prefer sunflower or safflower oil. Heated to medium high heat, the patties can be fried in batches. I do four at a time and allow each side to fry for approximately 3 to 4 minutes or until nicely browned. If you need to turn occasionally for even browning, then please do. My skillet has obvious hot spots and I know that they need to be turned before being flipped.
Once the patties are done you can remove them from the oil and allow them to drain on some paper toweling. Allow them to cool for a bit before serving with some tartar sauce or some homemade cheese sauce or even a quick aioli. I made my cold sauce by blending some bottled ranch dressing with some Dijon mustard. These were simply delicious! Now about a week later the family is asking me to make them again!
Just goes to show you that something as simple as a few cans of tuna and a bit of chopped veggies some eggs, cheese and bread crumb can be turned into a full on main course that is definitely going to make the family happy! You can also turn these into tuna burgers by serving on a bun with all the toppings or even a tuna patty melt by popping under the broiler with some sliced American cheese on top! No tuna lover is going to turn this winner down!
I hope this inspires you to go to your pantry and give these a go! I hope you give these tried and true tuna patties a try sometime soon and I hope you love them!
Happy Eating!
#wecook
Get my cookbooks here: http://bit.ly/1czqM5R
Business Inquiries can be sent to:
info@noreenskitchen.com
Check me out on social media!
Facebook: http://on.fb.me/12bdibt
Twitter: @noreenskitchen
Instagram: http://bit.ly/12bdqrp
Google + http://bit.ly/1o5GMYy
***MAILING ADDRESS****
Noreen's Kitchen
PO Box 14173
New Bern, NC 28561
Have a question for me? Send me an email:
info@noreenskitchen.com
Noreen's Kitchen Community Guidelines (The Rules)
http://bit.ly/2i7VocU
Any links to Amazon are, in many cases, affiliate links.
Produced by Noreen's Kitchen ©2008-2016 all rights reserved All embeds must live link to Noreen's Kitchen channel. No Editorial Excerpts without permission, Violators agree to pay royalties, all court costs, all collections & all lawyers fees.
131
views

CORNED BEEF AND CABBAGE BAKE!! LEFTOVER MAKEOVER!!
Every year I make corned beef and cabbage some time around St. Patrick's day. This year was no exception. As usual, we had leftovers. I wanted to do a leftover makeover with these and thought of a couple ways to do that. This is the idea that won out. I am so glad to be able to share with you this inspired idea for a layered, corned beef and cabbage bake, using what we already had and turning it into a one dish meal that was a delicious way to eat lunch for nearly one work week for two of us. This will make a great addition to your rotation and use up the leftovers you have in your fridge! In this time of frugality we never want to waste food anyway, but right now it is even more important to be vigilant and use what we have to our advantage! I hope this inspires you and gives you some ideas on how you can makeover your own leftovers!
We don't really need a "holiday" to enjoy this hearty meal, but when we do, I usually make a couple nice corned briskets in one way or the other. This time in the slow cooker and then with braised cabbage, carrots and mashed potatoes. We did not go the traditional "New England boiled dinner" route this time. I found a great deal on corned beef from the store and got a couple, tossed them in the slow cooker with some beef stock and seasonings and let them simmer away all day. I braised some cabbage in our favorite way with apples and onions and I made some mashed potatoes. In all it was a feast fit for a king. Or at least a feast fit for my family.
As always I made enough to sustain us through a few meals. I figure it takes the same amount of energy to cook one brisket as it does to cook two and if that fits in the slow cooker, I am going to do it! Leftover corned beef can be used in so many ways. This casserole just layered up all the leftovers from this meal. I could have easily only used half of the brisket I had left and saved the other for a different casserole that would be more like a reuben sandwich. I will have to do that another time. It sounds great in my head already!
This time I layered the cabbage and carrots in the bottom of an 8 inch glass baking dish and then topped with the shredded corned beef and spread over the leftover mashed potatoes but I topped it with some cheese because that always makes everything better right? Only thing Rick would say was missing was some bacon. But I digress.
Since we were going to be enjoying this for our mid day meal, and it was getting a little late, I opted for heating this through in the microwave. I know that this is not always a popular idea with some people and if you are opposed to using the microwave, please refrain and make this in your oven. 350 degrees for 25 to 30 minutes should do this one nicely. I actually did cook mine in the microwave and it was delicious! I started off by placing a piece of parchment on top to avoid scorching and drying out. Then I set the oven at 50% power. I cooked in 5 minute increments, checking after each time to see if the center was warm enough. I cooked this for a total of 8 minutes at 50% power and an additional 5 minutes on full power. Since microwaves can differ you should watch yours which may take more or less time than mine. I have an 1100 watt microwave.
I was actually quite happy with how this casserole turned out. Hearty and delicious just like the day we originally ate it and you cannot beat that! You already know that you love the contents, this just gives you a different way to present and serve it. We got 8 nice servings out of this casserole and we enjoyed it with a side salad of cucumbers and tomatoes. The best part is that we used what we already had and didn't waste it!
I hope that this inspires you to make something out of your leftovers that is delicious and a bit of a twist on the original! I hope you give this a try sometime soon and I hope you love it!
Happy Eating!
#wecook
Get my cookbooks here: http://bit.ly/1czqM5R
Business Inquiries can be sent to:
info@noreenskitchen.com
Check me out on social media!
Facebook: http://on.fb.me/12bdibt
Twitter: @noreenskitchen
Instagram: http://bit.ly/12bdqrp
Google + http://bit.ly/1o5GMYy
***MAILING ADDRESS****
Noreen's Kitchen
PO Box 14173
New Bern, NC 28561
Have a question for me? Send me an email:
info@noreenskitchen.com
Noreen's Kitchen Community Guidelines (The Rules)
http://bit.ly/2i7VocU
Any links to Amazon are, in many cases, affiliate links.
Produced by Noreen's Kitchen ©2008-2016 all rights reserved All embeds must live link to Noreen's Kitchen channel. No Editorial Excerpts without permission, Violators agree to pay royalties, all court costs, all collections & all lawyers fees.
30
views
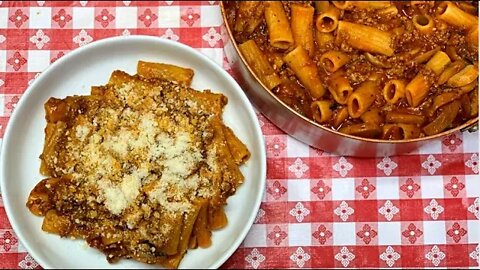
BACHELOR STEW ONE POT PASTA DISH!! PANTRY COOKING RECIPE!!
Today I am sharing a pantry recipe that has been in my family since I was a kid. My stepdad brought this now family favorite to us and he called it "bachelor stew". It is a dish he would make when he was single. He made it once a week in a big batch and ate off of it all week long. We loved it as kids and I still love it now and so do my kids. Its full of good, simple ingredients that you may already have on your pantry shelf and in your freezer. Quick to throw together and so satisfying and delicious! Comfort food at its best!
This is really a simple, one pot pasta dish that relies on many pantry staples. It starts with some ground meat. I am using ground beef but you can use chicken, turkey or pork if you like. I am adding some chopped onion and garlic and do enjoy using some bell pepper but Micah is not a fan so I left it out this time. I browned the ground beef as you would for any dish of this type or even tacos. Just be sure to get some "brown" on there and not just cook it. I always say you want the pan to sizzle, not simmer, be sure all the water has cooked away before adding the vegetables.
I just add the onions and garlic along with some salt and seasonings of your choice. I used a good palm full of Italian seasoning here. If you like, put a Neopolitan twist on this by adding some black olives, capers and roasted red peppers if you keep those on your pantry shelf, chop those and toss them in with some canned mushrooms with their liquid.
Next you will want to add one pound of short cut pasta, such as rigatoni, rotini, penne or ziti. Radiatore, Orecchiette and Cavatappi will work here as well. Just not long pasta like spaghetti or angel hair. You really want a good hearty pasta to hold up to the cooking and the sauce.
Now you can add one large jar (45 ounces) or two smaller jars of your favorite pasta sauce. Our favorite has always been Ragu, super chunky mushroom, but you should use what your favorite is or whatever you have on hand. If you don't have a jar of pasta sauce, use some canned tomatoes and a can of tomato paste and season that up to your preference. Now add in a bit of water. I added 1 cup and give everything a good stir. Bring to a simmer and reduce to medium heat and put a lid on it. Allow to simmer gently for about 15 minutes or until the pasta is just perfect. I like mine al dente, but if you like yours a bit more done, then cook it longer.
Now you are ready to serve up a delicious, one pot pasta dinner! Top off with some parmesan cheese and you are good to go! Serve with some garlic bread and a nice salad or steamed green beans or whatever veggie you have for a complete meal. In the alternative, you can choose to add whatever vegetables you like right to the pot. Some diced zucchini or shredded carrots would be nice here and if you saute them with the meat before adding the sauce, your kids won't even realize they are in there. Points for mom!
This makes a lot. Enough to feed my family of four adults for two full dinners and a couple lunches. You can keep the leftovers in the fridge in an airtight container for up to a week. Or you can freeze them for up to three months. I recommend turning the leftover bachelor stew into a pasta bake! layer into a casserole. Add some ricotta and mozzarella cheese and freeze until ready to use. Then bake until browned and bubbly! Two dinners at one time! What could be better than one to eat and one to freezer bank?
I hope this gives you another idea of what you can make with items off your pantry shelf! I hope that you are inspired to go pantry diving and make something delicious with what you have on hand! I hope you will give my family favorite, bachelor stew a try, sometime soon and I hope you love it!
Happy eating!
Get my cookbooks here: http://bit.ly/1czqM5R
Business Inquiries can be sent to:
info@noreenskitchen.com
Check me out on social media!
Facebook: http://on.fb.me/12bdibt
Twitter: @noreenskitchen
Instagram: http://bit.ly/12bdqrp
Google + http://bit.ly/1o5GMYy
***MAILING ADDRESS****
Noreen's Kitchen
PO Box 14173
New Bern, NC 28561
Have a question for me? Send me an email:
info@noreenskitchen.com
Noreen's Kitchen Community Guidelines (The Rules)
http://bit.ly/2i7VocU
Any links to Amazon are, in many cases, affiliate links.
Produced by Noreen's Kitchen ©2008-2016 all rights reserved All embeds must live link to Noreen's Kitchen channel. No Editorial Excerpts without permission, Violators agree to pay royalties, all court costs, all collections & all lawyers fees.
700
views
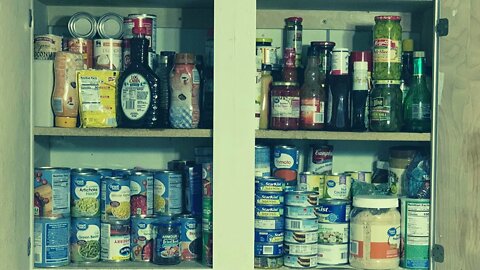
THE NEED FOR A WELL PREPARED PANTRY IN GOOD TIMES AND BAD!!
I live by the adage, "In the event of an emergency, the time to prepare has passed." A long time ago we received an order from a food storage company that we had purchased from and they included a card with this phase on it. This has stuck with me ever since and it is always in the back of my mind. If you have a disaster, whether it be a weather event, a personal setback, an accident, loss of job or in the current case, a pandemic with potential mass casualties, you will need to be prepared. Today we are starting a series of pantry chats where I will help you get some ideas on how you can get started on your way to never being unprepared again. It's never too late. Especially now! I hope this helps.
I recently prepared a shelf cooking recipe where I pulled nearly all the ingredients from my pantry. The idea here is that no matter what the circumstances, you should have what you need on hand to feed your family if you cannot get to the store. Lunch lady chicken and gravy is easy and quick and it is satisfying and comforting. In times of uncertainty, being able to feed your loved ones, in a healthy way, but still in a way that will make them remain calm, is a great accomplishment. Fear can tend to run rampant during these times. We are constantly being bombarded with news and reports and press conferences and information. Now with our phones, the notifications are always there, in our pocket , purse or even our nightstand, staring us at the face, even at 3:00 am. Set your fears aside. There is no reason to worry. Especially about feeding your family! I got you!
Many years ago I wrote a blog entry about keeping a prepared pantry. While some things have changed for me, the idea remains the same. Basically, you need to have on hand, the things your family enjoys eating. Then you need to be able to have on hand shelf cooking recipes that you can pull and make quickly with shelf ingredients. The Lunch Lady chicken and gravy is one of those recipes. But maybe you have some of your own. In which case you should stock the items to make those dishes. We love tuna noodle casserole and chicken and stuffing bake. Both of those are shelf pulls even when there is no fresh meat to add to them.
Do not limit your "pantry" to only the cupboard or closet. Your pantry is any food you have on hand including the freezer, refrigerator and dry pantry as well as root vegetables that only need cool or room temperature storage. I like to keep a well stocked freezer with lots of meats that we enjoy as well as frozen vegetables, fruits and freezer meals ready to heat up or toss in the slow cooker when time is precious. Freezer banking is a great way to do this when you are already making a casserole, why not make two, pop one in the freezer before you bake it and you already have dinner for another day! Same with leftovers of a slow cooked soup or stew! Those freeze great and can be reheated in the slow cooker for ease of preparation.
A variety of spices, sauces, condiments and mixes can help a lot and go a long way. Items such as pasta, mac and cheese, instant mashed potatoes, stuffing mix and the like can be turned into great dishes that are quick to make and delicious. Jarred gravy or gravy packets, stock in a box, creamed soups, family size cans of tomato soup are all great go to items for quick meals.
Basics such as canned vegetables, beans both canned and dried and canned meats like chicken, tuna, dried beef, salmon, and even spam are great options to keeping your pantry ready for anything! These items all require minimal preparation and depending on the circumstances you can always have something on hand to share in the event friends or neighbors come on hard times.
Keeping a prepared pantry is crucial. Not just for every day life, but for long term wellness of your family. If you do not have to worry about feeding your family then you can set your mind to help others who are in need. This may actually be one of the greatest gifts of all. I hope that you will find this helpful. It comes from the heart. Know that I am praying for all of you as we navigate these uncharted waters together.
Happy Eating!
Business Inquiries can be sent to:
info@noreenskitchen.com
Check me out on social media!
Facebook: http://on.fb.me/12bdibt
Twitter: @noreenskitchen
Instagram: http://bit.ly/12bdqrp
***MAILING ADDRESS****
Noreen's Kitchen
PO Box 14173
New Bern, NC 28561
Have a question for me? Send me an email:
info@noreenskitchen.com
Noreen's Kitchen Community Guidelines (The Rules)
http://bit.ly/2i7VocU
Any links to Amazon are, in many cases, affiliate links.
Produced by Noreen's Kitchen ©2008-2016 all rights reserved All embeds must live link to Noreen's Kitchen channel. No Editorial Excerpts without permission, Violators agree to pay royalties, all court costs, all collections & all lawyers fees.
66
views

LUNCH LADY CHICKEN AND GRAVY!! SHELF COOKING PANTRY PULL RECIPE!!
Nothing is better than a comfort food meal during a time of stress and uncertainty. This one is no exception. A take on our daughters favorite middle school cafeteria lunch we present our version of Lunch Lady chicken and gravy. This is served over mashed potatoes or stuffing or both, since we know that carbo loading can be a comfort in a time like this. Pair this with your favorite shelf stable or frozen veggie along with the finishing touch of some cranberry sauce from way back in the cabinet. This meal will go a long way to feed your hungry brood and it will take the edge off all these long, home schooling, working from home days ahead.
So we are a few days in to our recommended, self imposed "social distancing" quarantine. It is my hope that we can indeed flatten the curve and get a handle on this problem sooner rather than later. Since I know many were taken by surprise of all this and pantry closets, fridges and freezers can be a little on the questionable side, we are sharing this pantry favorite that is easy to put together using staples that you may have in or pantry or that you can plan to have in your pantry soon using online ordering and grocery pick up in your area.
This focuses on shelf staples that we should all try to have on hand for situations such as this. Seeing as how we live in a hurricane area, we are always prepared for a weather event. This is a little different. We have power, water, internet and phones. We have heat or in our case air conditioning. We are comfortable and blessed in many ways. But we know some of you looked in your pantry because you were either between paychecks or had not had time to go shopping yet before the panic purchasing began. Do not fear! You can do this! We are here to help and we have your back!
You can add these ingredients to your shopping list! A couple jars of chicken gravy. Or you can plan to use packet gravy or make your own gravy using some boxed chicken or turkey stock. A couple or more cans of chunk, white meat, chicken breast. Canned mushrooms, your favorite canned veggies and some instant mashed potatoes and stuffing mix. Of course you can make fresh mashed potatoes! Do you have potatoes? Use them! These are mere suggestions to get your ideas going and get you out of a fearful funk that this situation has thrust many people into.
Pour that gravy into a saucepan or mix up your gravy or make it the way you like. Add the mushrooms if you are loving those and be sure to use the juice. Also add in the chicken. You can choose to add the broth or leave it off to the side for the pets. I used the broth from one can and gave the other to the pets. I seasoned up the mix with my homemade chicken rub and poultry seasoning. You can find those videos here:
Hungarian chicken rub seasoning blend: http://bit.ly/2pPgfqF
Homemade poultry seasoning blend: http://bit.ly/34DaxXv
Place this over medium heat until slightly simmering and then you are ready to rock and roll. While this is coming up to heat, make your sides. I made both mashed potatoes according to the box directions and the stuffing. You can do what you like. I also made some frozen broccoli to add some green to this plate. Rick would have preferred corn, but there was a lot of heavy starch in this meal and I did not want to add more. A bit of cranberry sauce for the finishing touch and dinner is served.
Are canned chicken, jarred gravy and instant mashed potatoes my first choice for making a meal? Nope, but knowing that at any given time I can whip something together fast regardless of whether we are quarantined or not is a blessing. You could make this with fresh chicken if you have it. Add that to your slow cooker with your gravy and cook on low all day. Break up the meat and serve the same way. Make this your own and have peace of mind knowing you can do this!
I hope that this helps. I hope you give this a try and I hope you love it! Wishing you health, happiness and peace in the coming days!
Happy eating!
#wecook
Get my cookbooks here: http://bit.ly/1czqM5R
Business Inquiries can be sent to:
info@noreenskitchen.com
Check me out on social media!
Facebook: http://on.fb.me/12bdibt
Twitter: @noreenskitchen
Instagram: http://bit.ly/12bdqrp
Google + http://bit.ly/1o5GMYy
***MAILING ADDRESS****
Noreen's Kitchen
PO Box 14173
New Bern, NC 28561
Have a question for me? Send me an email:
info@noreenskitchen.com
Noreen's Kitchen Community Guidelines (The Rules)
http://bit.ly/2i7VocU
Any links to Amazon are, in many cases, affiliate links.
Produced by Noreen's Kitchen ©2008-2016 all rights reserved All embeds must live link to Noreen's Kitchen channel. No Editorial Excerpts without permission, Violators agree to pay royalties, all court costs, all collections & all lawyers fees.
78
views

SLOW COOKER CHICKEN STEW!! DUMP AND GO PANTRY PULL RECIPE!!
Sharing a delicious slow cooker, chicken stew. A real throwback to my childhood when my mom would make something very similar in the oven. You can make substitutions, changes, additions or deletions to my suggested base and create a delicious, nutritious meal for your family that will last more than one day. Leftovers freeze well and can also be used for lunches the next day or even dinner the next night, if you don't mind eating the same thing more than one day in a row. This is my way of helping a time that can be confusing and unsettling. I may not have all the answers, but I can help you make something soothing, comforting and delicious for your family. I hope you enjoy!
Today is the beginning of a focus for the next little while on shelf cooking, or pantry pull cooking. Using what you have, stocking what you need and cooking delicious meals for your family in this time of uncertainty. My hope is that I am going to be helpful to all people. Everyone from the seasoned cook with a well stocked home, to the living on a shoestring single parent who is fearful they won't be able to feed their children. We must all come together and do our part. This is what I can do. You can start by not worrying, not stressing, not freaking out because we have zero control here. All we can control is ourselves and our behavior. With that in mind, I am moving forward with this idea.
This stew is reminiscent of a chicken cacciatore or Italian hunter's stew. I am using ingredients that I have on hand to make a wonderful, warming meal on a cool, wet and rainy day. It all starts with chicken. I am using boneless, skinless chicken breasts, but you should use what you have on hand. Thighs, legs, whole cut up chicken or bone in chicken works here as well. I am adding stewed tomatoes, but diced, whole or crushed work here as well or in a pinch some pasta sauce or even tomato juice will work. Add in some veggies to bulk up that goodness. I am using mushrooms, red skin potatoes, onion, garlic and the ends of some sweet bell peppers that were hanging around. I am also adding a bag of frozen green beans. If you don't like those veggies, add what you do like! Carrots, zucchini, cabbage, all work here. There are no wrong answers.
Season this up with a bit of Italian seasoning, basil and a bay leaf, I also added a bit of salt and pepper when I added some extra chicken stock and vegetable juice two hours into the cooking. This just gets set in the slow cooker on high for six to eight hours or until the chicken is tender, the potatoes are no longer hard and the rest of the veggies are done.
This brothy stew or "stoup" is the perfect meal for the cold day we had here today. This first day of suggested self quarantine and "social distancing" due to prevention of virus spreading. Nothing is better to quell your nerves than a good meal, shared with people you love. It really bolsters what is important. While the world may be in an upheaval and we have no control over that, remember, you have total control of your world, your family and yourself, especially your behavior and your reactions and emotions. Keep them in check, give them and yourself grace and keep on, keeping on. This too shall pass. Brighter days are ahead.
To those who are facing a struggle, due to layoffs, shut downs or cut backs, please check with your local school district. In my area they announced drive through lunch pick up for students who qualified for the free lunch program. At least this will help some to get what they need. I know it can be hard, but we all have to work together. As the old adage goes, we may not have it all together, but together we have it all. When it all seems too much, simply quiet yourself and pray.
I hope that this recipe will find its way to your table. I hope you try this chicken stew and I hope you love it. I hope that you and yours are happy, healthy and well and I hope that we are all seen through this trouble sooner, rather than later. Keep a good attitude, its worth more than you can imagine!
Happy Eating!
Get my cookbooks here: http://bit.ly/1czqM5R
Business Inquiries can be sent to:
info@noreenskitchen.com
Check me out on social media!
Facebook: http://on.fb.me/12bdibt
Twitter: @noreenskitchen
Instagram: http://bit.ly/12bdqrp
Google + http://bit.ly/1o5GMYy
***MAILING ADDRESS****
Noreen's Kitchen
PO Box 14173
New Bern, NC 28561
Have a question for me? Send me an email:
info@noreenskitchen.com
Noreen's Kitchen Community Guidelines (The Rules)
http://bit.ly/2i7VocU
Any links to Amazon are, in many cases, affiliate links.
Produced by Noreen's Kitchen ©2008-2016 all rights reserved All embeds must live link to Noreen's Kitchen channel. No Editorial Excerpts without permission, Violators agree to pay royalties, all court costs, all collections & all lawyers fees.
18
views
HOMEMADE HAND SANITIZER!! ALCOHOL FREE!!
DISCLAIMER: You should use what you choose and think is best for fighting germs. You should use whatever sanitizer you think is best. I am a firm believer in Thieves oil. I have used it for years. I have never gotten sick when lots around me have. This video is for informational purposes only. I am not a scientist nor a doctor and make no claims to that effect.
In light of our current health crisis the world over. I thought it would be a good time to share with you how you can make a fabulous, moisturizing, germ busting hand sanitizer with ingredients that are easy to source. This is a scary time, but being able to be self sufficient and make your own stuff can be a very therapeutic endeavor. Preparedness is a way to be certain that you never have to be anxious or fearful of things like what we are facing now. So fear not! I have your back and we all have each other!
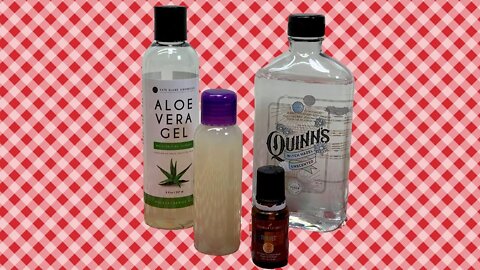
I have chosen to make my hand sanitizer alcohol free with ingredients of the same. You can make yours with whatever you can source and whatever your wallet deems appropriate. I am using all natural and organic aloe vera gel that does not contain any colorants, alcohol free, scent free witch hazel, a bit of water and several drops of my favorite Thieves, essential oil. You do not have to use the essential oil I have chosen. You can use Tea Tree oil, which has great germ fighting properties, lemon, peppermint, eucalyptus or Bergamot, all of which have germ fighting properties. Please do your own research before choosing what is best for you. I chose to use Thieves for it's known germ fighting abilities. I often use this oil in daily life and attribute my overall wellness to its regular use in personal care as well as in my housekeeping regimine.
The blend is simple. Into a reusable squeeze bottle pour 1/4 cup of aloe vera gel, 2 tablespoons of witch hazel a bit of water, and 15 drops or so of the essential oil. Cap it and give it a good shake to incorporate. It may or may not separate due to whatever brand of gel you have used. Mine did not. It has held steady since I made it. I added a bit less water but you can add a bit more do not exceed 2 tablespoons. It will make it much too runny.
If you have smaller bottles/containers, you can simply cut the recipe in half or you can distribute the mixture among more than one container. No worries. This is going to be a nice go to for your bag, purse or back pack. I am always vigilant about having either a spray or a gel in my bag for disinfecting the grocery cart when I go to the store. Does it look odd to whip out a spray bottle and douse the grocery cart. Probably. Do I care? Nope!
As you can see, a little bit of ingredients can go a long way. You only need a few drops in the palm of your hand to make them sanitized and moisturized not to mention smelling great! I chose to use alcohol free aloe and witch hazel because it can dry out your skin. This will not and when you are using the sanitizer multiple times a day that can make a big difference for your cuticles and the reduction of hangnails.
I hope that this will be something you can use and that you will try. I hope that you all stay healthy and well and do everything you can to take the proactive measures necessary to facilitate that. Be sure, during this time to keep your heads about you. Remember it is easier to be a blessing to others instead of a curse. One day you may need someone to be a blessing to you. So lift each other up and everything will be fine. We will all get through this arduous time and be better for it.
Happiness and Health!
Get my cookbooks here: http://bit.ly/1czqM5R
Business Inquiries can be sent to:
info@noreenskitchen.com
Check me out on social media!
Facebook: http://on.fb.me/12bdibt
Twitter: @noreenskitchen
Instagram: http://bit.ly/12bdqrp
Google + http://bit.ly/1o5GMYy
***MAILING ADDRESS****
Noreen's Kitchen
PO Box 14173
New Bern, NC 28561
Have a question for me? Send me an email:
info@noreenskitchen.com
Noreen's Kitchen Community Guidelines (The Rules)
http://bit.ly/2i7VocU
Any links to Amazon are, in many cases, affiliate links.
Produced by Noreen's Kitchen ©2008-2016 all rights reserved All embeds must live link to Noreen's Kitchen channel. No Editorial Excerpts without permission, Violators agree to pay royalties, all court costs, all collections & all lawyers fees.
58
views
OVEN BAKED HONEY MUSTARD SALMON!
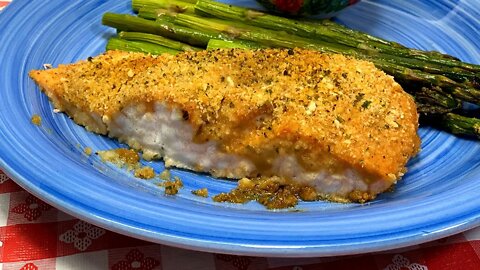
Today I am sharing with you a quick and easy, delicious and nutritious option for your dinner! This oven baked, honey mustard salmon is a great go to for when you are in a pinch to get dinner going! If you are a lover of salmon, you are going to love this! Flaky salmon topped with a quick honey mustard sauce and sprinkled with crispy bread crumbs. Baked to perfection, all you need to complete this meal is a delicious veggie or salad on the side. I know you are going to want to give this gem a try!
We came across a great deal on Atlantic salmon this week at the grocer and wanted to do something a little different. My usual go to is to poach the fish in water with lemon, tarragon and onion. We love that version and usually serve it with either bearnaise or hollandaise sauce. This time I wanted something a little less time intensive and without the extra heavy sauce. Which is delicious, but when you are trying to pare back your meal plan you want lots of flavor without all the extras.
I purchased a whole side of salmon and cut it into portions and then took the skin off. I love crispy salmon skin if it is done right in a very hot cast iron skillet for just the right amount of time. I will eat that ish all day long. But baking it like this in a not as hot oven will only steam that skin and make it pallid and soggy. So off it came. I did the salmon on a baking sheet lined with non stick aluminum foil for ease of clean up and so that my fish would not stick.
I mixed up a bit of honey mustard by blending some Dijon mustard right out of the bottle with some honey. I used about 1/2 cup of mustard to 1/4 cup of honey and blended them well. I sprinkled the fish with a bit of my favorite salt free seasoning. You should use your favorite or what you have on hand. A bit of lemon pepper, season all, season salt or even old bay would be perfect. Mrs. Dash works well too! Give all those filets a good sprinkle of that seasoning before liberally brushing on some of the honey mustard over each of the pieces. Next sprinkle the fish with a good amount of bread crumb over the top of each one. You don't want a ton, but just enough to blanket the filets.
We are almost ready to put these in the oven for a little nap. But first, to ensure crispy brown topping, I gave each piece of fish a good spray with my coconut oil cooking spray. Just a light coating will give you the desired outcome you are looking for and it will help everything brown up nicely. Pop this in a 350 degree oven for about 20 to 25 minutes depending on how well done you enjoy your salmon and you are in for a real treat!
When the fish is flaky it is ready to come out of the oven. Allow to rest for five minutes before serving. I served my salmon with some oven roasted asparagus spears. If you are interested in seeing how I do that you can check out my video here: http://bit.ly/2Uzl95Z
The video is very old and the quality is not great. It is probably a candidate for a redo. Stay tuned for a future revamping!
This salmon was delicious! Like smack yo mama good! The leftovers were even good cold as a quick lunch the next day! I love cold salmon leftovers by themselves or in a salad. This was just perfect and everyone loved it. This was Atlantic salmon and was not fishy tasting at all as it can sometimes be. On tip is to be sure to cut off the thinner sections of the side of salmon to avoid the very fishy taste that comes from certain sections that are not as fatty to avoid that taste. Overall this was amazing and I am so glad were were able to share it with you!
I hope you give this idea for oven roasted, honey mustard salmon a try, sometime soon and I hope you love it!
Happy Eating!
Get my cookbooks here: http://bit.ly/1czqM5R
Business Inquiries can be sent to:
info@noreenskitchen.com
Check me out on social media!
Facebook: http://on.fb.me/12bdibt
Twitter: @noreenskitchen
Instagram: http://bit.ly/12bdqrp
Google + http://bit.ly/1o5GMYy
***MAILING ADDRESS****
Noreen's Kitchen
PO Box 14173
New Bern, NC 28561
Have a question for me? Send me an email:
info@noreenskitchen.com
Noreen's Kitchen Community Guidelines (The Rules)
http://bit.ly/2i7VocU
Any links to Amazon are, in many cases, affiliate links.
Produced by Noreen's Kitchen ©2008-2016 all rights reserved All embeds must live link to Noreen's Kitchen channel. No Editorial Excerpts without permission, Violators agree to pay royalties, all court costs, all collections & all lawyers fees.
58
views
SLOPPY JOE STUFFED PEPPERS! LEFTOVER MAKEOVER!!
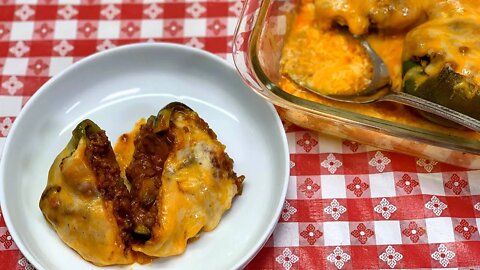
Today I am sharing a super fast, leftover makeover that may help you the next time you have some sloppy joes left after dinner. I have been toying with this idea for a while! Sloppy Joe stuffed peppers are a great way to makeover those leftovers and give them new life. We love stuffed peppers and Rick's very favorite meal is sloppy Joes, but we don't have them that often, so what could be better than blending the two? Top those off with some shredded cheddar and you have a quick and easy meal made with what you already had in a flash! If you love a stuffed pepper, you are going to love these budget friendly beauties!
It was recently Rick's birthday and he always chooses sloppy Joes for his home cooked birthday meal. Do you do that in your house? The birthday person gets to choose a home cooked meal as well as a restaurant for another evening for a celebration night out! When I make these, I always make a lot so there will always be leftovers for Rick for the coming week. The sloppy Joe meat also freezes well so no worries if you cannot get to it quick. If you are interested in seeing my sloppy Joe recipe you can check out the video here: http://bit.ly/2oKcsp3
On the day I made this video we were planning on having this for a lunch. It was actually lunch for three days. Once for two of us and twice for Rick for two more days. One stuffed pepper per serving is enough to satisfy anyone. Pair that with a tossed salad or some fruit on the side and you are good to go.
If you would like to make the sloppy Joes low carb and keto friendly, you can sub out the brown sugar for brown sugar substitute such as Swerve as well as a sugar free ketchup like our favorite G. Hughes brand. They both make this a really easy way to make this comply with any eating plan. Don't like ground beef? Use ground chicken, turkey or pork. You make them your own.
I cut two large green bell peppers in half and seeded them and removed the ribs with a spoon. If you don't like green peppers, then use red, yellow orange or whatever you like! Even consider stuffing this into some Anaheim or Poblano peppers for a little flair! I sliced right through the stem and did not remove it from the top to maintain the structural integrity of the pepper shell. Then I stuffed each shell with about 1/2 cup of the sloppy Joe mixture then topped them all off with a total of 1 cup of shredded cheese. I added about 1/4 cup of water to the baking dish then popped these in the oven for a total of 50 minutes or until they were browned a bit and bubbly and soft.
Note, that I do not like my cheesy top crispy, if you do, leave it that way when these come out of the oven. I like mine a bit more gooey so I added about 1/2 cup extra cheese on top and let that melt over. You should do what you enjoy most in this particular case. When you take these from the oven, let them cool for about five minutes or longer before serving so they are not molten and cannot injure someone who is ready to eat.
These were so good! They will definitely be going down on the menu plan in the future. What is not to like? A stuffed pepper using some leftovers that would normally be stuffed into a bun but these are going to really make you happy!
What are some things you like to stuff into a pepper shell? Leave me a comment down below and let me know. I have some other ideas for stuffed peppers that I will be sharing in the future. In the mean time, I hope you give these sloppy Joe stuffed peppers a try sometime soon and I hope you love them!
Happy Eating!
Get my cookbooks here: http://bit.ly/1czqM5R
Business Inquiries can be sent to:
info@noreenskitchen.com
Check me out on social media!
Facebook: http://on.fb.me/12bdibt
Twitter: @noreenskitchen
Instagram: http://bit.ly/12bdqrp
Google + http://bit.ly/1o5GMYy
***MAILING ADDRESS****
Noreen's Kitchen
PO Box 14173
New Bern, NC 28561
Have a question for me? Send me an email:
info@noreenskitchen.com
Noreen's Kitchen Community Guidelines (The Rules)
http://bit.ly/2i7VocU
Any links to Amazon are, in many cases, affiliate links.
Produced by Noreen's Kitchen ©2008-2016 all rights reserved All embeds must live link to Noreen's Kitchen channel. No Editorial Excerpts without permission, Violators agree to pay royalties, all court costs, all collections & all lawyers fees.
66
views
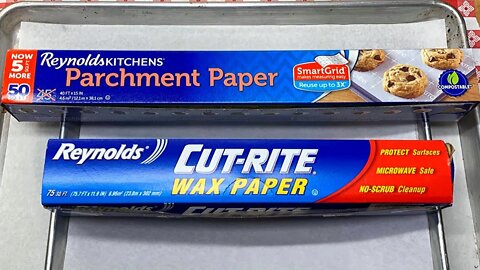
PARCHMENT VS WAX PAPER!! KNOWLEDGE, TIPS AND TRICKS!!
Today I am sharing some great information regarding the burning question of parchment paper vs. wax paper. Are they the same? Are they different? Can they be used interchangeably or should they have a designated spot in your kitchen repertoire? We are going to cover all of those questions that I have received from many of you over the years as well as offer up some great tips, tricks and hacks that you can use in your own life using both of these products.
The "get down to business" answer here is no, parchment and wax paper are not the same. While they can both be used to collect messes, avoid a lot of clean up and help with certain tasks, they are not identical in those tasks.
Parchment paper has been around for centuries. However it only gained popularity in the kitchen beginning in the mid 1800s when a couple of fine French gentlemen developed a way to coat paper with a substance that would allow the paper to become greaseproof and essentially non-stick. This was the birth of what could be referred to as "kitchen paper" and has evolved into what we know today in the form of parchment paper on rolls and individual sheets that help us bake great goodies without worry of removing them from the pan. Parchment can be used without problems, in the oven up to 450 degrees and can be used to line cake pans, brownie pans and to make dishes such as fish, chicken and vegetable en papillote or in a bundle.
Wax paper is what our grandmother's used to wrap leftovers and pack brown bag lunches before plastic bags came on the scene. Even my own mother used it to wrap sandwiches for my lunch when I was small. Wax paper was laid out in long swaths upon the table at Christmas when homemade chocolates and other treats were dipped and awaited drying time. Wax paper has it;s place, but one place it should never go is in the oven. This kitchen paper is coated on both sides with wax which will and can melt depending on the heat intensity and you can run the risk of this igniting under certain conditions. To be safe, this should never be used to line cake pans, or cookie sheets as it can be very unsafe.
Wax paper can be used to slick up your can opener, shine up your chrome fixtures and even slick up your metal or plastic sliding board! You can use parchment to line cookie and cake pans, make cornets or cones to pipe icing, old school, in place of a disposable piping bag or use it in a myriad of ways in the craft room! Parchment or wax paper can be used to line the table in place of newspaper when crafting, painting or doing any sort of messy work and can even be an aid when rebuilding equipment or cleaning your Winchester. A clean work surface is the best place to start and these tools are a great way to do that.
I hope this was informative and helpful and maybe even a little fun for you to learn about the differences in both these kitchen staples. Use one or both depending on your needs!
Happy Eating!
Get my cookbooks here: http://bit.ly/1czqM5R
Business Inquiries can be sent to:
info@noreenskitchen.com
Check me out on social media!
Facebook: http://on.fb.me/12bdibt
Twitter: @noreenskitchen
Instagram: http://bit.ly/12bdqrp
Google + http://bit.ly/1o5GMYy
***MAILING ADDRESS****
Noreen's Kitchen
PO Box 14173
New Bern, NC 28561
Have a question for me? Send me an email:
info@noreenskitchen.com
Noreen's Kitchen Community Guidelines (The Rules)
http://bit.ly/2i7VocU
Any links to Amazon are, in many cases, affiliate links.
Produced by Noreen's Kitchen ©2008-2016 all rights reserved All embeds must live link to Noreen's Kitchen channel. No Editorial Excerpts without permission, Violators agree to pay royalties, all court costs, all collections & all lawyers fees.
28
views
1
comment

SUGAR FREE WHITE CHOCOLATE HOT COCOA MIX!
Today I am sharing an updated sugar free version of one of my most popular cocoa drink mixes! This white chocolate hot cocoa mix is so delicious you won't even realize that it is sugar free! This is for all of you who have requested more sugar free recipes! This one is a real winner and I know you are going to love it! Rich, delicious, vanilla flavor with full creamy body. If you are a white chocolate and vanilla lover, you are going to love this mix!
This starts like most of my other sugar free versions with heavy cream powder, dry milk powder and cup for cup stevia blend sweetener. The real addition that makes this work here is sugar free white chocolate instant pudding mix. It gives just the right creaminess and texture to what would otherwise be bland, boring and thin. The pudding mix is the key, without it you just get hot milk essentially.
Most of the ingredients here are obtainable at the local grocer. The heavy cream powder can be purchased on Amazon and I will leave a link to a list where you can find some of the items used in this video.
You can store your mix in an airtight container for up to six months in a cool, dark, dry place. When you want to make a cup to enjoy, simply add 1/4 cup of the mix to 8 to 12 ounces of hot water. Stir well and I might suggest using a drink whisk if you have one to really get the lumps out. Add a bit of water to the bottom of your cup at first then blend the mix well to dissolve. Then you can top off with the remainder of the water to fill your cup. Stir well and enjoy!
The beauty of making your own mixes is that you can use as much or as little as you like to increase or decrease the intensity of flavor that you prefer. While this is sugar free, it is not fat free nor is it calorie free, so be aware and if you are on a special eating plan you will need to calculate your macros or calorie intake on your own. I am here to help with a great recipe that you can enjoy and hope you do!
I hope that you give this sugar free white chocolate hot cocoa mix a try and I hope you love it!
Happy eating!
A printable version of this recipe is available here: http://bit.ly/2wJDaH3
You can find a shopping list containing some of the items used in this video here: https://amzn.to/37Wc4ZW
Get my cookbooks here: http://bit.ly/1czqM5R
Business Inquiries can be sent to:
info@noreenskitchen.com
Check me out on social media!
Facebook: http://on.fb.me/12bdibt
Twitter: @noreenskitchen
Instagram: http://bit.ly/12bdqrp
Google + http://bit.ly/1o5GMYy
***MAILING ADDRESS****
Noreen's Kitchen
PO Box 14173
New Bern, NC 28561
Have a question for me? Send me an email:
info@noreenskitchen.com
Noreen's Kitchen Community Guidelines (The Rules)
http://bit.ly/2i7VocU
Any links to Amazon are, in many cases, affiliate links.
Produced by Noreen's Kitchen ©2008-2016 all rights reserved All embeds must live link to Noreen's Kitchen channel. No Editorial Excerpts without permission, Violators agree to pay royalties, all court costs, all collections & all lawyers fees.
2
views
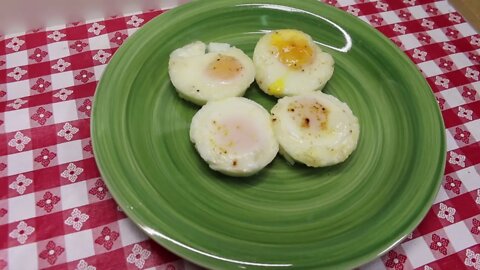
OVEN POACHED EGGS!! SHIRRED EGGS!! RETRO KITCHEN BASIC!
Today I am pulling one out of the "way back". Shirred eggs are eggs baked in the oven and were very popular in the 40's, 50's and 60's when ladies lunched and attended brunches and luncheons. While, not technically a poached egg, but sort of, these eggs could be baked in many ways. In cream, alone in butter etc. Essentially gently cooking them with surrounding heat and then serving with toast points. Today I am sharing with you how to poach eggs in the oven very similar to the shirred eggs of yore. This is a great way to make poached eggs without thinking too hard or without babysitting them. Also this is a great way to make poached eggs for a crowd! So let's get into the way back machine and poach some eggs in the oven!
As mentioned above, shirred eggs and poached eggs are similar but not the same. Shirred eggs are baked with cream or butter or both and sometimes with a mornay sauce or just about anything you can think of to fancy them up. Poached eggs are everyday goodness that can be fancied up or eaten as is. This is a great way to make a bunch all at one time if you are serving a crowd. It's also an easy way to make poached eggs if you are "challenged" in this department. I can poach an egg, but I am not patient and usually end up ruining them. So this is a great way to take care of the task.
You will need a cupcake tin, some eggs and some water. A spray of cooking oil is recommended even if you have a non stick pan like I do. This is just extra insurance that your eggs will come out of the pan with no problem. Next crack one egg into each well of the muffin tin. Next you will want to drizzle one tablespoon of water around the edge and into the middle of each egg. Be sure not to just dump the water on the egg. You want the water to distribute over the entire surface of each egg so that it will be bathed in warm water as it bakes in the oven.
Next you can place the pan in a 350 degree, preheated oven. Now is the tricky part. Every oven is different so you will want to set your timer for 8 minutes then check your eggs. If your eggs look very loose and still translucent on top they will need more time. Return them to the oven for an additional 3 minutes and then check them again. If they still look loose or not to your liking, add more time, but be warned, eggs will carry over cook, very quickly so if they look a bit under done, they will still be cooking in the pan and if you take them out and leave them for a few minutes they will be perfect but if you put them back in the oven, you run the risk of the egg over cooking. This all being said that if you like a harder yolk, you should cook them longer but if you want to ensure a velvety runny, dippy yolk, then take them out if you think they are getting close.
Now you can remove each egg from the pan using an offset spatula or a tablespoon, which is what I find most helpful. You can use these eggs to serve on toast, place on a burger or to make homemade eggs Benedict. You can make your easy hollandaise sauce while your eggs are in the oven and everything will be ready to go all at one time!
That is how you make poached eggs in the oven, or old fashioned shirred eggs like your grandma used to make. Only these are way easier and I am always looking for an easier way to get the job done! I hope you give this method a try and I hope you love it!
Happy Eating!
Get my cookbooks here: http://bit.ly/1czqM5R
Business Inquiries can be sent to:
info@noreenskitchen.com
Check me out on social media!
Facebook: http://on.fb.me/12bdibt
Twitter: @noreenskitchen
Instagram: http://bit.ly/12bdqrp
Google + http://bit.ly/1o5GMYy
***MAILING ADDRESS****
Noreen's Kitchen
PO Box 14173
New Bern, NC 28561
Have a question for me? Send me an email:
info@noreenskitchen.com
Noreen's Kitchen Community Guidelines (The Rules)
http://bit.ly/2i7VocU
Any links to Amazon are, in many cases, affiliate links.
Produced by Noreen's Kitchen ©2008-2016 all rights reserved All embeds must live link to Noreen's Kitchen channel. No Editorial Excerpts without permission, Violators agree to pay royalties, all court costs, all collections & all lawyers fees.
603
views

SHORTCUT BROWNIE BRITTLE! BUDGET FRIENDLY CHOCOLATE GOODNESS!
Today I am sharing a quick and easy way to make brownie brittle at home using your favorite brownie mix! This is super simple and only takes on substitution. The end result is similar to the brittle you can purchase at the store, but it is much more economical. The bonus is that you can customize your brownie brittle to suit your taste! This is a great treat to make if you are wanting a sweet treat without having to make a thick brownie. A couple crispy pieces of this chocolaty goodness is enough to satisfy that sweet tooth, I promise!
Today I am using one family size Duncan Hines Chewy Chocolate Brownie mix. You can use whatever type is your favorite. I am using the box instructions for both the water and the oil but I am only using egg whites in this recipe. The yolk will prevent the brittle from being crisp. So we want to eliminate that. Additionally, you will want to prepare two sheet pans with parchment, non stick foil or a silpat or silicone baking mat. I demonstrated only using one pan, but I will explain later why two is better.
Mix up your batter, then divide evenly between two sheet pans. Using an offset spatula, spread the batter very thin over the bottom of the pan. The offset spatula is your friend here because it will enable you to get all that batter spread super thin to all areas of the pan without having to get batter on your knuckles, which in the great vast scheme of things isn't a real problem, but ya know...
Now you can customize your brittle and give it some pizzazz! I am using 1/4 cup each of mini semi-sweet morsels as well as the same amount of crushed pecans. In my area, during the holidays you can get what is called "cookie pieces" pecans, which basically means crushed nuts. I contend that the nut manufacturer simply realized that all the crushed nuts in the bottom of his conveyor belt were good for something so he bagged them up and sold them like that. I love them and keep a bag in my freezer for times such as this. You can also use some toffee bits, coconut, honey roasted peanuts, or whatever you like. Just don't over do it. Scatter these all over the top of the batter then it's time to bake.
You want to bake the brittle in a 375 degree preheated oven for 18 to 22 minutes depending on your oven. You may want to bake each pan separately instead of at the same time to ensure even cooking and not burning. The brittle may be a bit soft when removing from the oven but it will crisp as it cools. Now for the part about using two pans. I used one pan with one family size brownie mix. I should have used two. As a result the middle of my "brittle" was not. It was thin and chewy like a brownie thin but not crispy. I am not worried because they will still get eaten because, well, brownies! But I want yours to come out crisp and thin all the way, so do as I say, not as I do and use two pans. Additionally, you can use only one box of brownie mix that will make on 8x8 pan of brownies or a non family size box of mix. The Ghirardelli brand makes the smaller pan. But make sure you get a mix that is just straight brownie mix without all the fancy add ins otherwise this won't work.
When the brownies are cool, you can break them into pieces and store them in an airtight container or zip top bag for up to 5 days. You and I both know they won't last that long if you have a family. You want to refrain from keeping these in the fridge or freezer because they will not stay crisp due to the high humidity in those environments. Make them, enjoy them and move on.
I hope you give this method of making brownie brittle a try and I hope you love it!
Happy Eating!
Get my cookbooks here: http://bit.ly/1czqM5R
Business Inquiries can be sent to:
info@noreenskitchen.com
Check me out on social media!
Facebook: http://on.fb.me/12bdibt
Twitter: @noreenskitchen
Instagram: http://bit.ly/12bdqrp
Google + http://bit.ly/1o5GMYy
***MAILING ADDRESS****
Noreen's Kitchen
PO Box 14173
New Bern, NC 28561
Have a question for me? Send me an email:
info@noreenskitchen.com
Noreen's Kitchen Community Guidelines (The Rules)
http://bit.ly/2i7VocU
Any links to Amazon are, in many cases, affiliate links.
Produced by Noreen's Kitchen ©2008-2016 all rights reserved All embeds must live link to Noreen's Kitchen channel. No Editorial Excerpts without permission, Violators agree to pay royalties, all court costs, all collections & all lawyers fees.
6
views

EASY HOT FUDGE SAUCE!! VALENTINE'S DAY DESSERT PERFECTION!!
Today I am sharing the easiest and most delicious hot fudge sauce you could ever make! This one is sure to be a hit with family this coming Valentine's day or anytime you need a chocolate treat! I have made this in the past for an ice cream social at church and the reviews were amazing. Everyone loves this sauce. Of course you can make this in bulk, but I have sized this down a bit to be more family friendly. Use this to make some sweetheart sundaes for your family this week and be sure to remember the festive sprinkles!
This recipe has only a few ingredients. You most likely have them on hand if you keep baking ingredients in your pantry on the regular. Some semi sweet or milk chocolate chips a can of sweetened condensed milk, be sure it's not evaporated or you will be sad. Adding in a bit of butter, water salt and vanilla extract and you have a smooth, silky and delicious hot fudge sauce to rival any that you have tried in the past!
Add everything but the extract to the saucepan and stir constantly over medium heat until everything is melted and well incorporated. You will see the mixture change texture a bit and become "fudgy" and the spoon will drag through leaving ribbons behind. Once everything is melty, smooth and fudgy, remove from the heat! You do not want this to simmer or even come close to boiling or it will seize. Then add in your vanilla and stir well. Now you are ready to serve or put in an airtight container. I use a mason jar. You can dip into this right away or you can let it cool a bit before making your sundaes. Then drape of your favorite kind of ice cream and enjoy!
Is there a favorite sundae you love? Just a scoop of vanilla with hot fudge is nice but up the ante a bit and think about your favorite ice cream joint and their offerings. When you go out what you you love? How about your own homemade version of a DQ Peanut Buster Parfait? Layers of ice cream, hot fudge and salted Spanish peanuts. My favorite is the DQ Pecan Mudslide. Vanilla ice cream topped with hot fudge, hot caramel and salted, roasted pecans. Oh Boy! I also love my hot fudge sundae made with strawberry ice cream for a sweet twist! Mix up the two and make a chocolate covered strawberry sundae with both hot fudge and strawberry topping! The possibilities are endless!
This topping is not just to make sundaes with. If you allow this to cool you can use it as a filling for cakes. Just a filling, between layers. Like the decadent fudge filling your favorite bakery puts in their layer cakes. You won't be disappointed! Just be sure to allow this to cool and even refrigerate overnight before attempting to fill a cake, otherwise it will be much too loose and may well ooze out the sides and make you sad. Delicious but sad.
I hope that this gives you a great option for making hot fudge the easy way. This really beats having to use a candy thermometer and boil hot sugar to the soft ball stage. The magic is in the condensed milk! You won't ever want to buy store bought again and that is always a good thing!
I hope you give this easy hot fudge sauce a try some time soon and I hope you love it!
Happy Eating!
You can find a printable version of this recipe here: http://bit.ly/2wcqKap
Get my cookbooks here: http://bit.ly/1czqM5R
Business Inquiries can be sent to:
info@noreenskitchen.com
Check me out on social media!
Facebook: http://on.fb.me/12bdibt
Twitter: @noreenskitchen
Instagram: http://bit.ly/12bdqrp
Google + http://bit.ly/1o5GMYy
***MAILING ADDRESS****
Noreen's Kitchen
PO Box 14173
New Bern, NC 28561
Have a question for me? Send me an email:
info@noreenskitchen.com
Noreen's Kitchen Community Guidelines (The Rules)
http://bit.ly/2i7VocU
Any links to Amazon are, in many cases, affiliate links.
Produced by Noreen's Kitchen ©2008-2016 all rights reserved All embeds must live link to Noreen's Kitchen channel. No Editorial Excerpts without permission, Violators agree to pay royalties, all court costs, all collections & all lawyers fees.
32
views

STEAK OSCAR! RETRO VALENTINE'S RECIPE! FT: BSTY MULTICOOKER
GET MORE INFO ON THE BSTY MULTIFUNCTION COOKER HERE: https://amzn.to/2vd3s3K
Today I am sharing one of my all time favorite, retro steakhouse dishes. Steak Oscar! Traditionally made with veal and called veal Oscar, this dish is the ultimate in indulgence. A well cooked steak topped with grilled asparagus, lump crab meat and draped with hollandaise or Bearnaise sauce, this is definitely a dish to bring out when you want to make something fancy. With Valentine's day just a week away, I thought that it would be fun to share this dish as an option for dinner with your sweetheart! Today we are making this on the BSTY multicooker using the grill pan and we thank them for sponsoring today's video as well as providing the appliance to prepare this amazing dish!
Traditionally this dish is made with veal and it's origins are murky at best. Said to have been created for King Oscar II of Sweden in 1897 and is named for him as well. It originally included ingredients that the king was very partial to, which included, veal medallions, sauteed in butter and white wine as well as lobster meat, topped with white asparagus spears and a rich sauce called Coronsauce that is, evidently similar to Hollandaise but I am unfamiliar with it.
I am making this dish with a sirloin steak in place of the veal. I made a conscious effort many years ago to not consume veal because I do not agree with the way it is raised. I am by no means an activist or a meat hater, as is evidenced by my many recipes. But veal is off limits for me so we chose a good, grass fed, Sirloin steak for this dish. You can use filet mignon, ribeye, new york strip or even a London broil if you are going to make this for a crowd. You can also make this "Oscar" dish using a boneless center cut pork chop or a boneless, skinless chicken breast. You should make this to suit your preferences and use the protein that best fits your needs.
I seasoned the steak with my homemade steakhouse seasoning on both sides and preheated the grill for five minutes on high to get it good and hot. Then I sear the steak on both sides getting good grill marks all around and allowed them to cook to a medium doneness or until their internal temperature, when taken on an instant read thermometer was between 140 and 145F. When done I removed them from the grill and allowed them to rest on a platter for 10 minutes before slicing and building our steak Oscar.
You can find my video for the steakhouse seasoning here: http://bit.ly/30wZ8HJ
To build the steak Oscar I sliced the steak and then fanned the portion onto the serving plate I layered three spears of steam/grilled asparagus on top that I cooked just after the steak was done using a bit of water and the lid for the grill. On top of the asparagus I layered a generous portion of lump crab meat. I am using real picked, local blue crab but I think that imitation crab would work here as well for a more budget friendly option. If you are not partial to crab you could also sub out for baby shrimp or even lobster meat if you prefer.
Now that we have the three main layers all built up, it's time for the crowning glory! The Hollandaise sauce. I have made mine from scratch using my fool proof method in the microwave. Don't knock it till you try it!
You can find my video on how to do this here: http://bit.ly/3bmJW5e
Drape the hollandaise sauce over the tower of goodness we built and then a sprinkle of cayenne pepper to finish everything off for good measure. Cayenne enhances the flavor of the hollandaise and gives it just enough kick. I make my hollandaise like a cross between true hollandaise and bearnaise sauce. Not only have I added the lemon juice which is integral to a good hollandaise but I have also added a bit of white wine vinegar which goes into bearnaise. I left out the shallot and tarragon that you would find in a traditional bearnaise sauce because Rick is not a fan.
Be sure to check out the BSTY multifunction cooker on Amazon as well as the accessory plates that can help you make better use of your time in the kitchen! Thank you to them for sponsoring today's video!
I hope you give Steak Oscar a try sometime soon, whether it's for Valentine's day or another occasion and I hope you love it!
Happy Eating!
Get my cookbooks here: http://bit.ly/1czqM5R
Business Inquiries can be sent to:
info@noreenskitchen.com
Check me out on social media!
Facebook: http://on.fb.me/12bdibt
Twitter: @noreenskitchen
Instagram: http://bit.ly/12bdqrp
Google + http://bit.ly/1o5GMYy
***MAILING ADDRESS****
Noreen's Kitchen
PO Box 14173
New Bern, NC 28561
Any links to Amazon are, in many cases, affiliate links.
Produced by Noreen's Kitchen ©2008-2016 all rights reserved All embeds must live link to Noreen's Kitchen channel. No Editorial Excerpts without permission, Violators agree to pay royalties, all court costs, all collections & all lawyers fees.
57
views

SUGAR FREE VANILLA CHAI LATTE MIX!! GIFTS IN A JAR!!
Today I am sharing a sugar free version of my homemade vanilla chai latte drink mix. In coming months I will be sharing sugar free versions of my drink mixes which have become a favorite among my subscribers. This is a delicious milk tea filled with spices and a little sweetness from stevia and erythritol. Add in a bit of vanilla in a surprising form and you have a wonderful warming mug that will make anyone happy! This is super easy to make and uses ingredients that are easy to source. If you are on a sugar restricted diet or are just trying to make better choices than this drink mix can help you do that without having to forgo some of your favorite things. This chai latte is delicious and satisfying and perfect for cool weather days!
I will be sure to leave a shopping list link below so you can source the ingredients you may need. Never feel like you need to use the products I recommend. You can always source your own with no problem. I am simply sharing with you the things you see me use in my videos. I am an Amazon affiliate so every time you use my link to purchase and item I do get a small percentage from that sale that does not cost you any extra but does help us to continue to make great content so I thank you for that. In any case, any ingredients you see me use in today's video will be listed in a link below.
I am using heavy cream powder to start this recipe off. It is the same heavy cream powder that I used in my sugar free hot cocoa video before Christmas. I am also using dried milk powder, stevia blend sweetener, swerve brown sugar substitute, unsweetened iced tea powder, one box of stevia sweetened, sugar free, instant vanilla pudding mix and some pumpkin pie spice. You can also choose to add some cardamom to this recipe if you wish to make it ultra authentic in flavor if you like.
All these ingredients get whisked together very well then stored in an airtight container for future use. Super simple and it smells amazing while you are mixing it up! To make a steamy cup of chai, simply add 1/4 cup of the mix to 8 to 12 ounces of hot water and stir well to dissolve. This will give you a lovely spiced, milk tea that has a nice layer of crema on top. Just like when you get a cup of hand pulled espresso!
These mixes are a great way to have delicious drinks on hand whenever you want or need them. They are also wonderful to give as gifts. With Valentine's day coming up, this would make a delicious gift to share with family and friends that will not hurt their diets and if you have people you love that have to regulate their blood sugar this will not be an issue for them.
I hope you give this sugar free vanilla chai latte mix a try sometime soon and I hope you love it!
Happy Sipping!
You can find a printable version of this recipe here: http://bit.ly/31oDsyj
You can find a shopping list that includes some of the ingredients used in this video here on my Amazon Influencer Page: https://amzn.to/2SdTwid
Get my cookbooks here: http://bit.ly/1czqM5R
Business Inquiries can be sent to:
info@noreenskitchen.com
Check me out on social media!
Facebook: http://on.fb.me/12bdibt
Twitter: @noreenskitchen
Instagram: http://bit.ly/12bdqrp
Google + http://bit.ly/1o5GMYy
***MAILING ADDRESS****
Noreen's Kitchen
PO Box 14173
New Bern, NC 28561
Have a question for me? Send me an email:
info@noreenskitchen.com
Noreen's Kitchen Community Guidelines (The Rules)
http://bit.ly/2i7VocU
Any links to Amazon are, in many cases, affiliate links.
Produced by Noreen's Kitchen ©2008-2016 all rights reserved All embeds must live link to Noreen's Kitchen channel. No Editorial Excerpts without permission, Violators agree to pay royalties, all court costs, all collections & all lawyers fees.
16
views

OVEN ROASTED NASHVILLE HOT CHICKEN WINGS!! SUPERBOWL SNACKS MADE EASY!!
Today I am sharing another awesome way to make wings for your next get together. With superbowl coming this weekend, there isn't a better time to make some delicious wings! These are my oven roasted, Nashville hot chicken wings. Seasoned with the Nashville Hot Chicken Shake Seasoning blend we made in a previous video and roasting them in a hot oven for a little over a half hour, these are seriously amazing! In fact, I am not a wing fan and these still had me thinking of them the next day! I think you are going to love the ease and simplicity of making your wings this way! I hope you give them a try!
These wings have two ingredients. Chicken wings, Nashville Hot Chicken seasoning and if you count time as an ingredient, then there you go. Three ingredients. These can be made quickly and in batches to you can always have some coming out of the oven in time for the next round. Be sure to have a bunch ready for the the half time rush!
I used approximately 5 pounds of chicken wings, which I purchase whole and trim myself. If you want to know how to cut up chicken wings you can refer to this video I made in the past to show you how: http://bit.ly/2SaJ7DI
I put the cut wings into a large bowl and doused them with 1/2 cup of my Nashville Hot Chicken Shake, seasoning blend. If you missed that video, you can find it here; http://bit.ly/30vXgzj
I recommend using rubber gloves for the next step. Go ahead and toss those wings in that seasoning very well. Massage it in and get it all distributed. No need to add anything else, but make sure that you spread the love and the seasoning so that everyone is evenly coated. This will ensure that every wing has a good coating of that delicious spice.
I baked my wings at 375 degrees for 45 minutes. I tested the internal temperature of one of the drummettes with an instant read meat thermometer. You want the temperature to be between 160 and 165. If you pull yours at 160 then tent with foil and allow to rest for 15 to 20 minutes. Carry over cooking will take care of those last few degrees and then you are ready to enjoy your wings!
If you prefer to have a Nashville hot chicken sauce to coat the wings in you can use about 2 tablespoons of neutral oil heated on the stove and add 2 tablespoons of the seasoning blend and bring to a healthy simmer. Then coat your wings as desired or use as a dip. The wings really do not need the added sauce in this case because they, in my opinion, are spicy enough. But if you like knock your socks off hot wings, then go for it. We served ours with some ranch dressing but if you prefer blue cheese then please go right ahead. I love blue cheese, but Rick is not a fan.
These wings are so simple to make and then really are delicious! You avoid frying. You avoid the mess of oven frying and the fact that there is zero flour or corn starch coating, you are avoiding carbs as well. These are perfect if you are on a keto or low carb plan and I know you are going to love them.
If you are not a fan of the spice, you can use your favorite barbecue rub and use the same idea and roast them to perfection. Don't let your imagination stop there though. Barbecue is great but how about roasted garlic wings? Sriracha wings, or even teriyaki wings? All seasoned and roasted to a delicious end that keeps the party going!
I hope you give these oven roasted wings a try, sometime soon and I hope you love them!
Happy Eating!
Get my cookbooks here: http://bit.ly/1czqM5R
Business Inquiries can be sent to:
info@noreenskitchen.com
Check me out on social media!
Facebook: http://on.fb.me/12bdibt
Twitter: @noreenskitchen
Instagram: http://bit.ly/12bdqrp
Google + http://bit.ly/1o5GMYy
***MAILING ADDRESS****
Noreen's Kitchen
PO Box 14173
New Bern, NC 28561
Have a question for me? Send me an email:
info@noreenskitchen.com
Noreen's Kitchen Community Guidelines (The Rules)
http://bit.ly/2i7VocU
Any links to Amazon are, in many cases, affiliate links.
Produced by Noreen's Kitchen ©2008-2016 all rights reserved All embeds must live link to Noreen's Kitchen channel. No Editorial Excerpts without permission, Violators agree to pay royalties, all court costs, all collections & all lawyers fees.
64
views

CRUNCHY RANCH PARTY SNACK MIX!! PERFECT FOR SUPERBOWL!!
Superbowl is this coming weekend, whether you are a huge football fan or not, everyone seems to love the Superbowl! Maybe you love the game, maybe you can take it or leave it. Maybe you love the commercials or maybe you are just here for the snacks! Today I am sharing with you this delicious, crunchy ranch party snack mix that is a great combination of crispity crunchity goodness that everyone loves. All flavored up with your favorite ranch dressing mix and a few added herbs and spices. This one is sure to please everyone in attendance. But don't wait for a special occasion to whip this up because it also makes a great snack to pack into school lunches, enjoy as an afternoon pick me up or as a fun snackity snack to enjoy anytime the urge strikes! I promise this one is going to become a fast favorite in your house!
As with all cereal snack mixes, this one starts off with an equal amount of both rice and corn Chex or "cereal squares". Add into that some old-fashioned oyster or soup crackers, a couple good handfuls of mini pretzels and a bag of parmesan goldfish crackers. Give this all a good mix in the biggest bowl you have in your kitchen that will contain the delicious blend of ingredients. Stir, stir, stir, toss, toss, toss. Mix it all up good!
Next its time to mix up the ranch sauce that will bake on to the snack mix. It starts out with one stick of melted butter. I won’t tell if you use a little more. Don’t use too much or it will be too messy. Add to the butter some ranch dressing mix, garlic powder, onion powder and dried dill weed. I am using my homemade ranch dressing mix that I make in large batches a couple times a year to have on hand for dip and flavorizing a lot of delicious dishes. Oddly we don’t use it for dressing that often. I use it to make a delicious, slow cooked ranch chicken, I use it to add to my flour dredge for oven fried chicken and more. Its great to have on hand. Mix this all of well until it is smooth and creamy.
You can find my ranch dressing mix recipe here: http://bit.ly/2vxzdEN
Now take this sauce and drizzle it over the dry ingredients. Using two spoons, toss, toss, toss until all of the cereal, crackers and pretzels are coated with the delicious mixture. Now divide the mixture between a couple of large half sheet cake pans or rimmed half sheet pans. Spread in an even layer and bake for 30 minutes stopping to stir well every 10 minutes. Since I know my oven, I made sure to switch the pans every time I stirred them. Taking the top pan and placing it on the bottom rack and vice versa to be sure for even heating and browning. Burning this will make you sad.
On the last ten minutes of baking, I returned the pans to the oven and then turned the oven off. There will be enough residual heat in the oven to complete the baking process and it will save a little energy as well.
Once the mix is all baked up, remove from the oven and allow to cool on top of the stove. Once cool, you can transfer this to an airtight storage container and enjoy whenever you are ready. You know they will be begging for a taste and you might have to make another batch if you are planning on taking this with you!
I hope you give this crunchy ranch party snack mix a try sometime soon, for the big game or anytime and I hope you love it!
Happy Eating!
You can find a printable version of this recipe here: http://bit.ly/2U2wvkS
Get my cookbooks here: http://bit.ly/1czqM5R
Business Inquiries can be sent to:
info@noreenskitchen.com
Check me out on social media!
Facebook: http://on.fb.me/12bdibt
Twitter: @noreenskitchen
Instagram: http://bit.ly/12bdqrp
Google + http://bit.ly/1o5GMYy
***MAILING ADDRESS****
Noreen's Kitchen
PO Box 14173
New Bern, NC 28561
Have a question for me? Send me an email:
info@noreenskitchen.com
Noreen's Kitchen Community Guidelines (The Rules)
http://bit.ly/2i7VocU
Any links to Amazon are, in many cases, affiliate links.
Produced by Noreen's Kitchen ©2008-2016 all rights reserved All embeds must live link to Noreen's Kitchen channel. No Editorial Excerpts without permission, Violators agree to pay royalties, all court costs, all collections & all lawyers fees.
49
views

SLOW COOKED PORK RAGOUT!! DUMP AND GO RECIPE!!
Today I am sharing another easy "dump and go" slow cooker recipe. This time for a decadent, rich and delicious, pork ragout. This is a great and different option for a quick, weeknight meal that you can throw together in about five minutes and not worry the rest of the day. When you get home you can enjoy this over a variety of things with a salad on the side and you are good to go! The best part here is that this makes enough for freezer meal! So you really are saving time by cooking once for two nights! This is perfect for the cooler weather and a great option if you just want a rich, delicious and comforting bowl of hearty stew. You will not be disappointed with this one, I promise!
This all starts out with about three pounds of pork loin roast which I sliced and cut into cubes much like stew meat. I placed this in the slow cooker with a large, 45 ounce jar of my favorite pasta sauce, some mushrooms, onions, a couple of cans of petite diced tomatoes and some garlic and spices. You can adjust the seasonings to suit your taste. As well, you can add or delete things you like or dislike. If you are not a fan of mushrooms like we are you can leave them out. If you want to put a bit of a neapolitan spin on this, you can add in some sliced black olives and a couple tablespoons of capers for a salty bite. My recipe is merely a starting point to help you on your way to making your ragout your own.
All of the ingredients literally get dumped into the slow cooker, stirred and set on high for around 6 to 8 hours or until the pork easily breaks apart and is tender. Then you can serve it over whatever you like. The obvious choice would be pasta for many people and that is how we served ours over some Farfalle, or bow tie pasta. But don't limit yourself to thinking this ragout is just good over pasta. Not so! You can eat this all alone with a crusty loaf of bread, serve it over rice, mashed potatoes, polenta or thick milk grits or even steamed spaghetti squash or even zoodles. It is going to be delicious no matter how you serve it. Also, don't limit yourself. Don't eat pork? No worries! Make this with beef or chicken and it will be just as good.
The bonus here is you are making enough to feed a family of four twice. Leftovers can be frozen in a zip top bag or air tight container for up to three months. When you are ready for a quick meal of planned leftovers, just remove from the freezer and thaw if you like, or if you are like me just toss that right into your slow cooker to cook on low until bubbly and delicious. A word of warning; Some slow cookers are not built to cook frozen foods and as a result can crack and actually void any warranty you may have. So be careful and refer to your user's manual for more information so you don't ruin your slow cooker.
I hope you add this slow cooker pork ragout to your next menu rotation and I hope you love it!
Happy eating!
Get my cookbooks here: http://bit.ly/1czqM5R
Business Inquiries can be sent to:
info@noreenskitchen.com
Check me out on social media!
Facebook: http://on.fb.me/12bdibt
Twitter: @noreenskitchen
Instagram: http://bit.ly/12bdqrp
Google + http://bit.ly/1o5GMYy
***MAILING ADDRESS****
Noreen's Kitchen
PO Box 14173
New Bern, NC 28561
Have a question for me? Send me an email:
info@noreenskitchen.com
Noreen's Kitchen Community Guidelines (The Rules)
http://bit.ly/2i7VocU
Any links to Amazon are, in many cases, affiliate links.
Produced by Noreen's Kitchen ©2008-2016 all rights reserved All embeds must live link to Noreen's Kitchen channel. No Editorial Excerpts without permission, Violators agree to pay royalties, all court costs, all collections & all lawyers fees.
31
views
NASHVILLE HOT CHICKEN SHAKE SEASONING BLEND!!
Who likes it hot? I do, but not too hot. So the idea of Nashville hot chicken is a bit much for me. Knowing that many recipes for this seasoning blend have upwards of 6 (yes 6) tablespoons of Cayenne pepper in it. I have come up with my own flavorful blend that I think is just right. Just in time for wings for your football party or anytime you want a nice shake of flavor on whatever you are making! This blend is easily made using ingredients you have on hand and if you don't have some of what I have used, don't worry! They are easily subbed out for what you may have. So let's make some Nashville Hot Chicken Shake!
When I say "shake" I mean for it to be the kind of shake like you shake the salt on your food. Of course not a milkshake! We can clear that up right away for anyone who may be confused. If you were looking for a hot chicken milkshake, you have come to the wrong place. This is a delicious blend of spicy, slightly sweet and very savory spices that are the perfect blend for any kind of chicken. But please don't stop with the bird. This is great on just about anything you would like to shake it on to zip it up! Pork, beef, fish or veggies will benefit from this seasoning and you can be as heavy handed as you like.
There is nothing outrageous about this blend. You probably have many of the basics on your spice rack as we speak. The main components are sugar, salt and cayenne pepper. From there we add in onion powder, garlic powder, black pepper, paprika and a couple different types of chili powder. I added Ancho chile powder for sweetness and chipotle chile powder for smokiness. If you do not have either of these just sub out an equal amount of regular chile powder in your favorite heat level. If you don't have chile powder, simply add in an equal addition of paprika. It will all work out in the end and still be delicious!
This shake will be great as a prep for chicken wings, for meats you want to put on your smoker, for burgers or even as a fry seasoning. I plan on using this for some wings very soon. I will shake the wings before I dredge them in flour that will also be seasoned with this shake and then dipped in a hot sauce that will be made using this as well. Of course you can use this as a base for your Nashville hot chicken soak and put a bunch of it in some buttermilk and marinate your bird. No matter how you choose to use this it is going to make your chosen recipe super flavorful!
I hope you give this Nashville Hot Chicken Shake Seasoning Blend a try sometime soon and I hope you love it!
Happy Eating!
You can find a printable version of this recipe by clicking here: http://bit.ly/30wWlhX
Get my cookbooks here: http://bit.ly/1czqM5R
Business Inquiries can be sent to:
info@noreenskitchen.com
Check me out on social media!
Facebook: http://on.fb.me/12bdibt
Twitter: @noreenskitchen
Instagram: http://bit.ly/12bdqrp
Google + http://bit.ly/1o5GMYy
***MAILING ADDRESS****
Noreen's Kitchen
PO Box 14173
New Bern, NC 28561
Have a question for me? Send me an email:
info@noreenskitchen.com
Noreen's Kitchen Community Guidelines (The Rules)
http://bit.ly/2i7VocU
Any links to Amazon are, in many cases, affiliate links.
Produced by Noreen's Kitchen ©2008-2016 all rights reserved All embeds must live link to Noreen's Kitchen channel. No Editorial Excerpts without permission, Violators agree to pay royalties, all court costs, all collections & all lawyers fees.
19
views