
Art Project #6, Claude Monet's Pastel: Broad Landscape, Part 2
In this demonstration, we go over the colors used in this drawing.
These colors include:
-light blue
-dark/medium blue
-white
-red (optional)
-light brown
-dark brown/black
-yellow green (think grass green)
-dark green (think forest green)
-pale/light yellow
-gold (think dark yellow)
Remember, if you don't have these colors, you can mix them. Refer to Art Project #6, Georgia O'Keeffe Anthurium, painting for ways of mixing colors (called color blending for drawing and color mixing for painting or any wet medium).

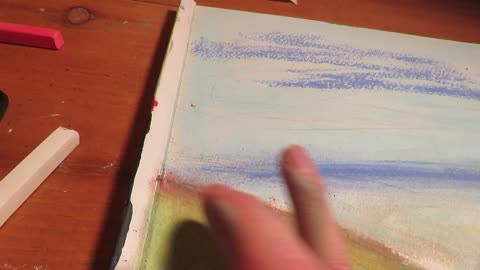
Art Project #6, Claude Monet's Pastel: Broad Landscape, Part 1
In this demonstration, we go over the basic sketch of it. This includes where the valley is and other basic elements of this picture/artwork.
For this part, you will just need a pencil and paper. I am using watercolor/mix media paper. You can use an eraser (optional).
Art Project #6, Claude Monet's Pastel: Broad Landscape, Part 3
In this demonstration, we look at how to use different value of hues, such as we already put down a light blue, then we will use a darker blue etc. We will consider Monet's drawing in order to figure out what colors go where and how best to blend them to achieve a similarity to Monet's pastel, "Broad Landscape".
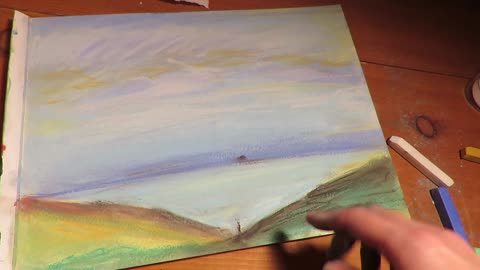
Art Project #6, Claude Monet's Pastel: Broad Landscape, Part 4
In this demonstration, we talk about ways to get the clouds to have that wispy effect, as well as discuss Monet's artistic style, which was Impressionism. Keep in mind, as an Impressionistic artist, Monet was all about color and light and how to achieve that through the sense of putting colors on top of each other (at times blending them) and at other times letting them sit on each other.
In one of Monet's series of work (meaning lots of the same motif/thematic imagery) he sat for hours and hours watching the sun set and the sun rise, sitting out in the cold. In one of his series, he studied and painted haystacks again and again in different seasons, including winter, attempting to capture the finite elusiveness of light and color. Incredible. Monet is one of my favorites. I hope you have enjoyed this and I look forward to seeing your work! I hope you've had a good experience in using pastel. Thank you!

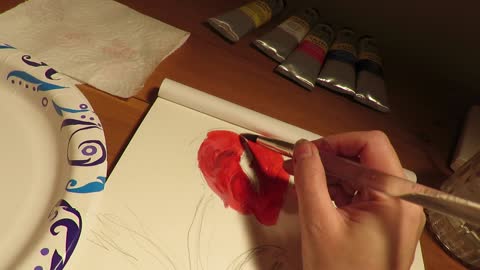
Art Project #6, Georgia O'Keeffe Anthurium, Part 4
We will go over how to paint the veins and the darker shaded values (darker colors) and then add tint (white) to the red. We will work on blending ( I use my fingers) as well as using our paintbrush.

Art Project #6, Georgia O'Keeffe Anthurium, Part 5
In this demonstration, we talk about how to create green using blue and yellow. In addition to this, we work at adding white to our green as well.

Art Project #6, Georgia O'Keeffe's Anthurium, Part 1
In this demonstration, we work out the drawing using a pencil. We will start with a sketch, and then figure out the dark and light areas, as well as the shapes in how to draw what we see, looking at Georgia O'Keeffe's flower, Anthurium.
You can use the art materials following for this project:
-pencil and eraser (optional)
- 9 x 12 Bristol or sketchbook
You can choose from the following:
1. watercolor
2. dry pastel (not oil, but chalk)
3. acrylic
4. gouache
This project will be done in acrylic as you worked with this medium in painting your Art Project #5, Advanced Bull Mask Sculpture.
Art Project #6, Georgia O'Keeffe Anthurium, Part 2
In this demonstration, we discuss the colors we need. If you have more colors than this, feel free to use them.
The colors you need are the following
-white
-yellow
-red
-blue (cobalt blue works best)
You will also need purple and green. But if you have the following colors above, you can use these primary colors (red, blue, and yellow) to make your secondary colors (purple, orange--optional, and green).
Remember the following color combinations:
1. red + blue = purple
2. yellow + blue= green
3. red + yellow= orange
4. red + white= pink
5. red + yellow+ white= peach
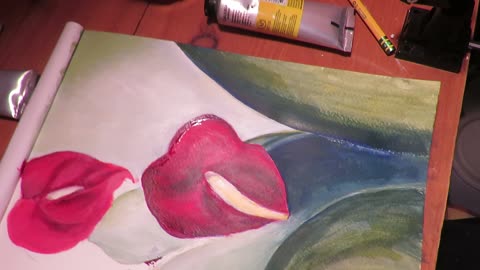
Art Project #6, Georgia O'Keeffe Anthurium, Part 6
In this demonstration, we will complete the top area, using dark blue and a bit of purple.

Art Project #6, Georgia O'Keeffe Anthurium, Part 3
In this demonstration, we do the basics using red for the flowers. We will cover the areas of our page that need red, because there are only two flowers.

Art Project #6, Georgia O'Keeffe Anthurium, Part 7
In this demonstration, we discuss briefly how to finish up the edges of the shapes/forms in Georgia O'Keeffe's Anthurium artwork. I'm excited to see what you all will create! Thank you.
Please also note: Again, this is not a painting class by any means, so your work again will be graded on your effort, not the finished piece, as we are just experimenting in different mediums (media) in this class. Thank you again.

Art Project #5 Advanced Bull Mask Sculpture, Part 4
In this demonstration, I talk about the physicality of pushing and shoving the material. This shoving down of the material allows you to create the top part of the head. Then we go into how to create the ears by folding and getting rid of the sharp corners (by more folding and pushing the paper plate's corners) so that the ear becomes more organic and curvilinear (half crescent moon shape/oval-ish).
Art Project #5 Advanced Bull Mask Sculpture, Part 6
In this demonstration, we go over how to secure the horns. In doing this, the ears were too close to the top of the bull's head so moving it down made more sense so that the horns could be positioned higher on top without the interference of the ears. To keep the horns strong and stable, especially to attach them with masking tape to the skull/head, using smaller pieces by tearing off smaller bits of the paper plate works well.

Art Project #5 Advanced Bull Mask Sculpture, Part 7
In this demonstration, we talk about the importance of adding masking tape to secure everything together. My suggestion is that you cover the ENTIRE armature of masking tape. It makes it a lot easier when you are using the paste (glue + water) and the small strips of newspaper/paper.
For time sake, I didn't cover the entire armature with masking tape. But for optimal results, I would highly suggest doing so.

Art Project #5 Advanced Bull Mask Sculpture, Part 5
In this demonstration, now that we have the ears, we will now work on the horns. Tear the paper plate in half. You need one half for one of the horns and the other half for the other horn. By twisting and turning the paper plate again and again we get the shape of the curved horns. Again, put some physical effort to start to change the shape of the paper plate to do what you want it to do. This is how artists create sculptures.

Art Project #5 Advanced Bull Mask Sculpture, Part 1
In this demonstration, we go over the concept of the 'armature;which is a term in sculpture that means the basic structure. For this demonstration, you can use any recyclable materials that you want. I have decided to use large paper plates and a paper cup.
You can use paper towel/toilet paper rolls, cereal boxes, or anything that is cardboard. Please no regular paper. It is not strong enough to create your armature, the structure for your sculpture. Please also keep in mind you will be physically manipulating the material (in this case, it will be large paper plates) and you will need to really work it hard to make the sculpture you want.
Materials:
-masking tape (REQUIRED)
-recyclable materials such as cereal boxes, any boxes that are not made from cardboard, as that is too think. What cereal boxes are made from is best
- paper plates (that is what it shown in this demonstration)
-paper cup (again show in this demonstration)
-scissors

Art Project #5 Advanced Bull Mask Sculpture, Part 3
In this demonstration, I do my best to try to help you how I went from a paper plate to then creating a cylinder/cone shape. I talk about the importance of the materiality. In sculpture, like I mentioned in the other video clips, it is critical to be able to move, twist, pull, and tear the material you are using. You have to be comfortable working hard at it and pushing and pulling the material. I realize that paper, especially paper plates do not lend well to being flexibility, but that is the key about sculpture: If you are using recyclable materials like many contemporary artists use, then you have to push it, fold it, crumple it--until it gets to the shape you want.
So in this demonstration, I specifically state this and also caution that what I am doing is not easy to do, so you have to be willing to shove the material to its breaking point in some instance to see what the material can do for you and the vision you have.
It's possible. But it does require a lot of imagination, push, and creativity and I think most importantly, trusting the process, your hands, and just doing it! So this is why this project is considered more advanced because you have to trust the materiality and push it to its limit. In this case, it is the paper plates.

Art Project #5 Advanced Bull Mask Sculpture, Part 2
In this demonstration, we go over how to put the paper plate together with the paper cup to create the basic armature for our bull mask.
If you do not have a paper cup, I have shown how you can do it with just a paper plate. If you do not have a paper plate as well, you can use like for instance, other recyclable materials listed in Part 1.
In sculpture, if you do not have your armature, your structure so to speak, your sculpture is surely to either fall down or not have enough solidity for your entire piece to be strong. So the armature is extremely important. It is more than a sketch. It is like the first layer of many of a finalized drawing. If you want to think of it as in an English paper, it is your outline and thesis statement. In other words, the armature is the most important part to ensure that your sculpture will not fall apart.

Art Project #5 Advanced Bull Mask Sculpture, Part 8
In this demonstration, I talk about that it takes about three hours to do a total of three layers for everything. I wasn't super happy with the way the left horn turned out so I twisted it some more. I'm not sure I would recommend this. I would leave that up to you.
Now after you are done with using the glue + water and the paper strips, you have to let it dry for a day.
I used 3 times over the glue + water in the paper plate. I used a plastic piece of silverware to mix the glue and water together.
This is the last part for this demonstration, as far as it takes to go from creating the armature to the pasting and paper strips that create a strong three (3) layers needed.
Once it dries, I will then do a brief painting demonstration using acrylic paint and add the final touches to make this bull look realistic and I think perhaps, rather incredible.
Thank you!
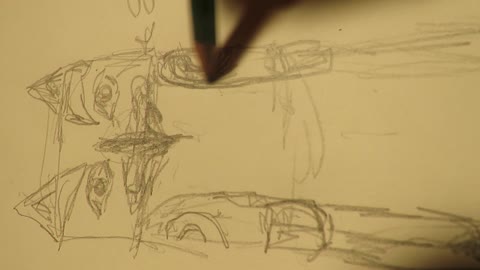
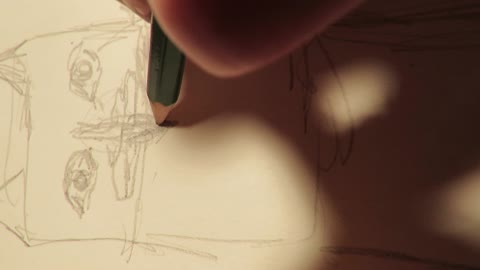
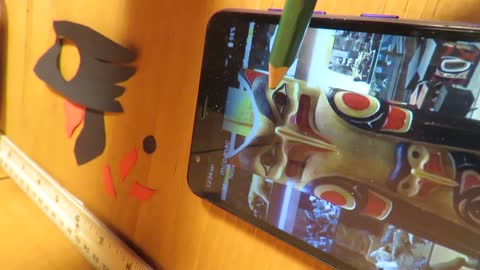
Art Design Project #5, Native American Animal Totem Pole Sculpture, Part 3
In this demo, I actually take the time to draw the animal totem of two eagles and a salmon. I go over shapes, sizes, and dimensions in order to draw this reasonably accurate.
Then I go over the shapes that we will need to cut out in order to make this totem work through cutting the cardstock paper. The colors that you will most likely use are the following:
-red
-black
-white
The next demo, will show how we put it all together.

Art Design Project #5, Native American Animal Totem Pole Sculpture, Part 5
In this demo, I go over how to make the ears three-dimensional as well as drawing out the basic outline for where we will place all the animal features on our totem pole sculpture.
Art Design Project #5, Native American Animal Totem Pole Sculpture, Part 2
In this demo, you can use whatever color you'd like for your toilet paper roll or a paper towel roll works well.
So the materials you need for this project are as follows
-toilet paper roll/paper towel roll
-tape
-scissors
-cardstock paper is best (can use construction paper but not as high qualiy)
-glue
-pencil
-eraser (if you need to erase)
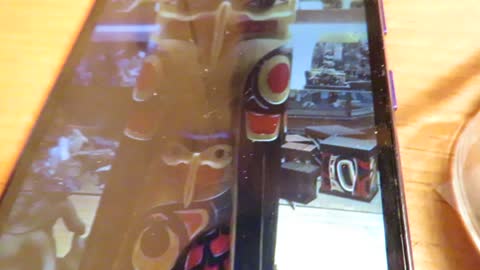
So to get started, look through the pdf handouts included in your module and decide if you want to create the same totem pole design or use one of the examples in these handouts. Please also consider as well it's important that your final sculpture retains the Pacific Northwest Native American imagery. Most of these imageries come from the Tlingit Haida, or in some cases native Alaskans.
So whatever animal totem pole you decide to use, that will determine the color you use for your background, ie what you will roll your paper towel roll or toilet paper roll into.
For my imagery, I have decided to use white paper.
Art Design Project #5, Native American Animal Totem Pole Sculpture, Part 7
In this demo, the largest eagle is finished, and so now I will move onto the smaller eagle and finish up the salmon.
Art Design Project #5, Native American Animal Totem Pole Sculpture, Part 6
In this demo, I will also outline the eyes in black sharpie. I will also show you ways to attach the ears and other features for the largest eagle on top.

Art Design Project #5, Native American Animal Totem Pole Sculpture, Part 8
In this demo, I will add a few more details and then it is finished. Look forward to seeing yours!
Remember as well that the Native Americans used animal totem poles as a way to show their honour and ancestral lineage to their spirit animals. Typically, animal totem poles related directly to the family name. As such, Native American families as well as communities felt protected by showing their animal totem poles as it related to their name and where they came from.
Again, only the Pacific Northwest Native Americans such as the Tlingit and the Haida as well as the British Columbia and Alaskan tribes used these kinds of animal totem poles.
Thank you for watching! Hope you enjoy making this sculpture.