
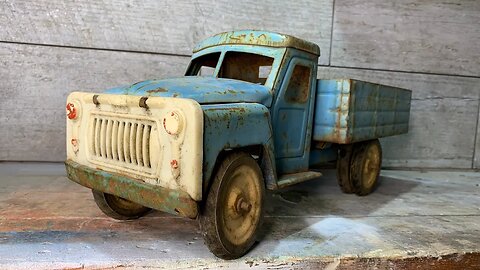
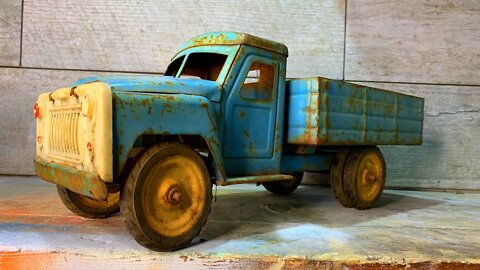
Restoration of a toy truck!
Let me tell you a little about this toy!
This toy was made in a factory where agricultural machinery was made. In the Soviet Union, it was quite common when cars were assembled in one workshop and toys were made in a neighboring workshop. Thus, the plants at least somehow compensated for the losses during the crisis years.
The metal from which this toy is made is very durable and thick. This is not some kind of tin, this is a full-fledged sheet metal. I think that's why it has been preserved in such good condition.
Restoration process.
First of all, I disassembled the toy and sandblasted all the parts. There were practically no foci of corrosion, surprisingly.
Then I degreased the entire surface and applied a primer. While the primer was drying, I made a new axle for the wheels (with the old axles, the wheels had a huge backlash)
I had a great desire to paint the cab of the truck and its sides in different colors, but still I decided to stick to the factory, solid color.
Even though it was an easy project, I still enjoyed working on it.
I hope you like the result (I would be grateful if you click "thumbs up" under this video).
Take care of yourself.
Best regards Max.
#restoration
#awesomerestoration
#asmr
27
views
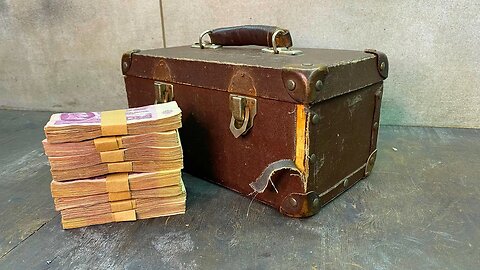
Travel suitcase restoration. Found 20 000 💲 under a secret bottom.
I bought this old trunk from a used goods site.
I don't know much about the seller and I'm currently unable to contact him as he has deleted his profile on the classifieds site.
If I contacted him, I would try to find out from him how there was so much money in this old suitcase!!!
I posted some information about this money in the video, so turn on the subtitles and be sure to read! it will be interesting.
Please support my channel❗❗❗, give this video a "thumbs up" and click the "subscribe" button. Help me reach 100,000 subscribers🙏🙏🙏 (I really want to hold the silver button in my hands)
Recovery process:
The first thing I did was remove all the old rusty rivets. Then he removed the old material from the suitcase. Then, using epoxy putty, I repaired some of the cracks in the wood case.
As a new material for lining the suitcase, I used eco-leather. The old protective corners were damaged and I used modern chrome ones.
The handle of the suitcase was also in poor condition, and I made a new one, recorded the detailed process on video.
#asmr
#restoration
#awesomerestoration
20
views
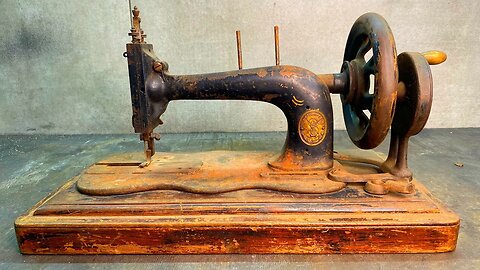
1882 SINGER Sewing Machine Restoration. Working after 140 years!!!
I have long wanted to understand how a sewing machine works. And then, quite by accident, I stumbled upon an old rusty sewing machine at a flea market. The seller told me that it was made in the late 1940s or 50s, but due to the unusual shape of the base, I guessed that it was made much earlier.
Already at home, I studied a lot of material regarding this model of a sewing machine. As it turned out the name of the model "Singer 12K". The figure base is called "Fiddlebase", and according to information from the forums, it is now quite rare to find it on sale.
During the repair process, I found her serial number, and after checking on the official website of Singer sewing machines, I found out the year of her production - 1882.
Restoration process:
The disassembly phase was pretty easy. Then I sandblasted most of the parts in a sandblasting chamber.
All metal parts were then primed and painted.
Some parts of the sewing machine were lost or broken and I had to remake them.
In general, the work on the sewing machine required the maximum amount of patience from me and took about 14 days, so I will be grateful for feedback from you in the form of comments and "thumbs up"
#asmr
#restoration
#singer
20
views
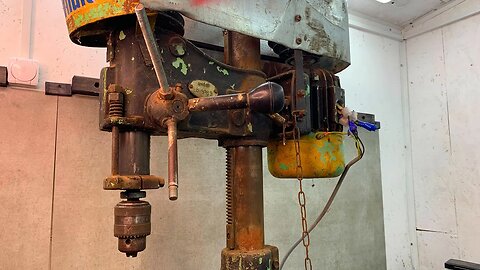
1969 Kamunaras Drill Press Restoration. Awesome result!
I got this drilling machine for the price of scrap metal. The headstock raise/release mechanism did not work, the headstock lock lever was jammed, the drill chuck was rusty and jammed, the on/off button was missing, all the electrics were rewound with duct tape. BUT the motor worked!
Restoration process.
First of all, I completely disassembled the drilling machine into parts. Some control levers were broken and new ones had to be made on a lathe.
I cleaned the parts of the hull using a paint remover and a rust converter.
I really like to use hammer effect paint on the body parts. Since the case is made of cast iron, it has an uneven surface and it is the hammer effect paint that hides all these irregularities, while the spray paint would only emphasize all the flaws.
During the repair was completely moved the engine. Rust was even on the rotor! Replaced all bearings and painted body.
The bearings on the spindle were also replaced!
In general, the work was not difficult but took a lot of time, and I will be grateful for the "thumbs up" pressed so more people will see the video and I will compensate for the cost of repairing this drilling machine! THANK YOU
I enjoyed working on this project, and upon completion, I had another "helper" in my workshop, who will often appear in the following videos.
So click "subscribe" and be sure to "bell" otherwise YouTube will not notify you about the release of a new video.
Good luck everyone and take care of yourself!
Sincerely, Max!
#awesomerestoration
#drillpress
#restoration
16
views
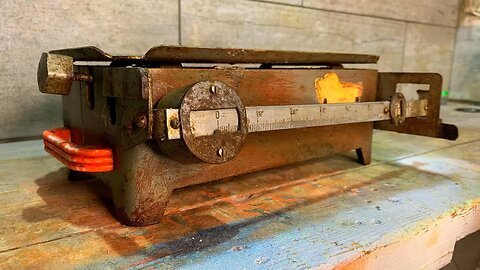
Vintage Kitchen Scale Restoration.
As soon as I saw these scales on the classifieds site, I immediately fell in love with them. I was very lucky that the seller lived in my city and I did not have to wait for courier delivery. I jumped in the car and 15 minutes later I was shaking hands with the salesperson after a successful deal.
I was driving home and already imagined exactly what the result of my work would be.
On the same evening, I dismantled the scale into parts, sandblasted all the details, puttied in the necessary places and covered with two layers of primer. Wet sanding made the base very smooth and perfectly even. Then I once again degreased all the parts, gave them time to dry thoroughly and applied two coats of light ivory. The paint turned out great.
The numbers on the scale plate were completely worn out after a long time of use, and I decided to apply the paint again. It took me a lot longer than I showed in the video. There were many unsuccessful attempts, removal of all paint, re-degreasing, and so on in a circle))))
This project didn't take me long, but I still really enjoyed working on it.
I hope you enjoy the combination of colors I chose. I look forward to your feedback in the comments.
Thanks for watching and give this video a thumbs up if you liked it.
Take care of yourself!
Best regards Max!
#restoration
#awesomerestoration
#asmr
4
views
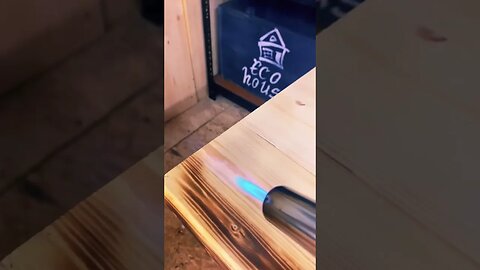
I made a belt sander using only simple tools #shorts #diy #awesomerestoration
https://youtu.be/2_czep4fCDo
Hello everyone🙌.
I built this belt sander using a simple power tool and junk I found in the workshop. I'm sure you can do the same, or even better!
Work process:
To make a drive roller without using a lathe, I took plywood and a jigsaw.
The plywood is strong enough and is perfect as a drive roller.
I cut the circles of the desired diameter with a jigsaw and glued them together with wood glue. For greater reliability, I pulled these circles with two long self-tapping screws.
Then I fixed this workpiece on the motor shaft and using an angle grinder and a chisel, gave a round shape to my workpiece.
I made the driven roller using several bearings and a bolt.
I made the frame of the grinder from a sheet of iron 6 mm thick.
I showed the whole process in the video, I think you will like it!
#BeltSander
#DIYProject
#DIY
3
views

Restoration Antique iron 1900's. Desert testing and Incredible Handle.
This iron is over 100 years old!
That's what the seller told me. According to him, this coal iron belonged to his grandmother, who said that she bought it brand new in the very early 1900s.
Also, according to the seller, it stood on the shelf for several decades as part of the interior (which is why it was completely painted with white paint).
I also decided that I would not use this iron for its intended purpose, and after the restoration I did something interesting with it (please write if you liked my idea, and what would you do with it if you were me?).
Recovery process:
It was quite difficult to disassemble this iron into parts. All the pins were rusted in their seats and each pin had to be drilled out.
Then there was the sandblasting process. This white paint adhered pretty well to the metal and the cleaning process was very slow.
I painted the body and lid of the iron with heat-resistant black paint. (at this stage, the idea occurred to me to use the iron for other purposes, so I covered the handle and the lid of the blower with acrylic enamel, having previously primed the surface)
I made a wooden handle from a block of stabilized wood (This block has been sitting idle for several months). Honestly, this block of wood cost more than all this iron together and the material used for it))))
I also made all new pins on a lathe.
In my opinion, the result is excellent. Now this iron, along with its "new resident" will stand in my workshop and please the eye)
Best regards Max
Take care of yourself!
PS
And yet, while I was writing this text, YouTube sent me a notification that today is the anniversary of my channel!
Exactly one year ago, on December 17, I created this channel! And after 365 days, I have 50,000 subscribers on my channel!!! Thank you my dear viewers!!! Today I have a little holiday. I'm off to open the champagne!
#restoration
#awesomerestoration
#asmr
16
views
Restoration of a toy truck. It was made at the tractor factory!
Let me tell you a little about this toy!
This toy was made in a factory where agricultural machinery was made. In the Soviet Union, it was quite common when cars were assembled in one workshop and toys were made in a neighboring workshop. Thus, the plants at least somehow compensated for the losses during the crisis years.
The metal from which this toy is made is very durable and thick. This is not some kind of tin, this is a full-fledged sheet metal. I think that's why it has been preserved in such good condition.
Restoration process.
First of all, I disassembled the toy and sandblasted all the parts. There were practically no foci of corrosion, surprisingly.
Then I degreased the entire surface and applied a primer. While the primer was drying, I made a new axle for the wheels (with the old axles, the wheels had a huge backlash)
I had a great desire to paint the cab of the truck and its sides in different colors, but still I decided to stick to the factory, solid color.
Even though it was an easy project, I still enjoyed working on it.
I hope you like the result (I would be grateful if you click "thumbs up" under this video).
Take care of yourself.
Best regards Max.
#restoration
#awesomerestoration
#asmr
22
views
Restoration of an Old Railway Lantern. Beavers that Gnaw Iron.
I was surprised that after so many years all the original parts were preserved in this lantern!
I found this flashlight at an internet flea market. The seller asked for 20 bucks for the lantern, bought without bargaining and with great pleasure.
I'll tell you a secret, at the flea market there were lanterns in almost new condition and at a lower price. It seems to me that the sellers of old things are aware that there is a certain group of people who want rusty things, and therefore, from two identical lots, the one with more rust will be more expensive!!!!
Recovery process:
The first thing I did was fill it all up with WD-40. Some nuts had to be heated with a soldering iron, but this did not help either - here the Dremel cutting wheel came into play.
Having completely disassembled the lantern, I sandblasted it. As it turned out later, a fairly large part of the body consisted of rust, and when the metal was cleaned of rust, the body became like a sieve, and the upper edge seemed to have been gnawed by mice or beavers))).
I have long wanted to try a special plasticine for metal, the so-called "cold welding". The instructions say that they can close up holes in metal, as well as make lost or missing parts.
I tensed up quite a lot remembering the developmental plasticine modeling classes that I attended in kindergarten. After spending a couple of hours on the theoretical part, then I fashioned the corroded upper part of the case, and filled up the through holes.
After a couple of hours, the plasticine hardened and was quite well processed.
Smaller irregularities I puttied and then all grouted and painted.
I want to write a few words about batteries. I was surprised by their vitality! They are over 30 years old, and I only had to fill them with electrolyte and recharge a little, as they came to life again, AMAZING QUALITY.
Overall, I enjoyed working on this lantern, although it took me longer and was behind my posting schedule. Therefore, a big request to you, click "thumbs up" under this video, and write me a small comment (for example, what do you think about this project, or what are the shortcomings in the work). This will help me a lot!!! Thank you.
Take care of yourself!
Best regards Max!.
#restoration
#awesomerestoration
#asmr
7
views
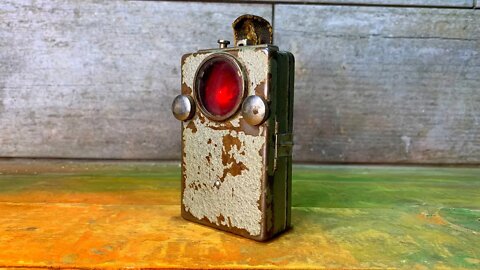
Restoration of a pocket Alarm Flashlight. Beautiful result.
I paid a little more than this flashlight was worth.
When communicating with the seller, I realized that this lantern is dear to him, and he sells it as needed. The price was not at all high, and I decided that for me the double price for a flashlight would not play a role, but for the seller it might be important. The seller was very surprised when I gave him a larger amount than he asked for, and tried to return the overpayment, but when he realized that I had deliberately overpaid, he simply said "Thank you!" It was a good day. I bought a great flashlight at a good price.
Restoration process:
Although the lantern was carefully kept, time did not spare it, because it is 50 years old! (1974). Rust formed on the back wall of the case, and corrosion made a hole in the case.
The chrome handles of the filters have also lost their luster and acquired battle scars.
After dismantling all the insides of the flashlight, I tested my new sandbox and compressor. I was surprised, it is 10,000 times more convenient and faster than rust removal by electrolysis))).
I then used putty to get rid of the deep sinks.
After sanding, I degreased all the details and covered with paint with a "hammer effect"
The rivets I drilled out had to be redone. For this I used an aluminum rod and a lathe.
The flashlight strap also fell into disrepair and had to be replaced. As a donor of quality leather, I took an old leather belt. (he turned out to be a little younger than the lantern, born in 1989).
Next was the most enjoyable process - the assembly of all the details!
It was a simple but very pleasant work with an object of venerable age.
I liked its new dark gray color and how the chrome handles look on the dark body.
If you like my work, I will be grateful for your likes and comments.
All the peaceful sky above your head.
Sincerely, Max.
#restoration
#awesomerestoration
#asmr
19
views
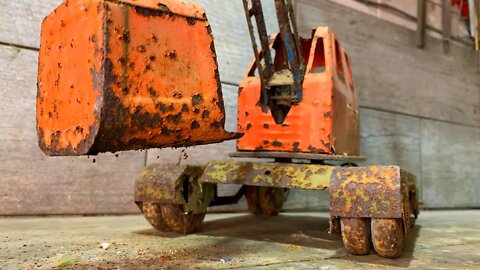
Full Restoration of a Large and Very Rusty toy excavator. I was Amazed by the Result!!!
For me it was difficult!
Indeed, the restoration of this toy took me more than two weeks! Difficulties began already with the electrolysis process. In a common electrolysis bath, some parts did not want to give in to electrolysis, the current simply flowed through those parts where the resistance was less. Therefore, I had to clean individual parts from rust using electrolysis one at a time (I’ll tell you a secret, this didn’t make it into the video, but I lost my nerve and I bought myself a sandblasting chamber, I will definitely show it in the next video).
After electrolysis, there was a long process of manual cleaning of rust residues using a small metal brush.
Next came the spackling process. I did it for the first time. When you watch this process from the guys on other channels, everything seems so simple and fast, but in reality everything is not at all like that.
Firstly, the putty, when mixed with a hardener, turns into a stone after 4-5 minutes. And I had to do a hundred small batches in order to have time to apply all the putty.
Secondly, if you put putty on the part a little more than required, then it will take much more time to polish all the excess.
Thirdly, a thicker layer of putty does not guarantee that this putty will not shrink when cured. And in any case, you will have to apply the putty again.
At the beginning of the work, I was full of enthusiasm, and I was sure that I could handle sanding by hand (how wrong I was!). MANUAL GRINDING OF PUTTY IS A REAL EVIL!!! My nerves were exhausted, my psyche was undermined, and only then did I go to the store for a vibration grinder.
Then there was the boring process of applying several layers of primer.
Wet sanding calmed my nerves and brought peace to my soul. It is really mesmerizing when all the flaws from puttying and priming are erased before your eyes.
On some parts, it was necessary to grind to the metal in order to level the surface (then it is necessary to re-prime the plane of the part)
At intervals, while the soil was drying up on the parts of the toy, I was engaged in turning work. Factory axles are disposable and cannot be re-mounted on a toy, so I machined the axles of the wheels from nails. I processed the nail heads with a turning cutter so that they were even and beautiful, then cut the thread.
Next was a pleasant process - painting in finishing colors. I chose exactly those shades that correspond to the time of manufacture of this toy (1978). The Soviet Union did not have a wide variety of colors. My combination turned out great!
During assembly, between all the rubbing parts, I inserted spacers made of plastic washers so that the paint would not wear off and the mechanisms would work more "softly".
Well, that's all!
With all the manual sanding and cleaning, this job took me more than two weeks, but this is a great experience for me, I learned a lot, and my main lesson is that you need to use modern material processing methods, not manual labor)) ))
I don’t know for whom I wrote all this, it seems to me that no one reads my descriptions for the video)))
If you read it and smiled a couple of times, let me know), I'll be glad that writing this text was not a waste of time.
All the peaceful sky above your head!!!
Sincerely, Max.
Full restoration
Amazed
#restoration
#awesomerestoration
#asmr
66
views

Revival of the T-55 Tank. The second Life of a Toy.
This toy tank is the dream of every teenager in the USSR. But for most it was a pipe dream, because for many parents from the USSR it was quite expensive.
Picking up this toy, I understood why it is so expensive. Highly detailed aluminum parts, high quality plastic and a shooting gun!!!!
But today I came across this tank with a faulty cannon and no tracks, later I learned that it is rather difficult to find them intact in our time.
Repair process:
Having removed all the old paint with a wash, I very carefully degreased everything and painted it with a primer in two layers.
I don't know why, but I decided to draw this toy with a brush. I will say right away that it was quite difficult, I had to apply 4 layers with intermediate drying so that the color lay evenly.
For high-quality painting of the body, I had to remove all the wheels, and then remake the wheel axles on a lathe.
Rumor has it that this tank had only one drawback - its shells were lost on the very first day after unpacking)).
I don't know what the original shells for this tank looked like, so I made the ones I decided myself.
It was quite a difficult and interesting job, I did not sleep until 5 am to post the video today, now I am very tired, but I like it, because while I am typing this text, my son is playing with this tank and trying to “shoot” the cat .
All the peaceful sky above your head. Take care of yourself!
Sincerely, Max.
#restoration
#awesomerestoration
#asmr
16
views
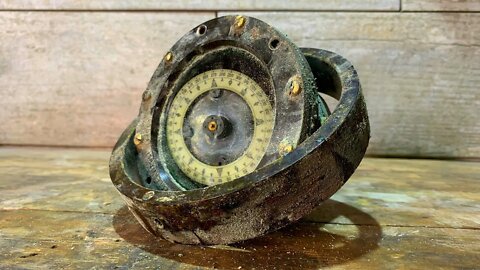
Restoration and Repair of an old German Compass. The most Beautiful compass STAND.
I found this old German compass at a flea market. There were no identification marks on it, only one inscription in German: "VEB Geräte- und Reglerwerke Teltow" I could not determine the year of its release, if you know, write me about it in the comments.
The compass was outwardly in fairly good condition, although rather dirty, with various stains. Several brass screws were missing, the compass fluid was missing, and the compass itself was misaligned. I don't really like the Bakelite look of such an interesting thing, so I decided to repaint it. Pre-cleaned the entire surface with fine sandpaper, and then degreased. Painted in three layers with drying.
I also made a stand for the compass, with the possibility of free swing.
The most difficult stage of the repair, for me, is filling the compass with liquid. The outlet is very small, and the displaced air greatly interfered with pouring liquid into the case. I poured an alcohol solution into the compass so that it would not freeze. It took quite a while, especially to get rid of all the tiny bubbles.
But I still really enjoyed working with this interesting thing, and I also liked my compass stand, now it sits very nicely on the shelf with the rest of my finished projects
Take care and see you next week. Sincerely, Max.
#restoration
#awesomerestoration
#asmr
10
views
Restoration of an Unusually Rare doorbell. A Ghost Called ME!
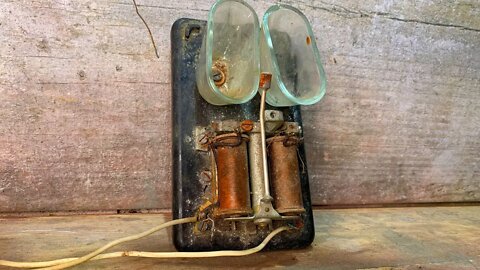
I bought this doorbell at a flea market literally for a penny. It seems to me that the seller was ready to give it away for free, but in order not to arouse suspicion, he set a symbolic price for it ($ 1). Outwardly, the bell was in poor condition, there was heavy rust everywhere, and signs of a bad attitude towards this little thing.
Restoration process:
The first thing I tried to disassemble this doorbell, but almost all the screws were covered with thick rust. I generously doused all the screws with rust remover and left it like that for a couple of days.
After I dismantled the doorbell, I saw the stamp of an old English company on the condenser. The condenser was all covered with a layer of rust and, unfortunately, the brand could not be preserved, but the condenser itself was in working order.
With the help of epoxy, I repaired the cracks in the doorbell housing, cleaned everything well and painted it.
I also had to replace the connecting wires, as they became very hard over time and cracked from an awkward touch.
When I assembled the doorbell and connected it to the mains, they called me....
I enjoyed working with this old and mysterious thing, and I also think that the video came out great. Please support this video with a like and a comment if you feel the same!
See you next week
Best regards Max.
#restoration
#awesomerestoration
#asmr
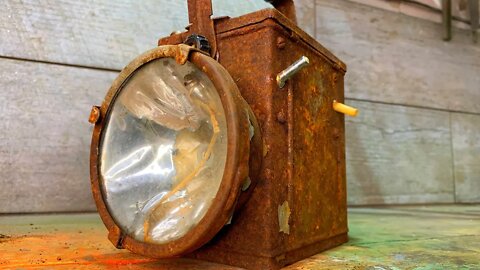
Secrets of the miner's lamp. Oil lamp restoration
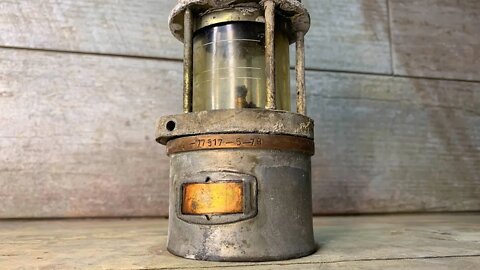
This lamp contains an interesting secret. It is quite difficult to disassemble for maintenance and refueling. I think that's why the seller sold this lamp very cheaply, he could not disassemble it.
The wick of this lamp is ignited by a lighter built into the body. But this lighter didn't work either.
Recovery process:
I unscrewed the bottom of the lamp using a thin awl. Then I dismantled the lighter into small parts and found a malfunction. After I cleaned and polished all brass parts and reassembled in reverse order.
The lamp body was quite oxidized and also needed a thorough cleaning. To do this, I used a soft brass nozzle on a drill.
Then I painted some parts, filled the fuel tank with lighter gasoline, installed new flint.
I enjoyed working with this old lamp, and I was also pleased with the result of my work.
Hope you enjoy this video as well! I will be grateful for your support in the form of "Like" and comments.
See you next week!
Best wishes Max!
3
views
Antique Alarm Bell Restoration. Making a Copper Bell.
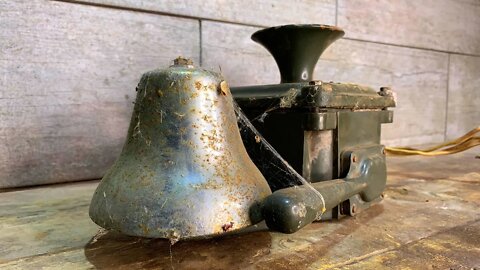
This vintage burglar alarm has been in use for over 50 years. And all these years it worked properly until it lost its relevance. And for several years of inactivity, the contacts oxidized and the mechanisms rusted.
Recovery process:
The alarm bell was in a very bad condition. The chrome plating has already peeled off and the metal has begun to rust. I polished the surface of the bell with a grinder. But you can not leave the surface unprotected, otherwise the socket will rust very quickly. I decided to cover the surface of the bell with copper. This will give a noble look, as well as protect the surface from rust.
Copper plating at home.
The first step is to thoroughly degrease the surface. For this I used caustic alkali.
After degreasing the surface, it is necessary to immerse the workpiece in sulfuric acid (electrolyte for batteries) for several minutes. The acid will remove all oxides from the surface.
Then we lower the part into a solution of copper sulfate, water and sulfuric acid. After several “up and down” cycles, a strong copper coating forms on the surface, which cannot be removed even with a brass brush!
Then I cleaned all the contacts from rust, painted the case and assembled the alarm in reverse order.
Now this device looks good on the facade of my workshop, and also perfectly drives away crows from my garden)))
I liked the result of my work, I hope you will like it too.
I will be grateful for your likes and comments!
#restoration
#awesomerestoration
#RITBR
20
views
1889 Mini Flamethrower: Restoration and Investigation
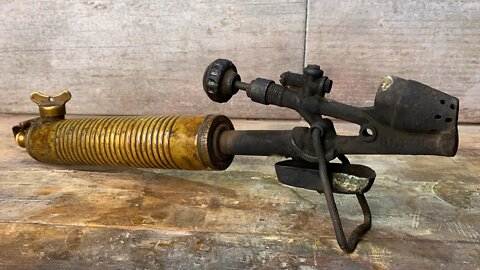
I rummaged through the entire Internet in search of information about the manufacturer of this blowtorch. All I could find was the name of the inventor - G. Barthel (Gustav Barthel) and the fact that his factory was in Dresden. Everything about his biography remains a mystery to me. But on the other hand, I found his namesake, who lived at the same time - G. Barthel (Guido Barthel).
And the most interesting thing is that if Gustav produced devices related to the flame, then Guido actively promoted the process closely related to fire - cremation !!!
Surprisingly, an interesting coincidence.
What do you think about this. Perhaps you have more information about Gustav Barthel.
Recovery process:
First of all, I completely disassembled the blowtorch. This is simply incredible, the lamp is completely made of non-ferrous metal, which is why it has been preserved in excellent condition!
Brass is a rather soft metal, so mechanical cleaning with coarse abrasives is not suitable. For cleaning, I used a carbon remover. In my opinion, he did his job perfectly!
He also removed all the dents on the case, and traces of the adjustable wrench (someone in the past did not think at all that the wrench had left burrs on the body of the soldering torch).
After cleaning, I reassembled the lamp in the reverse order, eliminated all fuel smudges and made the first start!!!
The blowtorch turned out to be powerful enough, much more powerful than a modern gas burner. But the big problem with a blowtorch is that it takes a lot of preparation and time to light it.
I enjoyed working with this ancient device, I hope you enjoy my video.
If you would like to see more of these videos, please let me know.
#restoration
#Restorationinthebackroom
#awesomerestoration
6
views
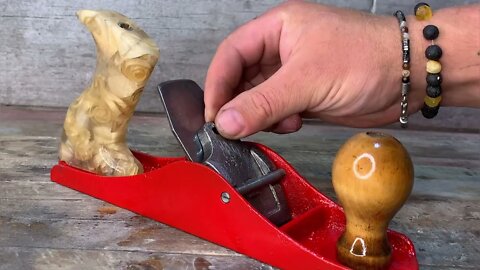
Restoration of an Old Planer. Very Amazing Handle!
This old planer belonged to my grandfather. But many years ago, its hilt burst and was lost. Since then, he lay on the lowest shelf in the barn and gathered dust.
I thought about him recently and decided to make him a new epoxy handle, and also updated his paint. In my opinion, the plane turned out to be quite original.!
I would be grateful if you rate this video using the "Like" button, since YouTube is currently promoting my videos rather poorly. Thanks!!!
FRIENDS ATTENTION!
I started a new channel on YouTube.
This channel is all about cooking!
Mostly male food! Everything we like - more meat, and without unnecessary troubles!
Please support my endeavor! Follow the link, look at a couple of recipes, I'm sure you'll like it!
Thank you!
https://www.youtube.com/channel/UCjWqeIua4jzuPkXP2WBAAuA
#restoration
#plane
#rusty
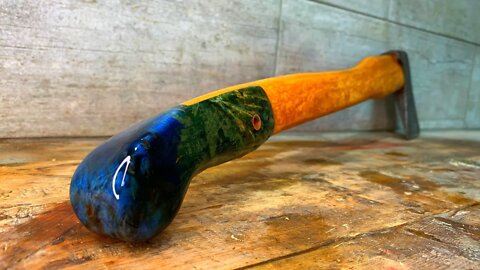
Restoration of a Large Felling Ax from the 19th century. Magnificent Handle!
According to the information that I managed to find on the thematic forums, this ax is about the 19th century!
I removed the thick layer of rust using the electrolysis process. Under the rust, I saw a drawing, something like flower petals or the rays of the sun. If you know what this drawing is, please write to me about it.
While the electrolysis process lasted, I began work on the ax handle. I used a ready-made strong beech handle, but modified it a little. I lengthened it using a piece of stabilized wood. I fixed it using epoxy glue and a brass tube as a pin. I am sure that many will write that the epoxy glue will crumble after the first blow, so at the end of the video I tested it !!!
I wish you all good luck and take care of yourself!
See you next week!
With respect to your viewers, Max.
#restoration
#axe
#rusty
2
views
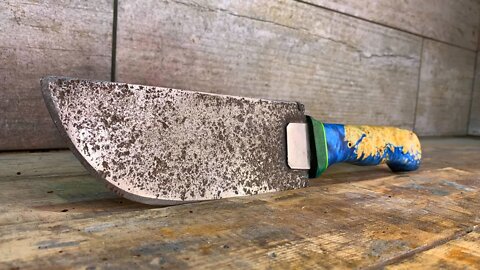
Awesome Restoration of a Huge Hunting Knife. The Most Incredible Handle!
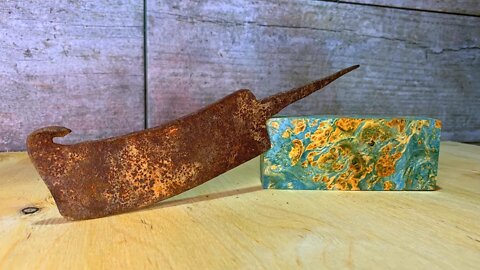
I got this antique knife very cheaply. Apparently the seller saw only rusty scrap metal in it)))
The metal has been preserved in very good condition, only the thin metal on the shank of the handle has been damaged.
Recovery process:
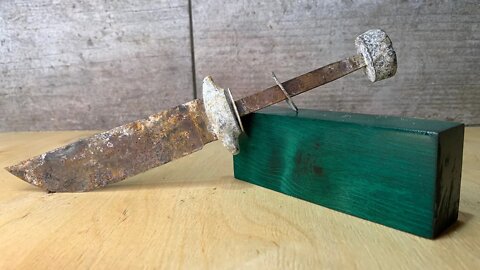
The first thing I did was to remove all the rust using the electrolysis process. Then I drilled out the old rivets that held the blade's tang. Using the old shank as a template, I fabricated two new parts, then riveted them using steel rod.
For the handle, I used two different designs of stabilized wood.
To secure the handle to the shank I used epoxy glue and also used a brass pin.
After the glue hardened, I shaped the handle on a belt grinder and then finished it by hand using rasps and files.
https://youtu.be/2_czep4fCDo
To sand the handle I used 250 to 2000 grit sandpaper, and at the very end I used carnauba wax for polishing.
I really liked the result, I hope you rate it using the "Like" button.
Thank you all for watching and see you next week!!!
Take care of yourself!
Best wishes Max!
#knife
#restoration
#awesomerestoration
1
view
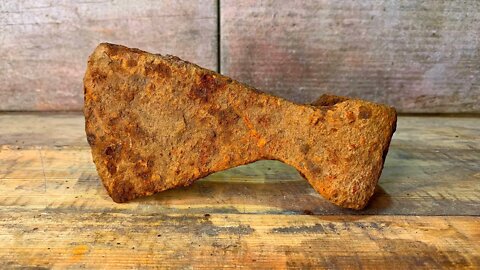
Restoration of an Ancient and Very Rusty battle axe.
I received an interesting package from my subscriber.
The package contained two rusty axes and two very rusty knives.
I decided that this ax would be the first in line for restoration!
Recovery process:
The first thing I tried was to remove the rust using a brass brush. But the rust turned out to be so strong that all my work with the brass brush was in vain.
I then decided to use electrolysis to remove the rust. The electrolysis process is very simple and anyone can repeat it at home. To do this, you will need water, baking soda, a car battery charger (you can use any, even less powerful chargers, the process will take longer).
We attach a negative brand to the part being cleaned, a positive brand to any metal part, and we lower all this into a solution of water and soda.
After electrolysis, you only need to wash the part from dark plaque.
Next, I sanded the head of the ax a little on a homemade belt grinder.
https://youtu.be/2_czep4fCDo
I decided to make the handle of the ax from a bar that I found in my workshop. I did most of the work with hand planes. Then I tweaked the shape a bit using rasps and files.
At the very end, I treated the handle with a special oil wax for wood. This protects the handle from premature wear and aging, and will also give an excellent color.
For a more comfortable grip on the handle, I wrapped it with leather tape, the look turned out to be gorgeous))).
I liked the finished look of the ax, it turned out to be small and quite light, just right for one-handed work.
I hope you also like my work, I will be grateful if you rate the work by clicking the Like button!
Thanks for watching and see you next week!
#rusty
#axe
#restoration
16
views
Restoration of a Cleaver from a 1000 year old city. You've Never Seen a Handle like this before.
This meat cleaver was found during the construction of a multi-storey residential building. It just lay in the ground, and the most interesting thing is that it was preserved in good condition.
I think that this cleaver was made by forging several centuries ago.
Recovery process:
I tried to remove the rust with a manual brass brush, but the dry rust is very light and pretty soon my entire workshop was covered with rusty dust and it was impossible to breathe without using a respirator.
So I decided to use my old proven method - electrolysis.
But everything didn't go according to plan. For some reason, my electrolysis flask burst as soon as I put it on the table. It's good that I had a plastic container in stock that I used to use for electrolysis.
After electrolysis, I properly washed the blade of the cleaver and saw that it was preserved in excellent condition.
For the handle, I used a block of maple. I drilled the hole using drills of different diameters, since the cleaver's shank is wedge-shaped.
For a more secure fixation of the blade in the handle, I decided to use a pin. thus the blade is more likely not to lose the hilt.
After curing the epoxy glue, I turned the handle on a belt grinder (which, by the way, I made myself). Then he brought the shape to the ideal with the help of a rasp and a file. After that I polished the handle using wood oil.
I really liked the result, I hope you do too.
There are many more cool and interesting videos on the channel, I will be grateful if you watch some of them!
https://youtu.be/2_czep4fCDo - Do-it-yourself tape grinder.
Good luck to you all and take care of yourself!
See you next week!
Best regards Max!
#rusty
#knife
#restoration
11
views
Emerald Handle for this Old Rusty Knife! Beautiful Restoration.
Today I have an old knife on my desktop!
I really liked its shape and therefore I decided to make a very beautiful and bright handle for it.
Restoration process:
First, I cleaned the metal of the knife from rust. For this I used electrolysis. After that, I drilled a hole in a wooden block with a diameter equal to the width of the blade shank. Then I divided the block into three parts using a miter saw. Then I planted all three parts of the handle on the shank of the knife, and inserted metal rings between the parts - part of the decor.
After the epoxy hardened, I sanded the handle on a belt sander that I made from what I found in my garage (I'm sure anyone can build such a machine)
https://youtu.be/2_czep4fCDo - Do-it-yourself tape grinder.
Having removed all unnecessary with the help of a belt grinder, I continued to work with hand tools - rasps and files. After giving the final shape, I only had to sand the handle with sandpaper. I used grit from 60 to 2000 grid. Then polished with wood oil.
I really liked the result of my work, and I hope you will like it too (I didn’t ask for a like in the video itself, but still, if it’s not difficult, please put it, so you will help promote my channel).
Thanks for watching and for your response!
Good luck to you all and take care of yourself!
See you next week!
Best regards Max!
FRIENDS ATTENTION!
I started a new channel on YouTube.
This channel is all about cooking!
Mostly male food! Everything we like - more meat, and without unnecessary troubles!
Please support my endeavor! Follow the link, look at a couple of recipes, I'm sure you'll like it!
Thank you!
https://www.youtube.com/channel/UCjWqeIua4jzuPkXP2WBAAuA
#rusty
#knife
#restoration
5
views
Belt Sander Grinder DIY. I made it Using Only Simple Tools.
Hello everyone🙌.
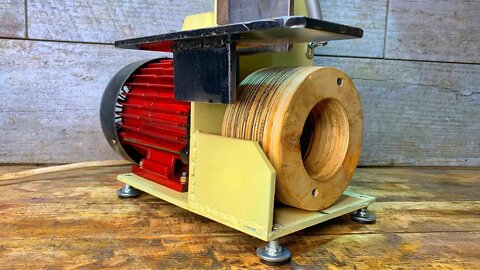
I built this belt sander using a simple power tool and junk I found in the workshop. I'm sure you can do the same, or even better!
Work process:
To make a drive roller without using a lathe, I took plywood and a jigsaw.
The plywood is strong enough and is perfect as a drive roller.
I cut the circles of the desired diameter with a jigsaw and glued them together with wood glue. For greater reliability, I pulled these circles with two long self-tapping screws.
Then I fixed this workpiece on the motor shaft and using an angle grinder and a chisel, gave a round shape to my workpiece.
I made the driven roller using several bearings and a bolt.
I made the frame of the grinder from a sheet of iron 6 mm thick.
I showed the whole process in the video, I think you will like it!
FRIENDS ATTENTION!
I started a new channel on YouTube.
This channel is all about cooking!
Mostly male food! Everything we like - more meat, and without unnecessary troubles!
Please support my endeavor! Follow the link, look at a couple of recipes, I'm sure you'll like it!
Thank you!
https://www.youtube.com/channel/UCjWqeIua4jzuPkXP2WBAAuA
#BeltSander
#DIYProject
#DIY
2
views