


War, genocide! WHY!
Zoom 5-10 EST daily https://us02web.zoom.us/j/6945489985?pwd=UllwRmwzRUhWS2pXUWNQODNEbnhSZz09 SwT80SwT80C
Thu 11/2/2023 6:01 AM
War, genocide has been going on all the slaves' pheasants, there is no race - race was created as religions and colour to divide the slaves.
There are two classes -- one is the parasite class , they been called many names over the years, --- vampires, elite, royalty, Khazarian jews, Zionists, jews, noble, kings, barons, crime ministers, presidents, and so on ----
The others are another class, they are called cultures, useless eaters, native, aboriginal , indigenous, first nations, Scottish, Americans, Canadian, Ozzie's , Irish, Japanese and so on
They use cryptic words such as race, Indian, Aboriginal, to divide the slave class, making them think they are different but in fact they are actually men and woman with different cultures and ideologies from where they are located,
The push colonization to deflect themselves from the real enemy - which is them pulling the strings.
Why do we think we are different race called white, red, yellow, black is because the Parasites have brainwashed that into the slave class to divide them!
Simply put, the major reason that whole populations of people have different skin colors is because there are differences in sunlight across the world.
So, when you are indocrintated for hundreds or thousands of years it is very easy to control the slaves to believe this insanity, Same as recent past 3 years with the indoctrination to take the kill shot. Indoctrination and the continuous drill this dis information continuous over and over to the slave class actually believes this insanity has left so many confused and uneducated they even to believe in the story the parasites created of invisible men.
The created fictional things called countries, and imaginary things called borders ! Yes, borders mor invisible shit they created. All done by design to divide the slave class.
They use the weak minded, with pleasures of gold, crypto, and other forms of greed to create and hypnotize some of the slaves they will benefit themselves to become bullies, and they use these sell outs as tools to be their enforcement class to protest the PARASTIES and their PARASITE SYSTEM.
They created their laws of Admiral, Maritime, Civil, Common Law and Roman Law to keep the slaves enslaved!
They have many secret societies all funded and well organized to infiltrate the slaves to ensure they remain slaves
The Skull and bones, Shriners, free masonry, are just a few to mention.
Lawyers and Doctors are indoctrinated and brainwashed to keep their LIE going. Lawyers are NOT What Most think through years of brainwashing. One is the PROTECTOR of their LAWS and the OTHER is the DRUG DEALER .
The other bullies who are Jesuits or mason or other secret societies are a brotherhood or Sisterhood and to many slaves they are called Police, RCMP, OPP, Sherriff's, FBI, CIA, MOSSAD , ect to enforce their tyranny with threat of violence or Murder.
The other Secret society is Preachers, Pastors and they place these people on pedestals for years as some sort of guru when in fact they are the brainwashed or part of the parasite class. Their JOB is to maintain their lies and brainwash millions to keep them obedient slaves.
The other Powerful tool they use is program you to send your precious children to prison to bombard them every day with lies and disinformation. Over load them to read and memorize the stupidity.
After years of these mass sycoses, they mentally and physically brainwashed!
Many of these are so indoctrinated they become the next bullies for the PARASITES
Many refer these things as teachers, professors, principals, educators. They instill you need a Piece of Paper proven you passed all the requirements to become the next brainwasher onto the slave class.
They instill you must GO to UNITED NATIONS training which is University or Collage or you will not be reward in their psychopathic world of tyranny.
To fully comprehend they created a system so intertwined and a huge web of deceit the average slave has been dumbed down so much they may never break through to actually see reality and the facts
Here are just a few examples - VOTING - the slaves have been so dumbed down they even say I voted for the lesser of the EVIL - We see it year after year. They know they are all corrupt, BUT I WILL KEEP VOTING to maintain the system that wants YOU and your children DEAD.
You cannot even make this shit up!
Even today the slaves are pushing their own death sentence with crypto, and cash is gold because its not crypto. Both are devising tools to keep the slaves enslaved. As both are Intruments of the FIAT fractions reserve scam they have used to bankrupt and impoverish all the slaves.
Money for NOTHING and SLAVES will NEVER be Free!
So here we are an dwhat we are faced with
Their it is in a NUT SHELL
No Law to protect the slave, go along with their system or be destroyed
Many went on with the system because it was not affecting them as severely, I have a home, job, and get two weeks a year for a holiday from the slave labour camp! So, life is good, it could be allot worst I could live in a third world country!
Well, it was all good because you , ME , I , were not affected so severe
The tables have turned and now you live in a third world country and they live in a 4th world country
The gig is up as more see the truth, the facts of how they are being intentionally being murdered, harmed and the brainwashing is wearing off slowly.
They are looking for answers to end this insanity!
They have tried everything from courts, to rallies, convoys and protest, Even petitions , referendums to stop this insanity and all has failed them
Time is up if we do not end this madness
What's the Solution- You know the only solution is walk away from their system , Stop funding their system and start building your own system
Restore law and order
What other choice do we have !!!!
1.57K
views
17
comments

THIS is what you have done to people....GENOCIDE.
Zoom 5-10 EST daily https://us02web.zoom.us/j/6945489985?pwd=UllwRmwzRUhWS2pXUWNQODNEbnhSZz09 SwT80SwT80C
ENOUGH....there are TENS OF MILLIONS all over the world. Canada is the WORST.....I DESPISE you rabid vaxxers!!!! THIS is what you have done to people....GENOCIDE....I WILL NOT stay silent, I will NOT obey and I will TAG every single person so the WORLD knows what JUSTTIN TRUDEAU and murdering pharma did...and for you DISGUSTING apologists and vile 'forgiveness' crew, you sicken me even MORE....this is MURDER!!!!!
1.25K
views
14
comments

The Past the Present and the Future (1986)
Zoom 5-10 EST daily https://us02web.zoom.us/j/6945489985?pwd=UllwRmwzRUhWS2pXUWNQODNEbnhSZz09 SwT80SwT80C
So, how many of these old "conspiracy theories" have come true or are being implemented?
Note about "desert base". In 1980 a 10MB hard drive cost $300. The "desert base" had 100's of 1GB drives which would be enough for them to record every phone call in the world...
0:30 banking system
6:00 none dare call it conspiracy
9:00 communism, council of churches, cfr
18:30 fabian society and blob hawke
24:00 club of rome
32:00 advanced technology and pyne g_ap
45:00 opinion programming
55:00 cashless society and bankcard scam
63:00 ID and the mark
67:00 Highway to Israel and prophesies
source: www.larryhannigan.com.au
#AUSTRALIA #COMMUNISM #NWO
One Crown People of Australia on Rumble & Bitchute:
https://rumble.com/c/OneCrownPeopleOfAustralia
https://www.bitchute.com/channel/OneCrownPeopleOfAustralia/
763
views

Growing Mushrooms at Home is Super Simple in Recycled Plastic Bottles
Zoom 5-10 EST daily https://us02web.zoom.us/j/6945489985?pwd=UllwRmwzRUhWS2pXUWNQODNEbnhSZz09 SwT80SwT80C
Growing Mushrooms at Home is Super Simple in Recycled Plastic Bottles
share 59Mushrooms are a versatile and delightful addition to various dishes, but they can be quite expensive when purchased from the store. However, you can save money and enjoy the freshest mushrooms by growing them at home. In this article, we’ll explore an innovative and eco-friendly method of cultivating mushrooms using recycled 5L plastic bottles. By following these steps, you can produce your own bountiful harvest of mushrooms in just 45 days.
Materials and Equipment Needed:
Recycled 5L plastic bottles
Straw
Mushroom embryo (spores or mycelium)
Plastic wrap
High-pressure watering can
Soil and substrate
Step 1: Preparing the Bottles
Begin by selecting your plastic bottles. Clean and sanitize them thoroughly to ensure a healthy growing environment for your mushrooms. Then, carefully cut off the top section of each bottle, leaving the bottom part intact. The open end will serve as the container for your mushrooms.
Step 2: Preparing the Straw
Straw is an excellent growing medium for many mushroom species. To prepare it, boil the straw to kill off any potential contaminants and soften it. Once boiled, allow the straw to cool and drain any excess water.
Step 3: Creating Air Holes
Use a drill or a heated metal rod to create small holes all over the plastic bottles. These holes serve as vital air exchange points for the mushroom growth process. Adequate air circulation is essential for successful mushroom cultivation.
Step 4: Layering the Bottles
Layer the bottom of your plastic bottles with the boiled straw, creating a substantial bed for your mushrooms. Ensure that the straw is evenly distributed and packed lightly.
Next, introduce the mushroom embryo (spores or mycelium) onto the straw bed. Layer more straw on top, allowing for a mix of straw and mushroom embryo within each bottle. This mixture will serve as the growing medium for your mushrooms.
Step 5: Covering with Plastic Wrap
Place plastic wrap over the top of each bottle to create a semi-sealed environment. This cover will help maintain humidity levels within the bottle and promote the mycelium’s growth, the network of mushroom roots.
Step 6: Initial Watering
Use a high-pressure watering can to moisten the straw and the mushroom embryo. This initial watering ensures that the growing medium is sufficiently hydrated.
Step 7: Observing Growth
Over the next 12 days, keep a close eye on your bottles. You should start to see some changes as the mycelium network expands within the straw. Once you observe signs of growth, it’s time to remove the plastic wrap carefully.
Step 8: Second Round of Watering
After removing the plastic wrap, continue to water your mushroom bottles regularly. This time, water directly into the bottle through the top opening, ensuring that the growing medium remains moist.
Step 9: Adding Soil and Substrate
Around 12-15 days after removing the plastic wrap, introduce a layer of soil and substrate to the top of each bottle. This mixture provides essential nutrients for the mushrooms as they enter the fruiting stage.
Step 10: Continued Watering and Growth
Continue to water the bottles as your mushrooms grow. Within 45 days, you should have fully grown mushrooms ready for harvest. Remember to maintain consistent humidity and moisture levels throughout the process for the best results.
Watch the video:
Growing mushrooms at home in recycled plastic bottles is an eco-friendly and cost-effective way to enjoy these delectable fungi. By carefully following these steps, you can turn your kitchen into a mushroom haven, providing a fresh and sustainable source of culinary delight right at your fingertips
1.55K
views
2
comments
How to Successfully Grow Garlic at Home in Containers
Zoom 5-10 EST daily https://us02web.zoom.us/j/6945489985?pwd=UllwRmwzRUhWS2pXUWNQODNEbnhSZz09 SwT80SwT80C
How to Successfully Grow Garlic at Home in Containers
May be an image of seedlings
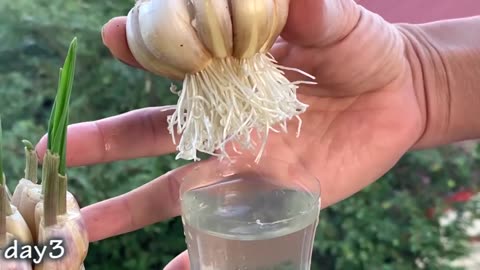
Garlic is a versatile and flavorful addition to many dishes, and growing it at home in containers can be both enjoyable and rewarding. This method involves beginning with whole garlic heads, cutting the top around the hard neck, and then placing the entire head in water to encourage growth. Once the garlic head has sprouted, you can divide it into individual cloves and plant them in containers filled with soil. Container gardening allows those with limited space or less-than-ideal outdoor conditions to enjoy a bountiful harvest of homegrown garlic. In this article, we’ll guide you through the process of successfully growing garlic in containers using this unique method.
Materials You’ll Need
Before you get started, gather the following materials:
Garlic heads (bulbs)
A container or pot with drainage holes
High-quality potting soil
Watering can or spray bottle
Sunlight or a grow light
A sunny and well-ventilated spot
Step 1: Select Your Garlic Heads
Choose healthy garlic heads from a reliable source or your local nursery. Look for bulbs that are plump, firm, and free from mold or disease. Varieties with larger cloves are generally recommended for home growing.
Step 2: Prepare the Garlic Heads
Take each garlic head and cut the top around the hard neck, ensuring not to damage the cloves during this process. This step will encourage the garlic to sprout.
Step 3: Start
Step 3: Start the Sprouting Process
Fill a shallow
Fill a shallow container or tray with water, just enough to cover the bottom of the garlic head without submerging it. Place the cut garlic head in the container with the top (cut) side facing upward. Position the container in a sunny spot or under a grow light. Change the water regularly to prevent rot and encourage healthy sprouting. After a few weeks, you should see green shoots emerging from the top.
Step 4: Transplanting into Containers
Once the sprouts are around 3 to 4 inches tall, it’s time to transplant them into containers. Choose a container that is at least 6-8 inches deep and has drainage holes to prevent waterlogged soil.
Fill the container
Fill the container with high-quality potting soil, leaving about 2 inches of space from the rim.
Carefully separate the garlic head into individual cloves, ensuring that each clove has a healthy sprout. Place these cloves in the container, with the sprouted tip just below the soil’s surface.
Cover the cloves
Cover the cloves with soil and water gently.
Step 5: Caring for Your Garlic Plants
Follow the care instructions mentioned in the previous version of this article (Step 5) to provide your garlic plants with the necessary sunlight, water, fertilizer, and care.
Step 6: Harvestin
Garlic is typically ready for harvest when the lower leaves begin to turn yellow and die back, usually in late spring or early summer. Gently dig up the bulbs, being careful not to damage them. Allow the bulbs to cure by drying them in a cool, well-ventilated area for a few weeks.
Conclusion
Growing garlic at home in containers using the water sprouting method is a rewarding and relatively simple process. With the right care and attention, you can enjoy fresh, flavorful garlic bulbs that you’ve nurtured from start to finish. Whether you have limited garden space or simply want to try your hand at container gardening, this method allows you to savor the taste of homegrown garlic in your favorite dishes. Happy gardening!
836
views
1
comment
How to Grow Mushrooms at Home in Buckets with Holes
Zoom 5-10 EST daily https://us02web.zoom.us/j/6945489985?pwd=UllwRmwzRUhWS2pXUWNQODNEbnhSZz09 SwT80SwT80C
How to Grow Mushrooms at Home in Buckets with Holes
Mushroom cultivation at
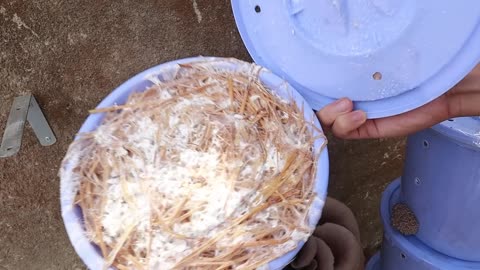
Mushroom cultivation at home can be a rewarding and eco-friendly hobby that allows you to enjoy the delicious taste of fresh, homegrown mushrooms. One of the simplest and most efficient methods for cultivating mushrooms is by using buckets with holes. In this article, we will guide you through the step-by-step process of growing mushrooms at home using straw, water, and mushroom seeds. Follow these instructions to enjoy a bountiful harvest of your own mushrooms in just a few weeks.
Materials Needed:
Straw
Water
Large pot for boiling
Mushroom seeds (spawn)
Plastic buckets with holes
Clean cloth or lid for covering the buckets
Watering can or spray bottle
A cool, dark place for incubation
Step 1: Preparing the Straw
Begin by gathering a sufficient amount of straw. Wheat straw or oat straw works well for mushroom cultivation. Cut the straw into small pieces, around 2-4 inches in length.
Step 2: Boiling the Straw
Place the chopped straw in a large pot and fill it with water. Bring the water to a boil and let it simmer for a period of time to sterilize the straw. After boiling, allow the straw to cool down to room temperature.
Step 3: Acquiring Mushroom Seeds
Purchase mushroom seeds,
Purchase mushroom seeds, also known as mushroom spawn, from a reputable supplier. You can choose from a variety of mushroom species such as oyster, shiitake, or white button mushrooms, depending on your preference.
Step 4: Layering Straw and Mushroom Seeds
Take your plastic bucket with holes and start by adding a layer of the cooled, boiled straw to the bottom. Next, evenly spread a layer of mushroom seeds on top of the straw. Repeat this layering process until the bucket is nearly full, finishing with a layer of straw on top. Make sure the layers are evenly distributed for optimal mushroom growth.
Step 5: Incubation
Cover the bucket with a clean cloth or a lid with small holes to allow for air circulation. Place the bucket in a cool, dark location with temperatures ranging from 70°F to 75°F (21°C to 24°C). During the incubation period, the mycelium (the mushroom’s root system) will start to colonize the straw.
Step 6: Daily Watering
To ensure a successful mushroom harvest, you’ll need to keep the straw consistently moist. Water the mushrooms once or twice a day using a watering can or a spray bottle. Be careful not to overwater, as excessive moisture can lead to contamination.
Step 7: Harvesting
After approximately 21 days, you’ll start to see mushroom pins (tiny mushroom primordia) forming on the surface of the straw. Continue to maintain the moisture levels. As the pins grow, they will develop into mature mushrooms. Harvest the mushrooms by gently twisting and pulling them from the substrate when they reach their desired size.
Step 8: Continued Harvesting
You can continue to harvest mushrooms for several weeks after the initial harvest, as new pins will continue to develop on the substrate. Be sure to harvest the mushrooms before they release spores, as spores can negatively affect future mushroom crops.
Disclaimer:
Growing mushrooms at home requires attention to detail and proper sterilization to prevent contamination. It’s essential to exercise caution and adhere to safety guidelines when handling potentially contaminated materials or consuming homegrown mushrooms. If you have any doubts or concerns, consult with local experts or mycology professionals for guidance.
Conclusion:
Growing mushrooms at home using buckets with holes is a satisfying and relatively simple process. By following these instructions, you can enjoy a steady supply of fresh, homegrown mushrooms throughout the year. Experiment with different mushroom species and techniques to expand your culinary horizons and enjoy the fruits of your labor. Happy mushroom growing!
For a visual demonstration of the mushroom cultivation process described in this article, you can watch the step-by-step guide in this video:
Do you like this? Share inspiration with your friends!
TAKE BOLD ACTION NOW FOR YOUR FUTURE AND FOR THE FUTURE OF YOUR CHILDREN.
There is no other path.
It is our destiny,and if we don’t take action we will be diluted outfrom ever again being able to take this course of actionthat will make us the free
Organzie a Local Meeting - We have so many men and women looking to connect!
1.56K
views
2
comments
Never Throw Away Eggshells: Your Plants Will Thank You for This!
Zoom 5-10 EST daily https://us02web.zoom.us/j/6945489985?pwd=UllwRmwzRUhWS2pXUWNQODNEbnhSZz09 SwT80SwT80C
Never Throw Away Eggshells: Your Plants Will Thank You for This!
May be an image of seedlings
Gardening is a
Gardening is a soulful pursuit, allowing you to forge a profound connection with nature while witnessing the bloom of your hard-earned labor. The key to a thriving garden lies in providing your plants with essential nutrients. While commercial fertilizers are abundant, they often strain your budget and harm the environment. Fortunately, you can embrace a sustainable and cost-effective alternative – eggshell fertilizer.
Eggshell Fertilizer: A Natural Treasure
Rich in Calcium: Eggshells are primarily composed of calcium carbonate, a vital nutrient for plant growth. Calcium strengthens cell walls, reduces disease risks, and enhances plant structure.
Slow-Release Nutrient: Eggshell fertilizer offers a gradual release of calcium, ensuring a constant supply of this vital mineral.
pH Balance: Calcium carbonate serves as a natural buffer for soil acidity, creating an ideal pH level for your plants.
Pest Deterrent: The sharp edges of crushed eggshells act as a deterrent to garden pests such as slugs and snails, safeguarding your greenery.
Sustainable and Cost-Effective: Eggshell fertilizer is an eco-friendly solution that recycles kitchen waste and saves you money on commercial fertilizers.
Creating and Applying Eggshell Fertilizer: A Simple Guide
Materials You’ll Need:
Eggshells
Mortar and pestle, coffee grinder, or food processor
Airtight container for storing finely crushed eggshells
Spray bottle (optional)
Steps:
Gather Eggshells: Save and rinse eggshells after your culinary adventures and let them air dry to remove moisture.
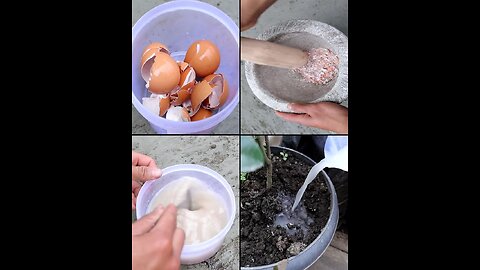
Pulverize the Eggshells: Use a mortar and pestle, a coffee grinder, or a food processor to grind the eggshells into a fine powder.
Store the Eggshell Powder: Keep the finely crushed eggshells in a tightly sealed container for easy access.
Blend with Water: When it’s time to nourish your plants, mix a few tablespoons of the eggshell powder with water. You can pour this mixture at the plant’s base or strain it and transfer it to a spray bottle for even distribution.
Application: If you opt for spraying, apply the mixture directly to the leaves and the soil around your plants. For ground-level application, gently pour the mixture around the root zone, avoiding contact with the foliage.
Repeat as Needed: Administer the eggshell fertilizer every few weeks or as required, depending on your plant’s specific needs.
Conclusion
Never throw away those eggshells! Instead, turn them into a natural, budget-friendly, and eco-conscious solution to enrich your garden’s vitality. By recycling kitchen waste and providing your plants with essential calcium and minerals, you’re giving your garden the secret ingredient it craves. Plus, the added benefit of warding off common garden pests makes it even more enticing. Don’t wait; give eggshell fertilizer a try and watch your garden transform into a thriving paradise. Your plants will thank you for it!
Do you like this? Share inspiration with your friends!
TAKE BOLD ACTION NOW FOR YOUR FUTURE AND FOR THE FUTURE OF YOUR CHILDREN.
There is no other path.
It is our destiny,and if we don’t take action we will be diluted outfrom ever again being able to take this course of actionthat will make us the free
Organzie a Local Meeting - We have so many men and women looking to connect!
532
views
How to Grow Cucumbers on a String
Zoom 5-10 EST daily https://us02web.zoom.us/j/6945489985?pwd=UllwRmwzRUhWS2pXUWNQODNEbnhSZz09 SwT80SwT80C
How to Grow Cucumbers on a String
Are you eager
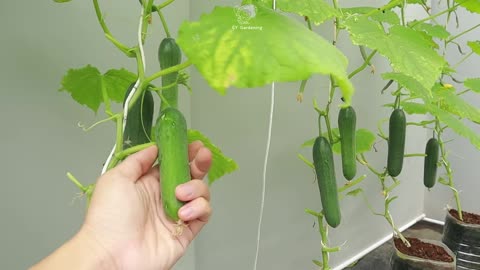
Are you eager to enjoy fresh, homegrown cucumbers but worried about space constraints? The solution might be simpler than you think. “How to grow cucumbers on a string” is an innovative and efficient method for cultivating these refreshing veggies in small spaces using containers like plastic bottles. In this beginner’s guide, we’ll walk you through the process step by step and even share some homemade fertilizer recipes to ensure your cucumbers thrive.
Why Choose Container Gardening for Cucumbers?
Container gardening is perfect for individuals with limited outdoor space or those who want to keep their cucumber plants neatly organized. By employing this unique “cucumbers on a string” method, you can make the most of your space, even if it’s just a small balcony or patio.
Materials You’ll Need:
Plastic Bottles: Start by collecting large plastic bottles, preferably 2-liter soda bottles. Make sure they are clean and dry.
Cucumber Seeds or Seedlings: Choose cucumber varieties suitable for container gardening, such as bush or dwarf varieties.
Potting Soil: Use high-quality potting mix or create your own using a blend of compost, peat moss, and perlite.
Scissors or Knife: For cutting and creating holes in the plastic bottles.
String or Twine: This will serve as your cucumber plant’s support system.
Homemade Fertilizers: We’ll discuss these later in the article.
Stakes or Trellis: To support the strings at the top and ensure they stay in place.
Step-by-Step Guide: Growing Cucumbers on a String
1. Preparing the Plastic Bottles:
Using a pair of scissors or a knife, cut the top third of the plastic bottle off. This will be used as a container for your cucumber plant.
Make small drainage holes at the bottom of the bottle to prevent overwatering.
2. Planting Cucumber Seeds/Seedlings:
Fill the plastic bottle with potting soil, leaving some space at the top.
Plant your cucumber seeds or seedlings in the soil, following the instructions on the seed packet or the nursery label.
3. Setting Up the Support System:
Create a hole at the bottom of the bottle and pass a piece of string through it, allowing it to dangle freely.
Secure the top of the string to a trellis, stake, or any support structure, ensuring it’s sturdy and tall enough for the cucumber to climb.
4. Caring for Your Cucumber Plant:
Place your bottle in a sunny spot where it will receive at least 6-8 hours of sunlight per day.
Water your cucumber plant regularly, keeping the soil consistently moist but not waterlogged.
Use homemade fertilizers to provide essential nutrients for optimal growth.
Homemade Fertilizers for Cucumbers:
Eggshell Fertilizer: Crush eggshells and mix them into the soil to provide calcium, which prevents blossom end rot in cucumbers.
Compost Tea: Create a mixture of well-rotted compost and water. Allow it to sit for a few days and use it to water your cucumber plant.
Banana Peel Fertilizer: Blend banana peels with water, and use the mixture to water your plant. The potassium in banana peels is beneficial for cucumber growth.
Epsom Salt Solution: Dissolve a tablespoon of Epsom salt in a gallon of water, and use it to water your cucumber plant. This provides magnesium and promotes fruiting.
Harvesting Cucumbers:
When your cucumber plants start to produce fruits, pick them when they reach the desired size. Harvesting regularly encourages more cucumbers to grow.
Need more help? Watch the video:
Growing cucumbers on
Growing cucumbers on a string is not only a space-saving solution but also a fun and rewarding way to enjoy homegrown cucumbers. With some basic materials and a little care, you can savor the fresh taste of your own cucumbers right from your balcony or small garden. So, give it a try, and enjoy the bountiful harvest of your “string-grown” cucumbers!
Do you like
Do you like this? Share inspiration with your friends!
TAKE BOLD ACTION NOW FOR YOUR FUTURE AND FOR THE FUTURE OF YOUR CHILDREN.
There is no other path.
It is our destiny,and if we don’t take action we will be diluted outfrom ever again being able to take this course of actionthat will make us the free
Organzie a Local Meeting - We have so many men and women looking to connect!
668
views
1
comment
Lemon Tree Propagation: A 99% Success Method
Zoom 5-10 EST daily https://us02web.zoom.us/j/6945489985?pwd=UllwRmwzRUhWS2pXUWNQODNEbnhSZz09 SwT80SwT80C
Lemon Tree Propagation: A 99% Success Method
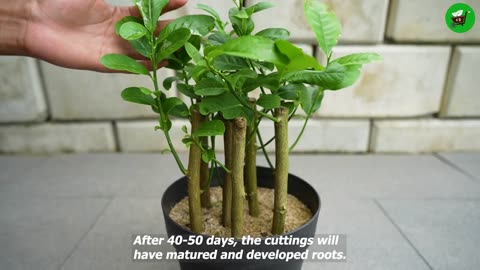
Are you interested in cultivating your very own lemon trees from cuttings without the complexities of traditional gardening methods? Look no further! In this detailed guide, we will walk you through a unique and straightforward technique that requires just a 2-liter plastic bottle and a few essential materials. Say goodbye to the hassle and hello to effective lemon tree propagation.
Materials Needed:
Before we delve into the step-by-step process, let’s gather the essential materials you’ll need:
A 2-liter plastic bottle: This will serve as the key component of our innovative propagation method.
Sand or well-draining potting mix: To provide the perfect environment for your lemon tree cuttings to develop roots.
Lemon tree cuttings (6-8 inches long): Select healthy cuttings with nodes to ensure a higher success rate.
Rooting hormone (optional): Use this to promote faster root development, though it’s not mandatory.
A sharp knife or scissors: For preparing the cuttings.
Rubber bands or twine: To secure the plastic bottle and create a mini greenhouse.
A misting bottle or spray bottle: For maintaining the right humidity levels.
Now that we have our materials ready, let’s proceed with the steps:
Step 1: Prepare the Cuttings
Begin by selecting healthy lemon tree cuttings. These cuttings should be around 6-8 inches in length and have nodes. Optionally, use rooting hormone to encourage root development.
Step 2: Create Plus Sign Openings
Take the 2-liter plastic bottle and make “plus sign” (+) openings on each side. These openings should be large enough to accommodate your lemon tree cuttings without them falling out.
Step 3: Insert the Cuttings
Gently insert the lemon tree cuttings into the “+” sign openings you created. Ensure they are secure within the bottle.
Step 4: Enclose and Maintain
Cover the top of the bottle with plastic wrap or a plastic bag and secure it with rubber bands or twine. This enclosure will create a greenhouse effect, helping to maintain humidity around the cuttings. Place the bottle in a well-lit area with indirect sunlight.
Step 5: Keep it Moist
It’s essential to keep the cuttings and the bottle’s interior consistently moist. Use a misting bottle or spray bottle to mist the cuttings regularly. This helps to create the ideal conditions for root development.
Step 6: Monitor Growth
Over time, check the cuttings for root development. You can gently tug on them to check for resistance, indicating that roots have formed.
Step 7: Transplant
Once the cuttings
Once the cuttings have rooted and developed sufficiently, you can transplant them into individual pots or directly into the garden, where they will grow into robust lemon trees.
By following this
By following this unique technique, you can enjoy the satisfaction of growing lemon trees from cuttings with minimal hassle. Patience is key, as it may take several weeks to see significant progress, but the results will undoubtedly be well worth the effort. Happy lemon tree propagation!
Watch this video:
With this innovative
With this innovative method, you can effortlessly propagate lemon trees and bring a touch of citrus freshness to your garden. Enjoy the rewarding journey of nurturing your lemon tree from a humble cutting to a flourishing citrus tree in your backyard.
Do you like
Do you like this? Share inspiration with your friends!
TAKE BOLD ACTION NOW FOR YOUR FUTURE AND FOR THE FUTURE OF YOUR CHILDREN.
There is no other path.
It is our destiny,and if we don’t take action we will be diluted outfrom ever again being able to take this course of actionthat will make us the free
Organzie a Local Meeting - We have so many men and women looking to connect!
584
views
1
comment
Create a Hanging Strawberry Garden with Just a Pipe and Two Secret Ingredients
Zoom 5-10 EST daily https://us02web.zoom.us/j/6945489985?pwd=UllwRmwzRUhWS2pXUWNQODNEbnhSZz09 SwT80SwT80C
"PEOPLE ARE NOT YOUR MOST IMPORTANT ASSET. THE RIGHT PEOPLE ARE."
Create a Hanging Strawberry Garden with Just a Pipe and Two Secret Ingredients
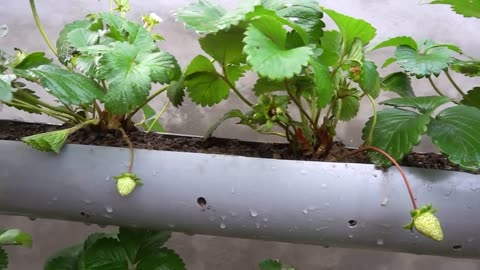
share2 9If you’re a strawberry enthusiast looking to cultivate your own delectable homegrown strawberries but are limited on gardening space, we’ve got the perfect solution for you! In this all-encompassing guide, we’ll take you through the process of establishing a hanging strawberry garden with just a single water pipe, making it both space-efficient and a great conversation piece.
Essential Materials:
PVC Water Pipe: The fundamental element for this project is a PVC water pipe. Opt for a diameter that aligns with your space and preferences; typically, a 4 to 6-inch diameter suits growing strawberries perfectly.
Pipe Caps: You’ll need two pipe caps to seal off the ends of the water pipe.
Drainage Holes: Ensure proper water drainage by creating small holes at the base of both half-pipes.
Hanger System: A robust hanger system, like hooks or brackets, is essential to support your suspended strawberry garden.
Compost: High-quality compost provides the necessary nutrients for your strawberry plants.
Trichoderma: This beneficial fungus safeguards plants from soil-borne diseases and is readily available at most gardening stores.
Seedlings: Opt for healthy strawberry seedlings from a reputable source.
Maintenance Supplies: Gather items such as beer (yes, you read that correctly), fertilizer, and any other necessities for your strawberry garden.
Step-by-Step Guide:
Cut and Seal the Pipe: Horizontally slice the PVC water pipe in half to create two equal half-pipes. Then, seal both ends with pipe caps.
Establish Drainage Holes: Utilize a drill to fashion small holes at the base of both half-pipes. Ensuring proper drainage is critical to prevent waterlogging, which can harm your strawberry plants.
Prepare the Hanger: Install a robust hanger system capable of bearing the weight of your suspended garden. Confirm that it’s securely fastened to a sturdy support structure.
Fill with Compost: Fill the bottom half of the pipe with high-quality compost, leaving ample space at the top for your strawberry seedlings.
Incorporate Trichoderma: Mix trichoderma into the compost. This beneficial fungus bolsters plant health and guards against soil-borne diseases.
Plant the Seedlings: Position your strawberry seedlings in the upper half of the pipe, ensuring adequate spacing between them and that the roots are well-covered with compost.
Water Regularly: Consistent and thorough watering is essential for strawberry growth. Be cautious not to overwater, as it can lead to root rot.
Maintenance: Regular maintenance is vital for a flourishing strawberry garden. Prune dead leaves and spent flowers to encourage new growth. Fertilize as required to provide essential nutrients, and occasionally add beer to the soil, as it can help deter pests.
Harvest Your Super Strawberries: As your strawberry plants mature, they will produce delicious, super-ripe fruit. Pluck them as they ripen, and savor the fruits of your labor.
Success Tips:
Sunlight: Ensure your hanging garden receives 6-8 hours of direct sunlight daily, as strawberries thrive in such conditions.
Spacing: Mind the spacing between strawberry seedlings to maintain good air circulation and reduce disease risks.
Pest Control: Regularly inspect your plants for pests and address them accordingly.
Variety Selection: Choose strawberry varieties suited to your climate and taste preferences.
Patience: Keep in mind that strawberries may take some time to establish and produce fruit, so be consistent and patient with their care.
Need more help? Watch the video:
With just a single water pipe and a dash of creativity, you can cultivate super-ripe, homegrown strawberries in your very own hanging garden. This innovative approach optimizes space while delivering mouthwatering results. Follow our detailed guide, and soon enough, you’ll be indulging in your homegrown, super-ripe strawberries sure to impress both friends and family. Happy gardening!
TAKE BOLD ACTION NOW FOR YOUR FUTURE AND FOR THE FUTURE OF YOUR CHILDREN.
There is no other path.
It is our destiny, and if we don’t take action we will be diluted out from ever again being able to take this course of action that will make us the free
Organzie a Local Meeting - We have so many men and women looking to connect!
779
views
2
comments
How to Multiply Your Lemon Tree with the Power of Aloe Vera and Turmeric
Zoom 5-10 EST daily https://us02web.zoom.us/j/6945489985?pwd=UllwRmwzRUhWS2pXUWNQODNEbnhSZz09 SwT80SwT80C
How to Multiply Your Lemon Tree with the Power of Aloe Vera and Turmeric
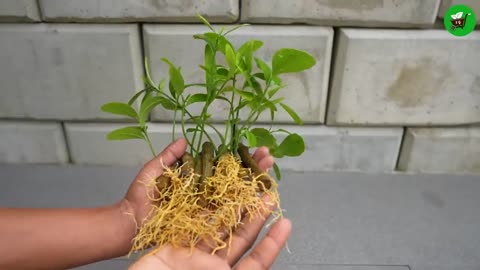
Unlock the secret to propagating your lemon tree with an innovative technique that blends the soothing qualities of aloe vera with the protective prowess of turmeric. Turmeric’s antifungal and antibacterial properties create an optimal environment for nurturing your lemon cuttings. In this all-encompassing guide, we invite you to embark on a botanical journey that combines aloe vera and turmeric magic for propagating a lemon tree. Let’s embark on this adventure in botanical multiplication.
Materials You Will Require:
Pristine lemon tree cuttings
Fresh aloe vera leaves
Turmeric powder
A container filled with sand
A 5-liter plastic bottle
Water
Sharp knife or scissors
A compact shovel or digging tool
Step 1: Procure Your Cuttings
Commence by gathering robust lemon tree cuttings. Opt for branches free from diseases or pests, measuring approximately 6-8 inches in length. Employ a sharp knife or scissors to create clean cuts at a 45-degree angle.
Step 2: Prepare the Aloe Vera and Turmeric
Aloe vera plays a pivotal role in this propagation process. Delicately slice open an aloe vera leaf lengthwise to unveil the nurturing gel within. This gel contains natural rooting hormones that invigorate root development in your lemon cuttings. Additionally, prepare a portion of turmeric powder in a small receptacle. Turmeric’s antifungal and antibacterial qualities will act as a protective shield for your cuttings.
Step 3: Apply Aloe Vera Gel and Turmeric
With care, apply the aloe vera gel to the lower section of your lemon cuttings. This gel not only stimulates root growth but also forms a safeguard against potential infections. Following the application of aloe vera gel, lightly sprinkle your cuttings with a dash of turmeric powder to harness its antifungal and antibacterial attributes. Ensure complete coverage for maximum effectiveness.
Step 4: Allow the Gel and Turmeric to Set
Allow some time for the aloe vera gel and turmeric-coated cuttings to set. This brief waiting period permits the gel to dry and the turmeric to create a protective shield around your cuttings.
Step 5: Plant Your Cuttings in Sand
Fill a container with pristine sand and craft cavities within it using a compact shovel or digging tool. Plant your prepared lemon cuttings in these hollows, ensuring they rest securely in the sand.
Step 6: Hydrate Your Cuttings
Liberally water your cuttings, maintaining moist sand without saturating it. Adequate moisture is essential for successful root development.
Step 7: Construct a Mini Greenhouse
Fabricate a petite greenhouse by removing the top half of a 5-liter plastic bottle. Position this modified bottle over your container to create an optimal environment for your lemon cuttings to root. This setup preserves humidity around your cuttings.
Step 8: Monitor Progress
Consistently assess the moisture levels within the container to maintain a continuously humid environment. You can slightly crack open the bottle to facilitate airflow, taking care not to desiccate your cuttings. Condensation forming inside the bottle is indicative of ideal humidity levels.
Step 9: Witness Root Development
After several weeks to a few months, observe the emergence of root development on your lemon cuttings. Once the roots are robustly established, and your cuttings have flourished into vibrant young plants, you can transplant them into more expansive pots or directly into your garden.
This method for propagating a lemon tree with aloe vera and turmeric amplifies your chances of success by harnessing the innate rooting properties of aloe vera and the protective benefits of turmeric. While it may require some patience, the gratification of cultivating your lemon tree from cuttings with these added steps is profoundly fulfilling. Happy gardening!
495
views

The World Population Hoax
Zoom 5-10 EST daily https://us02web.zoom.us/j/6945489985?pwd=UllwRmwzRUhWS2pXUWNQODNEbnhSZz09 SwT80SwT80C it is a zero
The official numbers for world population released by the United Nations as of now have just surpassed 8 billion people living on Earth. In 1800 there were only 900 million members of the human family spread across the world, raising to 1.65 billion in 1900, and skyrocketing to nearly 7 billion in the year 2000. Now in 2023 we have allegedly just passed the 8 billion mark with UN predictions claiming these statistics will continue to rise until reaching a whopping 11 billion at the turn of the next century. Given past failures and the many lies spewed by the UN during recent world events, however, it is fair and justified to remain skeptical of such statistics and to do some independent investigation before blindly believing.
1.51K
views
6
comments

The Mystery of Israel SOLVED - How Zionists Fooled Christians Into Supporting the AGENDA
This is an incredible documentary that reveals the great Israel deception. It's absolutely a "Must Watch" if you want to understand what's going on.
2.02K
views
7
comments

Gordon James Berry Jr. was live https://constitutionalconventions.ca/
Zoom 5-10 EST daily https://us02web.zoom.us/j/6945489985?pwd=UllwRmwzRUhWS2pXUWNQODNEbnhSZz09 SwT80SwT80C it is a zero
https://rumble.com/v2uz93g-alberta-fires-update-time-to-restore-law.htm
lhttps://rumble.com/v3mhl7r-laura-nina-was-live-constitutional-conventions.html
507
views
14
comments

Hurricane Otis: before and after footage shows scale of destruction in Mexico's Acapulco
Zoom 5-10 EST daily https://us02web.zoom.us/j/6945489985?pwd=UllwRmwzRUhWS2pXUWNQODNEbnhSZz09 SwT80SwT80C
681
views
1
comment

As Above so Below…
Zoom 5-10 EST daily https://us02web.zoom.us/j/6945489985?pwd=UllwRmwzRUhWS2pXUWNQODNEbnhSZz09 SwT80SwT80C
645
views
2
comments

Acapulco: drone footage shows trail of destruction
Zoom 5-10 EST daily https://us02web.zoom.us/j/6945489985?pwd=UllwRmwzRUhWS2pXUWNQODNEbnhSZz09 SwT80SwT80C
Breaking! Full Media Blackout! "Acapulco Completely Destroted by a DEW Attack Like Maui! Dead Bodies Everywhere! It Was All Planned Out, Not a Natural Event!" (Video!)
“There are Dead Bodies in the Streets, in Homes & in Hospitals – they’re EVERYWHERE…!” So then, WHY isn’t THIS the BIGGEST HUMANITARIAN NEWS STORY in the country right now?! WHY is THIS the FIRST we’ve heard about this MONSTROSITY, COUNTRY-FLATTENING STORM?! I’ll tell you WHY: There’s a COMPLETE MEDIA BLACKOUT in FULL FORCE & EFFECT on this story, because the ELITE LEARNED THEIR LESSON after the Media Circus ensued when they ran this exact same EVIL PLAN on Maui residents! PLUS…..the Military is ONLY there to KEEP people from getting help and KEEP people from bringing in AID!
The Military Presence Is Only “Keeping Rescue Efforts” From Reaching Those Who Need It – People Are Dying Everywhere!” Elites are Openly Depopulating ‘Poor’ People From ‘Paradise-Like’ Areas In Order To Claim The ‘Rebuilt’ Land For Themselves In a NWO Aftermath!
We present you the UNCENSORED, FULL REPORT of the EXTREME SHADINESS of what’s happening in Acapulco, Mexico. There was ZERO WARNING from the weather services about a hurricane – LET ALONE A CATEGORY 5 HURRICANE! He says people went to bed on Tuesday night, thinking everything was normal and suddenly, 200-mph winds and a massive storm surge basically destroyed Acapulco, which is a nice-sized city of about 700,000 people. Only 27 people have been reported killed, but witnesses claim that is FAR form the actual numbers. He has people on the ground, who were finally able to get there, through all the mudslides and here’s what he had to say.….
PLEASE SHARE THIS VIDEO EVERYWHERE!
681
views
1
comment

Acapulco: destroyed there was nothing left intact
Zoom 5-10 EST daily https://us02web.zoom.us/j/6945489985?pwd=UllwRmwzRUhWS2pXUWNQODNEbnhSZz09 SwT80SwT80C
Breaking! Full Media Blackout! "Acapulco Completely Destroted by a DEW Attack Like Maui! Dead Bodies Everywhere! It Was All Planned Out, Not a Natural Event!" (Video!)
“There are Dead Bodies in the Streets, in Homes & in Hospitals – they’re EVERYWHERE…!” So then, WHY isn’t THIS the BIGGEST HUMANITARIAN NEWS STORY in the country right now?! WHY is THIS the FIRST we’ve heard about this MONSTROSITY, COUNTRY-FLATTENING STORM?! I’ll tell you WHY: There’s a COMPLETE MEDIA BLACKOUT in FULL FORCE & EFFECT on this story, because the ELITE LEARNED THEIR LESSON after the Media Circus ensued when they ran this exact same EVIL PLAN on Maui residents! PLUS…..the Military is ONLY there to KEEP people from getting help and KEEP people from bringing in AID!
The Military Presence Is Only “Keeping Rescue Efforts” From Reaching Those Who Need It – People Are Dying Everywhere!” Elites are Openly Depopulating ‘Poor’ People From ‘Paradise-Like’ Areas In Order To Claim The ‘Rebuilt’ Land For Themselves In a NWO Aftermath!
We present you the UNCENSORED, FULL REPORT of the EXTREME SHADINESS of what’s happening in Acapulco, Mexico. There was ZERO WARNING from the weather services about a hurricane – LET ALONE A CATEGORY 5 HURRICANE! He says people went to bed on Tuesday night, thinking everything was normal and suddenly, 200-mph winds and a massive storm surge basically destroyed Acapulco, which is a nice-sized city of about 700,000 people. Only 27 people have been reported killed, but witnesses claim that is FAR form the actual numbers. He has people on the ground, who were finally able to get there, through all the mudslides and here’s what he had to say.….
PLEASE SHARE THIS VIDEO EVERYWHERE!
679
views

My Labour My TIme and the De-facto goverment Extortion
Zoom 5-10 EST daily https://us02web.zoom.us/j/6945489985?pwd=UllwRmwzRUhWS2pXUWNQODNEbnhSZz09 SwT80SwT80C
Extortion is a Natural law crime in of using threat of harm to demand money, property or some advantage from another person.
837
views
7
comments

AN ISRAELI EXPLAINS THE OCT 7TH FALSE FLAG
Zoom 5-10 EST daily https://us02web.zoom.us/j/6945489985?pwd=UllwRmwzRUhWS2pXUWNQODNEbnhSZz09 SwT80SwT80C it is a zero
1.26K
views
17
comments

Explanation of HOW YOU WERE ENSLAVED
Zoom 5-10 EST daily https://us02web.zoom.us/j/6945489985?pwd=UllwRmwzRUhWS2pXUWNQODNEbnhSZz09 SwT80SwT80C it is a zero
1.43K
views
10
comments

LATEST SCRIPT MOVES US EVEN CLOSER TO THE GREAT DECEPTION include Pierre Poilievre to this Club!
Zoom 5-10 EST daily https://us02web.zoom.us/j/6945489985?pwd=UllwRmwzRUhWS2pXUWNQODNEbnhSZz09
https://www.youtube.com/watch?v=v93RNdZSRj4
864
views
2
comments

Freedom of information uncovers the fact that the Police are a business run for theft
Zoom 5-10 EST daily https://us02web.zoom.us/j/6945489985?pwd=UllwRmwzRUhWS2pXUWNQODNEbnhSZz09 SwT80SwT80C it is a zero
Proof The Police Are A Business
Freedom of information uncovers the fact that the Police are a business run for profit.
1.15K
views
3
comments

Freedom of information uncovers the fact that the Police are a business run for profit
Zoom 5-10 EST daily https://us02web.zoom.us/j/6945489985?pwd=UllwRmwzRUhWS2pXUWNQODNEbnhSZz09 SwT80SwT80C it is a zero
Proof The Police Are A Business
Freedom of information uncovers the fact that the Police are a business run for profit.
635
views
5
comments

SHARE THIS! A GUIDE TO WORLD WAR 3! HOW'S THIS FOR PROOF OF ....
Zoom 5-10 EST daily https://us02web.zoom.us/j/6945489985?pwd=UllwRmwzRUhWS2pXUWNQODNEbnhSZz09 SwT80SwT80C it is a zero
790
views