

On The Job: Grounding The Slab
There are many facets to putting in a new service to a building. Grounding is one of them! In this latest episode of Electrician U, Dustin talks a bit about the grounding necessary when installing a new service to a building.
🤘⚡️MEMBERSHIP⚡️🤘
JOIN ELECTRICIAN U - become a member and get:
FREE Continuing Education every year
FREE Practice Exams
FREE Monthly Video Courses
FREE Weekly Live Instructor-Led Classes
FREE Monthly Educational Newsletter
Premium Members-Only Content
Private Discord Channel
Monthly Members-Only Discord Chats
Sign up here --- https://www.electricianu.com/electrician-u-membership/
🎧🎹MUSIC AND VIDEO:🎹🎧
https://www.facebook.com/descantmv
🎬✍️ART AND ILLUSTRATION:✍️🎬
https://www.daverussoart.com
There is much more than conduit, wire, and a panel needed when putting a new service to a new or existing building. For the most part, the grounding path has not been established yet at the utility side of things. So, until we MAKE it, it simply is not there yet! Article 250 if the NEC covers grounding, and specifically, articles 250.50 & 250.52 are where we would find the requirements for grounding electrodes. The first of those two articles instruct us to install all the grounding electrodes that are present, while the latter of the two articles define the different points where we should ground.
The one Dustin talks about in the video is the Concrete Encased Electrode, more commonly known as the Ufer Ground. This is to be at least #4 in size, at least 20’ long, covered by at least 2” of concrete, and in direct contact with the earth. The NEC also instructs us to bond together the following if they are present on the building: Metal Underground Water Pipe, Metal In-Ground Support Structures, Ground Ring, Rod & Pipe Electrodes, Plate Electrodes, and any Other Local Metal Underground Systems or Structures (such as piping systems, underground tanks, and underground metal well casings). The NEC also instructs that the following items are NOT to be permitted as Grounding Electrodes: Metal Underground Gas Piping Systems-250.104B tells us to bond them if it’s likely the piping will become energized, Aluminum, and steel reinforcing structures for pools-which must still be bonded together, just not part of the Grounding Electrode System.
Another portion of the jobsite grounding Dustin talks about is the installation of ground rods at the light poles on the project. While there has been much debate about these ground rods being effective at light poles, and is not an NEC requirement to be installed at light poles, MOST job sites require them per the construction documents (plans and specs). So, if the particular job requires them to put them in, then we install them! Another thing to keep in mind is sizing and quantities of things that the ELECTRICAL ENGINEER has shown on the construction documents for us to install. Remember; it is THEIR name on those drawings, not ours. So, if they tell us to install a 4/0 copper somewhere, it is probably with good reason they are asking us to do it. We may just not understand why. We don’t want to install a LESSER product than the NEC requires but can certainly install MORE!!
In a nutshell, grounding of the electrical service requires us to use several different items if they are present in our installation, so make sure you reference your NEC code at article 250.50 & 250.52 to see what applies to your installation. It is also worthwhile to know your construction documents as these also generally show us where we should be grounding and to what points.
We hope this has been helpful in understanding the grounding system of an incoming new service. Is there a topic you would like to see discussed? Leave a comment in the comment section below and let us know! Please continue to follow Dustin and Electrician U as we are constantly adding new content to assist our followers in their electrical careers!
310
views
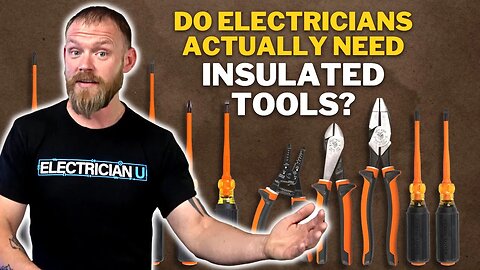
Every Insulated Tool Electricians Need!!!
Do electricians really need to use electrically insulated tools? A topic of debate depending on whom you talk to! In the latest episode of Electrician U, Dustin explores the subject and shows some of the electrically insulated tools from one of the top tool manufacturers Klein Tools.
🤘⚡️MEMBERSHIP⚡️🤘
JOIN ELECTRICIAN U - become a member and get:
FREE Continuing Education every year
FREE Practice Exams
FREE Monthly Video Courses
FREE Weekly Live Instructor-Led Classes
FREE Monthly Educational Newsletter
Premium Members-Only Content
Private Discord Channel
Monthly Members-Only Discord Chats
Sign up here --- https://www.electricianu.com/electrician-u-membership/
😀🔨SPONSOR: KLEIN TOOLS🔨😀
https://www.kleintools.com/
🎧🎹MUSIC AND VIDEO:🎹🎧
https://www.facebook.com/descantmv
🎬✍️ART AND ILLUSTRATION:✍️🎬
https://www.daverussoart.com
To establish a baseline for the question, lets explore some scenarios first. Should we be working on live circuits at all? That is really the whole debate! For most of the time, we can AND should shut the power off before working on something. It is safer and we can generally perform the work much faster and more efficiently with it off as we don’t have to tip toe around energized components. So, if someone wants to add a can light or a receptacle in their house, we can shut the circuit off and turn it back on once the work is complete. Same could be said for replacing the service/panel at a residence. BUT, if we are attempting to troubleshoot a particular system to see why something isn’t operating properly, we may actually NEED the power to be on for us to test and diagnose the problem. Or if us turning off the circuitry could result in a more dangerous condition (say, in a hospital where patients are relying on certain equipment to be healthy) we may need to work on said circuitry energized. And it’s the last couple of scenarios that lead to manufacturers designing and producing PPE and tools for electricians to use in these conditions.
Klein Tools is one of the best manufacturers of electrical tools in the industry. Almost all of us in the industry know who Klein is and use their tools. In addition to making tools for everyday usage, they also make quite an extensive line of electrically insulated tools. While most electrical tools (even if they have some type of insulation on the handles) are not rated for any protection while working on live circuits and will have markings on the tools stating such. Tools designed for work on energized circuits will have a rating on the tool of its voltage capacity and is usually distinguishable by a bright orange (or other bright color) coating on the normally exposed metallic surface. These types of tools should be carried by electricians who may be required to work on energized circuits and should NOT be used unless its in an exposed workspace. The tools should be kept separate from our normal tools, in a separate case and be really taken care of as our lives depend on those tools performing as intended!
Kleins line of insulated tools can be found in almost all the flavors we normally see. From screwdrivers, to nut drivers and most of the plier type tools, they produce every tool we would need to do our job safely in an energized environment. Klein even produces multi screwdrivers that allow you to change between flat head, Phillips, square tips, etc. to save some space in your kit! You can purchase the tools individually or various sets are available as well. The line of insulated tools is quite extensive ranging from standard to slim drive screwdriver tips to help in fitting in small holes like breakers. Definitely something that an experienced electrician should add to their kits if they may be required to work on energized circuits (and are trained to do so!).
We hope this shed some light on the topic of when we should be using tools rated for energized circuits and some of the tools available. Remember, these tools are designed to keep us safe so should be taken care of. Better than our normal everyday tools! This includes hot work PPE (gloves, suits, etc.) as well as our meters! Keep them clean, dry and in separate bags/cases from our standard tools. Is there a topic you would like to see discussed? Leave your comments in the comment section below and let us know! Please continue to follow Dustin and Electrician U as we are constantly updating our content to provide the best electrical education to our followers to help them in their careers!
222
views

My Son's First Day As An Apprentice!!!
For us guys, getting to be excited about our kids’ job is just something we love doing. But as a dad, getting to see our son following in our footsteps is really special. And getting to actually be a hands-on part of their electrical career is absolutely priceless!! In the latest episode of Electrician U, Dustin talks about his sons first day as a professional electrician and some of the things he is learning up front.
🤘⚡️MEMBERSHIP⚡️🤘
JOIN ELECTRICIAN U - become a member and get:
FREE Continuing Education every year
FREE Practice Exams
FREE Monthly Video Courses
FREE Weekly Live Instructor-Led Classes
FREE Monthly Educational Newsletter
Premium Members-Only Content
Private Discord Channel
Monthly Members-Only Discord Chats
Sign up here --- https://www.electricianu.com/electrician-u-membership/
🎧🎹MUSIC AND VIDEO:🎹🎧
https://www.facebook.com/descantmv
🎬✍️ART AND ILLUSTRATION:✍️🎬
https://www.daverussoart.com
It started off by getting Josh set up with the proper tools to do the job. A super important part as we cannot be expected to perform at the levels we do without the required equipment! He is also learning the proper way of doing things. The caterpillars and box extenders are a prime example of this proper training. Most teaching electricians would probably not start off on that level of craftsmanship on a brand-new apprentice. But what is right is right! Learn early on to do the right things in the proper sequences, and practice that way, and you will soon become proficient in the correct way to do our job!
No surprise here that Josh would follow his dad into the electrical workforce. I mean, Dustin is super smart, very good at being an electrician, and a successful master electrician/electrical contractor himself. And if that wasn’t enough, he also has a very successful social media presence on YouTube as well as multiple Podcasts! What kid wouldn’t want to be a part of that success! But, having said that, Josh isn’t one of those kids that is intent on riding on Anyone’s coattails. Instead, he is immersing himself into the business to LEARN what it takes to be a successful electrician. He is going to the jobsites and learning how to install electrical work just like the rest of us did! By having other craftsmen (and women) SHOW us and then working hard to become proficient ourselves.
Let’s face it, college is great. But going on to a formal classroom beyond high school is not for everyone! I think we can all agree to that. And some of us are much more proficient and interested in doing manual labor type of work! I know I was! And that should be ok! If a person is Forced to go on to higher education (or coerced or shamed or…...), especially after they just got done with 12 years’ worth (well a little more if you factor in preschool and kindergarten) they may not take full advantage of the information that is being taught and sometimes ends up being a colossal waste of their time, the instructors time and a considerable amount of finances. But, put that person out in the world doing something they actually enjoy AND getting paid while they do it, and that person will most likely excel in their trade and be much happier!
Now, I am not saying college is bad. Not at all. It just may not be the choice for EVERYONE! If your child has a desire to go into the workforce, I say support them in those wishes. Just as if you were to support a child going to school. BOTH college degree requiring jobs AND jobs that DON’T require a degree are needed to make society function. We need doctors, lawyers, and teachers. No doubt about it! But we also need electricians to keep the lights on, plumbers to keep the water flowing, and carpenters to make the structures to live/work in! So, support our youth in skilled trade choices. Show them that it is ok to work with your hands to make a living and support their families. You may be surprised at how well your child can do in that environment!!
We hope you enjoyed the video of Josh’s first day at work with his dad! Pretty awesome stuff. If your kid has questions about being in the skilled trades talk to them about it and perhaps even show them some of the things we have here at Electrician U! Is there a topic you would like to be shown on an upcoming video? Leave your comments in the comment section below and let us know! Please continue to follow Dustin and Electrician U as we are constantly updating our content to provide our followers with the topics and information they need to be successful!
172
views
Don't Get Angry, Just Fix It and Realize You Love Your Job
Part of our jobs as electricians is to fix things. And on any normal day, we are ok with this! But what about when it comes to fixing things that someone else has caused to be broken and in need of fixing. Should this bother us? In this latest episode of Electrician U, Dustin talks about fixing things that someone else broke and how it affects us.
🤘⚡️MEMBERSHIP⚡️🤘
JOIN ELECTRICIAN U - become a member and get:
FREE Continuing Education every year
FREE Practice Exams
FREE Monthly Video Courses
FREE Weekly Live Instructor-Led Classes
FREE Monthly Educational Newsletter
Premium Members-Only Content
Private Discord Channel
Monthly Members-Only Discord Chats
Sign up here --- https://www.electricianu.com/electrician-u-membership/
🎧🎹MUSIC AND VIDEO:🎹🎧
https://www.facebook.com/descantmv
🎬✍️ART AND ILLUSTRATION:✍️🎬
https://www.daverussoart.com
Perspective. If a single word could be used to describe this situation, that would be it. So, say you had to work on a weekend or a holiday. That could be a source of irritation to you, but for most of us, we love what we do! Then working an extra day at something we enjoy is not too much of an imposition! Plus, depending on what we had really planned on that day, are we really missing out on anything that was going to be so earth shattering important anyways? By trying to put things in perspective, it can help curb our desire or impulse to be upset at having to come behind someone and clean up what they broke! Plus, for the most of us, we are NOT working for free, and getting paid can CERTAINLY make us feel better!!
Another thing to remember is that no one is perfect. That no situation is perfect. Things happen and items do get broken or screwed up. Those items/situations just need to be corrected. That’s it! Try to train your mind into that yes, something is damaged or wrong and it may cost money and time to fix, but just focus and get the task done. The more time spent commiserating over why or who or what, you could spend that energy on fixing what needs to be fixed and getting back to whatever it is that you want to do! This is a trait that can usually only come with time and experience and can usually be one of the indicators as to how long someone has been doing something. A veteran of the trade is more apt to just go to work fixing the issue than complaining about having to come behind someone and fix their issues!
In construction, we install things. Usually, we install things in the proper sequence to minimize our workflow, money output, and head scratching! But, sometimes, things go sideways. But know this; there is nothing that is broken or wrong out there that we CAN’T fix! By nature of the job, we repair broken things. Motors burn up, light fixtures need to be swapped out for better ones, wire needs to be run from one point to another, and so on. So, if something is wrong or broken, even at the hands of someone else, we can fix it! It may cost us time and money, but it CAN be repaired. If you take that attitude, that nothing can be screwed up that we can’t fix, it will lend you to being able to take risks (calculated ones!!) and have additional options to install something. Think of it like a golf shot. Yes, you can take the safe shots and go for par and be average. Or, you can learn to take some calculated risks, a few more aggressive shots, and maybe come in Better than average!!
For the most of us electricians, we really love what we do! Otherwise, we wouldn’t be doing it!! So having to be the one to fix a screw up or issue, is something we would be doing anyway, just by the nature of what we do! Learn to love being the problem solver. Put things into perspective and know that EVERYTHING can be fixed no matter how bad! Just get to work!!
We hope this has been helpful in understanding the art of fixing other peoples screw ups! Is there a topic that you want Dustin to discuss? Leave your comments below and let us know! Please continue to follow Electrician U and Dustin as we are constantly adding new content to help our followers along in their careers.
114
views

How Hand Tools Are Made
Arguably, in the construction industry, we get to see some really cool things. Behind the scenes stuff that most folks would never see!! But, in this latest episode of Electrician U, Dustin has the opportunity to visit the KLEIN factory near Chicago and see the process of making Klein Tools! There are many tool manufacturers in the world. And for almost all of us tradesmen (and women), its just like Fords and Chevys! We are usually loyal to either one or the other! But to see the process of making tools from one of the Top Shelf manufacturers is an awesome opportunity! It doesn’t get much cooler than that!
🤘⚡️MEMBERSHIP⚡️🤘
JOIN ELECTRICIAN U - become a member and get:
FREE Continuing Education every year
FREE Practice Exams
FREE Monthly Video Courses
FREE Weekly Live Instructor-Led Classes
FREE Monthly Educational Newsletter
Premium Members-Only Content
Private Discord Channel
Monthly Members-Only Discord Chats
SIGN UP HERE --- https://www.electricianu.com/electrician-u-membership/
😀🔨SPONSOR: KLEIN TOOLS🔨😀
https://www.kleintools.com/
🎧🎹MUSIC AND VIDEO:🎹🎧
https://www.facebook.com/descantmv
🎬✍️ART AND ILLUSTRATION:✍️🎬
https://www.daverussoart.com
There are several different ways to manufacture a tool with the two most common being Casting and Forging. Casting is the process of pouring a liquid metal (also Super-Hot!!) into some type of mold to get it to the desired shape you want. Forging, on the other hand, is the process of taking a piece of metal, heating it up so it can be worked, and hammering (either by hand or with a machines help) repeatedly into the shape you are after. Klein tools uses forging to produce their tools as forged steel typically is stronger and less prone to breakage/wear resulting in a better product. I am not a metallurgist, but something to do with altering the grain flows within the steel itself! We wouldn’t expect any less from the Top Producer of Electrical Tools!
The first step in the process (for our tour of the plant, we witnessed the forging of Lineman’s pliers, but the general steps would be relatively the same for any plier type tool) is taking 20’ long pieces of high strength tube steel and cutting them into smaller pieces to be worked. The pieces are then fed onto an assembly line where they are fed thru an electrical induction heater to heat the material so it can be worked (and by hot, I mean Glowing Red Hot!!). The next several steps are where the magic actually happens! A series of huge machines hammers the steel into the desired rough shape and then splits the tool into the two individual parts. These forging machines are VERY BIG and smash the steel into its desired shape with TONS (literally) of force! An amazing sight to see, to say the very least!! And while this process is mostly automated (as the stamping action is performed by a machine doing the heavy lifting), it still relies on human interaction to complete the process. So, from a worker standpoint, it is the best of both worlds!!
An annealing process is next, where again, the steel is heated up to change the properties of it so it will result in a better tool in the end. The parts are then tumbled (in a process similar to sand blasting, but with steel shot) to remove the scaling from the steel during the heating and forging steps. A sort of pre machining process called Coining is one of the last things to be done before the individual parts are sent off for final machining and assembly. This Coining process is an additional machining step that Klein takes which results in the tolerances being much tighter than without this step (again, another reason why Klein is considered Top Shelf!!).
At this point in the forging process, we have two separate pieces of what we would recognize as a pair of Lineman’s Pliers. The separate pieces are now sent off to a different plant to be assembled into the final product. One of the awesome things about Klein Tools is that the entire journey of their tools is done here in the USA! American manufacturing is some of the best in the world and Klein Tools takes pride in its tools that are used to build America, right here in the states! Unlike many manufacturers that claim to be Made in the USA, by doing a single part of it, but the WHOLE process!
We hope this has been an insightful look into the awesome process of forging a pair of Klein pliers. We do have other videos available that show the finish machining/assembly process as well as other Klein Tool manufacturing. Make sure to check those out!! Is there something you would like to see in future videos? Please leave your thoughts in the comment section and let us know! Please continue to follow Dustin and Electrician U as we are constantly adding new content to help our followers learn all about this awesome trade we are in!!
351
views

Site Prep: Digging Underground
Site prep. It has to be done for most jobs (unless its strictly a remodel), but what exactly is it? And how does it affect us as the electrical trade. In the latest episode of Electrician U, Dustin takes us along with him on a commercial jobsite where they are performing the site prep to show us around.
🤘⚡️MEMBERSHIP⚡️🤘
JOIN ELECTRICIAN U - become a member and get:
FREE Continuing Education every year
FREE Practice Exams
FREE Monthly Video Courses
FREE Weekly Live Instructor-Led Classes
FREE Monthly Educational Newsletter
Premium Members-Only Content
Private Discord Channel
Monthly Members-Only Discord Chats
Sign up here --- https://www.electricianu.com/electrician-u-membership/
🎧🎹MUSIC AND VIDEO:🎹🎧
https://www.facebook.com/descantmv
🎬✍️ART AND ILLUSTRATION:✍️🎬
https://www.daverussoart.com
Almost all commercial projects will have underground work in some form or another. Unless it’s a remodel to an existing structure that is undergoing a minor facelift or change, the earth must be manipulated to serve the eventual structure. This may be digging footings/beams, installing rebar in those beams to provide rigidity and strength, and then pouring concrete in them. Once that concrete has set up and become solid, the MEP trades will generally come in and install the underground portions of their work. For us electricians, this is usually the electrical service from the utility, the incoming data conduits from the data provider, and even other sub panels/transformers/distribution gear throughout the building itself. We can’t always install things overhead due to height restrictions, or any other myriad of reasons. Also, if we were to pipe overhead, we must follow building lines from point A to point B, whereas underground, we can go straight from point to point, lessening the amount of materials we have to use as well as labor to install them. After the MEP trades have finished putting in the underground and backfilled, the remaining portion of the rebar can be placed, and the concrete can be poured for the slab. Once it has set up sufficiently, only then can the building actually be started!
The amount of underground needed to be put in the ground is totally dependent on the specific job. Some jobs have a ton of underground conduits that we spend months installing. Some jobs have the bare minimum of incoming utilities. Regardless of the quantity of underground pipe, we still have rules we must follow. Article 300.5 of the 2022 NEC is a big one that governs cover requirements. Certain areas require the conduits we install to be deeper than in other areas. Some of the depth requirements can be lessened if there is concrete on the top of them. If there is minimum underground and we aren’t digging it super deep, we may be able to dig it manually (with shovels), but if there is a considerable amount of underground conduit and/or it is deep, and if the soil is hard to dig, we may have to investigate using equipment to dig with. For single narrow trenches, for say a light pole, we can use a small trencher that looks like a large, wheeled chainsaw to dig the earth. Or we may need a backhoe or excavator for larger/deeper trenches. As a word of caution, DO NOT operate any equipment unless you have been trained on how it works. People can be seriously hurt by that equipment and screw ups can also be very costly!
As with any aspect of electrical work (or any trade work really) we must make sure we are competent in the task we are performing. If you have never installed underground conduit before, make sure you are under the direction of someone who has. In addition, when working underground we need to have a competent person available to assist us with the trenches themselves. Some soil is not stable enough to be dug straight down, but only a competent person who knows about trenching and shoring is going to know what the individual trench needs! So, make sure you have experience in what you are doing, make sure that you have the materials/equipment needed to install it properly, and make sure you have the trained personnel available to support the activity.
We hope this has been helpful in understanding the basic concept of underground work/site prep. Is there a topic you would like discussed? Please let us know in the comment section below. Please continue to follow Dustin and Electrician U as we are constantly adding new content to assist our followers on their electrical careers.
150
views
Side Work: Is It Worth It?
Should you REALLY be doing side work? A tough but worthy question to ask. In the latest episode of Electrician U, Dustin talks about what side work is and what the potential problems can be if you get caught working without the appropriate licensing.
🤘⚡️MEMBERSHIP⚡️🤘
JOIN ELECTRICIAN U - become a member and get:
FREE Continuing Education every year
FREE Practice Exams
FREE Monthly Video Courses
FREE Weekly Live Instructor-Led Classes
FREE Monthly Educational Newsletter
Premium Members-Only Content
Private Discord Channel
Monthly Members-Only Discord Chats
Sign up here --- https://www.electricianu.com/electrician-u-membership/
🎧🎹MUSIC AND VIDEO:🎹🎧
https://www.facebook.com/descantmv
🎬✍️ART AND ILLUSTRATION:✍️🎬
https://www.daverussoart.com
Let’s define Side Work first. Side work is work that you perform away from your normal job and get paid for it. So, say, your folks need some lights installed at their house, or someone you know has a building that they would like some receptacles installed in. second, you must consider your location in the country. Some states have rules governing contracting. Many states require a license for the particular trade in question and those states may also require some type of insurance to go along with that license. If you are performing work out there without these items, you can face serious consequences if you are caught. So, make sure and check with the state you are presiding in about the local rules. Another thing to consider is the company you are CURRENTLY working for. Are they OK with you doing work away from work? Or will they view that as taking customers away from them. Most employers are good with you performing small amounts of side work as long as it doesn’t impact your performance at the job or interfere with their customer base. But check first!
The problem really lies in the liability. If you honestly are not a qualified electrician (or any tradesperson!) you should not be performing side work. Our trade has A LOT to learn, and we should NOT be out there working on our own until we have enough experience to install things properly. If installed incorrectly, electricity can cause massive amounts of damage to houses, businesses, equipment and so on. It can also cause serious injury or even death. So, if the state you live in requires licensing, go out and get the required license and insurance. Even if the state you are working in does NOT require licensing, insurance is always good to have because we can’t possibly see each and every outcome for every situation up front.
Well, why would we do side work anyways if it’s such a liability and a huge no no (for the most part)? Finances could be one reason. We all know what its like to be just starting out as an adult and having more bills to pay than money coming in. Maybe, we want to learn additional skills. For some of us, we love the trade, and we love to work (yes, I am one of those!! Workaholics I think we are called!!). Some of us want to get into contracting and this may seem like the logical first step. I think it’s safe to say that most of us tradespeople do work on the side or have at least done some in our career. Whatever the motivating factor in your desire to look into side work, you really must weigh the potential consequences and see if it is worth the potential risk. Again, it depends on the municipality, but there can be stiff fines/penalties, removal of any licensing you currently have, and even the denial of any further licensing you want to obtain! So non conformance to the rules can have a lasting negative effect on your ability to work as an electrician.
We hope this sheds some light on the topic of whether we should do side work or not. Is there a topic you want to hear about? Leave a comment in the comment section and maybe we will do an episode on your question/topic. Please continue to follow Dustin and Electrician U as we are constantly adding new content to assist our followers in their careers as electricians!
54
views

Step by Step - How to Build a House
Believe it or not, there are sequences in construction. If there were not, we would all end up building our own individual portion of the project at the same time or at random times and we would wind up having an awful mess on our hands (not to mention a complete train wreck of a project)! In this episode of Electrician U, Dustin digs into the different phases of building a house.
🤘⚡️MEMBERSHIP⚡️🤘
JOIN ELECTRICIAN U - become a member and get:
FREE Continuing Education every year
FREE Practice Exams
FREE Monthly Video Courses
FREE Weekly Live Instructor-Led Classes
FREE Monthly Educational Newsletter
Premium Members-Only Content
Private Discord Channel
Monthly Members-Only Discord Chats
Sign up here --- https://www.electricianu.com/electrician-u-membership/
🎧🎹MUSIC AND VIDEO:🎹🎧
https://www.facebook.com/descantmv
🎬✍️ART AND ILLUSTRATION:✍️🎬
https://www.daverussoart.com
Before we start, there are a few things to discuss. For one, there are many (MANY!!) different phrase choices for the different phases, and these tend to vary from one location in the country to the other. So, for the purposes of this discussion, we will just talk in generalities, and you can adjust to where you are at to get the language just right! Also, while we ALL must work together to have a successful project, the different trades, and the different jobs Within each trade, will have more interest and interaction with the various phases of a construction job. A trim carpenter will most likely have no interaction with the site prep phase but will have a major part in the trim out phase.
One of the first things we must do is get the site ready to accept the job. We will call this Site Prep. Dirt must be moved and leveled, trees and underbrush must be cleared, and sometimes access roads must be built to give us access to the site. For us electricians (or anyone in the MEP trades) this is where we put in our deep underground conduits, bring our utilities to the site, and put in any of our work in that needs to be put in the ground. Closely behind the site prep portion is the slab work. This is where the rebar is installed and tied, and the concrete slab is placed. As electricians, we also must be present here to install the smaller branch conduits, floor boxes, etc. that go into the slab as well as install our Ufer grounds. This is also the point where the temporary utilities are brought to the site to use during construction.
Framing of the structure is the next phase of construction. Interior and exterior walls are framed, the roof is installed, and the building is dried in. This is the point where the MEP trades will do the rough in for their respective trades. Plumbing pipes are installed, ducts put in, and wiring is run. This is the process where it appears to have the most work done as you started off with just a slab of concrete and when done you have a building! As soon as those trades have finished, and their work is inspected (and passed!!) the drywall can be installed, and finishing can begin.
During the finishing stages the typical sequence is drywall is hung, taped, and floated, then textured. Once texture is complete, then the cabinets, tile, trim wood, etc. are installed. Typically, this work is done before final paint as installing those finishes can result in scuffing up the walls a bit, so paint is left until after. After the paint is dry, the MEP trades are released to come in and install their respective trim out devices. For us electricians, this is where we put in the receptacles, switches, can light trims, surface ceiling fixtures, and things of that nature. Serious consideration must be given to the scheduling of the various trades at any one time so we aren’t working on top of each other (or at least as little as possible) so we can get our jobs done in a timely fashion.
The last thing to be done once the trim has been placed is get the final inspection(s) for the project. A thorough run through the project is made by the inspector, and once he/she is satisfied that we have installed everything appropriately, they will release the project with a certificate of occupancy!
Sometimes the sequences are a bit different, and some of the tasks will vary from project to project and location to location, but these steps are fairly typical of a standard project. We hope this has been insightful into the steps necessary to build a home. Is there a particular topic you would like to have discussed? Please leave some comments in the section below and let us know. Please continue to follow Dustin and Electrician U as we are constantly adding new content to assist our viewers in their careers!
122
views
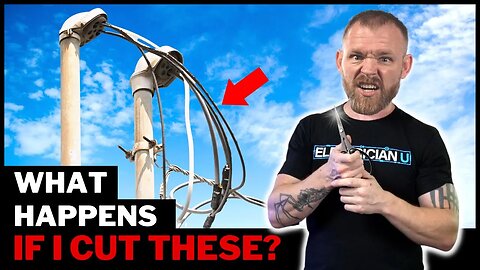
Electricity Travels in Loops - A Simple Explanation
A question came up from one of Dustin’s apprentices regarding the service loop at a residence. The question was (and I am paraphrasing here) “what would happen if I cut one of the service entrance conductors? Would it blow up or ??” In the latest episode of Electrician U, Dustin answers this question by explaining the loop theory of electricity.
🤘⚡️MEMBERSHIP⚡️🤘
JOIN ELECTRICIAN U - become a member and get:
FREE Continuing Education every year
FREE Practice Exams
FREE Monthly Video Courses
FREE Weekly Live Instructor-Led Classes
FREE Monthly Educational Newsletter
Premium Members-Only Content
Private Discord Channel
Monthly Members-Only Discord Chats
Sign up here --- https://www.electricianu.com/electrician-u-membership/
🎧🎹MUSIC AND VIDEO:🎹🎧
https://www.facebook.com/descantmv
🎬✍️ART AND ILLUSTRATION:✍️🎬
https://www.daverussoart.com
First, before we get started, unless you are qualified and allowed to (by the local utility) cut the service entrance conductors, PLEASE DO NOT CUT OR TOUCH THEM!! Leave this work to the professionals. Even if you are an electrician, unless you have experience with and are trained in doing it, PLEASE DO NOT CUT OR TOUCH THEM!! The potential current that is available on those conductors is massive and will result in serious injury or death if not handled properly!!
Ok, on to the lesson! In a nutshell, electricity travels in loops. Take the transformer on the pole outside your house. For the SECONDARY LOOP, on the transformer end, both wires are connected together. As those wires travel to your house, there is no current moving on them until the point where you plug something into the receptacle and close the loop on this other end! Also concerning that same said transformer, on the PRIMARY side, the same this is occurring. The wires are connected together in the transformer, and when connected together on the other end of the primary loop (at a generator or something like that) THEN current can flow on that side!
So, if you were to cut one of the secondary wires coming from the pole to your house, nothing would happen as long as it didn’t touch anything else. But if you were to cut two wires together or let the one cut wire touch something grounded or another phase, so much current would travel so fast that a fairly large explosion would happen! Even to the point of melting the WIRE ITSELF, the insulation, and anything else in its way! Therefore, we should leave this type of work to the professionals!
We hope this video has been informative and helpful regarding the cutting of the service wires and electrical loops. Please continue to follow Electrician U as we are constantly adding new content to assist our followers in their electrical careers!
106
views

Should We AFCI Protect Appliances?
A question posted from one of our followers regarding the requirements about ACFI and GFCI protection for Appliance Circuits. In this latest episode of Electrician U, Dustin dives into the topic to bring us answers!
🤘⚡️MEMBERSHIP⚡️🤘
JOIN ELECTRICIAN U - become a member and get:
FREE Continuing Education every year
FREE Practice Exams
FREE Monthly Video Courses
FREE Weekly Live Instructor-Led Classes
FREE Monthly Educational Newsletter
Premium Members-Only Content
Private Discord Channel
Monthly Members-Only Discord Chats
Sign up here --- https://www.electricianu.com/electrician-u-membership/
🎧🎹MUSIC AND VIDEO:🎹🎧
https://www.facebook.com/descantmv
🎬✍️ART AND ILLUSTRATION:✍️🎬
https://www.daverussoart.com
While Article 210 of the NEC DOES talk about AFCI and GFCI protection for circuits, the circuits that particular article refers to are Branch Circuits. Appliance Circuits are in article 422 of the NEC. However, while article 422 DOES cover certain GFCI requirements, those items it does refer to are not dwelling unit type items. So we do have to refer back to article 210.
To really understand the AFCI/GFCI issue, first we must know that the NEC is referring to LOCATIONS where the AFCI or GFCI protection is to be placed, not necessarily the equipment itself. The code tells us WHERE we are to have AFCI or GFCI, and if equipment is IN those areas, THEN it must be protected. It also helps to understand that a Branch circuit is a circuit that Leaves a Breaker and hooks up to a piece of equipment, whereas a Feeder generally leaves a Breaker and goes to another Breaker or Disconnect or some other type of controlling equipment. Also, as a reminder, the 2020 NEC did add 240v items to the GFCI requirements. So, keep in mind that if you do have a larger piece of 240v equipment that does fall within the AFCI/GFCI space, you will also have to protect that equipment as well.
So, Article 210.8(A) of the 2020 NEC states that ALL 125v through 250v receptacles (in the locations the NEC specifies), shall have Ground Fault protection. The key item here to pull out is RECEPTACLES! Not light switches or light fixtures, but receptacles. It may be worth it to check with your local AHJ (usually the inspector) and see what they will allow or not allow. Article 210.12(A) of the 2020 NEC states that AFCI protection is required for all 120v 15 & 20a Branch circuits. The keyword to be pulled out of this is BRANCH CIRCUITS. So, it’s the whole circuit, not just the receptacle! So, take a laundry room for instance. If you ran a dedicated circuit for your washing machine in that room, then it WOULD have to be AFCI protected. Something else to consider here, is that it is only 120v 15 & 20a circuits, not 240/250v ones.
Hopefully, this made the subject of AFCI/GFCI protecting of Appliances a bit clearer. What electrical content do you want to see in a video? Leave a comment in the comment section below. Please continue to follow Electrician U and Dustin as we are constantly adding new content to assist our followers in their electrical careers.
60
views
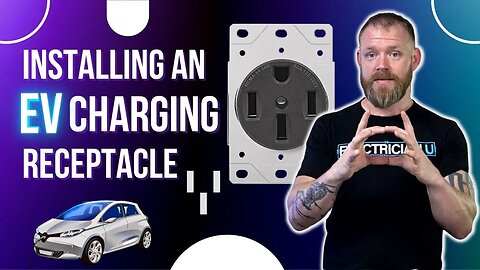
How to Install an Electric Vehicle Charger Receptacle
Electric Vehicles are becoming more and more popular on a daily basis. Maybe you own one yourself or know someone that does. Either way, one of those vehicles are going to need a way to charge their batteries. In this latest episode of Electrician U, Dustin walks us through the process of installing an electric vehicle charging receptacle in a residence.
🤘⚡️MEMBERSHIP⚡️🤘
JOIN ELECTRICIAN U - become a member and get:
FREE Continuing Education every year
FREE Practice Exams
FREE Monthly Video Courses
FREE Weekly Live Instructor-Led Classes
FREE Monthly Educational Newsletter
Premium Members-Only Content
Private Discord Channel
Monthly Members-Only Discord Chats
Sign up here --- https://www.electricianu.com/electrician-u-membership/
🎧🎹MUSIC AND VIDEO:🎹🎧
https://www.facebook.com/descantmv
🎬✍️ART AND ILLUSTRATION:✍️🎬
https://www.daverussoart.com
For most EV chargers a Nema 14-50R receptacle will be used. Most of us have probably seen one of these receptacles before in our homes. They are the same ones used for the oven! These receptacles are rated for 50 amps at 250 volts.
The very first step in the process would be to hire a professional electrician to install the receptacle. Now this would not only be for the non-electrician, but also for an electrician lacking the experience of installing this type of circuit. The second step in the process would be to remove power from the panel you will be installing the wiring to, so we aren’t working in a hot panel. Once we have that done, we need to figure our WHERE the new receptacle will be placed so the two-gang box can be installed. If you are installing the receptacle in an existing house, you will most likely be installing an old work box (sometimes called a pop in box). A tip here is to use a PENCIL (not a marker) to draw the outline of where you want to put the box. That way if there is a stud or other obstruction, you can shift the location to adjust and not have an unsightly pen mark left over!! To finish this portion of the installation, simply cut out the substrate to expose the void in the studs the size of the box you just marked, and you are ready to install the wiring!
For this installation, Dustin is using 8/3 NMC. So, it has 3 #8 conductors (2 hots and 1 neutral) along with a #10 bare copper ground. The cable will need to be fished down the wall to the box location. This will result in you having to go DOWN to the location where you cut the hole in the wall and reach inside the wall cavity to grab hold of the cable and pull it out of the hole. Once the cable is out, simply knock out one of the tabs in the box and pull the cable thru it and secure the box to the wall. Make sure you do not Over tighten the screws on the wings so those little tabs don’t break off.
Once the box is installed and wire is in place, then carefully remove the outer insulation from the NMC with a sharp razor knife. Don’t put pressure on the cable with the knife, just let the blade score the insulation gently so it can be removed. Next, remove just enough insulation for each conductor to go into the port on the receptacle. Put those stripped conductors into their respective ports on the receptacle itself and then tighten them down (making sure you are not over or under tightening them). Carefully fold the conductors back into the box and secure the receptacle to the box making sure that the bare copper ground wire is NOT contacting any other exposed metal parts of the receptacle or the exposed wires.
The last couple of steps must be repeated (sort of!!) on the other end to get the cable into the panel. Once the wire is into the panel and the connector tightened, the wires simply need to be landed into their respective places. The black & red conductors will be put on the breaker and the white goes to the neutral bar while the ground to the ground bar. Put the panel cover back on and you are ready to reenergize the panel and test the receptacle! Never walk away from an installation without testing what you just installed!! If you test the appropriate voltage at the receptacle, you are good to go with the installation and can call it done!
We hope this has been helpful in explaining the general steps in installing an EV receptacle. What type of installation would you like to see in a video? Leave comments below in the comment section! Please continue to follow Electrician U as we are constantly adding new content to help our followers along in their careers.
119
views
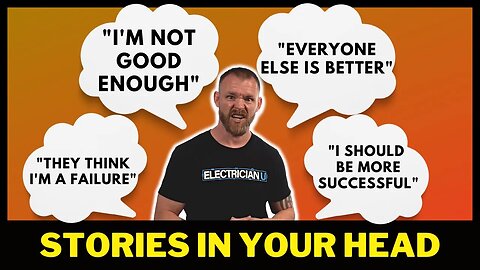
Stories in Your Head - Make The Change You Want To See
Have you ever felt like you were being passed up by your peers? Or that you just aren’t good enough to keep going at what you are working for? In the latest episode of Electrician U, Dustin explores the difficult topics of self-doubt/self-worth and offers some advice on how to combat those feelings and work to be the best you!
🤘⚡️MEMBERSHIP⚡️🤘
JOIN ELECTRICIAN U - become a member and get:
FREE Continuing Education every year
FREE Practice Exams
FREE Monthly Video Courses
FREE Weekly Live Instructor-Led Classes
FREE Monthly Educational Newsletter
Premium Members-Only Content
Private Discord Channel
Monthly Members-Only Discord Chats
Sign up here --- https://www.electricianu.com/electrician-u-membership/
🎧🎹MUSIC AND VIDEO:🎹🎧
https://www.facebook.com/descantmv
🎬✍️ART AND ILLUSTRATION:✍️🎬
https://www.daverussoart.com
One of the things that perhaps makes us feel that way, can be age. The difference say between being a boy and being a man (or a girl and a woman!). Continuing the story as our folks have told us to (which isn’t bad, not at all!!), doing the only way we have known how, versus writing our own story, making our own decisions based upon what experiences we have had and those we wish to have. That is the difference between boyhood and man hood. Write your own story, go your own way in life! It is YOUR life after all.
Take for instance being an electrician (or tradesman). While many in society may look down upon blue collar workers, someone must keep the lights on, right?! We get to work with our hands and build cool things!! And some folks will beat us up about not going to college and not having anything while working in said construction job. But that is where we need to make some choices. We can listen to those folks (and perhaps the voices in our own heads) telling us that we are not good enough, or we can become the best version of ourselves that we can! Be the best electrician, start a you tube channel, do a podcast- whatever it is you are led/feel compelled to do! Its up to each of us, but we needn’t listen to everyone else to define us and what success should be.
And, if you are not happy with those choices that you have made, then make others! Change your trajectory!! Set goals and have a plan. Get into a routine. Wake up early and get ready for your day, in lieu of waking up at the very last second and screaming into work. Be responsible and plan for unforeseen things (like traffic, accidents, or stop lights). Be that guy/gal that shows up for work ready to make the most out of the day, not the one who is just existing through it! And while you are setting those goals, make sure and write them down/type them. Written goals tend to be the ones that we stick to the best! And then break those goals down into the yearly, weekly, daily steps that you need to take to achieve those goals. Make sure also to reward yourself along the way when you achieve those goals! That way, you don’t get to the end only to realize that it wasn’t all that great, and you are immediately on to the next one! They can be small rewards or large, that is all dependent on you, the individual
Positive thinking is also super important! You are in control of your thoughts, no one else is! Be appreciative of what you DO have, be appreciative of yourself. We are not perfect, and sometimes the negative thoughts creep back in. But, when that happens, recognize it, and change those thoughts. Not to play down serious dark thoughts. If it’s a constant deep/dark pattern that you cannot shake, then consider speaking to a professional and getting some help.
We hope that this has been helpful for you to recognize your own worth and give you some tools to help vault you along to reach your goals? What are some of the things that you do to motivate yourself? Leave some of those things in the comment section below; we would love to hear!! Please continue to follow Electrician U as we are constantly making new content to assist our followers along on their journey to being the best self that they can be!!
68
views

Truck Talk!!! Let's Talk About BURNOUT
While there are many aspects of the construction industry that are great, fun, and exciting, Burnout is NOT one of them. In this latest episode of Electrician U, Dustin talks about some of the things required of you to run a company and how those things can lead to Burnout.
🤘⚡️MEMBERSHIP⚡️🤘
JOIN ELECTRICIAN U - become a member and get:
FREE Continuing Education every year
FREE Practice Exams
FREE Monthly Video Courses
FREE Weekly Live Instructor-Led Classes
FREE Monthly Educational Newsletter
Premium Members-Only Content
Private Discord Channel
Monthly Members-Only Discord Chats
Sign up here --- https://www.electricianu.com/electrician-u-membership/
🎧🎹MUSIC AND VIDEO:🎹🎧
https://www.facebook.com/descantmv
🎬✍️ART AND ILLUSTRATION:✍️🎬
https://www.daverussoart.com
There are many ways to get yourself into the burnout phase, but by far the most common would be overextending yourself by tackling too many tasks at one time. As a company owner, or anyone really that is involved in keeping a company running, one must constantly be straddling the line between a healthy and non-healthy work habits! That doesn’t mean that you can’t find a home life/work life balance. You can, but it is a very elusive beast that usually does NOT come into play until many years of sacrifice have been made. There are so many facets of a successful construction company (or any business for that matter) that go unseen to most people. There are people to be hired, customers to line up for work, emails, invoicing, bills, materials that need to be ordered, picked up, and distributed and the list keeps going on and on!
So, with so many tasks, one could simply hire more people to take care of those tasks so one person wouldn’t have to do them all. Seems simple enough. But in doing so now that person (and their families) is relying on you to provide them with enough work to keep them busy and get paid. And the more people you have, the more people you must support. And that train goes round! Not saying that it isn’t worth it to be a successful business owner, you just have to understand that it WILL require much sacrifice from you (and those around you, namely your immediate family) and you may not reap the benefits or your hard work for some time. In other words, you must prepare yourself for the inevitable line of burnout that you will be walking.
One of the first things to do when embarking on this journey is to ask yourself if its worth it to you. There will be many late nights, early mornings, weekends, missed events and so on. But if it is something that you truly enjoy doing, or something you feel that strongly about, then by all means, take it on! You will just have to steel yourself to push thru the tough times. But you will still have to make time to take care of yourself. If you flog it so hard, after a while, you will start to lose some of you (if that makes any sense at all!!). You may also become ineffective at what it is that you were trying to accomplish in the first place. You need to take care of your obligations, your people, and things like that, but one must take care of themselves too, at some point.
But, having said that, as a business owner or business manager, you must find some time and make that time work. So, while it may not be the time you would like, use what you have. Whether its unwinding at the end of the day with a book for a few minutes, or watching a video on social media, or treating yourself to a cold drink after a hard day’s work. Whatever you can squeeze in there to help keep your sanity and make your hard work worthwhile. Just keep pushing thru it! Sometimes its just sitting and talking/venting to someone who understands and that you trust. Trust me, that helps a lot to verbalize things and get them off your chest! And then once you are done, then pick up and keep going on! Asking for help is another way to get some resolution to issues. If you don’t know HOW to accomplish something or WHEN or WHY, maybe someone you know WILL! But you don’t know that until you ask!
We hope this has been insightful into the subject of burnout and what it may look like to run a company. We all have stories like this to tell. What are some of yours? We would love to hear them in the comment section below!
Please continue to follow Dustin and Electrician U as we are constantly adding new content to enlighten our followers!
56
views

More Code Terms Explained!!! (What's the Difference Between Damp, Dry and Wet!!!?)
While most of us can probably envision when a scenario is damp, dry, or wet, and some of the associated wording that goes hand in hand with them. In this episode of Electrician U, Dustin talks clears up these terms and discusses some of the terms that go along with those locations to provide a clearer picture for us.
🤘⚡️MEMBERSHIP⚡️🤘
JOIN ELECTRICIAN U - become a member and get:
FREE Continuing Education every year
FREE Practice Exams
FREE Monthly Video Courses
FREE Weekly Live Instructor-Led Classes
FREE Monthly Educational Newsletter
Premium Members-Only Content
Private Discord Channel
Monthly Members-Only Discord Chats
Sign up here --- https://www.electricianu.com/electrician-u-membership/
🎧🎹MUSIC AND VIDEO:🎹🎧
https://www.facebook.com/descantmv
🎬✍️ART AND ILLUSTRATION:✍️🎬
https://www.daverussoart.com
Article 100 of the NEC defines them as such: Location, Damp. Locations protected from weather and not subject to saturation with water or other liquids BUT subject to moderate degrees of moisture. This may be something like a receptacle installed on a patio. Its not DIRECTLY exposed to the pouring rain, but since it is located outside, it is still subject to getting damp depending on the severity of the weather. Location, Wet. Installations underground or in concrete slabs or masonry in direct contact with the earth; in locations subject to saturation with water or other liquids, such as vehicle washing areas; and in unprotected locations exposed to weather. This definition is much more expanded than the last one! So, any installation that is under the ground or exposed to the weather, or that WILL become wet is considered a wet location. Even if it ISN’T currently wet, it could become wet or saturated with water. Just because it doesn’t rain much at all in the Sahara Desert, it doesn’t mean that it COULDN’T!! Location, Dry. A location nor normally subject to dampness or wetness. A location classified as dry may be temporarily subject to dampness or wetness, as in the case of a building under construction. So, the fact that it is somewhere that ISNT exposed to weather may be obvious, the lesser known would be a building that is currently being built. It will eventually be dry but is temporarily subject to dampness or wetness while being worked on.
Rainproof is defined as “Constructed, protected, or treated so as to prevent rain from interfering with the successful operation of the apparatus under specified test conditions. Raintight is close in definition, “Constructed or protected so that exposure to a beating rain will not result in the entrance of water under specified conditions”, but still different. Something that is rainproof is built to still OPERATE in wet conditions, but a raintight item is built to not let water IN. Watertight is “constructed so that moisture will not enter the enclosure under specified test conditions” while Weatherproof is “constructed or protected so that exposure to the weather will not interfere with successful operation. Again, close in definition, but watertight is something made so moisture won’t get INTO it, whereas weatherproof items don’t let exposure to the weather affect OPERATION. Another thing to keep in mind is water is water, but weather could be any weather condition- rain, snow, blowing dirt, salt from the ocean, etc.
Labeled, in a nutshell, means something that is manufactured and marked, but also acceptable to the local AHJ (most cases this is the inspector). Listed, however, can be summarized as an item that has been TESTED by an organization acceptable to the AHJ, and found suitable for a specified purpose.
Identified (as applied to equipment) means recognizable as suitable for the specific purpose, function, use, environment, application, and so forth, where described in a particular CODE requirement. Basically, the item must be suitable and recognizable as what it is described to be. Not hidden or sneaky or something like that. So, something may have a requirement that it its HP, or KVA, or Voltage be identified.
We hope that this video has been helpful in clearing up some of the many confusing code terms that are in our codebooks! Make sure to leave comments below about topics you want to see us produce! Please continue to follow Dustin and Electrician U as we are constantly adding new content to help educate everyone!!
189
views
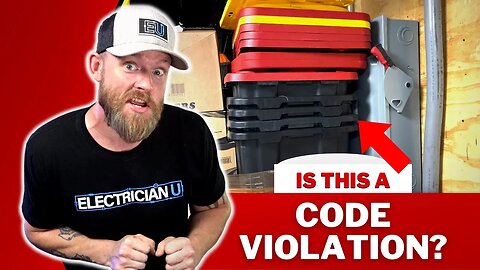
The Most Common Code Violation!!!
Let’s face it. All of us electricians have been there at least once. We go out to perform work somewhere and someone has decided to use the electrical room/space as a storage room! Things are stacked like Jenga in front of the panels, and since transformers have a nice flat top on them, they get repurposed as a shelf or additional work bench!! So, for the first 15 minutes, in lieu of performing electrical work, we are moving items just so we can get to the panel. And that is the minimum amount of disruption, as safety must also be considered. In the latest episode of Electrician U, Dustin digs into the topic of working space around electrical equipment.
🤘⚡️MEMBERSHIP⚡️🤘
JOIN ELECTRICIAN U - become a member and get:
FREE Continuing Education every year
FREE Practice Exams
FREE Monthly Video Courses
FREE Weekly Live Instructor-Led Classes
FREE Monthly Educational Newsletter
Premium Members-Only Content
Private Discord Channel
Monthly Members-Only Discord Chats
Sign up here --- https://www.electricianu.com/electrician-u-membership/
🎧🎹MUSIC AND VIDEO:🎹🎧
https://www.facebook.com/descantmv
🎬✍️ART AND ILLUSTRATION:✍️🎬
https://www.daverussoart.com
Lets start in Article 110.26 of the NEC is the code reference for working space around our electrical equipment. This article defines how much clearance we must have around our equipment from a width, depth, and height perspective. Article 110.26(B) states “Working space required by this section shall NOT be used for storage. When normally enclosed live parts are exposed for inspection or servicing, the working space, if in a passageway or general open space, shall be suitably guarded”. So, if it is in black and white language, then why is this particular code reference considered one of the most violated? In a nutshell, while all of us electricians are privy to this information, most homeowners/business owners or managers are not. They don’t study the code like we do or have access to a code book or even deal with tradespeople much at all!!
As a good steward of the electrical trade (as we all are!!) we must insert ourselves into the fray of this topic. For instance, once you have completed your work in the building and are ready to leave, take a moment to explain to the homeowner, manager, etc. that this area must be kept clear. Not only for convenience’s sake, but also from a safety standpoint. If something were to happen and a breaker needed to be turned off, or reset, it could not be done efficiently, and someone could get hurt. Don’t forget that transformers need clear space all around them to be able to shed some of the heat generated and clogging that space up does not allow them to do that. It may help to even have a copy of the code to show them the code references. Installing signage at the door to the electrical room, on the front of the panels, and on the top of the transformers that say something like “Keep Clear 4’” or “Not for Storage”, may be an additional action that can be beneficial in keeping the electrical room clear of unnecessary clutter.
As professional electricians, we must be well versed in Article 110.26 of the NEC. Again, this gives us the clearances we need to have around our equipment. When laying out an electrical room for our equipment, these dimensions will become critical, so it pays huge dividends to know this code. And by educating the general public about the topic (when relevant!!) can perhaps save you and/or some other electricians a huge amount of grief!!
We hope this has been helpful in understanding the topic of electrical rooms as storage rooms. Lets hear it in the comments below your worst experience with clearances not being maintained when you went into someplace to service it!!
Please continue to follow Electrician U as we are constantly adding new content to help our followers along in their careers!!
102
views
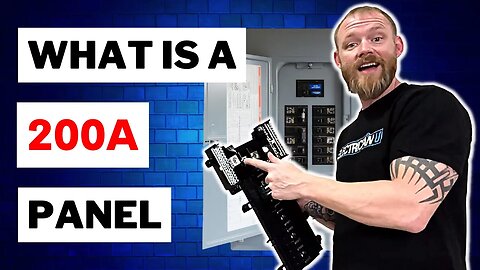
How Do I Know if My Panel is 200 Amps? (What Makes a 200 Amp Panel 200 Amps)
What part actually makes a 200-amp panel a 200-amp panel? With an almost infinite choice of panel types, ratings, sizes, and circuit quantity, we can lose track of what is all inside of a panel and how some of those ratings are achieved. In today’s episode of Electrician U, Dustin takes a look at and explains a few of the items that a panel is comprised of.
🤘⚡️MEMBERSHIP⚡️🤘
JOIN ELECTRICIAN U - become a member and get:
FREE Continuing Education every year
FREE Practice Exams
FREE Monthly Video Courses
FREE Weekly Live Instructor-Led Classes
FREE Monthly Educational Newsletter
Premium Members-Only Content
Private Discord Channel
Monthly Members-Only Discord Chats
Sign up here --- https://www.electricianu.com/electrician-u-membership/
🎧🎹MUSIC AND VIDEO:🎹🎧
https://www.facebook.com/descantmv
🎬✍️ART AND ILLUSTRATION:✍️🎬
https://www.daverussoart.com
Does the panel having a main breaker actually make it a particular size (say 200-amp)? Not necessarily. You can have a main breaker in the panel, or your panel can be an MLO (Main Lug Only), so the breaker by itself doesn’t define the panel rating. As a matter of fact, one of the panels Dustin uses in the video, you can actually remove the 200-amp breaker from the panel and put in a different size one (say, a 125-amp). That breaker is in there to provide overcurrent protection for the buss of the panel.
The bussing itself is actually what makes a 200-amp panel a 200-amp panel. The buss is the metal portion of the panel on the inside that “receives” and distributes what we put into it (electrically wise). This distribution takes place in the form of breakers that are either bolted to or snapped onto the buss. If you take a close look at the bussing, you will notice that the phases repeat themselves from the top to the bottom. So, in the case of a single-phase panel, circuits 1, 2, 5, 6, 9, 10, and so on are on the same A phase, while circuits 3, 4, 7, 8, 11, 12, etc. are on the same B phase. Same is true for a 3-phase panel, except in lieu of skipping one row, you skip two for the additional phase that is added. Circuits 1,2 are on A phase, 3,4 are on B phase, and 5,6 are on C phase, then we start over and repeat for all the spaces available.
All the busses are rated equally within the same panel. So, in the case of our 200-amp example A, B, and C phase busses are all rated at 200 amps. But something to remember is that we do not just ADD all of those together and get a 600-amp panel. The reason for this is that many times we will use multiple phases on a single piece of equipment to make it function. If we were to have a 2 pole 20-amp breaker, the piece of equipment wired to it would be able to utilize 20 amps on A phase and 20 amps on B phase. Same would be true for a 3-pole breaker.
For most panels, the interior buss assembly is made to be removable so you could replace it if necessary. In some instances, it is better to leave the existing enclosure in place (along with the associated wiring, conduit penetrations, grounding, etc.) and just replace the offending buss portion. Each manufacturer is different, but in the example Dustin uses, a screw can be simply removed holding the non-metallic backplate to the enclosure and the entire buss/backplate assembly can be slid upward and removed.
There are many other parts that make up an entire electrical panel. There are lugs, ground & neutral busses, dead fronts, and panel covers to name a few, but the buss is what gives a panel is ampere rating. We hope that this has helped you to better understand panelboard composition and ampere ratings. Please continue to follow Electrician U as we are constantly adding new content for our viewers. Don’t forget to leave comments below in the comment section!!
#electrician #electrical #electricity #sparky life #national electrical code
119
views

How Many Wires Can Fit in Each Hole?
When roughing in for new residential wall rough, does it really matter how many pieces of NM cable we put into each hole drilled thru the studs? In the latest episode of Electrician U, Dustin answers this question and brings to light some of the code articles associated with it.
🤘⚡️MEMBERSHIP⚡️🤘
JOIN ELECTRICIAN U - become a member and get:
FREE Continuing Education every year
FREE Practice Exams
FREE Monthly Video Courses
FREE Weekly Live Instructor-Led Classes
FREE Monthly Educational Newsletter
Premium Members-Only Content
Private Discord Channel
Monthly Members-Only Discord Chats
Sign up here --- https://www.electricianu.com/electrician-u-membership/
🎧🎹MUSIC AND VIDEO:🎹🎧
https://www.facebook.com/descantmv
🎬✍️ART AND ILLUSTRATION:✍️🎬
https://www.daverussoart.com
The very first thing to mention would be your local AHJ. The Authority Having Jurisdiction. That usually is your local inspector. They have the final say on approving your installation or not, so it makes sense to see what they are requiring, before just going out and doing! Some inspectors like no more than a couple, while some allow you three, etc. The last thing you want to do is rough in an entire house only to find out that the inspector won’t pass your wall rough, and you must do a bunch of rework! Trust me here, its no fun and can be quite aggravating (as well as expensive).
The NEC doesn’t specifically talk about how many wires you can install in a given size hole in a stud. And that also makes sense when you think of how many different sizes of holes you could drill in a stud. What the NEC DOES talk about that is related to the topic is cable bundling. If you were to install a bunch of NM cables together thru the wood studs and tie wrap them every few feet, it may look nice and neat but there are a few issues with an installation like that. The first would be heat dissipation. With so many cables that close together, they cannot dissipate the heat generated by the flow of current in them. This can be a point of contention to some of us. The likelihood of ALL those NM cables being run at FULL CAPACITY at the same time is pretty low, so is the need to dissipate a TON of heat really that important?
The more likely reason the NEC doesn’t allow us to bundle (without derating) is due to capacitive coupling. When you have two conductors run next to one another and an air gap in between them, you have the ability to build up capacitance. Capacitance is the ability of a component or circuit to collect and store energy in the form of an electrical charge. So, the theory here is the more space you provide between those conductors, the more you can reduce the effects of that capacitance. That capacitance CAN impede current flow in the conductors. If you had 10 cables bundled together, with 10 different amounts of current flow running thru them, all that capacitance can have a large adverse effect on the current flow. Table 310.15(C)(1) of the NEC is where we derive the values that we must derate our conductors when we install several of them together in a conduit or thru the wood studs of a wall, or things like that. The NEC doesn’t tell us that we CAN’T install many cables closely together, just that when we do, we may have to adjust our conductors to be able to carry less amperage than standard wire sizes normally allow.
So, in a nutshell, NO, the NEC doesn’t tell us how many conductors we can put in any given size hole in a stud. The larger the hole, the more cables you can fit in there. And the larger the hole, the less chance of you damaging the NM cable when pulling it thru the hole drilled in the studs. Don’t make the hole so small that it takes a truck to pull it in there, but not so big as to damage the studs. In fact, Article 300.4(A)(1) of the NEC tells us that if we drill holes in the studs for NM cable, that we cannot be closer than 1-1/4” to the nearest edge of the wood member, and that if we DO put them closer than that, we must install nail plates to protect the cables from screws, nails, or things like that! Bottom line is to plan your work and install the cables without damaging them.
We hope this sheds some light on the subject. We would love to hear your thoughts on cable bundling, heat dissipation, and capacitance. Leave your comments below in the comment section! Please continue to follow Electrician U and Dustin as we are constantly adding new content for our viewers!
92
views

What is the difference between Exposed, Accessible, and In Sight? (Code Words You Should Know)
In our ongoing series of Confusing Code Terms Explained, Dustin reviews the terms Exposed, Accessible and In Sight. And while not too awful sounding, they can be a bit confusing on exactly what they mean from a Code standpoint!
🤘⚡️MEMBERSHIP⚡️🤘
JOIN ELECTRICIAN U - become a member and get:
FREE Continuing Education every year
FREE Practice Exams
FREE Monthly Video Courses
FREE Weekly Live Instructor-Led Classes
FREE Monthly Educational Newsletter
Premium Members-Only Content
Private Discord Channel
Monthly Members-Only Discord Chats
Sign up here --- https://www.electricianu.com/electrician-u-membership/
🎧🎹MUSIC AND VIDEO:🎹🎧
https://www.facebook.com/descantmv
🎬✍️ART AND ILLUSTRATION:✍️🎬
https://www.daverussoart.com
Article 100 of the NEC defines accessibility as such:
Accessible (as it applies to equipment) is “Capable of being reached for operation, renewal, and inspection”. There is nothing too magical about this definition, it simply means that the equipment must be installed so it can be operated, serviced, etc. So, you can’t install something that has to be accessible above a hard lid ceiling with no access, or pour it in concrete, or bury it behind a piece of drywall or something like that. Accessible (as it applies to wiring methods) is defined as capable of being removed or exposed without damaging the building structure or finish or not permanently closed in by the structure or finish of the building. Same type of situations as above in that after you install it, it must be able to be reached and operated/manipulated after it is completed. Accessible, Readily (Readily Accessible) is defined as capable of being reached quickly for operation, renewal, or inspections without requiring those to whom ready access is requisite to take actions such as to use tools (other than keys), to climb over or under, to remove obstacles, or to resort to portable ladders and so forth. This is the most stringent of the group and in essence means that you must be able to walk right up to the item and be able to access/actuate it without tools, equipment, or moving anything.
On the inverse side of things, Article 100 of the NEC has a few terms that are the opposite of accessible:
Concealed is “Rendered inaccessible by the structure or finish of the building. Again, the exact opposite; you can’t see or access it. Enclosed means “surrounded by a case, housing, fence, or wall(s) that prevents persons from accidentally contacting energized parts”. This is important so not everyone has access to the potential dangers of electrical current flow. Exposed (as it applies to live parts) is the complete opposite of Enclosed and is “Capable of being inadvertently touched or approached nearer than a safe distance by a person”, while Exposed (as applied to wiring methods) “on or attached to the surface or behind panels designed to allow access”.
The NEC defines Guarded as “Covered, shielded, fenced, enclosed, or otherwise protected by means of suitable covers, casings, barriers, rails, screens, mats, or platforms to remove the likelihood of approach or contact by persons or objects to a point of danger”. While close to Enclosed, Guarded seems like it is a lesser form of protection.
In Sight From (or Within Sight From or Within Sight) is defined as “Visible and not more than 50 feet distant from the other”. You may hear this term as it relates to a disconnect being within sight from the equipment it serves (or something of that nature).
Isolated (as applied to location) means “Not readily accessible to persons unless special means for access are used”. So, one would have to be Given access to something isolated and not have it readily available.
We hope this has clarified some of the terminology surrounding Accessibility as it relates to the NEC. These terms are all closely related, and as electricians, we should know the difference between them. Make sure you are explaining this to your apprentices when teaching, make sure you are discussing this when your customers have questions as to WHY you installed something where you did, etc. I think with the state of current affairs today, EVERYONE could probably use a little more education on things!!
51
views
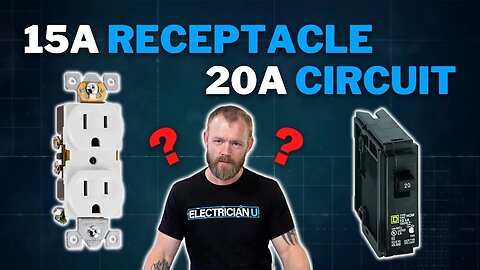
Won't These Melt?!? 15amp Receptacles on 20 amp Circuits!!!
In the latest episode of Electrician U, Dustin digs into some of the reasons WHY we are allowed to install 15a devices on 20a rated circuits in certain instances and what can happen if we overload those circuits.
🤘⚡️MEMBERSHIP⚡️🤘
JOIN ELECTRICIAN U - become a member and get:
FREE Continuing Education every year
FREE Practice Exams
FREE Monthly Video Courses
FREE Weekly Live Instructor-Led Classes
FREE Monthly Educational Newsletter
Premium Members-Only Content
Private Discord Channel
Monthly Members-Only Discord Chats
Sign up here --- https://www.electricianu.com/electrician-u-membership/
🎧🎹MUSIC AND VIDEO:🎹🎧
https://www.facebook.com/descantmv
🎬✍️ART AND ILLUSTRATION:✍️🎬
https://www.daverussoart.com
We usually see the results of breakers not tripping as they should, but the devices melting instead around the winter months where portable space heaters are more plentiful, or circuits are overloaded with Christmas lighting. Part of the problem with this (at least on the residential spectrum) is due in part to being able to install a 15a receptacle (and the associated wiring) but that 15a breaker can EASILY be replaced with a 20a breaker by anyone, thus negating the wiring and associated device being able to sustain the increased amperage and failing.
In fact, article 210.21 (B) of the NEC states that SINGLE receptacles installed on an individual branch circuit shall have an ampere rating of not less than that of the branch circuit. BUT 201.21(B)(3) and table 210.21(B)(3) allows us to install 15 OR 20 amp rated receptacles on a 20a branch circuit. Why would this be? Well, if you were to relate it to a service size, not EVERYTHING will be used at its capacity at the same time, and we are allowed to install one under this assumption. If you added up ALL the 20a breakers in your panel, along with the larger ones for your AC, water heater, etc., it would probably end up well over 200a on a standard 200a service in most residences. Another way to look at it would be that while you may be utilizing the entire 20a worth of current on the ENTIRE circuit (over all the devices on the circuit), the chances are very slim that you would be pulling 20a worth at any one device.
210.21(B)(2) further states that a receptacle connected to a branch circuit supplying 2 or more receptacles (which is most of the circuits we would install), that receptacle shall not supply a total cord-and-plug connected load in excess of the maximum specified in Table 210.21(B)(2). This table, for instance, shows us that for a 15 or 20a circuit, with a 15a receptacle, that we can have a maximum load on that cord-and plug connected circuit of 12a. If that were to be adhered to, there would be no problem. But are we, the installing electrician, available to guide the homeowner as to what they should plug into their house circuity or are most homeowners savvy to our electrical code (or even know there is one)? And considering the colder months and holiday months when additional load that isn’t normally being used, you can see why it can turn into a problem.
But wouldn’t the 20a breaker just trip if you had more than 20a worth of current being drawn on it? Not necessarily. If you dumped more than 20a all at once, then yes, it should trip. But thermally, if you allowed that amperage and heat to build up slowly (in the case of small electrical space heaters) then the breaker is designed to trip at about 130% of the value it is rated for. In the case of a 20a breaker, that would be 24a! And someone was to plug those space heaters into a single 15a rated receptacle, then that receptacle COULD melt before the breaker tripped!
210.23(A)(1) & (A)(2) also mention how much you can plug into a branch circuit, (A)(1) telling us that the rating of any one cord-and-plug connected equipment not fastened in place shall not exceed 80% of the branch circuit ampere rating, and (A)(2) telling us that utilization equipment fastened in place shall not exceed 50% of the branch circuit ampere rating where lighting, and/or other cord-and plug connected equipment are also supplied.
So, how can we combat these potential issues? Install nothing but 15a rated devices with 15a rated wiring and breakers? Or maybe nothing but 20a devices with 20a rated wire and 20a rated breakers. Or maybe some general electrical education of the general population is a better way to go? What are your thoughts? Let us know in the comments below! If you have a question or topic, you would like to know more about please let us know!
We hope this has brought some light to this situation. Please continue to follow Electrician U and Dustin as we are constantly adding new content to keep our followers up to date on the happenings of our industry.
182
views

Work Gloves For Different Jobs: Gloves For Electricians
There are TONS of gloves available on the market these days. You have old school standard leather work gloves, rubber insulated gloves for working with live electrical parts, even tactical gloves! Let’s face it, for us tradesmen (and women) our hands are how we make a living, and we need to protect them from the damages of our everyday work environments! In the latest episode of Electrician U, Dustin explores some of the gloves that are available to us.
SPONSOR: Klein Tools - https://www.kleintools.com/
🤘⚡️MEMBERSHIP⚡️🤘
JOIN ELECTRICIAN U - become a member and get:
FREE Continuing Education every year
FREE Practice Exams
FREE Monthly Video Courses
FREE Weekly Live Instructor-Led Classes
FREE Monthly Educational Newsletter
Premium Members-Only Content
Private Discord Channel
Monthly Members-Only Discord Chats
Sign up here --- https://www.electricianu.com/electrician-u-membership/
🎧🎹MUSIC AND VIDEO:🎹🎧
https://www.facebook.com/descantmv
🎬✍️ART AND ILLUSTRATION:✍️🎬
https://www.daverussoart.com
The first types of gloves we are exploring are standard latex (or nitrile) type gloves. These gloves are great for using in a finish environment where we don’t want to get our smudgy fingerprints all over things; so, for trim out, installing light fixtures or working where fresh paint is on the walls.
A newer type of gloves are the cut resistant, tight fitting foam type gloves. These are great for standard everyday usage. Lightweight and disposable after a few wearing’s, these gloves are the go-to for most of us tradesmen these days. The higher the ANSI number, the more cut resistant the gloves are. However, the more cut resistant they are, typically that makes them a bit stiffer and less nimble on your hands!
The next glove Dustin talks about are form fitting Electricians Gloves available from Klein Tools. A hardy pair of work gloves that are great for all environments. From pulling wire to installing boxes in metal/wood frames walls to installing light fixtures, this type of gloves honestly works great for anything! Definitely more flexible than the older leather gloves, but slightly less than the foam type gloves we spoke about above. A slightly different version of the Electrician Gloves are the wire pulling gloves. Much the same as the electrician’s glove, but the INSIDE of the hands are provided with a surface that Grips materials much easier. If you were pulling cable all day, working with a fish tape, or installing Romex, these gloves would provide protection for your hands and help you grip the materials better!
A standard pair of leather gloves is more of a preference type gloves. Some of the newer models are much more form fitting than leather gloves of old! Great for everyday usage, and as leather tends to last a bit longer, they offer great protection for the hands for standard work environments.
Impact type gloves are great to use if you are using tools where your hands are going to take a beating! Like swinging a hammer all day, or using a jackhammer, or anything where your hands are going to impact into another surface constantly. They are reinforced with extra padding in the palms and on the digits to protect your hands and built much beefier to withstand the abuse. Keep in mind that what you are gaining in protection, you will lose a bit in mobility
The last pair of gloves to talk about are hot work gloves. These gloves are actually two different gloves worn at the same time. A thick rubber glove is worn next to the hand to protect US against electrical shock, and then a leather over glove is worn on top of that to protect the rubber portion from getting damaged thus negating the electrical protection. We use these gloves when working in an energized environment and nothing else. We must also get these gloves tested as they will degrade over time and offer less protection. We must also protect these gloves from damage, so they tend to be put back in their own protective case when done. They are the least dexterous of all the gloves as they are so thick (and they are worn as two pairs!!) so be prepared for that!
We hope this has been informative and helpful in choosing some gloves to protect your hands! Continue to follow Dustin and Electrician U as we are constantly adding new content to help our followers. But watch the video first, like it, subscribe if you haven't yet and leave a comment! Definitely leave a comment about the amazing thumbnail.
#electrician #electrical #electricity #leather gloves #glove review #klein tools #best work gloves
161
views
How to Bend a Perfect Box Offset? Electricians Need to Know How to Bend Conduit.
As we all know, conduit bending is one of the terms of our trade and the act of bending conduit is an art! But it’s definitely a necessary art for us to be able to get from one place to another and install our wires in between. Offsets are a part of that bending art and can take some practice to master. In this episode of Electrician U, Dustin shows us how to bend the perfect box offset.
Sponsor: Milwaukee GRID: https://www.milwaukeetool.com/grid
🤘⚡️MEMBERSHIP⚡️🤘
JOIN ELECTRICIAN U - become a member and get:
FREE Continuing Education every year
FREE Practice Exams
FREE Monthly Video Courses
FREE Weekly Live Instructor-Led Classes
FREE Monthly Educational Newsletter
Premium Members-Only Content
Private Discord Channel
Monthly Members-Only Discord Chats
Sign up here --- https://www.electricianu.com/electrician-u-membership/
🎧🎹MUSIC AND VIDEO:🎹🎧
https://www.facebook.com/descantmv
🎬✍️ART AND ILLUSTRATION:✍️🎬
https://www.daverussoart.com
A box offset is making a small bend up and then back down to get our conduit straight into a box while still leaving us a place to strap near the box. First. Line the bender shoe up with the end of the conduit. The next step is to step on the bender shoe WHILE pulling on the handle. An important step often overlooked by the average electrician, but it makes the entire bend area pull away from the ground, resulting in a wonky bend!! Remember, a box offset is small in up distance, about 3/8 of an inch, so you need to barely get the conduit to bend. Once you have the first bend done, just roll the conduit over 180 degrees, scoot the bender shoe back a couple inches, and put the same type of bend on the second side. That’s it!! The important thing to remember at this point is to get the conduit rolled so that its headed straight, not off to the side. As your first bend bent the conduit UP, then the second bend should start with the bend you just made pointing DOWN.
Once the offset bend is made, install the box where you want it, put a connector on the end of the conduit (making sure it is tightened properly with either the set screw or the compression fitting), install the connector/pipe in the box, and tighten the locknut! Make sure the conduit set screws are facing the same way (most of us generally tend to put the screw facing out) as the rest of the screws on other conduits and that the straps are facing the same way as others. While this may seem persnickety, it just makes the installation look more professional and uniform. A small action that can make an installation look really good, or really bad!
Another item to keep in mind is not to get too frustrated with yourself when learning HOW to bend conduit. Know that you are going to make mistakes. But if you approach it with the mindset to learn from your mistakes so that you repeat them less, you will have much more success! Even mistakes and blunders can be the best teachers IF you learn from them!! Even the great conduit bending electricians had to start off in the same place- from the beginning! Trust me when I say that even those electricians messed up plenty of conduit learning how to master bending. So give yourself some grace and have some patience!!
To be honest, PRACTICE is the best way to learn how to master the art of bending conduit! Watch videos, pay attention to others doing it, ask questions, read books, THEN PRACTICE! One (out of many!!) of the things that separates GOOD electricians from GREAT electricians is their ability to bend conduit. It can (figuratively) make or break an installation. Correct and attractive conduit bending will result in less customer questions and potentially lead to them calling YOU back next time they need something. Practice your conduit bending, sharpen those skills, and continue to lead that Sparky Life!!
100
views
WHY Do Plugs Have HOLES? The ACTUAL Answer!
Have you ever thought to yourself “I wonder what those holes are for that are in the end of the plug blade”? If so, then this is definitely the video you have been waiting for! In this latest episode of Electrician U, Dustin digs into this topic to bring some clarity to our followers.
🤘⚡️MEMBERSHIP⚡️🤘
JOIN ELECTRICIAN U - become a member and get:
FREE Continuing Education every year
FREE Practice Exams
FREE Monthly Video Courses
FREE Weekly Live Instructor-Led Classes
FREE Monthly Educational Newsletter
Premium Members-Only Content
Private Discord Channel
Monthly Members-Only Discord Chats
Sign up here --- https://www.electricianu.com/electrician-u-membership/
🎧🎹MUSIC AND VIDEO:🎹🎧
https://www.facebook.com/descantmv
🎬✍️ART AND ILLUSTRATION:✍️🎬
https://www.daverussoart.com
There are several different opinions on the subject that appear on the internet consistently. The first being that manufacturers do this to save materials on the assembly. The train of thought here being a small amount out of each blade, times for each cord (one hot and one neutral on each end) times however many thousands of cords made each year could potentially add up to quite a bit of material savings. While this may have some truth to it, it does seem like a bit of a stretch.
The second school of logic that shows up online would be Lock Out Tag Out, or LOTO. For an electrical tradesman (or tradeswoman) this would consist of any number of ways to remove a source of power to a piece of equipment and position a lock on that part of the system to keep it de energized so that we can perform maintenance or and installation or something of that sort. However, this is also unlikely as it seems too easily bypassed.
Another thought on the subject would be something along the lines of there being an associated bump INSIDE the receptacle to keep it in place when inserted. While this seems like it may be a reasonable idea in theory, plugs go into and come out of the receptacle with relative ease and no definite snap can be heard or felt. Dustin actually disassembled a receptacle to take a look inside to prove/disprove the theory! Once he got a few different types of newer receptacles torn apart, there is in fact no BUMP that would snap into the hole of the plug blade.
So, after going through all those theories as to the mysterious hole in the plug blades, we reached out to Legrand to ask them for some answers! Legrand responded stating that the older receptacles used to have a protrusion on the female portion that would engage the plug blades akin to the last example that we looked into above. This was due to poor spring tension in the female portion of the older style of receptacles. In addition, back then the loads were short term low power loads. With newer technology and materials available to us, this isn’t really needed much anymore, but the manufacturers still tend to make the plugs in this fashion so they CAN still work properly in those older style of receptacles that are still in use in the world!
So, mystery successfully solved!! Y’all continue to follow Dustin and Electrician U as we are constantly adding new content and researching new topics to bring some knowledge to our followers!
#electrician #electrical #electricity
118
views

Testing Equipment You Probably Don't Have, But You Definitely Need in Your Electrician Tool Belt!
With so many types of test equipment available for the electrician, its hard to keep track of what is out there. In this episode of Electrician U, Dustin talks about some of the testing devices that one of our sponsors, Klein Tools, has available.
🤘⚡️MEMBERSHIP⚡️🤘
JOIN ELECTRICIAN U - become a member and get:
FREE Continuing Education every year
FREE Practice Exams
FREE Monthly Video Courses
FREE Weekly Live Instructor-Led Classes
FREE Monthly Educational Newsletter
Premium Members-Only Content
Private Discord Channel
Monthly Members-Only Discord Chats
Sign up here --- https://www.electricianu.com/electrician-u-membership/
🎧🎹MUSIC AND VIDEO:🎹🎧
https://www.facebook.com/descantmv
🎬✍️ART AND ILLUSTRATION:✍️🎬
https://www.daverussoart.com
First up is a simple voltage tester. No frills, but definitely worth thinking about. All it tells you is if there is voltage present. But that is the beauty of it! Less to break, less to malfunction! Small and compact, it easily fits in your pocket or tool pouch and its price is also super affordable. In addition, it does test on a range of voltages not just 120.
Klein’s ET-310 is next on our list of testers. This tool allows you to plug one end into a receptacle and with the other end (wand) you can go to the panel and scan the breakers until it audibly lets you know which one you are plugged into on the other end! Super handy and keeps you from running back and forth between panel and receptacles until you find out which one you are working on!!
Also available from Klein is a thermal imager. Unlike a standard laser type thermometer, this device also has a screen which allows you to SEE an infrared picture of what you are testing, not just get the digital readout of the temperature. This can be very useful in identifying hot spots in a circuit where there is a potential problem point or a loose joint/connection, without having to disassemble each and every device/bolt in the arrangement.
Klein's Amp Clamp type meter is next up. This tool will typically tend to have Less testing options than a Digital Multi Meter, but More than a standard voltage only tester. In addition, it has a split clamp on one end that you can clamp around a wire to see just how many amps are flowing through the circuit you are testing. They are available in different voltage and amperage ranges to suit the need of the electrician. If you are going to have one type of meter in your arsenal, make sure it is this type! They are totally invaluable!
A borescope is the next test instrument we look at. While not something that you would use every day, it is surely nice to have to allow you to look into an opening and behind something that you normally couldn’t see into. So, say for instance you wanted to see if there was an obstruction inside the wall cavity you just cut a box into, you could simply insert the camera end of the borescope into the hole and look around! Nice!!
A Megger is a tool that the average electrician probably Doesn’t have in their personal tool kit, but one that most of us have used them. These typically look much like a multi meter, but what they do is send a high voltage signal into the conductor they are clamped onto and can sense if that current is leaking out somewhere and escaping indicating a potential problem point within the conductor. A definite must use tool for the electrician.
The last tool we are looking into is a Earth Resistance Tester. This particular meter is a three-point fall of potential type, though there are four-point fall of potential types available. This tool allows you to test the immediate earth surrounding the area you are working in to see how much resistance the earth carries. An invaluable tool for service installations/problematic grounding testing.
We hope this has been helpful in showing you what types of electrical testers are out there that you can easily access and which ones to select. Continue to follow Dustin and Electrician U as we are constantly adding new content to the platform
#electrician #electrical #electricity #dustin stelzer #electrical contractor #electrician tool bag
187
views
What are IG Receptacles and How Do They Work? (Isolated Ground Receptacles)
Perhaps you have seen these orange receptacles installed in places before or heard of them. But what exactly is an Isolated Ground Receptacle (IG or IGR)? In the latest episode of Electrician U, Dustin dives into the topic of what an isolated ground is and where we should be using these types of devices.
🤘⚡️MEMBERSHIP⚡️🤘
JOIN ELECTRICIAN U - become a member and get:
FREE Continuing Education every year
FREE Practice Exams
FREE Monthly Video Courses
FREE Weekly Live Instructor-Led Classes
FREE Monthly Educational Newsletter
Premium Members-Only Content
Private Discord Channel
Monthly Members-Only Discord Chats
Sign up here --- https://www.electricianu.com/electrician-u-membership/
🎧🎹MUSIC AND VIDEO:🎹🎧
https://www.facebook.com/descantmv
🎬✍️ART AND ILLUSTRATION:✍️🎬
https://www.daverussoart.com
For the most part, these types of devices/systems are utilized where there will be sensitive electronic equipment installed. Things like computers, medical devices, and other items that would not operate well with power that is not “Clean”. By Clean, we mean power that does not have an abundance of electrical Noise floating around. This noise can happen in many different forms. EMI (electro magnetic interference) or ground loops. Maybe you have a system that is using several different pieces of equipment that are plugged into a few different receptacles. And maybe that equipment also has high (120v) and low (12v or 24v or lower) voltage power it is operating on. All of that equipment is generally tied back to the same ground. But the difference in potential between the different voltages and equipment can lend itself to the conductors picking up that additional noise creating havoc with the low voltage systems.
In an Isolated Ground system, we utilize an ADDITIONAL grounding loop to keep the grounding loop of the equipment being plugged into a receptacle separate from the standard equipment grounding loop that bonds ALL our grounds and metallic equipment together. In doing this, it keeps most of that electrical “Noise” separate from the ground going directly to the receptacle and what is plugged into it.
Normally, the yoke, or the metallic strap on the back of a receptacle that holds the device to the box allowing it to be bonded, is connected internally to the grounding prong hole of the receptacle. On an IG receptacle, that yoke is still there, but the ground prong hole is NOT connected to it. Neither is the grounding screw of the receptacle. They are separate from that yoke. Additionally, in a normal type of system, we would install one grounding wire that bonds all our non-current carrying parts together giving us an effective alternate ground return path in case something goes wrong. But with an IG system, we will have to run an ADDITIONAL grounding wire that is specific to the extra grounding loop, keeping them separate.
For installation purposes, the neutral and hot conductors get installed and wired just as you normally would. Nothing different. But the grounds DO require a bit of different handling! The normal equipment ground is still installed, connected to the box as usual, and on to the next box as we normally do. But, it does NOT get tailed out to our device! That is where the IG ground itself comes into play. The IG grounding wire (identified as green with a yellow stripe on it) is connected to the ground screw of the device, but not to the box or to the normal equipment ground. It can still go onto the next box and attach to another IG ground but not the normal equipment ground.
The IG ground DOES connect back to the normal equipment ground, but this is done either at the service where the neutral and grounding is bonded together, or a completely separate grounding triad at the service point. This should be the only place where the two grounding systems come together, and by keeping them separate, we eliminate almost all the noise associated with the different individual systems within our overall system.
We hope this sheds some light on the isolated ground topic! You can also discover information about isolated grounding in the NEC in article 250.146. Please continue to follow Electrician U and Dustin as we are constantly adding new content!
#electrician #electrical #electricity #electricial #igr #powerissues #nec #electricalcontractor
398
views
1
comment

Do Pancakes Violate Code? How Many Conductors can ACTUALLY Fit?
Do Pancakes Violate Code? Absolutely not!! They are delicious! Oh. Not that kind of delicious, syrupy goodness, but rather pancake electrical boxes!! If you have ever had the pleasure to install or perform service with one of these boxes, you know exactly what we are talking about!! On this episode of Electrician U, Dustin takes an adventure to find out if in fact the round pancake boxes we see, as electricians, are code compliant. I know, I know, I was hoping for a road trip for pancakes too!! 😊
🤘⚡️MEMBERSHIP⚡️🤘
JOIN ELECTRICIAN U - become a member and get:
FREE Continuing Education every year
FREE Practice Exams
FREE Monthly Video Courses
FREE Weekly Live Instructor-Led Classes
FREE Monthly Educational Newsletter
Premium Members-Only Content
Private Discord Channel
Monthly Members-Only Discord Chats
Sign up here --- https://www.electricianu.com/electrician-u-membership/
🎧🎹MUSIC AND VIDEO:🎹🎧
https://www.facebook.com/descantmv
🎬✍️ART AND ILLUSTRATION:✍️🎬
https://www.daverussoart.com
First, what would we use a pancake box for? These boxes can be rather handy if you have to install a box for a light fixture with very little clearance behind them. Biggest item that comes to mind is if the fixture needs to be installed directly where a stud is, and we don’t have a void in the wall for a box. You simply install the box to the stud, install your wires and the drywall covers up the depth of the box (as there is no plaster/tile ring) to install. You then would mount your fixture over the box, terminate your wires, and move on to the next task. While this application is handy for placement of the box, it can cause other issues such as not enough wire bending space, pinched wires (due to the shallow depth of the box), and other items.
Article 314.16 of the NEC (and I am paraphrasing here!) that a box shall be sized to provide enough free space for all the conductors in it. Within the article, there are a few areas that provide us with some guidance. B1 covers conductors; so, the wires themselves. B2 covers clamp fill; this is for any INTERNAL connectors (some metallic boxes have these built in and must be accounted for). B3 covers support fittings; some luminaires have a stud that holds the fixture to the box). B4 covers device/equipment; things like switches or receptacles themselves. B5 covers equipment grounding conductors; these are counted separately from the phase and neutral conductors as there can be more of them than any other conductor in certain situations.
Table 314.16(A) and 314.16 (B) are two tables that are used to size some standard boxes as well as some standard conductors. To use Table 314.16(B), simply find the corresponding wire size you are using, multiply by how many conductors you have in the box of that size and deduct for the equipment grounds (we only count them all as 1 conductor until you get to 4, then .25 of an allowance for every other equipment ground over 4). Once that number is generated, compare it to Table 314.16(A) with the box that you are attempting to use. Remember, you must account for devices, internal cable clamps and studs as well! If the number you came up with is larger than the amount for the box you are trying to use, you will have to select a larger box that will fit the number of conductors you need.
The boxes should have their volume stamped in them. 4” pancake boxes have a volume of about 6 CI and 3” pancake boxes have a volume of around 4 CI. Considering that a piece of #12 wire takes up 2.25 inches, that means you could not get a piece of 12-2 Romex into a 3" box. A piece of #14 wire takes up 2 inches so one piece of that cable WOULD be acceptable to put in there, but not if you had a device, a fixture stud, or an internal connector.
So, we can see that for most applications, a pancake box is too small to use for either 12-2 OR 14-2 especially if they have internal cable clamps in the box. So, what are our options? We could select a box without internal clamps, make sure and use 14-gauge wire (provided it worked with the ampacity of our fixture), and place the box at the end of the run and only had the one piece of cable entering it. It is simply a numbers game!
We hope this demystified the pancake box size issue! Please continue to follow Electrician U and Dustin as we are constantly adding new content to help our followers on their careers as electricians!
#electrician #electrical #electricity
90
views