2GIG GC2: Performing a System Test
The 2GIG CG2 system is designed to allow manual system tests on all connected devices. The following will help you execute this manual process.
The 2GIG CG2 security system is designed to execute self-monitoring security checks without the need for human assistance. However, it is still important that you perform a manual system test on a periodic basis.
The reason for periodic manual checks is to ensure the self-monitoring security is running smoothly. While the security system is efficient, if a disruption does occur, the only way you’ll know about it is by looking at the system personally.
It’s easy to do a manual system check of the 2GIG GC2 security system. If you have your master code handy and our video at the ready, you’ll be able to test the functionality of each system sensor using the device as the system’s central access point.
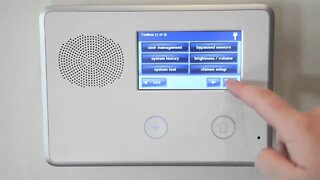
As you’ll see in the video, when you enter the system’s test mode, you will notice a “T” blinking on the upper right corner of your display’s monitor. This will serve as a prompt informing you that the system is ready to be tested manually. From the control panel displayed on the 2GIG GC2 screen, go to security, menu, and then toolbox. Once you enter your master code upon prompting, you’ll then enter system test.
When each sensor is tested, the control panel will emit a beep and display the sensor’s name. A green light will also display, along with a signal of 1 to 5 bars. These bars will indicate strength of signal, not unlike what you may see on a cell phone. When you see what corresponds on the video, you’ll be ready to test out the device.
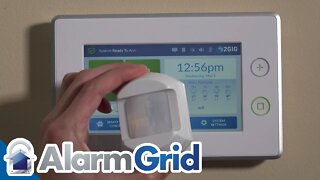
As the video demonstrates, the way you test the device depends on what device you’re testing. If you are testing the door or the window sensors, you will simply need to open and close them to ensure their security. If you are testing a portable sensor or a wireless keypad, you can press any button to conduct the test. For smoke, carbon monoxide, or broken glass detectors, just press the detector’s test button.
Testing motion sensors are a little more complex. As the video explains, you must stay out of the area they’re trained to secure for roughly five minutes. After that period has passed, you can then walk through.
Regardless of what you’re testing, you’ll want to look for a green bar displayed on the 2GIG GC2’s control panel. If you see this, then the sensor next to the bar is tested as functional.
When you are done with the testing, you’ll see a list of panel test checks on the control panel, which can be navigated by scrolling up or down. Follow the video’s instructions and press each test button you see on the list. This will activate a test question, which asks you to verify the color of the light. Answer this question with a “yes” or “no” response.
After all questions have been answered, press the OK button. This will bring up a confirmation screen. Press the OK button on that screen to officially exit testing, and then press back when finished.
-
 0:58
0:58
Alarm Grid Home Security DIY Videos
8 years ago2GIG Go!Control: Performing a Cell Unit Test
39 -
 8:01
8:01
Alarm Grid Home Security DIY Videos
7 years ago2GIG GC3: Motion Walk Test with 2GIG PIR1-345
33 -
 19:20
19:20
Shane Welcher
2 years ago $0.01 earnedUsing GSV Instructions in Studio 5000 For I/O Monitoring | Controllogix Get System Value
39 -
 6:06
6:06
AccAutomation
2 years agoC-More Micro HMI Simulate Project (Simulator)
7 -
 43:00
43:00
Louis Rossmann
3 years agotesting if lowering bitrate to 20k allows this to work
16 -
 5:22
5:22
ALLCHECKOUT
4 months ago $0.01 earnedGQ GMC-800 Geiger Counter Live Radiation Measurement Test With Uranium Green Glass
22 -
 14:59
14:59
AccAutomation
2 years agoC-More Micro HMI First Program Create
3 -
 7:01
7:01
KitGuruTech
1 year agoKitGuru’s GPU Benchmark System: 2023 update with PCSpecialist!
9 -
 15:28
15:28
Louis Rossmann
5 years agoMacbook repair + GoPro testing :D
8 -
 1:50
1:50
MisterHedgehog
8 months agoBench test of auxiliary systems
8