Premium Only Content

2GIG GC2: Setting Date & Time
A detailed explanation designed to guide you through the process of setting up an accurate time and date on your 2GIG GC2 device.
Making sure you have the accurate date and time on your 2GIG GC2 device is an important task to execute. If you have a system that’s set up with a back-end service provider – that is, an outside server that can automatically monitor and adjust metrics through a cloud-type setting – time and date will be automatically set up and controlled.
If you do not have a back-end service provider, setting up the date and time is something you must do manually. You will want to double check whether your system has a back-end service provider before installing the system.
This is a critical task because it does more than tell you the time and day on the 2GIG GC2’s home screen. Date and time provide a critical link to system history and event logs that store data on various system events. The information can range from the last time you did a manual system check to a time where the system was triggered.
However, it’s also an easy task to execute. Our video serves as a handy guide to walk you through the process. It will also teach you a couple of unique elements to the feature.
For instance, the video will inform you that setting the date and time on a manual basis is a bit intuitive. For example, the installer can set the system to automatically adjust for daylight saving time if it’s observed in your state of residence. If you live in a state that does not observe daylight saving time, such as Arizona, the installer will not make this adjustment.
If you have a cellular unit installed in your panel, the time and date will automatically set through the cellular radio. However, if you do have to set the date and time manually, it is an easy process to execute. There are just a few steps you’ll need to take to complete the task, which are detailed in the video.
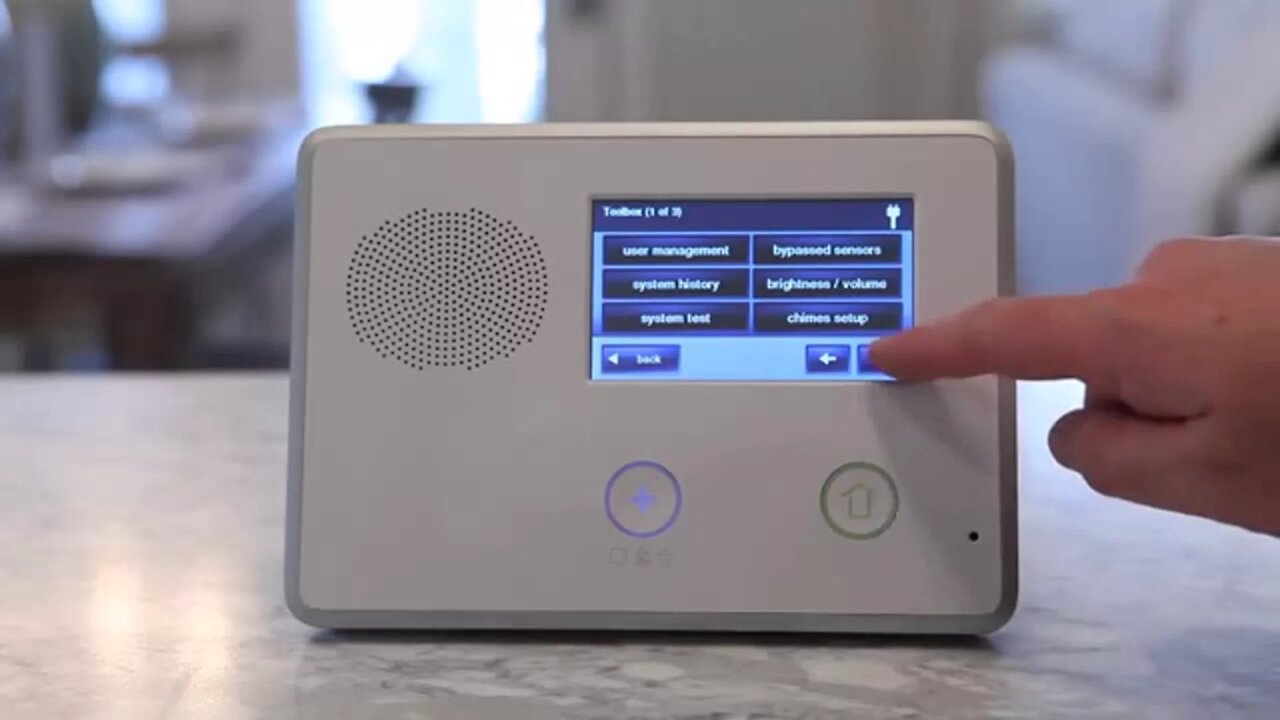
The first thing you will do is press the security button from the control panel screen. You’ll then select the menu button, and then the toolbox button. You’ll then be prompted to enter your current master code to enter the system.
After the code is entered, you’ll select “set date” or “set time” from the toolbox menu. If you select "set date," you will see a display with the month by name and the day and year by number. Up and down arrows will surround the data. If you select "set time," you will see numbers for the time and a section to designate AM or PM. Again, there will be up and down arrows on either side of the data.
You will then use the up and down arrows to set the current date or time, depending on what you are setting. Press the OK button once you have reached the desired date or time. The video provides a good visual aid as to how this process looks.
You will then see a confirmation screen displaying the date and the time that you entered. If you approve of the information, you will press the OK button. Your time or date will be ready to go.
-
 4:37
4:37
Alarm Grid Home Security DIY Videos
2 years agoQolsys IQ Panel 4: Change the Master Code
34 -
 1:52
1:52
xFrShizzLeX
4 years agoSetting Time, Date, and Day - 1969 Bulova (Clipper Sea King)
130 -
 2:47
2:47
BullbusterDotNet
3 years agoSetting Up A Drift For Night Time Swordfishing
66 -
 0:44
0:44
plt2122
3 years agoSetting a charge in silo
46 -
 0:32
0:32
TheLawnGuy28546
3 years ago $0.01 earnedFull moon rising time lapse as the sun is setting
61 -
 0:09
0:09
Hornseywood Film Archive
3 years agodisco club setting
37 -
 0:41
0:41
Dbruff
3 years agoSetting up Christmas!
63 -
 LIVE
LIVE
Laura Loomer
48 minutes agoEP152: Texas Man Arrested For Threatening To Kill Laura Loomer
253 watching -
 LIVE
LIVE
Barry Cunningham
1 hour agoJOIN US FOR MOVIE NIGHT! TONIGHT WE FEATURE THE MOVIE RFK LEGACY!
3,149 watching -
 LIVE
LIVE
Sarah Westall
2 hours agoHow Bitcoin was Hijacked, Palantir is a Deep State Upgrade & more w/ Aaron Day
125 watching