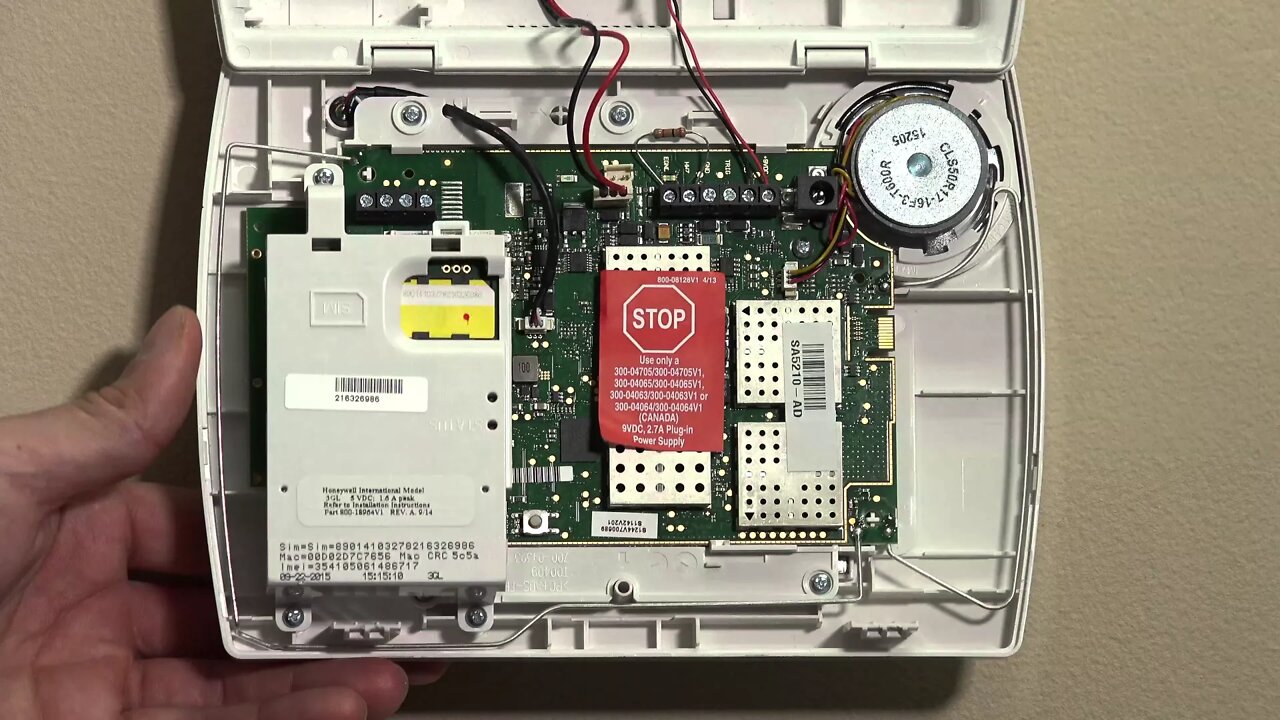
Honeywell 3GL: Installation to L5210
In this video tutorial we will show you how to install the Honeywell 3GL cellular device card into the L5210 control panel.
Honeywell 3GL: http://alrm.gd/honeywell-3gl
Honeywell L5210: http://alrm.gd/honeywell-l5210
Get Monitored: http://alrm.gd/get-monitored
The Honeywell 3GL cellular communication device is an AT&T enabled device to allow for cellular communications from your panel to the central station. Each device will come with a SIM card. You will need to ensure you use this SIM card for the device and not one you may previously have.
Each SIM card comes with 3 months activation. As the video will tell you, you can enroll in Cellular monitoring through the website and have a no-contract service through the company.
Our video will show you how to install the Honeywell 3GL cellular device card in to the L5100 control panel. Follow along to learn how you can install the card to have a cellular enabled home.
To access the device install slot on the control board, as the video tutorial will show you, there are two tabs on the top of the control panel. Pressing these tabs carefully with a flat head screwdriver will allow the unit to be opened up. Pull the front panel away from the back plate and it will swing down exposing the inside.
The first item is to disconnect the power supply to the unit. Follow along with the video as we show you where the battery pack connects to the control board. Remove the clip from the control board to disconnect the battery power supply. The next step is to remove AC power.
As we discuss in the video, if you have used the LT cable for power you can unplug the LT connector. However, if like in our video, you have the AC power hardwired into the board, you simply need to remove the converter from the AC outlet.
We recommend that if you are also installing a Z-Wave card that you install this first, as it sits under the 3GL device. Doing this will save you the hassle of having to remove and reinstall the 3GL device later.
Installing the 3GL is pretty straight forward. Follow the video to see how to line up the device with the control board. Firmly press the 3GL cellular device to the control board ensuring the pins match up and everything seats correctly.
The device needs to be securely mounted to the control panel. Use the 3 screw holes to attach the screws included with the device to the control board. Do not over tighten, and be sure the multi-pin connectors is seated properly before tightening the screws.
Reattach the battery terminal to the control board as shown in our video and plug the transformer back into the AC outlet.
Follow the video to learn about issues with the pins on the 3GL unit to ensure proper seating.
Close the front plate as the system reboots and your 3GL device is initialized. You can view our other videos to learn how to utilize the cellular service or for any other Honeywell L5210 issues.
-
 3:31
3:31
Alarm Grid Home Security DIY Videos
1 year ago $0.01 earnedWireless Repeater: Use With Life Safety Devices
28 -
 12:37
12:37
jrgreenboylawns
3 years ago $3.78 earnedDust Blocker Installation
16K -
 10:45
10:45
Projects Around with Dave and Ray
3 years agoWelcome Light Installation
18 -
 0:10
0:10
Andrés Núñez Leites
3 years agoFreeBSD ports installation
29 -
 1:51
1:51
Ramble On
3 years agoFloor Joist Installation
6 -
 LIVE
LIVE
Barry Cunningham
2 hours agoTRUMP WORLD END OF THE DAY NEWS AND SPECIAL GUEST JOHN AMANCHUCKWU!
6,832 watching -
 1:49:53
Glenn Greenwald
5 hours agoDOGE: Promises vs. Reality; Ukraine's Drone Attacks on Russian Air Bases; Gaza Ceasefire Deal Developments | SYSTEM UPDATE #463
52.6K24 -
 DVR
DVR
RiftTV/Slightly Offensive
3 hours agoZelensky Declares WAR on RUSSIA.. Trump FUMING Over Surprise ATTACK | The Rift | Guest: Sarah Stock
12.9K23 -
 LIVE
LIVE
PudgeTV
5 hours agoMod Mondays Special Ep | Gaming on Rumble Ambassadors | The Rumble Takeover
358 watching -
 DVR
DVR
Fragniac
2 hours ago🔴THE FINAL STREAM ...💥 ─╦ ╤ (•_-) - CLIP EVERYTHING❗🎬📽 🎞
1141