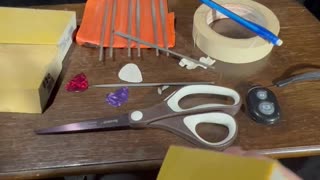
Guitar Shop - Making and Fitting a tapered nut shim o
In this video, we micro-adjust a tapered nut shim, by sliding it back and forth in the nut slot, and then cutting off the excess from both ends.
In an earlier video, we made a precision wood sanding block, for making these precision wood shims.
The reason i call these precision, is not because the wood shim itself is sanded down to high precision,
but because the nature of the taper shape makes it infinitely adjustable,
so you could, for example, do a precision adjustment by lowering the action until you start getting fret buzz, and then raise the action until fret buzz goes away, which isn’t really an adjustment you can do (and verify) any other way.
For this particular job, i had to do the nut shim adjustment 3 times before i was satisfied with the string action,
But this was no big deal, because making the nut over-long, and making these micro-adjustments, was part of the job plan.
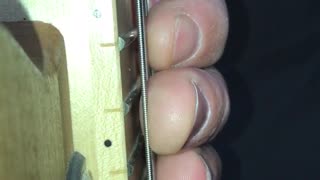
One thing to watch out for are, when the shim is in the nut slot, and you are tightening the strings, its easy to hit the delicate, fragile ends of the shims and break them off.
Also, be sure not to push or pull too hard on the shim, or you might break it.
1) make a tapered shim thats over-long on both ends. (Longer than the nut)
2) make sure one end of shim is slightly over-thick, and the other end of the shim is slightly under-thick, with a smooth, even taper from one end to the other
3) dry fit the nut shim. Bring the guitar up to tune, (or very close to it, if the nut slides to the bass side) so that you can verify the nut action, and check for fret buzz, under the full load tension of the guitar, as normally tuned
4) keep micro-adjusting the nut back and/or forth, until you find the best action and least fret buzz
5) verify, verify verify. check every fret for fret buzz. check every string for action, especially at the nut end of the string.
6) once you are sure you have the adjustment as good as you can get it, mark both ends of the shim, and cut off excess length. Sand smooth.
7) use wood glue on a toothpick to glue shim and nut
8) if you use the strings as a clamp, be very careful to have the string tension exactly the same on the bass and treble sides of the nut.
When the glue is wet, its acts like lube, and makes it so the nut is slippery in the nut slot. This can become a problem, if you glue your nut down, and then it slips while its drying, and then drys out-of-place.
How much tension can make a difference? If you turn the low E string tuner just enough to make the string move the distance of just ONE string winding, it can be enough to make the nut slide sideways.
To prevent this, i used just the two outside E strings, so that i could more accurately control and balance the bass-treble side string tension.
Once you think you have the string tension balanced, verify by trying to gently nudge the nut and see if it wants to move either way.
Even after you think you have it clamped good, keep checking, and verifying that nothing has moved, for about 30 minutes, or enough time for glue to dry.
-
 15:41
15:41
Beginner Guitar
1 year agoMaking a custom guitar pick (3 of 3)
161 -
 6:35
6:35
SeaBix
3 years agoWhy Are Guitar Necks Tapered?
10 -
 0:59
0:59
Cvin52
3 years agoMaking some noise with my guitar
932 -
 6:01
6:01
Beginner Guitar
3 years ago$12 Guitar Needs $8 Neck Shim
214 -
 1:34
1:34
uphere420
3 years agoA Guitar Bowl Lunch
471 -
 3:56
3:56
RockinB23
3 years agoMartin D-28 Custom Shop Wide Body Acoustic Guitar
57 -
 3:48
3:48
Daniel Gitano Cox
3 years agoShredding Guitar
1482 -
 0:06
0:06
monetlisa
3 years agomaking bread
512 -
 30:01
30:01
TechnoFog
3 years ago $0.60 earnedSmooth Jazz Guitar | Coffee Shop Ambience
1.19K9 -
 0:01
0:01
geniebus
3 years agothe guitar
381