How to Automate Review Requests with Quickbooks
Easily add customers to getmoreonlinereviews.com by connecting your Quickbooks online account.
You customer contacts will be imported as well as new customers as you add them. Never miss sending a review request again!
1) Sign into your getmoreonlinereviews.com account. Click the “Integrations” tab on the left sidebar.
2) Select “Connect” under Quickbooks Online.
3) Quickbooks authentication window will open.
Click on “New authentication”.
Dashboard Integrations - Quickbooks Authentication
4) Create a New authentication window will open.
Enter your Company and click “Create”.
5) A new window will open with Intuit(Quickbooks) Sign In. Enter your Quickbooks account login credentials and click “Sign In”.
6) Once you’re signed in, you see a confirmation success message. Click “Finish” to complete the process and import your customer contacts.
7) You will return to the Integrations page showing a blue border around Quickbooks to indicate the integration is active. You can Edit the integration list or remove the integration as you wish.
8) Click Review Requests on left navigation menu and the Recipients on the fly-out menu. You will see your Recipients - In-Queue tab. Small list import within minutes. Large list may take a while.
9) You can toggle the Auto-activate recipients daily and set the daily limits to automate the request process. You can also optionally manually toggle the Activate next to the recipient to Unsubscribe or Delete the individual recipient.
-
 1:51
1:51
getmoreonlinereviews.com
1 month agoAutomate Review Requests with Constant Contact
44 -
 1:14
1:14
getmoreonlinereviews.com
1 month agoHow To Get More Online Reviews by Automating Review Requests Using HubSpot
2 -
 0:25
0:25
amarawilliam
1 year agoQuickBooks scan manager
18 -
 15:43
15:43
Real Leads Finder Pro For Real Estate Professionals
1 year agoAutomating Customer Review Requests
1 -
 3:05:27
PabloMihai
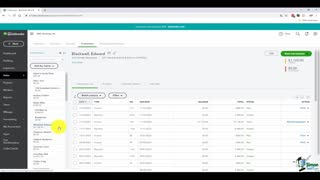
3 years ago $0.01 earnedQuickBooks Online Tutorial
116 -
 1:18
1:18
MedBedSpaUSA
1 year agoMore Customers, More Reviews, You are In Control with Automation
9 -
 6:17
6:17
406 Bookkeeping
7 months agoImporting Subaccounts in QuickBooks Online in 2023
491 -
 13:29
13:29
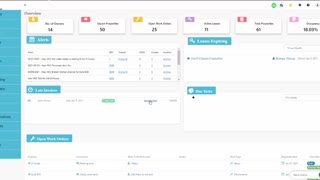
PopertyZar
1 year agoPropertyZar integration with QuickBooks
21 -
 1:50
1:50
Advanced Certified QuickBooks Expert
1 year agoReports in QuickBooks Subscription Levels
63 -
 3:07
3:07
Enoch Garcia
11 months agoHow to Send Receipt Showing Open Credit in Quickbooks Online
52