Installing A Mini Split - Complete Cassette Head
Phil's installing a 3 headed mini split air conditioner for a customer. Here they are completely installing one of the cassette heads.
Pioneer Inverter Ultra High Efficiency Heat Pump 3 head mini split.
⏱️⏱️Chapters⏱️⏱️
00:00 Intro
00:12 Installing a 3 headed mini-split
00:25 One of the heads will be going through a double ceiling
00:45 Took a drill and bit and drilled out the corners where we need to cut
01:05 Went upstairs to mark the plywood
01:45 Made the cut marks
02:15 Going to cut the drywall
02:40 Back after pulling the drywall out
02:50 Scored the drywall with razor knife and cut with an oscillating saw
03:08 Put a paddle bit wider that the saw blade and drill the corners
04:00 Something you may run into when measuring
04:15 The jog in the hole is for the freon lines
04:35 Before cutting, make sure there's no electrical above you
04:45 They ran into that with one of the heads
04:55 The instructions are for offices, not good for putting in a house
05:13 This job has several complications. They have to adjust to.
03:20 Cutting the plywood
06:10 Be careful of falling debris
06:25 Need to move insulation back... The heat is flooding into the room
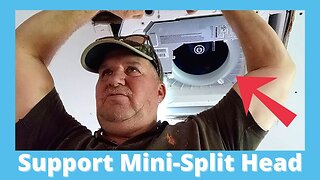
06:50 Put boards to support the area
07:20 The area for your freon lines you'll have to support too
08:00 Pattern for the shape of the head
08:25 The pattern shows a gap, you're not going to have it when it comes to rafters
08:45 They are doing the second head
08:55 Where the control wires go
09:50 Installation manual, pretty specific for acoustical ceiling
10:05 He's showing you how to put it into a home
10:20 The supports are in the blue package
10:50 The drain and freon lines for the head
11:05 Where the lines will be pointing
11:30 Electrical will come in there. You're using a 5/8 wrench
12:00 Installing the support bars
14:25 You have to keep an eye on the support to make sure it's facing where you need it to
15:00 2 supports are done
15:45 Want to be careful when rolling the head over
16:10 Leave enough room on the bottom to adjust it if you have to
16:50 The kit has anchors for concrete
17:30 You could use the anchors if it was inside a wall, but probably won't need them
18:00 Cut a piece of wood to keep the head 7/8 above the ceiling
18:20 Using 1/4" roofing screws
18:52 Not really a one person job trying to get the head up there
19:10 Woops, cut the area wrong
19:20 Need to cut the other corner out
19:45 Had to move the freon lines and cut another hole
20:00 You can't have the freon lines going out, may have to adjust
21:00 Using roofing screws to fasten it
21:45 The fun of working with someone you can't see
23:00 Only thing stays same is everything changes
23:10 Heavy or awkward?
24:50 The small piece of board is a measuring device
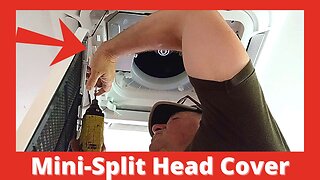
26:10 The box for the cassette head cover
26:50 Little tiny package of screws in the box
27:10 The cover doesn't go on just any old way
27:35 The wires have to go to a specific space
27:45 Where the wires have to go
28:25 To put the screws in you have to take one of the covers off
29:55 Tight fit
🙏 Subscribe, 👍, it helps a lot!!
➤❓/ 💬: ask@straightarrowrepair.com
➤ Follow https://straightarrowrepair.com/pipf
➤➤I get a little for the channel-no charge for you if you use the links:
➤➤Shop Amazon https://amzn.to/3CxD1T4
➤➤Tool lists & recommended products🧰 https://straightarrowrepair.com/0lvf
➤➤Services We use
➤➤MORNINGFA·ME https://morningfa.me/invite/StraightArrowRepair
➤➤A2 Hosting http://www.a2hosting.com/refer/140244
➤➤Tubebuddy https://www.tubebuddy.com/StraightArrowRepair
➤➤Apsumo http://fbuy.me/v/philbridges
➤➤VidIQ: https://vidiq.com/straightarrowrepair
#minisplit #ACInstall #cuttingceiling
-
 4:49
4:49
StraightArrowRepair
11 months agoInstalling A Mini Split - Cover for Cassette Head
43 -
 7:43
7:43
StraightArrowRepair
11 months agoInstalling A Mini Split - Installing One Head
85 -
 6:13
6:13
Triple T Ranch & Sawmill
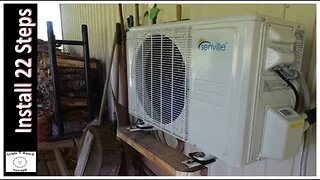
1 year ago22 Steps Installing Mini Split
45 -
 30:40
30:40
SchoolReports
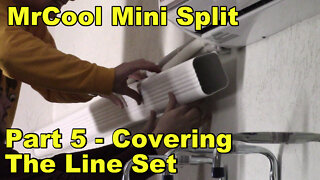
2 years ago $0.01 earnedInstalling our MrCool Mini Split 2400 BTU - Part 5 - Testing & Covering the Line Set
57 -
 28:33
28:33
SchoolReports
2 years agoInstalling our MrCool Mini Split 24K BTU - Part 2, Installing the outdoor unit
59 -
 2:12:02
SchoolReports
2 years ago $0.01 earnedMr Cool Mini-Split Heat Pump, Full Installation
124 -
 32:06
32:06
SchoolReports
2 years ago $0.02 earnedInstalling our MrCool Mini Split 2400 BTU - Part 4 - Connecting the line set
58 -
 11:06
11:06
SeidelRanch
3 years agoInstalling the Best Trimmer Head Ever | PivoTrim Replacement Head
2751 -
 12:30
12:30
taddydigest
1 year agoHow to install a mini split system?
14 -
 22:18
22:18
Del Hollow Productions
1 year agoS13E14 - Part 3 – Mini Split System Install – Ask Questions Before You Buy
9