
Featured

Featured
Jumbo Berry Special Recipe Sousou no Frieren (葬送のフリーレン) Beyond Journey's End
In Sousou no Frieren (葬送のフリーレン), AKA Frieren: Beyond Journey’s End, we see Stark visit a restaurant for the Jumbo Berry Special (ジャンボベリースペシャル) he had previously eaten with his master Eisen the dwarf warrior, who was in Frieren's previous party, which is a core memory for him. Unfortunately the "Jumbo" Berry Special is too small for him. In this video you'll learn how to make the Jumbo Berry Special yourself without needing to touch the stove so any age can make it, from young to thousands of year old elf!
Other Recipe's
1 KG Warrior Honoring Hamburger Steak https://youtu.be/UZb7PtZOjp4
Hope you enjoyed the video! Please subscribe & like if you haven't already. Every new subscriber makes us happy to see & encourages us to make more videos for you to enjoy. Thank you.
Ingredients:
1 lb. strawberries
2 to 3 tbsp. sugar
2 cups heavy cream
14 oz. condensed milk
Pinch of salt
Red food coloring
Blueberries
Raspberries
Wafer cookies
(Links to get ingredients below recipe)
Recipe:
1. Remove green leaves/calyx from 1 1lb. of strawberries then put them in a bowl. Note, you can use frozen strawberries but you'll need defrost the strawberries then drain them of their liquid.
2. Cut strawberries into halves or quarters depending on how big they are.
3. Try a piece of strawberry & if sweet add 2 tbsp. sugar or 3 if a bit sour
4. Mix strawberries & sugar
5. Cover bowl then put bowl in the fridge overnight for the strawberries to macerate
6. Pour macerated strawberries & liquid into a gallon size Ziploc bag. Take as much air out as you can from Ziploc bag by pressing down on open space while holding top of the bag up then securely close it.
7. Fold top of Ziploc bag over an inch then hold it in that position with a clip
8. Smash strawberries in bag
9. Put a fine mesh strainer on top of a bowl then pour smashed strawberries on it so the liquid goes into the bowl. Leave it on the side to strain by itself.
10. In a large bowl, chilled in the fridge first, add 2 cups heavy cream
11. Add 14 oz. condensed milk
12. Add pinch of salt
13. Add 2 to 3 drops of red food coloring to get pinkish color
14. Whisk everything together. Whisk mixture until it gets thick (manual) or stiff peaks (electric mixer). Start slow with electric mixers then faster when mix is thicker. Use the back of a spoon to see if mixture stays stuck on it for thickness.
15. Add drained strawberries into ice cream mixture. Put strawberry sugar liquid into fridge for later. Use a spatula to slowly mix in the strawberries.
16. Put ice cream mixture inside a container, preferably a previously chilled in the fridge metal container like a loaf pan
17. Hit container against a table to help settle the inside
18. Tightly cover top of container with saran wrap then put in the fridge for 2 hours
19. After you chill it run a fork through it a couple times to break up any ice crystals which might have formed, wrap top again, then put it in the freezer
20. For the first 3 hours every 30 minutes take it out of freezer, running the fork through it, wrap up, then put in the freezer again to prevent ice crystals from forming. After 3 hours you can leave it in freezer overnight.
21. Before serving place raspberries on rim of your serving dish. Wedge top of the raspberry into the rim of entire bowl.
22. Roll a whole strawberry around in strawberry sugar liquid to give it a nice sheen
23. Take ice cream out of freezer then scoop it out & put into bowl
24. Garnish 1 side of ice cream with a few blueberries
25. A little behind the blueberries dig a small rectangular hole into ice cream & place in hole 2 pieces of wafer cookies in a "V" shape
26. Put a couple spoonful of strawberry sugar liquid on top of ice cream
27. Put shiny strawberry on top
Follow mangaka
Manga artist https://twitter.com/abetsukasa
*Support the mangaka by buying the official Frieren: Beyond Journey’s End manga in English https://amzn.to/47siBvh
Ingredients
Strawberries https://amzn.to/4cxzUxZ
Sugar https://amzn.to/3EhaZxZ
Heavy cream https://amzn.to/3x6r6yT
Condensed milk https://amzn.to/43yvum4
Salt https://amzn.to/3KZGTlf
Red food coloring https://amzn.to/3TpJyKa
Blueberries https://amzn.to/3TvzHCz
Raspberries https://amzn.to/3INO3t4
Wafer cookies https://amzn.to/3PBEelL
Filming Equipment
Camera https://amzn.to/3KZph9q
Camera Stand https://amzn.to/3gfauch
Intro & outro music by K ☰ P I ꓘ https://soundcloud.com/kepik
Liked the video? Help us make more by buying us a coffee. Thank you https://ko-fi.com/kanda
*Some of the links above are affiliate links. We may receive a small commission with no extra cost to you when you click on the link(s). When you purchase an item(s) via the link it will not affect the price you pay. All earnings go back into improving the content on our channel. This is a way you can support our content creation/channel without spending more money than you usually would. Thank you for choosing to click on the link(s).
#sousounofrieren #frierenbeyondjourneysend #frieren
202
views
1
comment
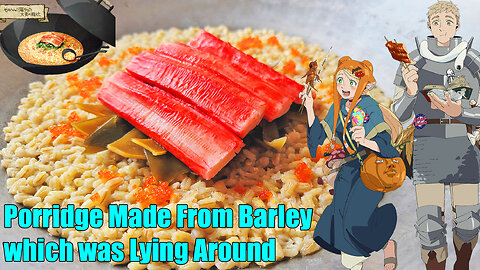
Dungeon Meshi Recipe Porridge Made from Barley which was Lying Around
In Dungeon Meshi (ダンジョン飯), AKA Delicious in Dungeon, Laios, Marcille, Chilchuck, and Senshi find another party wiped out in the lake level of the dungeon. While moving the wiped out party to the side Laios & Chilchuck find the parties supply of barley floating on the water. They decide to use the barley to make a delicious meal out of it along with monster ingredients they had gathered in the dungeon which we will show you how to make. Even Marcille who is normally hesitant to eat food made from dungeon ingredients eats it without hesitation and says it's delicious.
Hope you enjoyed the video! Please subscribe & like if you haven't already. Every new subscriber makes us happy to see & encourages us to make more videos for you to enjoy. Thank you.
Ingredients:
200 grams pearl barley
1,000 milliliters water
1 sheet dried kombu (waterweed)
4 pieces surimi (mimic meat)
Tobiko (fish-men eggs)
Salt
(Links to get ingredients below recipe)
Recipe:
1. Cut about 1 inch into sides of 1 sheet of dried kombu (waterweed) then place it in a wok/medium sized pot
2. Add 1,000 milliliters water into pot & leave kombu to soak in water for at least 3 hours to overnight to bring out the umami
3. After soaking is done put pot on stovetop then turn it on to medium heat
4. Before water boils take kombu out of water then put aside for later, dashi is made
5. Turn heat up to high to boil dashi. While boiling take a mesh skimmer & remove scum which floats to the top of water.
6. When dashi is boiling add 200 grams of pearl barley to pot then reduce heat to medium low
7. Add salt to taste; added about 1/2 a tablespoon in video
8. Stir pearl barley around to let salt mix in dashi
9. Cover pot with a lid & let barley simmer until barley absorbs most of the dashi, at least around 30 minutes
10. While waiting for barley to cook cut the kombu into the shape of waterweed with scissors. For decorative purposes leave it as is but as you're going to eat it cut it into bite sized pieces.
11. Pick up surimi sticks (mimic meat) & lightly press it between your pointer fingers & thumbs to crack the bottom a bit so it's easier to break apart later when serving it
12. Get a spoonful of tobiko (fish-men eggs) ready on the side
13. Depending on how much liquid you want with your barley porridge either cook it longer or around 30 minutes then turn off heat when done
14. Put kombu, surimi, and tobiko on top of barley to finish.
You've now made a signature Dungeon Meshi dish, Porridge Made From Barley which was Lying Around.
*Support the mangaka by buying the official Dungeon Meshi (Delicious in Dungeon) manga in English https://amzn.to/4aPAdm1
Ingredients
Pearl Barley https://amzn.to/49xunEH
Dried Kombu (waterweed) https://amzn.to/4cQJfB4
Surimi (mimic) https://amzn.to/4cKIGbQ
Crab legs (mimic) https://amzn.to/3PXywuQ
Salt https://amzn.to/3KZGTlf
Filming Equipment
Camera https://amzn.to/3KZph9q
Camera Stand https://amzn.to/3gfauch
Intro & outro music by K ☰ P I ꓘ https://soundcloud.com/kepik
Angevin - Thatched Villagers by Kevin MacLeod is licensed under a Creative Commons Attribution 4.0 license. https://creativecommons.org/licenses/by/4.0/
Fiddles McGinty by Kevin MacLeod is licensed under a Creative Commons Attribution 4.0 license. https://creativecommons.org/licenses/by/4.0/
Angevin 120 loop by Kevin MacLeod is licensed under a Creative Commons Attribution 4.0 license. https://creativecommons.org/licenses/by/4.0/
Liked the video? Help us make more by buying us a coffee. Thank you https://ko-fi.com/kanda
*Some of the links above are affiliate links. We may receive a small commission with no extra cost to you when you click on the link(s). When you purchase an item(s) via the link it will not affect the price you pay. All earnings go back into improving the content on our channel. This is a way you can support our content creation/channel without spending more money than you usually would. Thank you for choosing to click on the link(s).
#dungeonmeshi #deliciousindungeon #animecooking
45
views
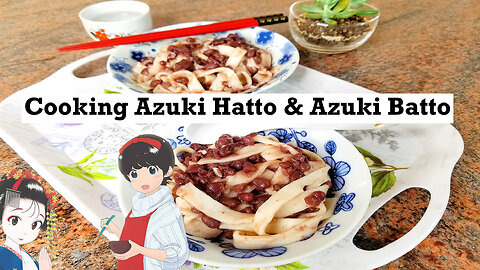
The Makanai: Cooking for the Maiko House Cooking Azuki Hatto and Azuki Batto
Having a gathering? Want a sweet treat? Cook azuki hatto!! Put it in the fridge & make the azuki hatto into azuki batto. It's a simple dish consisting of simple ingredients, cooked azuki beans & kishimen noodles. It's popular to eat during gatherings in the Tōhoku region of Japan, including Aomori prefecture. Watch the live action version on Netflix: The Makanai: Cooking for the Maiko House.
Hope you enjoyed the video! Please subscribe if you haven't already. Every new subscriber makes us happy to see & encourages us to make more videos for you to enjoy. Thank you for subscribing.
Aomori is where Chiyo and Suu-chan from the manga Maiko-san Chi no Makanai-san (Kiyo in Kyoto: From the Maiko House) (舞妓さんちのまかないさん) grew up. It's created by the mangaka Aiko Koyama. Chiyo cooked the azuki hatto for the maiko house in Kyoto where she works for all the hungry maiko's in training. Suu-chan, Chiyo's best friend, works as a maiko in the same house but is staying with her geiko aka Kyoto geisha "older sister" to practice for a major event.
As Chiyo & Suu-chan are childhood friends, Chiyo knows Suu-chan is a hard worker & will work hard to strive for perfection. Chiyo remembers a time when they were younger & Suu-chan was still working hard in the fields of Aomori while everyone else who was also working in the fields had finished & gathered to eat, including azuki hatto. By the time Suu-chan returned her portion had been put in the fridge and chilled to become azuki hatto. Suu-chan prefers it cold as it's a reminder & reward for her hard work.
Back in the present time Chiyo left Suu-chan's portion of the azuki hatto in the maiko house fridge for her to eat as azuki batto when she returned from practicing.
Ingredients:
1 cup of raw azuki beans (210 grams)
1 packet of chow fun noodles (you can replace it with kishimen noodles like the manga if you can find it available)
3/4 - 1 cup of sugar, depending on how sweet you want your azuki beans to be
1/2 teaspoon of salt
12 cups of water
(Links to get the ingredients are below the recipe)
Recipe:
1. Put the azuki beans in a washing bowl
2. Rinse the azuki beans
3. Drain the water from the bowl
4. Put 4 cups of water in a pot to boil
5. Put the azuki beans in the pot with water
6. Boil the water in the pot. If you see any beans floating to the top of the water while the water is boiling remove it as the bean is not good to eat
7. After the water has boiled, drain the water from the pot but leave the azuki beans in the pot
8. Refill the pot again with 4 cups of waters
9. Boil the water again
10. When the water has boiled, lower the temperature to medium low & let it simmer for 1 to 1.5 hours. Remove any scum you see. If the water level goes below the top of the beans refill the pot with enough water to cover the beans
11. Test whether the beans are done cooking by picking one up & squishing it between your fingers. If it's easy to squish then the beans are done cooking
12. Turn off stove top
13. Add 1/4 of the sugar to the azuki beans & mix. Repeat this step until you run out of sugar. Mix until the sugar has dissolved
14. Add the salt to the azuki beans & mix. Leave the beans off to the side after you're done as they are done cooking
15. Put enough water in a new pot to cook the chow fun noodles
16. Boil the water
17. Put the chow fun noodles in the boiling water. Spread the noodles to allow for even cooking
18. Drain the chow fun noodles in a strainer
19. Rinse the chow fun noodles under cold water to stop the cooking process
20. Add the chow fun noodles to the azuki bean pot & mix
Azuki hatto is now finished
To make it to Suu-chan's favorite, azuki batto, there's one more step.
21. Put the azuki hatto into the fridge to chill & it becomes azuki batto
Enjoy your reward
Watched Maiko-san Chi no Makanai-san on NHK WORLD?
https://www3.nhk.or.jp/nhkworld/maikosan/
*Support the mangaka by buying their manga
https://amzn.to/3SmmavM
Azuki beans https://amzn.to/3OeQIxB
Sugar https://amzn.to/3EhaZxZ
Himalayan Salt https://amzn.to/36edPHg
Can't find chow fun noodles on Amazon. You can likely find it at your local Asian grocery store. Here are noodles which are similar https://amzn.to/3visVE3
Filming Equipment
Camera https://amzn.to/3rcJHno
Camera Holder https://amzn.to/3s83qDP
Memory card https://amzn.to/3rgD83h
Battery charger https://amzn.to/3Gbo0Zf
Editing Software https://amzn.to/3oeFoGf
Intro & outro music by K ☰ P I ꓘ https://soundcloud.com/kepik
https://ko-fi.com/kanda
*Some of the links above are affiliate links. We may receive a small commission with no extra cost to you when you click on the link(s). When you purchase an item(s) via the link it will not affect the price you pay. All earnings go back into improving the content on our channel. This is a way you can support our content creation/channel without spending more money than you usually would. Thank you for choosing to click on the link(s).
#JapaneseCooking #MangaCooking #MaikosanChinoMakanaisan
75
views
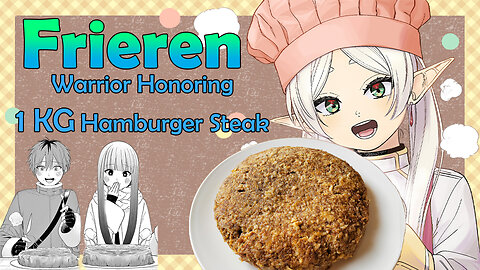
Made & Ate a 1 KG (2.2 lb.) Hamburger Steak from Sousou no Frieren / Frieren: Beyond Journey’s End
In Sousou no Frieren (葬送のフリーレン), AKA Frieren: Beyond Journey’s End, we see Frieren the elf mage make 1 KG Hamburger / Hamburg Steak (ハンバーグステーキ) for her party consisting of Fern the human mage and Stark the human warrior, as it's Stark's birthday (chapter 26 in the manga). Eisen the dwarf warrior, who was in Frieren's previous party, would make these absurdly massive hamburger steak as a way to honor the warriors from his village which were also made for birthday gifts, like when he made them for his party and his student Stark. I'll show you fellow warriors how to make the Warrior Honoring 1 KG Hamburger Steak based on the official Sousou no Frieren anthology manga.
Other Recipe's
Jumbo Berry Special https://youtu.be/WTFr5hlRkaI
Hope you enjoyed the video! Please subscribe & like if you haven't already. Every new subscriber makes us happy to see & encourages us to make more videos for you to enjoy. Thank you.
Ingredients:
1 kilogram (2.2 pounds) beef
200 grams bread crumbs
2 eggs
1 1/2 teaspoons salt
1/2 teaspoon black pepper
2 small onions or 1 large onion
Olive oil or butter as needed
(Links to get ingredients below the recipe)
Recipe:
1. Dice onion(s)
2. Heat frying pan on stovetop at medium heat, add either olive oil or butter into pan, & when hot enough add diced onion to sauté
3. When onions are an amber color take pan off heat & turn off stove. Put the onions aside to cool down.
4. Put 1 kilogram of beef in a large mixing bowl
5. Add 200 grams of bread crumbs to bowl
6. Add 1 1/2 teaspoons of salt
7. Add 1/2 teaspoon of black pepper
8. Add 2 eggs
9. Add sautéed onions
10. Mix everything thoroughly
11. Put mix in a large pan on the stovetop, recommend a 12 inch cast iron pan, & turn heat on to a little above low heat
12. Put thin layer of olive oil or butter in the pan before putting in your beef mixture
13. Compress meat into a big patty shape, including rounding off edges, as much as you can
14. Push divot in center of the patty
15. Leave hamburger steak alone to cook on low heat for 6 minutes
16. Loosen sides of the patty with a spatula then moving the patty onto a large plate
17. While wearing heat resistant oven mitts turn over pan used earlier & cover hamburger steak on plate then flip both together so patty is back in the pan with raw side down
18. Put pan back on stovetop & cook the raw side again for 6 minutes
19. After 6 minutes add about 250 milliliters of water into pan, enough to cover top of hamburger steak
20. Turn heat up to medium then cover the pan with a lid; cook meat for about 15 minutes
21. Check if meat is done by sticking a toothpick in middle & if it comes out clean it's done
22. Transfer hamburger steak to a large plate then enjoy eating your 1 KG Warrior Honoring Hamburger Steak made by Frieren to honor the warriors she, Fern, and Stark are as well as Stark's birthday present.
Follow the mangaka
Manga artist https://twitter.com/abetsukasa
Anthology mangaka for chapter 1 https://twitter.com/inkdaisuki
*Support the mangaka by buying the official Frieren: Beyond Journey’s End manga in English https://amzn.to/47siBvh
Anthology (Japanese): https://www.amazon.co.jp/-/en/%E4%B8%89%E6%B5%A6-%E8%93%AE/dp/4098530996/
Ingredients to buy
Ground beef https://amzn.to/3Gej9c7
Bread crumbs https://amzn.to/47szGF9
Eggs https://amzn.to/3n0UvCf
Salt https://amzn.to/3KZGTlf
Black pepper https://amzn.to/3s6lf6j
Onion https://amzn.to/3y7AsYU
Olive Oil https://amzn.to/3AWcZtv
Butter https://amzn.to/3PeAtQB
Cast iron pan https://amzn.to/47GLG5I
Wooden spoon https://amzn.to/47qP1Gt
Safety goggles https://amzn.to/3GdJkj2
Mixing bowl https://amzn.to/3MUnnJu
Measuring cup https://amzn.to/3RcbBg5
Measuring spoons https://amzn.to/3GeWY5K
Weight scale https://amzn.to/3SNPldU
Filming Equipment
Camera https://amzn.to/3KZph9q
Camera Stand https://amzn.to/3gfauch
Software https://amzn.to/3oeFoGf
Intro & outro music by K ☰ P I ꓘ https://soundcloud.com/kepik
Liked the video? Help us make more by buying us a coffee. Thank you https://ko-fi.com/kanda
*Some of the links above are affiliate links. We may receive a small commission with no extra cost to you when you click on the link(s). When you purchase an item(s) via the link it will not affect the price you pay. All earnings go back into improving the content on our channel. This is a way you can support our content creation/channel without spending more money than you usually would. Thank you for choosing to click on the link(s).
#sousounofrieren #frierenbeyondjourneysend #frieren
87
views

SPY x FAMILY Anya's SORRY Omelet Japanese Recipe
I'll show you how to make Anya's "SORRY" Omurice (omelet rice) from SPY x FAMILY. There aren't many memorable foods in Spy x Family but this was certainly a memorable omurice. The ingredients are simple & it's easy to make too.
This omurice is based on SPY x FAMILY, the comedy & action manga about a family which has a spy, assassin, and a mind reader who each hide their secret identity from each other. I love all the "Sorry" words on the plate which Loid, the spy, put on the special omurice as he wants to have Anya, his esper daughter, apologize to her classmate for punching him in the face a day earlier. To put it in her mind to apologize he followed her to school & put "subliminal messages" like this wherever she goes. The omurice is quite delicious with all the umami from the ketchup.
Hope you enjoyed the video! Please subscribe if you haven't already. Every new subscriber makes us happy to see & encourages us to make more videos for you to enjoy. Thank you for subscribing.
Ingredients for 1 serving of omurice
1 1/2 servings cooked rice
1/3 red bell pepper
1/2 inch zucchini
1/2 a small onion
3 eggs
1 watercress stalk
3 tbsp. milk
1 1/2 tbsp. ketchup for rice
Ketchup to write "Sorry" on plate
1 tsp. soy sauce
3 tbsp. vegetable oil
1/4 tsp. salt
1/8 tsp. black pepper
(Links to get the ingredients below the recipe)
Recipe
1. Cook rice
2. Mince onion. Put on the side for later.
3. Cut zucchini into triangular pieces
4. Cut off 1/3 of bell pepper then cut that piece into smaller pieces. Put on the side for later.
5. Add 1 tbsp. vegetable oil in a large pan
6. Put the pan on stove top then turn heat on to medium
7. When the pan is hot, add vegetables into pan
8. Add salt & black pepper
9. Fry vegetables until soft
10. Add rice into pan after vegetables have become soft
11. Add soy sauce into pan
12. Add 1 1/2 tbsp. of ketchup into pan
13. Slice into rice to break it up
14. Mix contents of pan until all rice grains become slightly red
15. Put rice mix on the side for later
16. Clean pan to use again for omelet
17. Crack 3 eggs into a bowl
18. Add milk into the bowl
19. Beat eggs & milk together
20. Add 2 tbsp. of oil into pan
21. Using a paper towel, spread oil all around pan
22. When finished, put pan on stove top & turn heat on to medium
23. Test if the pan is hot enough by dripping a bit of egg into the pan & if it sizzles then it's ready
24. Add beaten eggs into pan
25. Spread eggs on the bottom of pan
26. When bottom of eggs are cooked but top is still soft, turn off stove top
27. Add rice in center of omelet in a small mountain shape
28. Lift edges of omelet to loosen it off pan
29. Move omelet to edge of pan to help shape it
30. Flip omelet onto a large plate by holding both at an angle then push omelet off pan onto the plate
31. Cover omurice with paper towel to move it to center of plate, shape it more by giving it a round center & pointed edges, & to absorb excess oil from egg
32. Using small squeeze bottle with a small pointed opening filled with ketchup, write "Sorry" on the plate & omurice
33. Add the watercress garnish to finish
Enjoy making Anya's omurice & eating it too!
Watch our other SPY x FAMILY food videos
Yor's stew https://youtu.be/MGkzJKA35zo
Follow the mangaka on Twitter
https://twitter.com/_tatsuyaendo_
The anime
English https://twitter.com/spyfamily_en
Japanese https://twitter.com/spyfamily_anime
*Support the mangaka, buy the manga
English https://amzn.to/36UQJWm
Japanese https://amzn.to/3JrSutc
Ingredients
Rice https://amzn.to/3rgi1Ox
Red bell pepper https://amzn.to/3nubE7w
Zucchini https://amzn.to/3bxQmmB
Onion https://amzn.to/3y7AsYU
Eggs https://amzn.to/3n0UvCf
Watercress https://amzn.to/3I5h7v9
Milk https://amzn.to/3JcDvlt
Ketchup https://amzn.to/3a61N4O
Soy sauce https://amzn.to/36kLWNW
Soy sauce, low sodium https://amzn.to/3Ejvf1J
Vegetable oil https://amzn.to/3IYCrSh
Salt https://amzn.to/3KZGTlf
Black Pepper https://amzn.to/3s6lf6j
Filming Equipment
Camera https://amzn.to/3KZph9q
Camera Stand https://amzn.to/3gfauch
Editing Software https://amzn.to/3oeFoGf
Liked the video? Help us make more by buying us a coffee. Thank you https://ko-fi.com/kanda
Follow us on social media to know when we post a new video & to talk about it with us
https://www.instagram.com/kariandaustin/
https://twitter.com/KariandAustin
https://www.facebook.com/KariandAustin/
Intro & outro music by K ☰ P I ꓘ https://soundcloud.com/kepik
*Some of the links above are affiliate links. We may receive a small commission with no extra cost to you when you click on the link(s). When you purchase an item(s) via the link it will not affect the price you pay. All earnings go back into improving the content on our channel. This is a way you can support our content creation/channel without spending more money than you usually would. Thank you for choosing to click on the link(s).
#spyxfamily #omurice #omeletrice
95
views
Jumbo Berry Special Recipe Sousou no Frieren (葬送のフリーレン) Beyond Journey's End
In Sousou no Frieren (葬送のフリーレン), AKA Frieren: Beyond Journey’s End, we see Stark visit a restaurant for the Jumbo Berry Special (ジャンボベリースペシャル) he had previously eaten with his master Eisen the dwarf warrior, who was in Frieren's previous party, which is a core memory for him. Unfortunately the "Jumbo" Berry Special is too small for him. In this video you'll learn how to make the Jumbo Berry Special yourself without needing to touch the stove so any age can make it, from young to thousands of year old elf!
Other Recipe's
1 KG Warrior Honoring Hamburger Steak https://youtu.be/UZb7PtZOjp4
Hope you enjoyed the video! Please subscribe & like if you haven't already. Every new subscriber makes us happy to see & encourages us to make more videos for you to enjoy. Thank you.
Ingredients:
1 lb. strawberries
2 to 3 tbsp. sugar
2 cups heavy cream
14 oz. condensed milk
Pinch of salt
Red food coloring
Blueberries
Raspberries
Wafer cookies
(Links to get ingredients below recipe)
Recipe:
1. Remove green leaves/calyx from 1 1lb. of strawberries then put them in a bowl. Note, you can use frozen strawberries but you'll need defrost the strawberries then drain them of their liquid.
2. Cut strawberries into halves or quarters depending on how big they are.
3. Try a piece of strawberry & if sweet add 2 tbsp. sugar or 3 if a bit sour
4. Mix strawberries & sugar
5. Cover bowl then put bowl in the fridge overnight for the strawberries to macerate
6. Pour macerated strawberries & liquid into a gallon size Ziploc bag. Take as much air out as you can from Ziploc bag by pressing down on open space while holding top of the bag up then securely close it.
7. Fold top of Ziploc bag over an inch then hold it in that position with a clip
8. Smash strawberries in bag
9. Put a fine mesh strainer on top of a bowl then pour smashed strawberries on it so the liquid goes into the bowl. Leave it on the side to strain by itself.
10. In a large bowl, chilled in the fridge first, add 2 cups heavy cream
11. Add 14 oz. condensed milk
12. Add pinch of salt
13. Add 2 to 3 drops of red food coloring to get pinkish color
14. Whisk everything together. Whisk mixture until it gets thick (manual) or stiff peaks (electric mixer). Start slow with electric mixers then faster when mix is thicker. Use the back of a spoon to see if mixture stays stuck on it for thickness.
15. Add drained strawberries into ice cream mixture. Put strawberry sugar liquid into fridge for later. Use a spatula to slowly mix in the strawberries.
16. Put ice cream mixture inside a container, preferably a previously chilled in the fridge metal container like a loaf pan
17. Hit container against a table to help settle the inside
18. Tightly cover top of container with saran wrap then put in the fridge for 2 hours
19. After you chill it run a fork through it a couple times to break up any ice crystals which might have formed, wrap top again, then put it in the freezer
20. For the first 3 hours every 30 minutes take it out of freezer, running the fork through it, wrap up, then put in the freezer again to prevent ice crystals from forming. After 3 hours you can leave it in freezer overnight.
21. Before serving place raspberries on rim of your serving dish. Wedge top of the raspberry into the rim of entire bowl.
22. Roll a whole strawberry around in strawberry sugar liquid to give it a nice sheen
23. Take ice cream out of freezer then scoop it out & put into bowl
24. Garnish 1 side of ice cream with a few blueberries
25. A little behind the blueberries dig a small rectangular hole into ice cream & place in hole 2 pieces of wafer cookies in a "V" shape
26. Put a couple spoonful of strawberry sugar liquid on top of ice cream
27. Put shiny strawberry on top
Follow mangaka
Manga artist https://twitter.com/abetsukasa
*Support the mangaka by buying the official Frieren: Beyond Journey’s End manga in English https://amzn.to/47siBvh
Ingredients
Strawberries https://amzn.to/4cxzUxZ
Sugar https://amzn.to/3EhaZxZ
Heavy cream https://amzn.to/3x6r6yT
Condensed milk https://amzn.to/43yvum4
Salt https://amzn.to/3KZGTlf
Red food coloring https://amzn.to/3TpJyKa
Blueberries https://amzn.to/3TvzHCz
Raspberries https://amzn.to/3INO3t4
Wafer cookies https://amzn.to/3PBEelL
Filming Equipment
Camera https://amzn.to/3KZph9q
Camera Stand https://amzn.to/3gfauch
Intro & outro music by K ☰ P I ꓘ https://soundcloud.com/kepik
Liked the video? Help us make more by buying us a coffee. Thank you https://ko-fi.com/kanda
*Some of the links above are affiliate links. We may receive a small commission with no extra cost to you when you click on the link(s). When you purchase an item(s) via the link it will not affect the price you pay. All earnings go back into improving the content on our channel. This is a way you can support our content creation/channel without spending more money than you usually would. Thank you for choosing to click on the link(s).
#sousounofrieren #frierenbeyondjourneysend #frieren
202
views
1
comment