

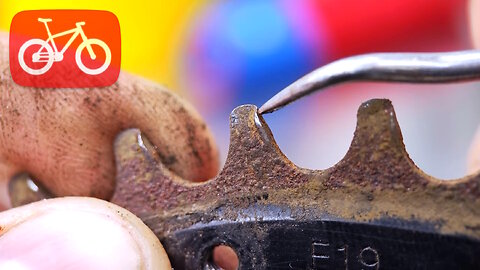
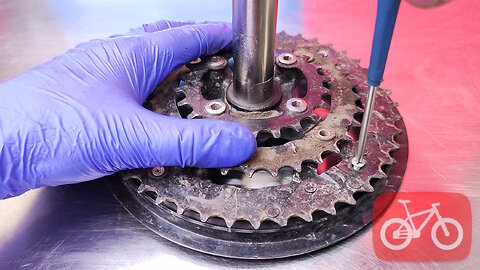
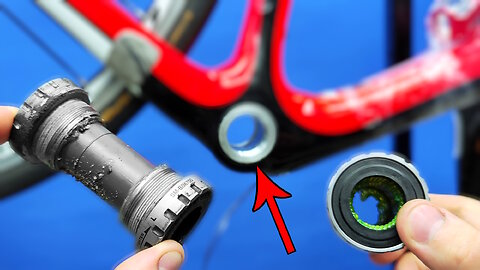
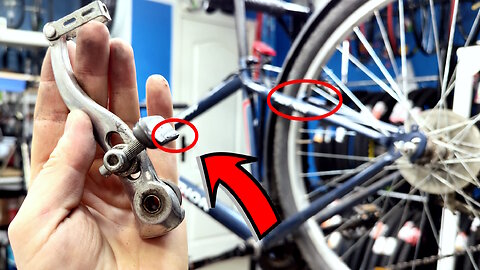
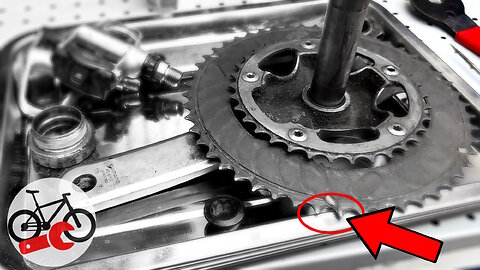
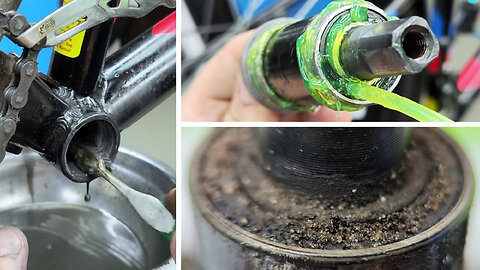
Restoration bicycle cranks. Why does a bicycle chain get stuck ?
How often does it happen to you that the chain on your bicycle gets stuck or jams?
This is due to the wear and tear of the bicycle cranks.
In this video tutorial, I will show you how to restore bike cranks.
After these steps, your chain will no longer bite.
In this video, there will be an example of an electric bicycle, where the load on the drivetrain is much greater than in a regular bicycle.
I'll show you how to remove bicycle chainrings from cranks. We will clean and restore cranks.
Let me remind you that this work was supervised by a quality control representative in a bicycle workshop!)
Enjoy watching.
00:00 Why does a bicycle chain get stuck?
00:19 How to remove the protective shield from bicycle cranks.
00:38 How to remove cranks from an electric bike.
01:24 How to remove bike chainrings.
02:25 That's why bicycle chain jam.
02:59 How to clean the bottom bracket on an electric bike.
03:51 Washing the visor bicycle cranks.
04:56 How to wash bicycle chainrings.
05:37 Burrs on the teeth of bicycle gear sprockets.
05:56 Restoration bicycle cranks.
07:58 How to install bicycle cranks.
09:09 How to install a protective shield on bicycle cranks.
12
views
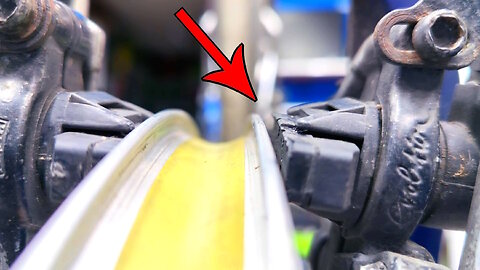
How to adjust the brake on your bicycle. Hydraulic V-Brake
Hello all cyclists!
This release will be unusual, just like the bike that arrived at our bicycle workshop!
What's unique about this bike is its brakes.
Hydraulic V-Brake is a very rare brake.
In my entire life, I have only seen a couple of such bicycles.
But like all bicycles, even rare ones, they all need timely maintenance and adjustment.
In this video I show you how brakes can cause scuff marks on a bicycle tire.
We will change the tire to a new one, remove the extra layer of the block and adjust the hydraulic V-Brake on the bike.
It will be interesting!
Video without verbal content, enriched by technical sounds. Universally comprehensible; follows a DIY video approach.
Cycling enthusiasts will find this video fascinating.
00:00 Bicycle hydraulic v-brake.
00:16 Bicycle wheel broke.
00:31 How can brakes affect a bicycle tire?
00:46 Removing a bicycle wheel.
01:00 How to remove a bicycle tire.
01:32 Bicycle inner tube, sealant does not work.
01:52 How can brakes affect a bicycle tire?
02:12 How green sealant works in a bicycle inner tube.
02:31 Unpacking bicycle inner tube with anti-puncture sealant inside.
02:52 How to install a bicycle inner tube into a tire.
03:19 How does a bicycle hydraulic v-brake work?
04:02 How to fix pads on hydraulic v-brake.
04:50 How to adjust the brake on your bicycle.
05:10 In the bicycle hydraulic v-brake there are a lot of bolts, itвђ™s difficult to adjust).
06:41 How to quickly install a tire on a bicycle wheel.
07:40 How to install a wheel on a bicycle if you have a hydraulic v-brake.
08:20 hydraulic rim brakes done )
35
views
1
comment
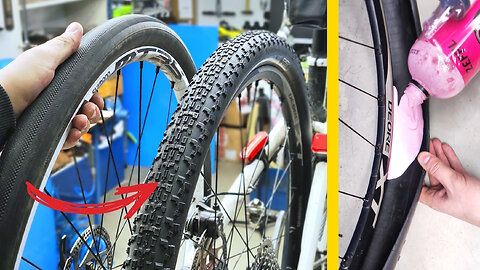
A good winter bicycle tires. How to replace a tubeless bike tires
Hello cyclists. In this educational video lesson, I will show you which tire to install on your gravel bike in order to confidently ride in the snow in winter.
In order for the bicycle wheels to have good traction, you need to install studded tires.
For reliability, we will use special tires to tubeless.
Install special a tubeless wheels on a bike.
We will use Shimano Deore XT wheels.
Video with no spoken words, utilizing only technical noises. Universally relatable; presented as a DIY tutorial.
People who love cycling will be fascinated by this video.
00:00 What tire to use on a bike in winter.
00:39 A good winter bicycle tires.
01:03 How to remove a bicycle wheel.
01:23 How to install center lock brake disc on a bicycle.
02:14 Unpacking new winter bicycle tires.
02:38 How to replace a tubeless bike tires.
03:26 How to fit tubeless mtb tires.
04:29 How to fill tubeless bike tires sealant.
06:35 What needs to be done to ensure that the tubeless bike tire sealant works correctly.
07:15 How to install tubeless wheel on your bicycle.
08:09 Testing a bicycle with a winter tire.
3
views
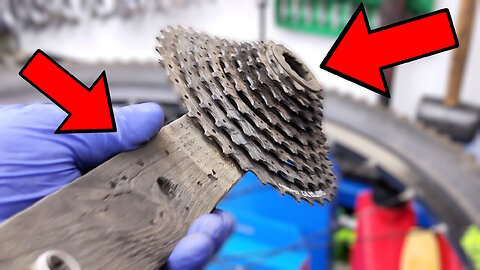
How to clean a bicycle cassette. Bike drivetrain maintenance
Hello. Almost every bicycle that comes into our bicycle repair shop requires cassette cleaning.
In this video I will show you how we clean bicycle cassettes.
Even if the cassette cannot be washed easily, I will show you how to achieve a 100% result.
This video tutorial will consist of dismantling the bike's cassette, surface cleaning, washing, and more rough cleaning.
Enjoy watching.
This video communicates through mechanics, void of spoken language. Universal appeal regardless of linguistic background. Presented as a DIY video.
This video is a must for cycling enthusiasts.
00:00 Washing a bicycle cassette.
00:16 When to clean your bike cassette.
00:49 How to clean the inside of a bicycle cassette.
01:11 How to remove a cassette from a bicycle.
02:11 Secret tool for washing bicycle cassette.
02:45 How to clean a bicycle cassette.
04:15 How to dry a bicycle cassette from water.
04:37 What to do if the bicycle cassette cannot be washed.
Thank you for your comment! 😍
If you liked my videos ❤️,
support the channel financially 💰🙏.
Use the "Membership" / "Sponsor" function on Youtube ✊😘
6
views
How to change chainrings on your MTB bike. Cleaning bicycle cranks. ASMR
Hello fellow cyclists. In this video clip I will continue to teach you how to maintain your bike.
Today you will see how I clean bicycle cranks from the hardened layer of grease and sand.
Formations on the surface of bicycle cranks, it was difficult to clean, but I managed)
To ensure the highest quality cleaning of bicycle cranks, I untwisted the chainrings on the bicycle cranks.
Every detail has to be done separately.
I'll show you all the tools I used to clean these cranks.
Language-agnostic video with technical audio components. International viewing; follows a DIY / ASMR video format.
Cyclists will definitely enjoy watching this video.
00:00 How i cleaned my bike crankset.
00:15 How to remove a bicycle crankset.
00:48 How to remove the external protection of a bicycle crankset.
01:05 How to change the chainrings on your mtb.
03:32 How to clean cranks.
03:46 At the moment i was using a car engine cleaner.
07:23 How to dry bicycle cranks from water.
08:02 How to wash crank bolts.
09:34 How to install chainrings on your crankset.
Thank you for your comment! 😍
if you liked this video,
share this video with your friends ❤️
it will help the development of the channel! 📈
13
views
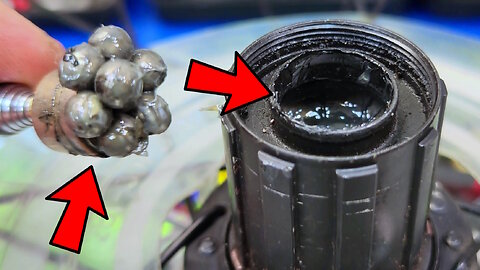
How to Fix a Creaking Bike. Lubrication of the bicycle bottom bracket
Hello! In this saw tutorial I will show you how to fix the annoying creaking of your bike. You will learn how to remove the carriage from the bike. I'll show you how to fix an old bicycle bottom bracket. You will see how all these operations are performed by a bicycle mechanic in the workshop.
00:00 How to fix a creaking bike.
00:15 Extraneous noise in the bottom bracket of your bike.
00:25 How to remove sealed cartridge bottom bracket.
01:35 One of the reasons why a bike creaks - Water inside the bike frame.
02:04 Pressing out the cups of the bicycle bottom bracket.
02:43 How to open a sealed bearing.
03:06 Disassembly of the bicycle bottom bracket.
03:16 Clean Bracket Bottom.
04:28 Lubrication of the bicycle bottom bracket.
04:59 Pressing the cups of the bicycle bottom bracket.
06:45 How to install sealed cartridge bottom bracket
#bicycle #bracketbottom #bikeworkshop
10
views
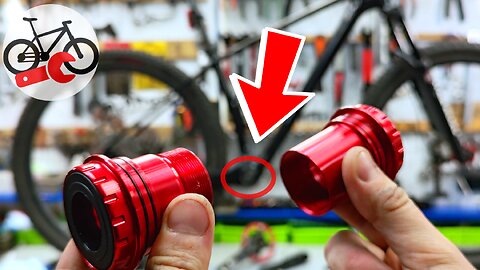
How to Fix Bike Bottom Bracket | Press Fit BB30 ZTTO Ceramic
Hello bike lovers!
In this video we will see: *How to Fix PRESS FIT BB30 Bottom Bracket in your bicycle.*
Get ready to become a bike maintenance pro with our video tutorial! In this in-depth video, we'll cover everything you need to know about keeping your bike in top-notch condition. From addressing bottom bracket backlash to unboxing the Ztto Press Fit BB30SH Red 68-73 Ceramic, we've got you covered!
We kick things off by tackling the issue of bike bottom bracket backlash, understanding its impact on your bike's performance, and demonstrating effective solutions to rectify it.
Next, we dive into the realm of bottom brackets, exploring the Shimano Deore gap and the Ztto Press Fit BB30SH Red 68-73 Ceramic. Join us as we unbox this premium ceramic bottom bracket, uncovering its innovative features that promise enhanced durability and performance.
With your bottom bracket ready, we'll demonstrate how to remove a BB Pressfit, providing essential insights into maintaining the heart of your bike.
Proper lubrication is key to a smooth ride, and we'll teach you the best practices for lubricating the Press Fit BB30 Ceramic, ensuring your bike operates like a dream.
Whether you're a seasoned cyclist or just starting out, our detailed guide has something for everyone. Don't forget to subscribe to our channel for more valuable bike maintenance content and ride like a pro with confidence!
Detailed episodes in this video tutorial:
00:00 Bicycle bottom bracket play
00:35 Bottom bracket shimano deore gap
00:52 Ztto press fit bb30sh red 68-73 ceramic unboxing
01:21 Removal of adjusting cap with tool
01:38 How to remove left crank from bike
02:00 Press fit bottom bracket runout
02:12 How to remove bicycle cranks
02:53 How to clean the crank
03:10 Remove BB pressfit
05:28 Cleaning the frame for a pressfit bottom bracket
05:45 Lubricating bb30 ceramic pressfit bottom bracket
06:05 Installing a pressfit bottom bracket
06:50 Lubricating the crank
07:00 How to install cranks
08:29 Good job!
#fixbike #bottombracket #mountainbikes
10
views
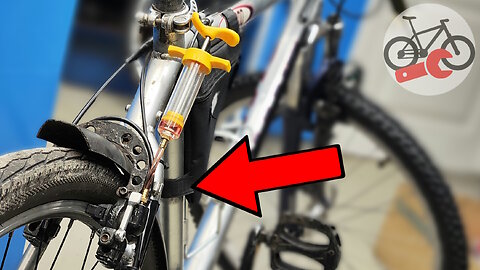
How to change brake fluid for bike hydraulic V-Brake. Magura HS 11 Special
Hello! In this video I will show you the maintenance of a bicycle with very unusual brakes.
The name of the brakes is Magura HS 11 special.
This is a rare example of bicycle brakes.
They are unusual in that they are V-Brake hydraulic brakes.
And with this in mind, I will teach you how to change the oil in Magura brakes.
00:00 How to change brake fluid for bike brake.
00:23 My bike's brakes are gone.
00:39 Bikes bleed kit.
03:11 How to bleed bike hydraulic v-brake.
06:21 What kind of oil is in hydraulic brakes magura hs 11 special.
Language-free video showcasing technical audio. Internationally accessible,
presented in a DIY video style.
If you're a biking enthusiast, you'll love this video.
Leave your queries in the comments below.
If you liked my videos ❤️,
support the channel financially 💰🙏.
Use the "Membership" / "Sponsor" function on Youtube ✊😘
4
views
How to remove and install HollowTech bottom brackets on a road bike
Hello, fellow cyclists! A carbon road bike has arrived at our workshop. It has been ridden extensively without proper maintenance, so many components of the bike need replacement. In this video, I will show you step by step how to replace the bottom bracket of the Hollowtech standard with a new one. This video will be interesting for cyclists and those who want to repair their bike at home. Enjoy watching!
00:00 Bottom bracket hollowtech on a road bike.
00:30 How to remove the hollowtech bottom bracket from your bicycle.
01:57 Bike preparation before installing the bottom bracket.
02:15 Unboxing the hollowtech bottom bracket.
03:08 Comparison of the new and old bottom brackets of the bike.
03:15 How to prepare the bottom bracket for installation on the bicycle.
03:42 Installing the hollowtech bottom bracket.
05:05 How to properly tighten the hollowtech bottom bracket into the bike frame.
05:48 Job done!
🆗🎥🚲
*Write in the comments, what you would like me to do in the new video.*
⚠ ❓ ⚠
*Ask your questions in the comments*
👇👇👇
7
views
Why is my bike squeaking? I rode my bike in the rain.
Hello fellow cyclist! Riding a bicycle in any season and weather condition without proper maintenance can lead to unpleasant consequences. Some components and parts may rust, deteriorate, or produce unpleasant sounds. In this video, In this video, I'll show you a close-up of what happens inside the bike's headset, its parts and bearings after such a ride. I hope this will be interesting and informative for you. Enjoy watching!
We kindly ask you to subscribe, like, and share this video with your friends. It will help the channel grow and improve the quality of future videos.
00:00 Why is my bike squeaking?
00:21 My bicycle creaks.
00:41 Dismounting the front wheel of the bicycle.
00:58 How to remove the bicycle fork.
02:20 Disassembling the bicycle fork.
03:00 Close-ups: how the components of the bike's headset look after rain.
03:58 A new purpose for the old bearing.
🆗🎥🚲
*Write in the comments, what you would like me to do in the new video.*
⚠ ❓ ⚠
*Ask your questions in the comments*
👇👇👇
Repairing a bicycle's hydraulic brake. Brake pads under a microscope
Once again we are going to repair the front brake on our MTB.
This time I noticed that the brake fluid was leaking through the connection of the hydraulic line to the brake caliper.
The bike stopped braking well again.
Poor braking is caused by mineral oil getting on the brake pads.
In this tutorial, I will show you how to replace a bicycle hydraulic brake tip with a new one.
Have fun watching!
This video is a gold mine for cycling enthusiasts.
Language-neutral video featuring technical auditory cues. Designed for international viewership; presented in a DIY video style.
00:00 Repairing a bicycle's hydraulic brake.
00:34 The disc brake caliper is dirty and oily.
00:42 How to remove a bicycle's hydraulic brake.
01:04 Macro shots of the bicycle's brake caliper.
01:37 Removal of the brake pads.
01:53 A close-up of the disc brake pad.
02:25 Cleaning the bicycle's brake caliper.
03:10 Removal of the hydraulic brake line.
03:50 How to shorten the hydraulic line.
04:11 Installing a new olive and connector in the hydraulic brakes of the bike.
04:58 Tighten the fixing screw until it stops.
05:30 Tools for bleeding hydraulic bike brakes.
06:10 How to fully bleed hydraulic bike brakes.
07:17 Bleeding hydraulic bike brakes.
08:48 Remove the funnel and tighten the bleeding screw.
09:26 Degrease the bike's brake caliper br-m355.
09:54 Installing the brake pads into the caliper.
#bikerepair #brakepads #bicycle
11
views
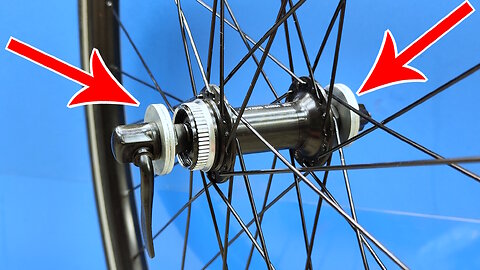
Bicycle maintenance. How to lubricate the bicycle
This video is about bicycle maintenance.
How often do you change the grease in the wheel hubs of your mtb bike?
Cyclists often don't realize that you need to change the grease every 2000 - 3000 km.
It is necessary to disassemble the bicycle wheel hubs in order to detect internal damage on the cone nuts and bulk bearings.
If the bearing is not replaced in time, it can damage the inside of the wheel hub.
Today we will be disassembling a common hub design on bulk bearings.
We will clean and change the oil.
Video with no spoken words, featuring only technical noises. Language barriers are irrelevant; follows a DIY video style.
This video is for people who are passionate about bicycles.
#bicycle #bicyclehub #bikeservice
00:00 Bicycle maintenance.
01:02 Removing the center-lock brake rotor.
01:34 Removing the bicycle cassette.
02:19 Opening the rear bicycle wheel hub.
03:28 Cleaning the hub axle and cone.
04:55 Cleaning the bearing balls.
06:14 Removing the bicycle hub seals.
07:10 Cleaning the inner surfaces of the bicycle hub.
07:44 Securing the cone and nut on the bicycle hub axle.
08:30 Reinserting the bearing balls into the bicycles hub.
09:07 How to lubricate the bicycle.
09:40 Installing the locknut and axle into the bicycles hub.
11:45 Adjusting the bicycle hub.
17
views
1
comment
Bicycle v-brake not working. Repairing bike brakes
Hello! In this video tutorial I will show you a common problem with bicycle brakes.
This bike was brought to our workshop to have the rear brakes repaired.
As practice shows, when repairing old vbrake brakes, there is no point in repairing them, but only replacing them with new ones.
In addition to replacing the brakes on the bike, we will also replace the cable hose and the cable itself.
To get a good result of our work, we will also need to center the rear wheel of the bicycle.
00:00 The brakes on my bike stopped working.
00:20 How to remove the brakes from a bicycle.
01:20 Unpacking new brakes for a vbrake bicycle.
01:57 Installing a vbrake on a bicycle.
02:37 Adjusting bicycle brake pads vbrake.
03:26 How to change a brake cable on a bicycle.
07:14 Bicycle rear brake adjustment.
09:39 How to quickly align the rear wheel of a bicycle.
Subscribe to the channel and ask your questions 👍
I'm happy to answer my subscribers ❤
3
views
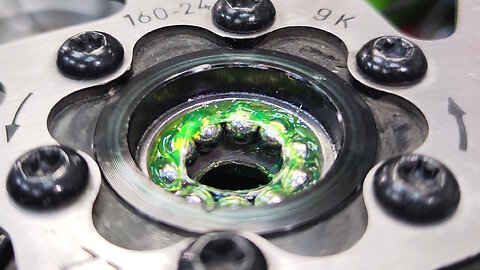
Bicycle maintenance. How to service a bike freehub body
In this video, we'll be servicing our bike.
We will clean and lubricate the bearings.
Your mountain bike will go faster)
Non-verbal video with a focus on technical audio. Universally relatable; presented as a DIY tutorial.
This video will pique the interest of bicycle enthusiasts.
#bicyclemaintenance #freehub #asmr
00:00 Bicycle maintenance.
00:01 Opening the bicycle freehub.
01:55 Removing the bike freehub body.
02:38 Disassembling the lower row of freehub bearing balls.
02:59 Cleaning the bike freehub.
03:43 Cleaning the inside of the bicycle freehub.
04:06 Disassembling the spring ring and pawls of the bicycle freehub.
04:27 Cleaning the remaining parts.
05:28 Lubricating and installing the bicycle freehub pawls.
06:25 Magnetizing tool.
06:51 Installing freehub bearing balls.
08:10 Assembling the bike freehub.
08:26 Lubricating the bicycle freehub.
09:52 Tightening the bicycle bicycle freehub.
10:39 Do a good job of bicycle maintenance.
2
views
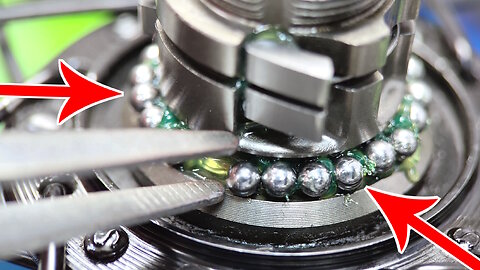
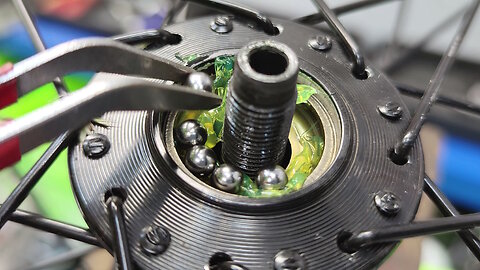
Maintenance of the bicycle hub by the mechanic. Bicycle hub with ball bearings
In this video we show you how bicycle wheel hubs are serviced in a bike shop.
A bicycle hub consists of bulk bearings, a cone and an axle.
We will disassemble the bicycle hub in detail, clean off the old oil and fill the bearings with new oil.
Language-free video with technical auditory elements. Suitable for global audiences; follows a DIY video approach.
If you're into bikes, you'll definitely want to watch this video.
00:00 How mechanic maintains the bicycle hub.
00:33 Bicycle wheel spins poorly.
01:20 Disassembling the bike hub.
02:07 Opening the bicycle hub.
03:15 Disassembling the loose ball bearings.
04:12 Removing the inner locknuts.
05:13 Cleaning the axle of the bike hub.
06:24 Cleaning the bearing balls of the bike hub.
07:33 Cleaning the locknuts and cones of the bike hub.
08:00 Cleaning the interior surface of the hub.
09:10 Assembling the bike hub.
10:34 Installing the locknut and axle into the hub.
11:15 Repeating similar steps for the other side of the wheel.
13:55 Adjusting the bike hub.
7
views
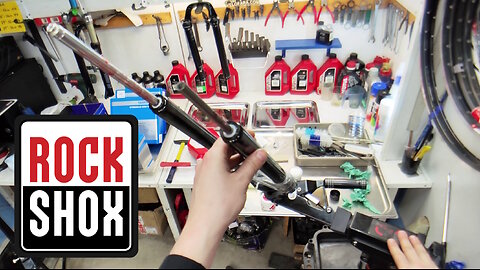
What's inside a new Rockshox Judy bike fork. Bicycle fork review and lubrication.
In this video I show you what's inside a new Rock Shox Judy fork.
When you buy a new bike fork, you should always do a first service to make sure everything is okay with the bike fork.
It happens that there are a lot of metal shavings inside the bicycle fork.
Many bike forks have a lack of oil inside.
In this video I'll show you how to take the Rock Shox Judy fork out of the box, do a superficial inspection of the bike fork, and perform the first maintenance.
This video instructions "DIY" for cyclists. Video tutorial in "ASMR" style.
It will be interesting and useful for cyclists!
00:00 Rock Shox Judy
00:19 Unpacking the rock shox judy fork
00:55 Rock Shox Judy bike fork review
02:37 How to disassemble a bike fork
05:03 What to look for in a new rock shox judy fork
06:19 Cleaning the inside of your fork
06:55 Lubricating the fork with grease
08:59 Lubricating the fork boots
10:42 Bike fork Rock Shox assembly
11:36 Filling liquid oil in a bicycle fork
13:11 Cleaning the outside of a bicycle fork
16:16 Testing a new Rock Shox Judy bicycle fork
#rockshox #bicyclefork #mountainbikes
1
view
Replacing bicycle cranks on your road bike. Cranks Ultegra and Tiagra
Hello to all bike mechanics!
This 13 year old road bike was fitted with Shimano Ultegra 10 speed cranksets.
After so many years, the bicycle connecting rods have worn out. It is no longer possible to find parts for Shimano Ultegra cranks at 10 speeds. We were forced to replace the bicycle connecting rods with more modern ones, but of a lower level.
This is a Shimano Tiagra level bicycle crankset.
00:00 Shimano Ultegra cranks.
00:05 Road bike cranks are worn out.
00:15 Unboxing shimano Tiagra fc-4700.
00:58 How to remove crank on a bike.
01:37 How to remove bike pedals.
01:53 How to remove bicycle crank Hollowtech ii.
02:28 How to remove bicycle Hollowtech bottom brackets.
02:49 How to lubricate bicycle Hollowtech bottom brackets.
03:05 How to installation bike Hollowtech bottom brackets.
03:28 Compare cranks Shimano Tiagra and Shimano Tiagra.
03:50 How to installation cranks on a bike.
05:56 How to clean and lubricate the threads of bicycle pedals.
06:59 How to installation move bike pedals.
2
views
Why do gears slip on a bike? Rear Derailleur Installation
In this video tutorial I will show you how to install and adjust a rear derailleur.
You will find out why your bike shifts badly.
For example, we will use a bicycle "Cube".
The "Cube" bicycle has a defect from the factory. We will fix this defect on the bike
This video instructions "diy" for cyclists. Video instruction in the style "asmr".
It will be interesting for bikers!
00:00 Bike not shifting gears
00:23 Front derailleur shimano slx
00:45 Bike rear wheel installation
02:07 Bike rear derailleur installation
02:55 Bike shift cable repair
08:00 Unpacking sram 9-speed chain pc 971
08:34 Bike chain sram installation
10:18 Bike rear derailleur adjustment
12:44 Why do the gears on my bike slip?
13:03 Installing a new rear derailleur cable cover
20:50 Rear derailleur adjustment
23:57 Good result
1
view
Making the bike faster. How to properly adjust your bicycle wheel hub.
In this instructional video, viewers will gain insights into improving their bicycle's speed and performance. The tutorial delves into the finer points of bike maintenance and enhancement:
The video commences by explaining techniques for boosting your bike's speed. A demonstration reveals an issue with the bicycle hub's rotation, resulting in an uneven spin.
The subsequent segment guides viewers through the proper methodology for fine-tuning their bicycle's wheel hub. Those encountering difficulties with a less-than-smooth hub rotation will find these instructions particularly valuable.
The process of fine-tuning the bicycle wheel hub is revisited, offering viewers a comprehensive view of the crucial steps and intricacies involved.
The video underscores the necessity of two wrench sizes, specifically 15 mm and 17 mm, for executing the maintenance procedures. These tools are essential for effective adjustments.
Furthermore, viewers are reminded of the significance of securing the lock nuts in place post-unscrewing, as emphasized in a dedicated segment. This precautionary step ensures the hub's stability and overall functionality.
The video goes on to illustrate the introduction of a slight degree of play in the bicycle hub, a technique contributing to smoother rotation and an enhanced overall biking experience.
Subsequently, the tutorial zeroes in on the task of adjusting Shimano bushings, providing viewers with a detailed walkthrough to achieve the desired outcomes.
Towards the video's conclusion, the optimal motion and rotation of the bicycle wheel hub are visually depicted. A close observation of this portrayal is crucial for confirming the success of the undertaken adjustments.
Whether catering to seasoned cyclists or individuals new to bike maintenance, this video serves as a valuable resource, offering practical insights for optimizing bicycle performance and ensuring a faster, more seamless riding experience.
This video will appeal to those who have a passion for cycling.
00:00 How to making the bike faster.
00:25 Bicycle hub spins jerkily.
00:45 How to properly adjust your bicycle wheel hub.
01:45 The bicycle hub does not turn very well.
02:09 Adjust bicycle wheel hub.
02:14 We will use a 15 mm and a 17 mm wrench.
02:27 After the lock nuts have been unscrewed, we need to fix them again.
02:48 Make a small play in the bicycle hub.
04:44 Adjusting the shimano bushings.
05:10 How the bicycle wheel hub should turn.
#bicycle #bikeservicing #bicyclemechanic
14
views
How to maintenance a bicycle hub. Relaxation video for cyclists
What do you think is essential to maintain on your bike?
Those who enjoy cycling will find this video fascinating.
Absence of speech, focus on mechanical audio in this video. Understandable across languages; follows a DIY video format.
00:00 How to service a bicycle hub shimano hb-tx505.
00:39 Bicycle hub rotates very badly.
00:43 How to remove the brake disk centerlock mount.
01:16 How to disassemble a shimano bicycle hub.
03:09 How a bicycle hub deteriorates from the inside out.
03:44 Replacement of shimano bicycle hub cones.
04:01 How to remove bicycle hub dust cover.
04:42 Cleaning shimano hb-tx505 hub.
05:53 Replacement of bicycle hub bearings.
06:35 How to assemble the front hub of a bicycle.
06:59 How to put oil in the front hub of a bicycle.
09:48 Adjusting the front hub of a bicycle.
#bicycle #bikeservicing #bikemaintenance
2
views
Maintenance and greasing the bicycle bottom bracket. The bike creaks
Greetings, dear cyclist! Today we received a bike in our bike workshop with a problem with clicking and hard to turn cranks when pedaling. The problem was found in the bottom bracket of the bike.In this video we will show you how to clean and lubricate the bottom bracket and the frame of the bike so that you can still ride on the old bottom bracket. This video will be interesting for cyclists and those who are interested in home repair and maintenance of their bikes.
00:00 Bike bottom bracket is very dirty.
00:31 The bottom bracket of the bicycle has play and hard to turn.
00:43 How to remove the bottom bracket of the bicycle.
01:30 Close-up of dirt, sand and grease on bottom bracket and threads.
02:10 Cleaning the bottom bracket of the bicycle.
04:07 How to clean the bike frame thread under the bottom bracket.
05:35 Greasing the thread and bottom bracket of the bicycle.
06:42 How to install and tighten the bottom bracket of your bike.
08:27 Checking the operation of the bottom bracket of the bicycle.
#bottombracket #bikecranks #bicycle
14
views
1
comment
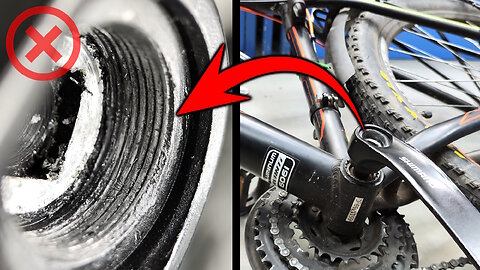
How to remove bicycle cranks, if the thread for removal is damaged
Hello, my fellow cyclist. Sometimes, you may need to remove a damaged square-taper bottom bracket crank, but the thread is stripped. In this video, I will show you one method of how to remove a crank from your bicycle's bottom bracket. In this case, we have Shimano cranks installed on a square-taper bottom bracket. Good Bicycle Maintenance.
00:00 The left bicycle crank shimano has damaged pedal thread.
00:36 Bicycle crankset removal tool for square bottom bracket.
01:25 The thread on the bicycle crank for the disassembling tool is also damaged.
02:50 Screw the connecting rod removal tool into the remaining threads.
03:43 To make it easier to remove the connecting rod, heat it well with a gas torch.
04:19 How to easily remove the left shimano bicycle crank.
05:10 The job is done!
#bottombracket #bikecranks #bicycle
3
views
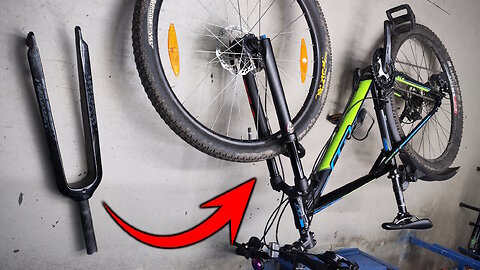
Preparing your bike for winter. Replacing a rigid fork on a bicycle
Hello cyclists who like to ride a bike in winter.
This video release will be useful for you.
Our workshop customers, often ask us the same question, how to prepare your bike for winter.
I will show you what you need to do to ride your bike in winter without any problems.
First of all, you need to replace the bike fork.
It is advisable to install a carbon fork on your bike.
Carbon absorbs vibrations, this will add to the comfort of your bike ride.
Also, your bike will become lighter and very good news.
00:00 How to prepare your bike for winter.
00:24 Removes the front brake from the bicycle.
00:42 Removing the steering wheel from the bicycle fork.
02:05 How to properly replace a bicycle fork.
03:39 Bicycle fork bearings.
03:58 How to clean bicycle fork bearings.
05:45 How to lubricate a rigid bicycle fork.
07:26 Replacing a rigid fork on a bicycle.
08:06 How to install handlebars on a bicycle fork.
08:45 Installing the front brake on a bicycle fork.
09:17 Installing the front wheel on a bicycle fork.
09:38 Bicycle handlebar adjustment.
8
views

How to wrap handlebars tape for road bicycle.
Hello! Today we have a road bike in our workshop.
We will be changing the handlebar tape on a road bike.
I'll show you a detailed tutorial, step by step, on how to remove an old road bike handlebar wrap, then how to install a new handlebar wrap.
I will show you a few tricky tricks that this work was done simply and efficiently.
00:00 The handlebar tape on a road bike needs to be replaced.
00:15 How to remove the old tape from a bicycle handlebar.
00:33 Unpacking a new road bike handlebar tape.
00:49 How to wrap handlebars tape for road bicycle.
02:04 How to tape your handlebars in the figure of 8 style.
03:08 How to install a cap in the end of a road bike handlebar.
04:18 How to wrap road bike handlebars with bar tape the right way.
06:44 How to align the bicycle handlebar tape to the center.
09:18 How to make a road bike handlebar wrap feel good on your hands.
*Ask your questions in the comments* 👇
❓ ✍ 👇
12
views
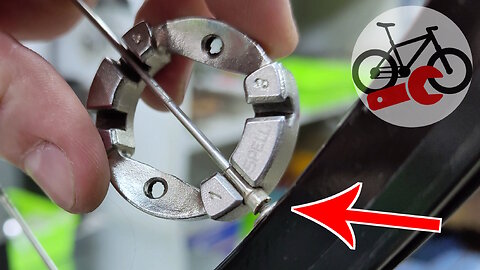
Bicycle wheel repair. How to replace a spoke nipple on a bicycle wheel.
When I started working on the bicycle, the first thing that caught my attention was the broken wheel. It seemed that a spoke in the wheel had snapped, like a nipple. In the macro shot, you can clearly see the broken spoke nipple. I'm not sure why, but I decided to replace that spoke.
To change a spoke on a bicycle wheel, you have to remove the sprockets. Taking off the cassette from the wheel, yes, how to remove a cassette from a bicycle wheel is an interesting question. But what do you do if the cassette gets stuck on the wheel? Especially if the wheel rim is made of aluminum, the cassette can catch on the ridges. It's these ridges that can cause the cassette to get stuck.
To bring the wheel back to perfect condition, I used a specialized machine for aligning bicycle wheels. It's interesting what happens to a bicycle wheel when a spoke breaks?
Replacing a spoke nipple required removing the rim tape. It's interesting how sometimes the rim tape can obstruct the replacement of a spoke nipple.
How do you replace a spoke nipple on a bicycle wheel? This process requires precision. Guide the nipple into the right spot and carefully screw it in.
To achieve perfect alignment, I had to carefully adjust the wheel alignment machine. The process of aligning a bicycle wheel isn't as complex as it might seem.
It's interesting how you can align a bicycle rim perfectly just by tightening the spokes. I tried this method and realized that it truly works.
Unfortunately, the spoke nipple turned out to be of poor quality, and it broke again. In the end, I had to replace it once more.
But sometimes, such experiences can be valuable as they provide a better understanding of the processes. I even intentionally tried to break a spoke nipple to see how it happens.
To achieve precise wheel alignment, I once again used the alignment machine. This tool helps achieve high accuracy.
To monitor the tension in the bicycle wheel spokes, I utilized a strain gauge. It helped determine how tight the spokes of the wheel were.
Cyclists will definitely enjoy watching this video.
This speechless video is filled with technical sounds. Language doesn't matter; it's internationally accessible. It follows a DIY video format.
00:00 Bicycle wheel broken.
00:29 Bicycle wheel spoke nipple broken.
00:57 Removing the cassette from the wheel.
00:57 How to remove the cassette from a bicycle wheel.
02:00 Unscrewing the broken nipple from the spoke.
02:23 Bicycle wheel alignment machine.
02:37 What happens to a bicycle wheel when a spoke breaks?
02:50 Removing rim tape.
03:11 How to replace a spoke nipple on a bicycle wheel.
03:57 How to adjust a wheel alignment machine.
04:15 How to align a bicycle wheel.
05:19 The spoke nipple is broken.
05:58 How to break a bicycle spoke nipple.
06:25 How to align a bicycle wheel on an alignment machine.
06:35 Using a strain gauge to check the tension in the spokes of a wheel.
07:06 Tensioning bicycle wheel spokes.
07:50 Tightening wheel spokes by hand.
#bicyclewheel #bikeservice #mountainbikes
159
views