

Stick burlap into your washing machine to make THIS for your door!
Hometalk | Ideas you can do.
Get our daily email for endless DIY ideas: https://ht.hmtlk.com/l/4VfU
FACEBOOK → https://www.facebook.com/Hometalk
INSTAGRAM → https://www.instagram.com/hometalk
PINTEREST → https://www.pinterest.com/hometalk
TIKTOK → https://vm.tiktok.com/ne4T87
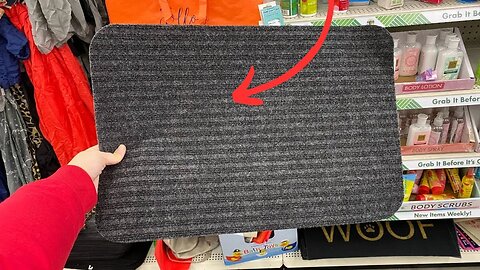
Tape up 4 Dollar Store mats (BRILLIANT!)
Hometalk | Ideas you can do.
Get our daily email for endless DIY ideas: https://ht.hmtlk.com/l/4VfU
FACEBOOK → https://www.facebook.com/Hometalk
INSTAGRAM → https://www.instagram.com/hometalk
PINTEREST → https://www.pinterest.com/hometalk
TIKTOK → https://vm.tiktok.com/ne4T87
2
views

Slide 2 Dollar Store baskets on a paper towel holder (BRILLIANT!)
Hometalk | Ideas you can do.
Get our daily email for endless DIY ideas: https://ht.hmtlk.com/l/4VfU
FACEBOOK → https://www.facebook.com/Hometalk
INSTAGRAM → https://www.instagram.com/hometalk
PINTEREST → https://www.pinterest.com/hometalk
TIKTOK → https://vm.tiktok.com/ne4T87
2
views

Why everyone's buying thrift store wicker baskets! (STUNNING!)
Hometalk | Ideas you can do.
Get our daily email for endless DIY ideas: https://ht.hmtlk.com/l/4VfU
FACEBOOK → https://www.facebook.com/Hometalk
INSTAGRAM → https://www.instagram.com/hometalk
PINTEREST → https://www.pinterest.com/hometalk
TIKTOK → https://vm.tiktok.com/ne4T87
2
views

You might want to rethink your address sign when you see this!
Hometalk | Ideas you can do.
Get our daily email for endless DIY ideas: https://ht.hmtlk.com/l/4VfU
FACEBOOK → https://www.facebook.com/Hometalk
INSTAGRAM → https://www.instagram.com/hometalk
PINTEREST → https://www.pinterest.com/hometalk
TIKTOK → https://vm.tiktok.com/ne4T87

Stick a command strip on your front door for this brilliant idea!
Hometalk | Ideas you can do.
Get our daily email for endless DIY ideas: https://ht.hmtlk.com/l/4VfU
FACEBOOK → https://www.facebook.com/Hometalk
INSTAGRAM → https://www.instagram.com/hometalk
PINTEREST → https://www.pinterest.com/hometalk
TIKTOK → https://vm.tiktok.com/ne4T87
9 genius NEW home hacks (from the guy who painted 1,000 homes)
Spring is right around the corner, making it a perfect time to get ready for home improvements.
The first thing we need to focus on is painting, which is a great way to spruce up our house. However, there's nothing worse than spilling paint all around the edges. Luckily, I have an important solution for that. Grab a clear plastic bottle and cut it off just at the top. Then, slip it over the paint can for a snug fit. To seal it in place, use a hairdryer or heat gun to warm the bottle, allowing it to form a tight seal with the edge of the paint can. Once it cools down, you'll see that it pours perfectly. Plus, with a lid, you can keep the paint fresh and clean for future use.
To achieve a crisp line with no bleed under when painting a room, especially at corners or where two walls meet, try this handy technique. Start by applying painter's tape exactly where you want it. Then, here's the trick: use some caulk from a caulking gun and apply it on top of the paint, right at the edge of the tape. Make sure to fill in any gaps, even on heavily textured walls. Once the caulk is applied, use a damp cloth to wipe off any excess, leaving the caulk underneath to fill in the gaps. When you paint, be sure to paint from the tape to the wall in a continuous motion. After removing the tape, you'll be left with a nice, straight, crisp edge with no bleed under.
For big paint projects that require a lot of brushing, here's a clever hack. Take a brush and drill a hole at an angle near the top, large enough to fit a cap inside. Attach a suitable cap using hot glue. Now, fill a bottle with paint, screw it onto the brush, and turn it over. This setup allows the paint to drip slowly, eliminating the need to constantly dip the brush. You can keep painting until you run out of paint, making your project much faster. When you're done, simply remove the brush, cap the paint bottle to keep it fresh, and clean the brush by running water through the cap edge.
To avoid forgetting the color, brand, or type of paint on a wall, try this practical solution. When removing outlet or switch covers, write the necessary details on the inside. Additionally, apply a small amount of sample paint with your finger. This way, when you put the cover back on, you'll always have a handy reference for touch-up painting.
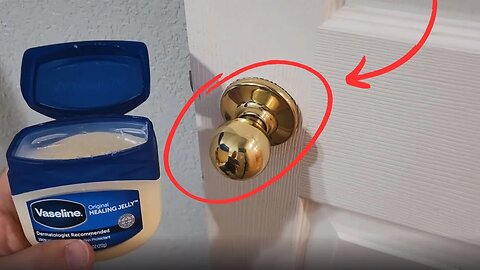
Drip marks on doorknobs or hinges can be frustrating while painting. But here's a simple hack using Vaseline. Just apply a small amount of Vaseline on those areas, and it will prevent the paint from sticking. If any paint accidentally gets on the Vaseline, it can be easily wiped off, saving you the hassle of taping.
Now, let's talk about caulking, especially in areas like tubs. Apply a thin line of caulk between the tub and the tile. Then, take a Popsicle stick and run it at an angle along the caulk, creating a perfect curve and a flawless caulk line every time.
Here's a water-saving tip for a leaky toilet. Remove the top lid and add some food dye to the back of the tank. Open the lid and check if the water in the bowl changes color. If it does, it indicates a leak, most likely from the flapper inside. Replace the flapper to save water and reduce your water bill.
Lastly, if your dryer isn't working as efficiently as it should, there might be lint buildup that's hard to reach. Grab the cardboard from a paper towel roll and squeeze it along its edges, creating a tool to get into those tight spots. Attach the cardboard to the end of your vacuum, turn it on, and use it to remove the trapped lint, which may have accumulated over the years.
I hope these home hacks inspire you to come up with your own painting and home improvement tricks. Thank you for watching Hometalk, and we'll see you next time!
Hometalk | Ideas you can do.
Get our daily email for endless DIY ideas: https://ht.hmtlk.com/l/4VfU
FACEBOOK → https://www.facebook.com/Hometalk
INSTAGRAM → https://www.instagram.com/hometalk
PINTEREST → https://www.pinterest.com/hometalk
TIKTOK → https://vm.tiktok.com/ne4T87
#Hometalk #DIY #homehacks #lifehacks
150
views

The Dollar Store bowl hack that's trending like CRAZY on Pinterest!
Looking to upgrade your home decor without breaking the bank? Then these dollar store diy home decor ideas are just what you need to create a drab-free home.
Hometalk | Ideas you can do.
Get our daily email for endless DIY ideas: https://ht.hmtlk.com/l/4VfU
FACEBOOK → https://www.facebook.com/Hometalk
INSTAGRAM → https://www.instagram.com/hometalk
PINTEREST → https://www.pinterest.com/hometalk
TIKTOK → https://vm.tiktok.com/ne4T87
#Hometalk #DIY #dollartree #dollartreediy #dollartreefinds #dollargeneral #dollarstore #homedecor #diyhomedecor

Put a napkin on a pillow case (GENIUS!)
Hometalk | Ideas you can do.
Get our daily email for endless DIY ideas: https://ht.hmtlk.com/l/4VfU
FACEBOOK → https://www.facebook.com/Hometalk
INSTAGRAM → https://www.instagram.com/hometalk
PINTEREST → https://www.pinterest.com/hometalk
TIKTOK → https://vm.tiktok.com/ne4T87
#Hometalk #DIY #homedecor #diyhomedecor #spring #springdecor
Brilliant ideas to save you HUNDREDS on a kitchen makeover!
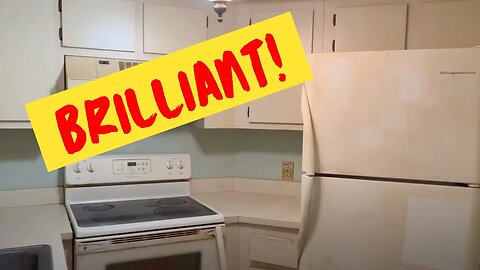
When I saw this condo kitchen, I thought it might be beyond saving. But since the cabinets were a custom size, I thought I'd try to clean them before giving up on them completely. And I was surprised at the difference! Just wait until you see this kitchen makeover.
I started by cleaning everything thoroughly with soapy water. Then, I removed the cabinet doors at the hinges. I was surprised to see even more items left behind in the cabinet. I washed the cabinet doors several times, removed the hinges from the doors themselves, and then went over them with a soft, lint-free cloth and a deglosser. You could see the difference right away. The cabinets didn't look damaged, so I thought I'd go ahead and paint them.
I used a color by Sherwin-Williams called "Chat Room." I applied the paint using a paint sprayer that I had received in a prior project. When it came time to painting the cabinet boxes, I first taped off the area using this painter's tape with an attached plastic tarp. It was easy to cover up everything that I didn't want painted, and then I was able to spray paint it in no time at all. I applied two different coats of the paint, each one very lightly. This way, I didn't have any streaks or drip marks anywhere. I let everything dry overnight, and then the next day, I did the other side of the doors.
First thing in the morning when I arrived, I had cabinet doors literally everywhere. I put them on the ironing board, on cans to get them off the floor. I made sure to put butcher paper down so that I wouldn't have any dust everywhere. Once those were dry, I added brand-new hinges onto the doors and attached those onto the cabinet boxes again. Then, I needed to go ahead and add new handles to make it look more modern.
When I attached my poles, I started by using a template to mark the location of the bottom part of the handle. I then flipped it over and used that same spot on the template to mark the other door. I took the screw and attached the bottom part of the pole. I like these big handles; they're about 10 inches, so they're larger than most people would use, but I like the way they look. What we did splurge on was spending money on granite countertops. Along with the new granite, I also purchased a new sink and faucet to make everything look more modern.
It was looking really good, but I still needed to do something to fix this backsplash. I decided to do something a little bit outside of the norm. I usually do a tile mosaic backsplash, but this time, I decided to use shiplap. I painted it first to make it a little bit of a gray color to go well with the countertops. Then, I measured and cut the shiplap pieces. It only took about 45 minutes to get all the shiplap backsplash completed, and I think it looks great. Here's the after. You can see that there was a really big transformation when you look back at the before and now to the current state of the kitchen. Of course, new appliances helped as well; that modernized everything. I hope this inspired you to renovate your kitchen.
Hometalk | Ideas you can do.
Get our daily email for endless DIY ideas: https://ht.hmtlk.com/l/4VfU
FACEBOOK → https://www.facebook.com/Hometalk
INSTAGRAM → https://www.instagram.com/hometalk
PINTEREST → https://www.pinterest.com/hometalk
TIKTOK → https://vm.tiktok.com/ne4T87
#Hometalk #DIY #kitchenmakeover #kitchendesign
22
views
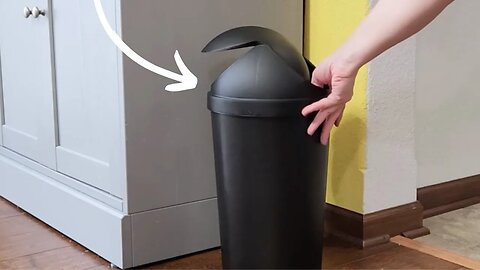
Pull the lid off a trash can for this brilliant hack!
For this hack, I'm going to grab this trash can and take off the top.
Now, I'm going to use a strong adhesive to apply it all over the back of the stair tread. Then, I'll wrap it around the trash can. To give it an antique look, I'll use a silver rub and buff, applying it to the back of the stair tread and even a little on the bottom of the can.
Next, I'll create some drainage holes in the trash can and place the stair tread on top. Now, I can fill the top of the trash can with soil and plants. This DIY project is an inexpensive way to repurpose an old trash can.
Hometalk | Ideas you can do.
Get our daily email for endless DIY ideas: https://ht.hmtlk.com/l/4VfU
FACEBOOK → https://www.facebook.com/Hometalk
INSTAGRAM → https://www.instagram.com/hometalk
PINTEREST → https://www.pinterest.com/hometalk
TIKTOK → https://vm.tiktok.com/ne4T87
#Hometalk #DIY #homedecor #diyhomedecor #homehacks #lifehacks

Slide a paper towel roll onto a hanger (this is BRILLIANT!)
Hometalk | Ideas you can do.
Get our daily email for endless DIY ideas: https://ht.hmtlk.com/l/4VfU
FACEBOOK → https://www.facebook.com/Hometalk
INSTAGRAM → https://www.instagram.com/hometalk
PINTEREST → https://www.pinterest.com/hometalk
TIKTOK → https://vm.tiktok.com/ne4T87
1
view

Everyone's copying this BRILLIANT Dollar Store kitchen countertop idea!
Next time you're at Dollar Tree, make sure to grab a square clear plastic container, a round garden dish, and some silver and white plates from the wedding aisle.
To create your dollar store DIY home decor, start by placing the wooden candle holders on top of the bottom of the clear square container. Secure them into place using a little bit of E6000 adhesive and let it set securely. Glue the round garden dish on top of the candle holders using E6000 as well. Set it aside and let it dry completely.
Once dry, give the entire structure a good coat of appliance epoxy spray paint. Take a plastic plate and glue it to the front using E6000. Give the whole piece a spray with gray chalk paint. Then, use gray acrylic paint and a foam brush to add texture and work in some black for definition. Spray the garden dish on top with metallic spray paint and dry brush some white paint on it.
For a pop of color on the bottom part, lightly pat on some dune grass paint from Country Chic Paint. Use a stencil pouncer and metallic paint to create a galvanized steel look on the top garden dish. If necessary, remove the plate from the front part to make it easier to work with.
Print off a vintage scale face and use Mod Podge to glue it into the middle of the plate. Apply another layer of Mod Podge on top to seal it and remove any air bubbles. Finally, glue the plate back onto the front part using E6000. Once everything is fully set, you'll have an adorable vintage-looking scale made with Dollar Tree items.
This DIY dollar tree home decor project only cost five dollars to make, and the result is impressively lifelike. I hope this inspires you to get creative with plastic pieces from Dollar Tree. Thank you for tuning in to Hometalk, and we'll see you in another video!
Hometalk | Ideas you can do.
Get our daily email for endless DIY ideas: https://ht.hmtlk.com/l/4VfU
FACEBOOK → https://www.facebook.com/Hometalk
INSTAGRAM → https://www.instagram.com/hometalk
PINTEREST → https://www.pinterest.com/hometalk
TIKTOK → https://vm.tiktok.com/ne4T87
#Hometalk #DIY #homedecor #diyhomedecor #dollartree #dollartreediy #dollartreefinds #dollargeneral #dollarstore
9
views
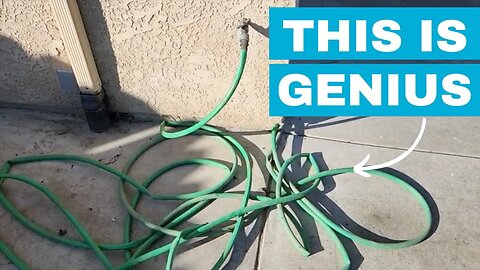
Few people know about this BRILLIANT garden hose hack!
I've got an area on the side of my house that is just ugly with an old hose.
So, what I'm going to do is take some handles and the base for a planter to create a decorative gardening solution. Finding out how to do it can be difficult, but it's actually quite simple. First, take the handles and cover them with tape. Then, use a pen to poke through where the screws go in the handles. Peel off the tape and transfer it onto the side of the planter where you want to drill your marks. Once it's firmly in place, use a pin or a black marker to mark the spots where you'll drill the holes. Remove the tape to reveal your marked spots.
To attach the handles, ensure you have the right size drill bit for the screws. Drill the holes and then insert the screws from the inside to the outside of the planter. Tighten the screws first by hand and then with a screwdriver. Repeat the process for both sides of the planter, ensuring they are securely attached. These handles will be used to carry the base around.
Next, flip the planter over to drill some drainage holes. Use the marks on the back as a guide and drill the holes all the way through, including the middle one for proper drainage. Flip the planter back over and fill it with succulent potting soil. Spread the soil out evenly and fill the planter. Now, you can begin transplanting your succulents onto this base. Simply create holes in the soil and place the roots of the succulents in them. Succulents are easy to care for and can be transported from one pot to another without much hassle. They require less water, earning them the nickname "forget-me-nots" due to their ability to thrive even with occasional neglect.
For the planter hiding the hose, drill a hole about halfway up where you'll insert the hose. A one-inch hole should suffice. Additionally, to prevent water buildup, drill some drain holes in the bottom of the planter.
Lastly, to hold the lid up, place some wood inside the planter. Pre-drill holes using a drill, insert screws and tighten them with the drill against the side of the planter. Make sure to do this on both sides to secure the wood properly. Don't forget to guide the garden hose through the hole, pulling it all the way through and wrapping it up neatly. Finally, place your succulent tray on top of the planter.
I hope these DIY gardening ideas inspire you to create your own succulent tray garden hose holder. Thank you!
Hometalk | Ideas you can do.
Get our daily email for endless DIY ideas: https://ht.hmtlk.com/l/4VfU
FACEBOOK → https://www.facebook.com/Hometalk
INSTAGRAM → https://www.instagram.com/hometalk
PINTEREST → https://www.pinterest.com/hometalk
TIKTOK → https://vm.tiktok.com/ne4T87
#Hometalk #DIY #homehacks #lifehacks #outdoordesign #outdoordecor #gardening #gardeningtips
17
views

How to solve every gardener's most annoying problem! #shorts
#sponsored @ChapinInternationalInc
Grab the Chapin 1 Gallon Multi-Use Sprayer here: https://ht.hmtlk.com/l/HjPl
Hometalk | Ideas you can do.
Get our daily email for endless DIY ideas: https://ht.hmtlk.com/l/4VfU
FACEBOOK → https://www.facebook.com/Hometalk
INSTAGRAM → https://www.instagram.com/hometalk
PINTEREST → https://www.pinterest.com/hometalk
TIKTOK → https://vm.tiktok.com/ne4T87

Do this BEHIND your washing machine (Brilliant)
Hometalk | Ideas you can do.
Get our daily email for endless DIY ideas: https://ht.hmtlk.com/l/4VfU
FACEBOOK → https://www.facebook.com/Hometalk
INSTAGRAM → https://www.instagram.com/hometalk
PINTEREST → https://www.pinterest.com/hometalk
TIKTOK → https://vm.tiktok.com/ne4T87
#hometalk #diy #laundryroom #laundryroommakeover #garage #garagemakeover
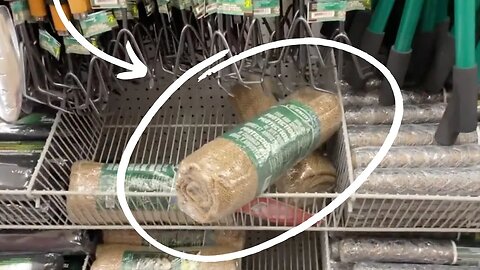
$5 trick to INSTANTLY upgrade your builder grade blinds!
Check out what I found at the dollar store that's going to completely upgrade my blinds!
To get the burlap ready to use, I want to finish the edges and I'm going to use my low temp glue gun and then fold the burlap over. I want to make a pocket for the curtain rod to go through. Then, I'm going to fold over the top edge about two or two and a half inches, I'm going to do this to the entire length of the burlap until I get to the other end. I'm going to remove the end of the rod and then just slip the rod right through that gap that I created at the top of the burlap. Next, I'm going to measure out two pieces of twine, grunge them up and tie the twine. How pretty are these faux burlap blinds?
Hometalk | Ideas you can do.
Get our daily email for endless DIY ideas: https://ht.hmtlk.com/l/4VfU
FACEBOOK → https://www.facebook.com/Hometalk
INSTAGRAM → https://www.instagram.com/hometalk
PINTEREST → https://www.pinterest.com/hometalk
TIKTOK → https://vm.tiktok.com/ne4T87
#Hometalk #DIY #homedecor #diyhomedecor #homehacks #lifehacks

Put a Dollar Store towel bar in your car (BRILLIANT!)
Hometalk | Ideas you can do.
Get our daily email for endless DIY ideas: https://ht.hmtlk.com/l/4VfU
FACEBOOK → https://www.facebook.com/Hometalk
INSTAGRAM → https://www.instagram.com/hometalk
PINTEREST → https://www.pinterest.com/hometalk
TIKTOK → https://vm.tiktok.com/ne4T87
#Hometalk #DIY #homehacks #lifehack #organization #storage #cleaning #cleanwithme
3
views
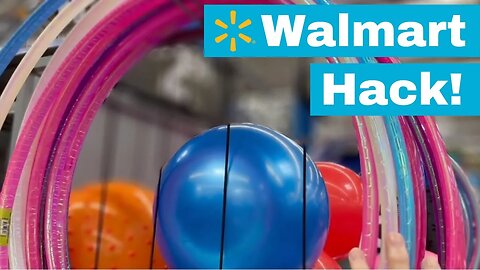
Buy a $2 Walmart hula hoop for this brilliant outdoor idea!
Pick up some hula hoops at Walmart and try these outdoor decorating ideas on a budget.
I went to the store and grabbed some hula hoops along with black matte spray paint, I took the hoops out to my garden and decided to attach them to my house using small poultry staples. I then slipped a piece of pipe cleaner through the hole and attached the hoop twisting the ends together. I used black electrical tape to join the hoops together. To attach the plant, I carefully moved each stem, bundling some together and following the curve of the hoop.
I love the look of my new trellis and it was so easy to make and as the plant grows I can simply add additional hoops.
Hometalk | Ideas you can do.
Get our daily email for endless DIY ideas: https://ht.hmtlk.com/l/4VfU
FACEBOOK → https://www.facebook.com/Hometalk
INSTAGRAM → https://www.instagram.com/hometalk
PINTEREST → https://www.pinterest.com/hometalk
TIKTOK → https://vm.tiktok.com/ne4T87
#Hometalk #DIY #outdoordesign #outdoordecor
5
views

Life-sized Pop-tart 👀
Hometalk | Ideas you can do.
Get our daily email for endless DIY ideas: https://ht.hmtlk.com/l/4VfU
FACEBOOK → https://www.facebook.com/Hometalk
INSTAGRAM → https://www.instagram.com/hometalk
PINTEREST → https://www.pinterest.com/hometalk
TIKTOK → https://vm.tiktok.com/ne4T87
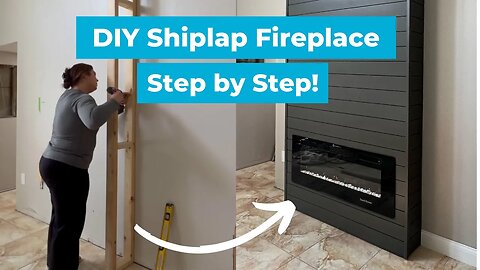
The fastest way to build a fireplace
Step-by-step video on how to build a DIY electric fireplace wall with shiplap. This electric fireplace only took 2 days! An easy and quick home improvement project with amazing resale value. #diy #diyfireplace #homeimprovement
Hometalk | Ideas you can do.
Get our daily email for endless DIY ideas: https://ht.hmtlk.com/l/4VfU
FACEBOOK → https://www.facebook.com/Hometalk
INSTAGRAM → https://www.instagram.com/hometalk
PINTEREST → https://www.pinterest.com/hometalk
TIKTOK → https://vm.tiktok.com/ne4T87
#Hometalk #DIY #homedecor #diyhomedecor
2
views

Buy a cheap Walmart bin to copy this brilliant idea!
Let's run on down to Walmart to grab your favorite inexpensive bucket!
Start by getting those handles off, we don't need those! Take them off both sides, they clip right off. Next, we're going to take that bucket and flip it over. We need to set in two strips of wood that are gonna fit right on the edge. Just go ahead and set it down there, no need for a tape measure and just mark it with a pencil.
What you're going to need is definitely two of these, just use your favorite saw, it's easy to do! Next, stack them on there and make sure they fit just right inside the grooves. Then, you can use some hot glue just three good dabs on the edge we'll do it. Just flip it over and press it against the plastic. Now I know what you're thinking, this glue does not hold permanently. That's okay! We just needed to hold until we can flip it back over so do that to both pieces right on the edge and just hold it down till it sets (takes about 20 seconds). Next, flip the bucket over and what you're going to do is grab just some small little screws, they don't need to be long, we don't want them to pop out through the end of the wood, so just take your drill and put it right in two or three in each strip of wood will be just right. Just put it in there and don't over-tighten -that's going to hold it in place.
Now it's time to put on the wheels. I got these little inexpensive caster wheels, but I need the drill bit to be just the right size and we're going to mark it one inch from each side of the wood. We're going to put four of these legs on, so once you get them marked let's go ahead and we're going to drill it. You can just drill all the way through the plastic, it's not going to be a problem because when we set the leg in it's going to block the hole so these little wheels are perfect. Now it's time to take that hot glue, put it right on the edge of the hole there and put the leg on. It's going to hold it just great.
If you don't want to use hot glue and you want a little different glue, go ahead it'll work. Also just let it set up, I like using hot glue because it's fast. Once we get the legs in, look at this! They are excellent, exactly what we need now it's time to go ahead and decorate the bucket. I grabbed this twine over at Dollar Tree. Just take again our favorite hot glue, put it right on the edge, this is our starter piece, just stick it right on there you want to make sure this first row is perfect. I use the edge of this bucket right on this line and that's going to be what I call my datum line. Just go ahead and set it all the way around and we're going to go around the whole bucket. Once you get that on it's time to take a little bit of your inexpensive fabric, cut about 12 inches wide we're going to use that hot glue again and we're going to fold over the edge that's going to give us a nice edge.
To finish this off, what I did was I just worked my way down with that hot glue and kept folding it over, be careful because it can get a little hot. Once we get both edges nice and done, what we're going to do is fold it over the bucket. It's going to cover all that plastic. Get that glue right on that last bit of rope right there, spread it over and just mark it down right there. We're going to take this all the way around the bucket.
Look at this! This is going to be a great container. We can store books, dog toys, or even toys for the grandkids - it turned out great! I hoped you loved this DIY rolling basket.
Thanks for watching Hometalk and we'll see you next time!
Hometalk | Ideas you can do.
Get our daily email for endless DIY ideas: https://ht.hmtlk.com/l/4VfU
FACEBOOK → https://www.facebook.com/Hometalk
INSTAGRAM → https://www.instagram.com/hometalk
PINTEREST → https://www.pinterest.com/hometalk
TIKTOK → https://vm.tiktok.com/ne4T87
#Hometalk #DIY #homehacks #lifehacks
14
views
Cut up a $5 rug (GENIUS storage hack!)
It's time to head down to Five Below to grab you one of them inexpensive rugs, But first, why don't we grab some hula hoops?
We're gonna need to spray paint those your favorite color. I wanted this to be a nice little teal color because it's going to match the inside of our house. I'm gonna need two hula hoops.
Once you give that some time to dry, bring it on inside, set your hula hoop down, and we need two pieces of board, this one is what we call a one-by-three, which means it's three inches wide and only one inch thick. I'm going to mark it exactly where I want to cut it on the hula hoop.
I'm going to set this over here at about 33 degrees and give it a cut right on those marks, that way it's beveled exactly with the hula hoop. Now, I'm going to use this to measure the next one and make sure that I have two pieces. Once we got those cut, bring them back inside. You're going to set those exactly the same distance apart from the top and the bottom. This video doesn't do it justice, I promise that they're both evenly spaced.
Once you get them spaced, let's go ahead and mark the ones on the bottom hula hoop and I'll explain why we've got to put some hot glue down. I know hot glue is just temporary but that's exactly what we're going to use it for, just temporary to hold the wood in place on the bottom hula hoop, so just get it, put a little dab on there and place it, make sure it's equal distance on both of them from the top and the bottom. Once you get that set up go ahead and place the top one on. You're going to make sure it's matched perfectly to the one on the bottom. Pre-drill it, and use a screw that will go through the hula hoop into the wood. It doesn't have to be too long, just enough to grip it.
Once we do that, let's lay that rug out that we got at Five Below. We're gonna take the hula hoop and lay it out on there. This one has a design in the middle and I want it right centered in front of there, so take a black marker and go ahead and mark around the hula hoop right on the inside because that's going to be our cut line. We want to cut it right down that black marker and I was really shocked at how well it cut. We're going to go ahead and lay it out, but remember, you got to turn it upside down because this is going to be the back of our project. Lay it out and again and it's time to grab that hot glue. We're going to go ahead and put this down, it's going to tack it down for us. Don't go sparingly with it, go ahead and put a lot down and that way you can smooth it out. The rug was just thick enough where I wasn't too worried about burning myself with the glue. Go ahead and put this up and then it's time to go ahead on the front and put some hooks on and I'll show you why we're going to do that just some simple hooks will be great. Let's hang it up. Now, remember those screws that we use, let's hide those with a little string from Dollar Tree and it's time to decorate.
Look at this project, it's a great command center for the front door, perfect for holding any decorations. I hope this inspired you to build your own DIY hula hoop command center.
Thanks for watching Hometalk and we'll see you again next time!
Hometalk | Ideas you can do.
Get our daily email for endless DIY ideas: https://ht.hmtlk.com/l/4VfU
FACEBOOK → https://www.facebook.com/Hometalk
INSTAGRAM → https://www.instagram.com/hometalk
PINTEREST → https://www.pinterest.com/hometalk
TIKTOK → https://vm.tiktok.com/ne4T87
#Hometalk #DIY #homehacks #lifehacks
52
views
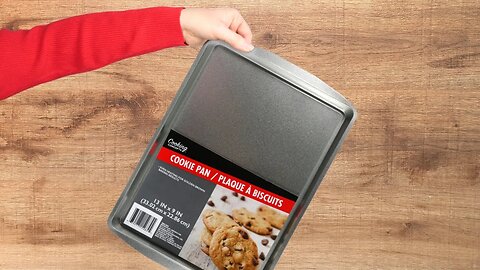
Grab a Dollar Store cookie pan - this is GENIUS!
Head on over to the dollar store to pick up a baking pan for this genius DIY home hack!
Start with a baking pan and fill it with a bunch of marbles. Remove the back off the glue dots and then peel off the backing. Place it onto the bottom of the baking sheet and flip them back over.
As you can see here this swivels really nicely. Next, take a cooling rack and bend up either side. Now, tip those cooling racks up and tie the top of the cooling racks together as well as the bottom. Place the glue dots onto the baking sheet and take those cooling racks and stick them onto the glue dots and press firmly to make sure they adhere well.
I hope this inspires you to make your own Dollar Tree Lazy Susan!
Hometalk | Ideas you can do.
Get our daily email for endless DIY ideas: https://ht.hmtlk.com/l/4VfU
FACEBOOK → https://www.facebook.com/Hometalk
INSTAGRAM → https://www.instagram.com/hometalk
PINTEREST → https://www.pinterest.com/hometalk
TIKTOK → https://vm.tiktok.com/ne4T87
#Hometalk #DIY #dollartree #dollartreediy #dollartreefinds #dollargeneral #dollarstore
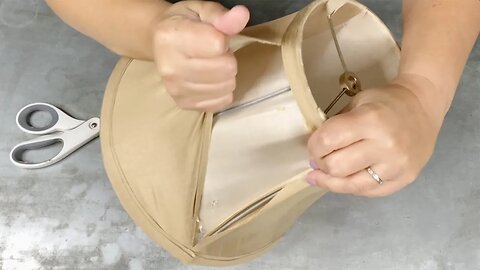
Cut the cord of your lamp (This is BRILLIANT!)
To start this project, I want to remove everything but the main section of this lamp I'm going to add the glue to each of the joints and then leave it all to dry.
I found these signs at the dollar store and I'm going to add a thinner wood round, a little wood glue will hold this into place perfectly. I'm going to find the middle and use the top of the lamp to trace a little circle.
Now, I'm ready to paint. I'm going to use the white chalky paint to cover both the base of the lamp and the wood. I want to attach the wood top to the lamp the circle that I drew before is going to help me so the lamp is correctly centered add some glue and then I can join them together and it'll be nice and solid.
How cute is this little table?
Hometalk | Ideas you can do.
Get our daily email for endless DIY ideas: https://ht.hmtlk.com/l/4VfU
FACEBOOK → https://www.facebook.com/Hometalk
INSTAGRAM → https://www.instagram.com/hometalk
PINTEREST → https://www.pinterest.com/hometalk
TIKTOK → https://vm.tiktok.com/ne4T87
#Hometalk #DIY #homedecor #diyhomedecor #upcycle
2
views