

How To Unf-ck Your Hips In 10 Minutes - Corrective Routine
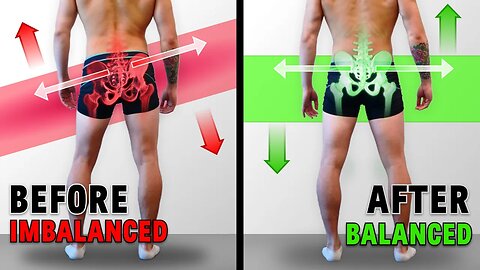
Do you experience hip shifting during your execution of the squat? Or...when standing, have you noticed that one of your hips is higher than the other? In most cases, uneven hips occurs when you have muscular imbalances that you’ve developed from lifting or doing any kind of repetitive task. Various asymmetries in the body are expected and perfectly normal. But when your uneven hips (e.g. left hip higher than right or hip shift) starts to cause back pain, hip pain, discomfort, or affect your lifts, then it can start to create problems. Today, I’m going to show you 3 tests that’ll determine if you currently have hip asymmetry. I’ll also give you an exercise program (covering various hip exercises and hip stretches to correct uneven hips) that focuses on strengthening weak structures and mobilizing tight structures to fix your uneven hips – that you can do at home.
For the first uneven hips test, stand in front of a mirror and palpate the top of your hip bones and orient your hands flat to the floor. If one hand sits higher than the other, then you may be positive for an unevenness in hip height. For the second test, again stand in front of the mirror or better yet, take a video from behind you. Then, raise one leg so that your foot is off the ground. Hold this position for 30 seconds. Repeat this test on the other side. If the pelvis of the raised leg drops and the trunk muscles flex towards your planted leg, then that would indicate a positive for the Trendelenburg sign.
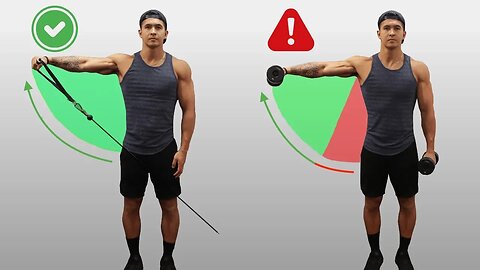
For test 3, we’re going to assess your hip symmetry when lifting. Next time you squat, look in the mirror and pay attention to your hips as they come up from the bottom. What some of you might notice is hip shifting during the squat. Sometimes this is caused by a strength imbalance where you preferentially shift towards your stronger hip. In other cases this is caused by a side to side hip mobility imbalance, specifically with external rotation.
Now, we’re going to dive into a simple yet effective 2 step plan (mobilize → strengthen) that you can start incorporating right away to fix uneven hips – even at home. Step 1 is all about mobility. The first exercise focuses on the hips with what’s known as the 90/90 drill. The second exercise is called “The Teapot”.
Step 2, strengthening, is arguably the most important step. To do so, we’ll use a progression going from 2 easier uneven hips exercises in level 1 to 2 more difficult ones in level 2 for you to move onto once ready. The first exercise in level 1 is the hip drop, which will work your glute medius isometrically as they stabilize the hips. The next exercise of this level is the side lying hip abduction, or what I like to call the “Jane Fonda”. Once you’ve mastered level 1 and your strength improves, you can move onto level 2. The first exercise we’ll use here is something called hip airplanes. The second exercise of this level, the RNT squat, helps tie everything together functionally and is especially helpful if you tested positive for hip shift when squatting.
Now let’s put this all together for you into a simple yet effective 10-minute corrective routine that’ll help address any uneven hip issues (e.g. left hip higher than right) – which could cause back pain.
Hip Mobility
1. 90/90 drill - 3 sets of 10 reps
2. QL stretch - 3 sets of 10
Hip Strengthening Progression Level 1
1. Hip Drop - 3 sets of 8-10 reps
2. Jane Fonda - 3 sets of 8-10 reps
Hip Strengthening Progression Level 2
1. Hip Airplanes (Assisted to Less Assisted) - 3 sets of 3-5 reps
2. RNT Squat - 3 sets of 6-8 reps (on affected side)
Perform the 4 exercises for whatever level you’re on in order and as a routine at least 2-3 times a week. After you’ve used this routine for a little while, it’s important to re-test your hip balance using whichever test you failed on to see if there have been any improvements. Then, once your asymmetries have been significantly improved, you won’t need to do these exercises as often but should still incorporate some of them into your weekly routine while just making an effort to get off your butt and move more in general!
But overall, it’s important to pay attention to often neglected muscles like the ones I went through in this video to prevent potential imbalances and injuries from creeping up later on down the road. And for a step-by-step all in one program that shows you week by week exactly how to train to build muscle and strength without leaving any important muscles behind, then take the analysis quiz to discover which science-based program would be best for you and where your body is currently at below:
https://builtwithscience.com/your-pot...)
Subscribe to my channel here:
https://www.youtube.com/jeremyethier/...
52
views
Leg Day - My Full Week of Training - Day 3 of 7
Train with me on my App⇩
https://www.myliftfitness.com/trainin...
Build Muscle & Achieve The Body You Want
✅ Instructional training videos
✅ My personal training notes
✅ "Chat with Davis" feature
✅ Community news feed
✅ Weight & PR tracker
✅ Food macronutrient tracker
✅ Progress photo uploader
✅ 7 Badass Workouts Available Each Week
✅ An exclusive 20% off ALL RYSE Supplements
————————————
Support this channel | Enjoy these discounts from my awesome sponsors:
RYSE Supps
⇨ 15% off when using my code: Davis
⇨ https://rysesupps.com
————————————
My Social Media
My Instagram ⇨ https://www.instagram.com/davis.diley...
My TikTok ⇨ https://www.tiktok.com/@davis.diley?l...
————————————
Filmed & Edited By - https://www.instagram.com/jacksonyoun...
————————————
#Bodybuilding #Muscle
8
views

How To Grow Your Rear Delts FAST (4 Key Exercises You’re Not Doing)
Let’s face it, most of us have underdeveloped rear delts (or "posterior deltoid"). In this video, you'll learn about the importance of developing your rear delts, and three key rear delt exercises you're not doing that will help you get big rear delts. We have underdeveloped rear delts mainly because we either tend to neglect them or we just don’t train them as effectively as we could be within our rear delt workout. And sorry to break it to you - a few sets of a reverse dumbbell fly just won't cut it!
The first exercise is going to be the barbell high row, which when performed correctly, will effectively hit the rear delts with some involvement of the biceps as well. Now to perform it, grab a barbell with a wide grip such that your arms are about 45 degrees out from your sides when standing. Next, set up how you would for a normal barbell row by slightly bending the knees and hinging at the hips until your back is almost parallel to the ground. Now at the starting position, think about pushing your fists down into the floor in order to protract your shoulder blades, as this will help prevent your traps from taking over the movement.
The next exercise, the dumbbell incline row, is another heavy movement that will effectively hit the rear delts. This rear delt exercise successfully incorporates the many movement functions of the rear delts with additional external rotation to emphasize the rear delts even more. Now to perform it, first set up a bench to an incline of roughly 30 degrees. Next, grab a pair of dumbbells in each hand and then lift the dumbbells up with your elbows angled out to your sides rather than tucked in, as anatomical analyses indicate that this puts the rear delts in a stronger position and prevents the lats from taking over. Now as you pull, you’ll want to externally rotate your shoulder by turning your wrists outwards during each rep. Hold the top position briefly while fully contracting your rear delts before coming back down.
The third exercise for the rear delts is going to be the lying face pull to now hit the rear delts with lighter weight and higher reps. Now although most of us know that the traditional standing or kneeling rope face pull is a great exercise for the rotator cuff and rear delts, I find that for a lot of people the traps, especially the upper traps, tend to take over the movement. However, by knowing that the upper traps are more active during upright exercises since they work as a postural muscle, we can modify the face pull by performing it laying on the ground instead. And to perform it, you simply perform a regular face pull but laying on your back instead.
This last exercise of the rear delt workout, the rear delt cable pull, is another great way to hit the rear delts with lighter weight and higher reps and is especially effective if you struggle with your neck, traps, or mid-back taking over on other rear delt exercises. So to properly perform it, what you’ll want to do is set up a cable to just higher than shoulder height. Grab the ball of the cable with no handle, and then simply bring your slightly bent arm down and back behind your body at an angle at around 45 degrees away from your side. Keep your elbow locked throughout each rep and as you come down, externally rotate your shoulder by twisting your arm and hand outwards as you bring the cable down.
I hope you were able to see that in order to grow your muscles in the fastest way possible, you need to not only carefully consider what exercises you perform but also how you perform them. And within my Built With Science programs, we not only put careful thought and research into each and every exercise that’s included in your routine, but we’ve also created in-depth tutorials for each exercise so that you can execute them optimally and build muscle as fast as possible.
To join today, simply head on over and take the starting point analysis quiz to discover the best program for you: https://builtwithscience.com/bws-free...
LINK TO WRIST STRAPS:
https://amzn.to/2YhLtWs
*The above link is an affiliate link meaning I will receive a small portion of the sale. Thank you in advance!
GRAPHICS:
Vector art from Vecteezy.com
MUSIC:
soundcloud.com/lakeyinspired
STUDIES:
STABILIZERS OF SHOULDER JOINT
https://www.ncbi.nlm.nih.gov/pubmed/1...
EGM ANALYSIS DELTOID STRENGTH TRAINING EXERCISES
https://www.bisp-surf.de/Record/PU201...
DELTOID MUSCLE CHARACTERISTICS
https://www.ncbi.nlm.nih.gov/pubmed/2...
ACE RESEARCH - TOP SHOULDER EXERCISES
https://www.acefitness.org/education-...
BACK ANATOMY
https://www.ncbi.nlm.nih.gov/books/NB...
REHABILITATION OF SCAPULAR MUSCLES
https://www.ncbi.nlm.nih.gov/pubmed/1...
74
views
Back & Biceps - My Full Week of Training - Day 2 of 7
Info on my training split is in my pinned comment✊🏼
Also, I want to give a shoutout to Paul Carter for the kneeling cable row (exercise 1) shown in this video. His info incredible - follow him on IG - LiftRunBang1
Train with me on my App⇩
https://www.myliftfitness.com/trainin...
Build Muscle & Achieve The Body You Want
✅ Instructional training videos
✅ My personal training notes
✅ "Chat with Davis" feature
✅ Community news feed
✅ Weight & PR tracker
✅ Food macronutrient tracker
✅ Progress photo uploader
✅ 7 Badass Workouts Available Each Week
✅ An exclusive 20% off ALL RYSE Supplements
————————————
Support this channel | Enjoy these discounts from my awesome sponsors:
RYSE Supps
⇨ 15% off when using my code: Davis
⇨ https://rysesupps.com
————————————
My Social Media
My Instagram ⇨ https://www.instagram.com/davis.diley...
My TikTok ⇨ https://www.tiktok.com/@davis.diley?l...
————————————
Filmed & Edited By - https://www.instagram.com/jacksonyoun...
————————————
#Bodybuilding #Muscle
33
views
How To Grow Your Chest With Only Push-Ups (FULL ROUTINE)
Can you build a big chest with push ups? Yes, you can. In this video, I’m going to share with you how you can build a massive chest by using push ups only. First, we’ll do a test to determine your current push up level, then we’ll go through how to pick the right push up variations based on that, and then complete your push up workout with 2 key exercises to speed up your gains. By the end, you’ll not only know how to build your chest muscles (fast) using just push ups, but also have a personalized weekly push-ups routine.
Step 1 of building your push up workout: assess your current push up level. First, warm-up. If you’re able to do push-ups, this is where you’ll want to do a few sets of 2-3 push-ups to get your body warmed up. Too difficult for a warm-up? You can do wall push-ups instead. After your warm-up, rest for about 2-3 minutes before the push-up test. When you’re ready, do as many push-ups as you can. Note down how many you get and see which level you fall under. Level 1 is if you got between 1-10 push-ups. Level 2 is if you got between 11-30 push-ups. Level 3 is if you got more than 30 push-ups
Step 2 is learning the push up variations suitable for your level to use in day 1 of your routine. For those in the 1-10 group, we’ll use the incline push ups that will require you to lift less of your bodyweight, making it easier for you to do. Simply perform your push-ups on an elevated platform and use a height that allows you to do 3 sets of 6-8 reps. For those in the 11-30 group, take the number of push-ups you can do in a row and take 70% of that. For those in the 30+ group, you’re going to use a slightly harder variation called hand release pushups. We’ll aim for 3 sets of half the number of what your max push-ups in a row number was from step 1. To perform it, get into a normal push-up set up, slowly come all the way down until your chest is resting on the ground, take your hands off the ground, place them back, and then continue a normal push-up.
Let’s now proceed to day 2, your strength day, which will further help you build a massive chest by (still) only using push ups. For the 1-10 group, you’ll use a variation that’s focused on the “downward” portion of the pushup. We’ll do 5 sets of just 1 rep of this variation. For the 11-30 group, for strength you’re going to do the hand release push ups mentioned earlier. For the 30+ group, we’ll want to do a variation that makes you lift more weight than you would with normal push-ups. We’ll do 3 sets of 50% of your max number of push-ups. To perform it, start in a normal push-up position, but come down to one hand instead of straight down. This shifts more of your bodyweight to one arm to increase the difficulty. Push back up using that one hand and then switch to the other hand for the next rep.
For day 3 all groups are going to do something called EMOM push-ups. To perform it, take 50% of your max pushups number. Then, using a timer, every minute for a total of 5 minutes you’re going to perform that number of push-ups.
Now it’s time to finish off your routine by adding 2 key movements that will speed up your push-up gains. When it comes to how to build your chest muscles (fast) using just push ups, this is ultimately key. The first is the shoulder tap, which will focus on strengthening these core muscles while integrating your shoulder, triceps, and chest muscles as well. The last exercise will add more volume to your routine while improving your push-ups power by focusing on the triceps. To perform it, you’ll do a standard push-up but with your hands placed closer together at about shoulder width apart. Based on your strength level, you can do these on an incline to make it easier or on a decline to make it more difficult. adjust the incline or decline of the movement based on your strength level like we did earlier with the standard push-up.
This routine is a lot of volume for your chest and triceps and should replace all of the chest and triceps exercises you’re currently doing. After starting the routine, every couple of weeks re-test how many push-ups you can do in a row. Once you graduate from one level, switch over your routine to the next level. Hopefully, at this point, you know clearly that you can definitely build a big chest with just push ups.
Within my Built With Science programs, I’ve used science and carefully thought out details to construct your weekly program in a way that will maximize your results and caters to your specific body and goals. To get started today you can take our free 1 minute quiz to find out which of our programs will best help you transform your body just like it’s done for thousands of our members below:
https://builtwithscience.com/your-pot...
Subscribe to my channel here:
https://www.youtube.com/jeremyethier/...
118
views
Full Back & Bicep Workout (How to Target 3 Regions of Lats) + How I Make My Videos
Train with me on my App⇩
https://www.myliftfitness.com/trainin...
Build Muscle & Achieve The Body You Want
✅ Instructional training videos
✅ My personal training notes
✅ "Chat with Davis" feature
✅ Community news feed
✅ Weight & PR tracker
✅ Food macronutrient tracker
✅ Progress photo uploader
✅ 7 Badass Workouts Available Each Week
✅ An exclusive 20% off ALL RYSE Supplements
————————————
Support this channel | Enjoy these discounts from my awesome sponsors:
RYSE Supps
⇨ 15% off when using my code: Davis
⇨ https://rysesupps.com
————————————
My Social Media
My Instagram ⇨ https://www.instagram.com/davis.diley...
My TikTok ⇨ https://www.tiktok.com/Davis.diley?la...
————————————
Filmed & Edited By - https://www.instagram.com/jacksonyoun...
————————————
#Bodybuilding #Muscle
14
views
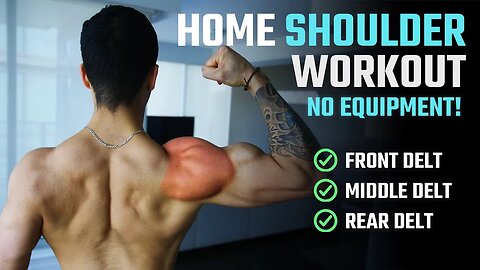
How To Grow Bigger Shoulders At Home (NO WEIGHTS WORKOUT)
If you want to build shoulders at home, you need to focus on hitting all of the three heads of the shoulders. Because adequately targeting and growing the front, middle, AND the often neglected rear delts really is key when it comes to creating that 3-dimensional, rounded look. By simply knowing what each head is responsible for doing, we can determine what bodyweight shoulder exercises can be used to effectively train each of these heads without the use of heavy weights. In this home shoulder workout, I’ll show not only show you what those shoulder building exercises are, but I’ll also show you how to properly progress each of them such that you can continue to grow your shoulders overtime as you get stronger, and all in the comfort of your own home. Without further ado, let’s get started on our shoulder workout at home!
The first exercise in the home shoulder workout is the pike-pushups, which mainly targets the front portion of your shoulders. Due to the similar mechanics of both exercises, this exercise can effectively replace the heavy overhead shoulder pressing movement we’d typically perform in the gym. To progress it even further from there you can first elevate your feet up to the edge of a platform and perform your reps on that. Then overtime, gradually move your hands closer to your feet to make the movement even more difficult.
Next, we’re going to use lateral raises in our shoulder workout at home to now target the side portion of your shoulders which helps give it that added width. Now this head of the delt is mainly responsible for shoulder abduction or in other words raising your arm out to the side. To make these easier, you can stand closer to the wall and use less of a lean. Then, overtime as you get stronger, you’ll want to gradually move further away from the wall and lean your body to a greater degree so that your side delts are now lifting a higher proportion of your bodyweight.
Next, it’s time to shift our emphasis onto the rear delts, which function to help pull the arm back behind the body and gives our shoulders that rounded, 3D look we’re after. We’ll effectively train our rear delts in this workout by performing rear delt rows, one of the best shoulder building exercises available, by using the bed sheet setup that I’ve shown in my other home workout videos. You can start with your feet further away from the door and then gradually move your feet closer to the door to make the movement more difficult overtime.
The last of the bodyweight shoulder exercises we’re including allows us to finish off the workout with a little more rear delt isolation, and it’s the rear delt fly. Here, you want to again use the bed sheet setup but this time you’ll straighten your arms in front of you with your palms inwards towards each other. If you don’t have access to bed sheets for this, a viable alternative are rear delt holds with external rotation. For this, I’d suggest using a combination of holding that end position for a longer pause, and adding additional load by holding onto water bottles, for example.
So to sum the video up, here’s what the workout that’ll help you build shoulders at home could look like:
Pike Push-Ups: 4 sets
Bodyweight Lateral Raises: 4 sets
Rear Delt Row (Sheets OR Doorway): 3 sets
Rear Delt Fly (Sheets OR Lying Holds): 3 sets
I’d recommend instead splitting the exercises up into at least 2 days throughout the week using an upper/lower split for example in order to better manage the training volume and frequency. Ideally you want to use a rep range of roughly 10-15 reps per set. But worry less about this and instead focus on taking each set of the workout either to failure or within a rep or two short of failure in order to maximize growth despite having access to heavy weights.
By executing and progressing this workout properly overtime as you get stronger, you’ll be able to build your shoulders in the comfort of your own home without the need for heavy weights. Just keep in mind though that that’s just one piece of the puzzle. Because pairing your workouts with the right nutrition plan is essential when it comes to seeing results and packing on size. And for a step-by-step science-based program that takes care of all the guesswork for you by showing you both how to workout AND what to eat week after week in order to build muscle as efficiently as possible with science, then simply take the analysis quiz below to discover which specific program is best for your body and where it’s currently at:
https://builtwithscience.com/bws-free...
MUSIC:
https://soundcloud.com/iamryanlittle
Filmed by: Bruno Martin Del Campo
Subscribe to my channel here:
https://www.youtube.com/jeremyethier/...
56
views
Chest & Shoulders - Workout for Growth
Train with me on my App⇩
https://www.myliftfitness.com/trainin...
Build Muscle & Achieve The Body You Want
✅ Instructional training videos
✅ My personal training notes
✅ "Chat with Davis" feature
✅ Community news feed
✅ Weight & PR tracker
✅ Food macronutrient tracker
✅ Progress photo uploader
✅ 7 Badass Workouts Available Each Week
✅ An exclusive 20% off ALL RYSE Supplements
————————————
Original Music By: META FORZA
Follow him for more: @beatsbyforza
https://instagram.com/beatsbyforza
————————————
Support this channel | Enjoy these discounts from my awesome sponsors:
RYSE Supps
⇨ 15% off when using my code: Davis
⇨ https://rysesupps.com
ICESHAKER
⇨ 15% off when using my code: Davis
⇨ https://www.iceshaker.com
————————————
My Social Media
My Instagram ⇨ https://www.instagram.com/davis.diley...
My TikTok ⇨ https://www.tiktok.com/@davis.diley?l...
————————————
This video was filmed at Palm Beach Gym in Boca Raton Florida ☀️
————————————
#Bodybuilding #ChestWorkout #Shoulderworkout
23
views
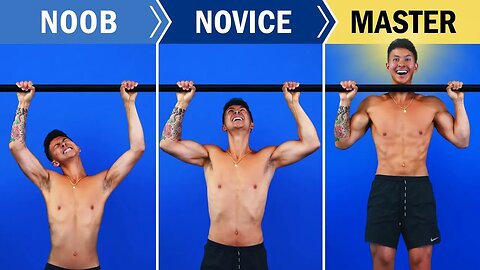
How To Get Your First Pull-Up (4 Steps)
I’m going to share with you the most effective pull up progression routine to master the exercise. First we’ll cover the science behind the 5 key muscles that make mastering the pull up so difficult, then we’ll increase your pullup strength by going through the best exercises that’ll strengthen these muscles by about 56% faster than normal. By the end of this video, you’ll know exactly how to do a pull up, and also know the exact steps needed to get your pull ups from beginner, to novice, to master.
Pull ups can be very difficult to master for two main reasons. First, they require a certain amount of strength in several key muscles (i.e., the core, the lats, the mid and lower traps, and the biceps) that tend to be weak. Second, they require your body to use these several muscles to work together. Your mid traps, lower traps and your core muscles have to keep your body stable while your lats and biceps pull your body up. To solve this, we’ll use a 4 step plan.
Step 1 of your 4-step pull up progression routine: we’ll use 3 different pull-up variations to accelerate strength gains by about 56% (vs. only practicing it once per week). To further accelerate your strength gains by another 20% or so, we’ll perform these 3 variations with a method called daily undulating periodization. Variation 1 is the kneeling lat pulldown. Variation 2, negative pull ups, will be your “secret weapon” in gaining the strength you need. Variation 3, banded pull ups, when properly setup will be the closest thing to performing a standard pull-up.
Here’s what your schedule should currently look like:
Session 1:
Kneeling Lat-Pulldown: 3 sets of 5 reps (heavy enough to slightly bring your knees off the ground
Session 2:
Negative Pull-ups: 5 sets of 1 rep (as slow as possible)
Session 3:
Banded Pull-ups: 3 sets of 4-8 reps
In step 2, we’ll increase your pullup strength by adding 4 accessory movements. The first movement, activated hangs, will help with improving your grip strength and the endurance of your back and core muscles. The second movement (Australian pull ups) will be added to session 1 of your routine. This movement teaches your body how to control itself as you pull, and will continue to strengthen the important core and back muscles used in the pull-up. The third exercise is the lat pulldown help add more overall pulling volume to your routine. We’ll use an overhand wide grip in one of our weekly sessions and an underhand close grip in the other session.
Your weekly pull up training should now look like this:
Session 1
Activated Hangs: 3 x 10s
Kneeling Pulldown: 3 x 5
Australian Pull-ups: 3 x 8-12
Session 2
Activated Hangs: 3 x 10s
Negative Pull-ups: 5 x 1
Overhand Lat-Pulldown: 3 x 8-12
Session 3
Activated Hangs: 3 x 10s
Banded Pull-ups: 3 x 4-8
Underhand Pulldown: 3 x 8-12
Now let’s go through how to build your strength in each of the exercises in your routine. For the kneeling lat pull-down, you primarily want to focus on increasing the weight. For the negative pull-ups, every week you’ll want to increase the time it takes you to descend from the top position. For your banded pull ups, start with a band that allows you to do 3 sets of 4 reps. Continue using this band until you can do 3 sets of 8 reps. One you can do that, drop to the next smaller band you have to make it more difficult. For your Australian pull-ups, you want to aim to do 3 sets of 10 reps. Once you can do that, you can make this harder by reducing the height of the bar. For your holds, simply attempt to increase the time you can hold. For the seated lat pulldowns, simply increase the weight every time you can successfully do 3 sets of 12 reps.
First off, to use this routine for the best results, replace all of your current back training with these 3 weekly sessions and do them consistently. It would also be a good idea to reduce the number of sets you do by about 10-20% for your other upper body muscles. Then, after a week or two of this, before each of these 3 weekly sessions start your session by attempting to do a chin-up. Once you can do a few chin-ups in a row, you’ll likely not only know just how to do a pull up, but also have the strength needed to master your first solid pull up and can build from there.
Within our Built With Science programs, we take care of all the guesswork in your routines by crafting a weekly program that caters to your specific body and fitness goals. To find out which of our programs are best suited for you, you can take the analysis quiz to discover which science-based program would be best for you and where your body is currently at below:
https://builtwithscience.com/your-pot...
Subscribe to my channel here:
https://www.youtube.com/jeremyethier/...
Music by:
https://brettjanzen.ca/
brettjanzenmusic@gmail.com
70
views

Chest & Triceps - My Full Week of Training - Day 1 of 7
Train with me on my App⇩
https://www.myliftfitness.com/trainin...
Build Muscle & Achieve The Body You Want
✅ Instructional training videos
✅ My personal training notes
✅ "Chat with Davis" feature
✅ Community news feed
✅ Weight & PR tracker
✅ Food macronutrient tracker
✅ Progress photo uploader
✅ 7 Badass Workouts Available Each Week
✅ An exclusive 20% off ALL RYSE Supplements
————————————
Support this channel | Enjoy these discounts from my awesome sponsors:
RYSE Supps
⇨ 15% off when using my code: Davis
⇨ https://rysesupps.com
————————————
My Social Media
My Instagram ⇨ https://www.instagram.com/davis.diley...
My TikTok ⇨ https://www.tiktok.com/@davis.diley?l...
————————————
Filmed & Edited By - https://www.instagram.com/jacksonyoun...
————————————
#Bodybuilding #Muscle
17
views
How To Get WIDER Shoulders (3 Training Mistakes You’re Probably Making)
Wider, broader looking shoulders are one of the most sought after bodily features that most men aim to achieve. This is likely because wider shoulders not only accentuate a powerful looking upper body, but bigger shoulders also create the appearance of a smaller waist as a result. And although genetics will play some role in how wide your shoulders appear, you can definitely add further width to them by targeting the lateral deltoids with proper shoulder exercises and wider shoulder workouts. Given that the lateral deltoids comprise the middle portion of your shoulders, adding more size to them will create the effect of wider looking shoulders. However, even if you choose the right broad shoulder workout, you want to make sure you are performing them optimally in order to see the best results. In this video I go through 3 of the most common shoulder training mistakes preventing people from getting bigger shoulders.
First, you want to ensure you’re varying the resistance curve applied to your shoulders during your shoulder workouts. This is done by choosing the right shoulder exercises. Rather than exclusively sticking to dumbbell lateral raises, incorporate some cable lateral raises since the cables enable tension to be applied to the shoulder throughout the whole range of motion. You can rotate between the two shoulder exercises throughout the week and/or perform both exercises during your shoulder training.
Next, you want to ensure that during the lateral raise that you’re not leading with your hands. At the top position, if your hands are higher than your elbows then you’re performing more external rotation which isn’t the main function of the shoulder and is instead involves more of the rotator cuff. To fix this, simply think about driving up with your elbows and having your hands stay inline with the elbow at the top position.
Lastly, during your shoulder exercises you need to make sure that you’re not letting the traps takeover the movement as you perform them. For example, during the overhead shoulder press or lateral raise, as you lift the weight up you want to make sure your shoulders aren’t shrugging up and tensing at the upper traps as you do so. Instead, keep the upper traps relaxed and pulled down before and throughout the movement.
As I say quite often, if you want to see the best results then it’s vital that you choose the right exercises and variations. But, even more importantly is that you apply them correctly within your routine.
For an all-in-one step by step program that optimizes your workout and nutrition based on science, head on over to the link below to find out what science-based program is best for you:
https://builtwithscience.com/bws-free...
WRITTEN ARTICLE:
https://builtwithscience.com/how-to-g...
FOLLOW ME ON INSTAGRAM & FACEBOOK:
https://www.instagram.com/jeremyethier/
https://www.facebook.com/Jeremyethier...
FILMED BY:
Abdo Megahid
Vimeo: https://www.vimeo.com/abdohmegahed
Facebook: https://www.facebook.com/abdohmegahid
Instagram: @abdohmegahed
MUSIC:
Soundcloud.com/lakeyinspired
STUDIES:
Wider shoulders and attractiveness:
https://www.ncbi.nlm.nih.gov/pubmed/7...
https://psycnet.apa.org/record/1996-1... https://link.springer.com/article/10....
Dumbbell lateral raise EMG:
https://www.bisp-surf.de/Record/PU201...
Lean-away lateral raise:
https://www.ncbi.nlm.nih.gov/pubmed/7...
13
views
How To Get Stronger AND Bigger Muscles (4 Things To Avoid)
Some people’s muscles tend to get stronger but not bigger over time. There are several possible causes for this. But, in general, it’s because they’re training in a way that emphasizes strength vs muscle growth – even if they’re unaware of it. If you’re not gaining muscle mass, but, instead gaining strength, you’re likely making this mistake too. But don’t worry. By the end of this video, you’ll know 4 ways that’ll help you prioritize muscle building vs strength – and that, when done together, will prevent you from getting stronger but not bigger.
The first reason why you’re getting stronger but not bigger is your training is more geared towards improving your strength rather than size. You want to fully activate your whole muscle to maximize growth. The last 5 or so reps performed in a set is where this happens. These are called “effective reps”. When using lighter weight, the first several reps that you perform are not as effective for growth. The last several reps provide the most gains. On the other hand, when using a really heavy weight, you’re able to fully activate the muscle much earlier on because it needs all the help it can get to lift that heavy weight. But, as a result, you’re not able to do as many reps. In this case, you're not exposing the muscle to enough of these “effective reps” to maximize growth. Meaning? Do more sets with a slightly higher rep range (6-12 reps) and less sets of very heavy, low rep training (2-4 reps). Your strength gains may slow down as a result, but your muscle gains will benefit considerably.
The second reason for stronger but not bigger muscles is “artificial” strength gains. This is where on paper you may be lifting heavier weights, but in reality you’re cheating to get there. You’re incorporating more momentum, using less range of motion, performing your reps faster, and recruiting other muscles to help you out. So whenever you decide to add more weight to an exercise, pay very close attention to how you perform the exercise with the new weight and ensure that every little detail in your execution remains the same. Otherwise, the only thing you’ll be growing is your ego.
The third reason you’re not gaining muscle mass, but, instead gaining strength, is because of something called neurological adaptations. When you first do a new exercise, you’ll get stronger rapidly. This is not because your muscle got a lot bigger, but is because your brain’s ability to activate that muscle during the exercise has improved (i.e. neurological adaptations). This period lasts about 8-12 weeks. But the good news is, AFTER you’ve maxed these out, further increases in strength are mostly because of increasing muscle size.
This is one of the reasons why it’s so important to stay consistent with your exercises week after week. If you’ve only been in the gym for a few weeks or have recently re-introduced a new exercise into your regimen, this is a likely explanation for why you’re experiencing a ton of strength gains with not much muscle to show for it. In this case, the most important thing is to not give up, your gains are just around the corner.
The final cause is VERY common but the easiest to fix; you’re not eating enough. It’s important to eat enough when you’re trying to prioritize muscle building vs strength because muscle growth requires having enough energy available. Now although in certain scenarios you definitely can build muscle while in a calorie deficit, being in a calorie surplus does appear to optimize the muscle building process and seems to become more and more important as an individual becomes more trained. Meaning, that when it comes down to it many of you watching simply just need to eat more. But this doesn’t mean simply adding an extra 1,000 calories to your daily intake. That’ll lead to a lot of fat gain instead of muscle.
A good recommendation if you haven’t been gaining weight and increasing in size is to take your current caloric intake and increase it by approximately 10-20%. This small bump should help to provide you with the energy needed to maximize the muscle building process while also limiting excess fat gain.
Implement what I went through in this video to start training in a way that prioritizes muscle growth vs strength and you’ll visually start seeing the results you’re after. And for a step-by-step program that takes care of all of the guesswork for you, then simply take our free analysis quiz below, and we’ll show you what approach will best help you attain a lean, attractive looking physique:
https://builtwithscience.com/your-pot...)
Subscribe to my channel here:
https://www.youtube.com/jeremyethier/...
Music by:
https://brettjanzen.ca/
brettjanzenmusic@gmail.com
72
views

Creatine 4 Step Guide
Here is a 4-Step guide on how to use creatine correctly #gymtok #fittok
7
views
Perfect Deadlift Stance For Hip
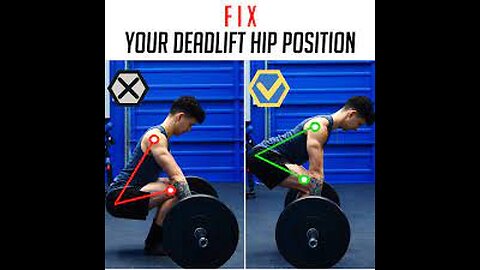
Here’s how to find the perfect deadlift stance for your hip structure. #science #gymtok #fittok
5
views
How To Get Ripped Obliques- 3 BEST Oblique Exercises You Should Be Doing
One of the biggest mistakes people make with their core workout or six pack abs workout is overlooking the obliques and failing to realize their importance towards contributing to a well-developed midsection. Based on the orientation of the obliques and the way their fibers run, they can help visually taper and narrow your waistline. It would, therefore, be in your best interest to start incorporating oblique exercises into your training plan. In this video, I cover the best obliques abs exercises, such as oblique crunches and oblique twists, you need to incorporate into your obliques workout.
The obliques actually have 2 lesser-known functions that most people overlook: it assists in the posterior pelvic tilt and tucking the ribs down and in, and it also assists in drawing in your abdomen by bringing the belly button in towards the spine. Research, therefore, shows that by implementing these two additional functions of the obliques during your obliques workout, you’re able to achieve even greater activation.
One of the best obliques ab exercises is the high to low cable woodchoppers. It's a great option as it enables us to apply weighted resistance directly in line with the diagonal way the oblique fibers run. The key here is to focus on the rotational aspect of the movement. You should minimize the use of your arms muscles by keeping your elbow position locked, rather than bending and extending them or swinging the weight down with your arms. When done properly, you should feel a strong contraction corresponding to the side of the obliques that you’re pulling towards. And for this exercise, you’ll want to implement a lower rep range of roughly 10-15 reps.
Next, we’ll follow this up with the bicycle crunch. This exercise has actually been shown in some EMG analyses to elicit quite high obliques activation compared to other oblique exercises. But in order to maximize the effectiveness of this exercise for the obliques, we need to ensure that we’re implementing all of the obliques functions as we perform it. And in terms of exercise execution, don’t do what most people guys and just try to touch your elbow to your knee which just ends up in form compensations. Instead, remember what the obliques function to do and put your focus on simply crunching to the one side while rotating your torso. Ignore where your elbows and knees end up and instead just go as far as you’re capable of to each side while still actually feeling the obliques working during each rep. And for this exercise you should definitely use a much higher rep range of over 15 reps per side.
Next we’re going to move onto twisting leg raises – one of the best oblique twists exercise variation. Now the traditional leg raise itself with no twist has actually been shown in a few EMG analyses to already provide superior obliques activation when compared to other common core exercises. To make the movement more of an oblique exercise, we can simply incorporate a twist into each rep as you come up since this will now incorporate lateral flexion and rotation of the torso into the movement. But again, just as we did with the last exercise, it’s vital that you don’t forget to incorporate the two additional functions of the obliques by moving into posterior pelvic tilt and drawing in the abdomen before you start your reps. And due to the difficulty of this exercise, a rep range of anywhere between 10-20 reps is ideal. But again, the focus needs to be on controlling and actively using your obliques every single rep.
As for frequency and number of sets recommendations for these movements in an oblique workout, I’d recommend throwing 3-4 sets of each of these into your current ab training. And as for your abs training, you should be doing them once to even 4 times a week, depending on how much volume you’re doing during each session. In any case, though, try out these movements and figure out which works best for you.
But keep in mind that picking the right core exercises to do in your oblique workout is just one part of the equation. Dialing in your nutrition and eating the right amount and types of foods are really the key to leaning down and defining that mid-section. For a step-by-step program that shows you exactly how to train and how to set up your nutrition to transform your body with science, take the quiz below: https://builtwithscience.com/bws-free...
Filmed by: Bruno Martin Del Campo
Filmed at: Club One Fitness Gym
MUSIC:
Soundcloud.com/lakeyinspired
STUDIES:
GREATER ACTIVATION OF THE OBLIQUES THROUGH POSTERIOR PELVIC TILT
https://www.ncbi.nlm.nih.gov/pmc/arti...
GREATER ACTIVATION OF THE OBLIQUES THROUGH ABDOMINAL DRAWING IN
https://www.ncbi.nlm.nih.gov/pmc/arti...
BICYCLE CRUNCH OBLIQUES ACTIVATION
https://www.acefitness.org/getfit/stu...
63
views
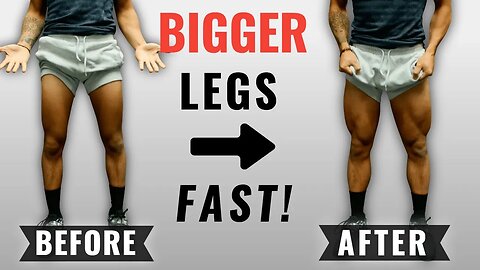
How To Get Bigger Legs FAST (3 Science-Based Tips For Bigger Quads)
When it comes to how to add mass to your legs or how to build bigger legs, you need to do the right leg workouts. But even with the right leg workouts and quad exercises, you still may not be seeing any visible quads growth. Within this video I explain why that may be the case by covering three leg workout mistakes I see people make all the time, which are slowing down their quad gains. And to prevent you from making the same mistakes, I'll go through each error in detail, so you know what not to do when it comes to how to get big quads. I’ll also show you what to do instead so you can build bigger quads, faster.
First, if you want to add size to your legs, pay attention to your exercise execution. What most people don't realize is that you can make minor tweaks to the way you perform your leg exercises. In doing so, you'll shift tension away from the glutes and hamstrings, onto the quads. For example, by tweaking the angles of your shin, torso, and application of force through your feet, you’d be able to shift the emphasis of the forward lunge from your glutes and hamstrings, to your quadriceps instead. Also, by shifting your feet placement down on the leg press slightly, you'd be able to emphasize your quads further. But do keep in mind that these tweaks will shift a little more force and stress onto the knees as a result.
When training quads, the second mistake I commonly see in the gym is a short range of motion for leg exercises. But multiple EMG studies have found that your quads are only increasingly activated the deeper you go. And this holds up until around 105-120 degrees of knee flexion. This means that it’s the very bottom of these lifts that seem to be the most important for quad growth. This is supported by a 2013 paper that found significantly greater quad muscle growth with a full range of motion squat, in comparison to a partial one. You can start increasing your range of motion for your squat or any similar movement by aiming to get your upper thigh at least parallel with the ground, or even slightly lower. And for your leg press, go past 90 degrees of knee flexion and as deep as you’re capable of doing safely.
If you struggle with increasing your range of motion, you need to look at mistake 3: neglecting your ankle's mobility. A 2015 paper found that increasing ankle mobility was strongly correlated with a greater ability to squat deeper. Which is problematic for most of you out there trying to get bigger quads. That's because if you try to achieve a full squat or leg press or even if you try to apply the quad modifications without sufficient ankle mobility, your body biomechanically won't let you. Instead, it will compensate by lifting your heels and/or bending your torso forward, for example.
So when it comes to how to get big quads and improve your form, you need to focus more on your ankle mobility. You can do so easily by just getting into the habit of regularly doing the following described routine. First, roll out the bottom of your feet and then your calves side to side as well as your shins to loosen up the soft tissue. Then, you'll want to move onto a couple of dynamic ankle mobility drills like the knee to wall drill and/or a weighted stretch. By regularly doing a routine like this, especially right before your actual leg workout, you're going to drastically improve your ability to apply the various tweaks I mentioned in this video and hence boost your quad growth in the long run.
By learning how to build big quads the proper way, I hope you now see why you may not have been seeing the leg growth that you’re after. And for a step-by-step program that avoids these mistakes for you and applies the science to enable you to build muscle and add size as effectively as possible, just like Brian over here did in 9 months, then take the start point analysis quiz below to determine what program is best for you:
https://builtwithscience.com/bws-free...
LINK TO MY LIFTING SHOES (*this is an affiliate link, and I will get a portion of the sale, so thank you in advance!):
https://amzn.to/2msqnUH
Filmed by: Bruno Martin Del Campo
MUSIC:
soundcloud.com/lakeyinspired
FOLLOW ME:
https://www.instagram.com/jeremyethier/
STUDIES:
FORWARD LUNGES
https://www.ncbi.nlm.nih.gov/pubmed/2...
LEG PRESS
https://www.ncbi.nlm.nih.gov/pubmed/2...
RANGE OF MOTION (LEG PRESS)
https://www.ncbi.nlm.nih.gov/pubmed/8...
RANGE OF MOTION (SQUATS)
https://www.ncbi.nlm.nih.gov/pubmed/2...
FULL VERSUS PARTIAL RANGE OF MOTION (2013 PAPER)
https://link.springer.com/article/10....
FULL VERSUS PARTIAL RANGE OF MOTION (VARYING WEIGHTS)
https://www.ncbi.nlm.nih.gov/pubmed/2...
KNEE JOINT LOAD
https://www.ncbi.nlm.nih.gov/pubmed/2...
ANKLE MOBILITY
https://www.ncbi.nlm.nih.gov/pmc/arti...
88
views
How to Get BIGGER By Doing LESS (Start Doing This!)
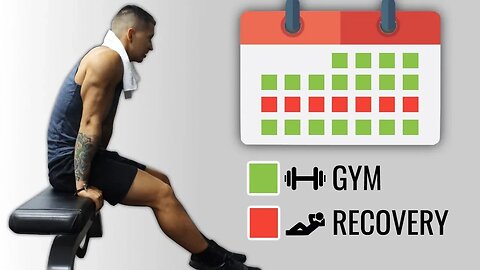
Let’s face it, building muscle is no easy feat and requires you to consistently push yourself harder and harder in the gym week after week. But, there is one often overlooked aspect of training that can enable you to gain more size and strength more effectively, all with less effort than you’re currently putting in. And it’s with something called deload weeks. What is a deload week? A deload week is basically a week where you take it easier on your training.This is done by significantly decreasing your workload for that week. This then enables your body to fully recover and come back bigger and stronger afterwards. Why should you deload? Well, the reasoning behind this is based on research of how the body deals with and recovers from the physical stress of our workouts. Basically, with our training we provide physical stress to our muscles during our workouts. This breaks down portions of our muscle and as a result actually temporarily decreases components of our fitness like our strength. Then, as we recover by using rest days and deload weeks, the body adapts and comes back bigger and stronger for the next session. This is a phenomenon commonly known as supercompensation. Thus, if you’re training hard and consistently, then a deload week is something that you must add to your routine. But unfortunately, most people just don’t know how to deload properly.
So let’s go through how to do a deload week. If you’re a beginner just starting out in the gym or someone who just doesn’t push hard during their workouts, then a full deload week isn’t needed. Instead, you’ll want to focus on getting stronger every week until you reach a plateau. Then, you can lighten the weight you’re stuck on by 10% or so before re-trying that weight the next session. However, as an intermediate lifter you’ll need to implement a deload week. As for how often to deload in this case, you’ll want to run it every 4-8 weeks. And to run it successfully, you’ll want to still go to the gym and perform your usual workouts by lift about 10% ligher than you usually do and cut your workout volume in half. This can be done by doing half the number of sets and less reps for example. As for your deload week cardio and deload week nutrition, simply eat at maintenance calories and avoid any high intensity cardio. The same applies if you’re deloading on a cut. By implementing this into your routine, you’ll notice a big improvement in your fatigue levels and your ability to continuously progress in the gym.
VIEW MY SCIENCE-BASED PROGRAMS HERE:
https://builtwithscience.com/bws-free...
WRITTEN ARTICLE:
https://builtwithscience.com/deload-w...
FOLLOW ME ON INSTAGRAM & FACEBOOK:
https://www.instagram.com/jeremyethier/
https://www.facebook.com/Jeremyethier...
FILMED BY:
Abdo Megahid
Vimeo: https://www.vimeo.com/abdohmegahed
Facebook: https://www.facebook.com/abdohmegahid
Instagram: @abdohmegahed
FILMED AT:
Club One Fitness
https://www.facebook.com/Club-One-Fit...
MUSIC:
Soundcloud.com/lakeyinspired
STUDIES:
Intermittent vs continuous workouts study:
https://www.ncbi.nlm.nih.gov/pubmed/2...
Deload weeks improve strength & how to deload properly:
https://www.ncbi.nlm.nih.gov/pubmed/1... , https://www.ncbi.nlm.nih.gov/pubmed/?...
https://www.researchgate.net/publicat...
6
views
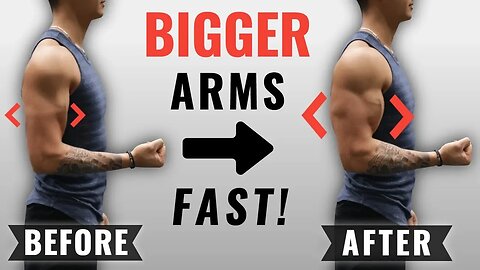
How to Get Bigger Arms FAST (4 Science-Based Tips)
One of the most frequent questions I get asked is “how to get bigger arms”. This is an important question since big arms (big biceps and big triceps) can dramatically improve your physique. However, at the same time, most people don’t realize that building bigger arms is no easy feat and is a much slower process than most people perceive it to be. Even if you choose all the right arm exercises and do all the right arm workouts, growing bigger arms can often seem painfully slow. However, if you’re serious about getting bigger arms, then luckily there are a few arm exercise strategies that research indicates are able to considerably speed up the process.
The first thing you’ll want to do is ensure you’re doing enough volume and enough arm exercises in general. Research has indicated that increase the volume dedicated to your arms can speed up growth. This can be easily done by adding an extra arm exercise to your routine or adding an extra set to your arm training every week, and gradually building up to 20+ weekly sets for the arms. This includes indirect work from compound movements. Then, once progress stagnates, reduce the volume of your biceps and triceps exercises for a while before repeating the process.
Next, you’ll want to prioritize arm development by moving your arm exercises to the beginning of your workout. Research has shown that prioritizing the arms in this way provides better results in terms of bigger biceps and bigger triceps, as opposed to performing your arm exercises last. So in a pull workout for example, move your biceps exercises before your back exercises to prioritize the arms more.
Next, you’ll want to focus on progressing your arm isolation exercises just as you would your main compound movements. Research indicates that progress with isolation exercises is a better indicator of muscle growth than progress with compound exercises. Meaning that you need to focus on progressing your arm isolation exercises week to week, as this will be more indicative of arm growth overtime.
Lastly, in order to best apply the previous tip, you’ll want to avoid switching up your arm exercises too frequently. This way you’ll be able to better track your progress with them overtime and get stronger with them week after week. Only once your progress plateaus or you get bored/demotivated of the same exercises should you consider switching it up.
As I say quite often, if you want to see the best results then it’s vital that you choose the right exercises and variations. But, even more importantly is that you implement and progress them correctly within your routine.
For an all-in-one step by step program that optimizes your workout and nutrition based on science, head on over to the link below to find out what science-based program is best for you:
https://builtwithscience.com/bws-free...
WRITTEN ARTICLE:
https://builtwithscience.com/how-to-g...
FOLLOW ME ON INSTAGRAM & FACEBOOK:
https://www.instagram.com/jeremyethier/
https://www.facebook.com/Jeremyethier...
FILMED BY:
Abdo Megahid
Vimeo: https://www.vimeo.com/abdohmegahed
Facebook: https://www.facebook.com/abdohmegahid
Instagram: @abdohmegahed
FILMED AT:
Club One Fitness
https://www.facebook.com/Club-One-Fit...
STUDIES:
Training volume and arm growth:
https://www.ncbi.nlm.nih.gov/pubmed/3...
https://www.ncbi.nlm.nih.gov/pubmed/2...
https://journals.lww.com/nsca-jscr/Ab...
Order of arm exercises:
https://www.sciencedirect.com/science...
https://link.springer.com/article/10....
https://www.ncbi.nlm.nih.gov/pubmed/2...
https://www.ncbi.nlm.nih.gov/pubmed/2...
Isolation exercises more indicative of growth:
https://www.ncbi.nlm.nih.gov/pubmed/2...
Music:
https://soundcloud.com/lakeyinspired
34
views
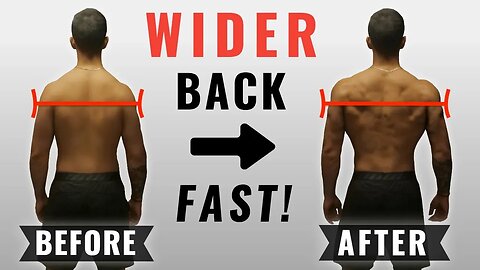
How to get a WIDER Back FAST (4 Science-Based Tips)
Like many other gym-goers, one of the main things I wanted to achieve when I first started lifting was a wider back. A wider back helps build out your V-taper and creates the illusion of a smaller waist. But how do you develop a wider back fast? If you’re seeking to do this, then the main muscle that you’re going to want to develop are the lats, as growing this muscle will help effectively add the width to your back that you’re after.
But, unfortunately, doing so often isn’t as simple as just hammering away at the lat pulldown machine. Because adding a decent amount of width to your back requires more than just performing all of the right exercises. In this video, I’ll be explaining a range of training strategies you can use to build a bigger and thicker back.
Activate The Lats Properly: First, you need to ensure that you’re able to maximally activate and utilize your lats in the first place. This is because for most lifters, one of the more difficult muscles to activate and actually feel working when training tends to be the lats, which often leads to other muscle groups like the biceps and traps to take over and essentially steals gains from the lats during back training. This is detrimental since we know based on a recently published 2018 study that establishing a strong mind-muscle connection with your muscles when training them seems to boost growth.
Target the Upper And Lower Lats: Next, you need to ensure that you’re emphasizing both the upper and lower lats within your training. If you want to maximize your back width, then it’s vital that you target both the upper and lower regions of the lats appropriately during your training which most people unknowingly fail to do.
Exercises that involve more shoulder adduction where the angle of pull is more in line with the upper lat fibers will more effectively hit the upper region, such as wide grip pull-ups or wide grip pulldowns. The lower region of the lats run more parallel to the body and are basically straight up and down. Therefore, exercises such as close grip pulldowns, chin-ups, and close grip rows will more effectively hit this region.
Make Your Rowing More Lats-Focused: Next, we want to tweak your rowing exercises to focus more on the lats. Now when most people think of lat exercises, they mainly think of pull-downs and pull-ups. But it’s important to realize that many rowing exercises when done properly are just as effective at building the lats. In fact, as shown in this EMG analysis from a 2018 study by the American Council of Exercise, we can see that many rowing movements elicit lat activation similar to that of pull-ups and lat pulldowns. Let’s take a look at the seated row for example.
If you perform it by angling the elbows out away from the sides more and focus on squeezing the shoulder blades together every rep, then you’ll be mainly emphasizing the traps and rhomboids. Whereas if you instead tuck the elbows in close to your sides, pull slightly lower, and think about pulling your elbows down and back then you’ll be able to emphasize the lats much more since you’re putting it in a more mechanically advantageous position.
Engage The Lats During Deadlifts: Lastly, you’ll want to ensure you’re properly using your lats during the deadlift. So to do this, before you lift, pull the bar into your shins and think about essentially performing a straight arm pulldown with the bar in order to engage the lats. You should now feel your lat muscles activated and turned on as a result of this.
It really is key training tips like the ones I mentioned in this video that is going to make all the difference if you want to build muscle as fast and as effectively as possible. And that’s exactly why within each of my Built With Science programs, we’ve taken the time to not only carefully select each and every exercise included in your weekly routine but we’ll also show you exactly how to optimally perform it and use it to build muscle based on science. To join today just head on over to builtwithscience.com and take the analysis quiz to discover which program is best for you and your specific starting point.
To join today, simply head on over and take the starting point analysis quiz to discover the best program for you:
https://builtwithscience.com/bws-free...
LINK TO RESISTANCE BANDS: https://shop.builtwithscience.com/
GRAPHICS: Vector art from Vecteezy.com
MUSIC: soundcloud.com/lakeyinspired
STUDIES:
MIND-MUSCLE CONNECTION
https://www.researchgate.net/publicat...
LAT ACTIVATION DURING LAT PULL-DOWN
https://www.ncbi.nlm.nih.gov/pubmed/1...
BEST BACK EXERCISE REVIEW
https://www.acefitness.org/education-...
68
views
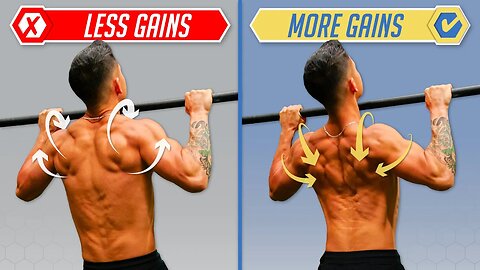
How To Get MORE Gains From Pull-Ups (4 Mistakes You Need To Fix)
Want to do better pull ups? Want to increase reps on pull ups? You’ve clicked on the right video. Pull-ups are one of the oldest yet most widely used back exercise out there - and for good reason. They’re convenient to do and very effective at growing and strengthening your mid and upper back muscles. But, despite how simple this exercise may seem, the truth is that most lifters screw this movement up with a few common pull up mistakes that take away from the effectiveness of this exercise. In this video I’ll cover exactly what those errors are so that you can instantly build MORE muscle with pullups – in turn, helping you increase pullup strength. And get more pullups.
The first mistake has to do with grip width. Gripping the bat too wide makes pull-ups less effective for two reasons. One is that it shortens the range of motion of the movement which may enable you to do more reps can compromise growth due to the limited range of motion your back muscles will experience each rep. And second, is that it puts your shoulders in a more compromised position. Which can obviously be detrimental for your gains in the event that you do actually end up harming your shoulder. You also don’t want to grip the bar too narrow. This can not only shift some of the tension away from your back muscles, but can also make your forearm muscles now the limiting factor in your pull-up. So, what you want to do for better pull ups is grip the bar not too wide and not too narrow. Use a grip that’s slightly outside of shoulder width.
The second mistake you’re making is failing to properly engage your core during the exercise. Now although this isn’t necessarily “bad”, it does create a great deal of instability and wasted energy during the pull-up which can negatively affect your strength in the movement. So instead, before you even go into your pull-up, start with your legs straight if possible and then crunch yourself into this “C” position by engaging your abs. Then from here, keep your core engaged and maintain that position as you perform each rep. This will not only instantly provide a ton more stability into your pull-ups, but by setting your lower back in this more stable position it can also enable your lats to pull with more force because they attach into the low back.
The next mistake is losing form at the top of the pull-up. Usually, they do so by letting the shoulders shrug up to the ears and roll forward as they struggle to get above the bar. This not only puts the shoulders in a compromised position but also disengages the back muscles that we’re trying to target. Instead, to build more muscle with pullups, we want to keep the shoulders back and externally rotated and chest upright even as we get to the top. To do so, before you initiate the pull, first set your shoulders by pulling your shoulder blades down and back so that your shoulders move down away from your ears. Then, as you’re pulling, simply think about pulling yourself up by leading with your chest and trying to get your upper chest or collar bone to the bar.
The last mistake you want to fix so you can get more pullups is you’re simply not doing enough volume for your pull-ups. Focus on doing more total pull-up volume, instead of the lat pulldown, as this will better transfer to your pulling strength. And there’s a variety of different ways you can achieve this. So, if you’re currently stuck, then add in some additional sets of pull-up negatives after you’ve fatigued yourself during your normal pull-up sets. Or, if you can only do let’s say 5 or so pull-ups in a row, then just perform more sets but with less reps per set.
So, to sum the video up, here’s a quick recap of the main points that’ll help you increase reps on pull ups:
First, use a proper grip of about 1.5x shoulder width.
Second, keep your core engaged before and during the movement.
Third, don’t lose form and roll your shoulders forward at the top.
And lastly, ensure you’re doing enough pull-up volume as that’s key to improving your strength with this movement.
So hopefully you were able to see that although yes choosing the right exercises is important, executing these exercises in the right manner is really what’s key to maximizing the growth you experience from them. And for a step-by-step program that uses science to not only show you what to workout week after week, but then shows you exactly how to perform each and every exercise for maximal activation and growth while pairing this with a nutrition plan to support your recovery, then take the analysis quiz to discover which science-based program would be best for you and where your body is currently at below:
https://builtwithscience.com/bws-free...
Filmed by: Bruno Martin Del Campo
MUSIC:
Music by Ryan Little - Body Language - https://thmatc.co/?l=A37F6F3E
83
views
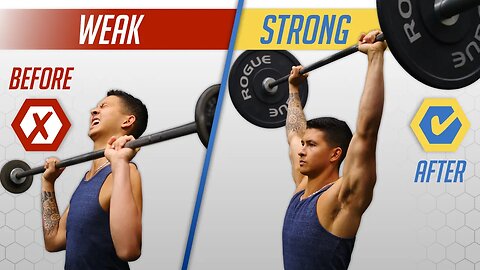
How To Get A Stronger Overhead Press (FIX THIS!)
Want to learn how to overhead press more weight? Well, the harsh truth is that many individuals just aren’t ready to overhead press to begin with. More specifically, they lack the sufficient range of motion and mobility in key areas that then makes it considerably harder for them to press weight overhead. Which is why it may seem like you can’t achieve a stronger overhead press regardless of what you do. So, in this video I’ll cover 2 such restrictions that are the most common culprits (thoracic spine mobility and lat mobility), and how to test if you’re actually restricted in these areas. Fix these overhead mobility issues, and you’ll finally be able to increase your overhead press.
The first thing that’s limiting your strength with the overhead press is your thoracic spine mobility. An inability to extend at the mid-back has been shown to limit shoulder strength during overhead movements. Also, a tight mid-back often comes with tight lats. Which is why many of you watching will likely feel quite a bit of resistance even when you just press your arms overhead with no weight, and is again why many of you will tend to arch at the lower back whenever you attempt to press overhead. That said, there are two simple tests (occiput-to-Wall test and its progression) that’ll determine if there’s sufficient mobility in your mid-back and your lats for overhead pressing.
Lack mid-back mobility and/or lat mobility? It’s time to focus on these various restrictions. And you can do that with a simple 3 step routine. Step 1 of this routine involves mobilizing the problem areas, which are your mid-back and lats. So, all we’re going to do is take a foam roller or a sock stuffed with a couple tennis balls, and start foam rolling these areas. For your mid-back, place your hands behind your head to open up your shoulder blades, and just slowly roll out just that mid to upper back region for about 30 seconds or so. Then, move onto the lats by laying onto your side and rolling out your lats from your armpit all the way down to your lower back again for about 30 seconds per side.
Next, to continue building a stronger overhead press, it’s time to move onto active stretching. To do so, there’s 2 active stretches we’ll use. First, we’ll focus on the lats with an active lat stretch. Next, we’re going to seated wall slides, a move that’ll not only further actively stretch our lats but will also teach us how to use our increased thoracic mobility in an overhead pressing motion similar to the overhead press.
Next is the final piece of the puzzle. After improving your overhead mobility with the previous two steps, it’s important to now transfer and engrain that into your overhead pressing so that your brain understands how to use that increased range of motion under load, which will help achieve our goal of actually boosting your performance in that movement. What I’d suggest though is at first, lighten the weight and take time off barbell overhead pressing altogether as this requires the greatest mobility demands. Instead, you’ll want to overtime progress through the following exercises: the kneeling single arm kettlebell/dumbbell overhead press, the standing single arm dumbbell press, the standing two arm dumbbell press, then the standing barbell overhead press.
So, here’s the action plan that’ll help you increase your overhead press:
Step 1: Mobilize
Foam roll mid-back: 30-60 seconds
Foam roll lats: 30-60 seconds each side
Step 2: Active Stretching
Active lat stretch: 5-10 reaches per side with 1s holds at end position
Seated wall slides: 10-15 reps
Step 3: Skill
Progression 1: Kneeling Single Arm Kettlebell or Dumbbell Press
Progression 2: Standing Single Arm Kettle Bell or Dumbbell Press
Progression 3: Standing 2-Arm Dumbbell Press
Progression 4 (goal): Standing Barbell Press
*For each progression, perform ~3 sets of 8-12 reps and increase load as appropriate overtime
Trust me, I know that corrective exercises aren’t fun. But if you want to stop spinning your wheels in the gym and actually break through the plateau you’re stuck in, then you need to address these things as it’ll pay off with more gains and less injury in the long run. And for a step by step program that shows you exactly how to incorporate important corrective exercises like these into a weekly training routine so that you can build lean muscle and break through plateaus in the most effective way possible, then take the analysis quiz below to discover which approach is best for your body:
https://builtwithscience.com/bws-free...
Filmed by: Bruno Martin Del Campo
MUSIC:
https://soundcloud.com/iamryanlittle
Subscribe to my channel here:
https://www.youtube.com/jeremyethier/...
68
views
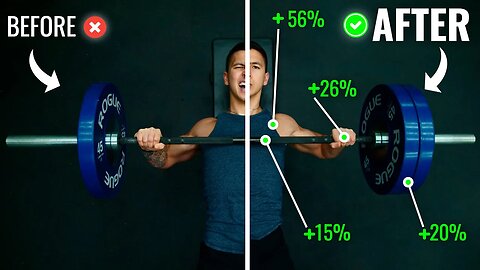
How To Get A Stronger Bench Press (3 Proven Methods You Need To Start Using)
Although you’ve probably heard of different ways on how to increase bench press, the truth is that only a handful of these methods have actually been proven to work for a stronger bench press and are worth your time and effort. In this video, I’ll share with you what those methods are and how you can properly use them to increase bench press strength fast. I’ll also cover important bench press accessory lifts you need to know to get a stronger bench!
The first and most crucial tip to a stronger bench press is simply to bench more frequently. Which is likely due to the superior skill acquisition and motor learning that you experience by benching more frequently. So, you can best do this by splitting up your weekly barbell bench press sets into multiple sessions. And you can also gradually increase your benching volume from where it’s at right now. And as for how many sets to aim for, build up for roughly 5-9 sets per week, and increase it further to 10-15 weekly sets if your body is still recovering well and you’d like to really focus on maximizing your bench press strength.
Next, when it comes to how to increase bench press faster is to mix up your rep range with something called daily undulating periodization. Pick 3 different set/rep schemes for each day. One that focuses on hypertrophy by using moderate weight and a moderate rep range (3 sets of 8 reps, ~75% 1RM), one that focuses on power by using lighter weight and lower reps performed explosively off the chest (4 sets of 3 reps, ~70% 1RM), and then one that focuses on strength by using heavy weight and a lower rep range (5 sets of 3 reps, ~85% 1RM). Throw these into your bench days with the hypertrophy day (H) first, the power day (P) in the middle, and the strength day (S) last, since this specific “HPS” order leads to significantly greater strength gains when compared to other orders, since the power day in the middle allows for sufficient recovery between your more straining hypertrophy and strength days.
The last thing is to add in the right bench press accessory lifts into your workouts. Choose exercises that help strengthen the specific weak points of your bench press. So if you seem to be the weakest and fail the most right off the chest, then you can perform the paused bench press. But if you tend to fail midway through your rep or during your lockout, the limiting factor is likely your lockout strength from your triceps. And a great accessory lift is the floor press. Some other great options as well include the close grip bench press as well as triceps extension movements such as dumbbell extensions or skull crushers for example.
To apply all of this information into your routine to get a stronger bench press:
Step 1:
Instead of benching just 1x/week, increase your benching frequency to anywhere between 2-4 times per week depending on your schedule, as this can boost your strength gains by an additional 28% per extra bench day.
Step 2:
Gradually increase your volume from less than 5 sets of bench per week to roughly 10-15 sets of bench per week, as this can boost your strength gains by an additional 20%.
Step 3:
Mix up your rep ranges during each of your bench days by using the HPS protocol I previously went through, which has the potential to double the strength gains you experience.
Step 4:
Throw in the right accessory movements into your workouts based on where your weak points are in your bench press. This would likely provide another substantial boost (~10-20%) in your rate of strength gains.
And when all of these steps are correctly applied, theoretically instead of gaining let’s say 10lbs on your bench press after a few months, you’d be able to potentially increase bench press strength by more than double that (+21.7lbs) given all of the little boosts each of these steps provide.
And for a step-by-step program that builds these protocols and exercises into your weekly plan for you and shows how to properly progress them overtime such that you can break through plateaus and pack on size and strength in the most effective way possible then simply take the analysis quiz to discover which science-based program would be best for you and where your body is currently at below:
https://builtwithscience.com/bws-free...
Filmed by: Bruno Martin Del Campo
Video Clips From:
NFL Network, Pain and Gain, Avatar
MUSIC:
soundcloud.com/lakeyinspired
STUDIES:
BENCH PRESS VOLUME
https://www.ncbi.nlm.nih.gov/pubmed/2...
https://www.ncbi.nlm.nih.gov/pubmed/2...
https://www.ncbi.nlm.nih.gov/pubmed/2...
REP RANGE
https://www.ncbi.nlm.nih.gov/pubmed/1...
https://www.ncbi.nlm.nih.gov/pubmed/1...
https://www.ncbi.nlm.nih.gov/pubmed/2...
HPS ORDER
https://diginole.lib.fsu.edu/islandor...
120
views
1
comment
How to Get a Rounder Butt FAST (Full Glute Workout Plan)
Want to grow rounder, stronger glutes? You need to use the right glute exercises and the right glute workout. Today Bret Contreras and I will help you build a 12 week glute workout plan and glutes workout routine — packed with only the best glute exercises out there — designed to get you rounder glutes (translation: big butt) as fast as possible. There's 5 steps to this.
Download the free 12-week glute workout routine below:
https://builtwithscience.com/gluteplan/
Click below for a step by step training plan that reveals all the best exercises you should do for each and every muscle group:
https://builtwithscience.com/quiz-pri...
Check out Bret’s Instagram and website below:
https://www.instagram.com/bretcontrer...
https://bretcontreras.com/
Click below to subscribe for more videos:
https://www.youtube.com/jeremyethier/...
The first step is to figure out how often to train your glutes and with how much volume. Here’s what Bret suggests: three times per week, achieved with a lower upper, lower, upper lower workout split. Bret recommends 36 sets per week. He explained, “According to the published research, we should only be doing 20 or you know, you shouldn't be doing 36 sets, but I'm telling you, the glutes can handle it.” That said, you can’t just do 36 sets of really exhausting exercises like squats or deadlifts. The key is to split up the 36 sets a week: 12 sets from vertical hip extension exercises, 12 sets from horizontal hip extension exercises, and 12 sets from abduction exercises.
As for the best glute exercises to use for each category, let’s start with vertical hip extension. The first exercise is the back squat. Use whatever stance width and foot angle is most comfortable for you, and try to descend as low as possible without too much butt wink. Next up: dumbbell Bulgarian split squats. You’ll want to lean your torso forward and descend diagonally at a slight angle backwards on the way down. Another great exercise is the smith machine reverse lunge. Finally, the Romanian deadlift. Keep your shins vertical, sit back as far as possible, and let your knees bend. Come down to just below your knee caps then use your glutes to thrust your hips forward. For this category, a lower rep range of about 6-12 reps per set usually works best.
To get the upper glutes more involved so you get a rounder butt, you’ll want to do some of the exercises from the horizontal hip extension category. One of my favorite exercises for this category is hip thrusts. Keep your mid back on a bench or pad, push up through your heels to drive your hips as high as possible. If your shins are not vertical, move your feet further in or out. Hold that position for 3 seconds before coming back down. I also like exercises that work the glutes one at a time, so the single leg hip thrust is a great option especially if you don’t have access to weights. Lastly, dumbbell glute dominant 45 degree hyper. Here you’ll need a back extension machine. Set it up so the pad is just under your hips. To better target the glutes, flare your feet out to 45 degrees and round your upper back. Keep your upper back rounded and raise your body up by pushing your hips into the pad using your glutes. If you don’t have access to this one, you can do the reverse hip extension exercise. For this category, a moderate rep range of about 8-20 reps per set usually works best.
Last but not least in our glutes workout routine, hip abduction exercises. First, seated hip abduction machine. I like to recommend leaning forward and holding onto the support. Drive your knees out as far as you can then control the weight back until your knees almost touch together. If you don’t have a machine, you can replace these with bands or the next exercise, the side lying hip raise. Get into a side plank position with your hips and knees bent at a 90 degree angle. Drive up through the grounded knee while driving your hips forward and separating your knees as much as you can. Let the hips move back on the way down. Last but not least, if you have cables make sure you include the cable standing hip abduction. Stand sideways to a cable machine and use a strap to attach the foot of your far leg to the cable. Hold onto the column with your opposite arm, take a few steps sideways until there’s tension in the cable, and then move your working leg in front of your planted leg with your foot slightly turned in. From here, swing the leg outward as far as you can to your side without rotating your foot outward. Now for this category, a higher rep range of about 12-30 reps per set is what I’ve found works best.
Step 5 to building a big butt: build your workouts. Thankfully, Bret and I have also created a free 12 week glute workout routine that will guide you week by week: https://builtwithscience.com/gluteplan/ . Big thanks to Bret for his help with this video. The man truly is a master at his craft!
88
views
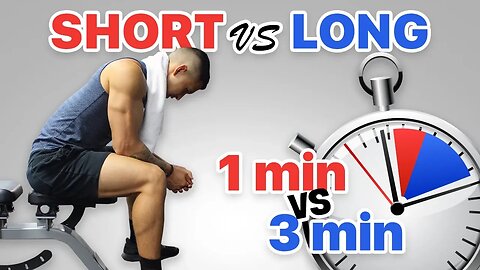
Short vs Long Rest Periods for Muscle Growth
When it comes to optimizing your workout program, you have to account for every variable – one often overlooked variable is how long to rest between sets. Your rest periods between sets have a major impact on how well you perform during each set of your workout, and as you’ll see plays an important role in hypertrophy and strength. Short rest periods have the advantage of inducing more metabolic stress, which is important since we know it’s one of the main drivers of muscle growth. However, long rest periods have the advantage of enabling you to achieve more total workout volume since you’re better rested for each of your sets. They also lead to better strength gains in the long run. But how long should your rest periods between sets be? Well, it depends on the type of exercise you perform and how heavy you’re lifting. For compound movements like the bench press, squat, deadlift, and overhead press, etc. - at least 3 minutes of rest is ideal. And when performing these movements for very low reps and heavy weight (e.g. 3-5 reps), then resting even longer (4-5 minutes) would be ideal. Whereas for isolation movements and less taxing exercises, rest periods of around 2 minutes would be ideal. Adding in a few sets with very short rest periods towards the end of your workout is also a smart move, since it adds a little more metabolic stress to your workout without negatively impacting your total workout volume. All in all, longer rest periods seem to be the better option for mass and strength gains. But as always, experimentation is key. It’s vital that you try things out for yourself and see what works best for you.
MY PROGRAMS:
https://builtwithscience.com/bws-free...
LINK TO WRITTEN ARTICLE:
https://builtwithscience.com/rest-bet...
FOLLOW ME ON IG/FB:
https://www.instagram.com/jeremyethier/
Facebook: https://www.facebook.com/Jeremyethier...
Studies:
Mechanisms of muscle growth:
https://www.ncbi.nlm.nih.gov/pubmed/2...
Brad’s Rest study:
https://www.ncbi.nlm.nih.gov/pubmed/2...
Other rest studies with similar findings:
https://journals.lww.com/nsca-jscr/Fu...
https://physoc.onlinelibrary.wiley.co...
Music:
https://soundcloud.com/lakeyinspired
Song 1: Lakey Inspired – Memories with you
Song 2: Lakey inspired – Better days
7
views
How to Lose Fat AND Gain Muscle at the Same Time (3 Simple Steps)
Can you build muscle and lose fat at the same time? Yes–and it’s known as body recomposition, where you build muscle and lose fat at the same time. However, recomp does come with a catch. We need to be at a calorie deficit in order to lose weight and strip off fat. But the drawback with being at a calorie deficit is that it severely compromises our ability to build muscle. However, this doesn’t mean it’s impossible to build muscle while losing fat, and in today's video I'll share 3 steps for how to build muscle and lose fat at the same time.
The first thing you need to do for body recomposition is setup your diet. Eat at a very slight deficit of roughly 5% to a maximum of 20%. And aim for around a protein intake of around 1g/lb of your bodyweight. Then, fill the rest of your calories with carbs and fats.
Next, to build muscle and lose fat at the same time, beyond training your muscles at an adequate volume, switch up your routine. For example, switching to a new training split, increasing or decreasing your muscle training frequency, and/or switching up some of your exercises or the manner in which you perform them.
Next, we need to optimize our nutrient timing so to build muscle while losing fat. First, you need to ensure that you’re evenly spreading out your daily protein intake into about 3-5 meals throughout the day. Also aim to have adequate carbs and protein shortly before and after you train.
When it comes to the question of ‘Can you build muscle and lose fat at the same time,’ the answer is yes, but you need to follow the action plan below:
Step 1 (Set Up Nutrition): Eat just slightly below maintenance calories (~5-20% deficit, or ~100-500 calories below maintenance). Multiplying your bodyweight in lbs by ~14-16 can give you an estimate as to what your maintenance calories are. Ensure your protein intake is ~1g/lb of your bodyweight, and consider going above this if you’re relatively leaner (e.g. 15% body fat or below).
Step 2 (Switch Up Training): Switch up your training routine. Still ensure that you’re training with the optimal muscle training frequency and weekly volume, but switch up your training to provide a new stimulus for growth.
Step 3 (Optimize): Spread your daily protein intake fairly evenly into at least 3 meals per day, and ensure that you’re ingesting adequate pre AND post workout protein + carbs in a timely manner.
Bonus Step (Measure): Track your bodyweight, circumference measurements, progress pictures, and strength in the gym. Use these to variables to gauge your progress.
A body recomposition isn’t ideal for everyone, but in the cases I went through and with the protocol I previously outlined, it can be an effective way for you to shortcut your transformation. But, in the long run, you’ll likely eventually want to transition to a dedicated muscle building or fat loss period and prioritize one or the other. And for an all in one, step by step program that shows you not only how to successfully achieve a body recomposition, but also then shows you exactly what to do afterwards so that you can continue to strip off fat and build lean muscle as efficiently as possible with science, then simply take the analysis quiz below to discover which specific program is best for your body and where it’s currently at:
https://builtwithscience.com/bws-free...
Filmed by: Bruno Martin Del Campo
Subscribe to my channel here:
https://www.youtube.com/jeremyethier/...
MUSIC:
https://soundcloud.com/iamryanlittle
FULL BODY WORKOUT ROUTINE:
Full Body Workout A -
• The Best Science-Based Full Body Work...
Full Body Workout B -
• The Best Science-Based Full Body Work...
UPPER/LOWER BODY WORKOUT ROUTINE:
Upper body workout -
• The Best Science-Based Upper Body Wor...
Lower body workout -
• The Best Science-Based Lower Body Wor...
PUSH PULL LEGS WORKOUT ROUTINE:
Push workout -
• The Best Science-Based PUSH Workout F...
Pull workout -
• The Best Science-Based PULL Workout F...
Legs workout -
• The Best Science-Based Leg Day For Gr...
Key moments
40
views