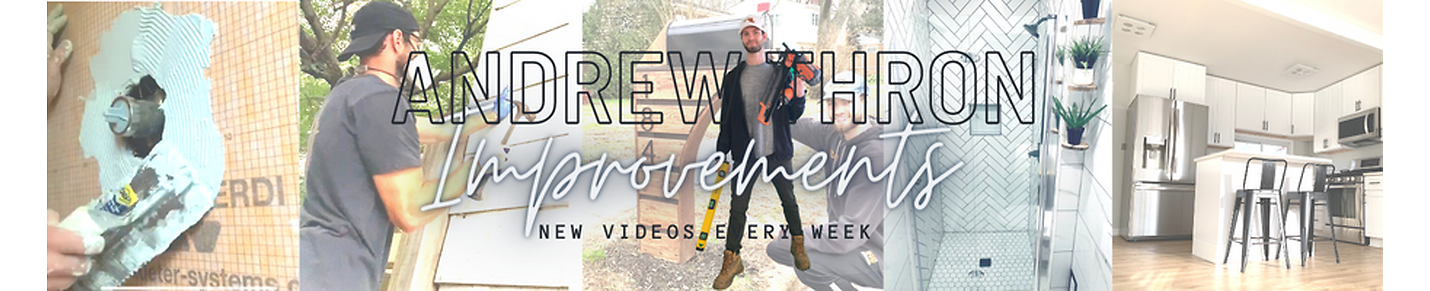

How to Install a Wire Railing System (DIY Muzata Cable Railing Installation)
In this video, you'll learn How to Install a DIY Wire Railing System from start to finish! This installation is for the Muzata BlackCool System and I anchored the railing posts in concrete using anchor bolts.
Muzata's Free Design Service Team can be contacted here: https://bit.ly/3VoypJd
To install the Muzata Wire Railing, you will need the following tools and materials 🛠🧰:
- Muzata BlackCool Railing System: https://bit.ly/3Fr6rr3
- Hammer Drill: https://amzn.to/3H6BYPW
- Carbide Tipped Masonry Bits: https://amzn.to/3B4FTJr
- Anchor Bolts: https://amzn.to/3EY3ywi
- Laser Level: https://amzn.to/3EZJr0x
- Shims: https://amzn.to/3B5gBLd
- Angle Finder: https://amzn.to/3VqPwKw
If you want to learn how to install a wire railing on a deck, you can check out my YouTube video linked here: https://youtu.be/w3pDRgD2y-Y
For even more information on how to install a wire railing, you can check out my Blog article linked here: https://atimprovements.com/cable-railing-everything-you-need-to-know/
The Steps to Installing a Wire Railing System are listed below:
1. Plan out your Wire Railing Project and order materials.
2. Mark you Cable Railing Post Locations
3. Pre-Drill Railing Post Mounting Locations
4. Insert Concrete Expansion Anchors through railing posts and into concrete.
5. Level Railing Posts and Shim as Needed
6. Install the cable wire Railing System
7. Install Cable Wires
8. Tighten Cable Wires as needed for desired tension
9. Test Wire Railing to Ensure Durability and Safety
Be sure to subscribe and hit the notification bell so you don't miss any future videos that are part of the Basement Renovation Series!
Follow me on Instagram: https://www.instagram.com/atimprovements/
Check out my Blog: Atimprovements.com
Subscribe to my YouTube Channel ⬇️ https://www.youtube.com/c/AndrewThronImprovements?sub_confirmation=1
Check out my Website for additional DIY Content: https://atimprovements.com
▬▬▬▬▬▬▬▬▬▬▬▬▬
🎥 MY YOUTUBE GEAR
Camera (Iphone Max): https://amzn.to/3d5HxSo
Microphone (Maono Condenser Mic): https://amzn.to/3RCAb7N
Tripod: https://amzn.to/3Rz5Gj3
Mini Tripod: https://amzn.to/3Rvt2WM
Lighting: https://amzn.to/3d4QdZ5
▬▬▬▬▬▬▬▬▬▬▬▬▬
🛠🧰 TOOLS THAT I USE
Carbide Tipped Drill Bit: https://amzn.to/3S0hdIM
Tapcon Screws: https://amzn.to/3OxEWxh
Drill: https://amzn.to/3JICKkk
Tape Measure: https://amzn.to/3HaTWgE
Circular Saw: https://amzn.to/3BFotC4
Masonry Drill: https://amzn.to/36yP1JW
Level: https://amzn.to/3HowUDn
Hammer: https://amzn.to/35fIpiT
Chalk Line: https://amzn.to/3MwSDg8
Clamps: https://amzn.to/3HLqwpK
Drill: https://amzn.to/3JICKkk
Sawzall: https://amzn.to/3HcdeSI
Circular Saw: https://amzn.to/3BFotC4
Jig saw: https://amzn.to/3I6lcyd
Air Compressor: https://amzn.to/34TatJf
Framing Nailer: https://amzn.to/3JGpBYU
Roofing Nailer: https://amzn.to/3BEAuYF
Orbital Sander: https://amzn.to/34UwlUD
Bar Clamps: https://amzn.to/3JjFrJe
▬▬▬▬▬▬▬▬▬▬▬▬▬
Thank you so much for watching!
*All content on the Andrew Thron Improvements YouTube channel reflects my own opinions. Please seek out guidance of professionally trained and licensed individuals before making any decisions. Links in the description may be affiliate links.
22
views
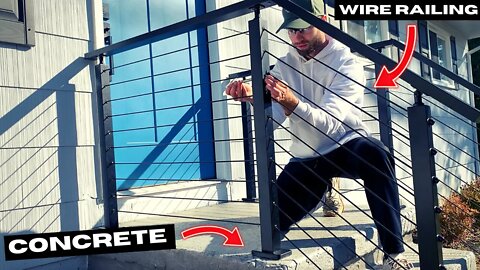
How to make Old Concrete look Brand New! (DIY Concrete Resurfacing)
This video will show you How to Resurface Concrete Steps with Newcrete Concrete Resurfacer product. If you have an old concrete slab or concrete steps, chances are that it looks old, cracked, and worn out. Fortunately, concrete resurfacing products such as Newcrete make it easy to give old concrete a fresh, new look.
To resurface concrete or concrete steps with Newcrete, you will need the following tools and materials 🛠🧰:
- Concrete resurfacing product: https://www.ctscement.com/product/newcrete
- Concrete Broom: https://amzn.to/3TWCseh
- Concrete Finishing Trowel: https://amzn.to/3i6bHai
- Drill with Mixer Attachment: https://amzn.to/3EtTYRD
- Sponges (optional): https://amzn.to/3UgZYmJ
- Concrete dye (optional): https://amzn.to/3VgF2wO
To resurface concrete or concrete steps with Newcrete, you will want to follow these general steps:
1. Clean the Existing Concrete Surface.
Before you can resurface concrete, you need to ensure that the existing concrete surface is clean. A “clean” concrete surface is one that is free of any dirt, debris, paint.
2. Select the Right Concrete Resurfacing Product for Your Application.
I recommend the Rapid Set Newcrete Product.
3. Mix up the Concrete Resurfacing Product According to the Manufacturer’s Recommendations.
Typically, concrete resurfacing product will be a “pancake batter” consistency once it is mixed up.
4. Moisten the Existing Concrete Surface Prior to Application of the Resurfacing Product.
Before you apply the mixed up concrete resurfacing product, it is recommened that you moisten the existing concrete surface.
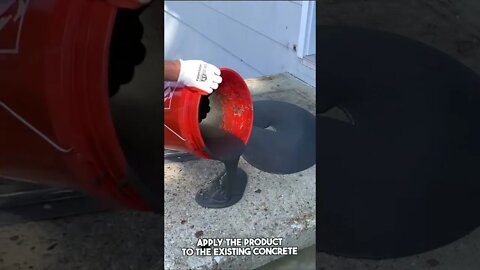
5. Apply the Concrete Resurfacing Concrete to the Application Area.
To apply the concrete resurfacing product to your existing concrete, it is recommended that you dump out small amounts of the product and the spread it out evenly with a hand trowel.
6. Apply texture to the concrete surface using a “Broom Finish”.
After applying the concrete resurfacing product to your existing concrete and smoothing it out evenly with a hand trowel, it is generally recommended that you apply a “broom finish” to the concrete surface.
A broom finish provides an aesthetic textured surface that hides any imperfections in the concrete.
7. Allow the Concrete Resurfacing Product to Fully Cure.
After applying your concrete resurfacing product and applying a broom finish (if desired), simply allow the concrete resurfacing product to cure according to the manufacturer’s recommendations. Typically, these products cure rapidly and are ready for foot traffic in as little as 2-4 hours.
8. Apply a Concrete Sealer (if desired).
Although a concrete sealer is not required, it can provide a few notable benefits such as:
- A sealer will help to prevent staining of the concrete surface and will help to prevent water discoloration.
- A sealer can “tint” the surface of the concrete - giving it a darker look.
To apply sealer to concrete, I recommend that you roll the product onto the concrete surface using a foam roller. However, you can also apply sealer using a sprayer.
-----
For even more detailed information on resurfacing concrete, check out my Blog Linked Here: https://atimprovements.com/how-to-resurface-concrete-steps-diy-guide-with-pictures/
Be sure to subscribe and hit the notification bell so you don't miss any future videos that are part of the Basement Renovation Series!
Follow me on Instagram: https://www.instagram.com/atimprovements/
Check out my Blog: Atimprovements.com
Subscribe to my YouTube Channel ⬇️ https://www.youtube.com/c/AndrewThronImprovements?sub_confirmation=1
Check out my Website for additional DIY Content: https://atimprovements.com
▬▬▬▬▬▬▬▬▬▬▬▬▬
🎥 MY YOUTUBE GEAR
Camera (Iphone Max): https://amzn.to/3d5HxSo
Microphone (Maono Condenser Mic): https://amzn.to/3RCAb7N
Tripod: https://amzn.to/3Rz5Gj3
Mini Tripod: https://amzn.to/3Rvt2WM
Lighting: https://amzn.to/3d4QdZ5
▬▬▬▬▬▬▬▬▬▬▬▬▬
🛠🧰 TOOLS THAT I USE
Carbide Tipped Drill Bit: https://amzn.to/3S0hdIM
Tapcon Screws: https://amzn.to/3OxEWxh
Drill: https://amzn.to/3JICKkk
Tape Measure: https://amzn.to/3HaTWgE
Circular Saw: https://amzn.to/3BFotC4
Masonry Drill: https://amzn.to/36yP1JW
Level: https://amzn.to/3HowUDn
Hammer: https://amzn.to/35fIpiT
Chalk Line: https://amzn.to/3MwSDg8
Clamps: https://amzn.to/3HLqwpK
Drill: https://amzn.to/3JICKkk
Sawzall: https://amzn.to/3HcdeSI
Circular Saw: https://amzn.to/3BFotC4
Jig saw: https://amzn.to/3I6lcyd
Air Compressor: https://amzn.to/34TatJf
Framing Nailer: https://amzn.to/3JGpBYU
Roofing Nailer: https://amzn.to/3BEAuYF
Orbital Sander: https://amzn.to/34UwlUD
Bar Clamps: https://amzn.to/3JjFrJe
▬▬▬▬▬▬▬▬▬▬▬▬▬
Thank you so much for watching!
*All content on the Andrew Thron Improvements YouTube channel reflects my own opinions. Please seek out guidance of professionally trained and licensed individuals before making any decisions. Links in the description may be affiliate links.
77
views
How to Resurface Concrete Steps (Newcrete Concrete Resurfacer Application on Front Porch Steps)
This video will show you How to Resurface Concrete Steps with Newcrete Concrete Resurfacer product. If you have an old concrete slab or concrete steps, chances are that it looks old, cracked, and worn out. Fortunately, concrete resurfacing products such as Newcrete make it easy to give old concrete a fresh, new look.
To resurface concrete or concrete steps with Newcrete, you will need the following tools and materials 🛠🧰:
- Concrete resurfacing product: https://www.ctscement.com/product/newcrete
- Concrete Broom: https://amzn.to/3TWCseh
- Concrete Finishing Trowel: https://amzn.to/3i6bHai
- Drill with Mixer Attachment: https://amzn.to/3EtTYRD
- Sponges (optional): https://amzn.to/3UgZYmJ
- Concrete dye (optional): https://amzn.to/3VgF2wO
To resurface concrete or concrete steps with Newcrete, you will want to follow these general steps:
1. Clean the Existing Concrete Surface.
Before you can resurface concrete, you need to ensure that the existing concrete surface is clean. A “clean” concrete surface is one that is free of any dirt, debris, paint.
2. Select the Right Concrete Resurfacing Product for Your Application.
I recommend the Rapid Set Newcrete Product.
3. Mix up the Concrete Resurfacing Product According to the Manufacturer’s Recommendations.
Typically, concrete resurfacing product will be a “pancake batter” consistency once it is mixed up.
4. Moisten the Existing Concrete Surface Prior to Application of the Resurfacing Product.
Before you apply the mixed up concrete resurfacing product, it is recommened that you moisten the existing concrete surface.
5. Apply the Concrete Resurfacing Concrete to the Application Area.
To apply the concrete resurfacing product to your existing concrete, it is recommended that you dump out small amounts of the product and the spread it out evenly with a hand trowel.
6. Apply texture to the concrete surface using a “Broom Finish”.
After applying the concrete resurfacing product to your existing concrete and smoothing it out evenly with a hand trowel, it is generally recommended that you apply a “broom finish” to the concrete surface.
A broom finish provides an aesthetic textured surface that hides any imperfections in the concrete.
7. Allow the Concrete Resurfacing Product to Fully Cure.
After applying your concrete resurfacing product and applying a broom finish (if desired), simply allow the concrete resurfacing product to cure according to the manufacturer’s recommendations. Typically, these products cure rapidly and are ready for foot traffic in as little as 2-4 hours.
8. Apply a Concrete Sealer (if desired).
Although a concrete sealer is not required, it can provide a few notable benefits such as:
- A sealer will help to prevent staining of the concrete surface and will help to prevent water discoloration.
- A sealer can “tint” the surface of the concrete - giving it a darker look.
To apply sealer to concrete, I recommend that you roll the product onto the concrete surface using a foam roller. However, you can also apply sealer using a sprayer.
-----
For even more detailed information on resurfacing concrete, check out my Blog Linked Here: https://atimprovements.com/how-to-resurface-concrete-steps-diy-guide-with-pictures/
Be sure to subscribe and hit the notification bell so you don't miss any future videos that are part of the Basement Renovation Series!
Follow me on Instagram: https://www.instagram.com/atimprovements/
Check out my Blog: Atimprovements.com
Subscribe to my YouTube Channel ⬇️ https://www.youtube.com/c/AndrewThronImprovements?sub_confirmation=1
Check out my Website for additional DIY Content: https://atimprovements.com
▬▬▬▬▬▬▬▬▬▬▬▬▬
🎥 MY YOUTUBE GEAR
Camera (Iphone Max): https://amzn.to/3d5HxSo
Microphone (Maono Condenser Mic): https://amzn.to/3RCAb7N
Tripod: https://amzn.to/3Rz5Gj3
Mini Tripod: https://amzn.to/3Rvt2WM
Lighting: https://amzn.to/3d4QdZ5
▬▬▬▬▬▬▬▬▬▬▬▬▬
🛠🧰 TOOLS THAT I USE
Carbide Tipped Drill Bit: https://amzn.to/3S0hdIM
Tapcon Screws: https://amzn.to/3OxEWxh
Drill: https://amzn.to/3JICKkk
Tape Measure: https://amzn.to/3HaTWgE
Circular Saw: https://amzn.to/3BFotC4
Masonry Drill: https://amzn.to/36yP1JW
Level: https://amzn.to/3HowUDn
Hammer: https://amzn.to/35fIpiT
Chalk Line: https://amzn.to/3MwSDg8
Clamps: https://amzn.to/3HLqwpK
Drill: https://amzn.to/3JICKkk
Sawzall: https://amzn.to/3HcdeSI
Circular Saw: https://amzn.to/3BFotC4
Jig saw: https://amzn.to/3I6lcyd
Air Compressor: https://amzn.to/34TatJf
Framing Nailer: https://amzn.to/3JGpBYU
Roofing Nailer: https://amzn.to/3BEAuYF
Orbital Sander: https://amzn.to/34UwlUD
Bar Clamps: https://amzn.to/3JjFrJe
▬▬▬▬▬▬▬▬▬▬▬▬▬
Thank you so much for watching!
*All content on the Andrew Thron Improvements YouTube channel reflects my own opinions. Please seek out guidance of professionally trained and licensed individuals before making any decisions. Links in the description may be affiliate links.
83
views
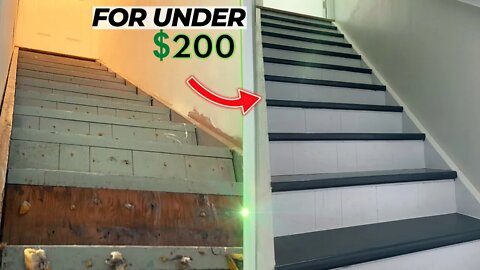
DIY Stair Remodel on a Budget (Step-by-Step)
Learn how to complete a DIY Stair Remodel on a Budget with this step-by-step instructional video! When I bought my home, the basement stairs were covered with nasty carpet. After removing the carpet, I was left with a bare staircase that was in need of some serious DIY remodeling. In order to save money, I transformed the stairs using budget friendly tools and materials that you can pick up from any big box store. This video will show you how to prepare the old staircase for new stair treads, nosings, and risers in a DIY step-by-step manner.
🛠 🧰 Below are some "must have" tools and materials for this stair remodel project:
Plywood Sheets: https://www.homedepot.com/p/1-4-in-x-4-ft-x-8-ft-BC-Sanded-Pine-Plywood-235552/100063669
1"x2" Pine Nosing Strips: https://www.homedepot.com/p/1-in-x-2-in-x-8-ft-Select-Kiln-Dried-Square-Edge-Whitewood-Board-418532/203450502
Wood Conditioner: https://amzn.to/3togp5o
Gel Stain: https://amzn.to/3A9VvuF
Polyurethane: https://amzn.to/3G8LyBC
Tape Measure: https://amzn.to/3HaTWgE
Circular Saw: https://amzn.to/3BFotC4
Level: https://amzn.to/3HowUDn
Brad Nailer (Option 1): https://amzn.to/3WVoEni
Brad Nailer (Option 2): https://amzn.to/3NYoZBq
Orbital Sander: https://amzn.to/34UwlUD
Bar Clamps: https://amzn.to/3JjFrJe
Router: https://amzn.to/3G5cKkE
3/4" Roundover Bit: https://amzn.to/3fZYIpQ
Painter's Tape: https://amzn.to/3T4K5Q4
Construction Adhesive: https://amzn.to/3NYpj36
Cost Breakdown for Materials is Below:
Plywood for Treads = $37 (X2) =$74
Pine Strips for Nosings = $7 (X4) = $28
Wood Conditioner = $10
Gel Stain = $24
Paint = $20
Polyurethane =$15
Miscellaneous Costs (sandpaper, construction adhesive, etc.) = $25
TOTAL PROJECT MATERIAL COST = ~$196
For even more detailed information on the stair remodeling process, check out my "Stair Remodel" Blog Linked Here: https://atimprovements.com/how-to-remodel-stairs-diy/
Be sure to subscribe and hit the notification bell so you don't miss any future videos that are part of the Basement Renovation Series!
Follow me on Instagram: https://www.instagram.com/atimprovements/
Check out my Blog: Atimprovements.com
Subscribe to my YouTube Channel ⬇️ https://www.youtube.com/c/AndrewThronImprovements?sub_confirmation=1
Check out my Website for additional DIY Content: https://atimprovements.com
▬▬▬▬▬▬▬▬▬▬▬▬▬
🎥 MY YOUTUBE GEAR
Camera (Iphone Max): https://amzn.to/3d5HxSo
Microphone (Maono Condenser Mic): https://amzn.to/3RCAb7N
Tripod: https://amzn.to/3Rz5Gj3
Mini Tripod: https://amzn.to/3Rvt2WM
Lighting: https://amzn.to/3d4QdZ5
▬▬▬▬▬▬▬▬▬▬▬▬▬
🛠🧰 TOOLS THAT I USE
Carbide Tipped Drill Bit: https://amzn.to/3S0hdIM
Tapcon Screws: https://amzn.to/3OxEWxh
Drill: https://amzn.to/3JICKkk
Tape Measure: https://amzn.to/3HaTWgE
Circular Saw: https://amzn.to/3BFotC4
Masonry Drill: https://amzn.to/36yP1JW
Level: https://amzn.to/3HowUDn
Hammer: https://amzn.to/35fIpiT
Chalk Line: https://amzn.to/3MwSDg8
Clamps: https://amzn.to/3HLqwpK
Drill: https://amzn.to/3JICKkk
Sawzall: https://amzn.to/3HcdeSI
Circular Saw: https://amzn.to/3BFotC4
Jig saw: https://amzn.to/3I6lcyd
Air Compressor: https://amzn.to/34TatJf
Framing Nailer: https://amzn.to/3JGpBYU
Roofing Nailer: https://amzn.to/3BEAuYF
Orbital Sander: https://amzn.to/34UwlUD
Bar Clamps: https://amzn.to/3JjFrJe
▬▬▬▬▬▬▬▬▬▬▬▬▬
Thank you so much for watching!
*All content on the Andrew Thron Improvements YouTube channel reflects my own opinions. Please seek out guidance of professionally trained and licensed individuals before making any decisions. Links in the description may be affiliate links.
62
views
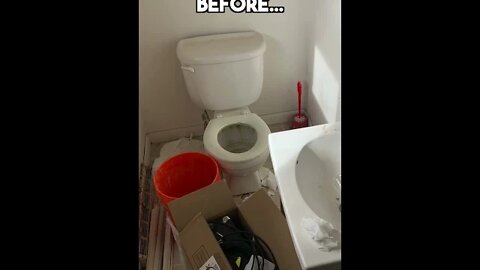
Half Bathroom to Full Bathroom Transformation! #Shorts
This video shows a time lapse of a Small Bathroom Remodel project where I converted a half bathroom to a full bathroom. Remodeling a small bathroom by Converting a half bath to a full bath is no easy task - but it is doable as a DIY project!
Full time lapse video can be found here: https://youtu.be/-MsdKLJrAS8
5
views
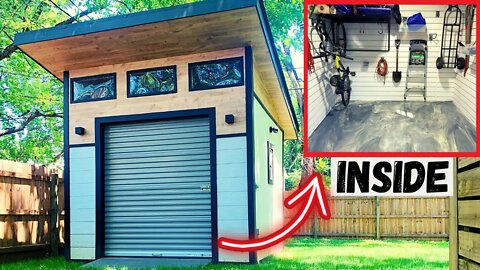
I Built the World's NICEST Shed! (Modern Shed Build Time Lapse)
Get my FREE Shed Building Ebook ➡️ https://atimprovements.com/product/modern-shed-ebook/
Last Summer, I Built (in my opinion) the World's NICEST Shed! This video is a Modern Shed Build Time Lapse of the entire shed construction process from start to finish. Everything from framing, siding, roofing, and everything in between is covered in this DIY Shed building time lapse. Building a Shed is a project that almost anyone can tackle with a little bit of knowledge and hard work. This video, along with my Free Modern Shed Building Ebook, will show you everything you need to know to build your own Modern Shed!
For more detailed instructions of every step shown in this Modern Shed Build Time Lapse Video, Check out my other videos in the"Modern Shed Build Youtube Series" (Videos are linked further down in the description)
🛠 🧰 TOOLS AND MATERIALS USED TO BUILD THIS SHED
TOOLS:
Air Compressor: https://amzn.to/34TatJf
Framing Nailer: https://amzn.to/3JGpBYU
Roofing Nailer: https://amzn.to/3BEAuYF
Roofing Mastic: https://amzn.to/3ePgBqK
Orbital Sander: https://amzn.to/34UwlUD
Bar Clamps: https://amzn.to/3JjFrJe
Carbide Tipped Drill Bit: https://amzn.to/3S0hdIM
Tapcon Screws: https://amzn.to/3OxEWxh
Drill: https://amzn.to/3JICKkk
Tape Measure: https://amzn.to/3HaTWgE
Circular Saw: https://amzn.to/3BFotC4
Masonry Drill: https://amzn.to/36yP1JW
Level: https://amzn.to/3HowUDn
Hammer: https://amzn.to/35fIpiT
Chalk Line: https://amzn.to/3MwSDg8
Clamps: https://amzn.to/3HLqwpK
Drill: https://amzn.to/3JICKkk
Sawzall: https://amzn.to/3HcdeSI
Circular Saw: https://amzn.to/3BFotC4
Jig saw: https://amzn.to/3I6lcyd
MATERIALS:
Shed Windows: https://amzn.to/3MUmgIF
Side Lights: https://amzn.to/3EY9fvP
Decorative Front Lights: https://amzn.to/3SoQ6X1
Overhead LED Bay Light: https://amzn.to/3ShAWmp
Acrylic Window Panels: https://amzn.to/3W0Iayj
Roll Up Door - See Roll Up Door Youtube Video Below
🎥 Below are the other detailed videos in my Modern Shed Build Series:
Introduction to the Modern Shed Series: https://youtu.be/zr0HnCBwrjo
Shed Foundation Options: https://youtu.be/M0EI-FO7DuA
How to Build and Frame a Shed Floor: https://youtu.be/9ZpD06daMeI
How to Frame Shed Walls: https://youtu.be/nXjUerQh444
How to Frame a Shed Roof:https://youtu.be/Y_RChmd6YHA
How to Install Shed Siding: https://youtu.be/CBfzH4OSYzE
How to Install Shed Sheathing: https://youtu.be/NCvIUb0UjRs
How to install Shed Trim: https://youtu.be/6bu6ob-pQm8
Inexpensive Shed Window Option (Acrylic): https://youtu.be/J9tkSISXRds
How to Install a Shed Window: https://youtu.be/L6pxrHfv_s4
How to Install Shed Siding Veneer: https://youtu.be/2SQKY-spzDk
How to Install a Roll-Up Door: https://youtu.be/VnjLM9KNomM
How to Build a Shed Ramp: https://youtu.be/iEzYHe12DLM
How to install asphalt shingles on a shed roof: https://youtu.be/9ZyUXLy4zK8
How to Add Electricity to a Shed: https://youtu.be/-pRhVgcqa1M
How to Organize Your Shed Storage: https://youtu.be/qmhCtR9W1TE
How to Apply Epoxy to a Shed's Subfloor: https://youtu.be/wnChJHcM2Y8
If you want to learn how to build the EXACT shed shown in the video, I put together "The Modern Shed Build Course" (https://bit.ly/3PeKr4V) which includes a materials list🧱, tools list 🛠, and cut list 🪚for each step of the entire shed build process. Basically, this course makes it feel like you built this shed alongside me! Every purchase helps support the channel!
Follow me on Instagram: https://www.instagram.com/atimprovements/
I post a ton of DIY Reels and other Home Improvement Content Daily!
Subscribe to my YouTube Channel ⬇️ https://www.youtube.com/c/AndrewThronImprovements?sub_confirmation=1
Check out my Website for additional DIY Content: https://atimprovements.com
▬▬▬▬▬▬▬▬▬▬▬▬▬
🎥 MY YOUTUBE GEAR
Camera (Iphone Max): https://amzn.to/3d5HxSo
Microphone 1(Maono Condenser Mic): https://amzn.to/3RCAb7N
Microphone 2 (Snyco G2 Lavalier): https://amzn.to/3Td3y1m
Tripod: https://amzn.to/3Rz5Gj3
Mini Tripod: https://amzn.to/3Rvt2WM
Lighting: https://amzn.to/3d4QdZ5
▬▬▬▬▬▬▬▬▬▬▬▬▬
Be sure to subscribe and hit the notification bell so you don't miss any Future Videos!
Thank you so much for watching!
*All content on the Andrew Thron Improvements YouTube channel reflects my own opinions. Please seek out guidance of professionally trained and licensed individuals before making any decisions. Links in the description may be affiliate links.
218
views
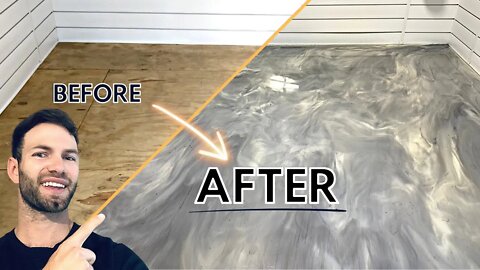
Epoxy Floor Coating Over Plywood Subfloor (Amazing Result!)
Learn how to apply an epoxy floor coating over a plywood subfloor with this DIY epoxy floor coating installation!
I applied a metallic epoxy floor coating over my shed's plywood subfloor but this same application method can be used for any plywood subfloor (bathroom, bedroom, basement, etc.).
Below are the steps you will need to follow to effectively apply an epoxy flooring system to a plywood subfloor.
00:00 - Introduction
00:32 - Prepare the Plywood Subfloor for Epoxy Application.
01:28 - Select Epoxy Floor Coating System and Products.
02:10 - Fill all Plywood Gaps, Cracks, etc. with Epoxy Crack Filler
04:39 - Apply Flexible Epoxy Primer
07:24 - Apply Waterborne Epoxy Primer
09:14 - Prepare and Mix Epoxy Color Pigments into Epoxy Resin
11:50 - Mix Part A and Part B of the Epoxy Floor Coating System
13:12 - Apply Epoxy Coating to the Plywood Subfloor Application Area
14:50 - Apply the "Accent Color" Epoxy (if applicable)
17:25 - Apply Protective Urethane Top Coat (Optional)
19:27 - Finishing Touches
I am super happy with the Epoxy Floor Coating result I achieved within my shed. It completely transformed the plywood subfloor into an eye-catching and durable shed floor that gives it a really unique and amazing look.
Get the Shed Plans and Course Materials! ⬇️
https://bit.ly/3PeKr4V
For additional information on applying an epoxy flooring to a plywood subfloor, check out my blog article linked here: https://atimprovements.com/epoxy-on-wood-floor/
🛠 🧰 Below are some "must have" tools and materials for this project:
1. Drill: https://amzn.to/3JICKkk
2. Drill Mixer: https://amzn.to/3CcVtlT
3. Latex Gloves: https://amzn.to/3fQIE9t
4. Painter's Tape: https://amzn.to/3T4K5Q4
5. For the Epoxy Products Used, check out my Blog Article (https://atimprovements.com/epoxy-on-wood-floor/) and https://www.spartanepoxies.com/
Check out my other videos in the"Modern Shed Build Youtube Series".
Introduction to the Modern Shed Series: https://youtu.be/zr0HnCBwrjo
Shed Foundation Options: https://youtu.be/M0EI-FO7DuA
How to Build and Frame a Shed Floor: https://youtu.be/9ZpD06daMeI
How to Frame Shed Walls: https://youtu.be/nXjUerQh444
How to Frame a Shed Roof:https://youtu.be/Y_RChmd6YHA
How to Install Shed Siding: https://youtu.be/CBfzH4OSYzE
How to Install Shed Sheathing: https://youtu.be/NCvIUb0UjRs
How to install Shed Trim: https://youtu.be/6bu6ob-pQm8
Inexpensive Shed Window Option (Acrylic): https://youtu.be/J9tkSISXRds
How to Install a Shed Window: https://youtu.be/L6pxrHfv_s4
How to Install Shed Siding Veneer: https://youtu.be/2SQKY-spzDk
How to Install a Roll-Up Door: https://youtu.be/VnjLM9KNomM
How to Build a Shed Ramp: https://youtu.be/iEzYHe12DLM
How to install asphalt shingles on a shed roof: https://youtu.be/9ZyUXLy4zK8
How to Add Electricity to a Shed: https://youtu.be/-pRhVgcqa1M
How to Organize Your Shed Storage: https://youtu.be/qmhCtR9W1TE
Be sure to subscribe and hit the notification bell so you don't miss any videos in the Modern Shed Build Series!
If you want to learn how to build the EXACT shed shown in the video, I put together "The Modern Shed Build Course" (https://bit.ly/3PeKr4V) which includes a materials list🧱, tools list 🛠, and cut list 🪚for each step of the entire shed build process. Basically, this course makes it feel like you built this shed alongside me! Every purchase helps support the channel!
Follow me on Instagram: https://www.instagram.com/atimprovements/
Check out my Blog: Atimprovements.com
Subscribe to my YouTube Channel ⬇️ https://www.youtube.com/c/AndrewThronImprovements?sub_confirmation=1
Check out my Website for additional DIY Content: https://atimprovements.com
▬▬▬▬▬▬▬▬▬▬▬▬▬
🎥 MY YOUTUBE GEAR
Camera (Iphone Max): https://amzn.to/3d5HxSo
Microphone (Maono Condenser Mic): https://amzn.to/3RCAb7N
Tripod: https://amzn.to/3Rz5Gj3
Mini Tripod: https://amzn.to/3Rvt2WM
Lighting: https://amzn.to/3d4QdZ5
▬▬▬▬▬▬▬▬▬▬▬▬▬
🛠🧰 TOOLS THAT I USE
Carbide Tipped Drill Bit: https://amzn.to/3S0hdIM
Tapcon Screws: https://amzn.to/3OxEWxh
Drill: https://amzn.to/3JICKkk
Tape Measure: https://amzn.to/3HaTWgE
Circular Saw: https://amzn.to/3BFotC4
Masonry Drill: https://amzn.to/36yP1JW
Level: https://amzn.to/3HowUDn
Hammer: https://amzn.to/35fIpiT
Chalk Line: https://amzn.to/3MwSDg8
Clamps: https://amzn.to/3HLqwpK
Drill: https://amzn.to/3JICKkk
Sawzall: https://amzn.to/3HcdeSI
Circular Saw: https://amzn.to/3BFotC4
Jig saw: https://amzn.to/3I6lcyd
Air Compressor: https://amzn.to/34TatJf
Framing Nailer: https://amzn.to/3JGpBYU
Roofing Nailer: https://amzn.to/3BEAuYF
Orbital Sander: https://amzn.to/34UwlUD
Bar Clamps: https://amzn.to/3JjFrJe
▬▬▬▬▬▬▬▬▬▬▬▬▬
Thank you so much for watching!
I also want to extend a HUGE THANKS to Spartan Epoxies!
*All content on the Andrew Thron Improvements YouTube channel reflects my own opinions. Please seek out guidance of professionally trained and licensed individuals before making any decisions. Links in the description may be affiliate links.
164
views
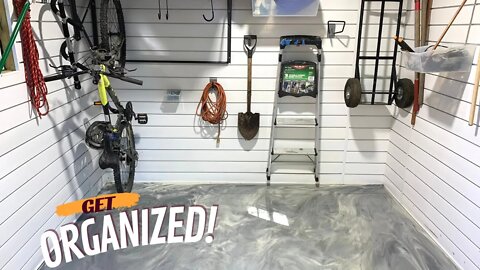
Shed and Garage Storage Idea (How to Organize Shed Storage with the Proslat Slatwall System)
Get the Shed Plans and Course Materials! ⬇️
https://bit.ly/3PeKr4V
For 10% off the Proslat Slatwall, use code "ANDREWTHRON10" at https://proslat.com
Shed and Garage Storage Optimization is very important if you have limited space. The Proslat Slatwall is a great idea for optimizing your shed and garage storage so everything is organized and stored properly. This video will show you how to install the Proslat Procore shed storage and organization system and will hopefully give you some ideas for optimizing storage in your own shed or garage. I chose to install the Proslat Slatwall in my 10'x10' shed modern shed since it is such a small space and I needed to make the most of every square inch.
For additional information on the Proslat Slatwall and the installation procedure, check out my blog article linked here: https://atimprovements.com/proslat-shed-storage/
🛠 🧰 Below are some "must have" tools and materials for this project:
1. Drill: https://amzn.to/3JICKkk
2. Impact Driver (optional): https://amzn.to/3SHtp0E
3. Level: https://amzn.to/3HowUDn
4. Snippers: https://amzn.to/3LT7fX7
5. Miter Saw: https://amzn.to/3SxMLpy
6. Jig Saw: https://amzn.to/3I6lcyd
In addition to the Proslat Shed Storage System installed in this video, I am also creating a complete "Modern Shed Build Youtube Series". Below are the other videos in the series:
Introduction to the Modern Shed Series: https://youtu.be/zr0HnCBwrjo
Shed Foundation Options: https://youtu.be/M0EI-FO7DuA
How to Build and Frame a Shed Floor: https://youtu.be/9ZpD06daMeI
How to Frame Shed Walls: https://youtu.be/nXjUerQh444
How to Frame a Shed Roof:https://youtu.be/Y_RChmd6YHA
How to Install Shed Siding: https://youtu.be/CBfzH4OSYzE
How to Install Shed Sheathing: https://youtu.be/NCvIUb0UjRs
How to install Shed Trim: https://youtu.be/6bu6ob-pQm8
Inexpensive Shed Window Option (Acrylic): https://youtu.be/J9tkSISXRds
How to Install a Shed Window: https://youtu.be/L6pxrHfv_s4
How to Install Shed Siding Veneer: https://youtu.be/2SQKY-spzDk
How to Install a Roll-Up Door: https://youtu.be/VnjLM9KNomM
How to Build a Shed Ramp: https://youtu.be/iEzYHe12DLM
How to install asphalt shingles on a shed roof: https://youtu.be/9ZyUXLy4zK8
How to Add Electricity to a Shed: https://youtu.be/-pRhVgcqa1M
Be sure to subscribe and hit the notification bell so you don't miss any videos in the Modern Shed Build Series!
If you want to learn how to build the EXACT shed shown in the video, I put together "The Modern Shed Build Course" (https://bit.ly/3PeKr4V) which includes a materials list🧱, tools list 🛠, and cut list 🪚for each step of the entire shed build process. Basically, this course makes it feel like you built this shed alongside me! Every purchase helps support the channel!
Follow me on Instagram: https://www.instagram.com/atimprovements/
Check out my Blog: Atimprovements.com
Subscribe to my YouTube Channel ⬇️ https://www.youtube.com/c/AndrewThronImprovements?sub_confirmation=1
Check out my Website for additional DIY Content: https://atimprovements.com
▬▬▬▬▬▬▬▬▬▬▬▬▬
🎥 MY YOUTUBE GEAR
Camera (Iphone Max): https://amzn.to/3d5HxSo
Microphone (Maono Condenser Mic): https://amzn.to/3RCAb7N
Tripod: https://amzn.to/3Rz5Gj3
Mini Tripod: https://amzn.to/3Rvt2WM
Lighting: https://amzn.to/3d4QdZ5
▬▬▬▬▬▬▬▬▬▬▬▬▬
🛠🧰 TOOLS THAT I USE
Carbide Tipped Drill Bit: https://amzn.to/3S0hdIM
Tapcon Screws: https://amzn.to/3OxEWxh
Drill: https://amzn.to/3JICKkk
Tape Measure: https://amzn.to/3HaTWgE
Circular Saw: https://amzn.to/3BFotC4
Masonry Drill: https://amzn.to/36yP1JW
Level: https://amzn.to/3HowUDn
Hammer: https://amzn.to/35fIpiT
Chalk Line: https://amzn.to/3MwSDg8
Clamps: https://amzn.to/3HLqwpK
Drill: https://amzn.to/3JICKkk
Sawzall: https://amzn.to/3HcdeSI
Circular Saw: https://amzn.to/3BFotC4
Jig saw: https://amzn.to/3I6lcyd
Air Compressor: https://amzn.to/34TatJf
Framing Nailer: https://amzn.to/3JGpBYU
Roofing Nailer: https://amzn.to/3BEAuYF
Orbital Sander: https://amzn.to/34UwlUD
Bar Clamps: https://amzn.to/3JjFrJe
▬▬▬▬▬▬▬▬▬▬▬▬▬
Video Timestamps:
00:00 - Introduction
00:38 - Shed Organization Options
01:20 - Installing the Proslat Procore System
04:23 - Installing Partial Segments
04:52 - Cutting Slatwall / Procore Panels
05:40 - Making Intricate Cuts
06:38 - Trimming Around Windows
07:28 - Using a Stop Block on Your Miter Saw
08:13 - Installing Top Trim
08:40 - Installing Accessories
09:33 - Final Result & Conclusion
Thank you so much for watching!
*All content on the Andrew Thron Improvements YouTube channel reflects my own opinions. Please seek out guidance of professionally trained and licensed individuals before making any decisions. Some links in the description may be affiliate links.
110
views
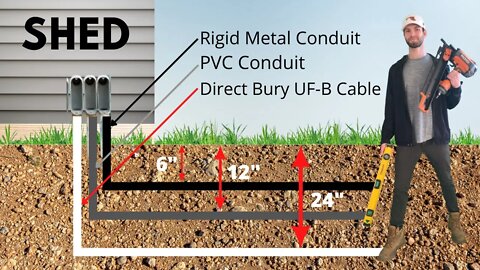
Shed Electrical Installation (How to Add Electricity to a Shed - DIY)
Get the Shed Plans and Course Materials! ⬇️
https://bit.ly/3PeKr4V
In this video, I show you How to Add Electricity to a Shed. Shed Electrical Installation projects are not as hard as you think. However, be sure to consult with a licensed electrician for all work associated with adding electricity to a shed. This step-by-step video tutorial will show you everything you need to know so that you can add electricity to your own shed or outdoor structure. This method worked for me, but every shed electricity installation is a little different.
🛠 🧰 Below are some "must have" tools and materials for this project:
1. PVC Conduit: https://amzn.to/3eMZcyA
2. PVC Conduit Glue/Cement: https://amzn.to/3U8iajj
2. Wire Strippers: https://amzn.to/3DpQmkI
3. Side Lights: https://amzn.to/3QI7PYG
4. Decorative Shed Lights: https://amzn.to/3QHJceE
5. Indoor Overhead Bay Light: https://amzn.to/3Bjt9he
6. Exterior GFCI Outlet: https://amzn.to/3QK5yMn
7. Exterior Switch Cover: https://amzn.to/3S5I0CI
8. Voltage Tester: https://amzn.to/3BFfTF1
I am creating a complete "Modern Shed Build Youtube Series". Below are the other videos in the series:
Introduction to the Modern Shed Series: https://youtu.be/zr0HnCBwrjo
Shed Foundation Options: https://youtu.be/M0EI-FO7DuA
How to Build and Frame a Shed Floor: https://youtu.be/9ZpD06daMeI
How to Frame Shed Walls: https://youtu.be/nXjUerQh444
How to Frame a Shed Roof:https://youtu.be/Y_RChmd6YHA
How to Install Shed Siding: https://youtu.be/CBfzH4OSYzE
How to Install Shed Sheathing: https://youtu.be/NCvIUb0UjRs
How to install Shed Trim: https://youtu.be/6bu6ob-pQm8
Inexpensive Shed Window Option (Acrylic): https://youtu.be/J9tkSISXRds
How to Install a Shed Window: https://youtu.be/L6pxrHfv_s4
How to Install Shed Siding Veneer: https://youtu.be/2SQKY-spzDk
How to Install a Roll-Up Door: https://youtu.be/VnjLM9KNomM
How to Build a Shed Ramp: https://youtu.be/iEzYHe12DLM
How to install asphalt shingles on a shed roof: https://youtu.be/9ZyUXLy4zK8
Be sure to subscribe and hit the notification bell so you don't miss any videos in the Modern Shed Build Series!
If you want to learn how to build the EXACT shed shown in the video, I put together "The Modern Shed Build Course" (https://bit.ly/3PeKr4V) which includes a materials list🧱, tools list 🛠, and cut list 🪚for each step of the entire shed build process. Basically, this course makes it feel like you built this shed alongside me! Every purchase helps support the channel!
For additional information on adding electricity to a shed, check out my blog article: https://atimprovements.com/how-to-run-electricity-to-a-shed/
Follow me on Instagram: https://www.instagram.com/atimprovements/
Check out my Blog: Atimprovements.com
Subscribe to my YouTube Channel ⬇️ https://www.youtube.com/c/AndrewThronImprovements?sub_confirmation=1
Check out my Website for additional DIY Content: https://atimprovements.com
▬▬▬▬▬▬▬▬▬▬▬▬▬
🎥 MY YOUTUBE GEAR
Camera (Iphone Max): https://amzn.to/3d5HxSo
Microphone (Maono Condenser Mic): https://amzn.to/3RCAb7N
Tripod: https://amzn.to/3Rz5Gj3
Mini Tripod: https://amzn.to/3Rvt2WM
Lighting: https://amzn.to/3d4QdZ5
▬▬▬▬▬▬▬▬▬▬▬▬▬
🛠🧰 TOOLS THAT I USE
Carbide Tipped Drill Bit: https://amzn.to/3S0hdIM
Tapcon Screws: https://amzn.to/3OxEWxh
Drill: https://amzn.to/3JICKkk
Tape Measure: https://amzn.to/3HaTWgE
Circular Saw: https://amzn.to/3BFotC4
Masonry Drill: https://amzn.to/36yP1JW
Level: https://amzn.to/3HowUDn
Hammer: https://amzn.to/35fIpiT
Chalk Line: https://amzn.to/3MwSDg8
Clamps: https://amzn.to/3HLqwpK
Drill: https://amzn.to/3JICKkk
Sawzall: https://amzn.to/3HcdeSI
Circular Saw: https://amzn.to/3BFotC4
Jig saw: https://amzn.to/3I6lcyd
Air Compressor: https://amzn.to/34TatJf
Framing Nailer: https://amzn.to/3JGpBYU
Roofing Nailer: https://amzn.to/3BEAuYF
Orbital Sander: https://amzn.to/34UwlUD
Bar Clamps: https://amzn.to/3JjFrJe
▬▬▬▬▬▬▬▬▬▬▬▬▬
Thank you so much for watching!
*All electrical work should ONLY be performed by a licensed electrician
*All content on the Andrew Thron Improvements YouTube channel reflects my own opinions. Please seek out guidance of professionally trained and licensed individuals before making any decisions. Some links in the description may be affiliate links.
74
views
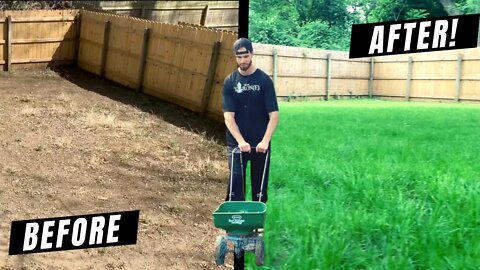
How to Grow a Lawn From Scratch (DIY Guide + Lessons Learned)
Learn How to Grow a Lawn from Scratch (Using Grass Seed) with this DIY Step-by-Step Video! I will also go over my "lessons learned" so that you can learn from my mistakes.
For a vibrant, green lawn, Check out Ironite: https://bit.ly/3L6zMbd
🛠 🧰 Below are some must haves tools and materials for this project:
1. Grass Seed: https://amzn.to/3qxgLFj
2. Seed Spreader: https://amzn.to/3qrYolm
3. Soil pH and Nutrient Tester:https://amzn.to/3BtELj7
🌱 To grow a lawn from scratch using grass seed, you will want to follow these steps:
1. Remove existing weeds, sticks, and debris from your lawn.
2. Test the Soil for pH and Nutrient Deficiencies
3. Till or Aerate the Soil
4. Apply Top Soil and Level the Lawn
5. Apply Grass Seed
6. Rake the Grass Seed Into the Soil
7. Water the Grass Seed
8. Overseed (if necessary)
For additional information on growing grass seed from scratch, check out my blog article: https://atimprovements.com/how-to-grow-grass-seed/
Follow me on Instagram: https://www.instagram.com/atimprovements/
Check out my Blog: Atimprovements.com
Subscribe to my YouTube Channel ⬇️ https://www.youtube.com/c/AndrewThronImprovements?sub_confirmation=1
Check out my Website for additional DIY Content: https://atimprovements.com
▬▬▬▬▬▬▬▬▬▬▬▬▬
🎥 MY YOUTUBE GEAR
Camera (Iphone Max): https://amzn.to/3d5HxSo
Microphone (Maono Condenser Mic): https://amzn.to/3RCAb7N
Tripod: https://amzn.to/3Rz5Gj3
Mini Tripod: https://amzn.to/3Rvt2WM
Lighting: https://amzn.to/3d4QdZ5
▬▬▬▬▬▬▬▬▬▬▬▬▬
🛠🧰 TOOLS THAT I USE
Carbide Tipped Drill Bit: https://amzn.to/3S0hdIM
Tapcon Screws: https://amzn.to/3OxEWxh
Drill: https://amzn.to/3JICKkk
Tape Measure: https://amzn.to/3HaTWgE
Circular Saw: https://amzn.to/3BFotC4
Masonry Drill: https://amzn.to/36yP1JW
Level: https://amzn.to/3HowUDn
Hammer: https://amzn.to/35fIpiT
Chalk Line: https://amzn.to/3MwSDg8
Clamps: https://amzn.to/3HLqwpK
Drill: https://amzn.to/3JICKkk
Sawzall: https://amzn.to/3HcdeSI
Circular Saw: https://amzn.to/3BFotC4
Jig saw: https://amzn.to/3I6lcyd
Air Compressor: https://amzn.to/34TatJf
Framing Nailer: https://amzn.to/3JGpBYU
Roofing Nailer: https://amzn.to/3BEAuYF
Orbital Sander: https://amzn.to/34UwlUD
Bar Clamps: https://amzn.to/3JjFrJe
▬▬▬▬▬▬▬▬▬▬▬▬▬
If you liked this video, you may like my Modern Build Shed Series:
https://www.youtube.com/playlist?list=PL68K7BI-1QBrhOEHnMrYS1Nz_6fa5V5fT
Thank you so much for watching!
#PenningtonIronite #Gettinggreener #Growinggreener
*All content on the Andrew Thron Improvements YouTube channel reflects my own opinions. Please seek out guidance of professionally trained and licensed individuals before making any decisions. Some links in the description may be affiliate links.
31
views
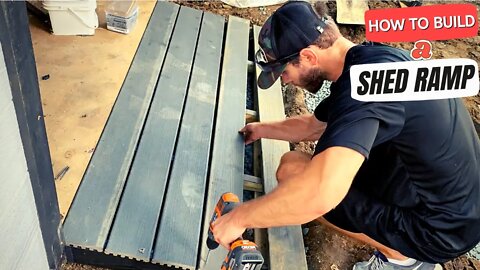
How to Build a Simple SHED RAMP (Step-by-Step)
Get the Shed Plans and Course Materials! ⬇️
https://bit.ly/3PeKr4V
In this video, I show you how to build a simple shed ramp. Building a Shed Ramp is not super complicated and can be completed pretty quickly. This step-by-step shed ramp building tutorial will show you everything you need to know so that you can build your own shed ramp.
There are many different ways to build a shed ramp, but this method worked for me!
For more information on How to Build a Shed Ramp, Check out my "How to Build a Shed Ramp Blog" Linked Here:
https://atimprovements.com/shed-ramp-building-guide/
I am creating a complete "Modern Shed Build Youtube Series". Below are the other videos in the series:
Introduction to the Modern Shed Series: https://youtu.be/zr0HnCBwrjo
Shed Foundation Options: https://youtu.be/M0EI-FO7DuA
How to Build and Frame a Shed Floor: https://youtu.be/9ZpD06daMeI
How to Frame Shed Walls: https://youtu.be/nXjUerQh444
How to Frame a Shed Roof:https://youtu.be/Y_RChmd6YHA
How to Install Shed Siding: https://youtu.be/CBfzH4OSYzE
How to Install Shed Sheathing: https://youtu.be/NCvIUb0UjRs
How to install Shed Trim: https://youtu.be/6bu6ob-pQm8
Inexpensive Shed Window Option (Acrylic): https://youtu.be/J9tkSISXRds
How to Install a Shed Window: https://youtu.be/L6pxrHfv_s4
How to Install Shed Siding Veneer: https://youtu.be/2SQKY-spzDk
How to Install a Roll-Up Door: https://youtu.be/VnjLM9KNomM
How to install asphalt shingles on a shed roof: https://youtu.be/9ZyUXLy4zK8
Be sure to subscribe and hit the notification bell so you don't miss any videos in the Modern Shed Build Series!
If you want to learn how to build the EXACT shed shown in the video, I put together "The Modern Shed Build Course" (https://bit.ly/3PeKr4V) which includes a materials list🧱, tools list 🛠, and cut list 🪚for each step of the entire shed build process. Basically, this course makes it feel like you built this shed alongside me! Every purchase helps support the channel!
Follow me on Instagram: https://www.instagram.com/atimprovements/
Check out my Blog: Atimprovements.com
Subscribe to my YouTube Channel ⬇️ https://www.youtube.com/c/AndrewThronImprovements?sub_confirmation=1
🛠🧰 Below are the Tools I use (some links may be affiliate)
Composite Screw: https://amzn.to/3KIUkq6
Bar Clamps: https://amzn.to/3JjFrJe
Circular Saw: https://amzn.to/3BFotC4
Exterior Construction adhesive: https://amzn.to/3CqDoCT
Exterior Brad Nailer: https://amzn.to/3dBPqil
Exterior Brad Nails (https://amzn.to/3SSjGpa).
Air Compressor: https://amzn.to/34TatJf
Framing Nailer: https://amzn.to/3JGpBYU
Drill: https://amzn.to/3JICKkk
Tape Measure: https://amzn.to/3HaTWgE
Miter Saw: https://amzn.to/3Q71gik
Level: https://amzn.to/3HowUDn
Chalk Line: https://amzn.to/3MwSDg8
Jig saw: https://amzn.to/3I6lcyd
Paint Sprayer (for Siding): https://amzn.to/3bkuwn8
Caulk: https://amzn.to/3SugNe1
107
views
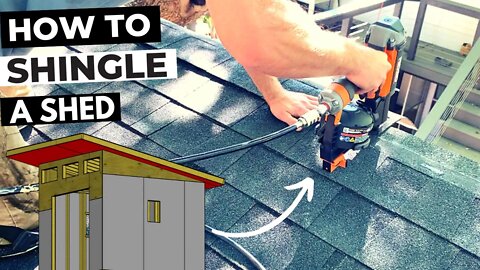
How to Install Asphalt Shingles on a Shed Roof (DIY Step-by-Step Tutorial)
Get the Shed Plans and Course Materials! ⬇️
https://bit.ly/3PeKr4V
In this video, I show you how to install asphalt shingles on a shed roof, step-by-step. Specifically, I will show you how to install a drip edge, how to install tar paper, how to install the starter strip of shingles, how to install asphalt shingles, and how to install ridge flashing. This video will cover everything you need to know so that you can install asphalt shingles on your shed roof.
For more information on how to install asphalt shingles on a shed roof, you can check out my Blog article linked here: https://atimprovements.com/how-to-install-asphalt-shingles-on-a-shed-roof-diy-step-by-step-shingle-installation-guide/
I am creating a complete "Modern Shed Build Youtube Series". Below are the other videos in the series:
Introduction to the Modern Shed Series: https://youtu.be/zr0HnCBwrjo
Shed Foundation Options: https://youtu.be/M0EI-FO7DuA
How to Build and Frame a Shed Floor: https://youtu.be/9ZpD06daMeI
How to Frame Shed Walls: https://youtu.be/nXjUerQh444
How to Frame a Shed Roof:https://youtu.be/Y_RChmd6YHA
How to Install Shed Siding: https://youtu.be/CBfzH4OSYzE
How to Install Shed Sheathing: https://youtu.be/NCvIUb0UjRs
How to install Shed Trim: https://youtu.be/6bu6ob-pQm8
Inexpensive Shed Window Option (Acrylic): https://youtu.be/J9tkSISXRds
How to Build a Shed Ramp: Coming Soon
Be sure to subscribe and hit the notification bell so you don't miss any videos in the Modern Shed Build Series!
If you want to learn how to build the EXACT shed shown in the video, I put together "The Modern Shed Build Course" (https://bit.ly/3PeKr4V) which includes a materials list🧱, tools list 🛠, and cut list 🪚for each step of the entire shed build process. Basically, this course makes it feel like you built this shed alongside me! Every purchase helps support the channel!
Follow me on Instagram: https://www.instagram.com/atimprovements/
Check out my Blog: Atimprovements.com
Subscribe to my YouTube Channel ⬇️ https://www.youtube.com/c/AndrewThronImprovements?sub_confirmation=1
🛠🧰 Below are the Tools I used to install shingles on my shed roof (some links may be affiliate)
Drip Edge: https://www.homedepot.com/p/Amerimax-Home-Products-F5M-Black-Aluminum-Drip-Edge-Flashing-5564535120/203484742#product-overview
Shingles: https://www.homedepot.com/p/GAF-Timberline-HDZ-Charcoal-Algae-Resistant-Laminated-High-Definition-Shingles-33-33-sq-ft-per-Bundle-21-Pieces-0489180/309755006
Ridge Flashing: https://www.homedepot.com/p/Amerimax-Home-Products-4-5-in-x-4-5-in-x-10-ft-Aluminum-Angle-Flashing-5445000120/100081760
Roofing Nailer: https://amzn.to/3pWdXSa
Roofing Nails: https://amzn.to/3RgkkLy
Tar Paper: https://www.homedepot.com/p/Warrior-Roofing-15-Felt-Roof-Deck-Protection-D406-0/100092007
Asphaltic Coating: https://www.homedepot.com/p/Karnak-10-1-oz-Cartridge-19-Asphalt-Flashing-Roof-Coating-Cement-19-CTG/100257533#overlay
Air Compressor: https://amzn.to/34TatJf
Tape Measure: https://amzn.to/3HaTWgE
Utility Knife: https://amzn.to/3AAPFC9
Utility Knife (Hook Blade): https://amzn.to/3Tu3jPS
Video Time Stamps are Below:
00:00 - Introduction
01:09 - How to Install Drip Edge on the Eave of the Shed Roof
02:40 - How to Install Tar Paper
03:51 - How to Install Drip Edge on the Rake Sides of the Shed Roof
04:53 - How to Install the Starter Row of Shingles
06:14 - How to Install Asphalt Shingles on the Shed Roof
13:52 - How to Install Ridge Flashing at the Front of the Shed
17:06 - How to Trim off any Overhanging Shingles on the Rake Side
17:45 - Final Result and Conclusion
Thanks for Watching!
*Some links may be affiliate
383
views
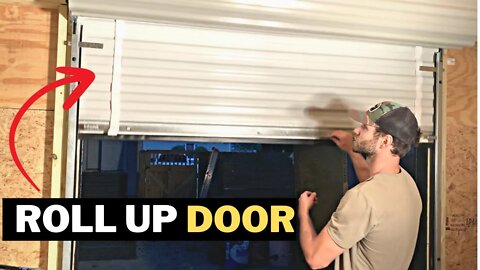
How to Install a Roll Up Door on a Shed
Get the Shed Plans and Course Materials! ⬇️
https://bit.ly/3PeKr4V
In this video, I show you how to install a roll up door on a shed. Personally, I think that roll up doors look awesome for a modern shed - so I was willing to pay a bit extra to achieve the look I wanted. Installing a Roll up door in a shed is a relatively easy project that anyone can tackle.
I purchased a Janus 650 Roll Up Door for my shed application. Here are the specs on the exact roll up door I ordered:
- 6'-0' Wide x 7'-0" High Janus 650
- Silhouette Gray
- Wood Mount
- Stainless Steel Mini Latch
- Standard Manual Operation
- Guides + Hardware
There are many different shed door options, but using a Janus 650 roll up door for my shed door was the right call for my Modern Shed Build.
I am creating a complete "Modern Shed Build Youtube Series". Below are the other videos in the series:
Introduction to the Modern Shed Series: https://youtu.be/zr0HnCBwrjo
Shed Foundation Options: https://youtu.be/M0EI-FO7DuA
How to Build and Frame a Shed Floor: https://youtu.be/9ZpD06daMeI
How to Frame Shed Walls: https://youtu.be/nXjUerQh444
How to Frame a Shed Roof:https://youtu.be/Y_RChmd6YHA
How to Install Shed Siding: https://youtu.be/CBfzH4OSYzE
How to Install Shed Sheathing: https://youtu.be/NCvIUb0UjRs
How to install Shed Trim: https://youtu.be/6bu6ob-pQm8
Inexpensive Shed Window Option (Acrylic): https://youtu.be/J9tkSISXRds
How to Install a Shed Window: https://youtu.be/L6pxrHfv_s4
How to Install Shed Siding Veneer: https://youtu.be/2SQKY-spzDk
How to install asphalt shingles on a shed roof: Coming Soon
How to Build a Shed Ramp: Coming Soon
Be sure to subscribe and hit the notification bell so you don't miss any videos in the Modern Shed Build Series!
If you want to learn how to build the EXACT shed shown in the video, I put together "The Modern Shed Build Course" (https://bit.ly/3PeKr4V) which includes a materials list🧱, tools list 🛠, and cut list 🪚for each step of the entire shed build process. Basically, this course makes it feel like you built this shed alongside me! Every purchase helps support the channel!
Follow me on Instagram: ATimrprovements
Check out my Blog: Atimprovements.com
🛠🧰 Below are the Tools I use (some links may be affiliate)
Exterior Construction adhesive: https://amzn.to/3CqDoCT
Exterior Brad Nailer: https://amzn.to/3dBPqil
Exterior Brad Nails (https://amzn.to/3SSjGpa).
Air Compressor: https://amzn.to/34TatJf
Framing Nailer: https://amzn.to/3JGpBYU
Drill: https://amzn.to/3JICKkk
Tape Measure: https://amzn.to/3HaTWgE
Miter Saw: https://amzn.to/3Q71gik
Circular Saw: https://amzn.to/3BFotC4
Level: https://amzn.to/3HowUDn
Chalk Line: https://amzn.to/3MwSDg8
Jig saw: https://amzn.to/3I6lcyd
Bar Clamps: https://amzn.to/3JjFrJe
Paint Sprayer (for Siding): https://amzn.to/3bkuwn8
Caulk: https://amzn.to/3SugNe1
Video Time Stamps:
0:00 Introduction
0:40 Measuring the Door Opening and Ordering the Roll Up Door (Door Cost)
1:20 Unpacking the Roll-up Door and Assembling the Guides
2:50 Lifting the Roll Up Door into place
4:19 Check that Installation is Plumb
5:05 Fasten the Roll Up Door to the Rough In Opening
6:06 Pre-tension the roll up door and pull the curtain into the Guides
6:51 Install Hardware
7:36 Adjust Door Tension (if needed)
8:43 Conclusion
Thanks for Watching!
87
views
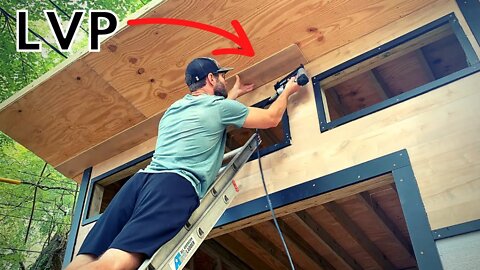
LVP Flooring as Shed Siding (Crazy Idea or Viable Option?)
Get the Shed Plans and Course Materials! ⬇️
https://bit.ly/3PeKr4V
In this video, I use LVP Flooring as Shed Siding. Crazy, I know. But hear me out... I had some leftover LVP Flooring from my house and I thought it could be a great shed siding veneer. Since LVP is "Vinyl" and inherently waterproof, I thought it would make a great shed siding option. So far (1 year later), the LVP veneer siding is holding up great!
To install the Shed Siding, I used Exterior Construction adhesive (https://amzn.to/3CqDoCT), a brad nailer (https://amzn.to/3dBPqil), and exterior brad nails (https://amzn.to/3SSjGpa).
There are many different shed siding options, but using LVP flooring as my shed siding worked for my Modern Shed.
I am creating a complete "Modern Shed Build Youtube Series". Below are the other videos in the series:
Introduction to the Modern Shed Series: https://youtu.be/zr0HnCBwrjo
Shed Foundation Options: https://youtu.be/M0EI-FO7DuA
How to Build and Frame a Shed Floor: https://youtu.be/9ZpD06daMeI
How to Frame Shed Walls: https://youtu.be/nXjUerQh444
How to Frame a Shed Roof:https://youtu.be/Y_RChmd6YHA
How to Install Shed Siding: https://youtu.be/CBfzH4OSYzE
How to Install Shed Sheathing: https://youtu.be/NCvIUb0UjRs
How to install Shed Trim: https://youtu.be/6bu6ob-pQm8
Inexpensive Shed Window Option (Acrylic): https://youtu.be/J9tkSISXRds
How to Build a Shed Ramp: Coming Soon
Be sure to subscribe and hit the notification bell so you don't miss any videos in the Modern Shed Build Series!
If you want to learn how to build the EXACT shed shown in the video, I put together "The Modern Shed Build Course" (https://bit.ly/3PeKr4V) which includes a materials list🧱, tools list 🛠, and cut list 🪚for each step of the entire shed build process. Basically, this course makes it feel like you built this shed alongside me! Every purchase helps support the channel!
Follow me on Instagram: ATimrprovements
Check out my Blog: Atimprovements.com
🛠🧰 Below are the Tools I used in this video (some links may be affiliate)
Exterior Construction adhesive: https://amzn.to/3CqDoCT
Exterior Brad Nailer: https://amzn.to/3dBPqil
Exterior Brad Nails (https://amzn.to/3SSjGpa).
Air Compressor: https://amzn.to/34TatJf
Framing Nailer: https://amzn.to/3JGpBYU
Drill: https://amzn.to/3JICKkk
Tape Measure: https://amzn.to/3HaTWgE
Miter Saw: https://amzn.to/3Q71gik
Circular Saw: https://amzn.to/3BFotC4
Level: https://amzn.to/3HowUDn
Chalk Line: https://amzn.to/3MwSDg8
Jig saw: https://amzn.to/3I6lcyd
Bar Clamps: https://amzn.to/3JjFrJe
Paint Sprayer (for Siding): https://amzn.to/3bkuwn8
Caulk: https://amzn.to/3SugNe1
Thanks for Watching!
*Some links may be affiliate
100
views
1
comment

How to Install a Shed Window (Step-by-Step DIY Guide)
Get the Shed Plans and Course Materials! ⬇️
https://bit.ly/3PeKr4V
This video will show you how to install a shed window. Specifically, this video will show you how to frame a shed window opening, how to prepare the window opening for the shed window installation, and how to install the shed window. Additionally, this video will show you how to install shed window trim, how to install shed window flashing, and how to caulk a shed window.
I highly recommend that you use PVC trim for your shed windows - since it is more resistant to rot.
There are many different ways to install a shed window, but this method worked for my Modern Shed.
For more shed window installation instructions, check out my Blog Article:
https://atimprovements.com/shed-window-installation-how-to-install-a-window-in-a-shed-diy/
I am creating a complete "Modern Shed Build Youtube Series". Below are the other videos in the series:
Introduction to the Modern Shed Series: https://youtu.be/zr0HnCBwrjo
Shed Foundation Options: https://youtu.be/M0EI-FO7DuA
How to Build and Frame a Shed Floor: https://youtu.be/9ZpD06daMeI
How to Frame Shed Walls: https://youtu.be/nXjUerQh444
How to Frame a Shed Roof:https://youtu.be/Y_RChmd6YHA
How to Install Shed Siding: https://youtu.be/CBfzH4OSYzE
How to Install Shed Sheathing: https://youtu.be/NCvIUb0UjRs
How to install Shed Trim: https://youtu.be/6bu6ob-pQm8
Inexpensive Shed Window Option (Acrylic): https://youtu.be/J9tkSISXRds
How to Build a Shed Ramp: Coming Soon
Be sure to subscribe and hit the notification bell so you don't miss any videos in the Modern Shed Build Series!
If you want to learn how to build the EXACT shed show in the video, I put together "The Modern Shed Build Course" (https://bit.ly/3PeKr4V) which includes a materials list🧱, tools list 🛠, and cut list 🪚for each step of the entire shed build process. Basically, this course makes it feel like you built this shed alongside me! Every purchase helps support the channel!
Follow me on Instagram: ATimrprovements
Check out my Blog: Atimprovements.com
🛠🧰 Below are the Tools I used in this video (some links may be affiliate)
14" x 21" Shed Window: https://amzn.to/3peXfwH
Flashing Tape: https://amzn.to/3PjN1Wr
Air Compressor: https://amzn.to/34TatJf
Framing Nailer: https://amzn.to/3JGpBYU
Drill: https://amzn.to/3JICKkk
Tape Measure: https://amzn.to/3HaTWgE
Miter Saw: https://amzn.to/3Q71gik
Circular Saw: https://amzn.to/3BFotC4
Level: https://amzn.to/3HowUDn
Chalk Line: https://amzn.to/3MwSDg8
Jig saw: https://amzn.to/3I6lcyd
Bar Clamps: https://amzn.to/3JjFrJe
Paint Sprayer (for Siding): https://amzn.to/3bkuwn8
Caulk: https://amzn.to/3SugNe1
Thanks for Watching!
64
views
Inexpensive Shed Window Option (Acrylic / Plexiglas Shed Window Alternative to Save Money)
Get the Shed Plans and Course Materials! ⬇️
https://bit.ly/3PeKr4V
This video will show you an inexpensive shed window option that uses arcylic / plexiglas panels instead of a standard glass window. This video will show you how to install trim around the shed window and how to mount the acrylic shed window panel in place. Overall, this inexpensive shed window option can save you a few hundred bucks!
There are many different ways to install a shed window, but this method worked for my Modern Shed - especially since these windows were up high on my shed and did not require any open/close functionality.
I am creating a complete "Modern Shed Build Youtube Series". Below are the other videos in the series:
Introduction to the Modern Shed Series: https://youtu.be/zr0HnCBwrjo
Shed Foundation Options: https://youtu.be/M0EI-FO7DuA
How to Build and Frame a Shed Floor: https://youtu.be/9ZpD06daMeI
How to Frame Shed Walls: https://youtu.be/nXjUerQh444
How to Frame a Shed Roof:https://youtu.be/Y_RChmd6YHA
How to Install Shed Siding: https://youtu.be/CBfzH4OSYzE
How to Install Shed Trim: https://youtu.be/6bu6ob-pQm8
How to Install Shed Sheathing: https://youtu.be/NCvIUb0UjRs
How to Install Shed Windows: Coming Soon!
Be sure to subscribe and hit the notification bell so you don't miss any videos in the Modern Shed Build Series!
If you want to learn how to build the EXACT shed show in the video, I put together "The Modern Shed Build Course" (https://bit.ly/3PeKr4V) which includes a materials list🧱, tools list 🛠, and cut list 🪚for each step of the entire shed build process. Basically, this course makes it feel like you built this shed alongside me! Every purchase helps support the channel!
Follow me on Instagram: ATimrprovements
Check out my Blog: Atimprovements.com
🛠🧰 Below are the Tools I used in this video (some links may be affiliate)
Acrylic Window Panels: https://amzn.to/3AiQbpb
Air Compressor: https://amzn.to/34TatJf
Framing Nailer: https://amzn.to/3JGpBYU
Drill: https://amzn.to/3JICKkk
Tape Measure: https://amzn.to/3HaTWgE
Miter Saw: https://amzn.to/3Q71gik
Circular Saw: https://amzn.to/3BFotC4
Level: https://amzn.to/3HowUDn
Chalk Line: https://amzn.to/3MwSDg8
Jig saw: https://amzn.to/3I6lcyd
Bar Clamps: https://amzn.to/3JjFrJe
Paint Sprayer (for Siding): https://amzn.to/3bkuwn8
Caulk: https://amzn.to/3SugNe1
Thanks for Watching!
10
views
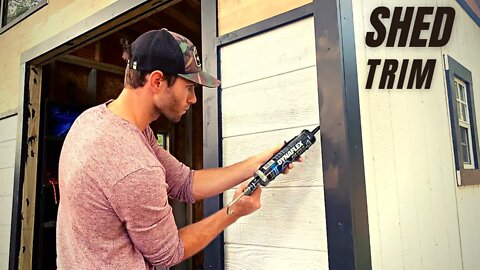
How to Install Shed Trim (DIY Shed Trim Installation Guide)
Get the Shed Plans and Course Materials! ⬇️
https://bit.ly/3PeKr4V
This video will show you how to install shed trim on a shed or outdoor structure. Specifically, this video will show you how to install trim on the outside corners, how to install trim around the shed door, how to install shed window trim, and how to install trim on the shed fascia boards.
I highly recommend that you use PVC trim for your shed - since it is more resistant to rot.
There are many different ways to install shed trim, but this method worked for my Modern Shed.
I am creating a complete "Modern Shed Build Youtube Series". Below are the other videos in the series:
Introduction to the Modern Shed Series: https://youtu.be/zr0HnCBwrjo
Shed Foundation Options: https://youtu.be/M0EI-FO7DuA
How to Build and Frame a Shed Floor: https://youtu.be/9ZpD06daMeI
How to Frame Shed Walls: https://youtu.be/nXjUerQh444
How to Frame a Shed Roof:https://youtu.be/Y_RChmd6YHA
How to Install Shed Siding: https://youtu.be/CBfzH4OSYzE
How to Install Shed Sheathing: https://youtu.be/NCvIUb0UjRs
How to Install Shed Windows: Coming Soon!
Be sure to subscribe and hit the notification bell so you don't miss any videos in the Modern Shed Build Series!
If you want to learn how to build the EXACT shed show in the video, I put together "The Modern Shed Build Course" (https://bit.ly/3PeKr4V) which includes a materials list🧱, tools list 🛠, and cut list 🪚for each step of the entire shed build process. Basically, this course makes it feel like you built this shed alongside me! Every purchase helps support the channel!
Follow me on Instagram: ATimrprovements
Check out my Blog: Atimprovements.com
🛠🧰 Below are the Tools I used in this video (some links may be affiliate)
Air Compressor: https://amzn.to/34TatJf
Framing Nailer: https://amzn.to/3JGpBYU
Drill: https://amzn.to/3JICKkk
Tape Measure: https://amzn.to/3HaTWgE
Miter Saw: https://amzn.to/3Q71gik
Circular Saw: https://amzn.to/3BFotC4
Level: https://amzn.to/3HowUDn
Chalk Line: https://amzn.to/3MwSDg8
Jig saw: https://amzn.to/3I6lcyd
Bar Clamps: https://amzn.to/3JjFrJe
Paint Sprayer (for Siding): https://amzn.to/3bkuwn8
Caulk: https://amzn.to/3SugNe1
Thanks for Watching!
49
views
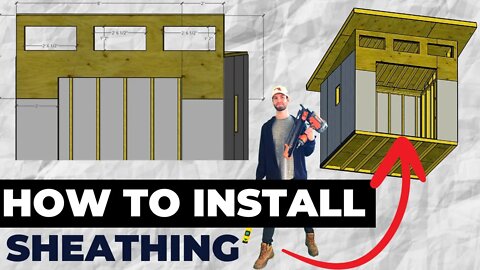
Shed Sheathing Installation (How to Install Plywood Sheathing on a Shed)
Get the Shed Plans and Course Materials! ⬇️
https://bit.ly/3PeKr4V
This video will show you how to install plywood sheathing installation on a shed. Specifically, I will be installing 1/2" plywood sheathing on the front, sides, and soffit of my 10'x10' Modern Shed.
This video will show you how to install shed sheathing as siding, step-by-step. Specifically, this video will show you how to install sheathing on your shed or outdoor structure.
Although plywood sheathing is typically installed for sheds, you also have the option to install T1-11 or LP SmartSide Siding on your shed (without the need for sheathing).
There are many different ways to install shed siding and sheathing, but this method worked for my Modern Shed.
Here is a link to my Shed Siding Installation Blog: https://atimprovements.com/how-to-ins...
I am creating a complete "Modern Shed Build Youtube Series". Below are the other videos in the series:
Introduction to the Modern Shed Series: https://youtu.be/zr0HnCBwrjo
Shed Foundation Options: https://youtu.be/M0EI-FO7DuA
How to Build and Frame a Shed Floor: https://youtu.be/9ZpD06daMeI
How to Frame Shed Walls: https://youtu.be/nXjUerQh444
How to Frame a Shed Roof:https://youtu.be/Y_RChmd6YHA
How to Install Shed Siding: https://youtu.be/CBfzH4OSYzE
How to Install Shed Windows: Coming Soon!
Be sure to subscribe and hit the notification bell so you don't miss any videos in the Modern Shed Build Series!
If you want to learn how to build the EXACT shed show in the video, I put together "The Modern Shed Build Course" (https://bit.ly/3PeKr4V) which includes a materials list🧱, tools list 🛠, and cut list 🪚for each step of the entire shed build process. Basically, this course makes it feel like you built this shed alongside me! Every purchase helps support the channel!
Follow me on Instagram: ATimrprovements
Check out my Blog: Atimprovements.com
🛠🧰 Below are the Tools I used in this video (some links may be affiliate)
Air Compressor: https://amzn.to/34TatJf
Framing Nailer: https://amzn.to/3JGpBYU
Drill: https://amzn.to/3JICKkk
Tape Measure: https://amzn.to/3HaTWgE
Miter Saw: https://amzn.to/3Q71gik
Circular Saw: https://amzn.to/3BFotC4
Level: https://amzn.to/3HowUDn
Chalk Line: https://amzn.to/3MwSDg8
Jig saw: https://amzn.to/3I6lcyd
Bar Clamps: https://amzn.to/3JjFrJe
Paint Sprayer (for Siding): https://amzn.to/3bkuwn8
Thanks for Watching!
33
views
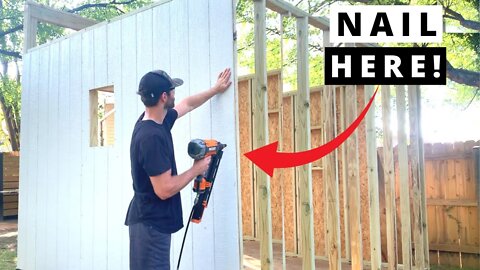
How to Install Shed Siding (T1-11 and LP SmartSide Panel Installation)
Get the Shed Plans and Course Materials! ⬇️
https://bit.ly/3PeKr4V
This video will show you how to install shed siding, step-by-step. Specifically, this video will show you how to install T1-11 or LP SmartSide Siding on your shed or outdoor structure.
There are many different ways to install shed siding, but this method worked for my Modern Shed.
Here is a link to my Shed Siding Installation Blog: https://atimprovements.com/how-to-install-t1-11-or-lp-smartside-siding/
I am creating a complete "Modern Shed Build Youtube Series". Below are the other videos in the series:
Introduction to the Modern Shed Series: https://youtu.be/zr0HnCBwrjo
Shed Foundation Options: https://youtu.be/M0EI-FO7DuA
How to Build and Frame a Shed Floor: https://youtu.be/9ZpD06daMeI
How to Frame Shed Walls: https://youtu.be/nXjUerQh444
How to Frame a Shed Roof:https://youtu.be/Y_RChmd6YHA
How to Install Shed Windows: Coming Soon!
Be sure to subscribe and hit the notification bell so you don't miss any videos in the Modern Shed Build Series!
If you want to learn how to build the EXACT shed show in the video, I put together "The Modern Shed Build Course" (https://bit.ly/3PeKr4V) which includes a materials list🧱, tools list 🛠, and cut list 🪚for each step of the entire shed build process. Basically, this course makes it feel like you built this shed alongside me! Every purchase helps support the channel!
Follow me on Instagram: ATimrprovements
Check out my Blog: Atimprovements.com
🛠🧰 Below are the Tools I used in this video (some links may be affiliate)
Air Compressor: https://amzn.to/34TatJf
Framing Nailer: https://amzn.to/3JGpBYU
Drill: https://amzn.to/3JICKkk
Tape Measure: https://amzn.to/3HaTWgE
Miter Saw: https://amzn.to/3Q71gik
Circular Saw: https://amzn.to/3BFotC4
Level: https://amzn.to/3HowUDn
Chalk Line: https://amzn.to/3MwSDg8
Jig saw: https://amzn.to/3I6lcyd
Bar Clamps: https://amzn.to/3JjFrJe
Paint Sprayer (for Siding): https://amzn.to/3bkuwn8
Thanks for Watching!
13
views
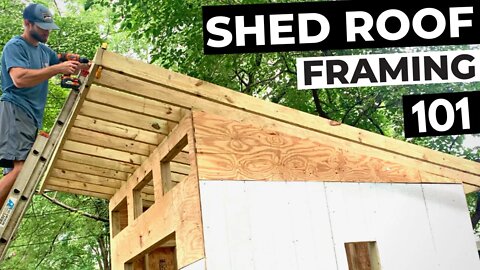
DIY Shed Roof Framing (How to Build a Shed Roof, Make Birdsmouth Cuts, and Install Plywood Decking)
Get the Shed Plans and Course Materials! ⬇️
https://bit.ly/3PeKr4V
This video will show you how to Frame a Lean to Shed Roof, step-by-step. Specifically, I will show you how to cut your shed roof rafters to size, how to make birdsmouth cuts, and how to install the plywood roof decking.
There are many different ways to frame a lean to shed roof, but I used 2"x6" pressure treated lumber for my shed roof rafters.
When framing your lean to shed roof, you want to plan our your rafter layout so that your plywood roof decking is fully supported along the edge.
The video will go through every aspect of the DIY Shed Roof Framing Process that I used to build my Modern Shed.
VIDEO CHAPTERS:
00:00 - Introduction
00:45 - Cutting the Shed Roof Rafters to Size and Making Birdsmouth Cuts
02:40 - Determining the Shed Roof Pitch
03:22 - Marking the Birdsmouth Cuts
06:35 - Cutting the Birdsmouth Notches in Each Shed Roof Rafter
09:58 - Mark the Shed Roof Rafter Spacing on the Shed Walls
10:33 - Positioning the Shed Roof Rafters in Place on Top of the Shed
11:33 - Securing Rafters with Hurricane Ties
12:28 - Installing Blocking Between the Shed Roof Rafters
14:19 - Installing the Shed Roof Fascia Boards
17:37 - Installing the Shed's Side Overhang Rafters
19:38 - Installing the Plywood Roof Decking
24:16 - Conclusion
I am creating a complete "Modern Shed Build Youtube Series". Below are the other videos in the series:
Introduction to the Modern Shed Series: https://youtu.be/zr0HnCBwrjo
Shed Foundation Options: https://youtu.be/M0EI-FO7DuA
How to Build and Frame a Shed Floor: https://youtu.be/9ZpD06daMeI
How to Frame Shed Walls: https://youtu.be/nXjUerQh444
How to Install Shed Siding: Coming Soon
How to Install Shed Windows: Coming Soon!
Be sure to subscribe and hit the notification bell so you don't miss any videos in the Modern Shed Build Series!
If you want to learn how to build the EXACT shed show in the video, I put together "The Modern Shed Build Course" (https://bit.ly/3PeKr4V) which includes a materials list🧱, tools list 🛠, and cut list 🪚for each step of the entire shed build process. Basically, this course makes it feel like you built this shed alongside me! Every purchase helps support the channel!
Follow me on Instagram: ATimrprovements
Check out my Blog: Atimprovements.com
🛠🧰 Below are the Tools I used in this video (some links may be affiliate)
Air Compressor: https://amzn.to/34TatJf
Framing Nailer: https://amzn.to/3JGpBYU
Drill: https://amzn.to/3JICKkk
Tape Measure: https://amzn.to/3HaTWgE
Miter Saw: https://amzn.to/3Q71gik
Circular Saw: https://amzn.to/3BFotC4
Level: https://amzn.to/3HowUDn
Chalk Line: https://amzn.to/3MwSDg8
Jig saw: https://amzn.to/3I6lcyd
Bar Clamps: https://amzn.to/3JjFrJe
Paint Sprayer (for Siding): https://amzn.to/3bkuwn8
Thanks for Watching!
179
views
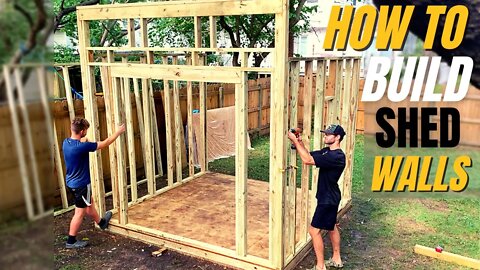
How to Frame Shed Walls (Complete DIY Lean-to Shed Wall Framing Guide for Modern Shed)
Get the Shed Wall Plans and Course Materials ⬇️
https://bit.ly/3PeKr4V
This video will show you how to frame shed walls for a lean-to modern shed, step-by-step!
There are many different ways to frame shed walls. I built my shed walls using and 2"x4" pressure treated lumber and 2"x6" pressure treated lumber for the front shed wall headers.
When framing your shed walls, you want to plan our your wall stud layout based on the siding you are going to be using for your shed. In my case, I used 4'x8' LP SmartSiding panels for siding. Therefore, I placed my studs so that they would be positioned where the two edges of siding panels meet. The video will go through every aspect of the shed wall framing process.
VIDEO CHAPTERS:
0:00 - Introduction
1:02 - Framing the Back Wall of the Shed
4:48 - Framing the Side Walls
8:13 - Framing the Side Wall Shed Window(s)
11:58 - Framing the Front Wall of the Shed
13:21 - Building the Front Wall Headers
22:29 - Lifting the Shed Walls Into Place
29:09 - Installing the Double Top-Plate
31:25 - Cutting out the Bottom Plate at the Door's Rough Opening
32:23 - Conclusions
I am creating a complete "Modern Shed Build Youtube Series"! Below are the other videos in the series:
Introduction to the Modern Shed Series: https://youtu.be/zr0HnCBwrjo
Shed Foundation Options: https://youtu.be/M0EI-FO7DuA
How to Build and Frame a Shed Floor: https://youtu.be/9ZpD06daMeI
How to Frame a Shed Roof: Coming Soon!
How to Install Shed Windows: Coming Soon!
Be sure to subscribe and hit the notification bell so you don't miss any videos in the Modern Shed Build Series.
Here is a helpful resource for framing the Shed Window: https://atimprovements.com/shed-window-installation-how-to-install-a-window-in-a-shed-diy/
If you want to learn how to build the EXACT shed show in the video, I put together "The Modern Shed Build Course" (https://bit.ly/3PeKr4V) which includes a materials list🧱, tools list 🛠, and cut list 🪚for each step of the entire shed build process. Basically, this course makes it feel like you built this shed alongside me! Every purchase helps support the channel!
Follow me on Instagram: ATimrprovements
Check out my Blog: Atimprovements.com
🛠🧰 Below are the Tools I used in this video (some links may be affiliate)
Air Compressor: https://amzn.to/34TatJf
Framing Nailer: https://amzn.to/3JGpBYU
Drill: https://amzn.to/3JICKkk
Tape Measure: https://amzn.to/3HaTWgE
Circular Saw: https://amzn.to/3BFotC4
Level: https://amzn.to/3HowUDn
Chalk Line: https://amzn.to/3MwSDg8
Clamps: https://amzn.to/3HLqwpK
Drill: https://amzn.to/3JICKkk
Sawzall: https://amzn.to/3HcdeSI
Jig saw: https://amzn.to/3I6lcyd
Bar Clamps: https://amzn.to/3JjFrJe
Thanks for Watching!
141
views
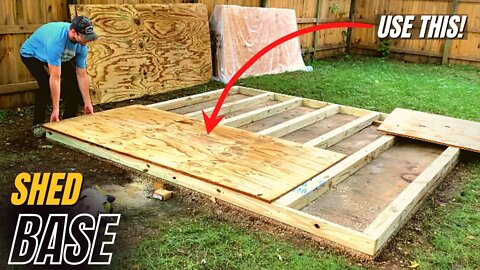
How to Build a Shed Floor (DIY Shed Floor Base Construction Process)
Learn how to Build the 10'x10' Modern Shed! ⬇️⬇️⬇️
https://bit.ly/3PeKr4V
This video will show you how to build a shed floor, step-by-step.
There are many different shed floor foundation options available for sheds. However, I built my shed floor using pressure treated 4"x4" and 2"x4" pressure treated lumber.
When building my shed, I was lucky to have an existing 10'x10' concrete slab that I could build my slab upon. If you don't yet have a shed foundation, check out these resources below:
Shed Foundation Options: https://youtu.be/M0EI-FO7DuA
Shed Foundation Blog: https://atimprovements.com/how-to-build-a-shed-base-concrete-slab-step-by-step-diy-guide/
In the next few weeks, I will show you:
- How to Frame Shed Walls
- How to install a lean to shed roof
- How to Install shingles on a shed roof
- How to install Shed Windows
- And much, much more.
Here is the introduction video for the modern shed build series:
https://youtu.be/zr0HnCBwrjo
Be sure to subscribe and hit the notification bell so you don't miss any videos in the Modern Shed Build Series.
If you want to learn how to build the EXACT shed show in the video, I put together "The Modern Shed Build Course" (https://bit.ly/3PeKr4V) which includes a materials list🧱, tools list 🛠, and cut list 🪚for each step of the entire shed build process. Basically, this course makes it feel like you built this shed alongside me! Every purchase helps support the channel!
Follow me on Instagram: ATimrprovements
Check out my Blog: Atimprovements.com
🛠🧰 Below are the Tools I use (some links may be affiliate)
Carbide Tipped Drill Bit: https://amzn.to/3S0hdIM
Tapcon Screws: https://amzn.to/3OxEWxh
Drill: https://amzn.to/3JICKkk
Tape Measure: https://amzn.to/3HaTWgE
Circular Saw: https://amzn.to/3BFotC4
Masonry Drill: https://amzn.to/36yP1JW
Level: https://amzn.to/3HowUDn
Hammer: https://amzn.to/35fIpiT
Chalk Line: https://amzn.to/3MwSDg8
Clamps: https://amzn.to/3HLqwpK
Drill: https://amzn.to/3JICKkk
Sawzall: https://amzn.to/3HcdeSI
Circular Saw: https://amzn.to/3BFotC4
Jig saw: https://amzn.to/3I6lcyd
Air Compressor: https://amzn.to/34TatJf
Framing Nailer: https://amzn.to/3JGpBYU
Roofing Nailer: https://amzn.to/3BEAuYF
Orbital Sander: https://amzn.to/34UwlUD
Bar Clamps: https://amzn.to/3JjFrJe
Thanks for Watching!
69
views
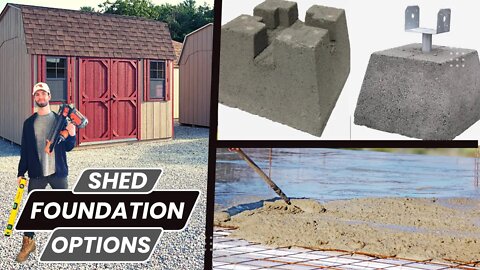
Shed Foundation Options (Concrete Slab, Gravel Base, Deck Block, etc.)
Learn how to Build the 10'x10' Modern Shed! ⬇️⬇️⬇️
https://bit.ly/3PeKr4V
There are many different foundation options available for sheds. However, I prefer the concrete slab foundation and the gravel shed foundation. When building my shed, I was lucky to have an existing 10'x10' concrete slab that I could build my slab upon. However, I made this video to discuss the shed base foundation options at a high level. Check out the links below for additional resources for building a shed foundation:
1. How to Build a Concrete Slab:
- https://atimprovements.com/how-to-build-a-shed-base-concrete-slab-step-by-step-diy-guide/
- https://www.youtube.com/watch?v=H56eiJJ_FCY&t=316s
2. How to Build a Gravel Shed Foundation:
- https://www.youtube.com/watch?v=WpAc64Op7MA&t=497s
In the next few weeks, I will show you:
- How to Build a Shed Base
- How to Frame Shed Walls
- How to install a lean to shed roof
- How to Install shingles on a shed roof
- How to install Shed Windows
- And much, much more.
Be sure to subscribe and hit the notification bell so you don't miss any videos in the Modern Shed Build Series.
The Modern Shed Build course (https://bit.ly/3PeKr4V) includes a materials list🧱, tools list 🛠, and cut list 🪚for each step of the entire shed build process. Basically, this course makes it feel like you built this shed alongside me!
Follow me on Instagram: ATimrprovements
Check out my Blog: Atimprovements.com
🛠🧰 Below are the Tools I use (some links may be affiliate)
Drill: https://amzn.to/3JICKkk
Tape Measure: https://amzn.to/3HaTWgE
Circular Saw: https://amzn.to/3BFotC4
Masonry Drill: https://amzn.to/36yP1JW
Level: https://amzn.to/3HowUDn
Hammer: https://amzn.to/35fIpiT
Chalk Line: https://amzn.to/3MwSDg8
Clamps: https://amzn.to/3HLqwpK
Drill: https://amzn.to/3JICKkk
Sawzall: https://amzn.to/3HcdeSI
Circular Saw: https://amzn.to/3BFotC4
Jig saw: https://amzn.to/3I6lcyd
Air Compressor: https://amzn.to/34TatJf
Framing Nailer: https://amzn.to/3JGpBYU
Roofing Nailer: https://amzn.to/3BEAuYF
Orbital Sander: https://amzn.to/34UwlUD
Bar Clamps: https://amzn.to/3JjFrJe
Thanks for Watching!
130
views
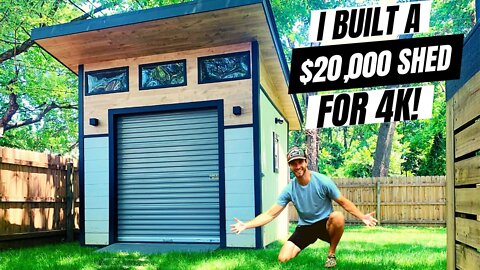
I Transformed my Shed (and so can you!) // Introduction to the Modern Shed Build Series
Learn how to Build the 10'x10' Modern Shed! ⬇️⬇️⬇️
https://bit.ly/3PeKr4V
This course includes a materials list🧱, tools list 🛠, and cut list 🪚for each step of the entire shed build process. Basically, this course makes it feel like you built this shed alongside me!
Here are the steps you will need to take to build your own shed:
1. Review the materials list spreadsheet (in course) and make any tweaks that you might want. For example, you may want to order windows that are slightly larger or smaller than the ones I used.
2. Place your materials order with your local Big Box Store. I used Home Depot and Amazon to source my materials, but Lowe's, 84 Lumber etc. should also be fine. I highly recommend that you get your materials delivered!
3. After your materials arrive on site, simply construct the shed based on the easy to follow lessons in my course.
This is my first instructional course, so I welcome all feedback! I spent a bunch of hours planning, 3D modeling, building, filming, and producing this course - So you don't have to!
If this course saves you a few trips to Home Depot and keeps you from making a few lumber mistakes, it is well worth it (at least in my opinion). Plus, it also is a great way to support the channel so I can keep putting out free content. You can check out more information on the shed course here: bit.ly/3PeKr4V
Although I highly recommend the course if you are looking to construct a similar shed, I will also be publishing a Youtube Series that shows each step of the build - just not to quite the same level of detail as the course.
In the next few weeks, I will show you:
- How to Build a Shed Base
- How to Frame Shed Walls
- How to install a lean to shed roof
- How to Install shingles on a shed roof
- How to install Shed Windows
- And much, much more.
Be sure to subscribe and hit the notification bell so you don't miss any videos in the Modern Shed Build Series.
Follow me on Instagram: ATimrprovements
Check out my Blog: Atimprovements.com
🛠🧰 Below are the Tools I use (some links may be affiliate)
Drill: https://amzn.to/3JICKkk
Tape Measure: https://amzn.to/3HaTWgE
Circular Saw: https://amzn.to/3BFotC4
Masonry Drill: https://amzn.to/36yP1JW
Level: https://amzn.to/3HowUDn
Hammer: https://amzn.to/35fIpiT
Chalk Line: https://amzn.to/3MwSDg8
Clamps: https://amzn.to/3HLqwpK
Drill: https://amzn.to/3JICKkk
Sawzall: https://amzn.to/3HcdeSI
Circular Saw: https://amzn.to/3BFotC4
Jig saw: https://amzn.to/3I6lcyd
Air Compressor: https://amzn.to/34TatJf
Framing Nailer: https://amzn.to/3JGpBYU
Roofing Nailer: https://amzn.to/3BEAuYF
Orbital Sander: https://amzn.to/34UwlUD
Bar Clamps: https://amzn.to/3JjFrJe
Thanks for Watching!
9
views
5 Simple and Effective Ways to Improve Your Outdoor Space (Outdoor Projector Screen, Amdro, etc.)
Hey everyone! Today I’m sharing 5 easy things you can do to improve your outdoor living space. Big shoutout to @AmdroPestControl for sponsoring this video! Head to any local Amdro retail partner (Home Depot, Lowes, Walmart) to pick up your Amdro products and say goodbye to insects for the summer!
Check out Amdro products at:https://bit.ly/3uG7M7h
Learn How to Build The Modern Shed 🛠⬇️
https://bit.ly/3o9P7xg
Tools and Products are linked below ⬇️⬇️⬇️
As someone who recently spent a lot of time and money renovating my backyard, I spent some time thinking about a few simple and effective ways that the average homeowner can improve their outdoor space. Here is what I came up with:
1. Take Care of Any Clutter: Excess Clutter Can Ruin any outdoor space. Consider using privacy screens to conceal trash cans and use a storage shed to organize your lawn tools.
2. Invest in Quality Outdoor Furniture: If you want to enjoy your outdoor space, you are going to want to have some high quality furniture that people actually want to sit in. It is totally worth spending a few extra dollars to get a nice outdoor sofa. OR if you want to build your own sectional sofa, I will leave a link to my "How to Build an Outdoor Sectional" Video Here: https://youtu.be/PD1OYTJDj-g
3. Get Rid of Bothersome Insects: Even if you have the nicest outdoor space in the world, people won't want to spend time outside if you have an insect problem. Mosquitos, ants, ticks, etc. can ruin your outdoor experience. Amdro makes a ton of products that can completely eliminate your insect issues. Check them out!
4. The Power of Landscaping and Plants: A few strategically placed plants can drastically improve your outdoor space. Don't underestimate the power of landscaping.
5. Add Outdoor "Features": There are so many possibilities for cool outdoor "features". Although I chose a fire table and projector screen for my features, there are many others such as tea lights, torches, outdoor games, etc.
🛠🧰 All of the tools and materials I used to complete my DIY Backyard transformation are linked below:
Fire Table:
Concrete Dye:https://amzn.to/3xB4ykT
Drill Mixer:https://amzn.to/3e36HOL
Glass Cleaner:https://amzn.to/36vnA0c
Drawer Slides: https://amzn.to/2T4IdgN
Concrete Sanding Pads: https://amzn.to/3wzGKNc
Corner Molding: https://amzn.to/3e3777N
Fire Glass:https://amzn.to/3yL6tn7
Outdoor Projector:
Projector Stand: https://amzn.to/3AJxewC
Projector: https://amzn.to/3yBrVgd
Projector Screen: https://amzn.to/3P1YFG7
Amazon Privacy Screen:https://amzn.to/3PbZNY1
Misc. Tools I Use:
Drill: https://amzn.to/3JICKkk
Tape Measure: https://amzn.to/3HaTWgE
Circular Saw: https://amzn.to/3BFotC4
Masonry Drill: https://amzn.to/36yP1JW
Level: https://amzn.to/3HowUDn
Hammer: https://amzn.to/35fIpiT
Chalk Line: https://amzn.to/3MwSDg8
Clamps: https://amzn.to/3HLqwpK
Drill: https://amzn.to/3JICKkk
Sawzall: https://amzn.to/3HcdeSI
Circular Saw: https://amzn.to/3BFotC4
Jig saw: https://amzn.to/3I6lcyd
Air Compressor: https://amzn.to/34TatJf
Framing Nailer: https://amzn.to/3JGpBYU
Roofing Nailer: https://amzn.to/3BEAuYF
Orbital Sander: https://amzn.to/34UwlUD
Bar Clamps: https://amzn.to/3JjFrJe
My DIY backyard transformation involved quite a few different projects – and I have put together detailed DIY tutorial videos for each of them. See below ⬇️⬇️⬇️
Full Backyard Timelapse:
https://youtu.be/AUujzcGkN-Q
Learn How to Build a DIY fence in your backyard:
https://youtu.be/Nst-QWq5Cuc
https://atimprovements.com/how-to-bui...
Learn How to Build a DIY Fence GATE:
https://youtu.be/ogQ4TG3bYB0
https://atimprovements.com/how-to-bui...
Learn How NOT to extend a DIY backyard concrete slab:
https://youtu.be/URTGmSfBxeg
https://atimprovements.com/how-to-ext...
Learn How to Install Backyard Patio Pavers:
https://youtu.be/0NsJrLGZDwk
https://atimprovements.com/diy-paver-...
Learn How to Build a Backyard Trash Can / Horizontal Privacy Screen:
https://youtu.be/sq9FEi7g3hk
Learn How to Install a DIY Backyard Wire Cable Railing on your Deck:
https://youtu.be/w3pDRgD2y-Y
https://atimprovements.com/diy-cable-...
Learn How to Build your own DIY Backyard (Exterior) Section Sofa:
https://youtu.be/PD1OYTJDj-g
Free downloadable DIY Sectional Sofa Plans: https://atimprovements.com/product/di...
Learn How to make a DIY Backyard Fire Pit Table 🔥:
https://youtu.be/WV7ZdXty_Dw
https://atimprovements.com/diy-fire-p...
I used the the following Easyfirepits.com products for my Fire Table build: - LP-In-Table "ITCK+ Kit" (https://easyfirepits.com/gas-kits)
- PAN28x10 which is 28"x10"
My favorite part of this DIY Backyard Transformation is the Modern Shed! I am putting together a detailed video series that will show you how to build the modern shed you saw in the video, step-by-step. Be sure to SUBSCRIBE to the channel if you want to be notified when the Modern Shed Build Videos drop!
Thanks!
#AmdroPartner #DefendWithAmdro #AmdroPestControl
189
views