

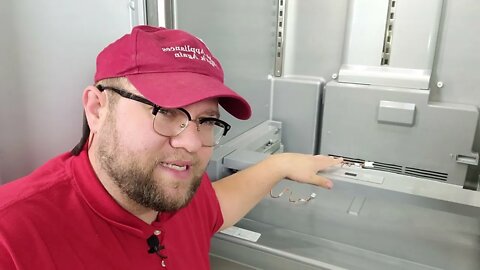
How Much Change Can a Dryer Have Inside? Taking a LOUD Dryer Apart for Coins Inside
How do you know if you're going to find money in a dryer? We brought a dryer into the shop and all we could here was money, so I got my camera to capture what would happen - good or bad. So join us and see if an electric clothes dryer has a lot of money in it. Also, we're giving away a free hat the week after release. I'll notify the winner on May 14th for a free hat w/ free shipping.
You can buy appliance parts w/ a great warranty at: https://bit.ly/3pVxWyX
Like or Hate the Hat? Buy the Hat! https://bit.ly/3dtHHjE (The hat is NOT an endorsement of any candidate, party, or ideology. I am just a big fan of parody)
Tools I use in all videos can be found at my Amazon Idea Page: https://www.amazon.com/shop/bensappliancesandjunk
Did this video help you out? Send me a tip, and help me make more Appliance Repair videos for people to watch for free!
PayPal: https://paypal.me/BensappliancesYT?locale.x=en_US
CashApp: $BenjaminSchlichter
Affiliate Disclosure Form: http://bit.ly/3oXeu3B
** Links to external websites and parts may result in me receiving a commission on sales.
3
views
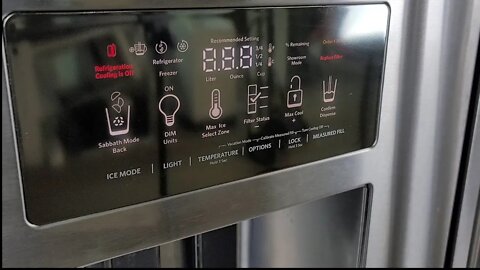
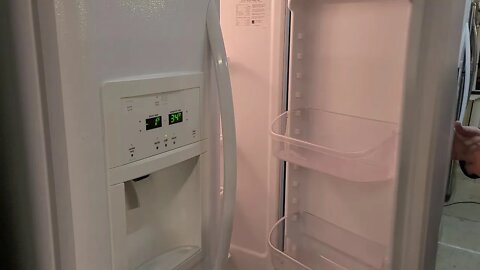
KitchenAid Refrigerator Not Cooling & Leaking Water but Freezer is Fine - How to Fix
One of the recent and common problems with newer high-end refrigerators with problems is having a KitchenAid Refrigerator that won't cool in the refrigerator cabinet, has water in the crisper drawers, or the KitchenAid Refrigerator makes noise. The same things can occur on a Whirlpool refrigerator - it won't cool in the refrigerator cabinet, or that the Whirlpool Refrigerator makes noise. Both are the same internally, so the proper fix is the same.
Buy the W11033168 Fan Kit: https://bit.ly/2RXQYZf
Make sure the fan assembly is for your exact fridge, otherwise check the appropriate one for your refrigerator at: https://bit.ly/3pVxWyX
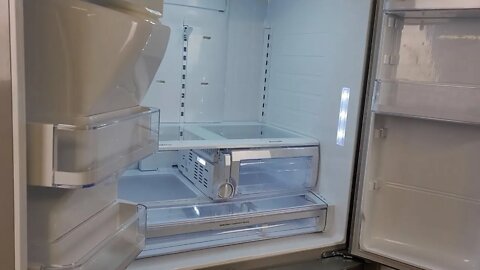
The major part we are using to fix this is the W11033168 Fan, Thermistor and Thermostat Kit. It is an all-in-one system that replaces the failed or degraded components. There's also the chance that there's damage to the fan which we address in the video. We're also adding on a secret tip from Whirlpool near the end on doing a forced-defrost mode that'll really help the refrigerator improve its de-icing capabilities through the Whirlpool Basic Defrost Mode.
Additionally, a major component of the fix is simply taking this type of refrigerator apart, which is a mess. 4 and 5-door units have a different system of teardown as far as the shelving goes. RepairClinic has a good video at: https://www.youtube.com/watch?v=ZFeHzy2U2Cw
Read the first comment by Scott Roper, though because he's correct that you can avoid a few issues by skipping to the crisper tray in the 4/5-door unit.
Remember: If your refrigerator has dirty condenser coils, it could be failing to cool this KitchenAid refrigerator properly, costing you a lot of money as well as why the ice maker won't automatically operate - consider buying an appliance cleaning kit to prevent your appliance from an early failure.
Link: https://bit.ly/3zQGFYK
Video Timeline:
Introduction / Explanation of Issue with Whirlpool and Kitchenaid Refrigerators: 00:00
How to Remove Kitchenaid Shelves: 00:57
How to Remove Kitchenaid Crisper Drawers: 01:39
Removing the Water System: 03:32
How to Remove the Kitchenaid / Whirlpool Refrigerator Air Tower: 05:39
Inspecting the Components & Forced Fan Mode 05:52
How to Remove the W11033168 Fan Assembly: 06:41
How to Install the W11033168 Fan Assembly: 08:18
Cleaning the Drain Line: 09:21
How to Put a KitchenAid Refrigerator in Basic Defrost: 09:55
Join our Appliance Discord Community! https://discord.gg/FJZcVG5x
Tools I use in all videos can be found at my Amazon Idea Page: https://www.amazon.com/shop/bensappliancesandjunk
You can buy appliance parts w/ a great warranty at:
Did this video help you out? Send me a tip, and help me make more Appliance Repair videos for people to watch for free!
PayPal: https://paypal.me/BensappliancesYT?locale.x=en_US
CashApp: $BenjaminSchlichter
Affiliate Disclosure Form: http://bit.ly/3oXeu3B
** Links to external websites and parts may result in me receiving a commission on sales.
52
views
KitchenAid Refrigerator Troubleshooting and Diagnostic Codes - Whirlpool Refrigerator Diagnostic Too
Today, we're unraveling how to put a KitchenAid Refrigerator into diagnostic mode, and how to decipher some of the KitchenAid Refrigerator Error Codes, among other things. This is a newer-style interface, and you can use this same system and same codes to Troubleshoot a Whirlpool Refrigerator along with the same Whirlpool Refrigerator Error Codes and Troubleshooting. The number of tests and error codes on this system is incredibly deep, and its very useful if in case your KitchenAid refrigerator won't cool or has some other issue.
I'll be honest: This video is boring unless you need to use the system, then its awesome. I struggled to find a good video on this when I had to tech these style machines at customer houses because the last tech didn't know what he was doing, and stole the tech sheet.
You can buy appliance parts w/ a great warranty at: https://bit.ly/3pVxWyX
Like or Hate the Hat? Buy the Hat! https://bit.ly/3dtHHjE
(The hat is NOT an endorsement of any candidate, party, or ideology. I am just a big fan of parody of all kinds)
Tools I use in all videos can be found at my Amazon Idea Page: https://www.amazon.com/shop/bensappliancesandjunk
Did this video help you out? Send me a tip, and help me make more Appliance Repair videos for people to watch for free!
PayPal: https://paypal.me/BensappliancesYT?locale.x=en_US
CashApp: $BenjaminSchlichter
Affiliate Disclosure Form: http://bit.ly/3oXeu3B
** Links to external websites and parts may result in me receiving a commission on sales.
4
views
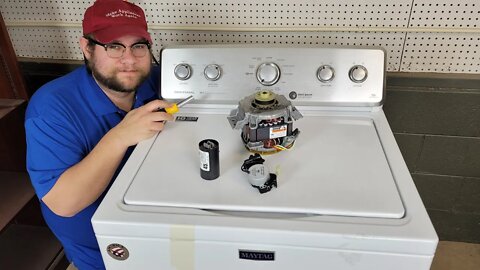
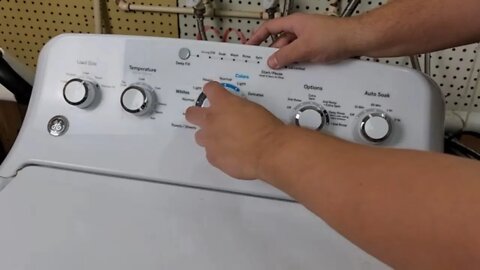
Maytag Washer Won't Spin - How to Troubleshoot a Maytag Centennial Washer
Have you found yourself in a situation where your washer won't spin? Its probably the most common washer-killing problem you'll find yourself in. In this video, I want to show you how to fix a Maytag Washer that Won't Spin. These techniques will work on any Vertical Modular Washer like how to find error codes on a Washer. The parts generally are similar on non-VMW's too, but they're going to be located in different areas. This is a very long video, but I tried to include every common issue and how to decide if that's what's causing your washer not to spinning.
Video Timeline:
Why Your Washer Won't Spin: 00:00
How to Find a Washer's Service Manual: 01:10
How to Enter Diagnostics: 02:25
Error Codes that Relate to Unit Not Spinning: 03:40
Fix #1 - Verifying the Maytag Washer Hub: 04:55
Fix #2 - Lid Lock: 05:32
Fix #3 - Verifying Spin Mode / Capacitance: 06:39
Fix #4 - Gearcase & Transmission Issues: 08:10
Spin-Related Components Underneath Washer: 08:45
Fix # 5/6 - Splutch / Belt Assy: 09:35
Fix #7 - Testing a Motor: 10:27
Fix #8 - Testing the Shift Actuator: 11:17
Fix #9 - Capacitor Test: 12:26
What to do After Installing a Part: 13:35
How to Recalibrate a Maytag Washer: 14:11
How to Look Up Parts for Your Washer: 15:05
Outro: 15:23
Parts Links for Major Failure Points:
Shift Actuator (F7E1, F7E5): https://bit.ly/3eMD4BK
Washplate Hub: https://bit.ly/3zoWhB8
Lid Lock (Maroon-Colored): https://bit.ly/2W9m2qJ
Helpful Videos I've made on this style washer:
Maytag Washer Diagnostic System: https://youtu.be/Saok_IA8_s8
How to Replace Suspension Rods (F0E5): https://youtu.be/jptPMYstdcA
How to Replace a Newer-Style Whirlpool/Maytag Lid Lock: https://youtu.be/d7tXnwpL5Zo
Removing a Stuck-On Washplate: https://www.youtube.com/watch?v=DoaxzocMhLo
Component links you may want to use:
Maroon Shift Actuator: https://amzn.to/3v9Osx9
You can buy appliance parts w/ a great warranty at: https://bit.ly/3pVxWyX
If you like the hat, buy a hat! https://bit.ly/3dtHHjE
(Note: The hats are meant purely as parody, and are not an endorsement for a person, politician, or party)
Tools I use in all videos can be found at my Amazon Idea Page: https://www.amazon.com/shop/bensappliancesandjunk
Did this video help you out? Send me a tip, and help me make more Appliance Repair videos for people to watch for free!
PayPal: https://paypal.me/BensappliancesYT?locale.x=en_US
CashApp: $BenjaminSchlichter
Affiliate Disclosure Form: http://bit.ly/3oXeu3B
** Links to external websites and parts may result in me receiving a commission on sales.
39
views
Maytag Refrigerator Reprogramming - Installing the W10310240 Control Board
If you have a Maytag Refrigerator that won't display temperature or a Maytag Refrigerator Control Won't turn on, this is a simple video on how to take out, install and reprogram a Maytag Refrigerator control board. When you buy a new W10310240 control board, you'll likely get the PE0000 error code, or something similar that requires you to reprogram your refrigerator. We did this on an MFI2569VEM2 Maytag refrigerator, but this will work for a Whirlpool Gold control board, too.
Replacement Board via Amazon: https://amzn.to/3B0EfXm
Remember: If your refrigerator has dirty condenser coils, it could be failing to cool this refrigerator properly, costing you a lot of money as well as why the ice maker won't automatically operate - consider buying an appliance cleaning kit to prevent your appliance from an early failure.
Link: https://bit.ly/3zQGFYK
Eventually, I am going to put out a video on simply repairing the board instead of replacing it, so make sure to subscribe for when the video comes out.
You can buy appliance parts w/ a great warranty at: https://bit.ly/3pVxWyX
Like or Hate the Hat? Buy the Hat! https://bit.ly/3dtHHjE
(The hat is NOT an endorsement of any candidate, party, or ideology. I am just a big fan of parody of all kinds)
Tools I use in all videos can be found at my Amazon Idea Page: https://www.amazon.com/shop/bensappliancesandjunk
Did this video help you out? Send me a tip, and help me make more Appliance Repair videos for people to watch for free!
PayPal: https://paypal.me/BensappliancesYT?locale.x=en_US
CashApp: $BenjaminSchlichter
Affiliate Disclosure Form: http://bit.ly/3oXeu3B
** Links to external websites and parts may result in me receiving a commission on sales.
10
views
How to Install Door Bins on a Frigidaire Refrigerator 240356402
This is a basic tutorial on how to replace a refrigerator door bin for a Frigidaire refrigerator. The bin we're replacing is the Frigidaire 240356402 door bin. I was asked by a company to shoot this video for their users to help them install it properly. The door bin likely works with other brands if the dimensions were the same.
You can buy the exact 2-Pack here: https://amzn.to/3leZCwY
You can buy appliance parts w/ a great warranty at: https://bit.ly/3pVxWyX
Like or Hate the Hat? Buy the Hat! https://bit.ly/3dtHHjE
(The hat is NOT an endorsement of any candidate, party, or ideology. I am just a big fan of parody of all kinds)
Tools I use in all videos can be found at my Amazon Idea Page: https://www.amazon.com/shop/bensappliancesandjunk
Did this video help you out? Send me a tip, and help me make more Appliance Repair videos for people to watch for free!
PayPal: https://paypal.me/BensappliancesYT?locale.x=en_US
CashApp: $BenjaminSchlichter
Affiliate Disclosure Form: http://bit.ly/3oXeu3B
** Links to external websites and parts may result in me receiving a commission on sales.
9
views
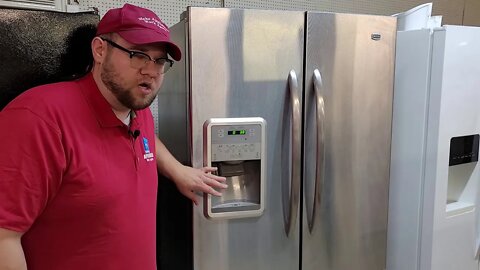
Samsung Refrigerator Not Cooling in Fresh Food Cabinet - How to Fix with a Second Heater
It seems like that, eventually, your Samsung Refrigerator won't cool in the upper cabinet, or the Samsung refrigerator starts leaking water inside the cabinet. Or you'll even experience the dreaded Samsung refrigerator fan noise problem. All of these issues (and maybe another one or two) are all due to one problem: Your refrigerator has ice and frost build-up behind the upper evaporator panel.
I made one video dealing with this problem, but the heater installation used a different type of splicing type that works great, but is a bit more difficult to work with (in my opinion!). This installation is quicker and easier.
Buy the drain tube and sealant kit kit online: https://bens-appliances.com/collections/all/products/refrigerator-secondary-heater-kit
Video Timeline:
Intro & How to Remove the Samsung Refrigerator Shelves: 00:00
How to Remove the Samsung Fresh Food Evaporator Panel: 00:48
What a Clean / Good Evaporator Panel Looks Like: 01:55
The Problem with the Samsung Refrigerant Line: 02:08
How to Fix the Problem / Installation Guide: 02:35
How to Force Defrost a Samsung Refrigerator: 06:20
Ending the Samsung Refrigerator Forced Defrost Mode: 07:55
Other Things to Help if Refrigerator Won't Cool / Water Buildup: 08:32
Previous video on the Samsung Icing/Leaking problem (includes full drain kit installation procedure): https://youtu.be/So1Zf-yIj94
Video on flushing a clogged drain line: https://youtu.be/D1-HQyvQ57k
You can buy appliance parts w/ a great warranty at: https://bit.ly/3pVxWyX
Like or Hate the Hat? Buy the Hat! https://bit.ly/3dtHHjE
(The hat is NOT an endorsement of any candidate, party, or ideology. I am just a big fan of parody of all kinds)
Tools I use in all videos can be found at my Amazon Idea Page: https://www.amazon.com/shop/bensappliancesandjunk
Did this video help you out? Send me a tip, and help me make more Appliance Repair videos for people to watch for free!
PayPal: https://paypal.me/BensappliancesYT?locale.x=en_US
CashApp: $BenjaminSchlichter
Affiliate Disclosure Form: http://bit.ly/3oXeu3B
** Links to external websites and parts may result in me receiving a commission on sales.
19
views
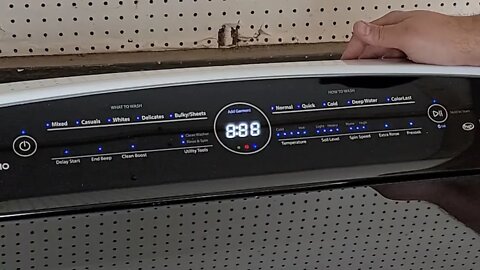
GE Washer Troubleshooting - How to Find Error Codes, and Reset a GE Washer
GE Washing Machines have a pretty fantastic hidden diagnostic mode that will help you troubleshoot a huge range of issues like dealing with a GE Washer not spinning. In today's video, I want to show how easy it is to figure out how to get a GE washing machine into diagnostics. Doing this can make GE washing machine repair much easier than guessing on what's going on, as you can initiate parts tests directly from the controls without opening anything up.
This diagnostic system is exclusively for the GE washer top load machines, and wouldn't working a GE frontload washing machine.
Video Timeline:
00:00 - Introduction
00:42 - How to Enter GE Washer Diagnostics
01:25 - How to Find GE Washing Machine Error Codes
02:18 - GE Washing Machine Fault Code List
03:50 - GE Washing Machine Diagnostics
05:24 - How to Reset a GE Washing Machine
List of Codes/ect: https://drive.google.com/drive/folders/1vMEqLj_kb0eTi0xwT2OQfyykL__xKZWx?usp=sharing
You can buy appliance parts w/ a great warranty at: https://bit.ly/3pVxWyX
Like or Hate the Hat? Buy the Hat! https://bit.ly/3dtHHjE
(The hat is NOT an endorsement of any candidate, party, or ideology. I am just a big fan of parody of all kinds)
Tools I use in all videos can be found at my Amazon Idea Page: https://www.amazon.com/shop/bensappliancesandjunk
Did this video help you out? Send me a tip, and help me make more Appliance Repair videos for people to watch for free!
PayPal: https://paypal.me/BensappliancesYT?locale.x=en_US
CashApp: $BenjaminSchlichter
Affiliate Disclosure Form: http://bit.ly/3oXeu3B
** Links to external websites and parts may result in me receiving a commission on sales.
14
views
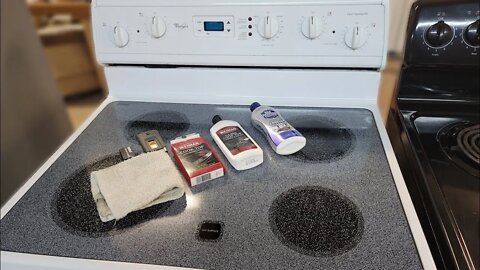
Glass Top Stove Cleaning - How to do it and Remove Burnt Food
Since I run a used appliance store, we had to learn how to clean a glass top stove a long time ago. It isn't hard to deal with a glass stove top, but I figured it'd be a great idea to film one of the ways we clean them. Initially, I wanted to film multiple styles, but hadn't found a stove this nasty since I filmed this, so I decided how to show you how to do it and how to clean burnt stove top gunk and junk with a razor knife.
Intro & View of Nasty Stove: (0:00)
Glass Stove Cleaning Products We're Using: (0:44)
First Pass of Cleaning Media: (2:10)
How to Clean a Burnt Stove Top with a Razor Knife: (3:22)
Glass Cooktop 1st Pass Complete : (5:48)
Glass Stove Top Cleaning 2nd Pass: (06:46)
Clean Stove Top After 2nd Pass: (07:30)
Comparison Before & After: (08:10)
In the video, I am using pretty basic stuff you can find at most stores, but if in case you can't find it, or want to shop online:
Multi-Purpose Razer Scraper Set (Not what I used, because what I used was garbage, use this style instead): https://amzn.to/2NfImuQ
Weiman's Scrub Pads + Cleaner Pack: https://amzn.to/3asDtYc
Make sure to subscribe because the next one up, we'll be using OVEN CLEANER to test and see how good it is, but I'm just waiting for a nasty stove to try it.
You can buy appliance parts w/ a great warranty at: https://bit.ly/3pVxWyX
Like or Hate the Hat? Buy the Hat! https://bit.ly/3dtHHjE
(The hat is NOT an endorsement of any candidate, party, or ideology. I am just a big fan of parody of all kinds)
Tools I use in all videos can be found at my Amazon Idea Page: https://www.amazon.com/shop/bensappliancesandjunk
Did this video help you out? Send me a tip, and help me make more Appliance Repair videos for people to watch for free!
PayPal: https://paypal.me/BensappliancesYT?locale.x=en_US
CashApp: $BenjaminSchlichter
Affiliate Disclosure Form: http://bit.ly/3oXeu3B
** Links to external websites and parts may result in me receiving a commission on sales.
18
views
1
comment
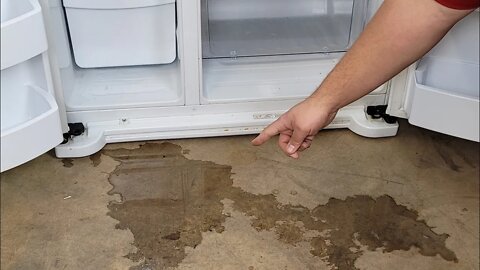
GE Refrigerator Leaking Water on the Floor - How to Clean a Drain Line
A huge problem that you could experience is your GE refrigerator leaking water on the floor. This trick works for most refrigerators leaking water inside the cabinet, as its usually caused by an ice build-up or obstruction in the drain line. If you suspect that your GE refrigerator is leaking from the bottom, then this video will help you.
In the video, I show you how to remove the evaporator panel cover on a GE refrigerator, what parts you're likely to see such as the evaporator coils and defrost heater, then show you how to clean a refrigerator drain line out. This is a cheap, easy fix that can save you a HUGE amount of money on a service call, and save a lot of headaches for the cost of some plastic hose and a soda bottle.
You can buy appliance parts w/ a great warranty at: https://bit.ly/3pVxWyX
If you like the hat, buy a hat! https://bit.ly/3dtHHjE
(Note: The hats are meant purely as parody, and are not an endorsement for a person, politician, or party)
Tools I use in all videos can be found at my Amazon Idea Page: https://www.amazon.com/shop/bensappliancesandjunk
Did this video help you out? Send me a tip, and help me make more Appliance Repair videos for people to watch for free!
PayPal: https://paypal.me/BensappliancesYT?locale.x=en_US
CashApp: $BenjaminSchlichter
4
views
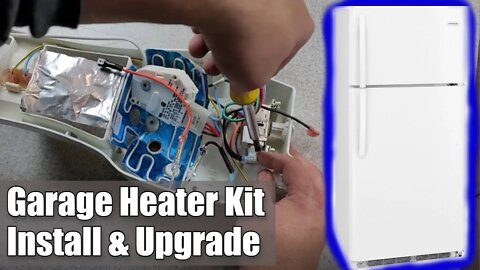
Refrigerator Won't Cool in Garage - How to Install Garage Heater Kit + Upgrade
If you have a refrigerator that won't work in garage, its likely not designed for that. However, there is a thing such as a Universal Garage Heater Kit, although its branded as a Frigidaire Garage Heater Kit.
This installation will work as a Whirlpool Garage Heater Kit and Kenmore Garage Heater Kit too, just make sure that you have a manual cold control switch prior to purchasing/installation. Hopefully by watching this video, you'll fully understand how to install a Frigidaire Garage Heater Kit, and then the option I went with to improve the design with the rocker switch.
Link to the pre-built kit with heater plus rocker switch and tool-less wire splicers: https://bit.ly/2ZRC0Iu
Tools I use in all videos can be found at my Amazon Idea Page: https://www.amazon.com/shop/bensappliancesandjunk
Did this video help you out? Send me a tip, and help me make more Appliance Repair videos for people to watch for free!
PayPal: https://paypal.me/BensappliancesYT?locale.x=en_US
CashApp: $BenjaminSchlichter
Affiliate Disclosure Form: http://bit.ly/3oXeu3B
** Links to external websites and parts may result in me receiving a commission on sales.
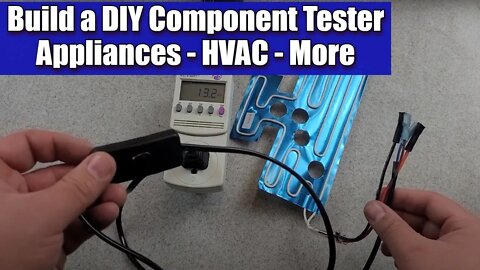
How to Test Appliance Parts with a Cheater Cord | How to Make a DIY Power Cord
When you do appliance repair, many times you will want to test a certain part away from the appliance, like to learn how to test a washer drain pump, or test a refrigerator heater. Learning how to build a cheater cord, or tester cord, or component tester is a great, cheap, easy way to do this. I was working on another video and wanted to test the component away from an appliance to see how it worked (the blue heater) which is why I decided to make this video.
I'll likely reference a few things in this video in the future, just in case you need to test a particular appliance part in the future. These are easy and cheap to build, so I have a few of these at my shop, and the on/off switch makes it more practical to do as well.
3 Pack of Lamp Cords + On Off: https://amzn.to/3qYihi7
Spade Connector Pack (higher quality, fewer pcs): https://amzn.to/3j26GMb
Tools I use in all videos can be found at my Amazon Idea Page: https://www.amazon.com/shop/bensappliancesandjunk
You can buy appliance parts w/ a great warranty at: https://bit.ly/3pVxWyX
Did this video help you out? Send me a tip, and help me make more Appliance Repair videos for people to watch for free!
PayPal: https://paypal.me/BensappliancesYT?locale.x=en_US
CashApp: $BenjaminSchlichter
Affiliate Disclosure Form: http://bit.ly/3oXeu3B
** Links to external websites and parts may result in me receiving a commission on sales.
7
views
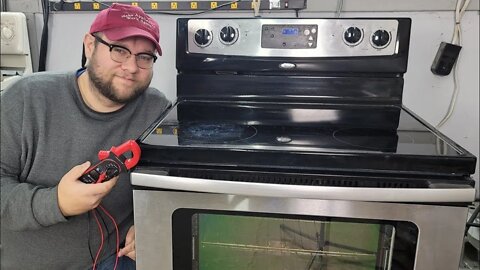
Whirlpool Oven Won't Heat - How to Range Troubleshoot a Whirlpool Oven Not Working
If you have a Whirlpool oven that won't heat, then this video is made to give you a few major ideas on how to diagnose and fix an oven not heating. We inspect & test a Whirlpool oven element, deal with an oven control board, and a few other things that could cause you to have a Whirlpool oven not working - along with ways to rule out a lot of different things.
Although this video is a guide for a Whirlpool Electric Oven, the same steps are going to be the same for practically every major brand on the market, and both coil top stoves and glass-top stoves. This video is not a good guide for gas stoves.
Here are a few basic parts and tools we're dealing with in the video to fix a range:
Frigidaire Terminal Block Kit (works on Whirlpools & others at 1/3rd the price): https://bit.ly/39NQjhY
Whirlpool Common Element: https://bit.ly/35TGuy2
Control Board / Misc Part Lookup for all stoves: https://bit.ly/3pVxWyX
You can buy appliance parts w/ a great warranty at: https://bit.ly/3pVxWyX
Like or Hate the Hat? Buy the Hat! https://bit.ly/3dtHHjE
(The hat is NOT an endorsement of any candidate, party, or ideology. I am just a big fan of parody of all kinds)
Tools I use in all videos can be found at my Amazon Idea Page: https://www.amazon.com/shop/bensappliancesandjunk
Did this video help you out? Send me a tip, and help me make more Appliance Repair videos for people to watch for free!
PayPal: https://paypal.me/BensappliancesYT?locale.x=en_US
CashApp: $BenjaminSchlichter
Affiliate Disclosure Form: http://bit.ly/3oXeu3B
** Links to external websites and parts may result in me receiving a commission on sales.
6
views
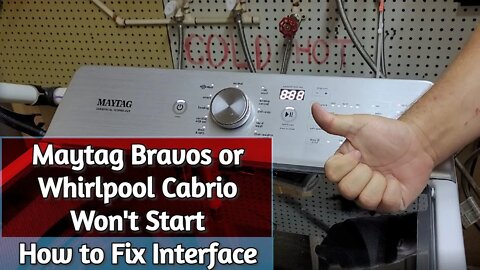
Whirlpool Cabrio Washer Won't Start or Turn On - How to Repair the Interface
If you own a Whirlpool Cabrio Washer that won't start or a Cabrio washer that won't turn on, there is a sadly common problem that is extremely costly to repair by replacing the Cabrio Washer interface board. However, there's a very quick and affordable fix to solve this issue. The problem occurs that will cause the Whirlpool Cabrio Washer won't start and just beeps among other things - again, all caused by the interface board.
In this video, we go through a quick confirmation via the Cabrio Washer Error Code system to show some other possible codes, but are primarily concerned with the Cabrio F6E2 Error code, if a code comes up at all.
Link for MG Chemicals Conformal Coating Repair Kit: https://bit.ly/3DrMHjs - Includes everything to fix the issue + coat board to ensure it lasts forever.
I did a similar video for the Maytag Bravos XL Washer that had the same issue - both systems are extremely similar. I did this companion video showing how to take apart the interface further for a better cleaning, so the video is slightly different.
If sadly this repair doesn't work and you confirmed there was damage to the interface, you'll have to purchase a new board. Here's an affiliate link to purchase the board from Appliance Parts Pros: https://bit.ly/3kXJ0Id
Like or Hate the Hat? Buy the Hat! https://bit.ly/3dtHHjE
(The hat is NOT an endorsement of any candidate, party, or ideology. I am just a big fan of parody of all kinds)
Tools I use in all videos can be found at my Amazon Idea Page: https://www.amazon.com/shop/bensappliancesandjunk
Did this video help you out? Send me a tip, and help me make more Appliance Repair videos for people to watch for free!
PayPal: https://paypal.me/BensappliancesYT?locale.x=en_US
CashApp: $BenjaminSchlichter
Affiliate Disclosure Form: http://bit.ly/3oXeu3B
** Links to external websites and parts may result in me receiving a commission on sales.
7
views
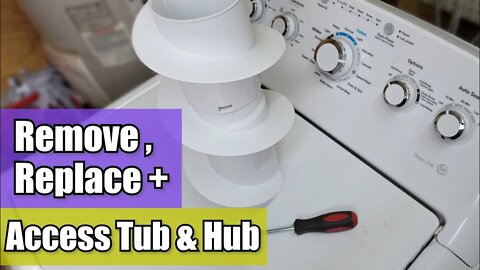
GE Washer Agitator Removal - How to do it and access the GE Washer Hub and More
Today, we had to replace a GE Washer agitator which meant that we had to take it out, which isn't easy to do on these newer-style washers. No one else has (seemingly) done a video, so I thought we'd do that when we got the new GE Washer Auger from Appliance Parts Pros.
All you need to do a GE Agitator Repair is a screwdriver, and the new agitator itself. The big problem with this is that you MUST remove the agitator if you want to do anything involving the GE Washer Hub, or a GE Washer Tub, or GE Wash Plate - the screw keeping everything in place is hidden under the agitator which is a major problem.
This video only involves the agitator / auger itself, not the hub. However, those are almost self-explanitory, and the big issue is what's shown in the video. I hope this helps you with your GE washer, as it was a real pain to figure this one out, as all newer style GE's have this issue which isn't really discussed much how to solve.
Buy this GE Agitator if yours is bad for a newer-style GE Washer (WH43X31240): https://bit.ly/2KRMY9r
You can buy appliance parts w/ a great warranty at: https://bit.ly/3pVxWyX
If you like the hat, buy a hat! https://bit.ly/3dtHHjE
(Note: The hats are meant purely as parody, and are not an endorsement for a person, politician, or party)
Tools I use in all videos can be found at my Amazon Idea Page: https://www.amazon.com/shop/bensappliancesandjunk
Did this video help you out? Send me a tip, and help me make more Appliance Repair videos for people to watch for free!
PayPal: https://paypal.me/BensappliancesYT?locale.x=en_US
CashApp: $BenjaminSchlichter
DISCLOSURE: This post may contain affiliate links, meaning when you click the links and make a purchase, we receive a commission. Affiliate Link & Earnings Disclosure: http://bit.ly/3oXeu3B
184
views
Clean a Washing Machine Inside: How to Remove Mold, Soap Scum and More with a CHEAP Organic Cleaner
Our used appliance store gets and refurbishes hundreds of washing machines every year. But what is the best way to clean a washing machine? How can you get rid of the problems to clean a stinky washer? We've spent 5 years and a huge budget on trying to solve this problem, and I think we've come to a pretty good solution. Its cheap, organic, works well, is safe. But you may not be able to buy it anywhere. What is it? Watch the video, as we tear a washing machine apart to see if we can clean a washer of soap scum, mold, and a lot of other nasty things.
You'll also find some ideas and guidelines on not just what, but how much you want to use to clean the washer and how to clean a washer drain too, among other things.
Additionally, this formula should work WONDERS if you want to clean a dishwasher drain or other components, this video and recipe should work great! Just use approximately 1/3rd cup of the citric acid and about 1/2tsp of the oxygenated bleach. This should help destroy problems in your drain system naturally and cheaply.
Affiliate Disclosure Form: http://bit.ly/3oXeu3B
** Links to external websites and parts may result in me receiving a commission on sales.
**The Main Thing We Used** - we buy from Amazon:
10lb Package from Millard ($25): https://amzn.to/38C9DhK
5lb Package ($15): https://amzn.to/2Mf9cCx
This video isn't sponsored by Milliard or Amazon. I've just found that this brand/package is the cheapest to buy for what we do. As for the other ingredient(s), its pretty clear where we bought them!
You can buy appliance parts w/ a great warranty at: https://bit.ly/3pVxWyX
Like or Hate the Hat? Buy the Hat! https://bit.ly/3dtHHjE
(The hat is NOT an endorsement of any candidate, party, or ideology. I am just a big fan of parody of all kinds)
Tools I use in all videos can be found at my Amazon Idea Page: https://www.amazon.com/shop/bensappliancesandjunk
Did this video help you out? Send me a tip, and help me make more Appliance Repair videos for people to watch for free!
PayPal: https://paypal.me/BensappliancesYT?locale.x=en_US
CashApp: $BenjaminSchlichter
Affiliate Disclosure Form: http://bit.ly/3oXeu3B
** Links to external websites and parts may result in me receiving a commission on sales.
7
views
GE Refrigerator Won't Cool - Easy Ideas on how to Fix a Refrigerator Not Cooling
Do you have a GE Refrigerator that won't cool at all, or just isn't getting cool enough? Many times, people think they need to figure out how to add freon to a refrigerator, but many times, its a fix that a regular person can do, or at least troubleshoot themselves easily enough.
In this video, I want to show you some GE Refrigerator troubleshooting - what GE Refrigerator parts to look for that could cause the unit to not work as its intended. On this one, we find out pretty darn fast why it won't work! But I went ahead and went over other major parts we find that are responsible for causing a refrigerator like this to not work properly.
The goal of this video is to show you why a GE refrigerator won't cool, and the main, easy-to-fix culprits of why a GE fridge won't cool.
A few things we cover in the video:
- How to clean a refrigerator
- How to check a refrigerator compressor relay
- How to Repair a GE refrigerator defroster system
- Addressing a GE Refrigerator Not Cooling
Link to the common GE defrost heater for a side-by-side refrigerator: https://bens-appliances.com/collections/ge-refrigerators/products/ge-refrigerator-defrost-heater-wr51x10055
Use the code "youtube" and get an extra 5% off of anything at this link!
Remember: If your refrigerator has dirty condenser coils, it could be failing to cool this GE refrigerator properly, costing you a lot of money as well as why the ice maker won't automatically operate right - consider buying an appliance cleaning kit to prevent your appliance from an early failure. Link: https://bens-appliances.com/products/appliance-cleaning-kit-for-refrigerators-and-dryers
_______________________________________
You can buy appliance parts w/ a great warranty at: https://bit.ly/3pVxWyX
Tools I use in all videos can be found at my Amazon Idea Page: https://www.amazon.com/shop/bensappliancesandjunk
Did this video help you out? Send me a tip, and help me make more Appliance Repair videos for people to watch for free!
PayPal: https://paypal.me/BensappliancesYT?locale.x=en_US
CashApp: $BenjaminSchlichter
Affiliate Disclosure Form: http://bit.ly/3oXeu3B
** Links to external websites and parts may result in me receiving a commission on sales
Video Timeline
Intro: (00:00)
Checking and Cleaning Condenser Coils: (01:25)
Comparing Clean and Dirty Coils - What They Look Like: (03:58)
Checking Condenser Fan Running: (05:18)
How to Check if Compressor is Running: (05:48)
How to Check a Relay: (06:22)
Defroster System: (07:27)
How to Test the Defrost Heater: (08:33)
Taking Apart System to Check Evaporator Fan: (09:34)
Outro / Things We Tested in System: (11:24)
How to Find Parts for Your Specific Refrigerator: (13:14)
79
views
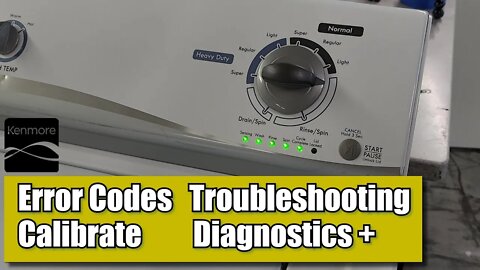
Kenmore Washer Troubleshooting - How to Find Error Codes & Recalibrate to Fix Your Washer
If you have a Kenmore Washer that has problems like it won't spin, this video is to help you "Open Up" the washer and put this washer into diagnostic mode. These style washers (made from 2009 to 2016 and still today with other brands) have a powerful error code mode that will show you how to solve stuff like your Kenmore Washer won't spin - or at least isolate why that's an issue. Using these systems should help you pin down why a Kenmore Washer won't spin, or other issues like a Kenmore washer won't drain. These steps can be done on many other styles of VMW washers (which all have the green oval lights and go under brand names like Maytag, Kenmore, Amana, Roper, Whirlpool, Inglis, Admiral and others).
In this video, we're showing you the 4 primary mode of the Kenmore Washer Diagnostic system:
- Error Code modes to help isolate why a Kenmore Washer's Not Spinning or your Kenmore Washer Not Draining
- Automatic Test Mode to test all Kenmore Washer Parts & Components
- Manual Test Mode (IMPORTANT!) to test all Kenmore Washer Parts individually
- Kenmore Washer Recalibration and Kenmore Washer Reset - this mode is NEEDED when you install a new Kenmore Washer Part!
My hope is this video helps you to identify what's going on with the washer. This doesn't show you how to install parts, buy parts, or diagnose the part via multimeter, but at least points you in the right direction. I plan on doing future videos on this.
Parts Links for Major Failure Points:
Shift Actuator (F7E1, F7E5): https://bit.ly/3eMD4BK
Washplate Hub: https://bit.ly/3zoWhB8
Lid Lock (Maroon-Colored): https://bit.ly/2W9m2qJ
Join our Appliance Discord Community! https://discord.gg/FJZcVG5x
DISCLOSURE: This post may contain affiliate links, meaning when you click the links and make a purchase, we receive a commission.
Affiliate Link & Earnings Disclosure: http://bit.ly/3oXeu3B
If you need to buy an appliance part to fix your washer, make sure to use Appliance Part Pro's model lookup system to get the EXACT part you need, to ensure it works - plus, you can return it if it doesn't fix your issue: https://bit.ly/3pVxWyX
Tools I use in all videos can be found at my Amazon Idea Page: https://www.amazon.com/shop/bensappliancesandjunk
Did this video help you out? Send me a tip, and help me make more Appliance Repair videos for people to watch for free!
PayPal: https://paypal.me/BensappliancesYT?locale.x=en_US
CashApp: $BenjaminSchlichter
15
views
I Made $13,000 Last Month Selling THESE and You Can Too! #Shorts
Almost 4 years ago, I decided to start a job knowing literally nothing about appliances. I make good money from doing this work, and you can too. All you need are a few things, and a willingness to watch a lot of YouTube. No experience needed!
#Shorts
Join our appliance discord! https://discord.gg/FJZcVG5x
Appliance Store Business Insurance (get insurance if you choose to do business, I'm paying $29/mo thru this company): https://bit.ly/3bZqI8x
1
view
How to Start Repairing and Fixing Appliances for Profit Interview Part #3
Here is the final 13+ minutes of my interview with Washer Dryer Money. Due to the length, we split it up into these 3 parts.
Part #1: https://youtu.be/aqoMbSen42w
Part #2: https://youtu.be/Cep0A3c-W7U
I hope that these 3 videos help you if you're interested in the appliance business and want to get involved in it!
Appliance Store Business Insurance (get insurance if you choose to do business, I'm paying $29/mo thru this company): https://bit.ly/3bZqI8x
2
views
How Much Money Can We Find in a Random Dryer? Opening Up a Rattling Dryer to See!
I buy used appliances for my store all the time. Once in awhile, we'll hear a lot of rattling around. This time, the person I bought the dryer from said they thought there was a significant amount in this one, so I decided to grab my camera and see what would happen. The video was shot with no knowledge of what would be in the dryer, and I think all the dirt/dust/lint on the inside would show that.

How to Run a Used Appliance Store Interview Part #2
Here is Part #2 of the interview with Gabe of Washer Dryer Money, a used appliance business out of Mississippi. We talk for another 20 minutes about our respective businesses, trade ideas, and situations with our respective customers and appliances.
Part #1: https://youtu.be/aqoMbSen42w
Part #3: https://youtu.be/GoPi8z0SHWU
Appliance Store Business Insurance (get insurance if you choose to do business, I'm paying $29/mo thru this company): https://bit.ly/3bZqI8x

How to Build, Fix and Sell Appliances - Interview Part #1
I was asked by another Appliance YouTuber - Gabe of Washer Dryer Money to discuss the business ins and outs. We talked for almost an hour about our respective businesses, and if you're ever interested in learning about how to make money in the business, Gabe knows his stuff.
Washer Dryer Money on YouTube: https://www.youtube.com/channel/UCD0c6qeBC6MKaP_q1DcjuMg
Part #2: https://youtu.be/Cep0A3c-W7U
This is Part 1 of a 3-Part Series. The other two parts are still in editing, and will be linked via this description and the cards very soon, so make sure to subscribe!
Appliance Store Business Insurance (get insurance if you choose to do business, I'm paying $29/mo thru this company): https://bit.ly/3bZqI8x
1
view
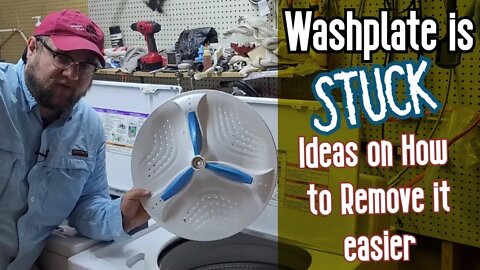
Washplate Stuck - More Ideas to Remove a Difficult Whirlpool Wash Plate
In April, I made a video on how to remove a stuck on washplate. Lots of people liked it, but its not a sure-fire technique for every washplate. In this video, I am showing you more ideas to remove the plate, preferably without as much damage to the plate as possible. In this video, we're dealing with the WORST PLATE EVER, and still manage to get it off.
Some of the things we used in the video to get the plate off that may help you:
Trampoline Spring Tool (2pk): https://amzn.to/38GX3PU
Milliard non-GMO Citric Acid, 5lb: https://amzn.to/2IEqHdq
A few things we deal with in this video are:
- How to remove a stuck on agitator
- How to remove a stuck on washplate
- How to remove a pulsator
- How to find a Whirlpool Washer Hub
- Replace a Whirlpool Wash Plate
You can buy appliance parts w/ a great warranty at: https://bit.ly/3pVxWyX
If you like the hat, buy a hat! https://bit.ly/3dtHHjE
(Note: The hats are meant purely as parody, and are not an endorsement for a person, politician, or party)
Tools I use in all videos can be found at my Amazon Idea Page: https://www.amazon.com/shop/bensappliancesandjunk
Did this video help you out? Send me a tip, and help me make more Appliance Repair videos for people to watch for free!
PayPal: https://paypal.me/BensappliancesYT?locale.x=en_US
CashApp: $BenjaminSchlichter
DISCLOSURE: This post may contain affiliate links, meaning when you click the links and make a purchase, we receive a commission. Affiliate Link & Earnings Disclosure: http://bit.ly/3oXeu3B
11
views
Maytag Bravos XL Washer Won't Start - How to Check and Refurbish Interface
It seems there is a rash of issues with both Maytag Bravos Washer's that won't start as well as the similar Cabrio Washer won't start issues. On either system, the interface either will "Hang" and not start any commands, or the Maytag Bravos XL Won't turn on, meaning the washer buttons don't work on washer. Both of these situations have to deal with a woefully inadequate interface that will short out.
Since releasing this video, the price of the coating has nearly doubled. I found a supplier to help me out, and we now have a kit with all the items you need to fix the problem, and coat the board as shown with the exact same coating for much less: https://bens-appliances.com/products/whirlpool-cabrio-maytag-bravos-interface-repair-kit
Fortunately, it's possible to repair them, as well as improve the design that Whirlpool whiffed on.
In this video, we're doing to deal with the following problems:
- Maytag Bravos Won't Start
- Cabrio Washer Screen Reset
- Cabrio Washer Won't Start
- Maytag Bravos Won't Turn On
- Maytag Bravos Stuck on Sensing
- How to Replace Maytag Bravos Interface
- How to Fix a Maytag Bravos Interface
- Maytag Bravos XL Troubleshooting
Among other things. All the issues center around refurbishing the interface. In the video, we thought the interface was toast, but it wasn't. You'll see what a properly-cleaned interface is supposed to look like on the contact pads, so if yours has residue/damage, you'll know exactly what the difference is.
If this did not fix the issue, then its very likely the Bravos / Cabrio Interface is bad. If you have to order the correct one, AppliancePartsPros can verify which interface you need:
Maytag Bravos XL Washer Interface: https://bit.ly/33b4ZVZ
Cabrio Washer Interface: https://bit.ly/3kXJ0Id
You can buy appliance parts w/ a great warranty at: https://bit.ly/3pVxWyX
If you like the hat, buy a hat! https://bit.ly/3dtHHjE
(Note: The hats are meant purely as parody, and are not an endorsement for a person, politician, or party)
Tools I use in all videos can be found at my Amazon Idea Page: https://www.amazon.com/shop/bensappliancesandjunk
Did this video help you out? Send me a tip, and help me make more Appliance Repair videos for people to watch for free!
PayPal: https://paypal.me/BensappliancesYT?locale.x=en_US
CashApp: $BenjaminSchlichter
DISCLOSURE: This post may contain affiliate links, meaning when you click the links and make a purchase, we receive a commission. Affiliate Link & Earnings Disclosure: http://bit.ly/3oXeu3B
27
views