

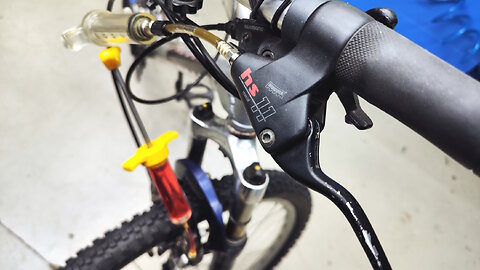
How to repair a bicycle hydraulic v-brakes. Bike service
Hello fellow cyclist. In this video, I will demonstrate how to change the brake fluid in the rim hydraulic brakes on a bicycle. These brakes were used on cross-country bikes in the past, but this technology has been replaced by disc brakes. However, bicycles with this type of brake are still being ridden and serviced in bike worshops.
This video will be of interest to cyclists and those interested in unusual mechanisms.
00:00 The brake lever is pushing through.
00:26 Where to fill new brake oil in hydraulic v-brakes.
01:27 How to change the brake fluid in a bicycle brake.
02:00 What bike brake oil looks like after a few years of use.
02:30 Add the second portion of brake oil.
03:50 Tighten the screw in its place.
04:08 The bike brakes are now well braked.
6
views
How to service an MTB suspension fork without removing it from the bike. ASMR
Hello cyclists!
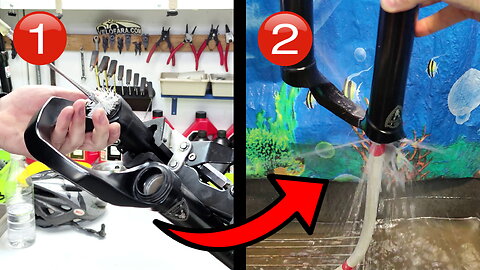
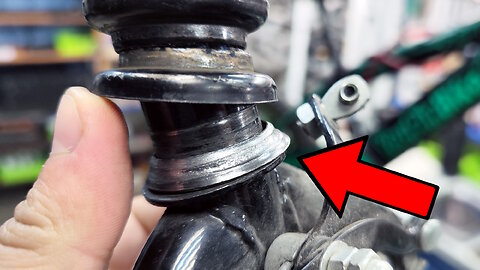
This video tutorial will show you how to service your fork without removing it from your bike. How to service a MTB suspension fork. How do they do it in the workshop? Everything is very easy. Remove the wheel from the bike. First of all, we have to carry out these actions to free the fork from the parts that will interfere with the partial disassembly. Carefully unscrew the lower caps. In this case we have a Manitou fork. The bottom bracket looks like this. Yours may be different. Remove the lower legs of the suspension fork. The main thing is not to rush! Oil will flow out of the forks. Replace the pan so that the oil does not flow on the floor, but in the box. How to service the fork without removing it from the bike. Not all forks are easy to disassemble. This fork sticks a little. This is a characteristic feature of Manitou forks released after 2015. Thus, without removing the fork from the frame, it can be partially disassembled for further maintenance. We evaluate what's inside the fork, how dirty it is, how much grease there is. We provide high quality technical service. We clean the fork legs very well. Suspension fork maintenance. Of course, you could take the plug completely, but sometimes, to speed up the process, you can do because we have done it. In this case, we do not have to reconfigure the vocal out, configure steering, do not have to spend time on this. There is some dirt in the spring. Will need to wash the foam rings too. Need to wash well. There are leftovers of old grease and all kinds of garbage! In fact, foam rings are a consumable that changes, but in this case we have there are no similar foam rings and we left the old one. We washed them and put them back on. Thoroughly clean the fork boot. We clean everything we can, from all sides. We use purified gasoline called "Kalosha". It will lift old dirt and grease well. How to clean bicycle fork. We clean both parts of the fork. The inside is already clean, but not enough. We are very cold, so that the service of bicycle forks is of the highest quality. Here is a demonstration of how our nozzle works. Water squirts out under tap pressure. Bicycle fork washing. Residual dirt and pressurized grease are washed out very well! The nozzle hits the water, a jet of water comes out of the butt and side.
The next step is to dry the fork. Service bike fork inside. We will absorb most of the water on a napkin, but it is better to leave the fork to dry for a while. We usually leave the fork overnight and dry it the next day. Let's start assembling the internals. Install foam rings. High performance suspension fluid. We use a standard medical syringe to fill the oil inside the coil. Lubricating the foam rings inside the fork. For foam rings, liquid grease for anthers - thick grease. Called "sram butter". It's a duster lubricant. This will make it easier to assemble the fork. Install the lower legs of the suspension fork. Another problem (. A feature of the "Manitou" forks. In order to lubricate the fork, you must turn the bike upside down. Lubrication on the fork. See the manual! For each fork, the oil dosage is individual. To be honest, I usually pour into such forks as 10 or 15 milliliters of oil, viscosity 15W But you must take into account the peculiarities of each fork and study the manual before filling the oil inside the fork / Fork rebound adjustment/ Finally, we can pull the springs on anthers, this is done at the last moment. Carefully put them in place. Degreasing the suspension fork. When servicing the fork, it is all greasy! Grease is not a must! It must be well cleaned of oil. Remove the wheel from the bike. Just in case, we will process the brake disk to keep it clean. If a drop of oil falls accidentally, the brakes will squeal! On our channel there is a detailed video on how to eliminate unpleasant sound, grinding, squeaking disc brakes on a bicycle. Perform brake adjustment. When you take off and put on the wheel, then a small brake disk bends. We fix it immediately with the tool. All done! Our fork is ready!
00:00 how to service your mtb suspension fork
00:28 removing the wheel from the bike
01:27 removing the lower legs of the suspension fork
02:05 How to service the fork without removing it from the bike
03:44 suspension fork maintenance
06:05 how to clean bike fork
07:27 wash bike fork
08:32 service bike fork inside
09:37 high performance suspension fluid
09:56 lubricating foam rings inside the fork
11:25 lubricating suspension fork
12:10 install lower legs of suspension fork
13:40 Lubricating suspension fork
15:29 Degreasing the suspension fork
15:50 Mounting the wheel
#suspension #bicycle #mtb
31
views
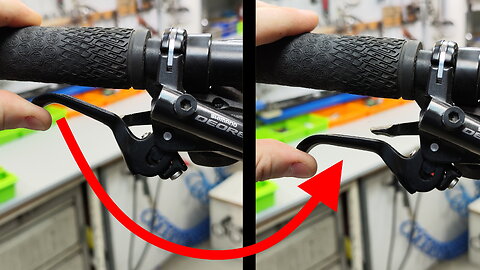
Adjusting the hydraulic brakes. Brakes handle alignment
Delve into the world of bicycle hydraulic brakes with us!
In this video, we address common issues and demonstrate step-by-step solutions for flawless bike brake performance. Learn to adjust brake handles precisely using specialized tools and pump bicycle brakes with a specialized funnel using Shimano hydraulic mineral oil.
Don't miss our expert tips on releasing air bubbles and achieving the ideal stiffness for optimal brake performance. We also stress the significance of brake degreasing and repeating the process on both brakes for consistent results.
Join us for a thorough brake examination, resulting in perfectly functioning brakes! Subscribe now to become a master in maintaining and fixing hydraulic brakes, ensuring safe and enjoyable cycling adventures.
Hit that like button and embark on this exciting journey together!
#bikeservice #brakes #bicycle
00:00 Bicycle with hydraulic brakes
00:30 Fix this on your bicycle right away
01:05 Brake handle adjustment
02:07 How to pump the hydraulic brake on a bicycle
04:09 Brake degrease
04:20 How stiff should the hydraulic brake of a bicycle be?
04:50 How to pump the brake tektro on a bicycle
07:55 Testing the brakes. our pumping result
1
view
How to Make Your Bicycle Faster. Bike Rear Hub Maintenance | Shimano FH-RM30
Hello cyclists!
In this video, we will show you how to Make Your Bicycle Faster.
I will teach you Bike Rear Hub Maintenance.
For example, we will use a bicycle hub Shimano FH-RM30.
This video lesson (DIY) for cyclists. Video tutorial in style "ASMR"
This video speaks through mechanics, void of verbal content. Universally understandable; designed as a DIY tutorial.
Detailed episodes in this video tutorial:
00:00 How to make your bike faster.
01:01 Removing the eccentric and cassette from a bicycle wheel.
01:12 Bike rear hub shimano fh-rm30.
01:22 Cleaning a bicycle hub.
01:33 How to turn a hub.
02:33 Cone wheel bearing on your bicycle rear wheel hub.
03:45 Cleaning the rear wheel hub.
05:27 Bike rear hub maintenance.
05:45 How to grease a bicycle hub.
07:34 How to adjust cone bearings on a bicycle hub.
09:26 Installing the cassette on the freewheel.
09:55 Good job!
#maintenance #bicycle #tutorial
9
views
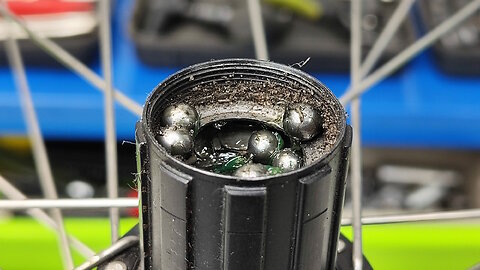
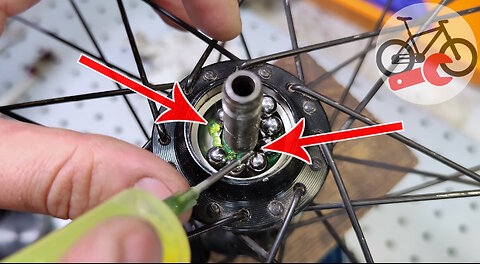
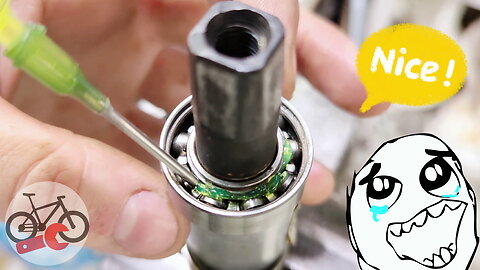
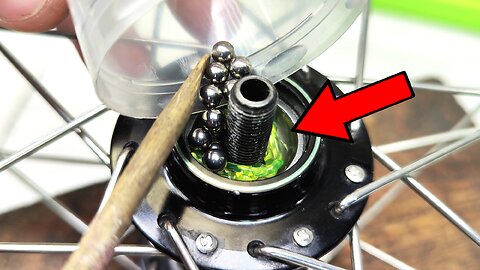
What is inside a bicycle hub. Bike wheel service
Hello friends. This tutorial will be about bicycle wheel maintenance.
I will show you what's inside a bicycle hub.
We will disassemble the rear hub of the bicycle into small parts, clean the bearings and apply new grease.
00:00 Bike wheel service.
00:34 When should a bicycle wheel hub be serviced ?
00:45 How to disassemble the rear hub of a bicycle.
01:22 What is inside a bicycle hub.
01:35 Ball bearing bike hubs.
01:51 How to remove a bicycle axle of wheel hub.
02:14 Removing the balls of a bicycle rear wheel hub.
02:33 How to clean bicycle wheel hub balls.
03:45 Cleaning cones and other small parts of the bicycle hub.
04:30 Cleaning the axle of the bicycle wheel hub.
06:30 How to clean the inner cups of a bicycle wheel hub.
07:34 Greasing the bicycle wheel hub.
07:51 How to assemble the bicycle wheel hub correctly.
08:40 Installing the dust cover in the bicycle hub.
10:32 How to tighten the nuts on the bicycle wheel hub.
10:50 Now the wheel works perfectly.
I made this video without words so that it would be international. I hope that everything will be clear to you, my dear viewers.
Enjoy the technical sounds of ASMR cycling service
If you liked this video tutorial,
share this video with your friends ❤️
It will help the development of the channel! 📈
*Ask your questions in the comments* 👇
❓ 👇
4
views
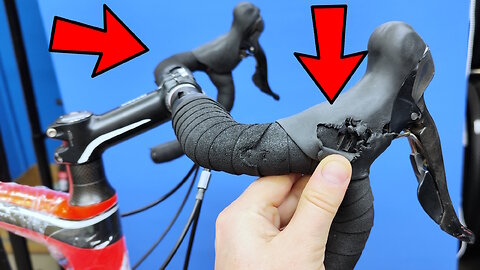
How to replace road bike shifter covers. Shimano ultegra st-6700 shift-brake levers hoods
Hello my fellow cyclists! 🙃
If you have a dropbar with shift-brake levers on your bike, it's not always obvious how to remove and replace the hoods. In this video, I'll show you how to do it using the example of Shimano ultegra st-6700 shift-brake levers.
Video format "ASMR" about bike.
It will be interesting for cyclists!
00:00 Rubber hoods for bicycle shift-brake levers.
00:15 Dismantling the bicycle handlebar tapes.
01:28 How to find where the shift-brake levers of a bicycle are unscrewed.
01:50 Dismantling the shift-brake levers of a bicycle.
02:18 Disconnecting the bike's brake and shift cables.
03:25 How to remove the bike shift lever hood.
03:47 New shimano shift-brake lever hood.
04:50 How to install a hood on a bicycle shift lever.
06:05 Installing the shift-brake lever on the handlebars.
06:20 How to adjust the position of the shift-brake levers on the bike handlebars.
07:00 Putting the housing and cables back in place.
08:00 Good job.
5
views
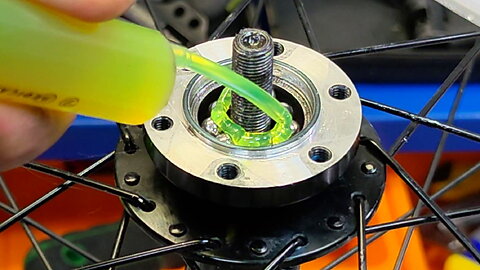
Ball bearing bicycle wheel hub service. Rebuilding and cleaning of bicycle hubs.
Hello to those who ride a bike!
In this video tutorial, I will show you "How to service ball bearing bike wheels hubs".
We will change the oil in a conventional rear hub MTB bike, or mountain bike.
Watch this video lesson to the end you can service yourself your rear hub on your bike.
You will see how the bushing is serviced in the workshop. Bicycle hubs: Rebuilding and cleaning.
Make your bike fast and ride fast by doing wheel hub maintenance at home. In this video I will show you how to easily service Shimano ball bearing hubs at home.
IF you do this service on your bike, it will go fast and your ride will be FAST.
If you're passionate about cycling, this video is for you.
Speech-free video with technical audio, transcending language barriers. An international, do-it-yourself (DIY) video format.
#wheelhub #bicycle #bikeservicing
00:00 Rebuilding and cleaning the hubs
00:10 Cassette removal
01:12 Disassembling the hub
04:27 Maintaining ball bearing hubs
06:54 Adjusting the cup and cone bearings on your bike
08:05 Fitting the rotor to the wheel
08:25 Cassette installation
9
views
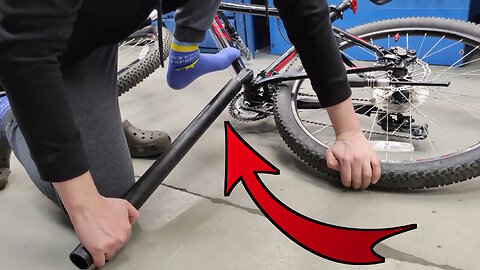
How to remove bicycle cranks when the thread is damaged. Best working solution!
In this video we will show you how to remove bike cranks when the thread is damaged.
I will be using square bike cranks.
What to do when damaged bike crank arm threads.
This is the working method I use in the bike shop.
This video instruction "DIY" for cyclists. Video instruction in the style of "ASMR".
It will be interesting and useful for cyclists!
#bikeadjustment #bikecranks #bikeshop
*Detailed episodes in this video:*
00:00 How to remove bicycle cranks when the thread is damaged
00:20 How to remove bike cranks with a crank extractor
00:32 Cannot remove bicycle cranks
00:52 Damaged bike crank arm threads
01:05 Bicycle crank threads are damaged
01:24 Choosing a drill with the right diameter
01:35 Lubricate the place where we are going to drill the bike cranks
02:07 Starting to drill the cranks with a large drill bit
02:32 Cleaning up metal shavings
04:04 Choosing a drill with a smaller diameter
04:28 Drilling deeper holes in the bicycle cranks
04:48 At the end of the video lesson you will find out why I do this) Watch to the end
06:37 It is very important to make the holes exactly as shown in the video.
07:06 Removing the pedals from the cranks
07:46 The most important tool to remove cranks when there is no thread )))
08:02 Heating the bike crank with a gas burner
08:35 When aluminum is heated, it expands. this will help us remove the bicyle cranks of the bike
08:45 Removing a very stuck bike crank arm with damaged threads
09:32 Nice! it's a miracle! we did it!)))
09:56 We drilled two ribs that caused the bicycle crank to come loose on the shaft.
10:10 Thanks for watching! Share this helpful video! Post your likes!
3
views
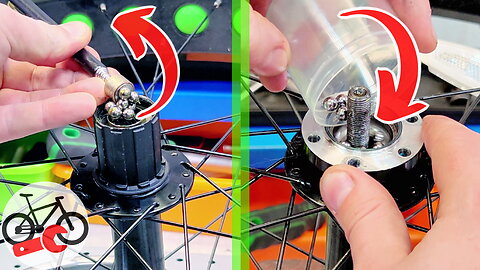
Your Bicycle Wheel don't Move. How To Maintenance Bike Freehub
Hello cyclists !
Bicycle wheel don't move. In this video tutorial, I will show you useful information.
How to remove a bike freehub body on a bike wheel.
You will see a lot of tricks that used in the bicycle workshop.
One of them is a magnet. With help magnet You won't lose the bearings.
Bike Freehub SHIMANO FH-RM30. This is a very popular bushing. Inside, it has a classic design, Very common on bikes.
The result of such dirt is riding in wet weather, when dirt gets on the hub, rain, snow or slush.
How to clean a bike freehub body. It is very important to clean everything perfectly!
Dirt should not remain. Take this maximum attention. Watch the video to the end so that you know all the subtleties of this bicycle hub maintenance.
How to degrease a bike freehub body. We use isopropyl alcohol for cleaning.
Then use wet wipes as well as dry wipes. The bicycle hub must be perfectly clean, before installing it back.
Need to lubricate the seats for doggie frivilla bicycle hub.
How to lube a bicycle freehub body. This grease is sticky, it will not only lubricate,
and also to help establish small balls (bearings) to their seats.
Now I will show you how quickly and easily qualitatively, you can clean the bearing balls.
We sprinkle isopropyl alcohol and wipe them with a dry cloth in the palm of your hand.
Then pour the balls into a clean container. The next trick is how easy and fast fill the balls into seats.
How do you like this life hack? Write in the comments) Install a bicycle freehub body on a bike wheel.
We collect everything in reverse order. Let's not forget the extra details.
Top lock nut, screwed against clockwise, do not miss this moment! Now it's different! Testing bike freehub after maintenance.
Thank you for watching! Necessarily. Put likes! subscribe to the channel
Don't miss our other video tutorials! Good luck!
DIY with ASMR
#workshop #asmr #bicycle
00:00 Bicycle wheel don't move
00:32 How to remove a bike freehub body on a bike wheel
01:03 Freehub shimano fh-rm30
01:44 How to clean a bike freehub body
02:30 How to degrease a bike freehub body
03:55 How to lube a bicycle freehub body
05:43 Install a bicycle freehub body on a bike wheel
07:51 Testing bike freehub after maintenance
12
views
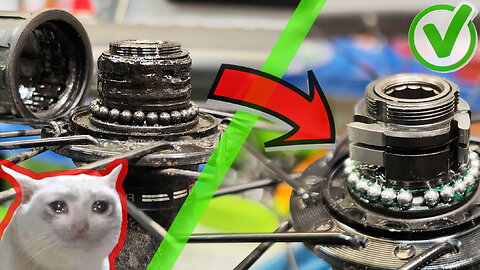
How to Fix a Creaking Bike. Lubrication of the bicycle bottom bracket
Hello! In this saw tutorial I will show you how to fix the annoying creaking of your bike. You will learn how to remove the carriage from the bike. I'll show you how to fix an old bicycle bottom bracket. You will see how all these operations are performed by a bicycle mechanic in the workshop.
00:00 How to fix a creaking bike.
00:15 Extraneous noise in the bottom bracket of your bike.
00:25 How to remove sealed cartridge bottom bracket.
01:35 One of the reasons why a bike creaks - Water inside the bike frame.
02:04 Pressing out the cups of the bicycle bottom bracket.
02:43 How to open a sealed bearing.
03:06 Disassembly of the bicycle bottom bracket.
03:16 Clean Bracket Bottom.
04:28 Lubrication of the bicycle bottom bracket.
04:59 Pressing the cups of the bicycle bottom bracket.
06:45 How to install sealed cartridge bottom bracket
#bicycle #bracketbottom #bikeworkshop
14
views
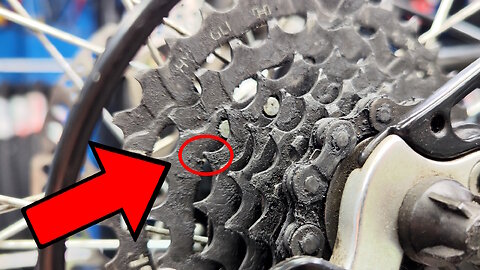
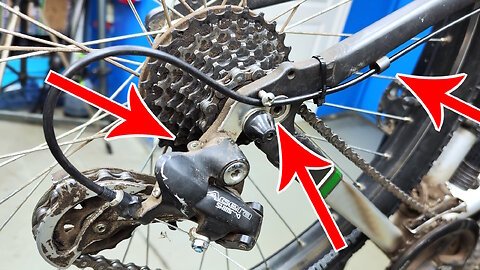
Bicycle repair. Replacement chain, cassette and derailleur of bicycle
Greetings, dear cyclist. We have a bike in our workshop that needs attention and repair. In this short video I will show you how to do several tasks at once to repair your bike. First we will replace the cassette of the bike, then we will change the chain to a new one and replace the rear derailleur of the bike. Also, during the repair process, I will show you how to align the derailleur hanger and properly adjust the rear derailleur. There's a nice bonus at the end 😉
Ask questions in the comments, we try to answer everyone.
Subscribe, like and share this video with your friends. This will greatly help the development of the channel and improve the quality of videos in the future😘
00:00 Bicycle repair.
00:15 How to disconnect the chain on a bicycle.
00:38 Dismounting the rear wheel of the bicycle.
01:01 Replacement bicycle cassette.
01:34 Installing the cassette on the bicycle wheel.
02:04 Mounting the rear wheel of the bicycle.
02:29 How to remove the rear derailleur on a bicycle.
03:23 Alignment of the rear bike derailleur hanger.
04:04 Replacement bike derailleur.
05:06 Replacement bicycle chain.
05:48 Adjusting the rear bike derailleur.
07:10 How to adjust gear shifting on a bicycle.
07:50 Good job!
08:00 A fluffy guest in the bike workshop.
🆗🎥🚲 *Write in the comments, what you would like me to do in the new video.*
❓❔❓ *Ask your questions*
👇👇👇
21
views
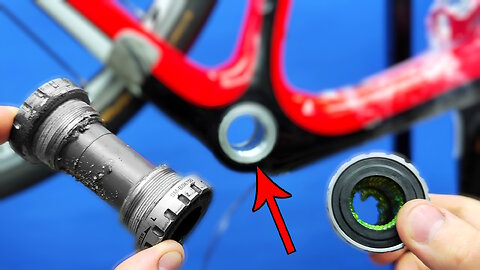
How to remove and install HollowTech bottom brackets on a road bike
Hello, fellow cyclists! A carbon road bike has arrived at our workshop. It has been ridden extensively without proper maintenance, so many components of the bike need replacement. In this video, I will show you step by step how to replace the bottom bracket of the Hollowtech standard with a new one. This video will be interesting for cyclists and those who want to repair their bike at home. Enjoy watching!
00:00 Bottom bracket hollowtech on a road bike.
00:30 How to remove the hollowtech bottom bracket from your bicycle.
01:57 Bike preparation before installing the bottom bracket.
02:15 Unboxing the hollowtech bottom bracket.
03:08 Comparison of the new and old bottom brackets of the bike.
03:15 How to prepare the bottom bracket for installation on the bicycle.
03:42 Installing the hollowtech bottom bracket.
05:05 How to properly tighten the hollowtech bottom bracket into the bike frame.
05:48 Job done!
🆗🎥🚲
*Write in the comments, what you would like me to do in the new video.*
⚠ ❓ ⚠
*Ask your questions in the comments*
👇👇👇
14
views
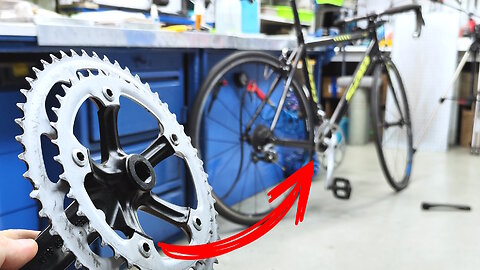
How to properly change crankset, the connecting rod system on a road bike
Hello, friends, cyclists. Today's video tutorial will be about how to quickly change the cranksets on a road bike. These cranksets are for a square-type bottom bracket. You will see how to do a crankset replacement on a bicycle with a bicycle mechanic in the workshop. All the nuances and the sequence of actions for the correct replacement of the cranksets will be covered.
#crankset #roadbike #bicyclemechanic
7
views
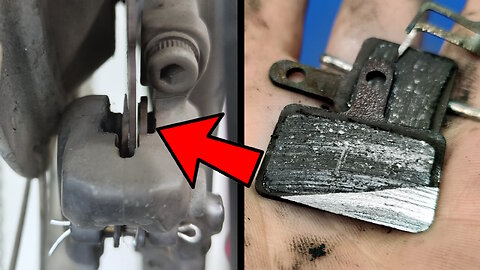
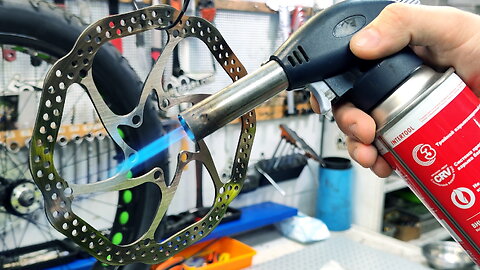
Bicycle brake pads wiped out. Bike brake pads replacement, cleaning and adjustment
Hi. In this video I will show you how cyclists wear out their brake pads to 100% and more.
This is a cassica when I do not change the brake pads on my bike.
When a brake pad wears out, the braking is done by the metal platform of the brake pad.
Eventually, the brake disk is worn off at an accelerated rate.
00:00 The brakes of the bike do not work.
00:35 Dismantling the bike's brake caliper.
01:10 How to remove the brake pads of a bicycle hydraulic disc brake.
02:00 Cleaning the bicycle brake caliper.
02:20 Preparing to inflate the bicycle's hydraulic brakes.
06:02 Cleaning and degreasing the bike rotor.
07:21 How to fit brake pads to hydraulic bike brakes.
08:17 Burning the brake rotor of a bicycle.
08:47 Mounting the brake rotor of the bike.
09:46 Quick pumping of the hydraulic brakes of the bike.
10:46 Adjusting the hydraulic brakes of the bike.
12:15 Checking the operation of the bicycle brakes.
14:46 The job is done!
#bikefix #bicyclemechanic #bikebrake
6
views
Adjusting the "V-BRAKE" bicycle brakes. Replacing the brake cable
Hello self-taught bicycle mechanics!
In this video tutorial, you will learn how to change a bicycle brake cable guard.
You will see how the job is done by a bike mechanic in a workshop.
It will show you in detail
how to adjust the brake pads on a bicycle and how to set up V-BRAKE brakes.
Even the ugliest bicycle can be brought into a technically sound condition.
Jagwire Internal Housing Damper.
00:00 V-brake rear brakes do not work.
01:00 Dismantling the brake cable of the bike.
02:25 Replacing the tensioning screw of the bicycle monoblock.
03:17 How to replace the brake cable in a bike.
04:20 Adjusting the v-brake brake pads on your bike.
05:38 Preparing the bike's brake lining.
07:15 How to route the brake line on the bike frame.
10:41 Checking the bike brakes after repair.
#bikeworkshop #bicyclebrakes #bicyclemechanics
🎥🚲 *Write in the comments, what you would like me to do in the new video.*
❓❔ *Ask your questions in the comments*
👇👇👇
26
views
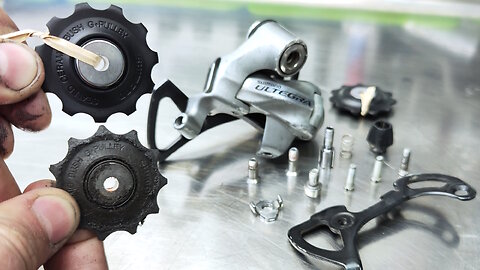
Cleaning the rear derailleur on a road bike. Replacing the derailleur jockey wheels
Greetings, fellow cyclist.
A carbon road bike with a Shimano Ultegra groupset was brought to our bicycle workshop. This bicycle has been ridden for many years, but it has never been serviced in a bicycle workshop. Even high-level components require care and repair. In this video I will show you how to replace the rollers and clean the rear derailleur of the bike so that it looks and works like new and looks very nice.
00:00 Maintenance derailleur shimano ultegra.
00:19 Removeing the rear derailleur of the bicycle.
00:54 How to remove bicycle rear derailleur jockey wheels.
01:23 Cleaning the rear switch in gasoline.
03:17 How to clean the rear derailleur of a bicycle.
04:20 Washing the rear switch of a bicycle with a high-pressure water jet.
04:56 Why replace the jockey wheels on the rear derailleur.
05:59 How to properly install bicycle rear derailleur jockey wheels.
06:58 We tighten the bolts to limit the movement of the rear derailleur of the bicycle.
08:29 How to grease a bicycle rear derailleur.
09:42 Installation of a rear derailleur on a bicycle.
If you liked this video,
share this video with your friends ❤️
It will help the development of the channel! 📈
*Ask your questions in the comments* 👇
❓ ✍ 👇
14
views
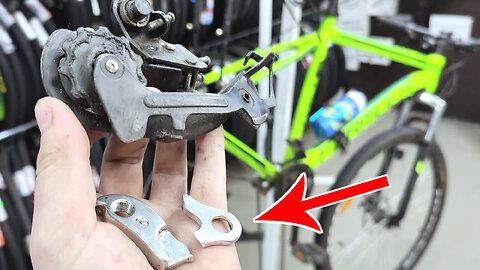
Replacing the bicycle hanger of derailleur. Green bicycle repair (part 2)
Hello fellow bike mechanics!
In this video tutorial we will continue to repair the green bike.
I will pick up a new bike derailleur holder hook.
I'll do the installation. The shifter was a little warped.
I will be aligning the bike shifter.
I will for now how to install the bike derailleur on the bike and do its adjustment.
00:00 Broken bicycle hanger of derailleur.
00:20 Selection of a new bicycle rim.
00:57 How to install a new bike derailleur cockerel.
01:17 How to disconnect the bike chain.
02:03 Installing the bicycle wheel on the bicycle.
03:14 Adjusting the rear brakes of the bicycle.
03:33 Aligning the bicycle's wheel rims.
05:19 Installing the bike's derailleur rollers.
06:42 Mounting the bike's rear derailleur.
07:14 How to install the chain on the bike.
09:05 How to insert the cable and jacket into the rear derailleur of the bike.
10:25 Checking the bike's rear derailleur.
10:50 Adjusting the bike's rear derailleur.
13:48 Test the rear derailleur of the bike.
#derailleur #bicyclerepair #bikemechanics
19
views
How to improve shifting gears on your bike. 3 good tips for cyclists
Improper gear shifting on a bicycle is quite a common issue. There are several reasons for its occurrence, and accordingly, various ways to fix it. One possible cause of poor gear shifting is an old and worn-out cable and housing. In this video, we will demonstrate how to replace the cable and housing for gear shifting on a bicycle. This video will be interesting and useful for cyclists and those who want to repair their bike independently
Plus, I'll show you a few secrets to making your bike shift better.
00:00 Journey to the workshop with the cat.
00:30 Poor gear shifting on the bicycle.
00:44 How to remove the gear shifting cable on a bicycle.
01:06 The cable rubs inside the housing, causing poor movement.
01:30 How to extract the cable from the revoshifter.
02:44 Installing a new gear shifting cable.
03:46 Drilling frame mounts on the bicycle for installing a continuous shifting line.
04:47 Cutting and installing a new housing for the bicycle cable.
06:05 Checking how the rear derailleur of the bicycle works.
06:32 How to check if the derailleur hanger on the bicycle is straight.
07:16 Adjusting the bicycle gear shifting.
08:17 Adjusting the set screw of the rear derailleur on the bicycle.
09:30 Final touch.
10:10 Job done, and the cat approved.
#derailleur #bikeshifting #bicyclemaintenance
✍ *Ask your questions in the comments*
✍ *Write in the comments, what you would like me to do in the new video.*
👇👇👇
25
views
It will make your bicycle faster. Maintenance of the bike hub
Hello cyclists. In this video lesson, I will show you a useful secret to make your bike faster.
Do everything as I have shown in the video and your bike will ride much better.
Bicycle wheel hub maintenance is important!
If you liked this video,
share this video with your friends ❤️
It will help the development of the channel! 📈
*Ask your questions in the comments* 👇
❓ ✍ 👇
A kids bicycle has broken down. Replacing the bicycle headset
Today, a children's bicycle was brought to our bike workshop. This bicycle had an issue with the headset. As you can see, riding this bike was impossible. I will show you how to repair a child's bicycle.
I hope that my video tutorial will be helpful for you. You will learn how to replace a bicycle's headset on your own.
00:00 The fork and handlebar of the kid's bike are loose and not holding well.
00:44 How to remove the handlebar on a children's bike.
01:47 How to remove the fork on a child's bike.
02:35 Removing the rings and cups of the children's bike's headset.
03:08 Dismounting the kid's bike's wheel.
04:00 Close-up of old damaged parts of a children's bicycle headset.
04:57 How to install a headset on a child's bike.
06:00 Installing the fork on the child's bike.
07:00 How to put on the front wheel of a kid's bike.
07:31 Installing a handlebar stem riser adapter on the children's bike.
08:20 How to align the handlebar on a child's bike.
09:10 Testing the kid's bike after the repair.
#kidsbike #bicycleheadset #bicyclekids
13
views

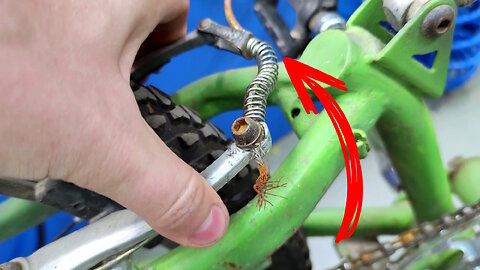
Replacing the bicycle shift cable. Green bicycle repair (part 1)
Many bicycles are brought to our workshop. Almost every bike has the same fault.
This fault consists of a worn bicycle shift cable. The cable cover is also clogged with dirt.
To fix this problem, we need to replace it all. After replacing the cable, we will adjust the bike.
00:00 The rear derailleur on the bicycle is broken.
01:00 How to remove the rear bicycle wheel with nuts.
01:31 Disassembling the broken derailleur hanger on the bicycle.
01:55 Remove the old bicycle cable.
03:32 How to remove the cable from the bicycle's shift/brake lever.
04:03 The speed shifting cable of the bicycle is damaged.
05:47 Replacing the cable housing of the bicycle.
06:32 Select end caps for the bicycle's cable housing.
08:15 Subscribe to not miss the continuation of the video.
#bicycleworkshop #bikerepair #bicycle
2
views
Ball bearing bicycle wheel hub service. Rebuilding and cleaning of bicycle hubs.
Hello to those who ride a bike!
In this video tutorial, I will show you "How to service ball bearing bike wheels hubs".
We will change the oil in a conventional rear hub MTB bike, or mountain bike.
Watch this video lesson to the end you can service yourself your rear hub on your bike.
You will see how the bushing is serviced in the workshop. Bicycle hubs: Rebuilding and cleaning.
Make your bike fast and ride fast by doing wheel hub maintenance at home. In this video I will show you how to easily service Shimano ball bearing hubs at home.
IF you do this service on your bike, it will go fast and your ride will be FAST.
If you're passionate about cycling, this video is for you.
Speech-free video with technical audio, transcending language barriers. An international, do-it-yourself (DIY) video format.
00:00 Rebuilding and cleaning the hubs
00:10 Cassette removal
01:12 Disassembling the hub
04:27 Maintaining ball bearing hubs
06:54 Adjusting the cup and cone bearings on your bike
08:05 Fitting the rotor to the wheel
08:25 Cassette installation
8
views

Why is it difficult to ride a bicycle? Hollowtech bottom bracket maintenance
Hi friends!
Every self-respecting cyclist, from time to time, asks the same question, "Why is my bike so hard to ride?"
I pedal as hard as I can, but my bike is so hard to get up to speed.
Even if I'm riding on a flat road and there is no headwind, my bike rides very hard. Today I will show you one secret that makes your bike slow.
If your bicycle bottom bracket is serviced in time, your bicycle will become faster.
This video communicates through mechanics, not words. Language barriers are irrelevant; presented as a DIY tutorial.
This video is designed to cater to the interests of cycling enthusiasts.
00:00 Servicing the bottom bracket hollowtech on a bicycle.
00:35 The shimano hollowtech bottom bracket doesn't rotate well.
00:57 How to clean a shimano bottom bracket.
02:52 The bearing in the bottom bracket doesn't rotate well.
03:33 Disassembly of the protective ring of the bicycle's bottom bracket.
04:57 How to remove the bearing retainer of the bicycle's bottom bracket.
05:54 How to wash the bearing of the bicycle's bottom bracket.
07:31 Flushing the bearing to an ideal state.
08:20 Drying the bearing of the bicycle's bottom bracket with a compressor.
08:29 How to lubricate the bearing of the bicycle's bottom bracket.
10:25 The work is done.
#bicycle #bottombracket #bikemaintenance
31
views
Bicycle loses brake. Bleeding hydraulic brake Shimano Deore
Shimano hydraulic brake. Deore falls through the handle.
if you press it several times, the handle is restored. but the first press, the brake lever fails.
or if you flip the bike, then after that, the handle also fails.
In this comprehensive and practical tutorial, we will guide you through the step-by-step process of troubleshooting and resolving common brake problems on your bicycle equipped with Shimano Deore Hydraulic Brakes. If you've noticed your bike losing brake power or experiencing uneven brake lever positioning, this tutorial is perfect for you!
First, we'll delve into the issue of a bicycle losing its brake power, explaining possible causes and how to diagnose the problem accurately. Then, we'll demonstrate a simple yet effective technique for unscrewing the brake lever to ensure it is perfectly parallel to the ground, optimizing your braking performance.
Next up, we'll dive into the crucial process of pumping Shimano Deore brakes and teach you how to use the appropriate hydraulic brake oil. We'll walk you through the steps of removing pesky air bubbles from the hydraulic brake system, ensuring a smooth and responsive braking experience.
For the hands-on part, we'll show you how to push the brake lever of your bike several times while simultaneously changing its angle, effectively eliminating all air bubbles from the brake system. You'll witness the difference in brake performance as you do this process correctly.
Throughout the tutorial, we'll stress the importance of safety and precision when working with hydraulic brakes. As we proceed, we'll also demonstrate the correct method to clean the brake lever from any excess oil, ensuring its longevity and consistent operation.
By the end of this tutorial, you'll have gained a comprehensive understanding of how to inspect, maintain, and optimize your Shimano Deore Hydraulic Brake system. Feel confident in tackling future brake-related issues and enjoy a safe and smooth cycling experience.
#bike #bikeworkshop #mtb
00:00 Bicycle loses brake
00:15 Unscrewing the brake lever to make it parallel to the ground
00:31 How to pump shimano deore brakes
03:43 Cleaning the brake lever from oil
04:10 Check the shimano deore hydraulic brake
11
views
The Bicycle brakes squeak. Bicycle brakes squeak.
The bicycle slows down badly. Additional brake sound. Screeching, creaking pads do not grab.
The bike doesn't want to slow down! These are all signs of a dirty brake system.
When oil gets on the bicycle brake, everything starts to creak and slow down badly.
In order to fix this problem, we need remove the brake disc and remove the pads.
We will degrease the pads and brake disc. Everybody must be perfectly free of residues of grease and debris.
Cyclists will definitely enjoy watching this video.
00:00 Bicycle brakes squeak.
00:10 If you squeeze the brake pads, you can hear the pads squeak.
00:25 Removing a wheel from a bicycle.
00:41 How to remove the brake pads from the brake caliper of a bicycle.
01:27 You can see a ball of cobwebs on the pads.
01:32 Degreasing the caliper on a bicycle.
02:13 Shorten the brake cable as it is loose.
02:41 Remove the brake disk from the bicycle wheel.
03:29 Degrease the brake disk of a bicycle.
04:12 How to clean a bicycle brake disk properly.
04:26 It is very important to remove all dirt inside the perforations of the brake disk.
06:12 What you need to do to keep your bicycle brake disk from squeaking.
06:20 It is important not to overheat the brake disk, so that it does not spoil.
06:39 Degrease the brake pads on your bicycle.
07:25 The brake pad spring must be cleaned.
07:55 How to remove oil residue on bike brake pads.
08:08 The main thing is not to overheat the brake pads so that they do not fall apart.
09:05 Installing brake pads in a bicycle caliper.
09:45 Installing the wheel in the bicycle frame.
10:22 It is very important to clamp the wheel when the bike is perpendicular to the floor.
10:36 Adjusting the bicycle brake, after cleaning.
#bicycle #brake #squeaks
31
views