2GIG Takeover Module: Installation
Installing a takeover super switch module into your 2GIG security system isn’t as intimidating as it sounds. It can happen in a few easy steps.
There are many reasons to consider installing a takeover module into your security system. For instance, a takeover module can convert as many as eight hardwired zones into wireless zones while still using the existing hardwire system. It can also stack as many as six takeover modules into a single Go!Control system. It can take over dry contacts and powered zones, as well.
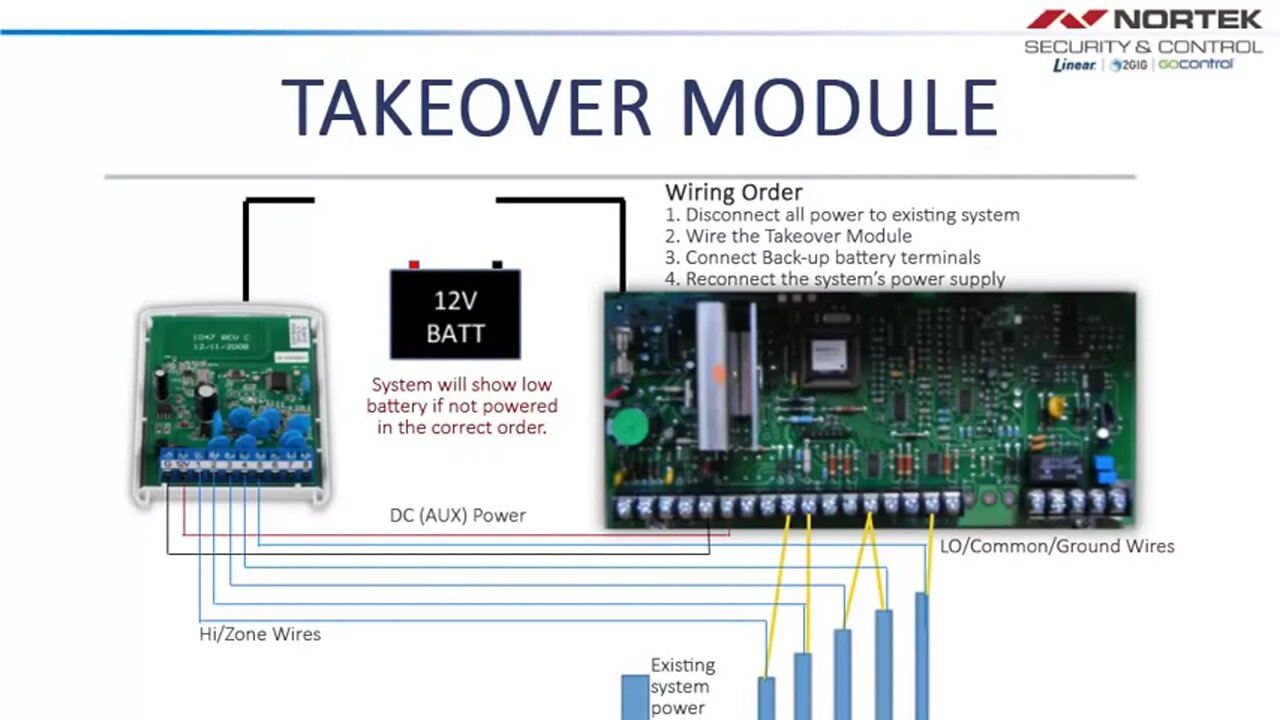
Before considering the installation process, it’s important that you familiarize yourself with the design of the takeover module. Specifically, you should get to know the three ports in the module.
The first port is the G port, a common ground port for low (or LO) wires from the existing system. The second port is the 12-volt port, which is the 12 VDC power from the system’s auxiliary power. Finally, there’s the zone port, which handles high (or HI) wires from an existing system. Our video can provide you with an excellent visual aid to help you differentiate the devices.
You should also realize that there are two different sets of steps to installing a takeover module; one for existing systems, and one for new systems. Our video goes over these differences so you can be assured of following through with the right processes.
You’ll learn the steps you’ll need to take to wire the takeover module into an existing security system. The first step shown involves powering down the existing system. Next, you’ll remove the zones/hi side wires from the existing system, and place them on the takeover module ports, which are labeled one through eight.
After this step, you’ll add the power and ground wires from the Takeover Module to the 12-volt aux output on the existing system. It should be noted that you can either leave the common wires on the existing system, or they can be wired to the ground port on the Takeover Module. Once this is completed, the Takeover Module must be powered up by the back-up battery first. Failure to do so will cause the system to show low battery.
After attaching the battery leads to the Takeover Module, repeat the process with the existing system. The system will then be ready to receive power. Finally, replace the main power wires to the existing system.
The video will also teach you how to wire the takeover module to a new power supply back-up battery charger. The video begins by showing you how to power down the existing system. Next, you’ll remove the zone/hi wires from the existing system, and place them on the Takeover Module ports. These ports are labeled one through eight. After this, you’ll remove the rest of the wiring, and then add the supply module. Common wires will be wired to the ground port on the Takeover Module.
When this has been completed, the Takeover Module must be powered up to the back-up battery first. Failure to do so will cause the system to show low battery.
Once you’ve attached the battery that leads to Takeover Module, repeat the process with the power supply board. Afterward, add the power and the ground wires from Takeover Module to the 12-volt output on the power supply board. Attach battery leads to the power supply board. Once this happens, the system will then be ready to receive power. Finally, replace the main power wires to the existing system.
-
 10:19
10:19
Alarm Grid Home Security DIY Videos
1 year agoPROA7 or PROA7PLUS: Awareness Zone Types
32 -
 7:24
7:24
gogorossco
3 years ago $0.12 earnedOn3 module
150 -
 12:37
12:37
jrgreenboylawns
3 years ago $4.29 earnedDust Blocker Installation
17.6K -
 10:45
10:45
Projects Around with Dave and Ray
3 years agoWelcome Light Installation
18 -
 52:23
52:23
MattMorseTV
2 hours ago $0.15 earned🔴The Cartels are SCREWED.🔴
65.6K78 -
 LIVE
LIVE
Badlands Media
16 hours agoAltered State S3 Ep. 44
1,036 watching -
 21:09
21:09
Bearing
13 hours agoAustralian “Racist” Protest EXPLODES 💥 Glowies, Brawls & Media Spin 📣
2.07K20 -
 LIVE
LIVE
Tundra Tactical
1 hour agoTwo Vets, One Ouija Board, Zero Good Decisions
75 watching -
 3:49:59
Barry Cunningham
6 hours agoPAM BONDI & KRISTI NOEM HOST A PRESS CONFERENCE AND JOHN RICH JOINS THE SHOW!
17.1K13 -
 LIVE
LIVE
GrimmHollywood
10 hours ago🔴LIVE • GRIMM HOLLYWOOD • RETRO PS2 GAMES • GRIMMDY GAMES • BRRRAP PACK x FINALS RANKED GRIND
80 watching