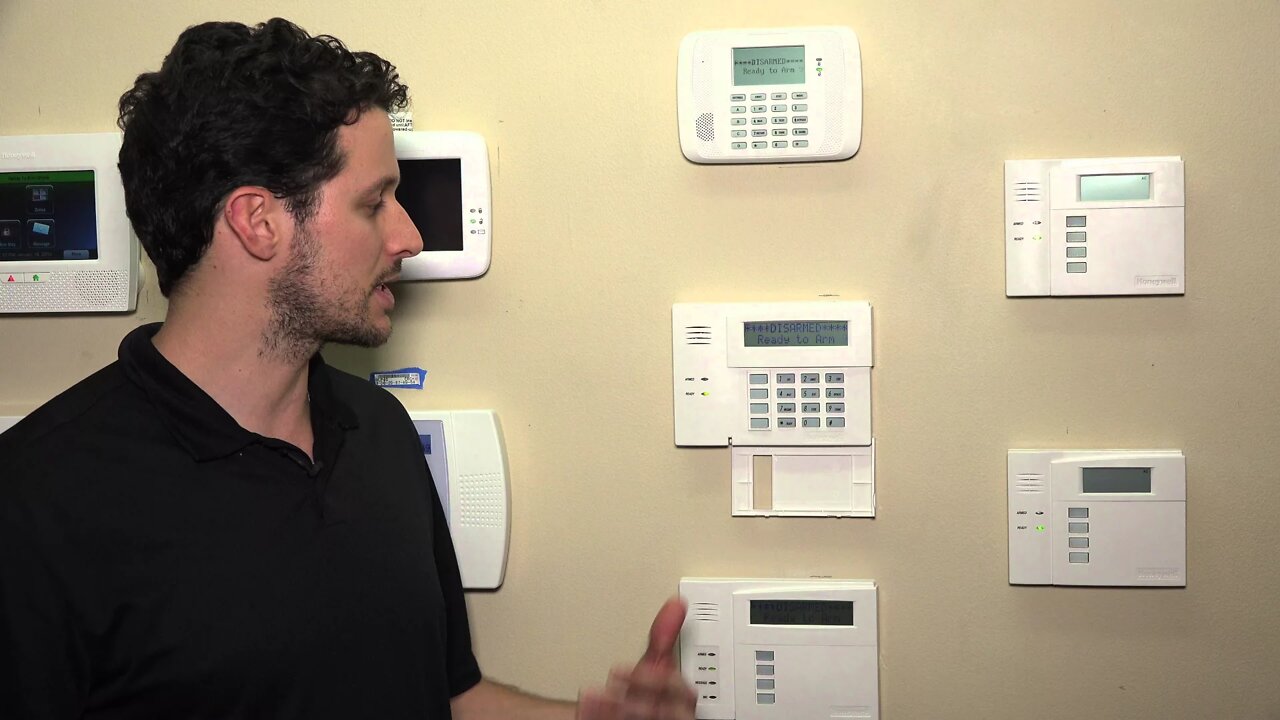
Honeywell VISTA: Program *20, Change Installer Code
This instructional video shows you how to change the default Installer Code for the Honeywell VISTA 6160 line of alphanumeric keypads.
Honeywell VISTA 21iP: http://alrm.gd/honeywell-vista-21ip
Honeywell VISTA 20P: http://alrm.gd/honeywell-vista-20p
Honeywell VISTA 20P: http://alrm.gd/honeywell-vista-15p
Get Monitored: http://alrm.gd/get-monitored
All alarm systems ship will default access codes. Used for initial setup, you’ll want to change any default codes as soon as possible. Programming the Honeywell VISTA can seem a little complicated at first, but our video tutorial is here to help.
This is the first video in our series on programming the VISTA 21IP with the 6160RF keypad. In this guide we cover each step in changing the Installer Code from the default to something unique.
The Installer Code is used to access various Programming features on the VISTA system. This is a different code than the Master Code. While the Master Code lets you access a variety of functions, it’s mainly designed for the end user. The Installer Code is designed for the system installer. Basically, the Installer Code is for changing system features and settings while the Master Code is for day-to-day user operations.
Programming the VISTA can feel a bit confusing if you’re unfamiliar with the alarm system. Unlike a system operated with a large touchscreen, the display on the 6160RF is limited to two lines. New users often prefer watching a video when learning how to navigate the system.
The default installer code for the unit is 4112. You’ll enter 4112800 in order to enter the first programming field. Then you’ll enter *20. Now you’re ready to create a new Installer Code.
You can enter any four-digit code you like. Remember, this is the Installer Code, not the Master Code. So you probably won’t need to enter this code on a regular basis. So you want a code which is fairly easy to remember. At the same time, avoid your house address, birthday, last name or anything else easy to guess.
As discussed in the video, you don’t want to fall into the habit of using the Installer Code to arm and disarm your system, because it won’t work in every situation. If the VISTA is armed with the Master code (or any sub-user code), the Installer Code is unable to disarm.
Here’s where it can get a little confusing: After you’ve changed the Installer Code, you do want to arm and disarm the system using your new code. This is the best way to check that the new Installer Code has been correctly programmed in. But you only want to arm and disarm with the Installer Code for this specific testing purpose.
The video provides additional details on the other 6160 keypads which use this same code changing process. Note there are some keypads in this line which have a different programming process which we cover in additional videos.
Programming your Installer Code adds an important layer of security, as the default code is obviously widely available information. Plus, learning how to change the code acts as a great introduction to the many other programming features in the Honeywell VISTA.
-
 6:05
6:05
Alarm Grid Home Security DIY Videos
1 year agoPROA7 or PROA7PLUS: Using Lyric Sensors
22 -
 13:10
13:10
The Geek's Corner
3 years agoHow to change which program opens which file.
46 -
 0:45
0:45
BobandBrad
3 years ago10 minute daily back program that can change your life
352 -
 2:19
2:19
WFTS
3 years agoFlorida lawmakers work to change medical marijuana program as 2022 legislative session begins
16 -
 1:53
1:53
NTD News
4 years ago $0.03 earnedPennsylvania Senator Opposes Climate Change Program
1699 -
 2:36
2:36
WEWS
3 years agoSNAP program change may level playing field between home, school meals
12 -
 2:13
2:13
WFTS
3 years agoUSF program for students with intellectual disabilities ready to grow, change more lives
-
 4:59
4:59
Alarm Grid Home Security DIY Videos
4 years ago $0.01 earnedHoneywell VISTA System: Factory Defaulting
28 -
 1:00
1:00
Càirn Globél's Rock Pile
3 years agoChange
55 -
 1:27
1:27
KGTV
4 years agoChula Vista greenlights rent relief program
44