Customizing Home Depot blinds to fit YOUR windows! | Home Essentials 2" Horizontal Blinds | 2021/41
My wife recently decided that the vertical blinds we installed throughout our home in 2014, have seen better days. Having three cats have taken their toll, plus the slats are beginning to grow brittle, and we are looking for a new look.
Our last home has Bermuda Shutters in the living room, and we really liked the look, but not the expense! So, we compromised on the Home Essentials 2" Faux Wood Horizontal Blinds from Home Depot. They had the look and feel of the Bermuda Shutters, without the price.
I started small to see, if she was going to really like them, so we designed to do the kitchen window first, it’s the smallest window on the first floor, and the blinds were only $40.00, so if we didn't like them, it wouldn't be a loss.
As many are aware, windows come in many sizes, blinds do not, while they come in standards sizes, the store can cut them to fit window widths, but not height. We took our measurements and headed to the nearest Home Depot, and picked out the size that would fit our window. We gave them the measurement of the opening, and it was cut to 1/2" in smaller. Never cut your blinds to the exact width, this will come back in a minute.
Returned home and removed the existing blinds. I installed the two brackets (the kit comes with three, but this opening was narrow and two was more that enough to support these blinds. Here is where we made our first mistake, we gave the tech at the store the height of the window, not the width, the blinds were too wide. Pre-made blinds have a maximum and minimum width. In my case the minimum width for these blinds was 35 1/2" the width needed was 34 1/4" fortunately there was a little play, and I was able to get the blinds re-cut to the smaller size, without having to repurchase another set. Whew.
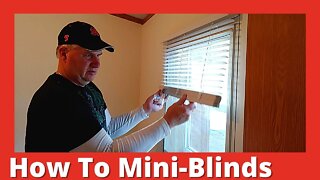
Back home, the now shorter blinds snapped right in, and the task of cutting them to length was now at hand. This was the most time consuming of the process, had I not needed to cut the blinds, I would have been done at this point. Blinds come in standards lengths, 24", 27", 48", 64" and 72" in my case due to the width, the length was 64", my window is only 40" tall, so, I had to remove, multiple slats and shorten the strings.
The first step is to cut the retaining loops, being careful not to cut the retraction strings (the smaller taught ones), the remove the extra slats. Once that's done, you remove clip the horizontal "ladder" lines left, except the top one, this is where the bottom bar will stop at.
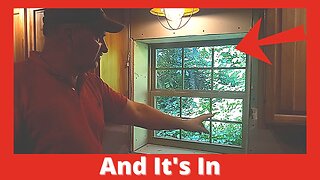
The blinds are self-retracting, so it was easy to raise them to their new height, tie the strings off, cut the excess, and tuck them into the buttonholes on the bottom.
Done, and even with the trips to the store, this project only took about 60 total minutes. Looks like I will be doing the rest of the windows in the coming weeks.
Thanks for watching Dad It Yourself!!!
**This post contains affiliate links and I will be compensated if you make a purchase after clicking on my links.**
Helpful/Affiliate Links:
Home Essentials 2 Inch Faux Wood Blinds by Bali: https://homedepot.sjv.io/3PyOKK
Tools I use in my shop: https://www.dadityourselfdiy.com/2019/06/power-tools-i-use.html
Support Dad It Yourself by shopping on Amazon: https://www.amazon.com/shop/dadityourselfdiy
Support Dad It Yourself by shopping at Home Depot: https://homedepot.sjv.io/LENzO
#Blinds #Home Depot #DadItYourselfDIY
-
 13:43
13:43
Wisdom Preserved
3 years agoDIY Bamboo Accent Wall Repurposed from Bamboo Blinds
164 -
 10:09
10:09
StraightArrowRepair
2 years agoHow To Install Cordless Window Blinds
53 -
 17:35
17:35
Wood, Metal, Everything
2 years agoI make a DIY Custom Sit Stand Desk for my Sister. Hickory top with Mechanized Stand!
15 -
 8:05
8:05
StraightArrowRepair
11 months agoReplacing A Mobile Home Window Second Window Part 1
52 -
 9:42
9:42
StraightArrowRepair
11 months ago $0.02 earnedReplacing A Mobile Home Window Second Window Part 2
103 -
 15:50
15:50
Wood, Metal, Everything
2 years ago $0.02 earnedWindow Screens 101 | Step by Step How to Make or Repair Any Size Window Screen
51 -
 19:37
19:37
Wood, Metal, Everything
3 years ago $0.18 earnedHow To DIY Kitchen Cabinets Complete Kitchen Remodel PT1. Make Cabinets, FaceFrames and installation
7993 -
 8:01
8:01
Hometalk
1 year ago$5 trick to INSTANTLY upgrade your builder grade blinds!
-
 19:37
19:37
Wood, Metal, Everything
3 years agoHow To DIY Kitchen Cabinets Complete Kitchen Remodel PT1. Make Cabinets, FaceFrames and installation
79 -
 16:56
16:56
Wisdom Preserved
3 years agoHow to Remodel a Coat Closet; DIY Industrial Pipe Shelves
140