How to Make a Double Chair Bench | DIY Double Chair Version 1 | Patio Furniture
➡️ Get Plans For 16,000 Woodworking Projects You Can Do Without Needing A Large Workshop or Expensive Tools at http://GetThesePlans.com
How to build a double chair bench. Free working plans for the DIY bench are available on DIYPETE.com. Pete shows step by step how to make the patio furniture.
For more info, project photos, and downloadable plans check out:
http://www.diypete.com/how-to-build-a...
Download Plans: https://gumroad.com/l/doublechairbench
Check out the Newest DIY Double Chair Version Here: https://youtu.be/Vm4fo3t66dE
(Version 2 plans available for purchase here: road.com/l/DIYdoublechair
Tools Used (Amazon Affiliate Links):
- Dewalt 12" Miter Saw: http://amzn.to/2ESRcZX
- Dewalt 12 Volt Drill : http://amzn.to/2CJrLUV
- Dewalt Jig Saw: http://amzn.to/2FxBpNo
- Dewalt Orbital Sander: http://amzn.to/2FxsdbV
If you are wanting to build great looking chairs for your patio you’ve come to the right place. I bought a home late last year and didn’t have any patio furniture whatsoever. My dad had built a beautiful piece for their home and so I credit him with design help and the inspiration to build my own. This setup is perfect for enjoying a relaxing evening out on the deck with friends or family. I built my chairs out of cedar because cedar does not rot and stands up against the outdoor elements quite well. You can use pine as long as it is painted or coated with a thick finish of poly.
Make Your Cuts
Cut each piece on your miter saw. For all angles in this project, set the saw to 15 degrees. If you don’t have a miter saw you can find one here. I use a Dewalt 12″ miter saw for all of my projects.
Use a jigsaw to cut out the notch on the two front legs. The 2×6 piece will eventually rest in the notch. Measure 9 1/2 inches up from the bottom of the 2×4 front leg and mark. Measure 1 1/2″ back (depth). Then measure from your nine inch mark up 5 1/2″ and make one more mark. Connect the lines and cut out your notch on both pieces.
Next, grab a role of tape to make your rounded corners for the arms and back supports. Do a rounded corner for the two outside armrests, and for both outside pieces of the table top. Create rounded corners for the top of the backrest supports as well(Part H). Cut with a jigsaw and use an orbital sander to smooth the edges. Check out photos in later parts of the project to see the rounded edges.
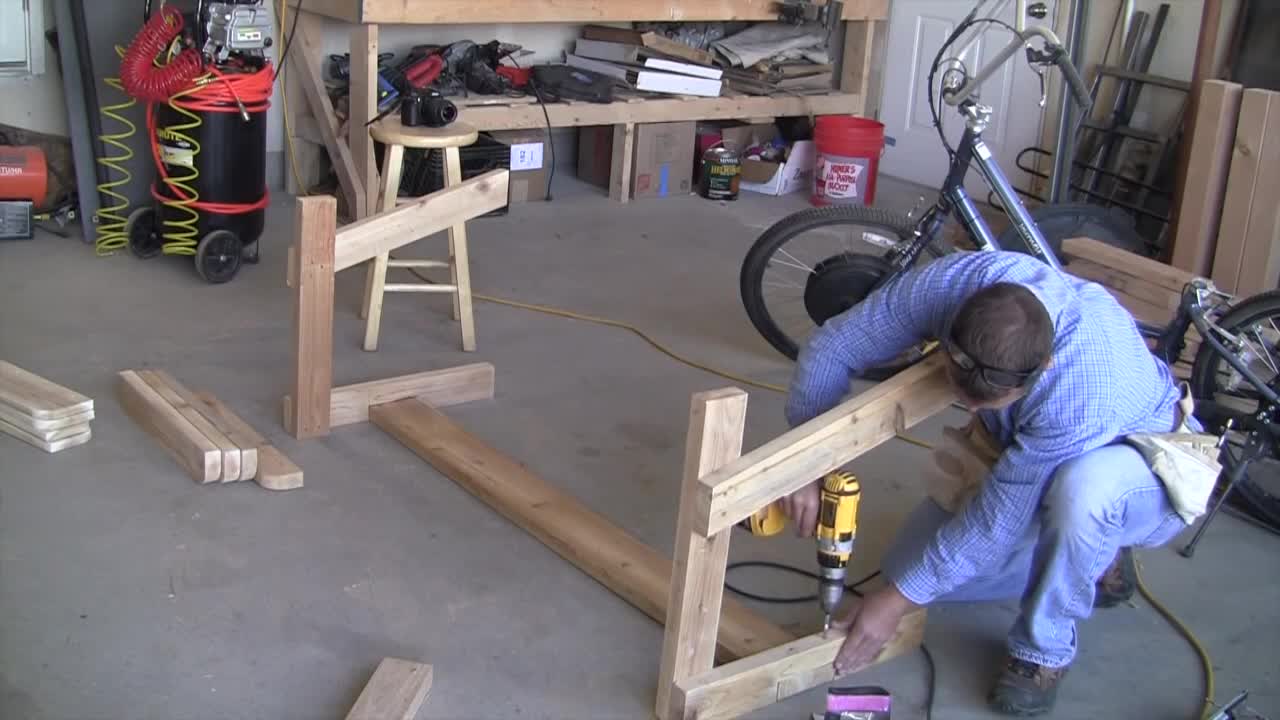
Assemble Both Sides
As shown in the video, attach the front and rear leg together on the top with the arm support 2×4. Measure 11″ back from the rear of the front leg and put a mark. Then line up the rear leg so that the 15 degree angle sits flush with the arm support. Attach with 2 1/2″ Deck Screws. Use the star (torx) deck screws instead of philips because they are much easier to use and don’t strip. Only attach the two legs to the arm support in this step. We’ll get to the lower cross support later.
Measure 11 inches from the back of the front leg to the front of the back leg. Flush it up with the horizontal 2×4 and attach with 3 screws.
Attach each cross support. For the middle 2 you can drive 2 screws in from the front side. (Through the 2×6 and into the cross support.). To attach the rear side of the support drill a pilot hole through the side of the cross support at an angle down into the rear support. It will keep it in place and later steps will solidify the joint.
Attach Back Supports
Fasten to the sides with 2.5″ screws. Flush up the bottom with the 15 degree angle. The upper support arm bottom corner will be flush with the back side of the backrest support.
Attach Chair and Backrest 1×4 Wooden Slats
Attach the front slat so that it hangs over the front 2×6 by 3/4″. Then attach the rear slat so it touches the two backrest supports. Attach the remaining 3 slats and space them evenly apart. (About 1/4 or so). These boards are 20.5″ wide.
Attach the backrest slats. These boards are 19″ wide. Attach the top board first to help square up the backrest supports. Then attach the bottom slat. Finally, attach the remaining boards and space evenly.
Fill Screw Holes
Fill all the screw holes with wood putty. The screws need to be countersunk in order to fill them.
Apply Finish
I like to use Minwax Spar Urethane. It enhances the natural beauty of cedar and protects the wood against the outdoor elements.
Apply 2 coats of Urethane with a brush. Let the second coat dry completely (6-12 hours), then lightly sand the armrests, table, and areas you come in contact with when sitting (chair slats). This light sanding with 220 grit paper will remove any dust particles that settled in the first coat. Next, take a clean cloth and wipe a thin coat of poly on all the areas you sanded. This will give you a nice smooth finish. Once dry, enjoy your new furniture and have a barbecue!
Looking for woodworking, concrete working, and other DIY projects plans to follow? You can download plans for free at http://gumroad.com/DIYPETE
Looking for woodworking, concrete working, and other DIY projects plans to follow? You can download plans for free at http://gumroad.com/DIYPETE
Facebook: http://facebook.com/DiyProjectsWithPete
Instagram: http://instagram.com/diypete
➡️ Get Plans For 16,000 Woodworking Projects You Can Do Without Needing A Large Workshop or Expensive Tools at http://GetThesePlans.com
-
 3:53
3:53
BestHomeAndGardening
3 years agoDouble Chair Bench with Table
89 -
 4:49
4:49
BestHomeAndGardening
3 years ago $0.01 earnedTable Bench Outdoor Furniture // Woodworking How to
3361 -
 0:20
0:20
ArdiLagends10
3 years agoHow to make Sanger-Espresso double coffee.
114 -
 5:00
5:00
BestHomeAndGardening
3 years ago $0.03 earnedDIY Garden Bench Chair Out Of Scrap Wood ( Pallet Wood )
150 -
 2:14
2:14
Dollfuncraft
3 years ago $0.01 earnedDoll Furniture DIY - Doll Chair DIY - Miniature Chair DIY - Styrofoam Chair
58 -
 4:57
4:57
JnJOrigami
3 years agoHow to Make Origami Chair (Wellington Oliveira)
53 -
 2:25
2:25
MisisA
4 years agoHollywood version of Chair Pulling Prank
22 -
 LIVE
LIVE
StoneMountain64
2 hours ago#1 WARZONE TACTICIAN + New Battlefield Trailer
157 watching -
 20:03
20:03
Adam Does Movies
3 hours ago $0.43 earnedAlien: Earth Episode 1 - Recrap
11.5K1 -
 15:38
15:38
IsaacButterfield
11 hours ago $0.42 earnedExploiting His Baby For Views (The Island Boys)
8.76K11