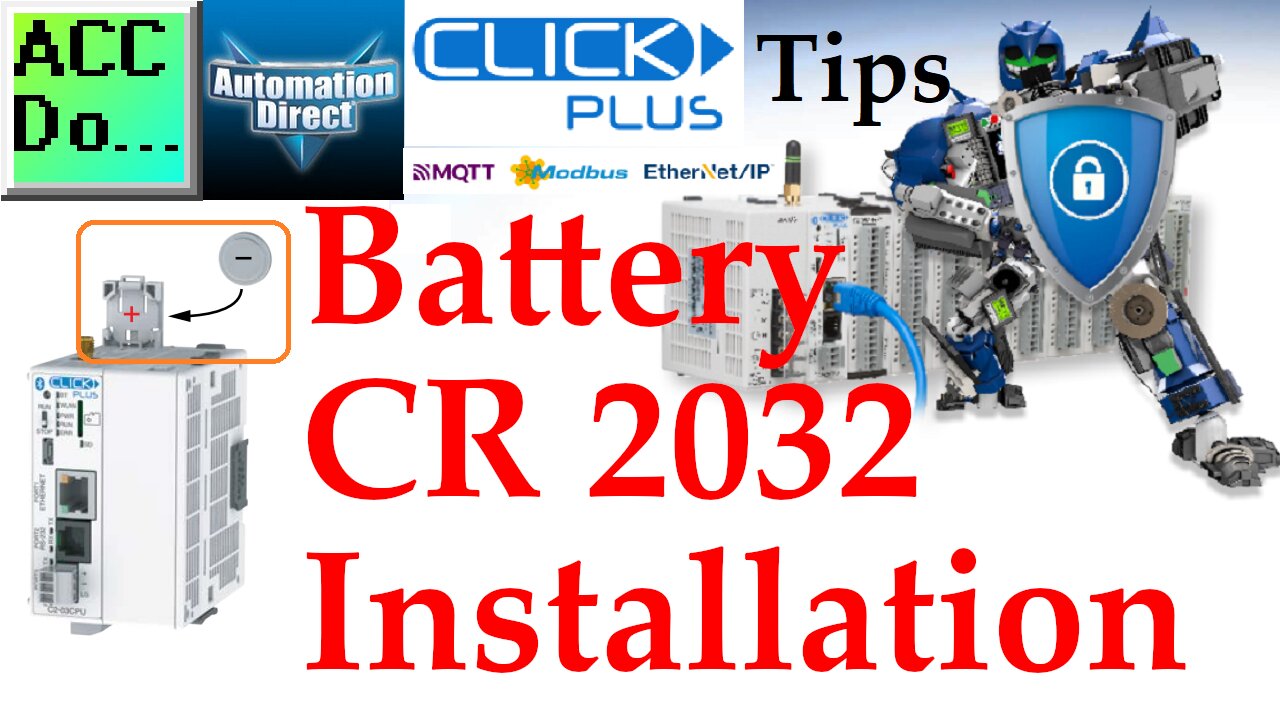
Click PLUS PLC Battery CR 2032 Installation
To install or replace the D0-MC-BAT (CR 2032) battery:
1. Power up the CPU for at least 10 minutes to charge the CPU’s capacitor prior to removing the battery. This will retain function memories. It is recommended you backup data memory before replacing the battery. Plan to complete the battery replacement within 10 minutes of power off.
2. Power off the CPU.
3. Pull out the battery holder. (This may require a small screwdriver to push in the tab and lift it when the unit is mounted.)
4. Put in a new battery, with the positive (+) polarity side facing the battery holder. This should snap into place.
5. Insert the battery holder into the CPU and push it all the way in.
6. Power on the CPU.
7. Make a note of the date the battery was installed. (Battery life is about 3 years.) The battery backup is now available.
Programming and examples of the Click and Click PLUS PLC series can be found at this URL:
https://accautomation.ca/series/click-plc/
There are several reasons why we are using the Click and Click PLUS PLCs. Here are just a few.
- Investment is low for the hardware and the software is free
- Standalone PLC with built-in I/O
- Communication ability - Ethernet Port, RS232, RS485 - support for protocols such as Modbus RTU, Modbus TCP, etc.
- Ability to expand the system with a variety of modules including RTD and Thermocouple inputs directly.
ACC Automation
https://accautomation.ca/
-
 LIVE
LIVE
Grant Cardone
3 hours agoHow to Buy Real Estate With NO Money Down (LIVE Training With Grant Cardone)
2,600 watching -
 19:53
19:53
MetatronHistory
17 hours agoRome VS Greece - Ultimate Clash of Civilizations Explained
20.8K7 -
 1:32:33
VapinGamers
2 hours ago $3.01 earnedTools of the Trade - EP12 The Art of Story Telling with MidnightinTheMountains - !rumbot !music
9.37K1 -
 LIVE
LIVE
SOLTEKGG
1 hour ago🔴LIVE - Battlefield 6 - Going Pro in RED SEC
194 watching -
 LIVE
LIVE
Midnight In The Mountains™
3 hours agoThe Midnights Play Arc Raiders | Loot Scoot and KILL | Crypto Wallet up n running GO JOIN THE BETA!
134 watching -
 53:25
53:25
X22 Report
4 hours agoMr & Mrs X - Trump Is Using The Same Tactic As Our Founding Fathers To Rebuild America - EP 17
66.9K16 -
 LIVE
LIVE
PudgeTV
1 hour ago🟣 Arc Raiders - Gaming on Rumble | Going Topside w My Daughter’s Husband
89 watching -
 2:05:43
LFA TV
21 hours agoRUMBLE RUNDOWN WEEK 7 with SHAWN FARASH 11.22.25 9AM
130K7 -
 LIVE
LIVE
ttvglamourx
2 hours ago $0.60 earnedGLAMOURX VS CALL OF DUTY LOBBIES !DISCORD
139 watching -
 LIVE
LIVE
DannyStreams
4 hours agoSaturday Morning Tarky
94 watching