Learn Motion Design Week 08 part 2 of 2
Week 08 A Cinema 4D PART 02 Spline Pen & NURBS
1. Empty scene out, Spline Pen - click on spline pen, go to TEXT
Attributes panel. Font: change font, in attributes Text, change what it says in the box
Add camera to scene, add alight to the scene, move light in font of text, ALT and mouse click to move camera, grey box shows the render area
Hit render key- nothing happened. Here’s why
Splines, unlike primitives and objects, splines are a shape or a line that needs to be extruded. Like old school after effects- (in AE 3d enable, then choose how much to extrude it)
In C4D Lite- you need to use a NURB
There are some default complex and interesting splines to start off with. Add a spline to scene, then add a NURB to it
NURBS are 2 icons away form spline pen, extrude, lathe etc
extrude - like classic 3d in AE. to make this work, click text in object manager. Drag it up to the extrude nurb in object manager, arrow changes on mouse tool, now text is parented to the nurb, nurb parent, text child
Pick spline, then choose type of nurb, the parent the spline inside the nurb. Ite hierarchy is VERY important when dealing with nurbs
Click on the nurb to get its attributes, OBJECT- offset- how deep extruded, CAPS- size, adjusts bevel, softens bled of edges for more modern look.
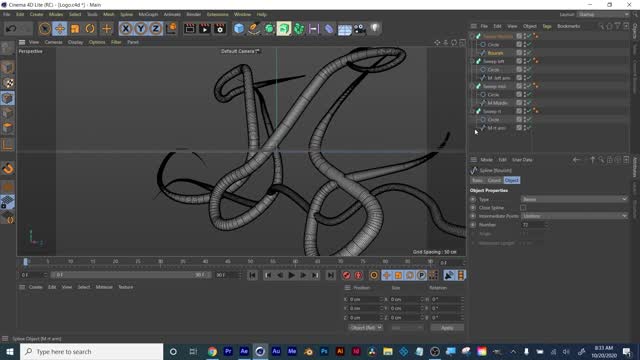
2. Keep camera and light delete rest- sweep NURBS demo next
For sweep NURBS hierarchy is very important
Spline- add a Spline circle, then add a Spline Helix- we now have 2 shapes
Go to NURBs - Sweep
Sweep NURB at top of object manager
Drag spline circle inside the Sweep NURB
Drag spline helix inside the sweep nurb- watch what happens!
Drag circle above the helix- now it is working properly, rotate camera to show angle or side shot
Click on circle nurb, attributes - OBJECT - adjust radius, smaller- this affects how thick extrusion of helix is
Now click on the heli, attributes - OBJECT. Adjust start, end, angle
So many more options now in C4D lite than we ever had in AE
Drag helix above circle to show improper hierarchy, then drag circle above again.
Proper order Sweep, circle, then helix
Delete circle, add spline star, star above helix. Sweep is using a star shape to create the helix now. No longer a nice rounded circular tbe look. Add a spline Cissiod and remove star. Overall shape as it travels along the sweep. NURB, type of 3d extrusion, then the overall shape created as weep travels along it.
3. Delete all but sweep, light and camera. Add Spline Circle. Add spline flower
Sweep, drag in circle, then drag in flower hierarchy
Circle- attributes - object - radius
Final shape (flower) is what we ultimately want to create, then the extrusion of it is the shape above that. Will it be rounded like a garden hose, or squared off like a gear?
Spline N side, delete circle, add n side above flower, reduce radius, now we have angular edges, not rounded.
4. Delete all but light and camera - demo Lathe NURB next
This functions like revolve in Ilustrator
Draw silhouette, profile of object, then the Lathe NUrb rotates around the shape. Bottle, light bulb, ballon are all lathe nurbs- things that are rounded, candle stick.with spline pen click and drag, draw a shape, like a vase
Add lathe NURB, spline inside Lathe
To edit spline, select the spline in Object manager click on the VERTEX select tool
Click on the selection arrow tool in top tool bar, pick a specific spline and adjust it, then adjust it with arrows in 3d space
Draw the profile, then use a lathe nurb to get yoru rounded, 3d shape
5. Delete all but light and camera. Text, in attributes Text, change what it says in the box. If you hold down ALT or OPTION when you click on your NURB while text is selected, it will automatically parent what you have selected to the nurb. Hold LAT or option as you click on Extrude NURB. text is now auto parented into the nurb! This will save you some time moving forward.
6. Spline pen demo- make a shape, white circle to close off shape when done. Make it a rectangle, but with a slope leading up to final click.
Select the middle slope spline with SPline Arc tool inside pen tab
Delete extra point and click and drag, see circle helping round out the straight slope now. Show pushing outwards and caving inwards
Spline arc made the bezier curve points for us.
Select spline in object manager, alt option click the extrude to parent it and extrude it out. Like a puzzle piece.
7. Delete spline and nurb. Add a cube to the scene. Inside nurbs is Array button. Drag the cube into Array in object manager. Or ALT OPTION click on array while cube is selected.
Demo radius, copies, amplitude in properties tab
Move playhead to where you want to start, click radio button for radius in properties (radio buttons like stopwatches in AE)
Move playhead then make a value change
Text in radius turns yellowish orange- this means there was a change, BUT a keyframe was not added. Click ONE more time on radio button to add the new keyframe. Now the radio button is red. Meaning a new keyframe has been added to the change. You must click on the radio button everytime you make a change in C4D lite, unlike in AE when you only click stop watch 1 time.
Rewind and hit playbutton to show the animation.
8. Delete array, add a new cube.
Show 4 screen split up button, by camera tools at top right, click a 2nd time to exit it.
show the deformers button at top right, like a slinky. Select cube, hold ALT or option click on bend
Strength- how strong deformation will be.m Not working right. Drag Cube out of Deformer, Drag Bend ONTO the cube. Now it will work properly.
Deformer is the OPPOSITE of a NURB, do shape then the Deformer into that shape.
9. Click on the cube in Object manager, go to properties tab - OBJECT tab
# of segments, higher number bends more and gets more circular, # higher number less roughness
Bend fwd, click radio button, move playhead, bend backwards hit radio button, go fwd bend fwd click radio button again for animation
10. Recap- OBJEcts and primitives, splines like a pen tool which need to be extruded. If using a spline need a NURB to extrude it. Watch parenting order, NURB then SPLINE inside it. Sweep, need a shape that is the extrusion shape, then a a shape of what path it will follow, such as a coil. Deformers, object layer, then deformer goes inside of it.
11. Add OBJECT- figure, place deformer explosion into figure, Properties panel, object- Time, set to 0, and keyframe animate it to make figure explode.
12. Materials!!
Add a sphere and a cone into an empty scene
Select sphere, go Window - Material Manager.
Timeline panel, top left corner burger stack options lines Drop down menu choose Create text button next to it.
Choose new material. Click on the material and rename it. Double click on the new material to edit it. New window pops up Material Editor.
Color in the left tab clicked on to edit the color. Thumbnail changes, to give a preview of the material in yoru scene. Click on Reflectance, adjust settings in properties. Specular how shiny or sharp reflections look on materials.
Click on transparency- fully transparent like glass, or semi,
Click on Glow button to add a glow if you like.
Click on Lumanince- it will emit light like a light bulb or neon sign. Must be very strong to be brighter than the lights already in the scene
Now we can either drag the material we just made onto teh shape in our scene to apply it or- drag it into the object manager panel on teh layer we want.
If we hold down CMND or CNTRL while clicking and dragging to the right of the material thumbnail we create a duplicate of that material, now we can edit it and it will not affect the original material, give it now glow and no transparency, click the render button and we will see the semi red transparent sphere emitting a light and glowing in font of the green cone.
Recap click create- new material, then double click on it to edit it to yoru needs.
Playa round with sliders, and watch teh preview for the material live update.
Hit quick render when done to update and get a fast preview of teh scene
Fresnel shading: Transparency - Texture - little triangle at left side is a drop down. Choose Fresnel form drop down, click on radio button for fresnel reflectibvity 1st
Click on the gradient in fresnel shader, arrows at top right of material editor allow you to go back and forth in teh screens inside of it. Hit redner button.
What fresnel does: changes the way the reflections are, based upon the camera, pointing at it. When straight on we have less specular highlight, as we turn we see more of it happening, like this occurs in nature.
Click on teh shader in fresnel, render - front and back. Adjust gradient sliders, and see teh thumbnail update
—----------------------------------------
Week 08 B Cinema 4D PART 01 Spline Pen & NURBS Advanced
1. We covered basic keyframing. Lets go over mograph. You may need to create a free Cinema 4d Lite account before doing this!
2. Cinema 4d lite file selected in AE project panel hit CMND E or CNTRL E to open it in C4D lite
3. Or in C4D go File- Merge Project. This is the same as opening a file in AE
4. Reminder click teh render gear icon to adjust size of teh scene, free C4D lite can not render full 2k, but you can render out scene in AE, svae go back to Ae and redner the file there.
5. In AE for something new we hit new composition button, in C4D we go file - new project.
6. FRONT VIEW Draw flourish letter, hit ESCAPE a few times to end pen path line.
7. Making broad loops for lines to animate through them. YOu will get multiple slime shapes in object manager.
8. Then a brush stroke going through the bottom letter loops.sleect each slime in object manager, hit enter key to rename it.
9. Go to point edit mode select tool on left side, edit letter shapes to clean them up, use gizmo arrows or curve handles to make changes
10. Like in AI less points for smoother curves.
11. Click on the top selection tool to edit the full object transforms, pos rot scale etc.
12. Reminder- SPLINES alone do not render- hit fast render, nothing there.
NURB- Sweep generator. Add a circle shape- the profile of the extrusion: Sweep, Circle, Flourish spline
Select Circle- Properties panel, OBJECT, adjust radius. Double click sweep generator to rename it.
Click on SPline flourish, we will be changing a setting in properties Object tab, to get a smoother geometry.
At top middle menu choose Display - Garaud Shading (lines). Zoom in- lines are all different lengths.
In properties panel, object - Intermediate Points - uniform
Now the lines are all teh same length. Number below this, increase it for more geometry to work with, smoother shapes.
Select the NURB sweep flourish, properties, object panel - twirl down teh details arrow,
Scale over time, rotation over time.
Scale: drag the far left point down, in point of flourish gets tapered, if i drag teh right edge, it tapers the other end.
CMND or CNTRL click in between the curves to add points, to adjust teh thickness where and when we want!
Graph adjusts the thickness over time.
We can always increase the Number in OBJ settings for teh Sweep if not smooth enough
13. Select Sweep nurb generator, hold CMND or CNTRL and click and drag it in Object manager, we duplicate it and everything inside of it! Rename it, delete the spline flourish in it and drag the letter spline you wnat inside, below the circle. We can adjust teh circle radius to make it thicker than the flourish if we want.
In left spline we can adjust teh details of teh graph as well for teh spline.
Do the above again for each part of yoru letter.
14. Zoom in once all set, and we will see some geometry is colliding in a way we do not want.
Adjust spline so meshes don’t pass through one another
Green check by SPLINE to only see path to edit it easier in object mode
15. Trim Paths with sweep nurb generator
Properties panel, OBject, End Growth keyframe it to get a trim path draw on
Numbers at far right of timeline- end frame make it higher to make animation duration longer
Select layer keyframed, Hover over the radio button that has keyframes - RIGHT CLICK - Animation - Show Track
Drag either end bar at top to slide start and edn of keyframes for better timing in animation
Or go Window - Timeline Dopesheet for all keyframes and Window - Timeline F curve for graphs
Select keyframesthen click the interpolation at top of dope sheet
Cartoon Shading
Highlight, mid tone and a shadow tone, tritone colors
CREATE - MAterials - New Standard Material
Double click on it to edit it
Drag it to the art to add it in Object manager or in the scene
Turn off:Color, and Reflectance
Turn on Lumanance, this gives us a flat look
To have lights in scene affect this material we will CLick on Texture in Lumanance, choose drop down Effects - LUmas
Click once on the color swatch by texture
Go thru 3 Specular Shader tabs at top and click off active for the specular
Go to shader tab, click color and set teh color to full white
Set Illumination to 100%
This is now the jumping off point for our cartoon shader
Click on Lumance
We see Lumas in the effects texture now
Click one more time on the arrow to teh right of Texture and choose COlorizer
Click on the color swatch once
Condense the look by dragging the sliders
You can also drag the dot in the gradient bar to have less of a gradient
We want it crushed, less tonal range
Select both gradient arrows below gradient by holding down shift
Then click on the arrow next to word gradient
And fromInterpolation drop down choose STEP
Now slide arrows to adjust gradient look
Click on the color balck and add a color ie dark shade of blue, then white set to a light blue for the highlight
Then click in between teh 2 arrows below gradient bar and mae our midtone color
YOu can blur teh offset if you ant a softened tritone look
Close material editor and render frame
Apply material to sweep
Make sure there is a light in the scene to create the cartoon shaded look
Select te light
Properties panel
Shadow - Ray Traced Hard
Create a new scene to use MoGraph function
PLace capsules in scene hold CMND or CNTRL as you drag in Object Manager to duplicate shape
All on same 0 point in 3d, will use mograph to scatter them randomly
MoGraph - Fracture, straight mode
Properties - object - mode- straight
Place all shapes inside the Frature
Add Effector - Rando form mograph, in properties panel for Fracture, effector, select the Random
Fracture parented inside random
Sleect effector, go to effector tab, increase strength to spread apart more
We can go to parameter tab and spread out on axis even more
In parameter you can also check on Rotation and scale as well
Effector, Effector tab - change Random to Noise
Random - efectror tab, click on indexed
THis will affect each onject individually if using Noise
-
 LIVE
LIVE
Reidboyy
39 minutes agoHow To Make $$$ in Delta Force Console Operations!
23 watching -
 1:00:35
Timcast
2 hours agoDOJ To BAN Transgenders From Owning Guns
101K104 -
 LIVE
LIVE
Side Scrollers Podcast
2 hours agoUK JAILS TV WRITER FOR WRONG THINK + TWITCH ALLOWS CYBERSTALKING + MORE | SIDE SCROLLERS LIVE
318 watching -
 LIVE
LIVE
Viss
1 hour ago🔴LIVE - PUBG Solo Tactics To Win Consistently! - PUBG 101
90 watching -
 2:05:54
Steven Crowder
4 hours agoLive Reaction: RFK Faces Senate Grilling After Employees Demand His Resignation
261K188 -
 1:02:58
The Rubin Report
3 hours agoPress Stunned by Trump’s Brutally Honest Message for Elon Musk
46.7K41 -
 LIVE
LIVE
Rebel News
1 hour agoPolice chief says 'comply' with intruders, Carney on temp workers, Trump on tariffs | Rebel Roundup
290 watching -
 DVR
DVR
Neil McCoy-Ward
1 hour ago🚨 Hospitals Are Bracing For MASS Casualties...
7.84K1 -

The Mel K Show
2 hours agoMORNINGS WITH MEL K - NATO Cognitive Warfare & Post WWII Betrayal Finally Exposed 9-4-25
20.2K15 -
 LIVE
LIVE
The Shannon Joy Show
4 hours agoCOVID Not A ‘Lab Leak’, It Was Created At UNC Chapel Hill! LIVE - Exclusive With Dr. David Martin
240 watching