How I Personalized those Unfinished Wood Signs from Hobby Lobby
Do you ever check out those unfinished wood signs at Hobby Lobby and wonder what to do? When I first saw these beaded white signs, I was hoping these weren’t a short lived product and I bought a few on the spot. I’ve added transfers to them and stenciled them but this one I think really stands out. Check out how I deconstruct it and completely change the look!
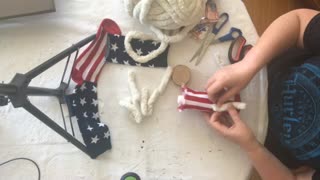
Supplies I Used for my unfinished wood signs
White Beveled Beaded Wood Wall Decor from Hobby Lobby
Jute rope, scissors, 2 paper plates, scotch tape or large eyed needle
Dixie Belle Products: Caviar, Cotton, Coffee Bean, Mud Puddle and White Lightning
Join MPD Tribe and get access to my library of free cut files including Bless This Home from this project!
PREPPING MY UNFINISHED WOOD SIGNS
Before I get started, I remove the wooden beads from my unfinished wood sign.
I used scissors to cut the knots from behind and I place the beads in a safe place.
Normally I don’t use the same jute rope string since the rope is cut pretty tight and I have trouble retying a knot so I use new jute rope later.
As always, we need to start with a clean surface.
Any fingerprints or dirt will prevent any paint from sticking to the surface they are painted on.
My favorite product to use is Dixie Belle’s White Lightning. I mixed a small amount, approximately a tablespoon in a spray bottle and use this for small projects.
Once the project is clean, make sure to use a clean wet cloth to wipe off any White Lightning residue.
And now we are ready to start!
PAINTING MY UNFINISHED WOOD SIGNS
First I divided my wood beads into two groups and placed them on two different paper plates.
On one plate I added a very small amount of Coffee bean, maybe 2 teaspoons worth.
You can always add more paint as you go, once the paint was on the plate, I swirled my plate around to cover the beads.
I kept swirling until the paint was dry on the beads.
The next plate I added Mud Puddle and repeated the same process.
Check out my video short below to see my process.
This way of painting beads if very satisfying, my version of a fidget spinner.
If you check out my YouTube channel I have two more videos on painting wood beads also.
I choose to use Dixie Belle paint for these beads because the paint contains sealer in it.
This will provide extra protection for my painted beads, but we are not done yet!
When the beads were good and dry, I then placed all the beads on one plate and added a small amount of Cotton to the plate and repeated the process.
Why? Because I wanted a speckled look to my wooden beads!
STENCILING MY UNFINISHED WOOD SIGNS
I love these unfinished wood signs and I have been using them in other projects.
Check out my other White Beveled Beaded Wood Wall Decor to see how I personalized them.
I have several blog post and videos on how to stencil on different mediums, click here to check this out!
Once I have my design figured out on my Silhouette Cameo software and cut using contact paper, click here to see how, it’s time to start stenciling.
I used Caviar first to burnish the stencil to help prevent bleeds.
Once this was dry I then used Cotton over my stencil.
Before the Cotton was dry, I pulled my stencil up slowly and carefully to prevent the paint from being pulled up.
Usually I wait until the paint is dry and then lightly sand it before pulling up the stencil, but we have a lot of humidity here in Iowa so I’ve found pulling it up when still wet works best for me.
Once completely dry, you can use your favorite sealer, or you can leave unfinished for a chalkboard look, which is what I choose to do this time.
ASSEMBLING MY UNFINISHED WOOD SIGNS
Now it’s time to reassemble my unfinished wood sign.
I grabbed my role of jute rope, added scotch tape tightly to the end.
Then I threaded the just rope from the backside up, then I started adding the wood beads back onto the rope.
I alternated the dark brown/white and medium brown/white speckled beads until they were all threaded on the jute rope.
Then I pushed the jute rope down into he other side of the sign and tied two knots on each side and then cut the excess jute rope.
That is it!
-
 3:42
3:42
MPDtribe
2 years agoCheck Out My Patriotic Gnome
96 -
 56:56
56:56
The Squad
14 hours agoArsenal GOING CLEAR & Man City WILL FLOP🏆 Big Ange is a FRAUD😨Enzo Fernandez MUST BE SOLD!
49.1K8 -
 13:42
13:42
Space Ice
1 day agoCon Air Is So Good It'll Restore Your Faith In Mankind - Best Movie Ever - Nicolas Cage
69.5K46 -
 1:05:36
TheGetCanceledPodcast
22 hours agoTHE GCP Episode 5 | Diogo Snow Talks Growing Up In Brazil, Art Basel, Cyberpunk & More
82.1K11 -
 1:06
1:06
bostonbeaman
1 day agoBE A MAN: Against the Grain 6 Pack
64.7K7 -
 14:43
14:43
JoBlo Horror Originals
1 day agoHarry and the Hendersons: When Bigfoot Went Hollywood
58.4K12 -
 13:49
13:49
Good Kid Productions
1 day agoXi Van Fleet on Maoism coming to Fairfax, VA (convo)
54.5K23 -
 7:07
7:07
Hannah Barron
23 hours agoDilemma in the New Kitchen!
54.1K40 -
 8:24
8:24
SaturdayMorningInspection
23 hours ago $0.01 earnedTexans Just Got A FREE AGENT STEAL
52.9K7 -
 21:17
21:17
Brewzle
1 day agoBottling Our Barrel Picks at Cathead Distillery!
55.7K9