
My Prayer Wall & Canvas
My Prayer Wall & Canvas was a project from the heart. I was sitting at my dining room table looking at my stairway and I was inspired to add prayers to my walls before starting my painting project! And then it morphed into an accent wall with the plans of stenciling Psalm 91:11 when I was done.
Supplies I Used
Sherwin Williams Poppy Seed: I used this as my base coat on my Prayer Wall. Really you can use any black or dark grey paint.
Dixie Belle’s Caviar, Hurricane Gray, Driftwood, Cotton, Bronze Patina Paint, Clear Coat in Flat
Brayer Roller
Paper plate, cheap chip brushes (optional)
24″ x 24″ Grandeur Collection Canvas
Joint Compound
Spatula or Putty Knife
220 Grit Sandblock
Paint brushes
Optional Wall Decor: natural rustic flower wood wall decor, white rustic flower wood wall decor, distressed white flower wood wall decor, white rustic flower wood wall decor, natural rustic flower wood wall decor
3M Command Strips
Pencil (preferably). I used a permanent marker on my wall to write my prayers requests on, I DO NOT recommend as this will normally bleed through your paint.
Prayer Canvas
Technically, this is two projects in one, BUT, they are done very similarly.
The Prayer Canvas has one extra step, and it starts at the beginning with joint compound.
For the prayer wall, no joint compound was used, so wait until the next step.
I apply a thin layer of joint compound over the entire canvas surface, pushing it into the weave of the fabric.
Once the entire surface is covered, I then make a “stair step” pattern.
When I have the pattern I like, I let this dry for a full 24 hours.
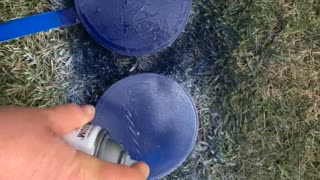
TAKE YOUR CANVAS OUTSIDE
I take the canvas outside and sand over the joint compound with my 220 grit sand block.
This essentially just knocks the peaks off of the dried joint compound and this step is VERY dusty, which is why we do this outside.
LET’S PAINT!
Clean off the dust with a dry rag and then grab your darkest paint color, I used Dixie Belle’s Caviar.
I paint the entire surface of the canvas including the sides.
Typically I do one coat, later I will do a second coat once I have the top side done.
HOW TO PAINT WITHOUT A PAINT BRUSH!
For my Prayer Wall & Canvas, I wanted to use my Distressed Technique.
I do not use a paint brush, but instead a brayer roller and a paper plate.
This technique is pretty much what I did on my Prayer Wall also.
For my Distressed canvases I have done so far, I tend to stick with similar colors and use a light, medium and dark color.
I love the looks of black, grays, and white.
For an added wow factor, I added touches of Dixie Belle’s Bronze Patina and I loved how this turned out!
Other combinations I’ve used and love is white, gray and blues.
LET’S GET STARTED ON OUR PRAYER CANVAS
Since we already have our Canvas painted in Caviar, I grabbed Hurricane Gray and poured about a tablespoon onto a paper plate.
Grab our brayer roller and roll it across the paint, I pretty much covered the entire roller.
Then, I roll this across my canvas.
I picked a pattern and criss crossed this going down and moved across the Canvas repeating this same pattern.
Then I flip the canvas so the sides, is now the bottom and top.
Once this layer of paint is dry, I pour a tablespoon of Driftwood on the same paper plate and repeat the same process, then flip the canvas again.
THE REASON WHY I FLIP MY CANVAS?
I do not want any noticeable patterns showing.
Next I go back to Caviar, flip my canvas again and repeat!
These steps on my Prayer Canvas can be repeated again until I get the look I like.
During this whole time, I do not wash my brayer brush.
The previous dried on paint, just adds more texture as we go through our steps.
ADDING PATINA TO MY PRAYER CANVAS AND PRAYER WALL
For the final touch, I then grabbed my cheap chip brush and Dixie Belle’s Bronze Patina.
This doesn’t take much paint at all either.
I use my paper plate to off load any patina paint that is on my chip brush and lightly dab in random place across my canvas.
Then I grab the brayer brush and roll over the Bronze Patina.
If I have an area that has too much patina, I can always go back once this is dry and lightly dab a little caviar over it and roll with the brayer brush to break up any areas.
Once this is all dry, I paint on a medium coat of Dixie Belle’s sealer in Flat.
Since there is a lot of texture, I tend to cross-hatch the sealer to get the sealer onto the entire surface and crevices.
When this is dry, we can move on to stenciling our canvas!
STENCILING OUR PRAYER CANVAS
I have a full blog post on how I make my stencils from contact paper and how I apply them to my signs.
For the full instructions click here.
But!
I have many other projects where I show you how to stencil, so if you want to get a better idea on how this is done, click here!
Once your stencil is applied, this is where I veer off a little from my normal stenciling routine.
I do not burnish my stencils on canvases, normally.
Especially when they have texture.
The purpose of burnishing is to help the stencil adhere to the surface but with this added texture, I think it will be too much of a headache.
Grab a couple of paint brushes, I prefer a small round and small flat square or angle brush.
PAINTING OUR PRAYER CANVAS
Since my canvas is a combination of black and grays, I picked Dixie Belle’s Cotton or white for the lettering.
Next I grabbed my paint, a damp paper towel, and two brushes.
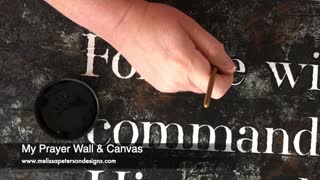
Instead of pouncing our paint on over the stencil like we normally do, I go across each letter and outline inside the stencil with the round brush.
I save the round brush for the thinner letters and the flat brush for the bigger letters where I can paint more space without risking bleeds.
This step is a little time consuming but so worth it!
Once you have painted all the letters and remove the stencils, it’s time to do the clean up!
You will have some bleeds but we can fix them later after the paint is dry.
To fix my “boo-boo’s” or bleeds, I grab my caviar.
Or grab the same color as your base paint, and a clean small round brush and we will lightly brush the Caviar paint over the bleed areas only.
OUTLINING THE LETTERS
Now on mine, I had some areas, that didn’t have bleeds but because of the light background I went ahead and outlined part of the letter anyways to make it stand out better.
I really love how this turned out!
Once this is done, it’s time to clean up the sides of our canvas.
Remember, we only painted one coat on the sides in the beginning.
I didn’t do a second coat yet because of the all the layers of paint we were adding, in case any got along the sides and messed them up.
Once the second coat of caviar is painted around the sides and dry, we can add a final coat of Dixie Belle’s sealer in Flat on the canvas.
Just so you know, I did not seal the paint on my Prayer Wall.
Dixie Belle’s Chalk Mineral Paint has sealer in it and will cure in 30 days!
I now have my prayer canvas hanging on my prayer wall with two nails surrounded by my favorite wood flowers I found at Hobby Lobby!
Using 3M Command Strips, I hung my wood flowers around the Prayer Canvas.
There will be more flowers added in the future as I collect them!
Let me know what you think, and I hope I inspired you to get creative and plan an accent wall or even a prayer wall for your own home!
Speaking of accent walls, did you see my faux shiplap accent wall I did this Spring?
-
 1:57
1:57
MPDtribe
4 years ago $0.01 earnedMy Dollar Tree Garden Stakes
94 -
 1:04:45
MPDtribe
4 years agoMy Prayer Wall & Canvas are Finally Done!
24 -
 22:07
22:07
sillyboy
4 years agoNehemiah’s Prayer
68 -
 2:30
2:30
Grateful Heart Ministry
4 years agoMorning Prayer
169 -
 4:43
4:43
LynnGriesemer
4 years agoMarriage Prayer
38 -
 0:05
0:05
DanielSnider
4 years agoNeed Prayer?
37 -
 6:04
6:04
PrayingPrincess
4 years agoPrayer Against Lying
63 -
 0:53
0:53
annieo69
4 years agoDaily prayer
118 -
![Mr & Mrs X - [DS] Trafficking Empire – The Pedo Network Island, The Cover-Up: Part 2 - Ep 6](https://1a-1791.com/video/fww1/f8/s8/1/y/p/x/f/ypxfz.0kob-small-Mr-and-Mrs-X-DS-Trafficking.jpg) 59:56
59:56
X22 Report
18 hours agoMr & Mrs X - [DS] Trafficking Empire – The Pedo Network Island, The Cover-Up: Part 2 - Ep 6
77.4K23 -
 1:03:07
Candace Show Podcast
1 day agoI’M BACK! And STILL Asking Questions (Sorry Brigitte). | Candace Ep 233
103K207