How I Created this Unique Guest Book
PREPPING THE “GUEST BOOK”
Once I brought home the Galvanized Metal Letter from Hobby Lobby, I cleaned all the surfaces.
I keep a bottle of White Lighting and water mixed up in a spray bottle for small projects.
For a small spray bottle I put in about 1/2 tablespoon of white lighting and then fill the bottle with water and mix well.
I’ll either spray the project or my cleaning rag, wipe down really well and then use another clean damp rag to wipe off any of the residue left behind.
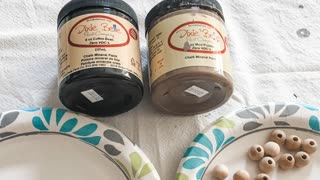
Once the surface is dry, I grab my craft brush and start painting the surface with Slick Stick.
I use Dixie Belle’s slick stick on any surface that is non-porous or I’m concerned paint may have trouble adhering too.
Once the first coat is on and completely dry, I’ll add a second coat and let it dry then I usually wait a day before moving on to painting!
PAINTING THE “GUEST BOOK”
This project is going to be a guest book for a young mans’ graduation party and mom wanted this one done in black and she wanted a soccer ball added.
Since I decided to add the soccer ball in the PVPP method, I painted the metal letter in white or Dixie Belle’s cotton first.
PVPP is an acronym for Paint, Vinyl, Paint, Peel
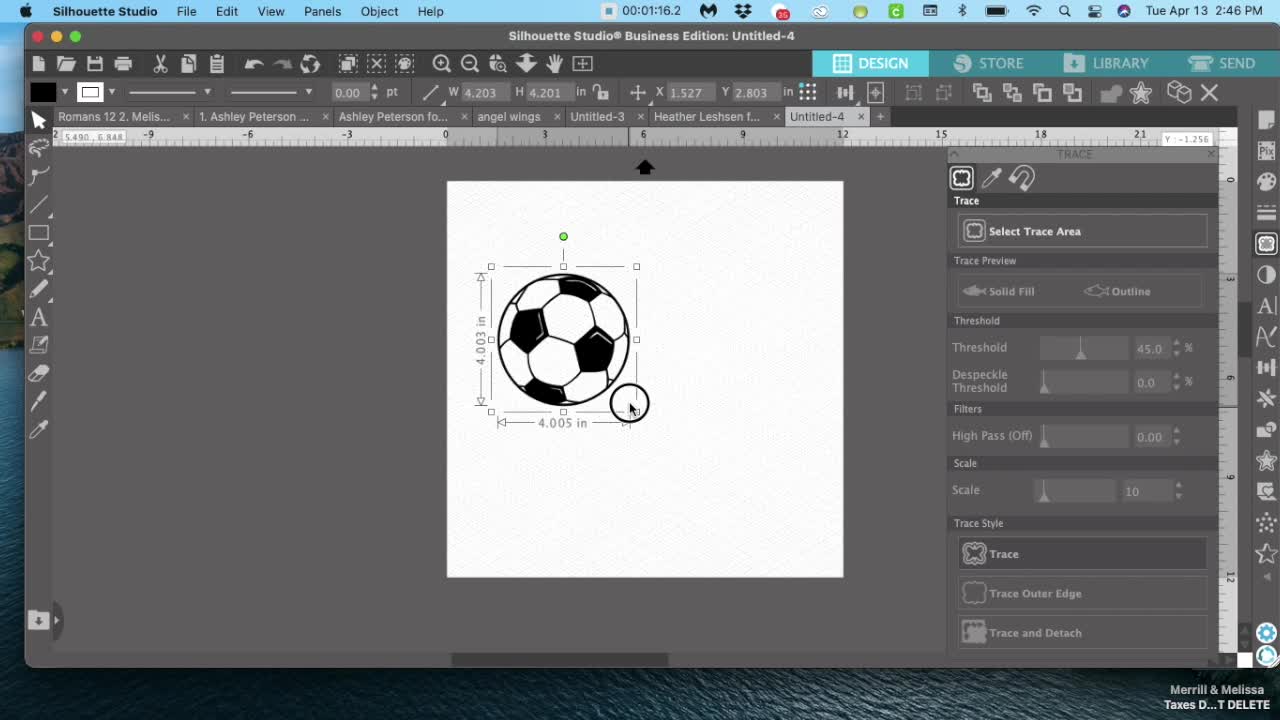
ADDING THE SOCCER BALL PER PVPP
Once the white (Cotton) coat is completely dry, I used my Silhouette Cameo to cut a 4″ soccer ball design.
I actually cut two designs side by side, just in case I messed up and weeded the wrong part of the stencil.
Next I applied the stencil to the “guest book”, making sure there were no areas of the stencil not adhered to the metal.
Then I grabbed a clean craft brush and my Caviar paint.
I carefully painted over the stencil the first coat, while this was drying I started painting the remainder of the letter in cross-hatch pattern.
Cross hatching in painting is moving your brush in a criss-cross pattern. .
When the first coat of Caviar was dry, I went back and repeated the process, so the galvanized letter had two coat of paint.
Once dry, I used my 220 grit sandblock and lightly sanded over the stencil and the letter.
Then I carefully removed the stencil and with a small detail brush I painted over any areas that bled through, sometimes that happens.
SEALING THE “GUEST BOOK”
When it comes to sealing, when I paint with white, red or black paints I usually (not always) wait one day.
This is just a personal preference, I just want to make sure the paint is good and dry and won’t smear when the sealer is being applied.
Just as with my canvases I paint in my distressed style, I also applied the sealer in a cross hatch pattern.
Why? I liked the look.
When painting on slick surfaces sometimes brush strokes are hard to avoid and for some reason this give the finish a nice muted or matte look that I wanted!
Once she is cured, she is ready to be signed by friends and family with a white permanent marker!
And that is it!
-
 1:28
1:28
MPDtribe
4 years agoHow I Personalized those Unfinished Wood Signs from Hobby Lobby
195 -
 0:57
0:57
KSHB
4 years agoNew book shows unique KC attractions
22 -
 2:25
2:25
WFTS
4 years agoBrag Book: Reconnections Education Center offers unique education in New Port Richey
2 -
 2:29
2:29
Heather7Light
4 years ago $0.02 earnedVessels created
1543 -
 1:02
1:02
jaypeacase3
4 years agoWe are unique
772 -
 2:53
2:53
WKBW
4 years agoUnique Irish Phrases
20 -
 0:07
0:07
Davidtheexplorer
4 years agoVideo I created
1981 -
 2:07:06
Side Scrollers Podcast
16 hours agoHasan Piker CAUGHT LYING AGAIN + Twitch URGES LEFTIST IDEOLOGY + More | Side Scrollers
14.3K6 -
 8:40
8:40
MattMorseTV
12 hours ago $3.58 earnedSchumer just KICKED OFF the Left-Wing CIVIL WAR.
5.75K16 -
 21:39
21:39
Nikko Ortiz
2 days agoI Take A North Korean Shooting
2.17K3