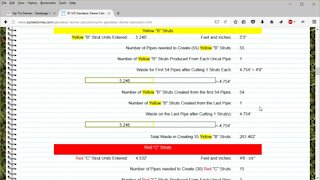
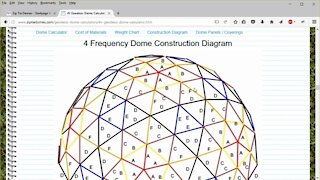
How to Use a Geodesic Dome Calculator - Part 4: Construction Diagram
3 years ago
87
https://www.ziptiedomes.com - This video is about how to view and understand the Geodesic Dome Construction Diagrams for each Geodesic Dome Calculator. It also describes the difference between the 3v 3/8 and 3v 5/8 domes.
Loading comments...
-
 12:10
12:10
ZipTieDomes
3 years agoHow to Use a Geodesic Dome Calculator – Part 2: Cost/Utilization
81 -
 12:36
12:36
ZipTieDomes
3 years agoHow to Use a Geodesic Dome Calculator - Part 5: Dome Coverings
46 -
 7:32
7:32
LiberatedAmon
1 year agoHow to Build a Geodesic Dome
73 -
 0:52
0:52
morphtrust
7 months ago2V Geodesic Dome shed with color layout
252 -
 11:41
11:41
Geodesic Dome Models
1 year agoV1 Geodesic Dome Assembly Instructions
31 -
 7:09
7:09
OP Freedom
2 years agoHEIGHT of the Dome Firmament EXPLAINED in Detail
3.66K40 -
 8:25
8:25
Trillium Domes
2 months agoDomeCraft #2 Pony Walls - Mastering Geodesic Structures with Trillium Domes
11 -
 14:55
14:55
Trillium Domes
2 months agoDomeCraft #1 Deep Frame Method - Mastering Geodesic Structures with Trillium Domes
10 -
 13:54
13:54
16mm Educational Films
5 months agoHow to Use a Combination Square: Tri Square, Center and Protractor Heads
17 -
 2:41
2:41
MathRevolution
2 years agoBase Twelve Geometry and Pi - Creating a diagram for 360 Degrees using Base Twelve Geometry
21