Easy DIY Valentine Day Decor
I absolutely love these easy DIY Valentine’s Day decor! I can not wait to share with you and hope you will be inspired to make them yourself!
First things first
First we need to gather our supplies.
Supplies were purchased from various places including Michaels, Hobby Lobby, and Walmart
All of my supplies either came from Hobby Lobby, Michaels or Walmart. Overall I think this project cost less than $6!
Frame of your choice: for my first project I used a 4×6 black frame, for my second project I used an 4×6 unfinished frame I believe came from Michaels.
Paint: I used DecoArt Black Tie and Americana Primary Red
Scrapbook paper: I bought several sheets of scrapbook paper I purchased from Hobby Lobby when it was on sale 4 for $1
Wood Heart Cutouts: I think I purchased these from Hobby Lobby in the Valentine section, I think.
Word Wood Cutout: I purchased “love” from Hobby Lobby
Fat Quarters: I used my 40% off coupon from Hobby Lobby to purchase a pack of fat bundles with Valentine designs. I also found different patterns of fat quarters I liked at Walmart.
Ribbons: your choice (optional)
Jute Rope
Mod Podge
Hot glue and glue gun
Paint brushes
LETS CRAFT OUR DIY VALENTINE’S DAY FRAME!
To get the ball rolling I decided to paint the frame and heart first, that way they could start drying!
But before I did, I removed the backing from the frame and set it aside.
My two frames I used for this project had cardboard backing only.
That is ok!
Save this and we will reuse it!
I painted my heart red, of course, and my frame in black.
I used paint I already had, DecoArts Black Tie and Americana Primary Red
TIME TO EMBELLISH THE FRAMES BACKING
That backing we saved? We will use this as a template to cut out our scrapbook paper.
Place your frame backing on the backside of the scrapbook paper and draw around the edges.
Cut this out and save your scrapbook paper for a future project!
Paint the frame backing with Mod Podge, nice thin even layer and apply the scrapbook paper directly on it!
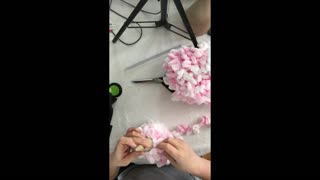
INTRODUCING MY MESSY BOW!
I think this is my most favorite part of this project!
Here I used a combination of fabric that I had ripped in approximately 1″ strips, ribbons and jute rope.
I found fat quarters at both Hobby Lobby and Walmart in patterns and colors that I liked.
I used red and pink fabric in addition to Christmas Ribbon I purchased on clearance that was a combination of burlap with buffalo plaid.
If you have fabric or ribbon on hand, consider using this for your bow.
ASSEMBLING MY MESSY BOW
I assembled all the fabric, ribbons and jute rope and cut them into approximately 5 inches in length for a small Messy Scraps Bow.
The fuller these bows are the cuter they look!
I stacked the materials on top of each other.
Cut jute rope approximately 5 inches or more.
We are going to use this jute rope to tie the bow, so use whatever length you can work with. You can always trim this and include this into the bow.
Place the jute rope perpendicular over your messy pile of fabric.
Carefully flip this bundle over and then tie everything off tight with the jute rope. I usually tie it again to keep this secure.
Trim your jute rope and fluff your new Messy Bow!
You can embellish your bow if you chose with a button or a smaller heart.
Click here to see more information on how to assemble my Messy Bows in small and larger sizes!
TIME TO ASSEMBLE OUR DIY VALENTINE’S DAY DECOR
Now it’s time to put everything together!
Carefully replace the backing into the frame.
Then use hot glue and glue the heart onto the backing of the frame.
I like my heart tilted, you can do yours straight up and down, it’s your choice.
My “love” word wood cutout, I left unpainted on purpose.
I added drops of glue to the backside at the bottom of the word.
I then placed the word cutout towards the bottom of the frame.
Be careful your cutout does not overlap the bottom of the frame.
If you plan to use your decor on a table top, this will prevent your frame from standing upright.
My love cutout overlapped the sides a little and that is ok!
Now to decide where you want to apply your Messy Bow?
I kept mine to a corner, and of course I had to tilt this a little too!
That’s how I roll.
And that is it!
I have a short 20 minute video tutorial so you can see how I completed this project!
I hope you enjoy it.
-
 1:57
1:57
MPDtribe
4 years ago $0.01 earnedMy Dollar Tree Garden Stakes
94 -
 4:33
4:33
Let's Wing It
4 years ago $0.01 earnedEASY DIY Christmas gift | Holiday decor | Pottery Barn wooden candles | Farmhouse
1842 -
 5:29
5:29
BrickHouseVintage
4 years agoTrash to Treasure Thrifted Turkey -- Easy Fall DIY Decor
1091 -
 3:44
3:44
Simon Timothy
4 years agoVanessa Valentine
2011 -
 0:19
0:19
JuanChristian
4 years ago $0.01 earnedChristmas Decor
1243 -
 0:07
0:07
ijeannie
4 years agoAutumn Decor
32 -
 16:04
16:04
MPDtribe
4 years ago $0.22 earnedHow I Made my Valentine Trees
3951 -
 2:41
2:41
Kimber ~ Kreate With Me
4 years agoHoliday Floral ~ DIY Home Decor ~ Crafts
1073 -
 LIVE
LIVE
XxXAztecwarrior
1 hour agoSearching for more Reds!!
37 watching -
 LIVE
LIVE
TheItalianCEO
2 hours agoWhat about an Italian for breakfast?
69 watching