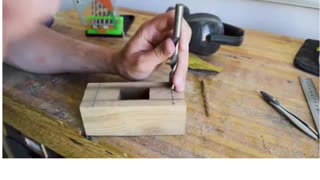
DIY Wooden Soap Dish!
This is a great gift idea for birthdays or holidays. This project didn't take much time at all to build and can be done with scrap hardwood pieces.
These are the tools that you need:
Table Saw
Air Compressor
Pin Nailer
Glue
Framing Square
Teak Oil
Titebond III Glue
If you have a chop saw that can make things a little easier when you cut the wood strips to length, but you can cut them on your table saw with a miter gauge.
Step 1: Decide how big you want your soap dish to be. The one I did in this video is 3" wide by 5.5" long
Step 2: Determine the thickness of your scrap. Mine was 3/4". You want to cut the material into strips that you will then cut again in half. The table saw blade has a kerf (the amount of wood that disappears in a cut) of 1/8". So, knowing that I had 3/4" subtracting 1/8" meant that I had 5/8" of material to divide into two pieces of 5/16" each. So, I set the table saw blade to 5/16" and cut the wood into strips.
Step 3: Cut the strips you must made into half again
Step 4: Sand the rough edges of the material
Step 5: Square up one end of each stick of material
Step 6: Cut four pieces to 3" long and five pieces to 5.5" long
Step 7: Layout the four short pieces evenly over the space of 5.5"
Step 8: Glue and nail the 5.5" pieces onto the four short pieces. Use two pin nails at each connection so the pieces don't rotate while the glue sets
Step 9: Wipe off any excess glue as you go
Step 10: I didn't show this in the video, but rinse the tray in water quickly and then allow to dry. This raises the grain of the wood (it gives it that fuzzy feel). Once you have let it dry, lightly sand the tray to get rid of the raised grains. This will make it so that when the tray is wet it won't feel fuzzy.
Step 11: Oil the project with teak oil and let dry
Step 12: Sit back and enjoy a cold soda pop and pat yourself on the back. You are awesome!
-
 17:51
17:51
Our Humble Abode
1 year agoHomemade Dishwasher Detergent
53 -
 15:54
15:54
Homemade Business Ideas
2 years agoHow To Make Wooden Old Lamp
91 -
 24:07
24:07
TheDoItYourselfWorld
9 years agoHow To Make All Natural Cold Process Soap On A Wood Stove
90 -
 11:28
11:28
TravelingCraneWoodcrafts
3 years agoDIY: Wooden Cake Knife
22 -
 16:24
16:24
DIY Creators
4 years agoHow to make A Workbench | DIY WOODWORKING
140 -
 4:51
4:51
Baniyes
1 year agoBest Soap Box 2022 || How to Make Soap Base at Home
49 -
 0:55
0:55
yourtopshelflife
2 years agoHow To Make Wooden Hammer 😎 Wood Meat Tenderizer 😎 #woodworking #SideHustle #shorts
156 -
 1:08
1:08
3DParts4U | 3D Printing For Everyone
8 months ago🧼 3D Printed Soap Dish - 3D Printed Bathroom Accessories - Soap Dish 3D Print
68 -
 4:37
4:37
Ellen Ruth Soap
3 years agoHow to Make Easy DIY REBATCH ♻️ Soap using Old scraps, shavings & bits ♻️ | Ellen Ruth Soap
3 -
 3:44
3:44
Katie On The Spot
1 year agoDIY spot cleaning with dish soap (DON'T DO THIS!)
13