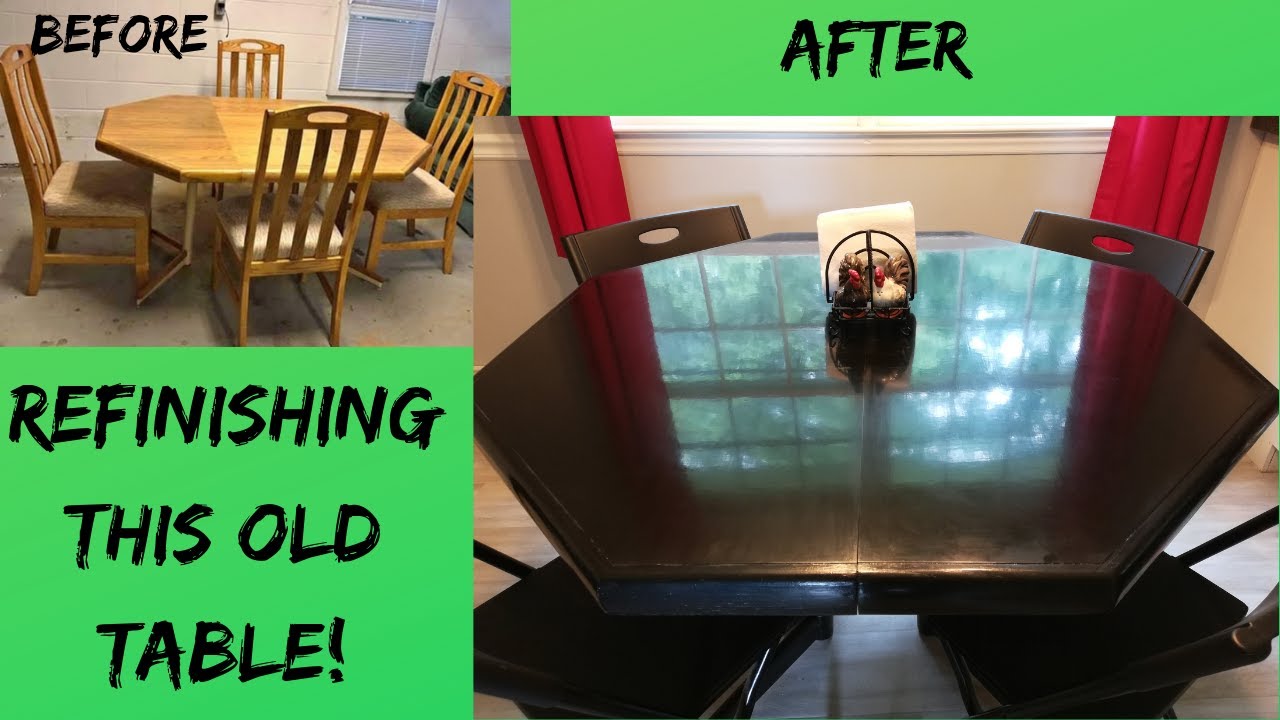
How to apply a water based finish Minwax Polycrylic (Refinishing wood table top & painting black)
Thank you for watching.
4f Pumice Powder
https://amzn.to/2IpPDFU
Minwax Polycrylic
https://amzn.to/2LiKnVP
Wet/dry sandpaper
https://amzn.to/3lVLZBv
Trade Stocks on Webull! Download and get a free stock. No deposit Necessary! https://act.webull.com/i/oUnoZGqanArF/a2r/
I purchased this old wood table on craigslist (pictured in thumbnail). I Liked the chairs more than the table, but decided to refinish the table first as it would be an immediate upgrade to our plastic folding table we were using in the dining room. I will refinish and reupholster the chairs in a future video.
I started off by disassembling the table and sanding the sides of the table. It had a lot of grim over the years that I needed to get off. Just strait sanding worked best for me. I started with 120 grit sandpaper on my orbital sander and also used a utility knife. The knife worked great for getting the majority of the and grim off. I used the sandpaper to take off the stain. I tried using other techniques, but sanding produced the best results. I did get a few disks of sand paper “clogged” with stain. I just tired to clean it off or just replace it when it got too much to deal with. I finished by sanding the sides and the laminate top with the 320 grit and wiped off the sawdust with a wet cloth.
I made sure to get all the dust and debris off the table before paining the table top black. There was a little bit left that had accumulated from sanding and being stored overnight before painting the next day. This is an important step to ensuring a clean and smooth painted surface. I decided to use a can of black spray paint instead of using a paint brush or foam brush. It is a little faster application and easier to get into small corners. I am sure using a brush will product similar results (if not better). The rust-oleum paint I used was a paint and primer all-in-one. My first pass on the wood table top was just a light misting around the top surface, the sides of the table as well as the legs and supports. As per these particular directions, I was able to apply the second coat of paint after 30 minutes from the previous application. I did this three times making sure to cover every area of the table thoroughly without getting “drips” or “Runs” in the finish. The next day, I lightly sanded the freshly painted surface to get any imperfections out of the paint that had landed there through the course of applications. I was painting outside for this project which caused some small insects to check out the table up close. After the light sanding, I carefully cleaned the surface in order to prepare for the finishing.
I decided to use Minwax polycrylic wood finish instead of polyurethane, I cleaned the table from any foreign contaminates. When opening the can, I did not shake it because this will create air bubbles and transfer directly onto your surface. Instead, I used a painting stir stick. I swirled it around in the can slowly and smoothly. then poured contents from the can to another cup or disposable container to use. This helped keep the contents of the can pure and free of any debris. I did this so when I made a few strokes on the table and reloaded the brush, I did not loose any debris in the can and contaminate the can. I first tried using a foam brush as they are much cheaper than a brush. This went on decently. I put on a thick first coat. I noticed a lot of air bubbles despite being careful not to create them. Per the directions, the second coat could only be applied after 2 hours of curing. After the two hours had passed, I lightly sanded with 320 grit sandpaper to help remove some of the high spots and air bubbles. I was careful only to remove only the tops of the bubbles and not grind down into the paint. Then I cleaned the surface very well to remove the dried-up white powder left from the sanding of the polycrylic. I decided to use a bristled brush to see if the air bubbles would be eliminated or at least significantly decreased. I may have been using an improper brush, but I did not notice a difference between the foam brush and the bristle brush. After application of the second coat, I waited until the next day to lightly sand off the air bubbles with 320 grit sand paper and add another coat. I did a total of 3 thick coats of the polycrylic finish.
After I applied the water based finish I used 1000, 2000, and 2500 grit for wet sanding and then shined it up with the pumice stone. Go with the grain and take your time. This last step is the most important to make polycylic smooth and slick. That is how to refinish a table. Painting a wood table black and have Polycrylic over painted wood furniture.
The music in this video:
Bay Breeze by FortyThr33 https://soundcloud.com/fortythr33-43
Creative Commons — Attribution 3.0 Unported— CC BY 3.0
http://creativecommons.org/licenses/b...
Music promoted by Audio Library https://youtu.be/XER8Zg0ExKU
#Polycrylic #refinishfurniture #DIY
-
 24:01
24:01
MPDtribe
3 years ago $0.01 earnedHow to make a Wood Table Runner
205 -
 29:09
29:09
ArtASMR
3 years ago $0.02 earnedASMR Waterfall Painting with Water and Bird Sound
78 -
 0:17
0:17
dpjackson
3 years agoFinish applied to wood board
40 -
 0:22
0:22
ENORM ART BY Monder Talmoudi
4 years agoDesign 3D Arabic table wood
128 -
 4:47
4:47
Bright Space
3 years agoDIY Wood Table with Simple Connection Details
59 -
 4:05
4:05
Navilee Art
3 years ago(18) Easy Flip Cup on a TV Tray Table -Acrylic Pouring
26 -
 1:00
1:00
OpsManJoe
3 years agoTop water action
32 -
 1:15
1:15
Pour Your Soul Out
3 years agoHandmade Wall Art/Spirit Board & Planchet Acrylic Painting Epoxy Resin Finish
74 -
 2:05
2:05
dansworkshop
3 years ago $0.03 earnedWood fired domestic hot water heater
106 -
 4:34
4:34
UnicornSPiT
4 years agoBeach Theme Faux Painting on Wood
112