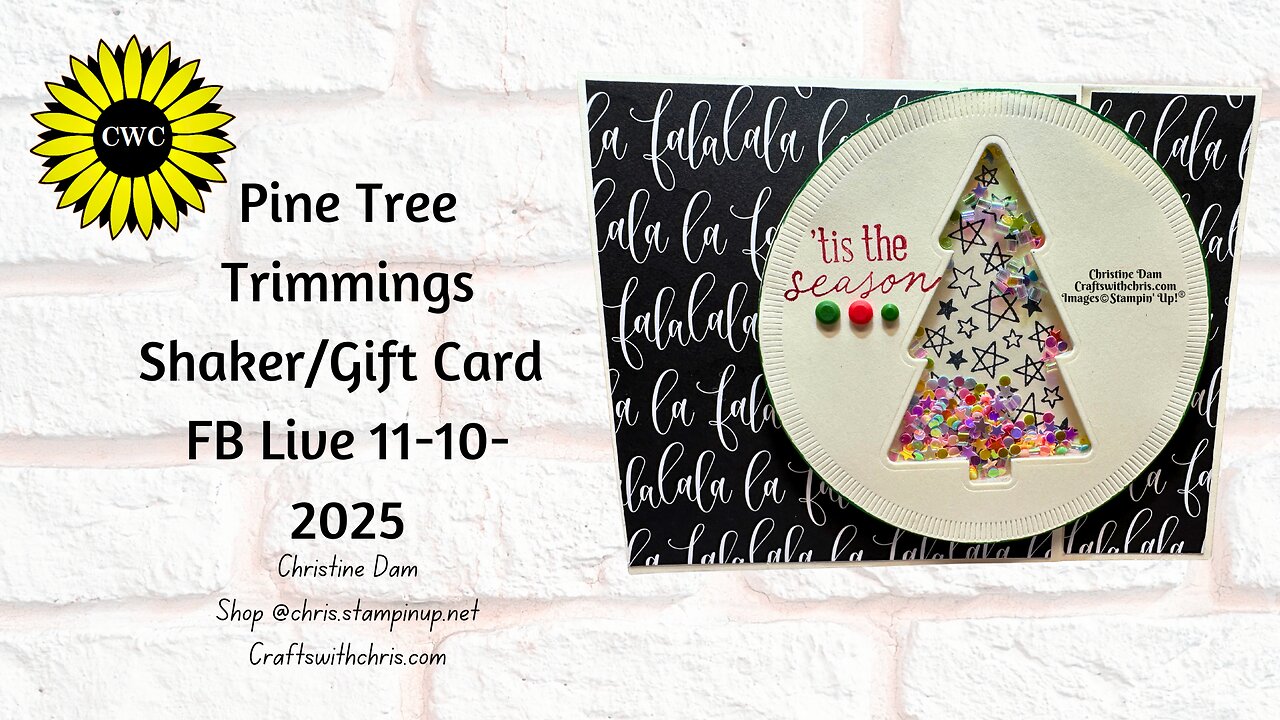
How to Make a Shaker Gift Card Holder Using Pine Tree Trimmings Bundle by Stampin' Up!
How to Make a Shaker Gift Card Holder Card
This tutorial guides you through creating a festive shaker card that doubles as a gift card holder. It's perfect for the holidays!
Materials Needed:
Card base (white or colored cardstock): Cut to 5½" x 8½" and folded in half at 4¼" to create a 4¼" x 5½" card.
Designer Series Paper (DSP): Two pieces cut to 1⅜" x 4⅛" and 3⅞" x 4⅛".
Dies: Spotlight on Nature (largest circle with fancy line edge) and Pine Tree Trimmings (tree shape).
Cut & Emboss machine.
Stamps: "Tis the Season" sentiment and stars.
Inks: Cherry Cobbler (for sentiment) and Memento Black (for stars).
Adhesives: Glue (thin layer for pocket), liquid glue (for assembly), and foam strips (for shaker element).
Window sheet (clear acetate): Cut to fit inside the circle.
Shaker bits (e.g., sequins, glitter, or small beads).
Gift card (to insert into the pocket).
Step-by-Step Instructions:
Prepare the Card Base:
Start with your card base folded to 4¼" x 5½".
On the front panel (landscape orientation), cut a 1½" wide strip from the right edge, stopping at the fold line. This creates two flaps on the front: a narrow flap (1½" x 4¼") and a wider flap (4" x 4¼").
Add Designer Paper:
Cut two pieces of DSP: one 1⅜" x 4⅛" (for the narrow flap) and one 3⅞" x 4⅛" (for the wider flap).
Glue each piece to the corresponding flap on the front of the card.
Create the Gift Card Pocket:
Take the 1½" strip you cut earlier.
Apply a thin layer of glue along the bottom top, and the outside edge.
Adhere it to the inside of the narrow flap to form a pocket. This is where the gift card will go.
Die-Cut the Circles and Tree:
Using your Cut & Emboss machine and the largest circle die from Spotlight on Nature (the one with the fancy line edge), cut two circles from cardstock.
On one circle, center and die-cut a tree shape using the Pine Tree Trimmings die. This will be the top layer.
Stamp the Elements:
On the second (uncut) circle, stamp stars using Memento Black ink.
On the top circle (with the tree cutout), stamp "Tis the Season" using Cherry Cobbler ink.
Assemble the Shaker Element:
Flip the top circle (tree cutout) over to the back side.
Apply foam strips all around the tree opening to enclose it, creating a separate compartment for shaker bits.
Add remaining foam strips around the outer edges of the back side of the circle.
Cut a piece of window sheet slightly smaller than the circle so it doesn't show outside the edges.
Adhere the window sheet over the foam strips covering the tree cutout to form a clear window.
Partially align the stamped stars circle (bottom layer) onto the foam strips (about halfway).
Add your shaker bits into the enclosed tree area.
Finish adhering the bottom circle fully onto the foam strips to seal the shaker.
Attach the Shaker to the Card:
Apply liquid glue to the ½ to ¾ of the back of the assembled shaker circle.
Adhere it to the front of the card, but only glue it to the wider flap (the one that opens). Avoid gluing to the narrow flap to allow the pocket to function.
Your card is now complete! You have a fun shaker gift card holder ready for the holidays. Insert a gift card into the pocket and enjoy sharing it.
Product List
Pine Tree Trimmings Bundle (English) [166047] $33.25
Spotlight On Nature Dies [163580] $35.00
Tuxedo Black Memento Ink Pad [132708] $8.00
Cherry Cobbler Classic Stampin' Pad [147083] $9.00
Modern Christmas 12" X 12" (30.5 X 30.5 Cm) Specialty Designer Series Paper [165990] $16.50
Window Sheets [142314] $5.00
Dear Dots [165848] $8.50
Loose Shaker Elements [165268] $7.50
Foam Adhesive Strips [141825] $8.25
Multipurpose Liquid Glue [110755] $6.00
Stampin' Seal [152813] $8.00
Take Your Pick [144107] $12.00
Stampin' Cut & Emboss Machine [149653] $140.00
Paper Trimmer [152392] $28.00
Simply Shammy [147042] $9.00
You are free to use my designs for PERSONAL USE ONLY.
Shop my store @Christine Dam, Independent Stampin' Up! Demonstrator
Visit my website @Crafts With Chris
Become a Demonstrator @Become a Demonstrator
Contact me @[email protected]
Sign up for my newsletter @Newsletter
Subscribe to Paper Pumpkin @Paper Pumpkin
Join My Team @Join My Team
Facebook page @Craftswithchris FB
VIP Facebook page@Craftswithchris VIP FB
Last Chance Products @Last Chance Products
-
 15:52
15:52
Crafts with Chris
9 months agoMy FAVORITE Seagull Card Design! (Stampin' Up! SAB)
14 -
 10:00
10:00
TheMightyMcClures
22 days ago $1.31 earnedWe Fed 500 Families!
12.3K4 -
 6:23
6:23
The Shannon Joy Show
14 hours agoWas Covid a MILITARY OPERATION?
11.9K7 -
 LIVE
LIVE
The Bubba Army
23 hours agoTRUMP SIGNS EPSTEIN BILL! - Bubba the Love Sponge® Show | 11/20/25
1,502 watching -
 27:24
27:24
DeVory Darkins
22 hours agoTrump secures RECORD BREAKING INVESTMENT as Charlotte Schools issue SHOCKING Update
38.5K48 -
 34:15
34:15
ZeeeMedia
17 hours agoPolice Demand Government Critic Hands Over His BLOOD | Daily Pulse Ep 147
68.8K36 -
 1:47:50
Side Scrollers Podcast
17 hours agoSide Scrollers Presents: OVERCOCKED
38.4K12 -
 3:33:22
HLL8LLY
5 hours ago $1.47 earnedBattlefield 6 Live Gameplay
11.8K2 -
 34:04
34:04
Code Blue Cam
20 hours agoTeen Plays Real-Life GTA… Ends Horrifically
29.3K11 -
 13:33
13:33
MattMorseTV
18 hours ago $36.63 earnedThey actually TOOK THE BAIT…
88.8K71