Shelly Cashman Excel 2019 | Module 7: End of Module Project 2 | Brand Deluxe (Full answer 2025)
Brand Deluxe
IMPORT DATA AND WORK WITH SMARTART AND IMAGES
GETTING STARTED
• Open the file SC_EX19_EOM7-2_FirstLastName_1.xlsx, available for download from the SAM website.
• Save the file as SC_EX19_EOM7-2_FirstLastName_2.xlsx by changing the “1” to a “2”.
o If you do not see the .xlsx file extension in the Save As dialog box, do not type it. The program will add the file extension for you automatically.
• To complete this SAM Project, you will also need to download and save the following data files from the SAM website onto your computer:
o Support_EX19_EOM7-2_Department.html
o Support_EX19_EOM7-2_Group.jpg
• With the file SC_EX19_EOM7-2_FirstLastName_2.xlsx still open, ensure that your first and last name is displayed in cell B6 of the Documentation sheet.
o If cell B6 does not display your name, delete the file and download a new copy from the SAM website.
PROJECT STEPS
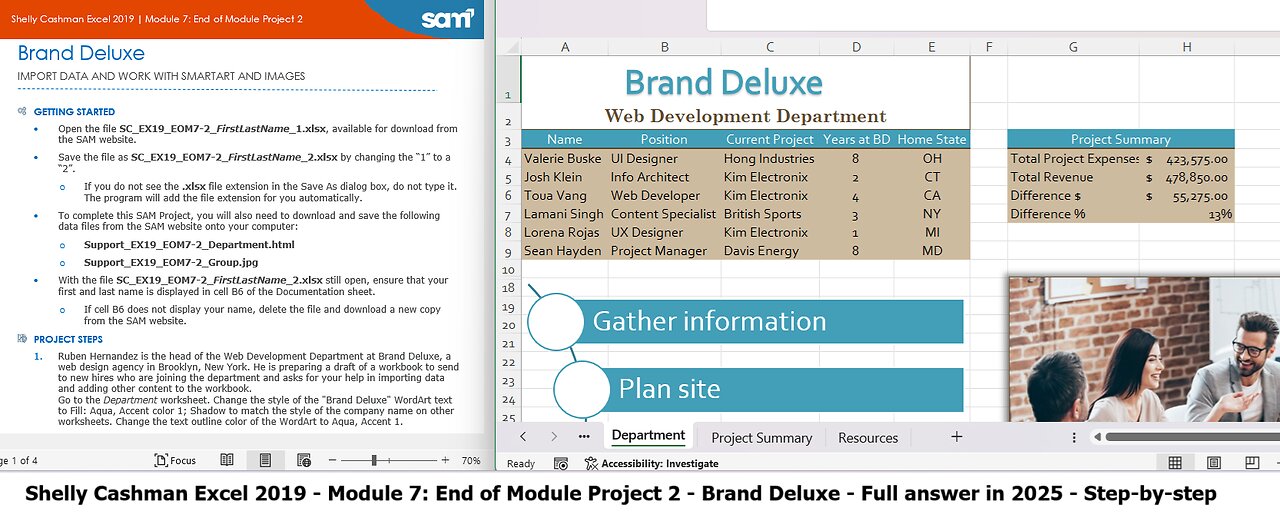
1. Ruben Hernandez is the head of the Web Development Department at Brand Deluxe, a web design agency in Brooklyn, New York. He is preparing a draft of a workbook to send to new hires who are joining the department and asks for your help in importing data and adding other content to the workbook.
Go to the Department worksheet. Change the style of the "Brand Deluxe" WordArt text to Fill: Aqua, Accent color 1; Shadow to match the style of the company name on other worksheets. Change the text outline color of the WordArt to Aqua, Accent 1.
2. Copy the formatting from cell E3 to cell D3 to use consistent formatting for the column headings.
3. The worksheet should list information about the department members, which is contained in a webpage. Get data from the Support_EX19_EOM7-2_Department.html webpage. (Hint: Use Windows Explorer to navigate to the Support_EX19_EOM7-2_Department.html webpage, click in the Address bar, and then copy the path. In the From Web dialog box, paste the path in the URL box.) Import only the Web Development Department Members webpage data as a table to cell G11 in the existing worksheet. [Mac hint - Import the file from HTML, copy the data starting in row 2 and paste it to cell G11 in the Department worksheet. Format the imported data as a table with headers and apply the Brown, Table Style Medium 7 table style.]
4. In the imported table, delete the table row for Brett Warrick because he has moved to a different department. Find the text "David Energy" and replace it with Davis Energy to use the correct company name.
5. Ruben wants to list the department information in the range A4:E9. The webpage table separated the first and last names, but Ruben wants to list the full name on the Department worksheet. In cell A4, enter a formula using the CONCAT function that displays the first name shown in cell G12 followed by a space (" ") and then the last name shown in cell H12. Fill the range A5:A9 with the formula in cell A4 to list the full names of the remaining department members.
6. Begin to incorporate the imported data in the range B4:E9 by copying the Position data from the range I12:I17 and paste only the values in the range B4:B9.
7. In cell C4, enter a formula using the PROPER function to capitalize the first letter in each word in the Current Project text in cell J12. Fill the range C5:C9 with the formula in cell C4 to list the names of the remaining projects.
8. In cell D4, enter a formula using the LEFT function to insert the first 2 characters on the left of cell K12. Copy the formula in cell D4 to the range D5:D9.
9. In cell E4, enter a formula using the RIGHT function to insert the last 2 characters on the right of cell L12. Copy the formula in cell E4 to the range E5:E9.
10. Resize columns A:E to their best fit, resize column G to 18.25, and resize column H to 13.00. Hide rows 11 to 17 so that the worksheet does not display duplicated data.
11. Ruben already imported project summary data on the Project Summary worksheet but wants to display the data in the range G4:H7 of the Department worksheet.
Go to the Project Summary worksheet. Copy the data in the range A1:D2, and then transpose the rows and columns as you paste the data on the Department worksheet starting in cell G4.
12. In the Department worksheet, insert and format a picture of Web Development Department members by inserting the picture Support_EX19_EOM7-2_Group.jpg. Position the picture so that the upper-left corner is in cell G18 and the lower-right corner is in cell J33.
13. Add a border to the picture using Brown, Accent 6 as the border color to coordinate with other borders on the worksheet. Apply the Offset: Center picture effect from the Outer section of the Shadow gallery.
14. Ruben also wants to provide a diagram of the major planning steps the department takes for any web development project. Insert the Vertical Curved List SmartArt from the List section of the SmartArt gallery. Move and resize the SmartArt so that the upper-left corner is in cell A18 and the lower-right corner is in cell E33.
15. Enter Gather information in the top shape. Enter Plan site in the second shape and then add a shape after so that it appears below the "Plan Site" shape. Enter Design webpages in the new shape. Enter Write content in the bottom shape.
16. Go to the Resources worksheet, which Ruben asks you to finish. In cell D12, use the Quick Analysis tools to insert the total number of resources from the range D4:D11. (Hint: Ignore the errors if any appear.) [Mac hint - Use the AutoSum button.]
17. Ruben also wants to format the column chart in the range G3:L14 to make it easier to understand. Switch the rows and columns so that the chart compares total and estimated resources.
Your workbook should look like the Final Figures on the following pages. Save your changes, close the workbook, and then exit Excel. Follow the directions on the SAM website to submit your completed project.
Final Figure 1: Department Worksheet
© g-stockstudio/Shutterstock.com
Final Figure 2: Project Summary Worksheet
Final Figure 3: Resources Worksheet
#MicrosoftWord
#MicrosoftOffice
#Microsoft
#ShellyCashman
#ShellyCashmanWord
#SAMProject
#MicrosoftExcel
-
 LIVE
LIVE
The Quartering
2 hours agoEpstein Victims To NAME People, Mutiny Over RFK Jr, Trump Turns On Warp Speed?
9,047 watching -
 LIVE
LIVE
Dr Disrespect
4 hours ago🔴LIVE - DR DISRESPECT - METAL EDEN - NEW 2025 SCI-FI FPS LAUNCH STREAM
1,528 watching -
 LIVE
LIVE
StoneMountain64
2 hours agoBattlefield's Easter Egg Phantom Project is STILL ALIVE
156 watching -
 LIVE
LIVE
Jeff Ahern
1 hour agoNever Woke Wednesday with Jeff Ahern
152 watching -
 13:43
13:43
The Kevin Trudeau Show Limitless
5 hours agoClassified File 3 | Kevin Trudeau EXPOSES Secret Society Brainwave Training
11.2K4 -
 LIVE
LIVE
SportsPicks
3 hours agoCrick's Corner: Episode 75
46 watching -
 1:06:30
LindellTV
1 hour agoMIKE LINDELL LIVE AT THE WHITE HOUSE
10.8K -
 1:05:33
Russell Brand
4 hours agoTrump Goes NUCLEAR on China - accuses Xi of CONSPIRING against US with Putin & Kim - SF627
111K41 -
 1:14:47
Sean Unpaved
3 hours agoTrey Wingo's Gridiron Grab
17.2K1 -
 13:07
13:07
Silver Dragons
21 hours agoBullion Dealer Reacts to SILVER PRICE SURGING!
8.84K5