USING MICROSOFT EXCEL 2016 - Guided Project 7-3 - Placer Hills Real Estate (Update 2025)
USING MICROSOFT EXCEL 2016
Guided Project 7-3 (Mac 2016)
Guided Project 7-3 (Mac 2016 Version)
Agents for Placer Hills Real Estate (PHRE) have built a worksheet to help clients compare monthly payments. You clear and
reset data validation and insert a spin box form control for the agent’s ID. This project has been modified for use in SIMnet.
Skills Covered in This Project
• Find and clear data validation settings.
• Set data validation with an error alert.
• Insert a spin box form control.
• Set properties for spin button control
• Protect a worksheet.
• Add and remove the Developer tab.
Step 1:
Download
start file
1. Open the PlacerHills-07 start file. Click the Enable Editing button.
2. The file will be renamed automatically to include your name. Change the project file name if
directed to do so by your instructor, and save it.
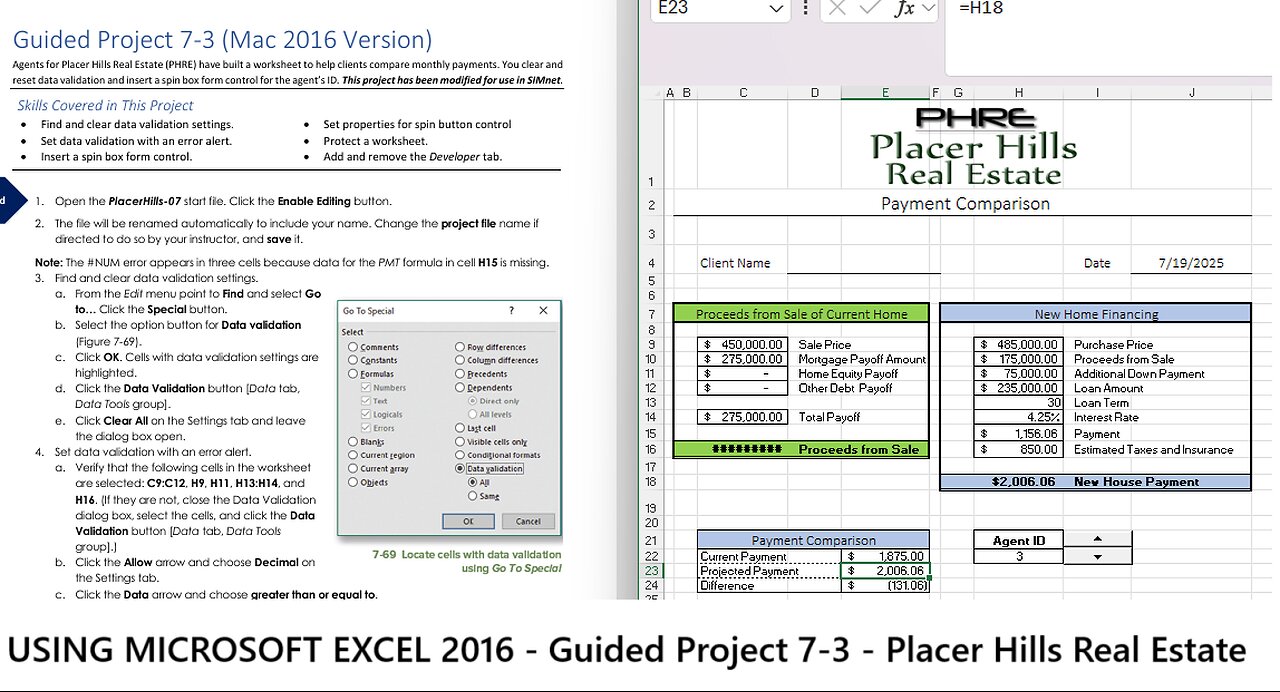
Note: The #NUM error appears in three cells because data for the PMT formula in cell H15 is missing.
3. Find and clear data validation settings.
a. From the Edit menu point to Find and select Go
to… Click the Special button.
b. Select the option button for Data validation
(Figure 7-69).
c. Click OK. Cells with data validation settings are
highlighted.
d. Click the Data Validation button [Data tab,
Data Tools group].
e. Click Clear All on the Settings tab and leave
the dialog box open.
4. Set data validation with an error alert.
a. Verify that the following cells in the worksheet
are selected: C9:C12, H9, H11, H13:H14, and
H16. (If they are not, close the Data Validation
dialog box, select the cells, and click the Data
Validation button [Data tab, Data Tools
group].)
b. Click the Allow arrow and choose Decimal on
the Settings tab.
c. Click the Data arrow and choose greater than or equal to.
d. Click the Minimum box and type 0.
e. Click the Error Alert tab and verify that the Show error alert after invalid data is entered box is
selected.
f.
Verify that Stop displays as the Style.
g. Click the Title box and type Required.
Excel 2016 Chapter 7 Working with Templates and Sharing Work
Last Updated: 3/8/18 Page 1
USING MICROSOFT EXCEL 2016
Guided Project 7-3 (Mac 2016)
h. Click the Error message box and type Please enter a positive value. (Figure 7-70).
i.
Click OK.
5. Display the Developer tab on the Ribbon if it is not shown.
a. Select the Preferences from the Excel menu. Click Ribbon & Toolbar in Authoring section.
b. Select the Developer box
in the Main Tabs group
and click Save.
6. Insert a spin button form
control.
a. Show the gridlines on the
worksheet [View tab].
b. Review the Controls buttons [Developer tab, Controls group].
c. Click the Spinner button.
d. Draw a control directly over cells I21:I22 (Figure 7-71).
e. Right-click the control and choose Format Control…
f.
Click the Minimum value box on the Control tab and type 1.
g. Set a maximum value of 8. These are agent identification numbers (1 through 8).
h. Click the Cell link box and select cell H22. The choice made by the spin button will be
placed in this cell (Figure 7-72).
Excel 2016 Chapter 7 Working with Templates and Sharing Work
Last Updated: 3/8/18 Page 2
USING MICROSOFT EXCEL 2016
i.
j.
Click OK to close the dialog.
Guided Project 7-3 (Mac 2016)
Click cell D4 to deselect the control.
7. Protect the worksheet for data entry.
a. Select cells D4:E4.
b. Press command and select cells C9:C12, H9, H11, H13:H14, H16, H22, and E22.
c. Click the Format button [Home tab, Cells group].
d. Select Lock Cell to remove the Locked property.
e. Click the Protect Sheet button [Review tab, Changes group].
f.
Allow the options to select locked and unlocked cells. Do not use a password.
g. Click OK.
8. Delete the contents of cells C9:C10, H9
and H16.
9. Select cell C9, type 450000, and press
Enter. The cells are formatted and
formulas are calculated.
10. Type 275000 in cell C10 and press Enter.
11. Select cell H9, type 485000, and press
Enter.
12. Type 75000 in cell H11.
13. Enter data in cells H13, H14, and H16 as
shown in the Figure to the right.
14. Click the spin box control arrows to
select
3 as the agent ID.
15. Select cell E22, type 1875.
16. Remove the Developer tab.
a. Select the
Preferences from
the Excel menu.
Click Ribbon &
Toolbar in
Authoring section.
b. Deselect the
Developer box in
the Main Tabs
group and click
Save.
Step 2:
Upload &
Save
Step 3:
Grade my
Project
17. Save and close the
workbook (Figure 7-73).
18. Upload and save your
project file.
19. Submit project for
grading.
Excel 2016 Chapter 7 Working with Templates and Sharing Work
Last Updated: 3/8/18 Page 3
-
 LIVE
LIVE
Akademiks
2 hours agoICEMAN EPISODE 3
14,097 watching -
 LIVE
LIVE
Inverted World Live
5 hours agoThe Robots Are Here | Ep. 103
6,624 watching -
 1:21:53
Man in America
12 hours agoInflation, Debt & War: The 2032 Crash Cycle Is Here—Nations Will FALL w/ Martin Armstrong
11.5K14 -
 DVR
DVR
Adam Does Movies
11 hours agoTalking Movies + Ask Me Anything - LIVE
3.99K -
 2:55:43
TimcastIRL
4 hours agoTrump DOJ To Ban Trans People From Owning Guns After Catholic School Shooting | Timcast IRL
149K89 -
 LIVE
LIVE
The Quartering
3 hours agoBaldur's Gate 3 First Playthrough!
679 watching -
 LIVE
LIVE
Rallied
5 hours ago $0.22 earnedWarzone Solo Challenges
393 watching -
 57:40
57:40
MattMorseTV
5 hours ago $0.21 earned🔴Trump just SHATTERED the RECORD.🔴
39.1K78 -
 43:39
43:39
WickedVirtue
2 hours agoLate Night Spooky Plays
12K -
 2:04:02
Glenn Greenwald
6 hours agoTrump and Rubio Apply Panama Regime Change Playbook to Venezuela; Michael Tracey is Kicked-Out of Epstein Press Conference; RFK Senate Hearing | SYSTEM UPDATE #508
91.9K105