PowerPoint 2019 In Practice - Ch 3 Improve It Project 3-7 - The Big Announcement (Update 2025)
Improve It Project 3-7
These instructions are compatible with both Microsoft Windows and Mac operating systems.
Delivering News That Employees May
Perceive As Bad News Is A Difficult
Task. Olivia Hudson With Solution
Seekers Has Been Working To Convert
A Formerly Text-Only Presentation To
One That Is More Visual. She Is Using
Pictures With Brief Text And Transferring
Listed Information To Notes Pages She
Will Use During Her Presentation. She
Has Asked You To Complete A Notes
Page, Convert A List To A SmartArt
Graphic, Apply Custom Theme Colors,
And Add Animation.
[Student Learning Outcomes 3.1, 3.2, 3.4, 3.8]
File Needed: Announcement-03.pptx (Available from the Start File link.)
Completed Project File Name: [First Name.Last Name]-Announcement-03.pptx
1/3
https://d2l.pima.edu/d2l/le/content/616389/viewContent/7279341/View
6/18/23, 9:18 AM PowerPoint 2019 In Practice - Ch 3 Improve It Project 3-7 - SIMnet
https://d2l.pima.edu/d2l/le/content/616389/viewContent/7279341/View 2/3
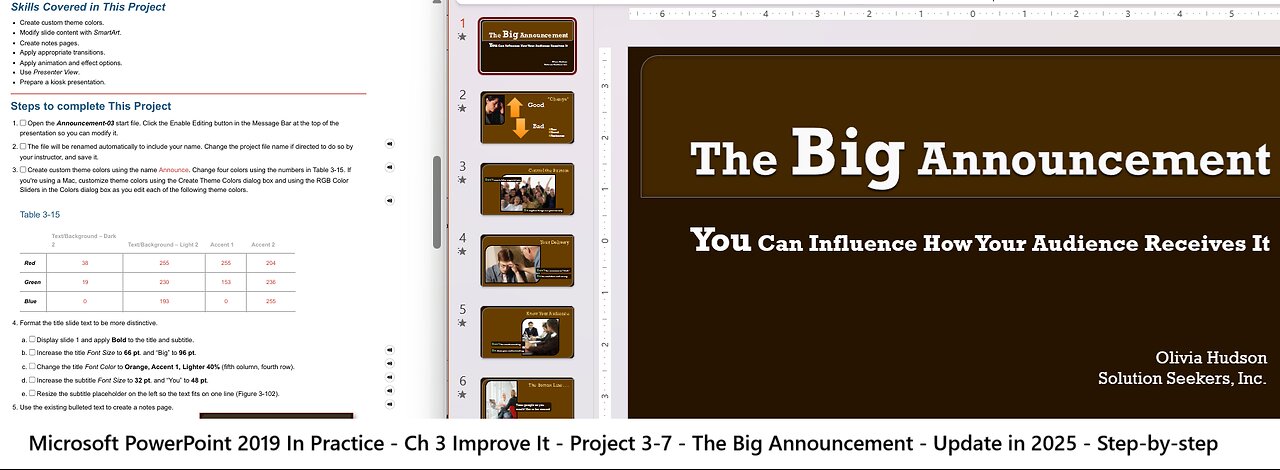
Figure 3-102 Title slide revised
Skills Covered in This Project
Create custom theme colors.
Modify slide content with SmartArt.
Create notes pages.
Apply appropriate transitions.
Apply animation and effect options.
Use Presenter View.
Prepare a kiosk presentation.
Steps to complete This Project
1. Open the Announcement-03 start file. Click the Enable Editing button in the Message Bar at the top of the
presentation so you can modify it.
2. The file will be renamed automatically to include your name. Change the project file name if directed to do so by
your instructor, and save it.
3. Create custom theme colors using the name Announce. Change four colors using the numbers in Table 3-15. If
you're using a Mac, customize theme colors using the Create Theme Colors dialog box and using the RGB Color
Sliders in the Colors dialog box as you edit each of the following theme colors.
Table 3-15
Text/Background – Dark
2 Text/Background – Light 2 Accent 1 Accent 2
Red 38 255 255 204
Green 19 230 153 236
Blue 0 193 0 255
4. Format the title slide text to be more distinctive.
a. Display slide 1 and apply Bold to the title and subtitle.
b. Increase the title Font Size to 66 pt. and “Big” to 96 pt.
c. Change the title Font Color to Orange, Accent 1, Lighter 40% (fifth column, fourth row).
d. Increase the subtitle Font Size to 32 pt. and “You” to 48 pt.
e. Resize the subtitle placeholder on the left so the text fits on one line (Figure 3-102).
5. Use the existing bulleted text to create a notes page.
a. Display slide 2. If the Notes pane is not available
below the slide in Normal view, click the Notes button
on the Status bar.
Increase the size of the Notes pane so you can
work in both panes.
b. Copy the existing bulleted text on the slide and paste
it in the Notes pane.
c. Add a blank line space after the first and second
lines.
d. Select the indented text and apply bullets (Figure 3
103).
e. Click the Notes button again to
hide the Notes pane.
6. Modify and reposition the bulleted text.
a. Display slide 2 and replace the
bulleted text with the three words:
Fear
Dread
Resistance
b. Resize the body placeholder to
fit the text and move it to the lower
right.
6/18/23, 9:18 AM
PowerPoint 2019 In Practice - Ch 3 Improve It Project 3-7 - SIMnet
7. Insert a SmartArt graphic to show that
“change” can be perceived as both
good and bad.
a.
b.
c.
d.
Insert the Opposing Arrows layout from the Relationship category.
Type the text Good and Bad.
Apply the Inset SmartArt Style.
Resize SmartArt graphic and position it as shown (Figure 3-104).
8. Animate text boxes on slides 3–5.
a.
b.
c.
9.
Display slide 3. Select the “Do” text box.
Apply the Wipe animation with the From Left effect
option.
Repeat this animation for the “Do” text boxes on
slides 4 and 5.
Apply the Gallery transition to all slides.
10.
11.
12.
Review the presentation and speaker notes using
Presenter View.
Modify the transitions by entering 00:03.00 for After
seconds and apply the change to all slides.
Set up the slide show for a kiosk presentation.
Figure 3-103 Notes pane expanded
Figure 3-104 Slide 2 revised
IMPORTANT: When you are finished with this project, your presentation should contain 6 slides. If it does not, your
project will not grade properly and you may lose a significant number of points. Check your work carefully.
13.
14.
15.
Save and close the presentation (Figure 3-105).
Figure 3-105 PowerPoint 3-7 completed
Upload and save your project file.
Submit project for grading
-
 LIVE
LIVE
SpartakusLIVE
5 hours ago#1 Challenge CHAMPION of WZ || Ridin' The GRAVY Train w/ GloryJean
296 watching -
 LIVE
LIVE
The Pascal Show
1 hour agoDISTURBING UPDATES! New Developments In The D4vd Celeste Case... Possible Celeste Sighting?!
121 watching -
 2:03:18
The Charlie Kirk Show
3 hours agoTPUSA Presents This is The Turning Point Tour LIVE with Megyn Kelly and Governor Glenn Youngkin!!
189K56 -
 LIVE
LIVE
Badlands Media
19 hours agoAltered State S3 Ep. 47
2,590 watching -
 LIVE
LIVE
putther
2 hours ago $0.52 earned⭐ Bounty Hunting on GTA⭐
66 watching -
 58:58
58:58
MattMorseTV
3 hours ago $4.39 earned🔴This NEW INFO changes EVERYTHING.🔴
19K40 -
![[MnK] Nighttime Duos w/ Spartakus 🔥 6.7 K/D](https://1a-1791.com/video/fww1/59/s8/1/C/e/8/k/Ce8kz.0kob-small-MnK-Nighttime-Duos-w-Sparta.jpg) LIVE
LIVE
GloryJean
3 hours ago[MnK] Nighttime Duos w/ Spartakus 🔥 6.7 K/D
70 watching -
 LIVE
LIVE
CharleyHornsePlays Gaming & Entertainment
3 hours ago🔴CHP GAMING | Diablo 4 Season 10 Sorcerer
29 watching -
 LIVE
LIVE
LFA TV
23 hours agoBREAKING NEWS: SHOOTER IN DALLAS! | WEDNESDAY 9/24/25
555 watching -
 5:04:07
Charlotte Winslow
5 hours ago⚔ playing Assassin's Creed Brotherhood for the First Time!
11.2K2