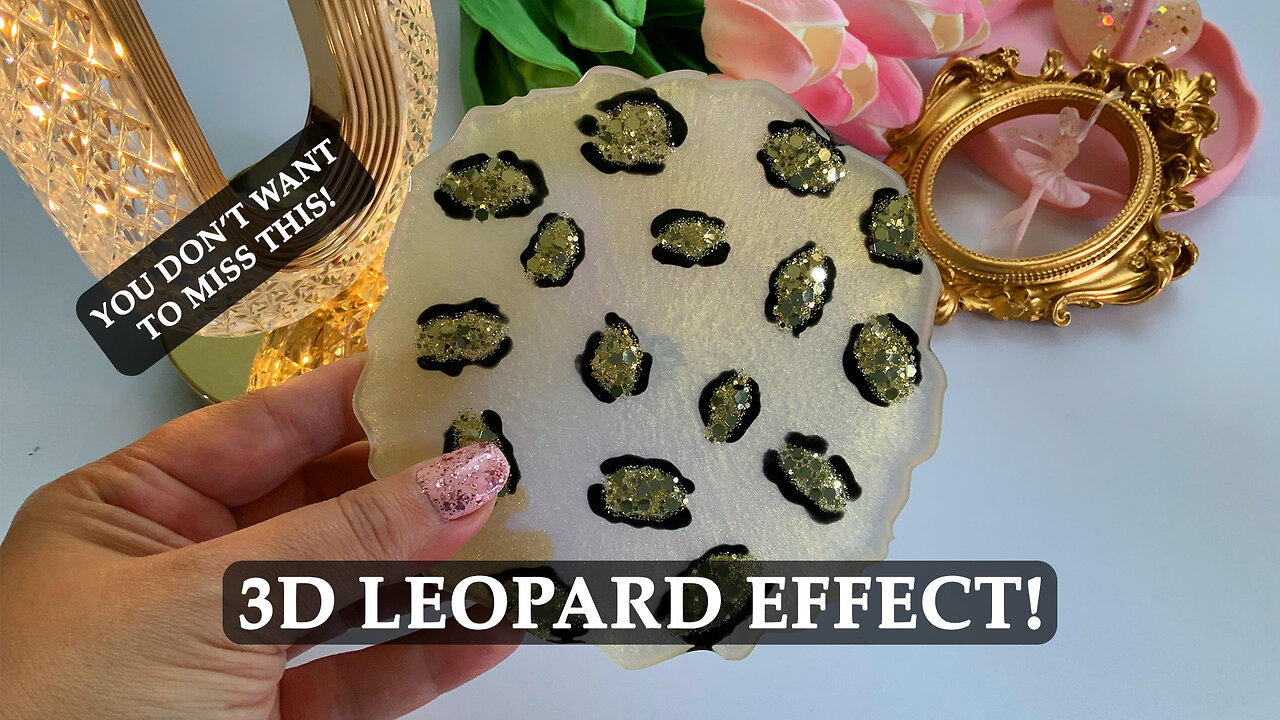
✨ 3D Leopard Coaster Tutorial
✨ Making 3D Leopard Coaster by using both UV and epoxy resin.
🎉🎉 Welcome to my rumble channel!
If you're new here, great to have you! And if you're returning,
welcome back 💖
In this video, I’m showing you how to create a 3D leopard print pattern inside epoxy resin coaster using UV nail gel and a custom glitter mix! 🐆✨
This is just one of several techniques I use for adding dimensional effects to coasters, so make sure to **subscribe** if you enjoy unique resin art tutorials!
Materials Used:
– Epoxy resin for shallow pours
– UV gel (UR SUGAR Color Coat, black)
– UV resin + gold glitter mix
– Chameleon pigment + opal pearl mica
– Silicone coaster mold
– UV lamp & alcohol spray
✨ Tips:
– Let your base layer fully cure before painting.
– You don’t need perfect drawing skills- messy spots look more natural!
– Use low-viscosity UV resin for easier glitter mixing.
💌Subscribe for more creative resin projects!
#resinart #uvgel #resincoasters #diyresin #leopardprint #crafttutorial #resintutorial #3dresin #glitter #EpoxyCoasters
📅 New Videos Every Thursday & Sunday
🔔 Subscribe & hit the bell to get notified when a new tutorial drops!
💖 Let’s Connect:
📸 Instagram – @pouring.mimosas.studio
📘 Facebook – https://www.facebook.com/PouringMimosasStudio/
🎬 TikTok - @pouringmimosas
🦋 Pinterest – https://uk.pinterest.com/pouringmimosasstudio/
📓 https://beacons.ai/pouringmimosasstudio
-----------------
💌 Want to send me products, request a custom creation, or challenge me with your idea? For collaborations or business inquiries, email me at:
📧 [email protected]
🙏 Thank you so much for watching!
If you enjoyed this video, give it a 👍 and leave a comment below.
I'd love to know what you'd like to see next!
💬 Got questions? Ask below — I’ll do my best to help!
📓CHAPTERS:
00:00 - Materials & Pigments Used
00:56 - Pouring the First Resin Layer
01:18 - Drawing the Leopard Spots
01:36 - What Products Work Best for Spots
02:47 - Filling the Base with Spots
04:50 - Mixing Custom Glitter Resin
06:10 - Filling the Spots with Glitter
07:22 - Pouring the Final Clear Resin Layer
07:46 - Finished Result & 3D Effect
07:58 - Outro & What’s Next
-
 12:31
12:31
Robbi On The Record
4 hours ago $0.23 earnedWhy Nothing Feels Real Anymore | The Science, Culture, and Spiritual War Behind the Fog
7.67K7 -
 18:42
18:42
Navy Media
4 hours agoHouthis ATTACK the Wrong U.S. Fighter Jet – Then THIS Happened…
11.1K20 -
 40:24
40:24
MetatronGaming
1 day agoSomething is REALLY Wrong with this apartment...
5.75K2 -
 LIVE
LIVE
SpartakusLIVE
4 hours agoHUGE NEW UPDATE - Aim Assist NERF, New META, New MOVEMENT || #1 King of Content
329 watching -
![battlefield 6 with the crew! [RGMT CONTENT Mgr. | RGMT GL | GZW CL]](https://1a-1791.com/video/fwe2/7f/s8/6/w/D/y/F/wDyFz.0kob.18.jpg) 2:32:26
2:32:26
XDDX_HiTower
2 hours agobattlefield 6 with the crew! [RGMT CONTENT Mgr. | RGMT GL | GZW CL]
9.21K -
 2:28:57
Nikko Ortiz
4 hours agoVirtual Reality Milsim... | Rumble LIVE
20.5K4 -
 LIVE
LIVE
StevieTLIVE
3 hours agoNEW UPDATE Warzone WINS w/ The Fellas
57 watching -
 9:00:32
Dr Disrespect
12 hours ago🔴LIVE - DR DISRESPECT - WARZONE x BLACK OPS 7 - SEASON 1 INTEGRATION
143K7 -
 1:25:00
Sam Tripoli
4 hours ago $0.02 earnedPunch Drunk Sports LIVE!
17K2 -
 55:45
55:45
MattMorseTV
3 hours ago $0.10 earned🔴Trump scores 3 VICTORIES in ONE DAY.🔴
20.7K34