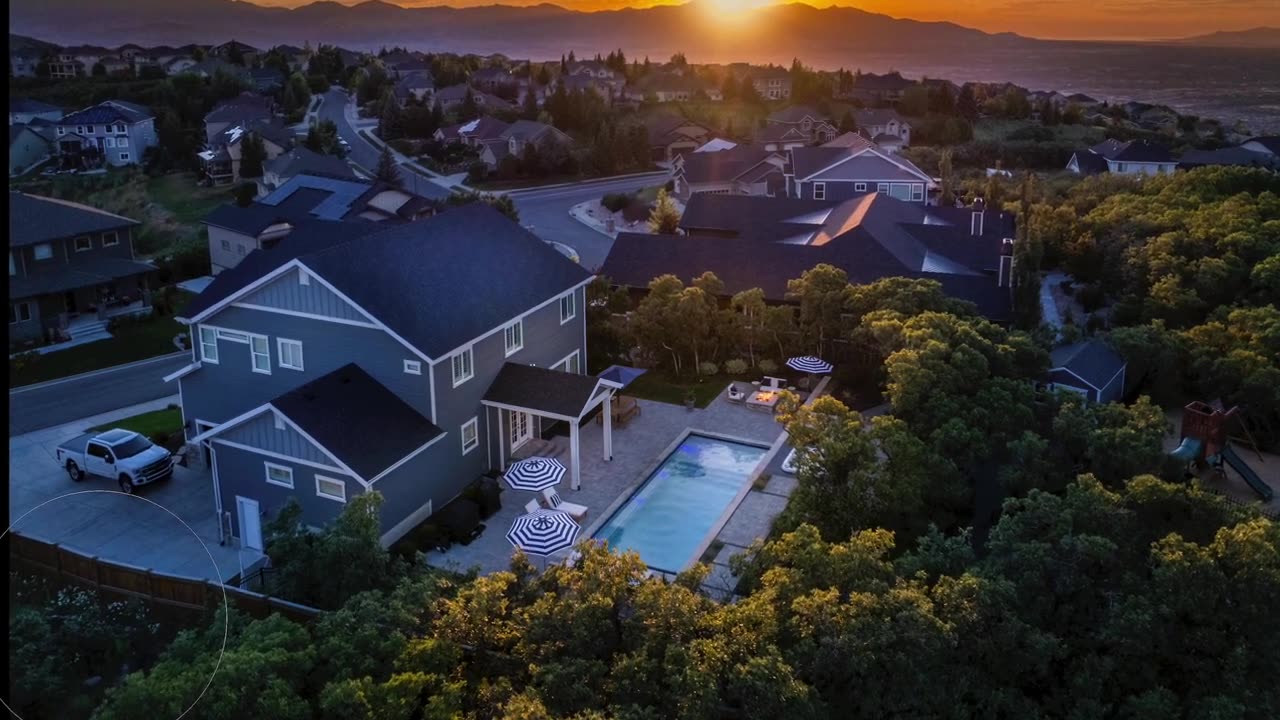
How I Made... Twilight Images | Layering for a Stunning Final Edit
Creating a perfect twilight image isn’t about capturing one perfect shot—it’s about blending multiple exposures, adjusting for highlights and shadows, and enhancing the richness of the colors. In this tutorial, I walk you through my full editing process for a commercial twilight image, showing how I handle burnt-out highlights, color balance, and distractions to create a polished final image.
What You’ll Learn:
✅ How to blend multiple exposures for depth and color richness
✅ Adjusting for burnt-out highlights & sun glare
✅ Layering techniques for natural-looking twilight edits
✅ Removing distractions & refining the composition
✅ Using Photoshop & Lightroom for a non-destructive workflow
Watch Next:
📺 Editing a Bracketed Pano for an NBA Arena: https://www.youtube.com/watch?v=HMTb7x9GY9c
📺 Mastering Backlit Homes: [Insert Link]
📺 Photoshop Quickies – One-Click Actions to Save Time: [Insert Link]
Grow Your Photography Business
📘 Starting a Photography Business? Get the Guide: https://rephoto.net/ultimate-real-estate-photography-business-guide/
📘 Real Estate Tips for Beginners: https://rephoto.net/real-estate-photography-tips-for-beginners/
Join the Community & Get More Tips:
🔹 Facebook Group – Learn & Share with Other Photographers: https://www.facebook.com/groups/rephotonew
🔹 Follow Me on Instagram: [Insert Link]
🔹 Subscribe for More Tutorials: https://www.youtube.com/@Dave_Koch
#TwilightPhotography #TwilightEditing #RealEstatePhotography #PhotographyEditing #PhotoshopTutorial #LightroomEditing #RealEstateEditing #TwilightPhotoTips #LayeringTechniques #PhotoshopWorkflow #PhotographyTutorial #LightroomTips #RealEstatePhotographyTips #PhotoshopForPhotographers #EditingForPhotographers #ProfessionalPhotography #CommercialPhotography #TwilightPhotographyTips #AdvancedEditing #HDREditing
-
 37:47
37:47
Welker Farms
1 day ago $7.87 earnedWEIGHT and COST Finally Revealed! Monster BIG BUD!
35.4K10 -
 LIVE
LIVE
Pepkilla
49 minutes agoBattlefield 6 Two Weeks Until BR
88 watching -
![I Can’t Believe How INTENSE This Got! | [REC] (2007) Reaction](https://1a-1791.com/video/fwe2/5e/s8/1/k/L/j/r/kLjrz.0kob-small-I-Cant-Believe-How-INTENSE-.jpg) 26:54
26:54
SouthernbelleReacts
2 days ago $13.44 earnedI Can’t Believe How INTENSE This Got! | [REC] (2007) Reaction
27.3K7 -
 LIVE
LIVE
DRE ONYX
8 hours ago🚨🔴LIVE - TRIPLE THREAT CHALLENGE #1 RANKED 6'10 POINT GAWD | !build !cam !join !member !psn
49 watching -
 LIVE
LIVE
xBuRnTx
1 hour agoARC Raiders - Server SLAM - Squad UP
5 watching -
 16:04
16:04
Mrgunsngear
19 hours ago $21.87 earnedMcCoy 12ga Single Shot Shotgun Test 👀
120K7 -
 10:00
10:00
It’s the Final Round
20 hours ago $2.26 earned💰NFL Week 7 Best Bets🔥Player Prop Picks, Parlays, Predictions FREE Today October 19th
20K3 -
 15:35
15:35
Demons Row
16 hours ago $3.43 earnedThe Worst Sgt-at-Arms I Ever Met 💀🔥 (and the Mistakes I Made as One)
21.6K5 -
 9:34
9:34
Sideserf Cake Studio
1 day ago $2.87 earned484 Lego Bricks. 1 Hyperrealistic Cake.
21.6K3 -
 22:42
22:42
marcushouse
1 day ago $7.86 earnedMassive Surprises From Starship Flight 11 Revealed! 🤯
24.3K15