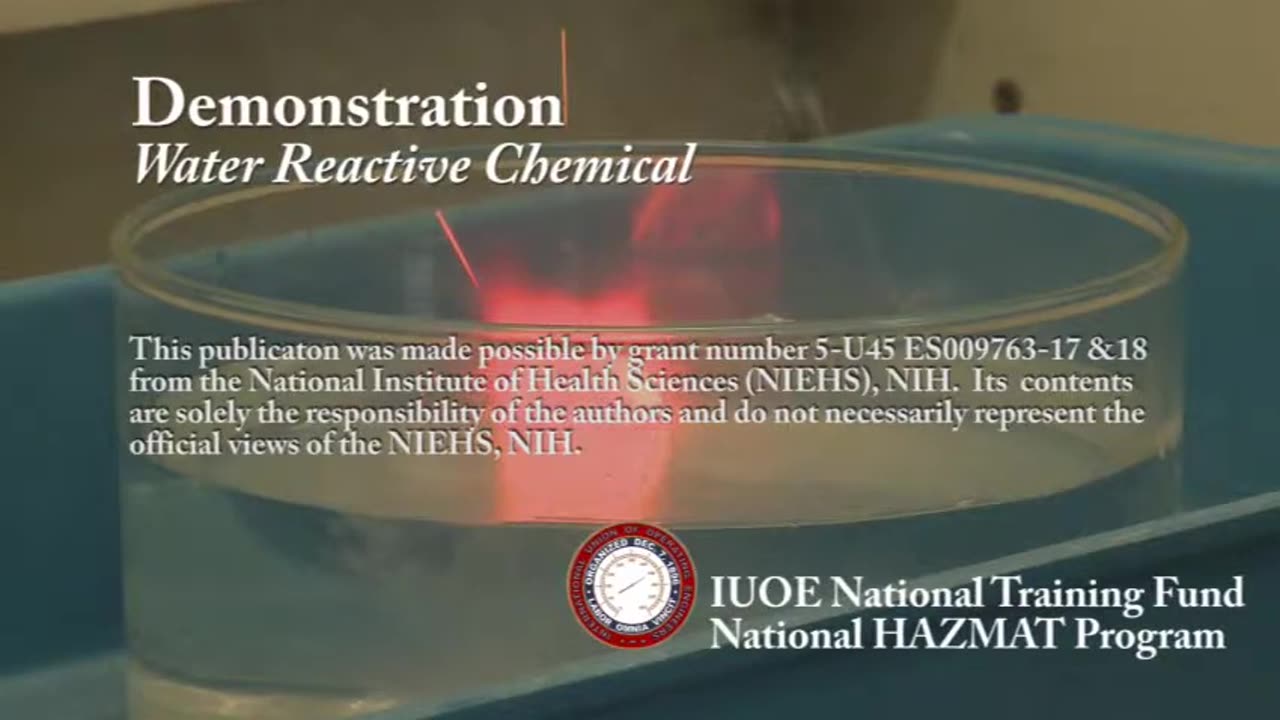
Water Reactive Chemical (Demonstration)
### **Water Reactive Chemical Demonstration: Safe Educational Procedure**
Water-reactive chemicals produce hazardous reactions, such as releasing heat, flammable gases, or even explosions, when exposed to water. Demonstrations of these reactions can be educational but must prioritize safety. Below is a detailed outline for conducting a **water-reactive chemical demonstration** safely and effectively:
---
### **1. Objective**
- To demonstrate the reaction of water-reactive chemicals while explaining the hazards and safety measures associated with their use.
- Example: **Sodium Metal + Water Reaction** (releases hydrogen gas and heat, often causing flames).
---
### **2. Materials Needed**
- **Water-reactive chemical**: Sodium, potassium, or calcium carbide (small quantities only).
- **Safety equipment**:
- Safety goggles, gloves, and lab coat for all participants.
- Fume hood or a well-ventilated area for the demonstration.
- Heat-resistant container or tray.
- **Emergency equipment**:
- Fire extinguisher (Class D for metal fires).
- Sand or dry powder for quenching metal fires (NEVER use water).
- Spill kit for accidental releases.
---
### **3. Setup**
1. **Location**: Conduct the experiment in a lab equipped with a fume hood or outdoors in a controlled area. Ensure no flammable materials are nearby.
2. **Containment**: Use a large, clear, heat-resistant container to contain the reaction.
3. **Protective Barriers**: Place a transparent shield between the reaction site and the audience to protect against splashes.
4. **Chemical Preparation**:
- Cut the sodium or potassium into small pieces under an inert oil (e.g., mineral oil).
- Dry the pieces thoroughly before the demonstration.
---
### **4. Demonstration Steps**
#### **Step 1: Introduction**
- Explain the chemical being used and its properties.
- Example: "Sodium is an alkali metal that reacts violently with water, producing hydrogen gas and heat."
#### **Step 2: Add Water**
1. Pour a small amount of water (around 100-200 mL) into the reaction container.
2. Move a small piece of sodium (the size of a pea) into the container using tongs.
#### **Step 3: Observe Reaction**
- Describe the reaction as it happens:
- Sodium floats on the water and reacts vigorously.
- Hydrogen gas is released, and the heat ignites the hydrogen, producing a flame.
#### **Step 4: Safety Commentary**
- Emphasize the hazards observed:
- "The hydrogen gas released can ignite and cause explosions if not controlled."
- "This is why water-reactive chemicals are stored away from moisture."
---
### **5. Cleanup Procedure**
1. Wait for the reaction to complete and for the container to cool.
2. Neutralize residues using an appropriate chemical (e.g., dilute vinegar for alkali residues).
3. Dispose of waste as per your institution’s hazardous waste disposal guidelines.
---
### **6. Safety Guidelines**
- **Do NOT** use large quantities of the chemical.
- Never handle water-reactive chemicals with bare hands.
- Keep a safe distance from the reaction at all times.
- Avoid repeating the demonstration in quick succession, as heat or residues may amplify subsequent reactions.
---
### **7. Explanation for Audience**
- Discuss the science behind the reaction:
- "Sodium reacts with water to form sodium hydroxide (a strong base) and hydrogen gas:
\[ 2Na + 2H_2O → 2NaOH + H_2 \].
- The heat generated ignites the hydrogen, creating flames."
- Link the demonstration to real-world safety concerns:
- "This reaction illustrates why it's crucial to store water-reactive chemicals away from moisture or humid environments."
---
### **8. Conclusion**
- Reinforce safety lessons:
- Always consult the Safety Data Sheet (SDS) for handling and storage instructions.
- Use extreme caution with reactive materials.
- Thank the audience and open the floor for questions.
---
Would you like help creating visuals or a detailed risk assessment for this demonstration?
-
 20:24
20:24
HSESafetyInformation
6 months agoKABULI PULAO RECIPE - Original 40+ KG Afghani Meat Pulau Prepared - Street Food Qabili Plav Recipe_2
35 -
 LIVE
LIVE
SpartakusLIVE
1 hour agoNONSTOP Snipes, Rockets, and BICEPS = Monday MOTIVATION
169 watching -
 59:53
59:53
Donald Trump Jr.
1 hour agoProtecting Home Field: Cartels on Notice, Plus Biden Autopen Scandal Goes From Bad to Worse | Triggered Ep.273
13.3K43 -
 1:01:40
The Nick DiPaolo Show Channel
4 hours agoMedia Ignores Slaughter of White Woman | The Nick Di Paolo Show #1789
10.4K10 -
 LIVE
LIVE
The Jimmy Dore Show
1 hour agoHolocaust Museum DELETES “Never Again” Post! Rand Paul Calls JD Vance Despicable! w/ Anthony Aguilar
4,831 watching -
 LIVE
LIVE
Rallied
2 hours ago $0.26 earnedSolo Challenges All Day
128 watching -
 LIVE
LIVE
ZWOGs
5 hours ago🔴LIVE IN 1440p! - I'M BACK! EFT w/ The Boys, Gamescom, Sniper Elite 5 w/ SV, More! - Come Hang Out!
38 watching -
 LIVE
LIVE
LumpyPotatoX2
2 hours agoMonday Finals Gameplay - #RumbleGaming
45 watching -
 43:25
43:25
Katie Miller Pod
55 minutes agoEpisode 5 - Mike Tyson | The Katie Miller Podcast
143 -
 1:04:12
TheCrucible
2 hours agoThe Extravaganza! EP: 33 (9/08/25)
45K8