Premium Only Content

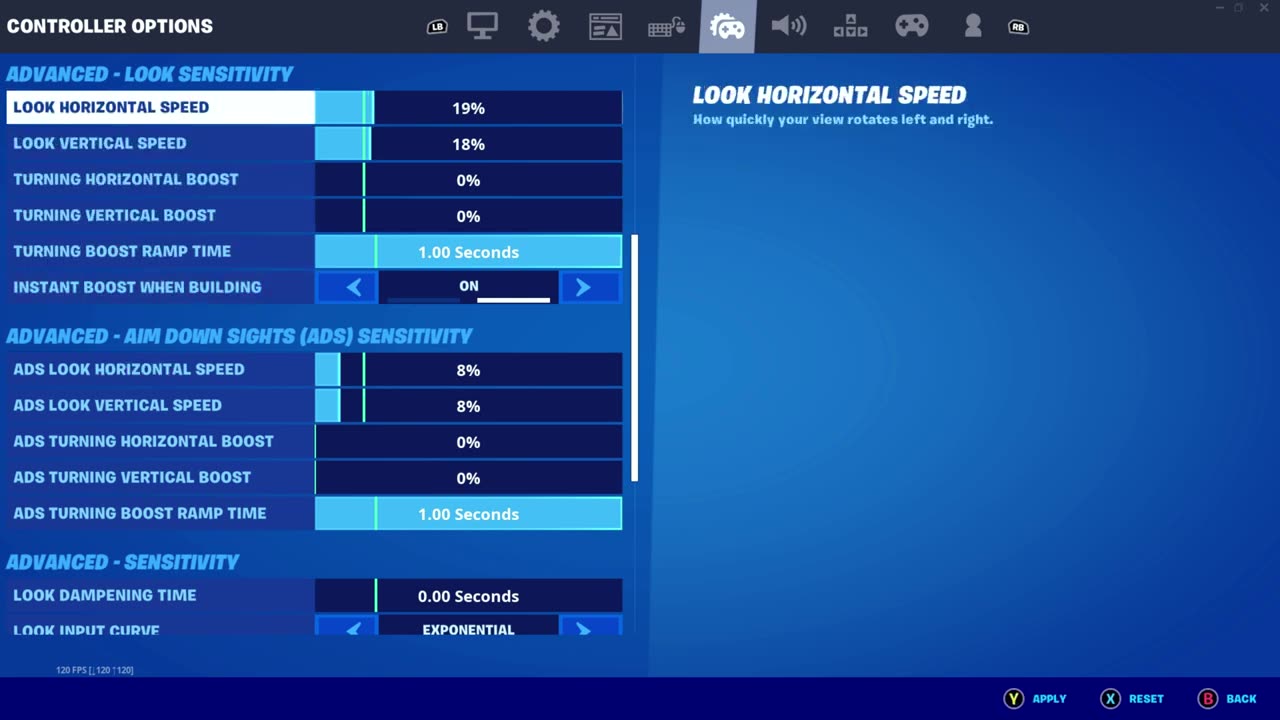
Fortnite - Best Graphics & Controller Settings
#fortnite @fortnite
Settings for NVidia Raytracing RTX and Controller settings with Xbox Elite Series 2 Wireless Controller.
I am going to share my NVidia Graphics settings for full epic graphics quality, Ray Tracing, reflections, and Shadows with my ROG-STRIX-RTX2060-O6G-EVO-GAMING and my controller settings that have helped me and other Switch and PlayStation players.
-------------------------------------------------------------------------
Image Sharpening
Select the Sharpen level to 0.5 and the Ignore film grain to 0.17. Also, enable the GPU Scaling option. Click OK to apply the settings.
Ambient Occlusion
This setting should be turned ON and selected to Performance.
Anisotropic Filtering
The setting for this option should be Application Controlled.
Antialiasing FXAA
This should be turned OFF.
Antialiasing Gamma Correction
This improves the visual quality of 3D images by enabling Gamma correction for antialiasing. This setting should be turned ON.
Antialiasing Mode
Select this to Application-controlled.
Antialiasing Transparency
This should be switched OFF.
CUDA GPUs
This should be selected to All.
DSR-Factors
They say turn this off I say use DL Scaling but not Legacy
Low Latency Mode
This should be turned ON for higher FPS and lower Input lag.
Max Frame Rate
This setting should be turned OFF for better performance.
Monitor Compatibility
For laptops, this is turned OFF by default. For desktops, select G-Sync Compatible if available or else select Fixed Refresh Rate.
Multi-Frame Sampled AA
You should turn this OFF for better performance.
OpenGL Rendering GPU
This setting should be selected to your NVIDIA Graphics Card.
Power Management Mode
This should be selected to Prefer Maximum Performance.
Preferred Refresh Rate
This option should be selected to Highest Available for the best image quality.
Shader Cache
Turn this option ON for best performance.
Texture Filtering – Anisotropic Sample Optimization
This setting should be turned ON.
Texture Filtering – Negative LOD Bias
This should be set to Allow.
Texture Filtering – Quality
You should switch this setting to Quality or Performance.
Texture Filtering – Trilinear Optimization
Turn this option ON for better performance.
Threaded Optimization
You should turn this setting to Auto.
Triple Buffering
Turn this setting OFF.
Vertical Sync
You should turn this setting OFF.
Virtual Reality Pre – Rendered Frames
This setting should be selected to 1. After applying all of the settings click on the Apply Button.
Configure Surround, PhysX Settings
Click on the drop-down menu and select your NVIDIA Graphics Card. Once done, simply click on the Apply button.
Change Resolution
Select the highest possible Screen Resolution under Resolution section. Similarly, select the highest possible Refresh Rate under the Refresh Rate section.
Scroll down below and select Use NVIDIA Color Settings. For the different sub-settings, select Desktop Color Depth to Highest(32-bit), Output color format as RGB, and Output dynamic range as Full. Click on Apply to save the settings.
Adjust Desktop Color Settings
Scroll down below to Apply the Following enhancements section. Under this section, increase the Digital Vibrance to 50%. Keep the rest of the settings as it is and click on the Apply button.
Rotate Display
Choose the Orientation to Landscape and click on the Apply button.
View HDCP Status
Use the default settings.
Set Up Digital Audio
Again, keep all the settings as default and don’t change anything.
Adjust Desktop Size and Position
Select Scaling Mode to No Scaling and adjust the Screen Resolution and Refresh Rate to the highest possible settings. Once you’re done with that click on the Apply button.
Video Settings
Here we will adjust the Video Color settings that allow us to enhance the color settings for the video content of the display.
Adjust Video Color Settings
Under How do you make color adjustments section, select the second option With the NVIDIA settings. After that, click on the Advanced tab and increase the Dynamic Range to Full (0-255).
Adjust Video Image Settings
Keep all the settings to default and don’t change anything. Click on the Apply button to save all the changes. After you have applied each and every setting, restart your computer to apply all the changes.
These settings are set back to default once you update your driver again. You have to change the settings after every new driver update.
-
 48:56
48:56
Standpoint with Gabe Groisman
1 hour agoTed Cruz Exposes Tucker Carlson's Anti-American Agenda In Bombshell Interview!
2.99K11 -
 13:57
13:57
stateofdaniel
1 day agoFetterman TORCHES the Cruel Left on CNN: “They Want Me to Die” — Dana Bash Freezes
1.3K4 -
 1:07:58
Crypto Power Hour
13 hours ago $7.83 earnedTether Co-Founder Brock Pierce & Martha Fain Wash DC Insider Boom!
40.5K7 -
 13:08
13:08
Cash Jordan
15 hours agoNYC Busses 'SELL OUT' in Minutes... as "Communist" Mayor WAGES WAR on AMERICA
11.7K48 -
 28:48
28:48
Jasmin Laine
18 hours agoCBC PANICS—Narrative COLLAPSES & They Blame TRUMP Live on TV
16.1K20 -
 19:17
19:17
T-SPLY
16 hours agoFederal Judge Prepares To Release Illegal Immigrants "Back Into Chicago!
11.3K14 -
 LIVE
LIVE
BEK TV
23 hours agoTrent Loos in the Morning - 11/14/2025
235 watching -
 19:26
19:26
The Official Steve Harvey
15 hours ago $1.14 earnedGoing Viral Ain’t Luck — It’s Consistency
10.2K -
 11:04
11:04
TheSaltyCracker
17 hours agoEpstein Email Alleges Hillary Had Sexual Affair with ‘Suicided’ Vince Foster
85.6K184 -
 54:26
54:26
ZeeeMedia
14 hours agoWhy America Needs Radical Change & The New Governor of NY? ft. Larry Sharpe | Daily Pulse Ep 143
25.3K6