Nissan Rogue: 2009-2023 Brake Light Replacement.
Rear lights on Nissan rogue. Replacing brake lights on 2009 to 2018 Nissan rogue.
If you own a 2009 to 2018 Nissan Rogue and need to replace a tail light, this guide is for you. Learn how to change a tail light on a 2015 Nissan Rogue with our step-by-step guide, ensuring a quick and easy tail light replacement. Our DIY tail light repair tutorial is perfect for Nissan Rogue owners looking to save money and replace their tail light in just 5 minutes. This essential guide to tail light maintenance simplifies the process, making tail light installation effortless even for beginners. By following our simplified tail light installation tips, you can easily handle your Nissan Rogue tail light replacement. Our comprehensive guide includes key tools and tips for a smooth and efficient tail light fix, ensuring your vehicle's lights are always in top condition. Whether you're a seasoned DIY enthusiast or a first-time repairer, our beginner’s guide to Nissan Rogue tail light replacement provides all the information you need to get the job done right. So, dive into our guide and discover how easy it is to keep your Nissan Rogue tail lights functioning perfectly. This detailed guide, we will walk you through the process of changing a tail light on a 2015 Nissan Rogue. The procedure is straightforward and can be completed in about five minutes, making it accessible even for those with minimal mechanical experience. We will start by gathering the necessary tools, which in this case is a 10-millimeter socket.
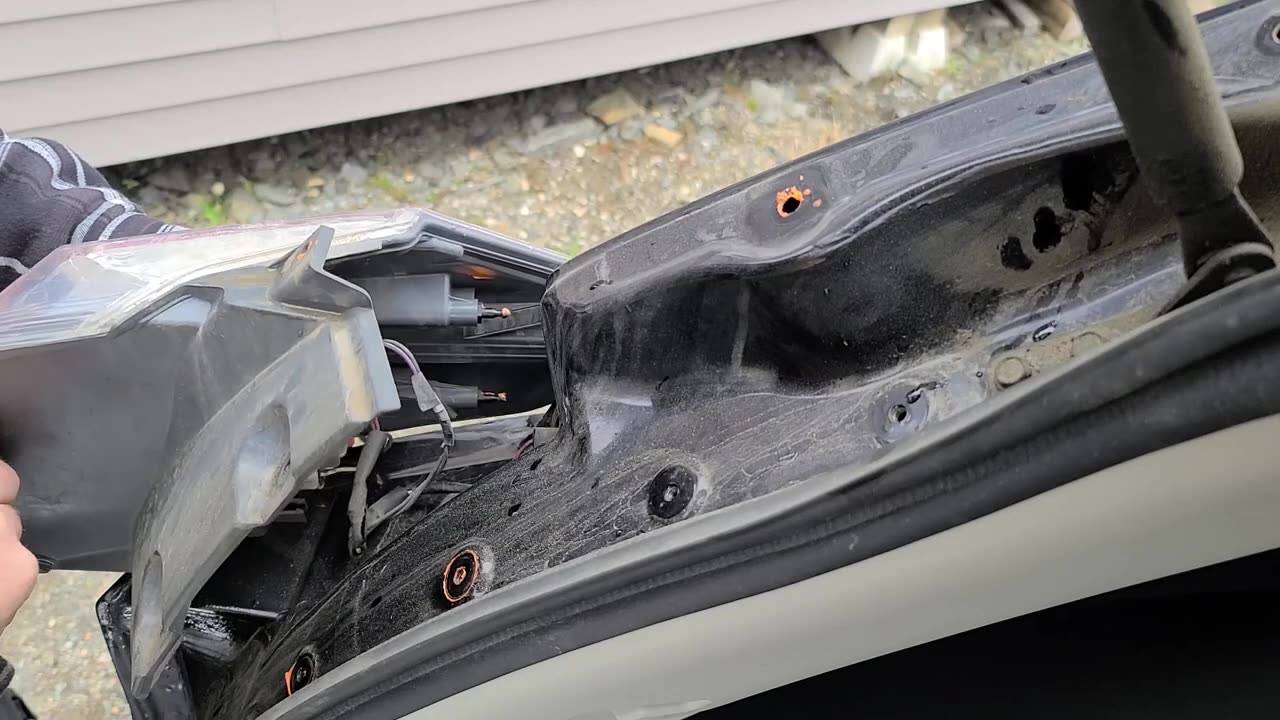
First, you need to remove the component secured by three clips—located on each end and one in the middle. These clips are integral to holding the light assembly in place. Carefully unclip these to proceed. Next, note that the light assembly is secured with three pins. These pins are complemented by three little push pins, including a distinctive red one at the bottom, ensuring the assembly is firmly attached.
Once the clips and pins are identified and the necessary screws are removed, gently pull the light assembly straight toward you. This step reveals the bulbs, which are easily replaceable by turning and pulling them out of their slots. If the bulbs need replacing, simply insert the new ones by pushing them back into place in the same manner. During this process, it is a good idea to clean the area to ensure no debris interferes with the new installation.
Reassembly involves aligning the clips and pushing the light back into its original position. Pay particular attention to the bottom clip that fits into the designated slot on the light assembly. After aligning everything correctly, you can put the bolts back in. It is crucial to tighten the bolts by hand to avoid over-torqueing, as the light assembly components are made of plastic and could be damaged by excessive force.
Throughout this guide, we've emphasized simplicity and efficiency. This method ensures the task is done correctly without requiring professional assistance, thus saving you time and money. This process applies to the 2015 Nissan Rogue and potentially other models with a similar design, streamlining the repair for various users.
If you found this tutorial useful, consider subscribing to our channel, leaving a comment, and sharing where you’re watching from—we love hearing from viewers worldwide. We create videos for everyday repairs, from lawnmowers and snow blowers to chainsaws, aiming to make each task as informative and uncomplicated as possible. Our goal is to empower you to handle your repairs, save money, and learn new skills in the process. Thank you for watching, and we hope to see you again soon for more practical repair guides.
#usa #canada #taillights #autorepair
-
 30:09
30:09
Afshin Rattansi's Going Underground
1 day agoCurtis Yarvin: ‘Trump 47 is 10x More Powerful than Trump 45’ & the TOXIC US-Israel Relationship
24.1K34 -

Drew Hernandez
9 hours agoTRUMP HINTS DEMS COULD HAVE PLANTED FAKE EVIDENCE & MANIPULATED EPSTEIN FILES
43.1K10 -
 LIVE
LIVE
Eternal_Spartan
12 hours agoThe Legend of Zelda: Majoras Mask Ep. 5 | USMC Vet | Come Join the Best Chat on Rumble!!!!
99 watching -
 3:44:24
Barry Cunningham
7 hours agoBREAKING NEWS: LIVE COVERAGE OF NEW YORK POLICE OFFICERS UNDER SIEGE!
88.9K66 -
 2:51:25
The Pascal Show
4 hours ago $1.71 earnedBREAKING! Active Shooter In Midtown Manhattan NYC Multiple People Shot!
19.3K2 -
 10:25
10:25
MattMorseTV
9 hours ago $11.42 earnedVance just DROPPED a NUKE.
38.8K41 -

Jokeuhl Gaming and Chat
7 hours agoDARKTIDE - Warhammer 40k w/ Nubes and AoA
17.2K2 -
 2:53:08
Shoriantrax
3 hours agoLIVE: Hardcore Chaos in Tarkov – Loot, Die, Repeat!
10.3K -
 LIVE
LIVE
John_Goetz
4 hours agoJohn Gets Gaming - Medal of Honor Vanguard Part 2
6 watching -
 1:29:09
RiftTV
6 hours agoSydney Sweeney Spreading RACIST Propaganda? | The Rift | Guest: Braeden Sorbo + Sarah Stock
38.9K10